Charm Kiosk
The Charm Kiosk app is a component of the Charm suite of products, certified as a comprehensive Ambulatory EHR meeting stage 1 Meaningful Use criteria. The HIPAA-compliant feature simplifies the patient check-in process. It enables staff to handle patient data during consultations efficiently.
The dynamic iPad interface allows users to:
- Add New Patient
- Update Patient photo using iPad camera
- Search Patients
- Share Questionnaire and Consent Forms
- Patients can add/edit Demographics and Insurance Details
- Answer pre-appointment Questionnaire
- Read and Sign Consent Forms
- Attend TeleHealth Appointments
Practices can use the Charm Kiosk app either with a Nurse Intervention workflow or choose Self check-in workflow based on their Facility's specific needs. Additionally, enable Guided Access on your iPad to prevent Patients from browsing outside the Kiosk app.
1. How to Set Up a Kiosk Account
The Charm Kiosk app requires you to create a unique login credential. Practice Members with the Facility Settings or Kiosk role privileges can configure sign-in credentials for Charm Kiosk using the following steps:
- Login to the CharmHealth EHR Dashboard using your EHR credentials.
- Go to the 'Settings > Facility > Kiosk Setup' section.

- Tap the '+ New Account' button. Enter the Username and Password based on your Practice requirement.
- Now, the 'Access Through' field provides you with two options:
Web Browser, Tablet - Use this option to enable a Nurse Intervention workflow. You can associate multiple facilities to a single Kiosk account. Practices can choose to include TeleHealth Consultations for Patients through the Charm Kiosk using the 'Video Consult' option.

Kiosk Terminal - Select this option to activate the Self Check-in workflow. A separate Kiosk account must be created for each Facility.

Note: To enable the Self check-in option, the Practice should have an active 'Text/Voice Notification' subscription.
- Choose the required Modules (Patient Demographics, Insurance, Questionnaires, and Consent Forms). Only the chosen modules will be displayed in the Kiosk account for Patients to complete.
- Select the default Checked-in Status. When a Patient checks-in, this configured status will be automatically applied to their appointment scheduled for that day.
- Tap the 'Add' button.
- You can create multiple Kiosk accounts using the same steps with individual Username and Password.
a. Downloading the Application
Users can download and install the Charm Kiosk application from the App Store (iOS).
The Charm Kiosk App requires iPadOS 13.0 or later.

2. Nurse Intervention Workflow
The Nurse Intervention Workflow allows the Nurse or Front Office staff to register and set up the initial Patient profile and share questionnaires or consent forms with the Patients. The Kiosk app does not allow Patients to view other Patient profiles or details.
You can use this workflow if you have chosen the 'Web Browser, Tablet (iPad, GTab, etc.)' option in the CharmHealth EHR settings page.
- Download the Kiosk app and log in using the Username and Password of your Charm Kiosk account that was already created in your CharmHealth EHR.

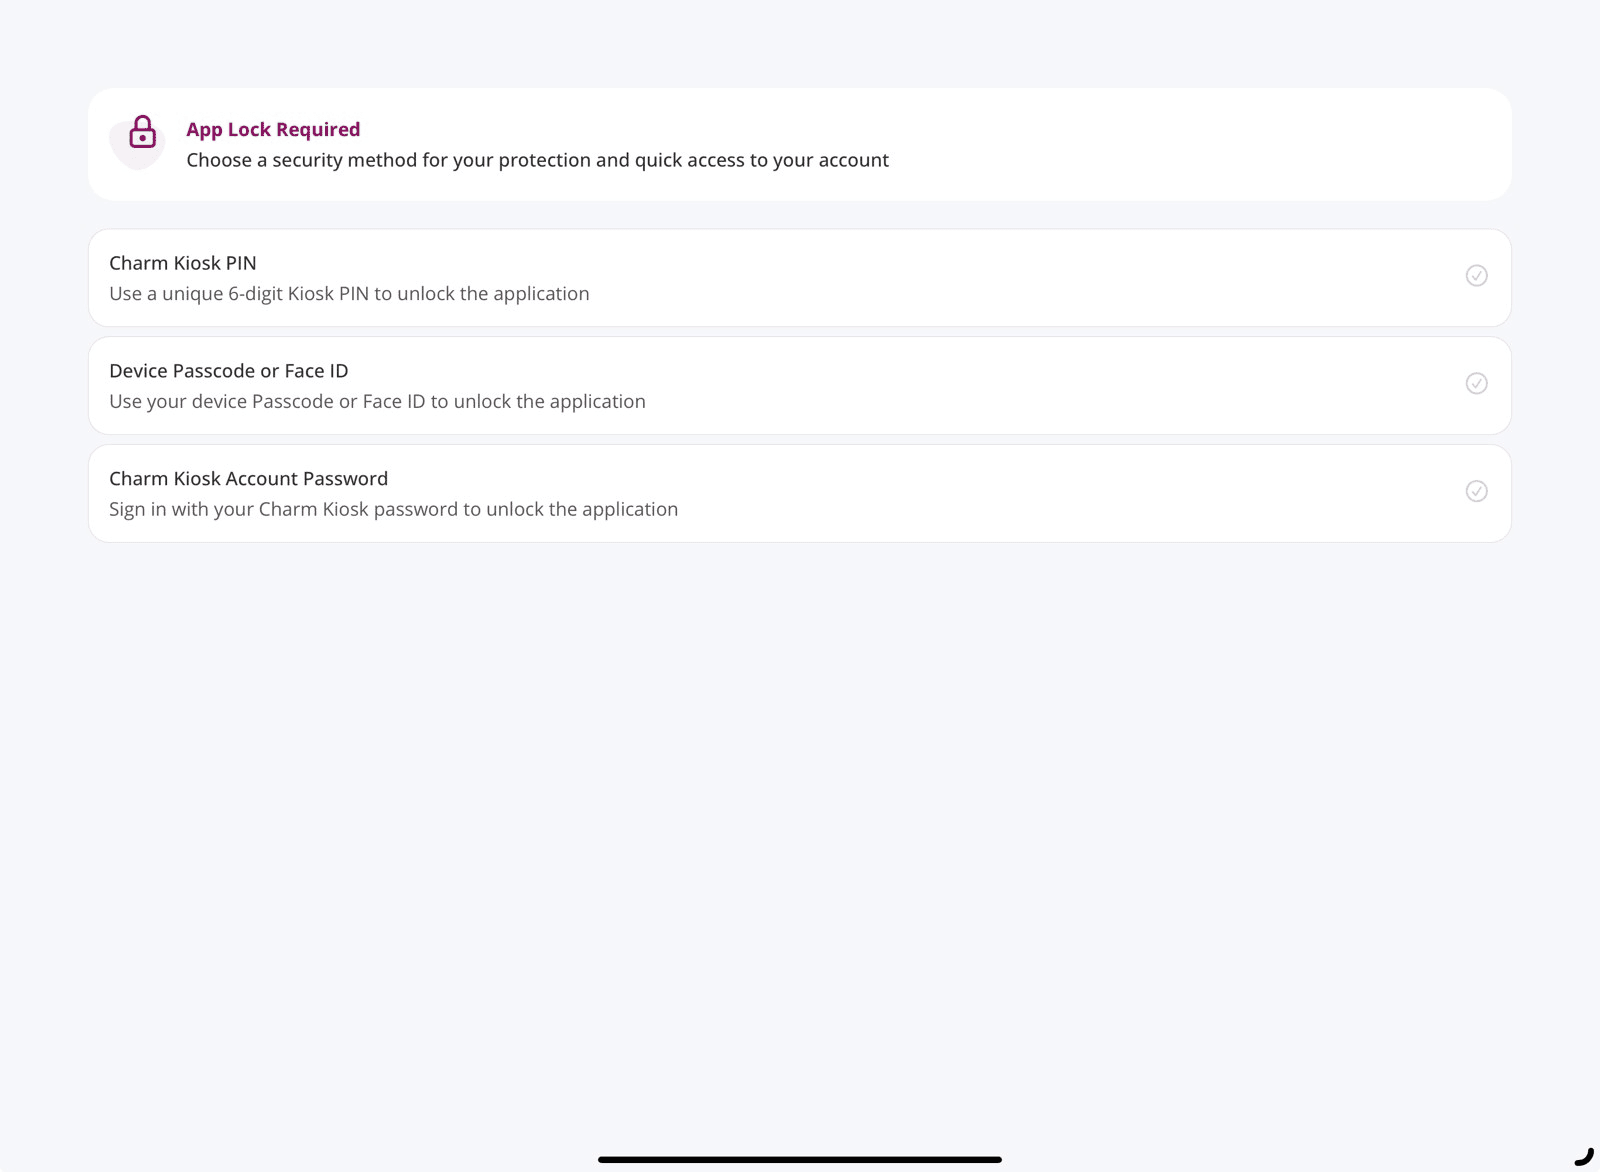
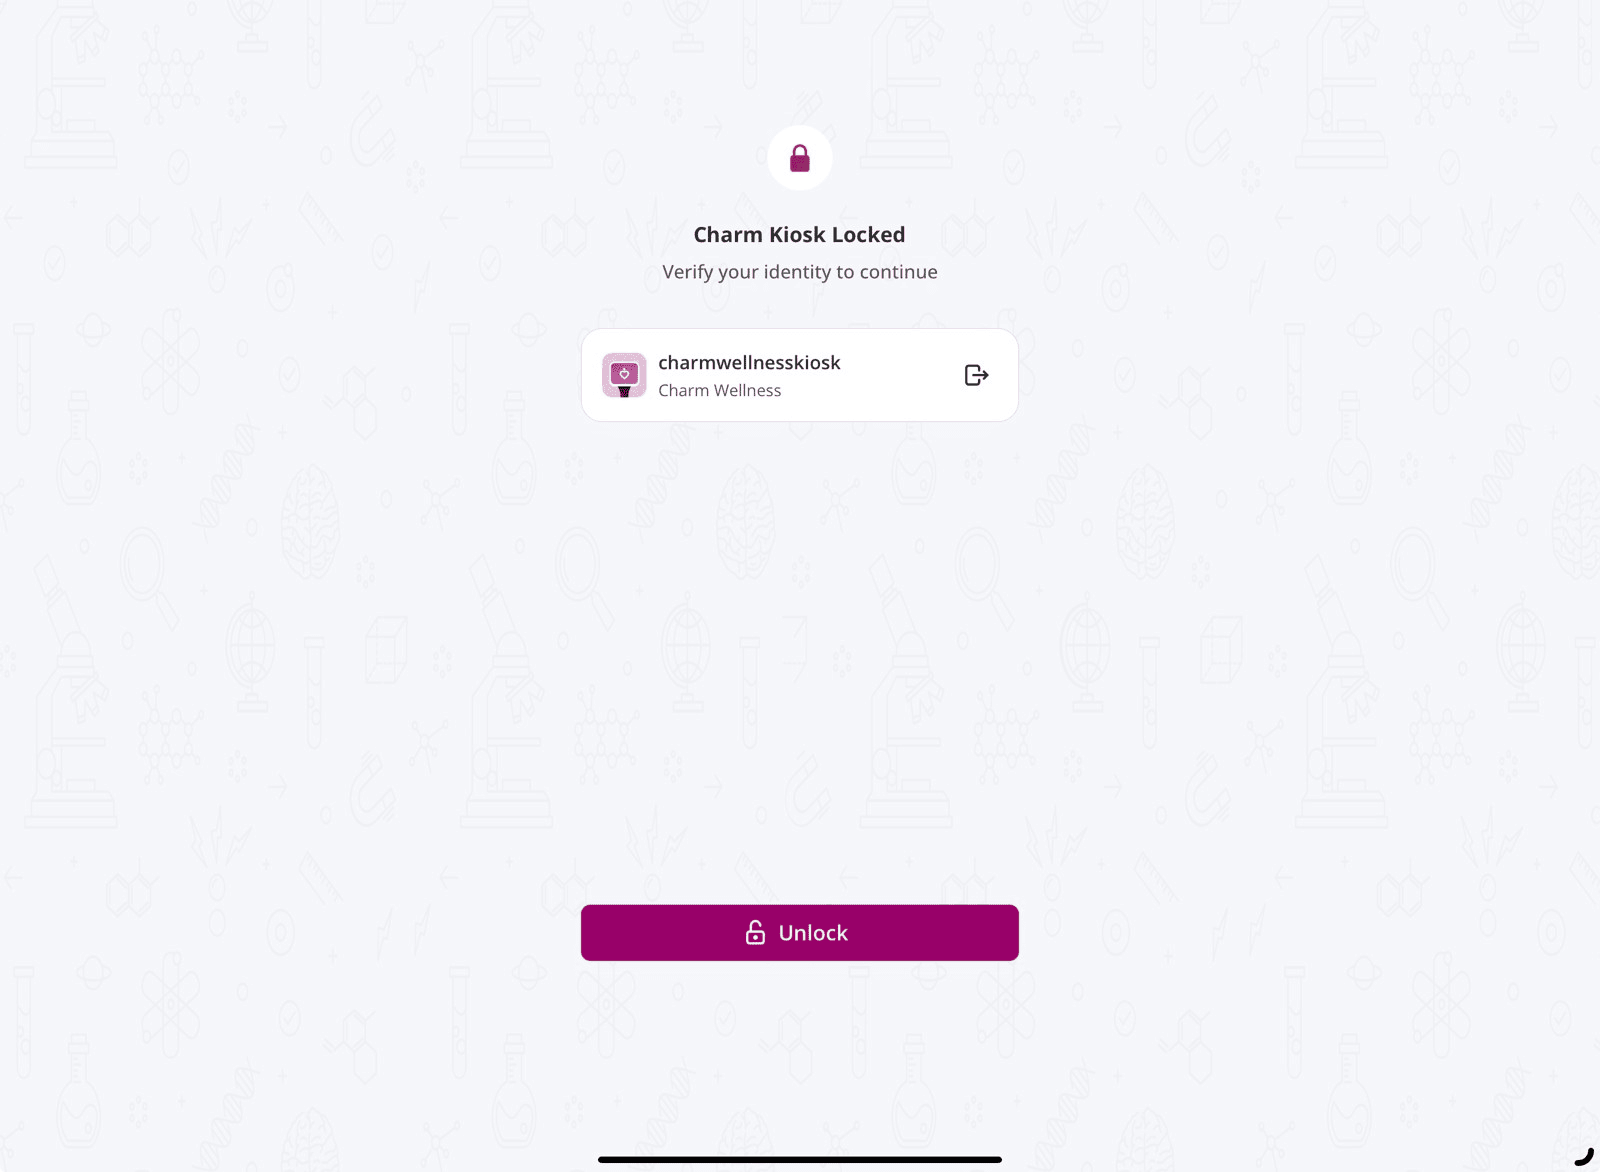
- Configure an App Lock Method for quicker and secure access to your Charm Kiosk account. You will be required to unlock the application using the selected App Lock method each time you access it.

- All Facilities associated with the Kiosk account will be listed. Choose a Facility as required.

- You will be prompted to enable Guided Access, which prevents Patients from navigating outside the Kiosk app. Follow the on-screen instructions or Click Here to set up Guided Access.
- The Charm Kiosk Homepage displays the following options.

a. Add Patient
The Nurse or Front Office Staff can add new Patients to the selected Facility by following the steps below.
- To add a new Patient, tap the 'Add Patient' icon on the left-hand sidebar.

- Enter the 'Patient Details' and tap the Profile Picture icon to capture the Patient's picture.
- Tap the 'Add Patient' button to add the Patient to the selected Facility.
- After adding a new Patient, tap the '+' icon to add questionnaires or consent forms.

- Then, tap the 'Handover' button.
If the Patient is already registered with the Facility, you can view the existing Patient details. To create a new entry, select the 'Do you want to create a new patient entry' checkbox and tap the 'Create New Entry' button.

If the Patient is registered with another Facility associated with the Charm Kiosk account, you can either map the Patient to the selected Facility or create a new Patient entry.

b. Search Patient
To search the Patients within the selected Facility, follow the steps below.
- Enter the 'Patient Name' in the search bar.

- Choose a 'Patient Profile' from the list of matching profiles.

- Tap the '+' icon to add questionnaires or consent forms.

- Tap the 'Handover' button and give the Patient the iPad to enter their details.
c. Patient View
After the Nurse or Front Office Staff hands over the Kiosk, Patients can update their demographic information and complete questionnaires or consent forms by following these steps:
- Verify their 'Date of Birth' (DOB registered in the CharmHealth EHR records).


- If Patients have appointments scheduled, the appointment status will be updated based on the configured Kiosk Settings.
- Patients can add or update the following details as required.
- Profile
- Personal Information
- Patient Address
- Contact Information
- Emergency Contact
- Caregiver
- Insurance
- Primary Insurance
- Secondary Insurance
- Capture the images of the Insurance Card

Note: The Patient can skip filling the Primary and Secondary Insurance sections.
- Profile
- Patients can then complete the questionnaires or consent forms if they have been shared by the Practice during appointment booking or through Messages from CharmHealth EHR.

- Swipe the left-side navigation bar to view all the questionnaires and consent forms shared and their submitted status.


- All upcoming TeleHealth appointments of the Patient will be listed on the Patient Summary Page. The Patients can join the session by tapping the 'Join' button.

- On updating the personal details and completing the TeleHealth session, Patients can tap the 'Finish' button, the patient will be redirected to the 'Thank You' page.

The Nurse or Front Office Staff can unlock the Kiosk app using the configured app lock method to continue with the next Patient check-in.

You can use your password instead.
d. Telehealth Appointments
The Nurse or Office Staff at a remote facility can help Patients join their TeleHealth sessions. To see the list of scheduled TeleHealth appointments for the day, tap the 'Video' icon on the left sidebar of the homepage.

Patients can join the TeleHealth sessions either through the Charm Integrated Video Platform or Zoom, based on the configuration set by the Practice in CharmHealth EHR.
- At the scheduled appointment time, the Patient can join the Telehealth session by clicking the 'Check-In' link next to their upcoming Telehealth appointment in Charm Kiosk.
- Before joining the session, the Patients must fill out and submit any pending consent forms if shared by the Practice.
- The Patient must wait for the Provider to join the Telehealth session.
Through the Charm Integration Video Platform
If the Practice has configured the Charm Integrated Video Platform, clicking the 'Join' button against the TeleHealth appointment will display a Meeting Passcode. Copy the TeleHealth Meeting Passcode and tap the 'Proceed' button.

A link to join the TeleHealth consultation will open directly in the browser within the Charm Kiosk app.
If the Patient's government-issued ID is not already available in the CharmHealth EHR and the Practice has mandated ID verification for TeleHealth sessions, Patients will be prompted to upload it during the check-in process.
Patients need to enter their name and Meeting Passcode to join the consultation with the Provider securely.

Patients need to allow the microphone and camera access in their browser when prompted.

During the TeleHealth session with the Provider, the Patients can mute or unmute their audio and video as needed.

Note: The guided Access must be disabled for TeleHealth Sessions by the Nurses or Front Office Staff.
Connecting via Zoom
- When the Patient joins via Zoom, they will get added to the virtual waiting room, and the Provider must admit the Patient to proceed with the encounter.

- Once joined, the Patient can control the microphone and video by tapping their respective icons.

- Tapping the 'Participants' icon displays the list of attendees.
- Tapping on your profile name displays these options:
- Raise Hand (if lowered) or Lower Hand (if raised)
- Unmute (if muted) or Mute (if unmuted)
- Rename

- Selecting any other participant or host opens the chat window for private or public conversations.

- Tap the 'End Call' button to 'Leave the Session'.

After completing the TeleHealth session, the Patient will be redirected to the 'Thank You' page. Tapping anywhere on this page will take them back to the Charm Kiosk lock screen.
3. Self Check-In Workflow
The Self Check-In feature allows Patients to check in independently using the Charm Kiosk.
The Charm Kiosk self check-in workflow enables the existing Patients to check in, update their profiles, and fill out questionnaires and consent forms independently, without assistance from Front Office Staff.
You can use this workflow if you have chosen the 'Kiosk Terminal (Self Check-In)' option in the CharmHealth EHR settings page and have an active 'Text/Voice Notification' subscription.

Note: The self check-in kiosk workflow is available only for existing patients. New patients cannot use this option to register.

The Nurse or Front Office Staff can install the Charm Kiosk app and log in to the respective Kiosk account. They can also set up Guided Access and other Kiosk Settings by tapping the 'Settings' icon.
The Patients can follow the steps below to check in and update their details.
- Select your Country Code from the drop-down menu, enter the Phone Number registered with CharmHealth EHR, and tap the 'Send OTP' button.

- Enter the OTP received on your registered mobile number and tap the 'Verify' button.

Note: If you enter the wrong OTP three times, you can request a new one. The 'Resend OTP' button will be enabled after 45 seconds, but you can only request a new OTP twice. If you reach this limit, please contact the front desk for help.
- If a phone number is linked to multiple Patients, select the required Patient to proceed.

- Tap the 'Edit' button on the patient summary page to update your demographics, contact details, and primary and secondary insurance information.

- You can fill in the questionnaires and consent forms by tapping the 'Fill' button.

- Once done, tap the 'Finish' button, and you will get redirected to the 'Thank You' page.

4. Kiosk Settings
The Nurses or Front Office Staff can configure the Kiosk Settings by tapping the 'Settings' icon on the left-hand sidebar.
Nurse-Intervention Workflow Settings


In the Self check-in Workflow, the Nurses or Front Desk Staff must re-authenticate to view or edit the Settings.
Self Check-In Workflow Settings


- Facility - If the Kiosk account is associated with multiple facilities, switch between them as needed. This is only accessible for the Nurse-intervention workflow.
- Default Gender - Set a default gender to be preselected when adding a new patient.
- Patient Check-in Status - This setting can be configured in the 'Settings > Facility > Kiosk setup' section of CharmHealth EHR. When a Patient checks-in, the configured Check-in status will be automatically applied to their appointment scheduled for that day. Practice members can view the updated check-in status in the EHR Calendar.
- Auto-lock Timer - Set a timer to automatically lock the app after a period of inactivity to enhance security.
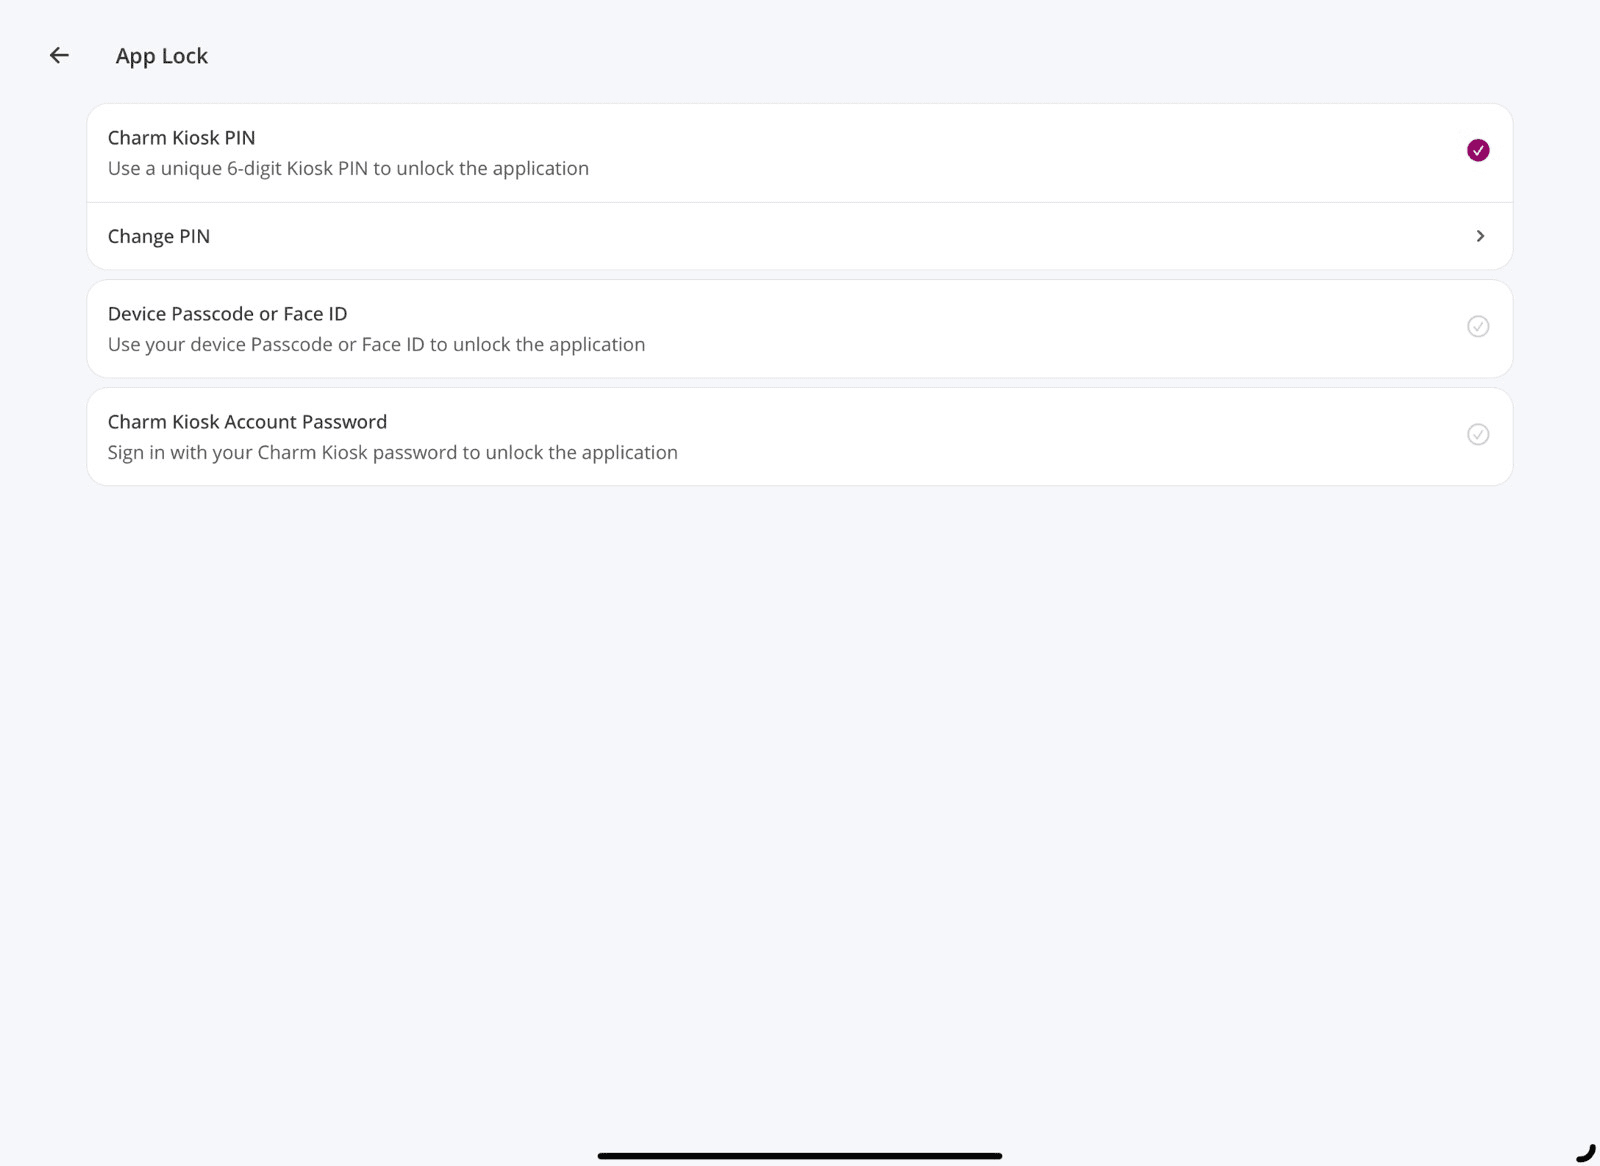
- App Lock Method (Only for Nurse-intervention Workflow): You can secure your Kiosk account by configuring any one of the following App Lock methods:
- Charm Kiosk PIN:
Set up a unique 6-digit PIN to unlock the Kiosk application. You can change the PIN at any time under Kiosk Settings. - Device Passcode or Face ID:
Select this option to use your device’s Passcode or Face ID to unlock the Kiosk account for secured access. - Charm Kiosk Account Password:
Choose this option to unlock the Kiosk application using your Charm Kiosk account password.
Note: You will be prompted to set up your preferred App Lock method at your first login. To change the App Lock method, click the 'Manage App Lock' option and choose the required App Lock type.

- Charm Kiosk PIN:
- Guided Access - Enable Guided Access to restrict patients from navigating outside the Kiosk app. Tap the button to view Guided Access settings. The detailed instructions on Guided Access are available here.
- Data Update - The system syncs the latest data from Charm EHR whenever the app is reopened. To update manually, tap the 'Update' option.
- Send Diagnostic and Usage Statistics - Help improve Charm Kiosk by automatically sending diagnostics and usage statistics.
- Sign Out - To log out, tap the 'Sign Out' button.
5. Enable Guided Access
Enabling Guided Access prevents the Patient from browsing outside the Kiosk app, altering the device settings, or locking the device.
It ensures privacy compliance, enhances data security, and minimizes the risk of unintended actions that could compromise sensitive health information.
When logging in to the Charm Kiosk account, the Nurse or Front Office staff will be prompted to enable guided access to the Charm Kiosk app. This prompt will appear during every login.

You can enable Guided Access to the Charm Kiosk app using the following steps:
- How to set up Guided Access?
- Tap the 'Settings' option. This will take you to the device settings.
- Select 'Accessibility' and scroll to the end.
- Under the 'General' section, select 'Guided Access'.

- Enable the Guided Access toggle.
- You can set up any of the following to end the Guided Access session.
- Tap the 'Passcode Settings' option, select 'Set Guided Access Passcode', and enter a passcode
- Turn on the Face ID or Touch ID.
- How to start Guided Access mode?
- Open the Charm Kiosk App.
- Triple-tap the Home button (on an iPad with a Home button) or the top button (on other iPad models).
- Circle the area of the screen you want to disable.
- Tap the 'Start' button.
Note: If you are facing difficulties, try turning off and on the Accessibility shortcut under the 'Settings > Accessibility > Guided Access' section. If not, try restarting your iPad.
- How to exit Guided Access mode?
- Triple-tap the Home button (on an iPad with a Home button) or the top button (on other iPad models).
- Enter the Guided Access passcode and tap the 'End' button.
- If you have enabled the Face ID or Touch ID option in the Guided Access Settings, unlock your iPad with Face ID or Touch ID.