Recurring Payments
- Add Recurring Payments
- Edit / Change Card in the Recurring Profile
- Send Link to Patients to Update Card Details
- Recurring Payments View
- Check the Status of Recurring Payments
- Ability to Identify Patients with Recurring Profile from the Calendar section and Patient Dashboard
- Watch List in the Recurring Payments Tab
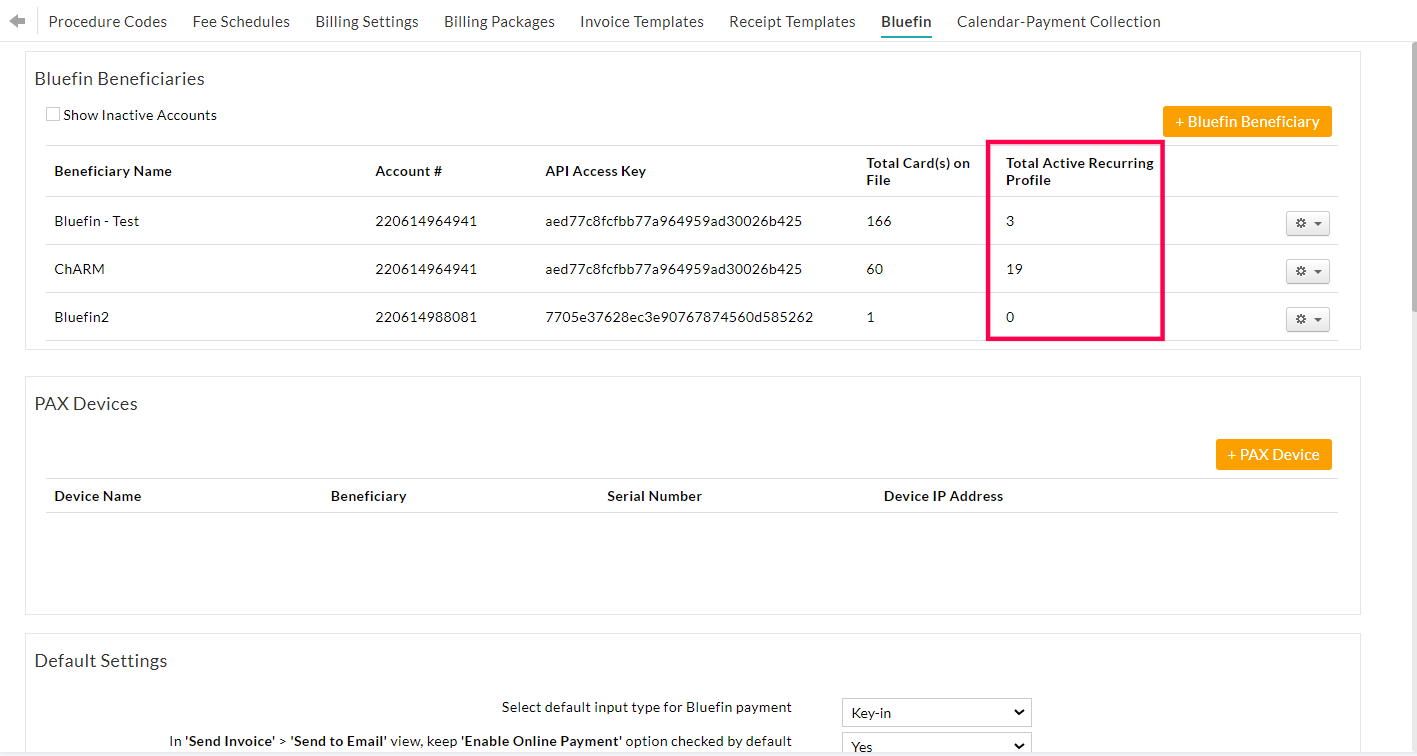
- Active Recurring Profile Count in Bluefin Settings for Each Beneficiary
- Option to Manage Failed Recurring Payments Effectively
- Cancel Recurring Payments
- Disable Recurring Payments
- Failed Payment Notifications
- Bulk Actions in Payment Notification Messages
Add Recurring Payments
The Provider can create a recurring schedule for charging a card periodically. To add Recurring Payments, follow the steps given below.
- Go to 'Billing > Receipts > Recurring Payments > + Recurring Payments'.

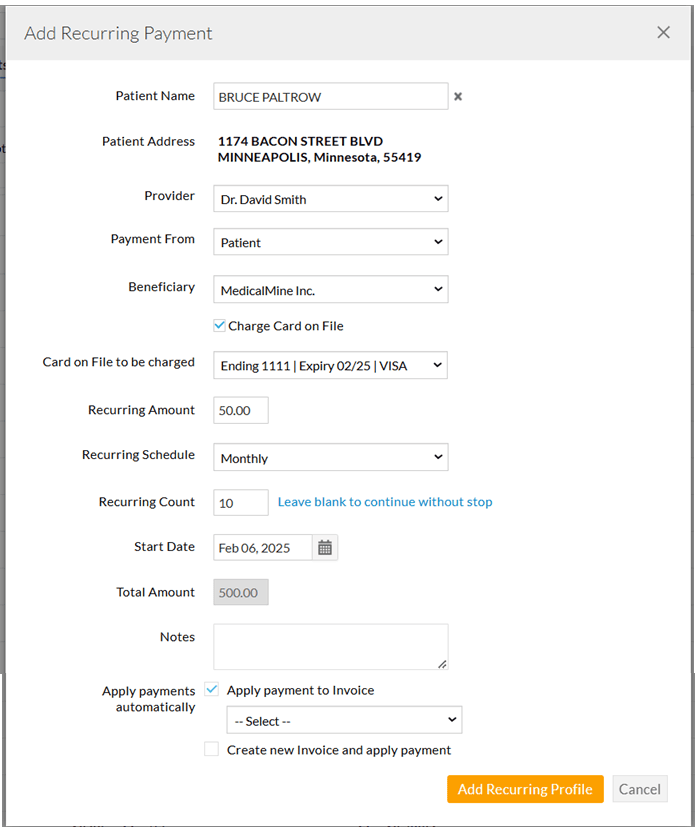
- Search and select the Patient for whom the Recurring Payments need to be added. Select the Beneficiary.
- Choose a Provider to associate with the Recurring Profile. The Provider's name will be included in the Invoices and Receipts generated for the Recurring Profile.
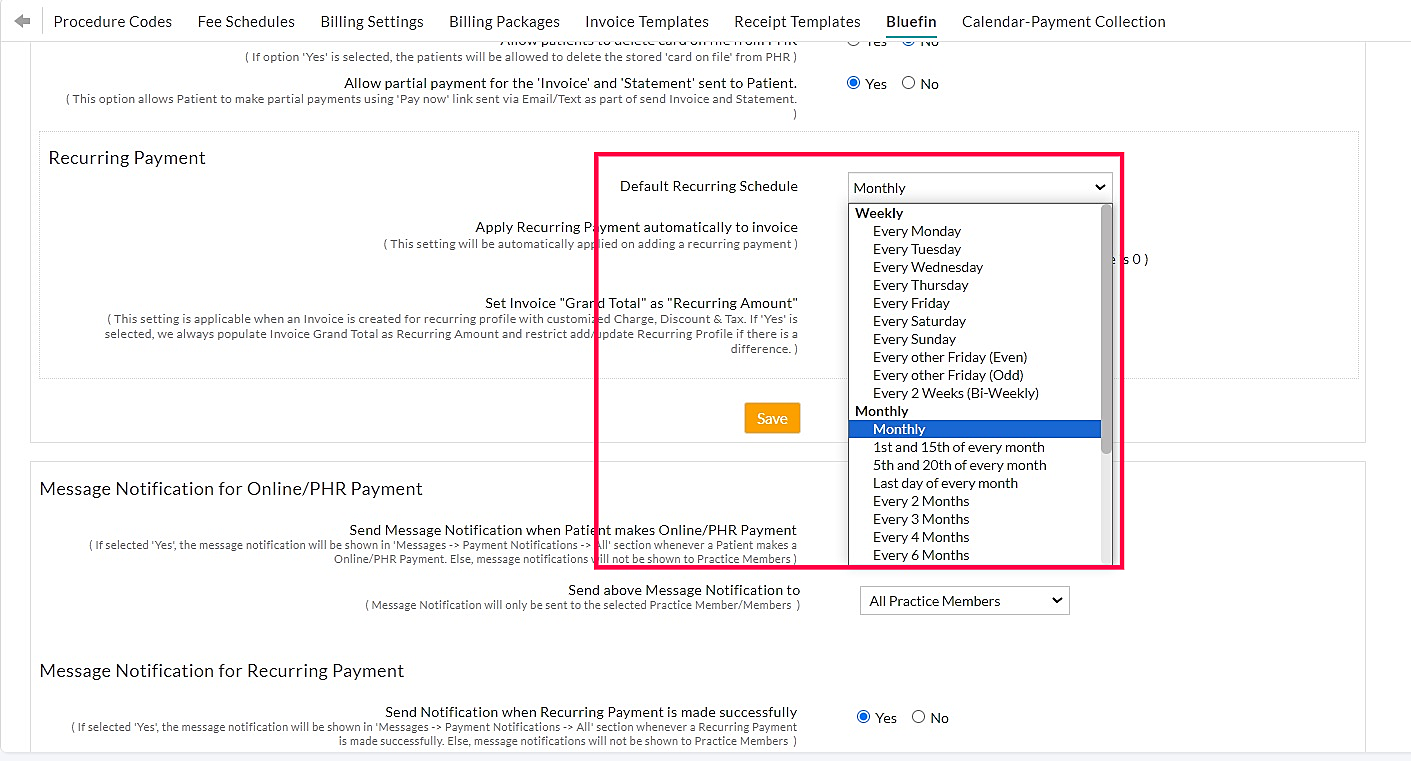
- Choose the frequency of the Recurring Schedule, such as weekly, monthly, quarterly, or annually.
Note: Select the 'Start Date' from 1st - 28th of each month or choose the 'Last Day of Every Month' option.
- Practices can define a default Recurring Schedule that applies automatically while creating new Recurring Profiles. To set a default schedule, navigate to the 'Settings > Billing Settings' section and choose the frequency of the scheduler.
- Enter the card details (You can swipe the card or key in the card details).
- Enter the recurring amount to be charged and choose the recurring schedule.
- Enter the number of times to be charged in the 'Recurring Count' field. Leave the Recurring Count empty if you need to charge the card without a pause.
- Select the Start Date from when the card needs to be charged.
- Auto Apply Recurring Payments to Invoice: The Practice can apply recurring payments to invoices automatically by enabling the 'Apply Payments automatically' option. You can either apply payments to a specific Invoice or apply payments to the outstanding Invoices by selecting the appropriate option from the drop-down.

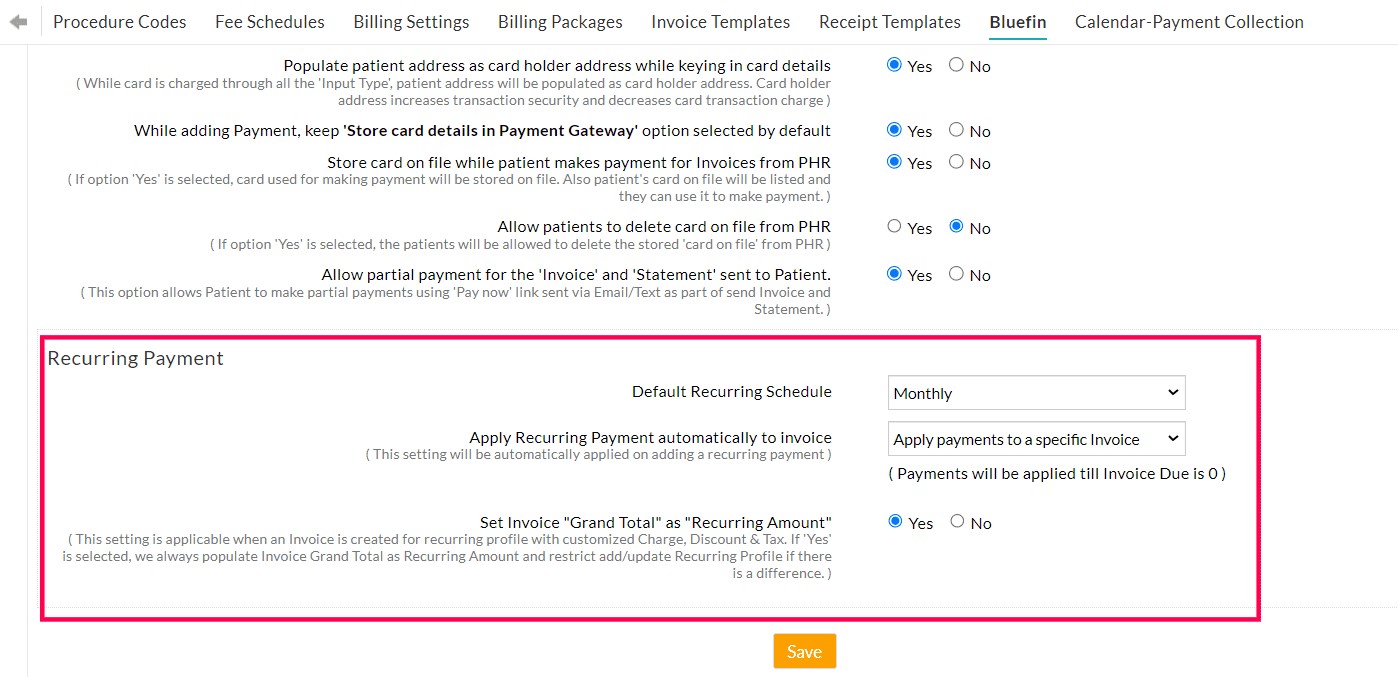
Practice members can configure the default values under the 'Billing Settings > Bluefin' section.
- Create Invoice automatically and Apply Payments to Invoice: The Practice members can create an Invoice for every recurring payment collected. As part of this, Procedures and Products of the Invoice can be configured. When this option gets configured, a new Invoice will be automatically created with the added Procedures and Products when the payment gets received from Bluefin for the Recurring Payment, and the payment will be applied to the Invoice automatically.
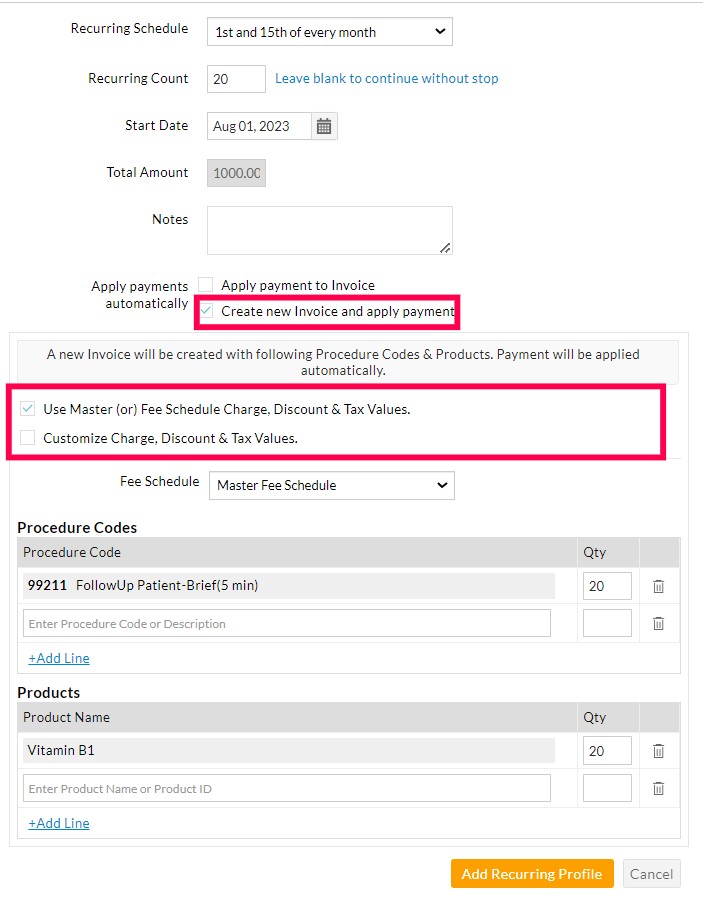
- You can use the Quantity, Charge, Discount, and Tax Values either from the Master Fee Schedule or customize the values. If the Fee Schedule is selected, the Charge, Discount, and Tax Values get auto-populated as configured in the Fees Schedule.
- When the Invoice is created with the customized Charge, Discount, and Tax values, you can auto-populate the Invoice Grand Total Amount as a Recurring Amount by enabling the setting under the 'Settings > Billing > BlueFin > Recurring Payment' section.

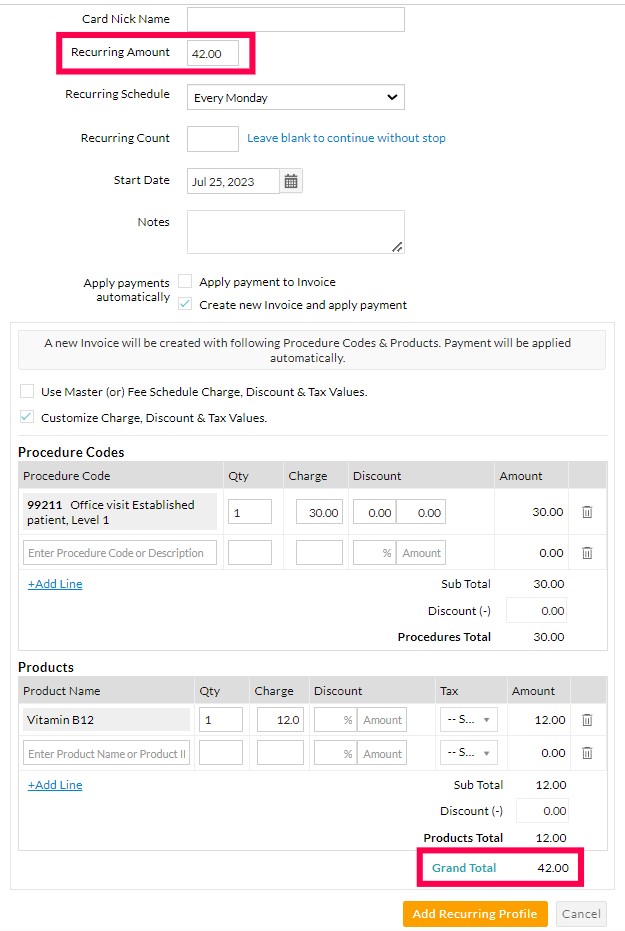
- Click the 'Add Recurring Profile' button. You can view the details by clicking on the list.
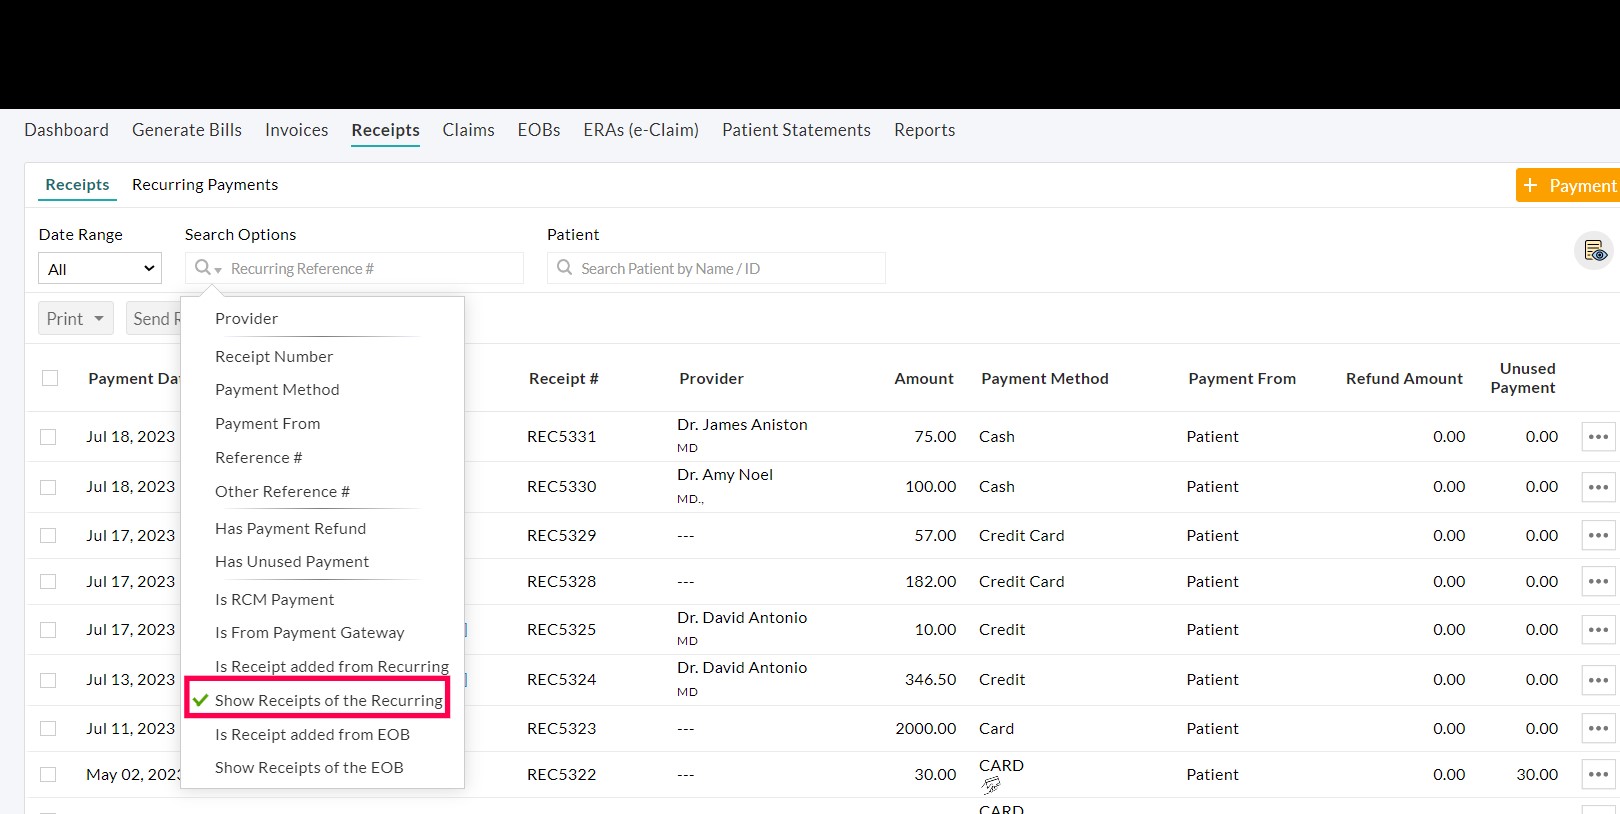
- To list the Receipts of the Recurring payment, go to the 'Billing > Receipts' section and choose the 'Show Receipts of the Recurring' option under the 'Search Options'. Enter the Recurring Reference# to list the Receipts of the Recurring payment.
Note: If the recurring payment is created for a new card, it will be enrolled with Bluefin. Upon successful enrolment, a recurring payment will be created.
The card will be charged for the amount as per the schedule. Receipts for the payments will be created. If the Apply Invoice is automatically chosen, the amount will be applied to the Invoice.
Edit / Change Card in the Recurring Profile
Using this option, the Practices can edit the recurring amount, change the Card, modify the recurring schedule, and increase the recurring count.
- Go to 'Billing > Receipts > Recurring Payments'
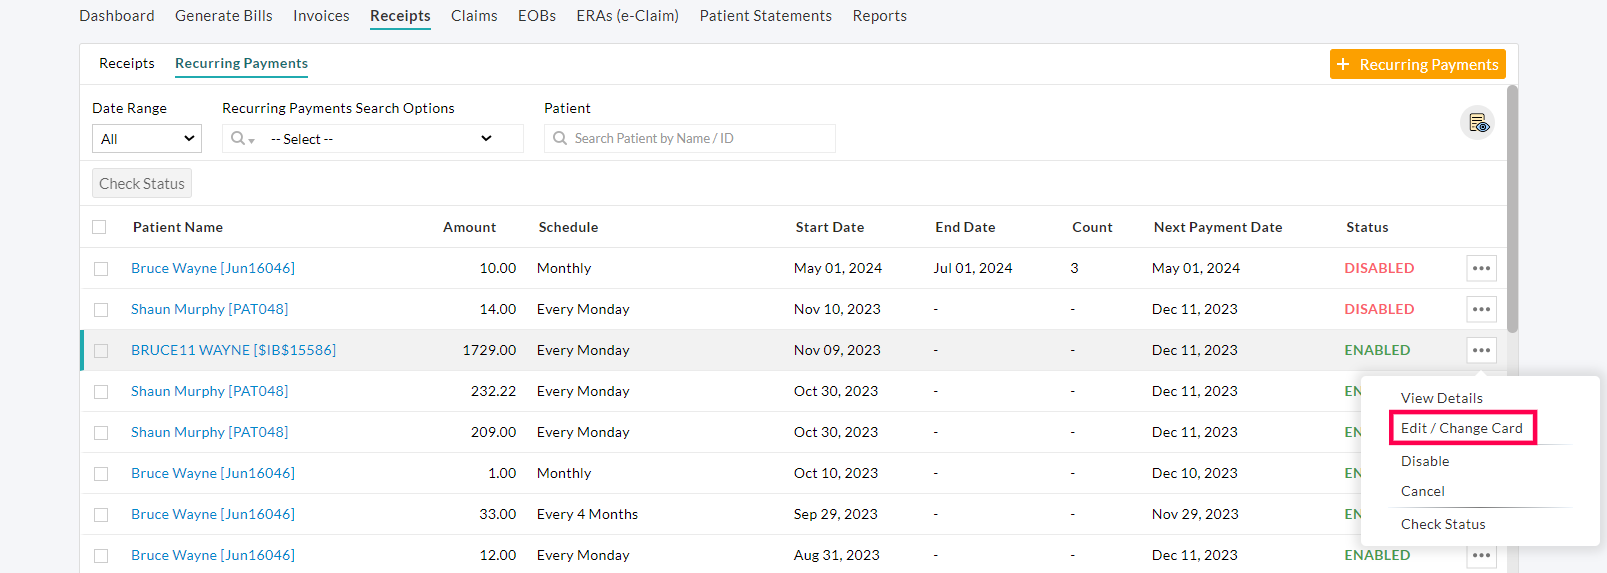
- Click the 'More Options' (...) icon against the Recurring Payment and select the 'Edit / Change Card' option.
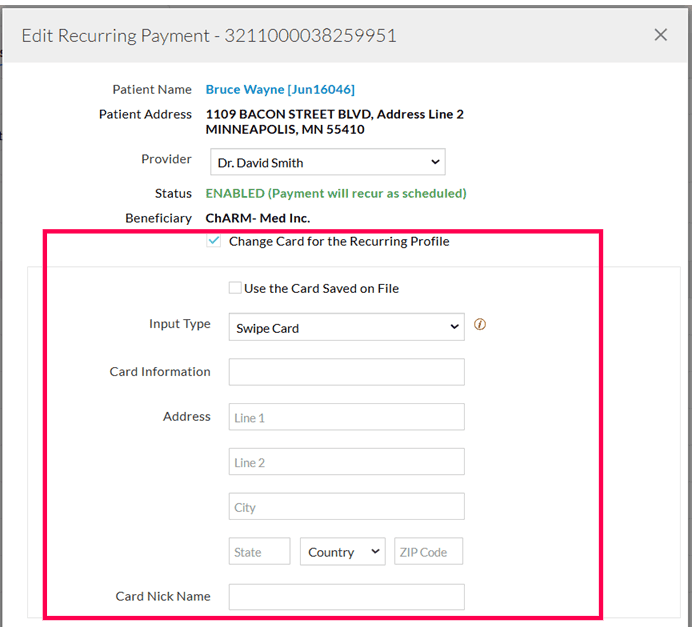
- To change the Cards associated with the Recurring Profiles, enable the 'Change Card for the Recurring Profile' option below the Beneficiary name.
- Use either the Card saved on File or Input new card details and update the information.
- Adjust the other values and click the 'Update Recurring Profile' button.
Send Link to Patients to Update Card Details
Practices can send a link to the Patients to get the updated card details for the Recurring Payments. Patients can click on the link sent to their Email or Cell Number to update their cards.
You can configure the default Email or Text Message content and Email Subject in the 'Settings > Billing > Bluefin > Default Message for 'Send Link to Update Card' section.
To send a card update link to the Patients, follow the steps below.
- Navigate to 'Billing > Receipts > Recurring Payments'
- Click the 'More Options' (...) icon against the Patient's Name and select the 'Send Link to Update Card' option.

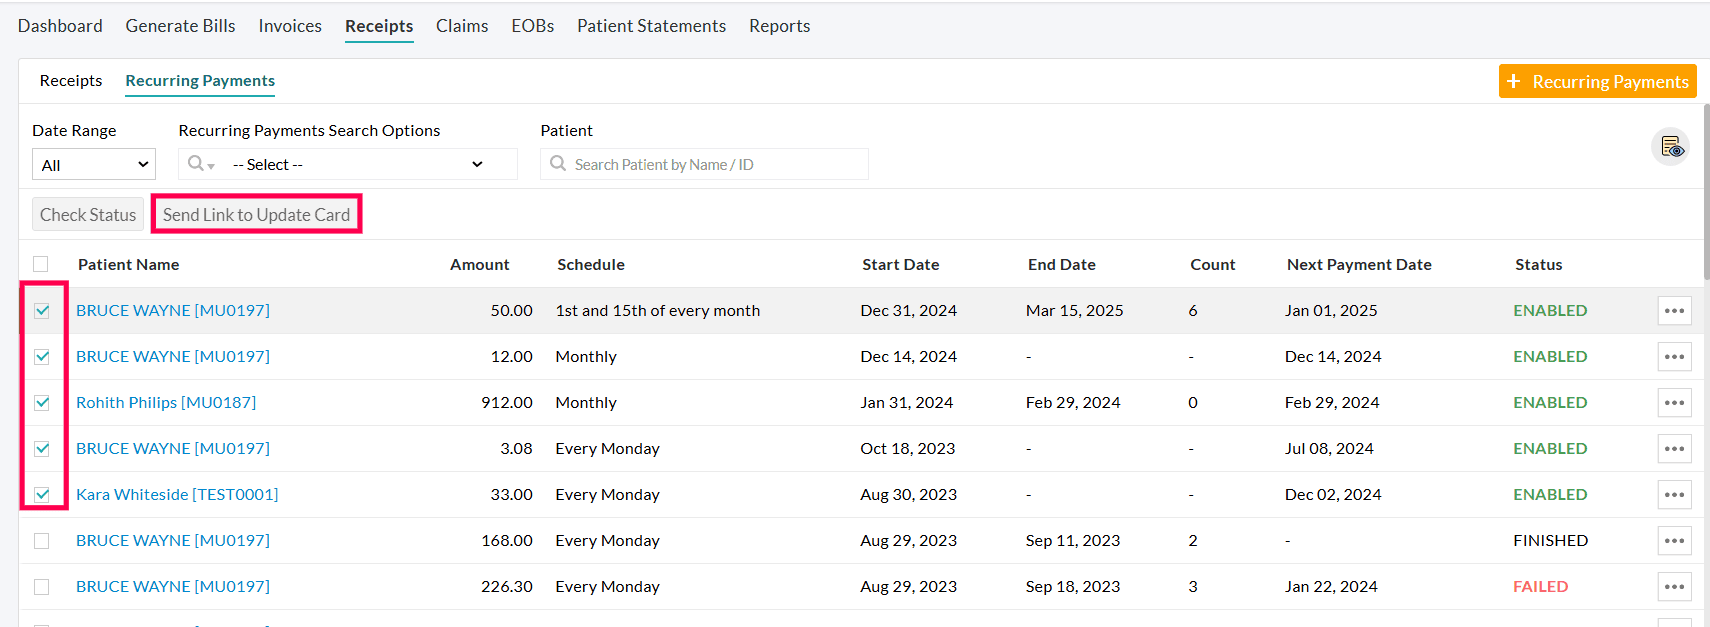
- To send the update link to multiple Recurring Payments at once, select the Recurring Payments and click the 'Send Link to Update Card' button.
- Choose the Patient Communication mode (Email or Cell Number) from the drop-down menu to send the link. If the Patient has Guarantor details, choose to send the link either to the Guarantor's Cell Number or Email address.
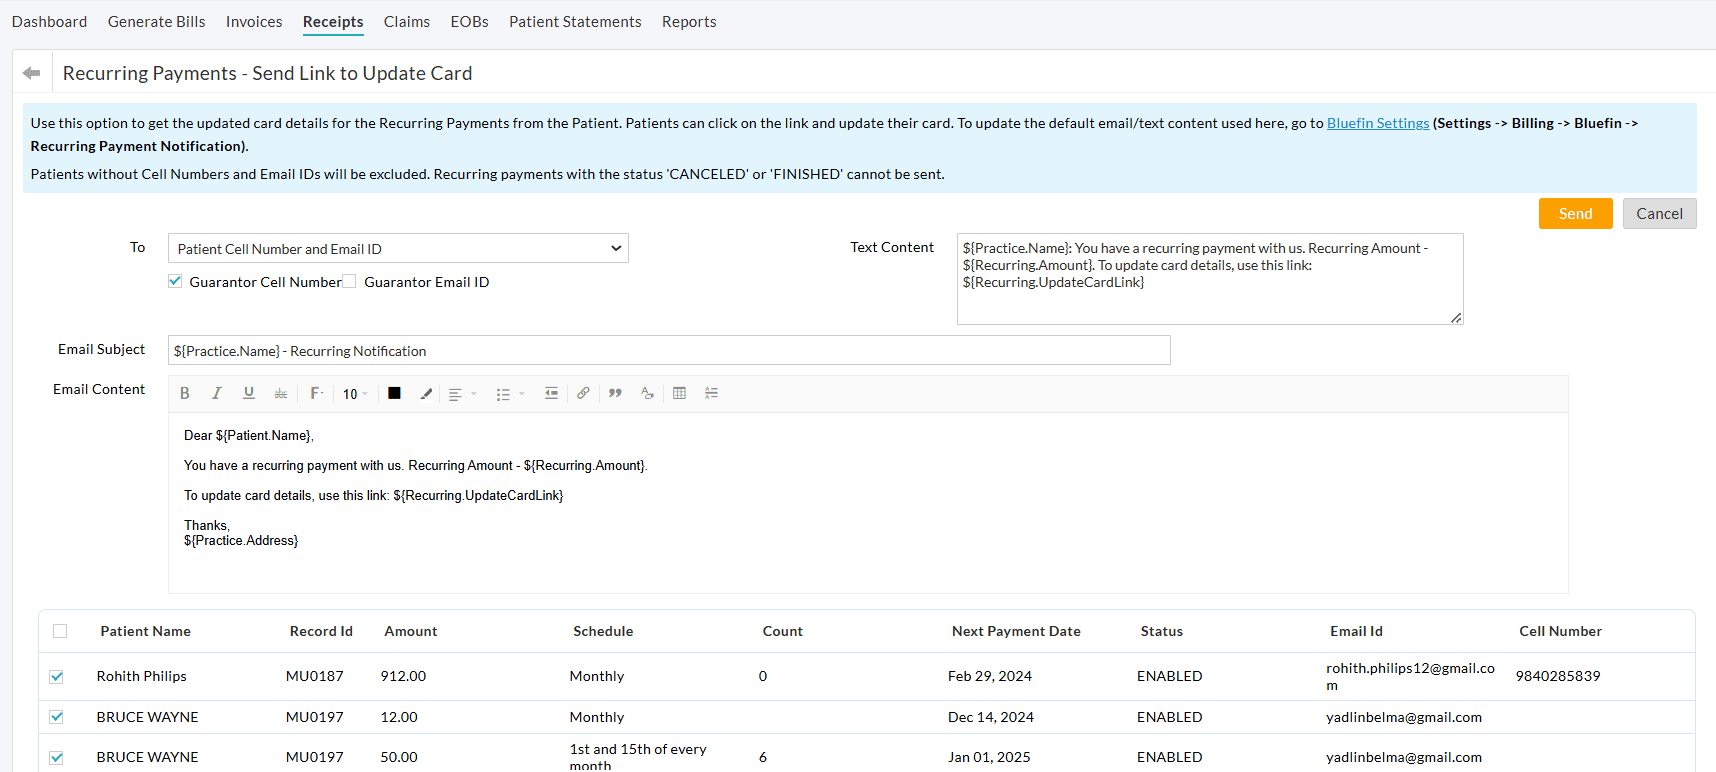
- Click 'Send' to send the link to update the Patients' card details.
Note: Patients without Cell Numbers and Email IDs will be excluded. The Card detail update link cannot be sent for Recurring payments with the status 'CANCELED' or 'FINISHED'.
Once the notifications are sent, they can be viewed under the 'Messages tab > Sent folder' section.
Messages sent to the Patient's Email ID

Messages Sent to the Patient's Cell Number

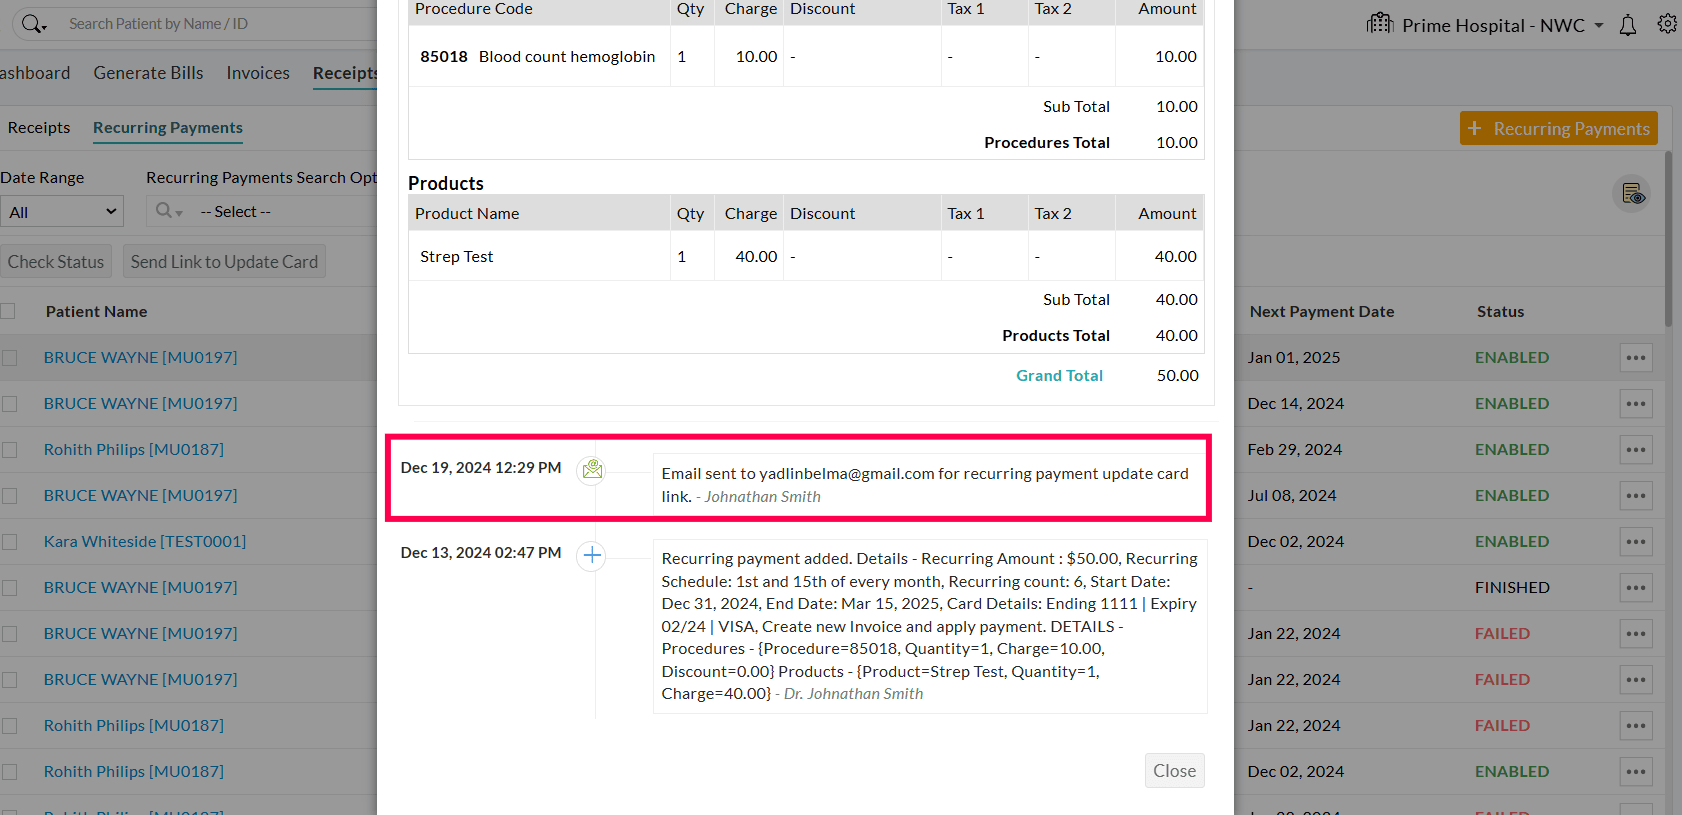
The notifications sent to the Patients get recorded in the Recurring Payment activity of each schedule under the 'Billing > Receipts > Recurring Payments' section, as shown in the screenshot below.
Recurring Payments View
To view the details of the Recurring Payments, follow the steps given below.
- Go to 'Billing > Receipts > Recurring Payments'
- Click the 'More Options'(...) icon against the Recurring payment and select the 'View' option.

- The details of the Recurring payment get displayed.
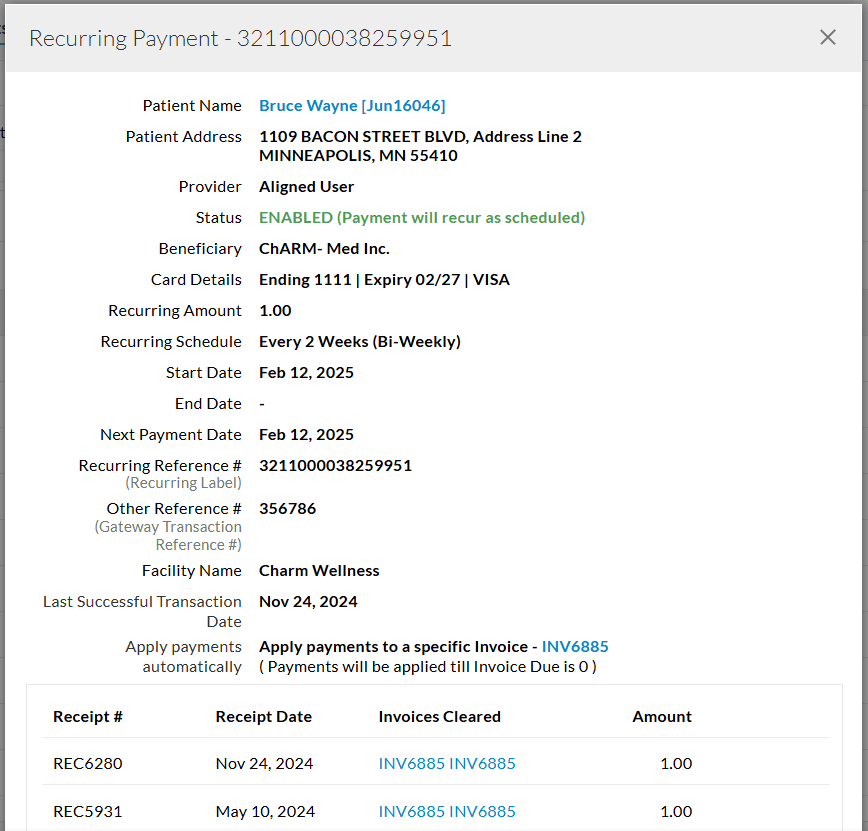
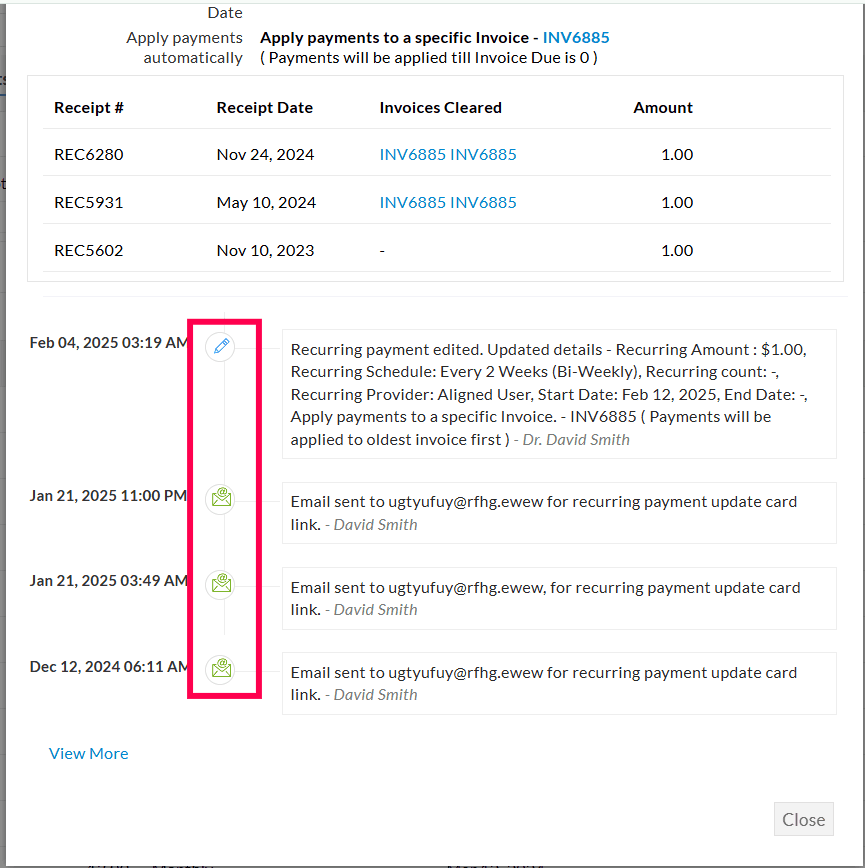
- Practices can access a detailed activity log within each Recurring profile, providing insights on transaction history, status updates, and relevant details.
- This helps the Practice in providing a detailed overview of each occurrence for better tracking purposes.
- To explore the activity details, access the dedicated 'Activity' or 'History' section within the Recurring Profile.
Check the Status of Recurring Payments
Practice members can do the status checks of individual recurring payments or bulk status checks. The column 'Next Payment Date' shows the date on which the next recurring payment recurs which will be updated as part of the status check. Given below is the list of Recurring statuses and their descriptions.
- ENABLED: Payment will recur as scheduled.
- DISABLED: Payment has been disabled and will not recur
- CANCELED: The Recurring payment has been stopped and will not recur.
- RETRYING: Payment failed and will retry up to the number of times in your account's settings.
- FAILED: Payment failed and will not be retried.
- FINISHED: No more recurring payments remain.

Ability to Identify Patients with Recurring Profile from the Calendar section and Patient Dashboard
A Recurring Profile icon has been included to indicate Patients with a Recurring profile in the Calendar List View, Appointment Scheduling, and Patient Dashboard. If there are any failed schedules or other tasks that need to be addressed by the Practice, a notification will appear on the Recurring Profile icon.
 |
Recurring Profile without Notification |
 |
Recurring Profile with Notification |
While Creating an Appointment
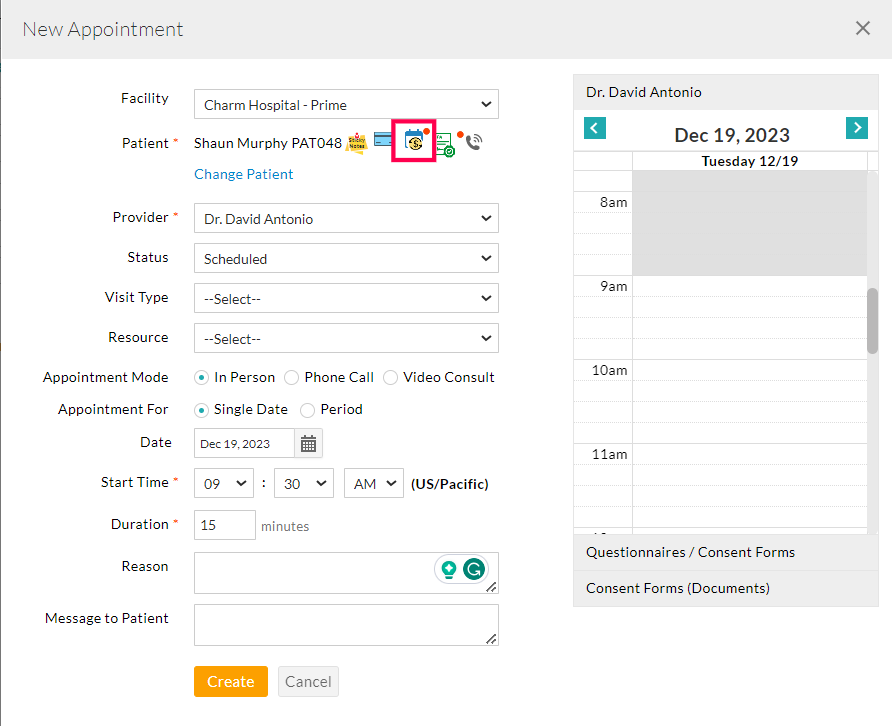
If a Patient has an active profile, a Recurring Profile Icon will be displayed next to their name when creating an Appointment.
Calendar List View
The Icon will be displayed adjacent to the Patient's name in the Calendar list view when there are active Recurring Profiles.

Patient Dashboard
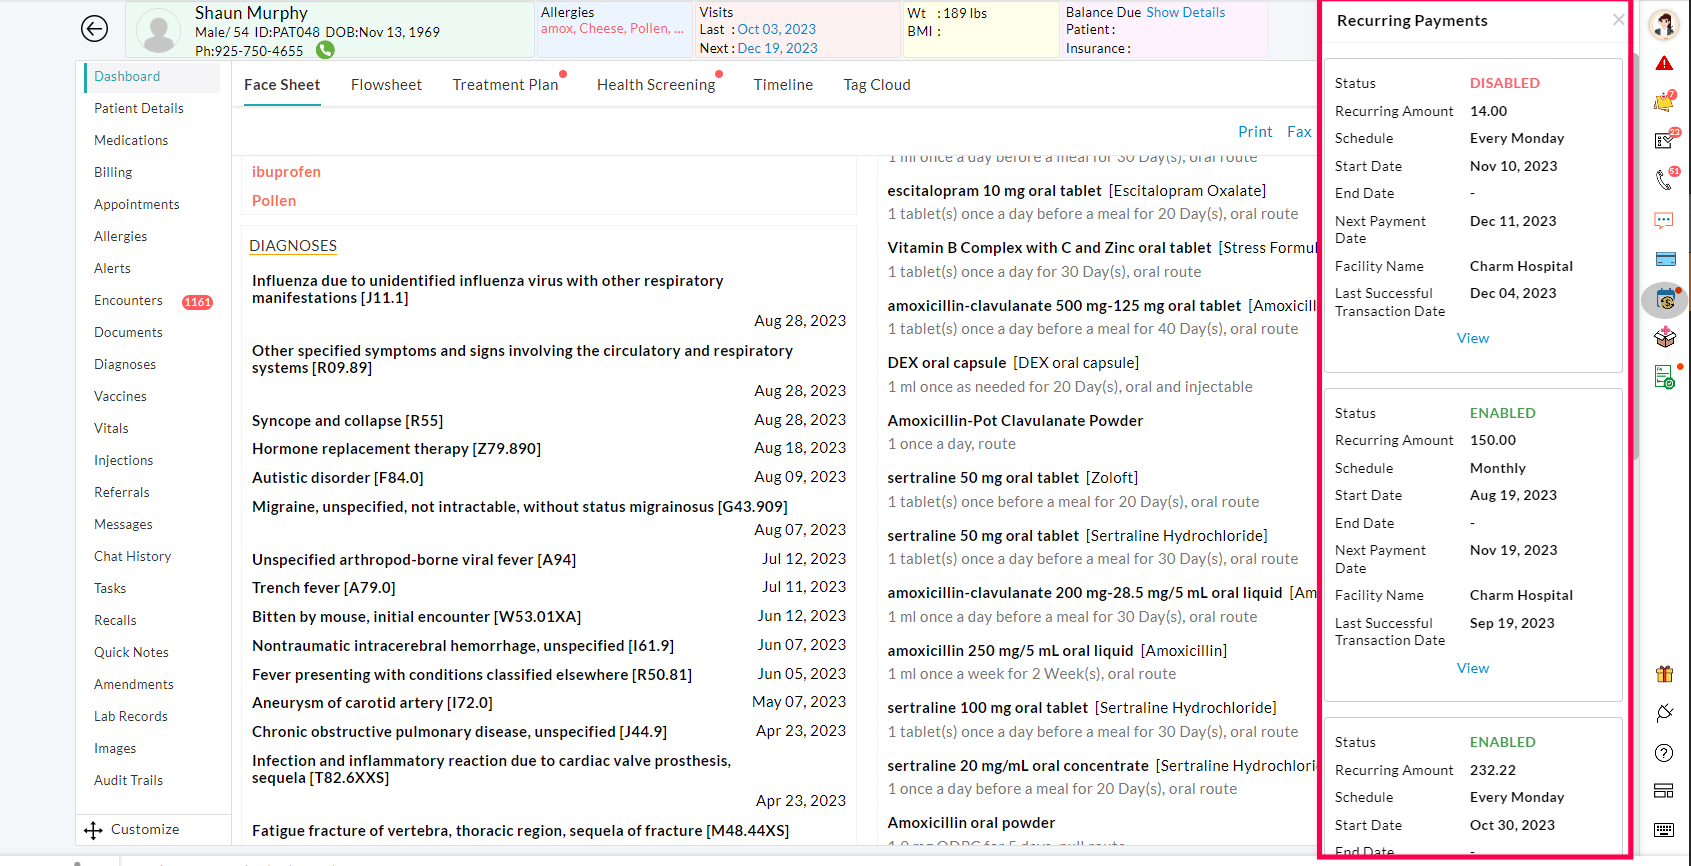
The Recurring Profile icon on the right pane of the Patient Dashboard highlights the Patient with a Recurring Profile. A detailed overview of the Recurring Profile appears upon clicking the icon.
Watch List in the Recurring Payments Tab
- The Recurring Profile Watch list provides the Practice with a consolidated view of the important data. The Practice Members can click on the individual items to access the finer details and take action accordingly.
- Click the Watch List icon in the top right corner of the 'Billing > Receipts > Recurring Payments' section. The following items are displayed.
- Active Recurring Profiles: This shows the count of Recurring Profiles that are active.
- Disabled Recurring Profiles: The number of Recurring Profiles disabled gets displayed. The Practices can enable these profiles if needed.
- Failed Recurring Profiles: This shows the count of Failed Recurring Profiles. The Practice can promptly address these failed payments.

Active Recurring Profile Count in Bluefin Settings for Each Beneficiary
Practices can view the count of Active Recurring Profiles for each Beneficiary under the 'Settings > Billing > Bluefin' section. This helps the Practice to have an insight into the active profiles before making the Merchant account inactive.
Option to Manage Failed Recurring Payments Effectively
Watch List - Failed Recurring Profiles
The total count of Recurring Profiles with Failed payments can be viewed under the Watch List icon of the 'Billing > Receipts > Recurring Profiles' section. The Practice can promptly address these failures and take appropriate actions.

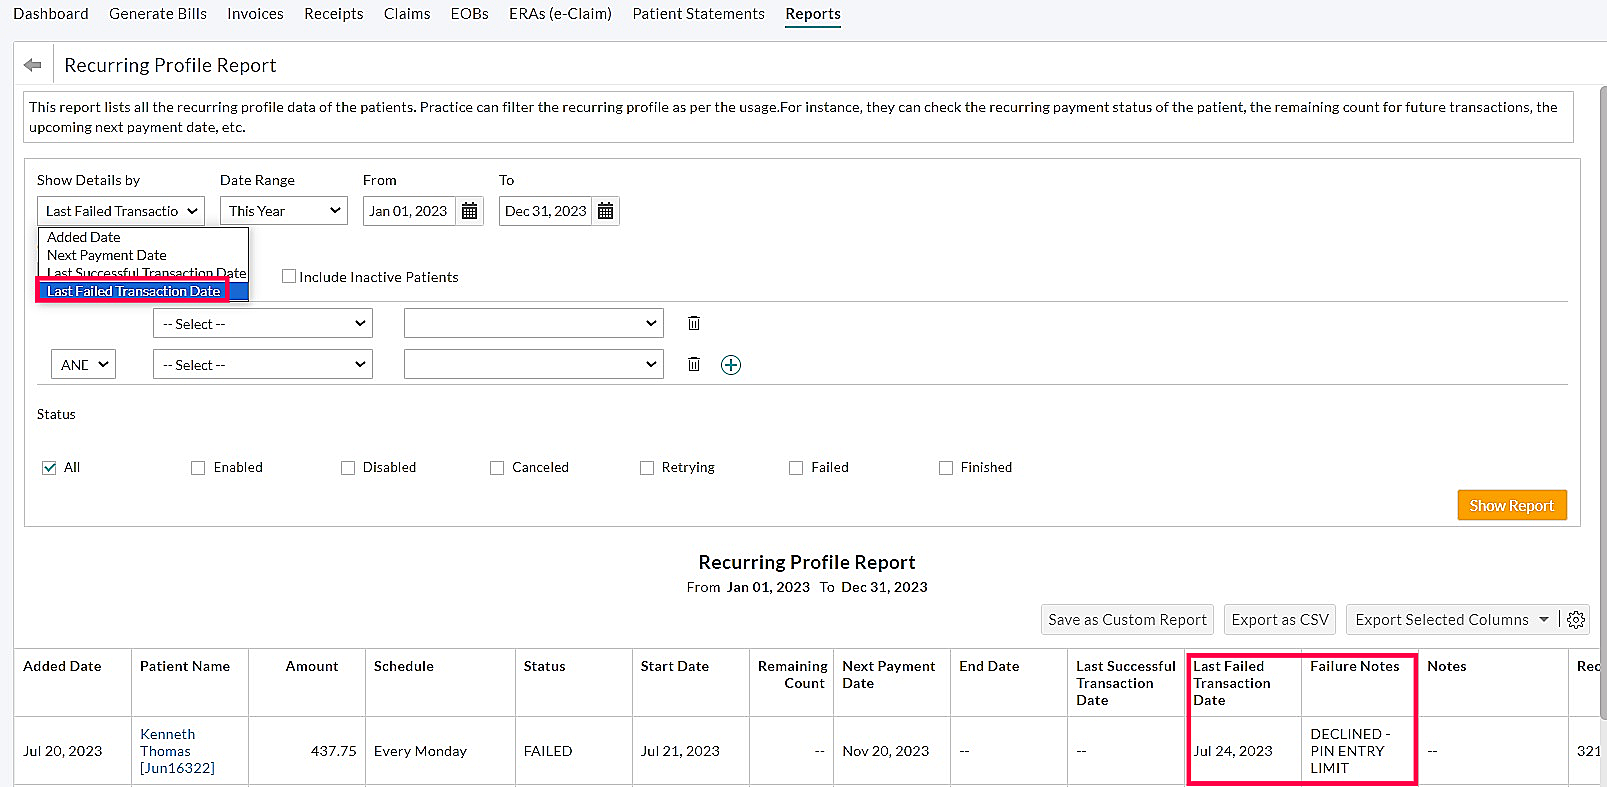
Recurring Profile Report - 'Last Failed Transaction Date' and 'Failure Notes' columns
The following columns in the 'Recurring Profile Report' and 'Recurring Profile - Invoice Line Item Report' provide the Practice with better insights on the Failed Recurring Payments.
- Last Failed Transaction Date - This column records the date of the last failed transaction.
- Failure Notes - This column provides information on the reason for the failure.
Option to get Recurring Profiles by the 'Last Failed Transaction Date'
Practices can now filter the Recurring Profiles based on their 'Last Failed Transaction Date', thus helping in easily identifying the Failed payments and resolving the payment issues.
Cancel Recurring Payments
Using this option, the Provider can stop the recurring payments.
- Go to 'Billing > Receipts > Recurring Payments'.
- Click the 'More Options' (...) icon against the Recurring Payment and select the 'Cancel' option.
- Click the 'Ok' button to confirm the cancellation.
Note: More than one recurring payment can be added for a Patient. Multiple recurring payments can be added using the same card on file.
Option to Disable Recurring Profile
You can now disable Recurring Profiles effortlessly, allowing you to have control over the payment schedule to suit your needs. To disable the Recurring Profile, follow the steps given below.
- Go to 'Billing > Receipts > Recurring Payments'.
- Click the 'More Options' (...) icon against the Recurring Profile you need to delete.
- Select the 'Disable' option. The status of the Recurring Profile gets changed to 'Disabled'.
- You can enable the profile anytime later by selecting the 'Enable' option under the 'More Options' (...) icon.

Failed Payment Notifications
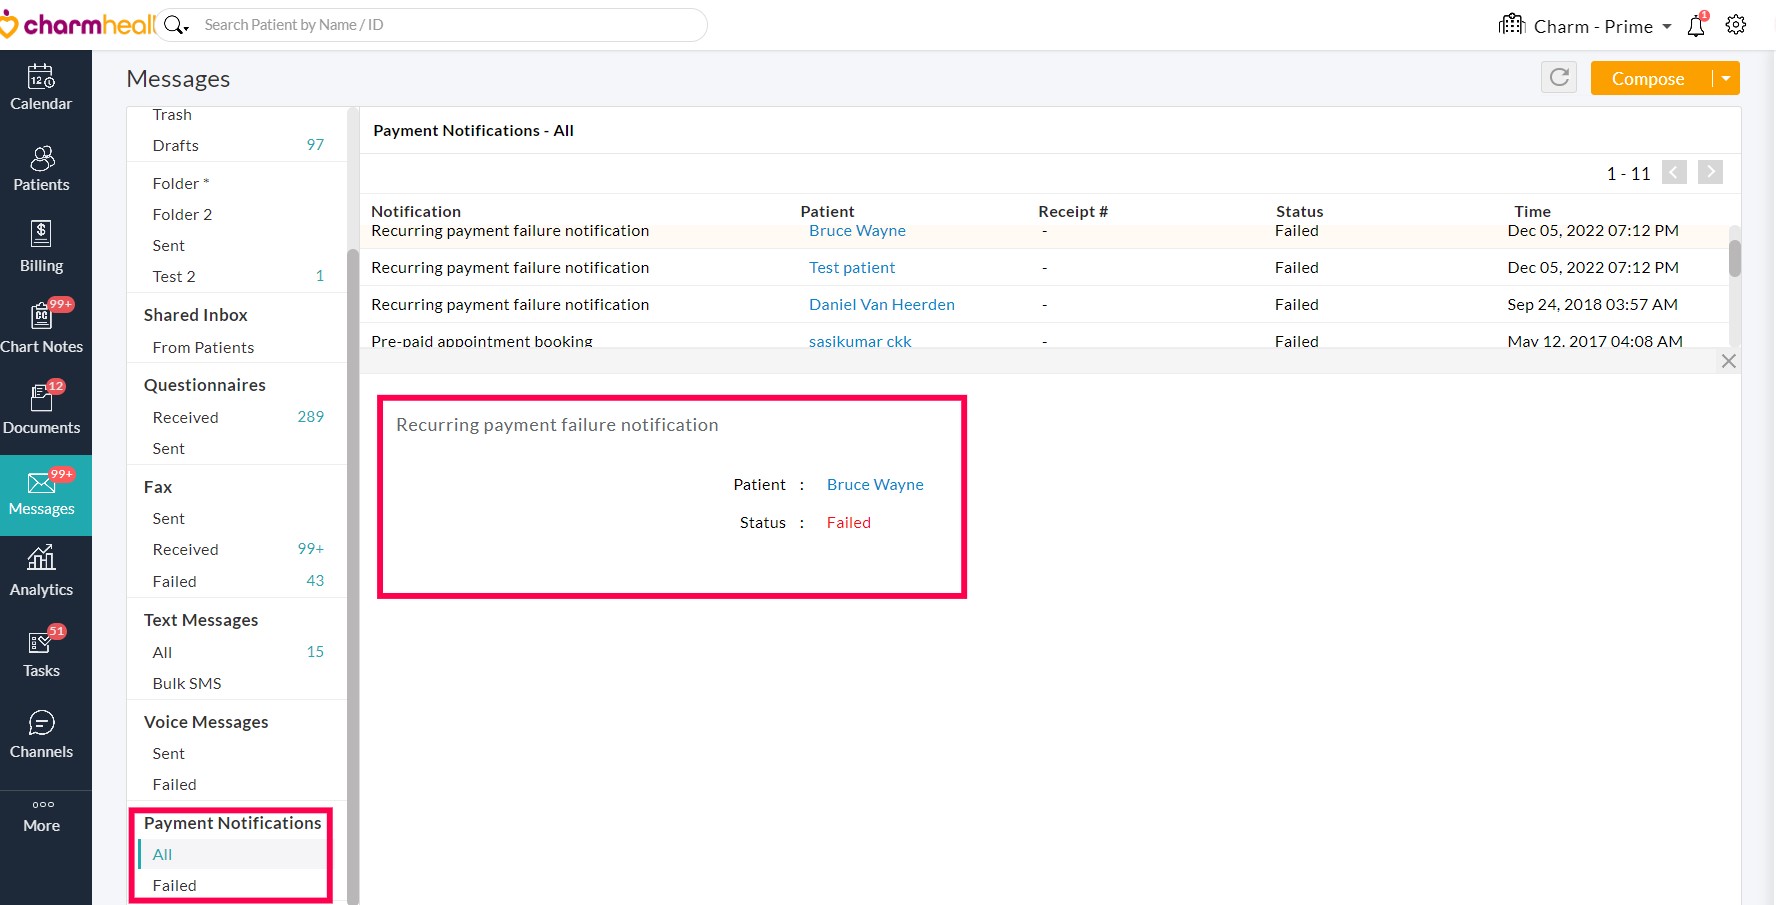
- CharmHealth helps the Practice to stay informed about any recurring payments that have failed to process automatically.
- Whenever a recurring payment fails, an immediate notification will be sent to the Practice members. This helps the Practice to promptly address the failed payments.
- The above setting can be enabled under the 'Settings > Billing > Bluefin > Message Notification for Recurring Payment' section.

- Enable the 'Send Notification when Recurring Payment fails' option.
- The message notification will be shown in the 'Messages > Payment Notification > All' section.
- The notification for successful payments can also be enabled by the setting as mentioned in the screenshot above.
- Choose to send both the above Message Notifications either to All Practice Members or Provider in the Invoice or a particular Provider.
Bulk Actions in Payment Notification Messages
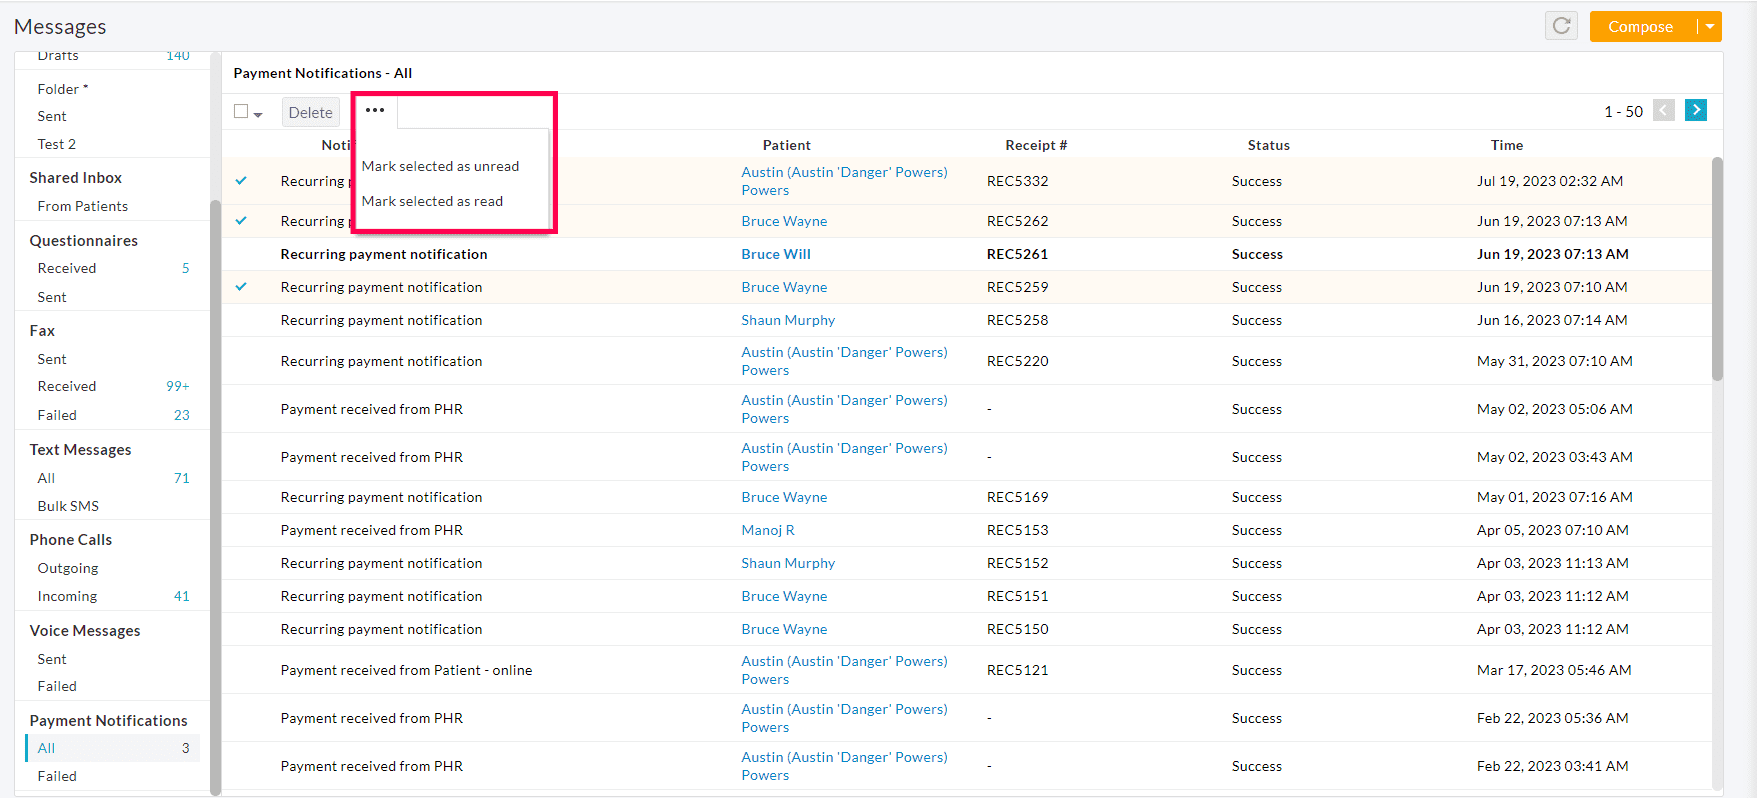
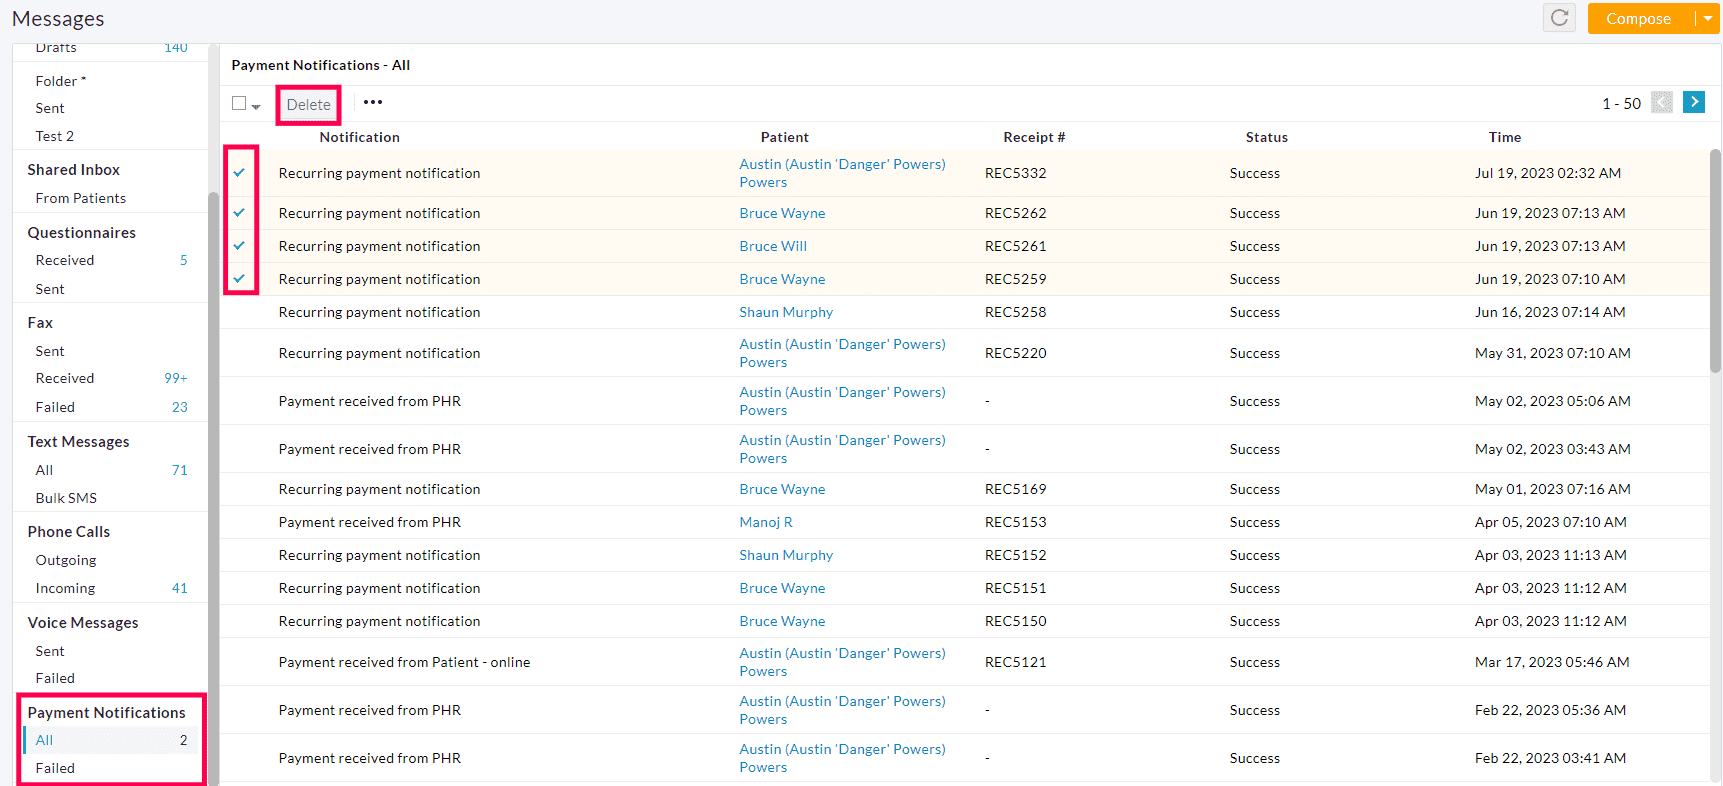
The following bulk actions can be performed in the 'Messages > Payment Notifications' section.
Delete Payment Notifications
Payment notification messages can be deleted at once by selecting the messages and clicking the 'Delete' button, as shown in the screenshot below.
Read and Unread Payment Notification Messages
To mark the messages Read or Unread, select the messages and click the 'Mark selected as Unread' or 'Mark selected as Read' option under the 'More Options' (...) icon.
