Welcome to Charm mPHR
Charm mPHR is a secure, HIPAA-compliant Patient Health Record (PHR) application that enables you to access and manage your personal health information conveniently. It can help you participate in your healthcare and communicate with your providers on the go.
With Charm mPHR, you can:
- Add and manage your health records
- Communicate securely with your Practice or Provider
- Share your Health Passport within or outside the Practice
- Book In-person and TeleHealth appointments
- Request medication and supplement refills
- Track ailments and monitor treatment progress
- Record health vitals and track fitness goals
This guide provides an overview of the app’s key features and how to use them.
Note: Users can contact support@charmhealth.com directly for any mPHR-related queries.
Disclaimer: The patient details in the user guide images are for reference only. They do not pertain to any individual, living or dead.
- Getting Started with Charm mPHR
- Navigating the Charm mPHR App
- Dashboard Overview
- My Health
- Appointments
- Flowsheets
- Messages
- Questionnaires
- Reminders
- Wellness
- Share Sections
- Billing
- Card on File
- Health Passport
- Documents
- Visit Summary
- Prescriptions
- Allergies
- Labs
- Procedures
- Immunizations
- Insurance
- Sync Health Record to Charm mPHR
Getting Started with Charm mPHR
Before using the Charm mPHR app, you must have an active Patient Portal account.
Registering for a Patient Portal Account
To register for a Patient Portal account, you must first receive an email invitation from your Practice.
- Open the invitation email sent by your Practice.
- Follow the instructions in the email to complete your registration in the web Patient Portal.
- Set up a password and activate your account.
Note: If you already have a Patient Portal account, skip this section and proceed to downloading and logging in to the app.
Click here to learn how to create a Charm Patient Portal account.
Logging in to the Charm mPHR App
- Download the Charm mPHR app from the App Store.
- Open the app and tap 'Login'.
- Enter the username and password you use for your Patient Portal account.
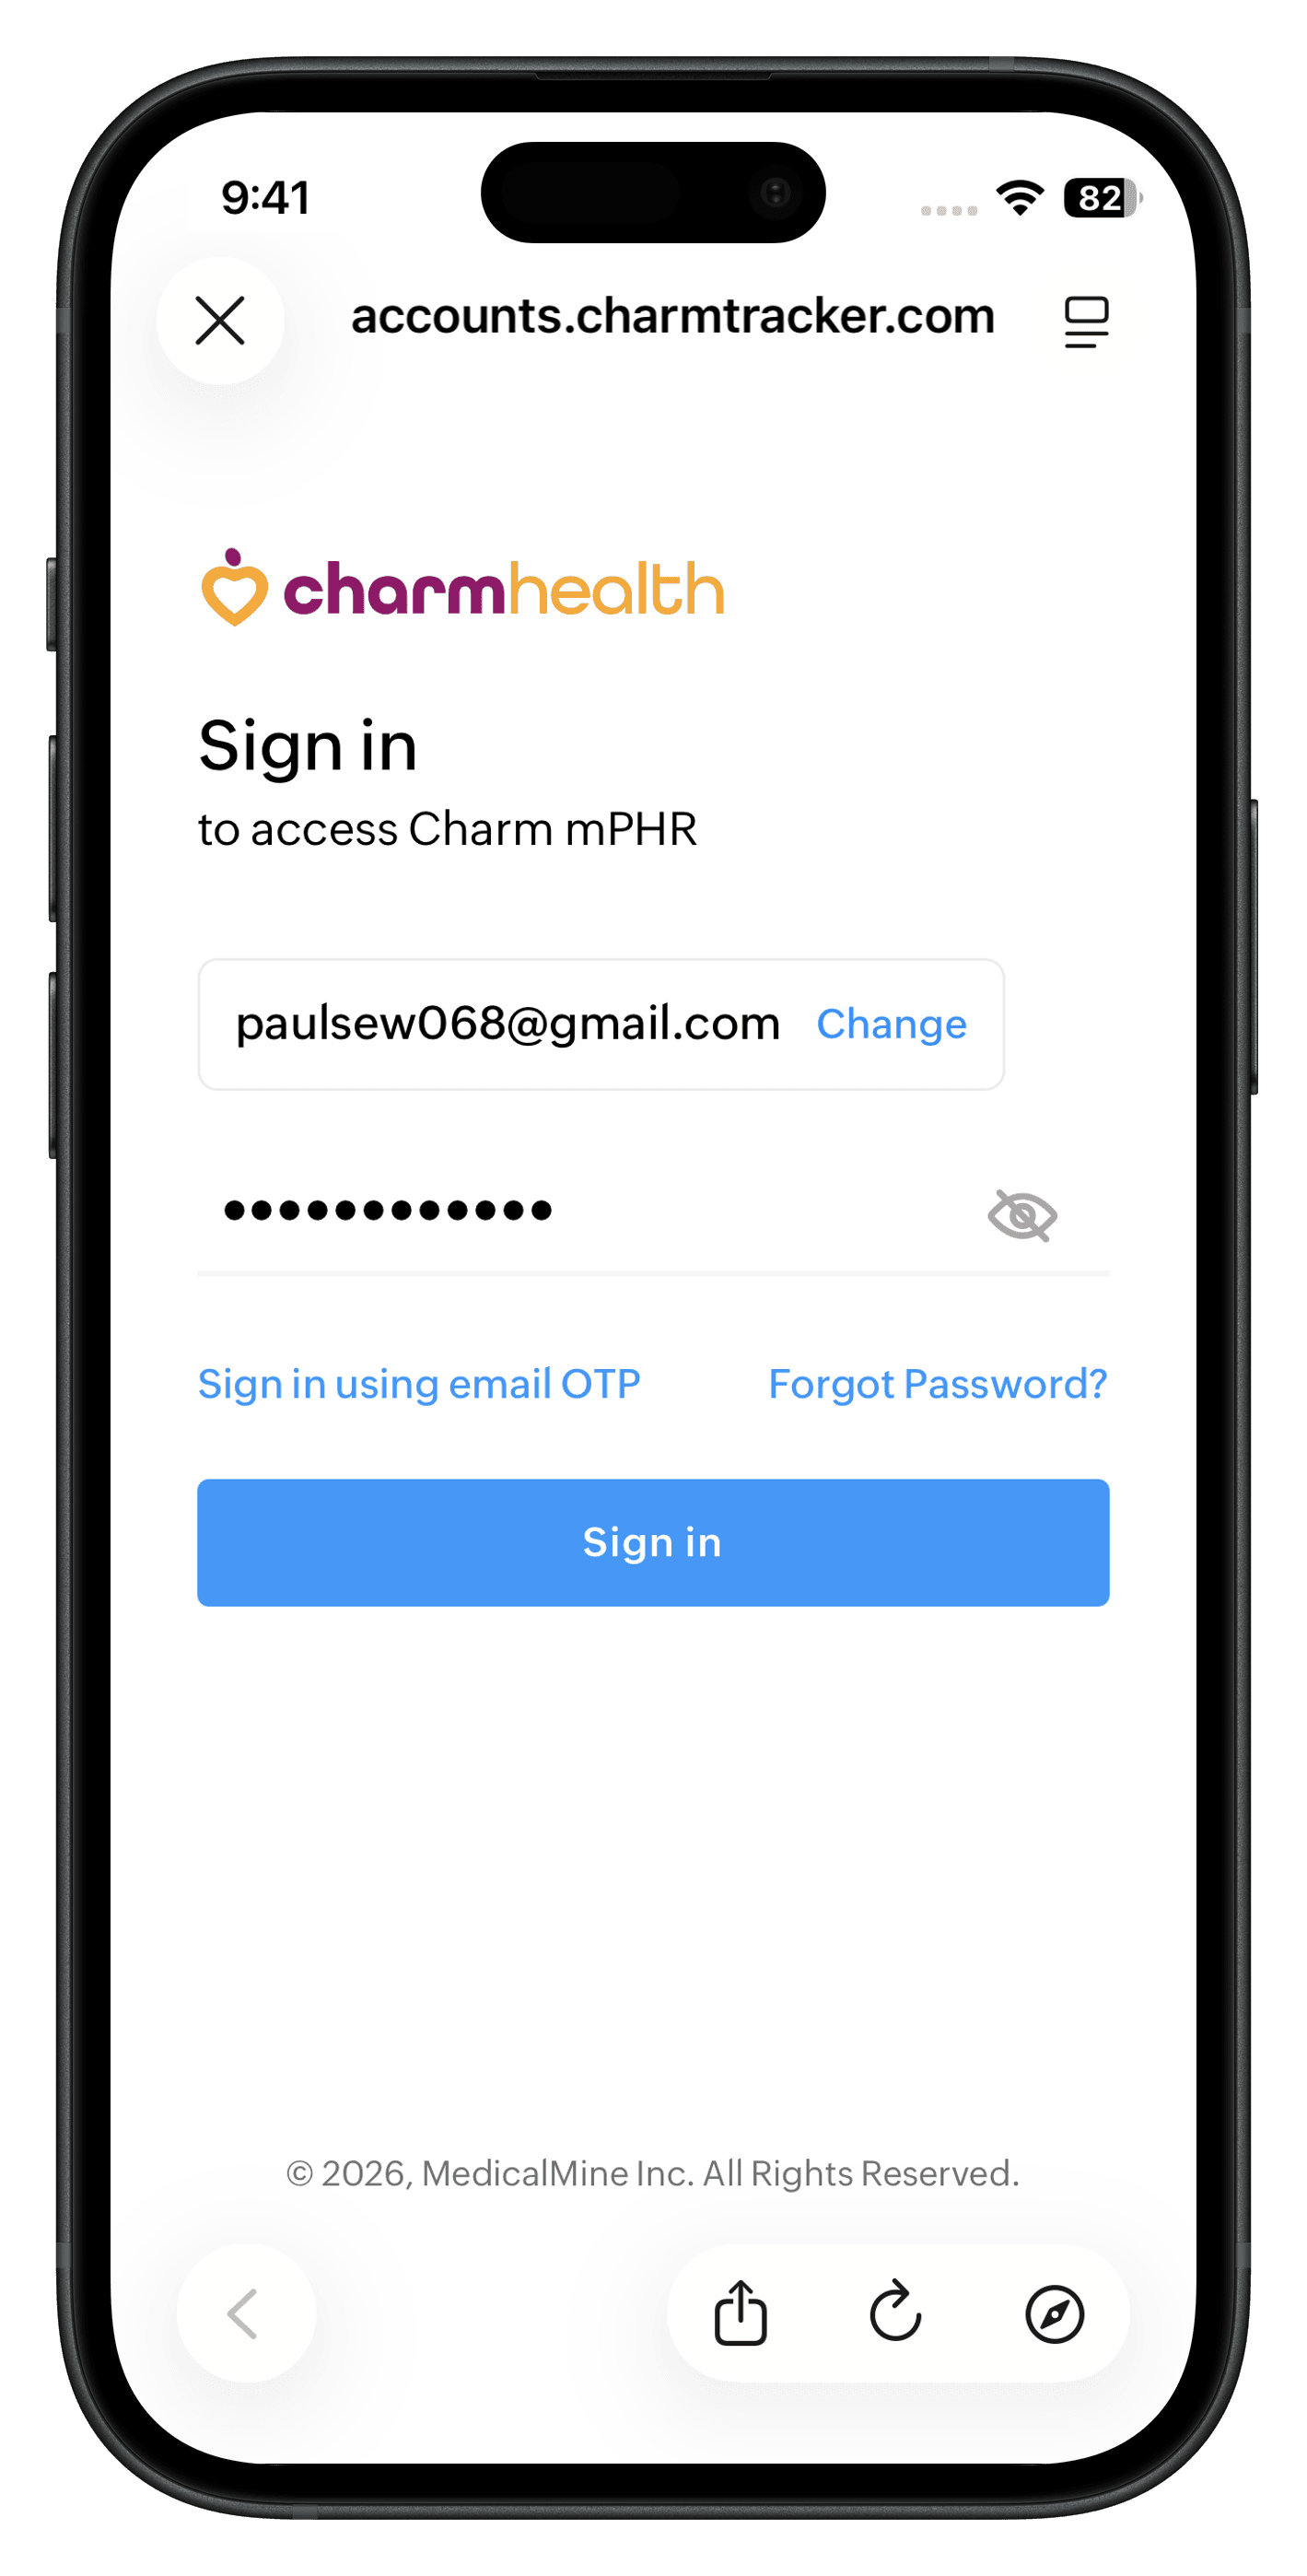
- Complete the login process.
mPHR App Lock
To protect your health information, enable an app lock after logging in.
- Your device’s existing security option, such as Face ID or device PIN, is set as App lock by default, or
- If device lock is not available, set up an app-specific PIN that can be reset simply by signing out of the app.
- If you have forgotten your old PIN, tap the 'Log out' option on the application lock screen to set a new one. The Logout button will appear after one wrong PIN attempt.
Selecting a Family Member
If multiple family members are linked to your account, the app displays a list of members after you log in.
Tap a member to access their respective PHR dashboard.
If only one member is linked to an account, you are taken directly to the dashboard.
Navigating the Charm mPHR App
Upon logging in, the app displays the Home view, featuring the app header and the mPHR Dashboard.
App Header
The header provides quick access to important information and options:
- Announcements: Tap the button to view the latest announcements shared by your Practice. Tap an announcement to view the complete message.
- Profile Icon: Tap to view linked family members or access profile-related options.
From the profile section, you can:
- Switch between linked family members
- View and edit demographic details in 'My Info'
- Tap on 'App Feedback' to report technical issues related to the application, and 'Contact Practice' to send medical queries directly to your Practice.
- Sync Health Record to Charm mPHR
- Log out of the app

Dashboard Overview
The mPHR Dashboard provides a quick overview of your most important health information, including:
- Vitals
- Upcoming appointments
- Recent messages
- Active invoices
- Shared Questionnaire
- Active medications

You can tap on each section to view it in detail.
My Health
The 'My Health' tab allows you to access, track, and manage your health information, communicate securely with your Practice or Provider, and manage billing all in one place.
Appointments
The mPHR app allows you to view, book, cancel, and manage appointments, as well as add yourself to a waiting list, depending on what your Practice has enabled.
The Appointment section displays all your Upcoming, Requested, Wait-listed, Denied, and Past appointments.
Booking an Appointment
Appointments can be booked through multiple workflows in the mPHR app.
- Tap 'Book Now' from the Upcoming Appointments section in the Dashboard.
Note: This option is available only if there are no upcoming appointments.
- Tap on the 'Add (+)' icon and choose 'Book Appointment'.

Booking from the Appointments Section
To get a detailed view of all your appointment timelines and status, and to book an appointment, follow the steps below :
Navigate to 'My Health > Appointments' and tap on the 'Add (+)' icon.
Practices can configure their settings to display or hide Provider availability.
Follow the steps below to continue booking an appointment either way :
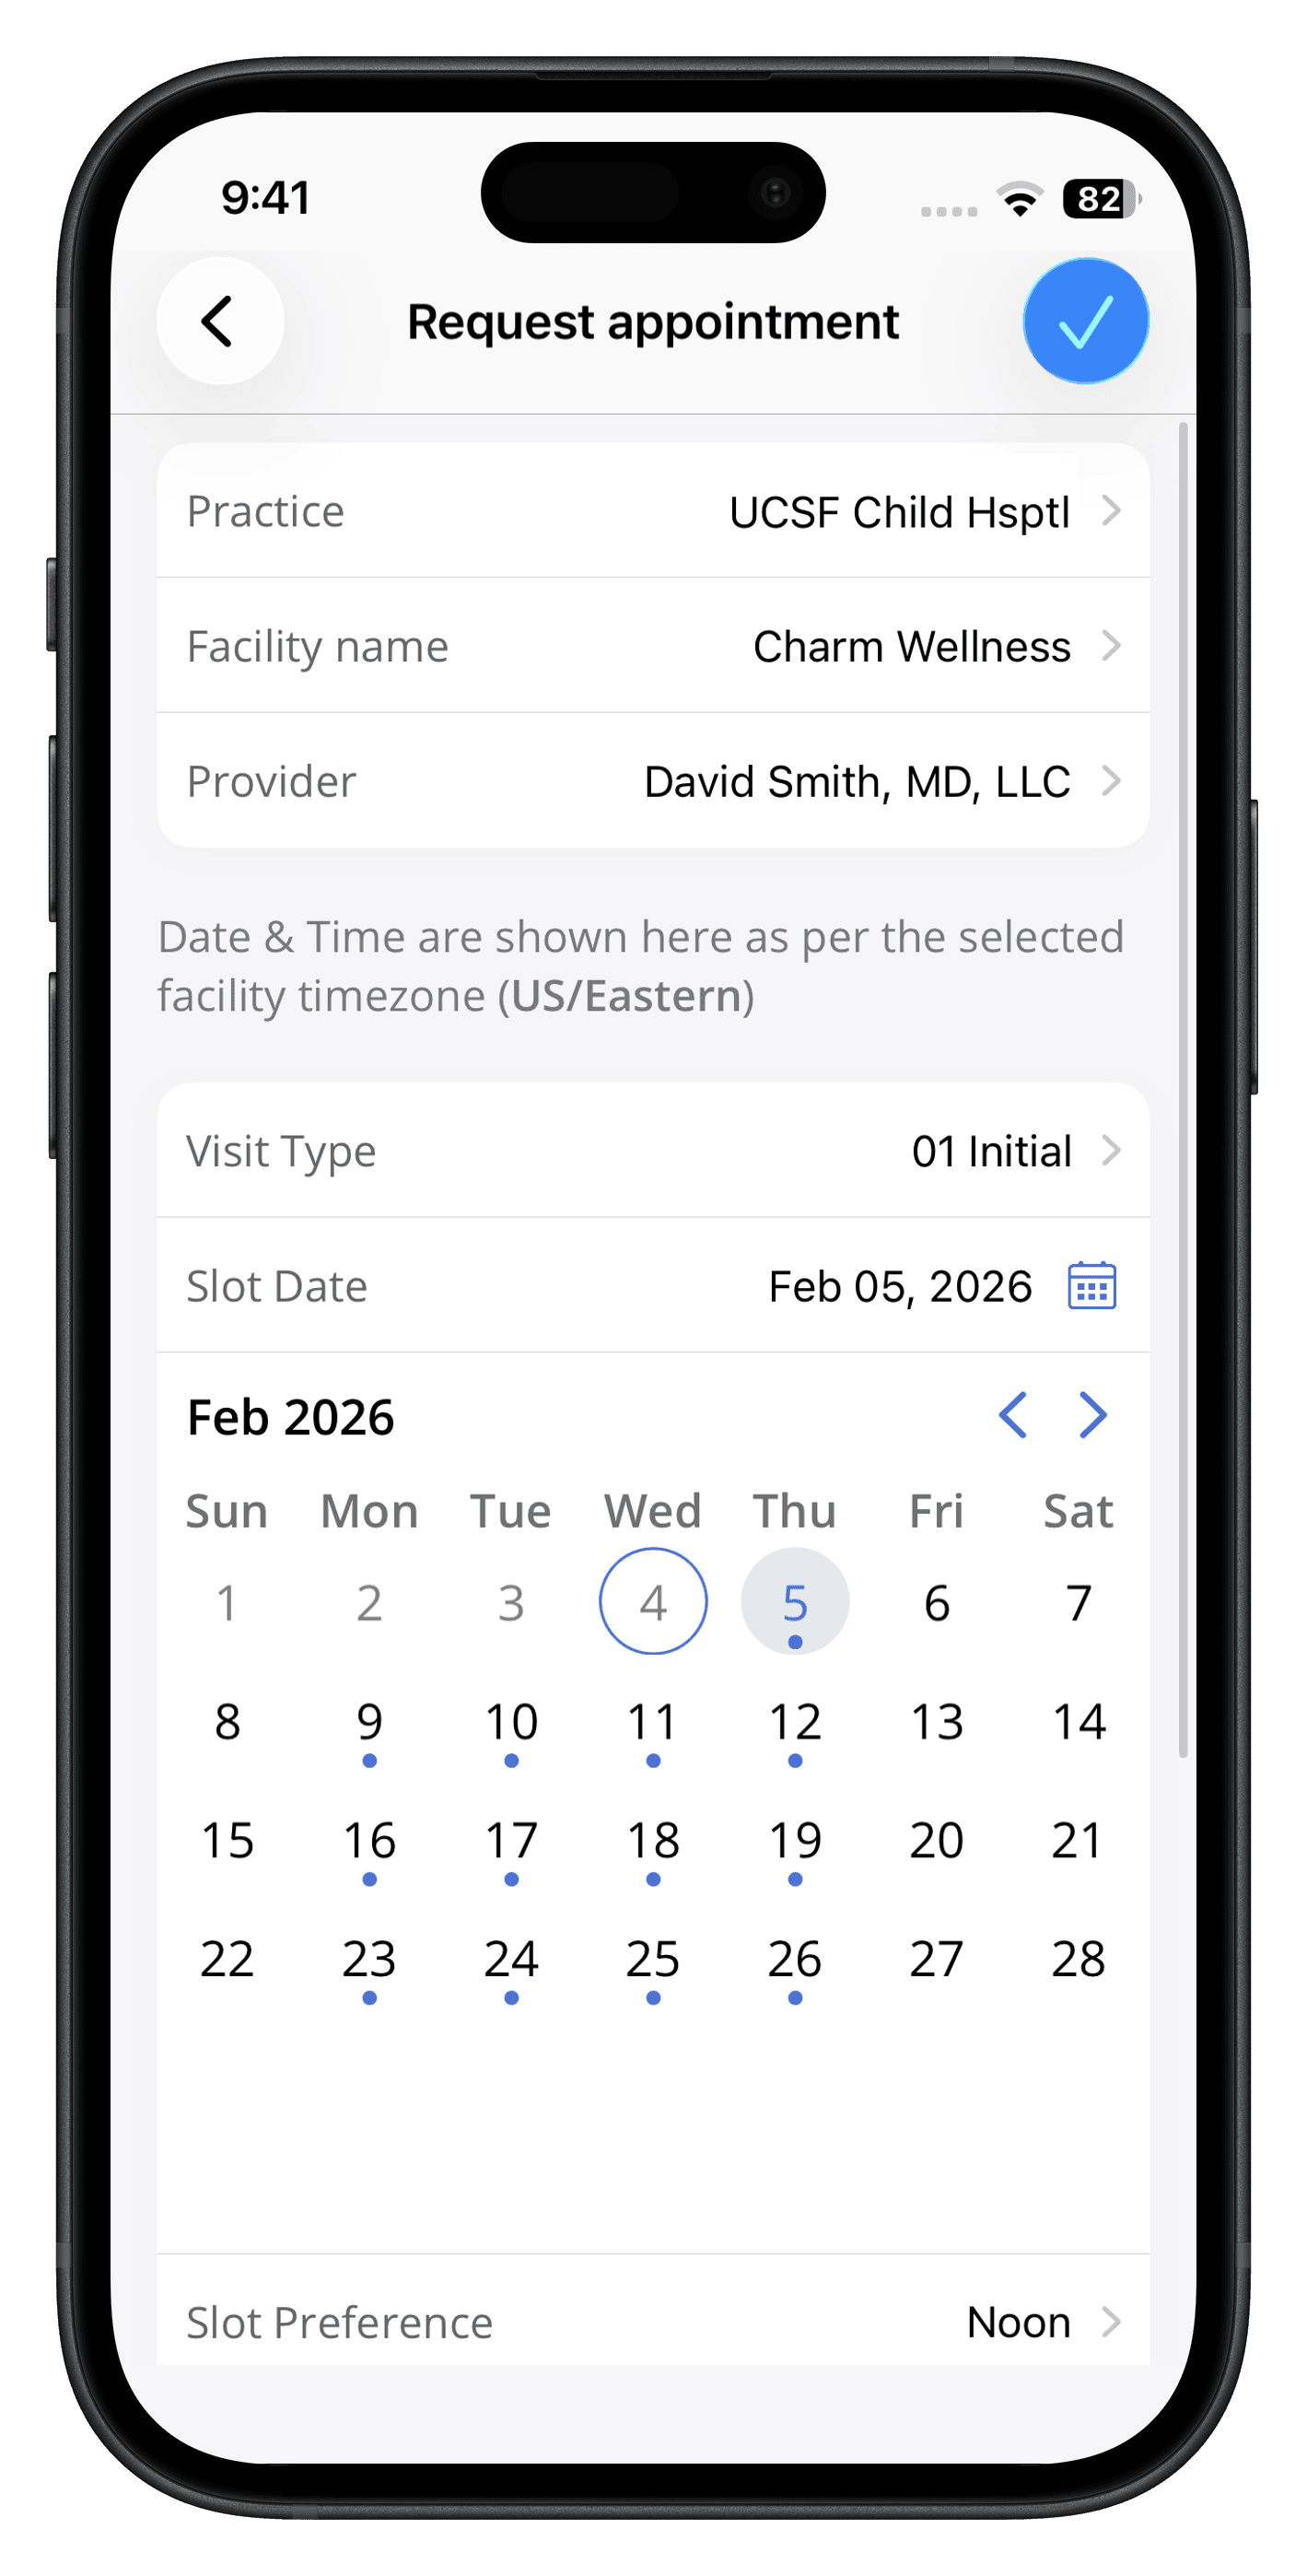
If Provider availability is enabled:
- Select your 'Practice', 'Facility', and 'Provider'
- Select a 'Visit Type' (If enabled by your Practice).
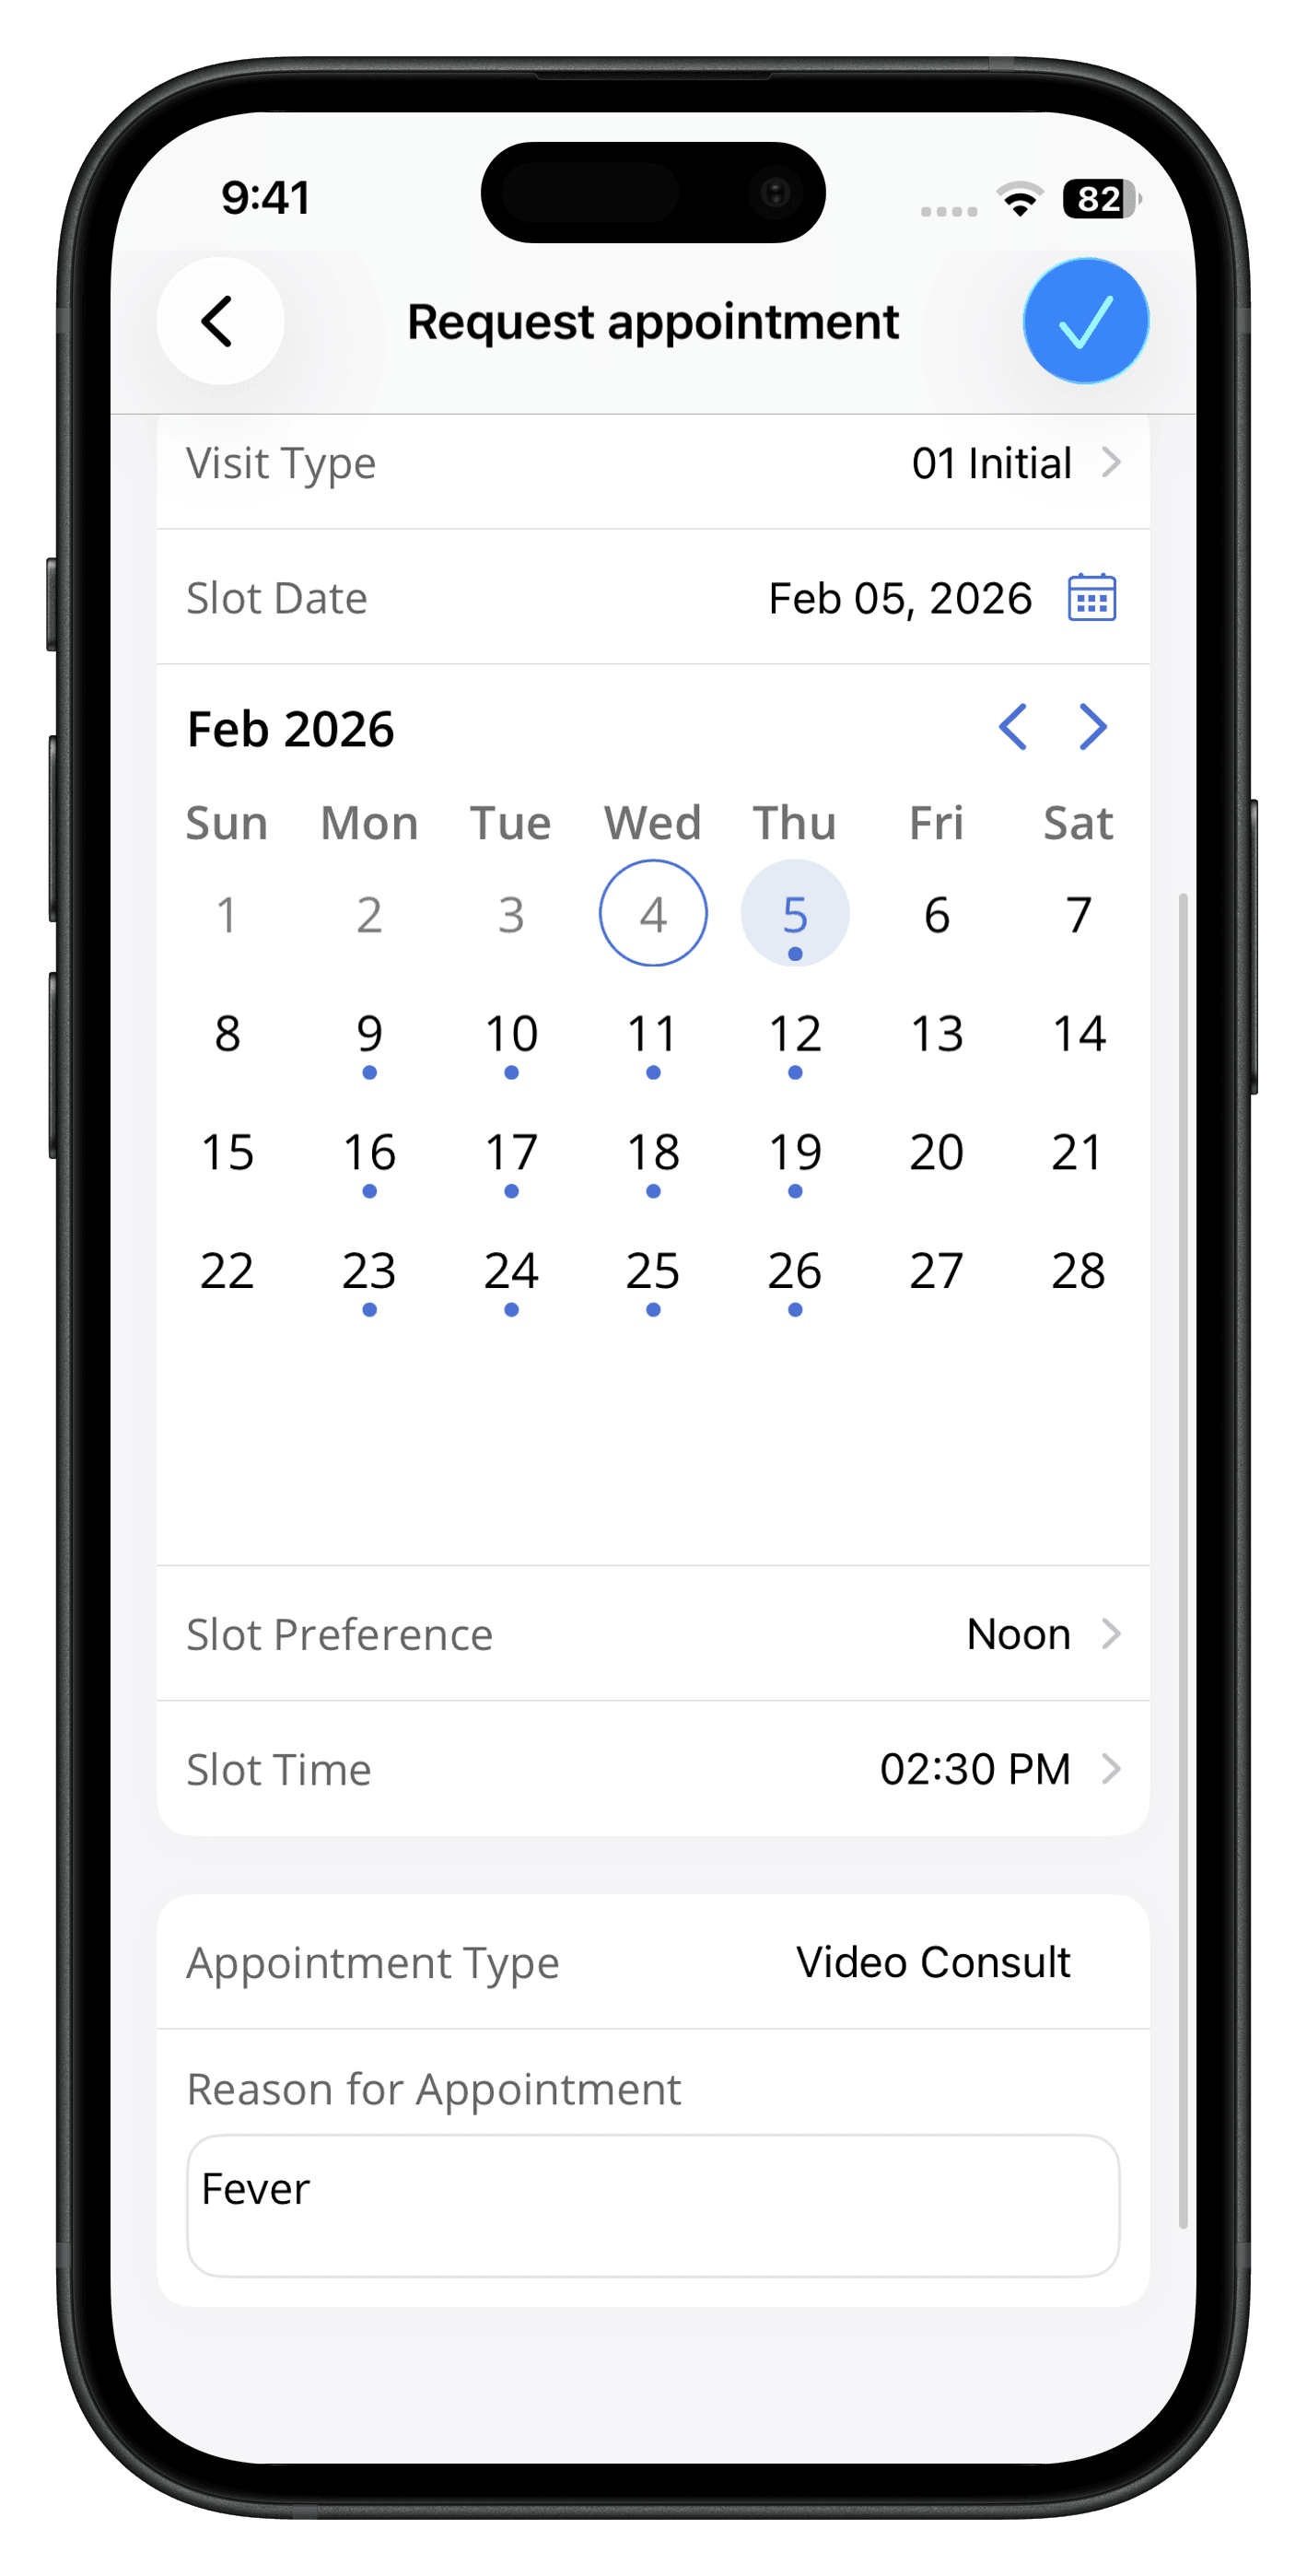
- Choose a preferred date and time from the calendar view. (Appointment times are displayed based on the selected facility's time zone)
Note: Days with available slots are marked with a blue dot.
- Enter the Reason for appointment
- Tap on the 'Done' icon to submit the booking
If Provider availability is disabled:
- Select your 'Practice', 'Facility', and 'Provider'
- Select a 'Visit Type'. (If enabled by your Practice)
- Select 'Any Date' and 'Any Time' or a specific date and time in the slot preference.
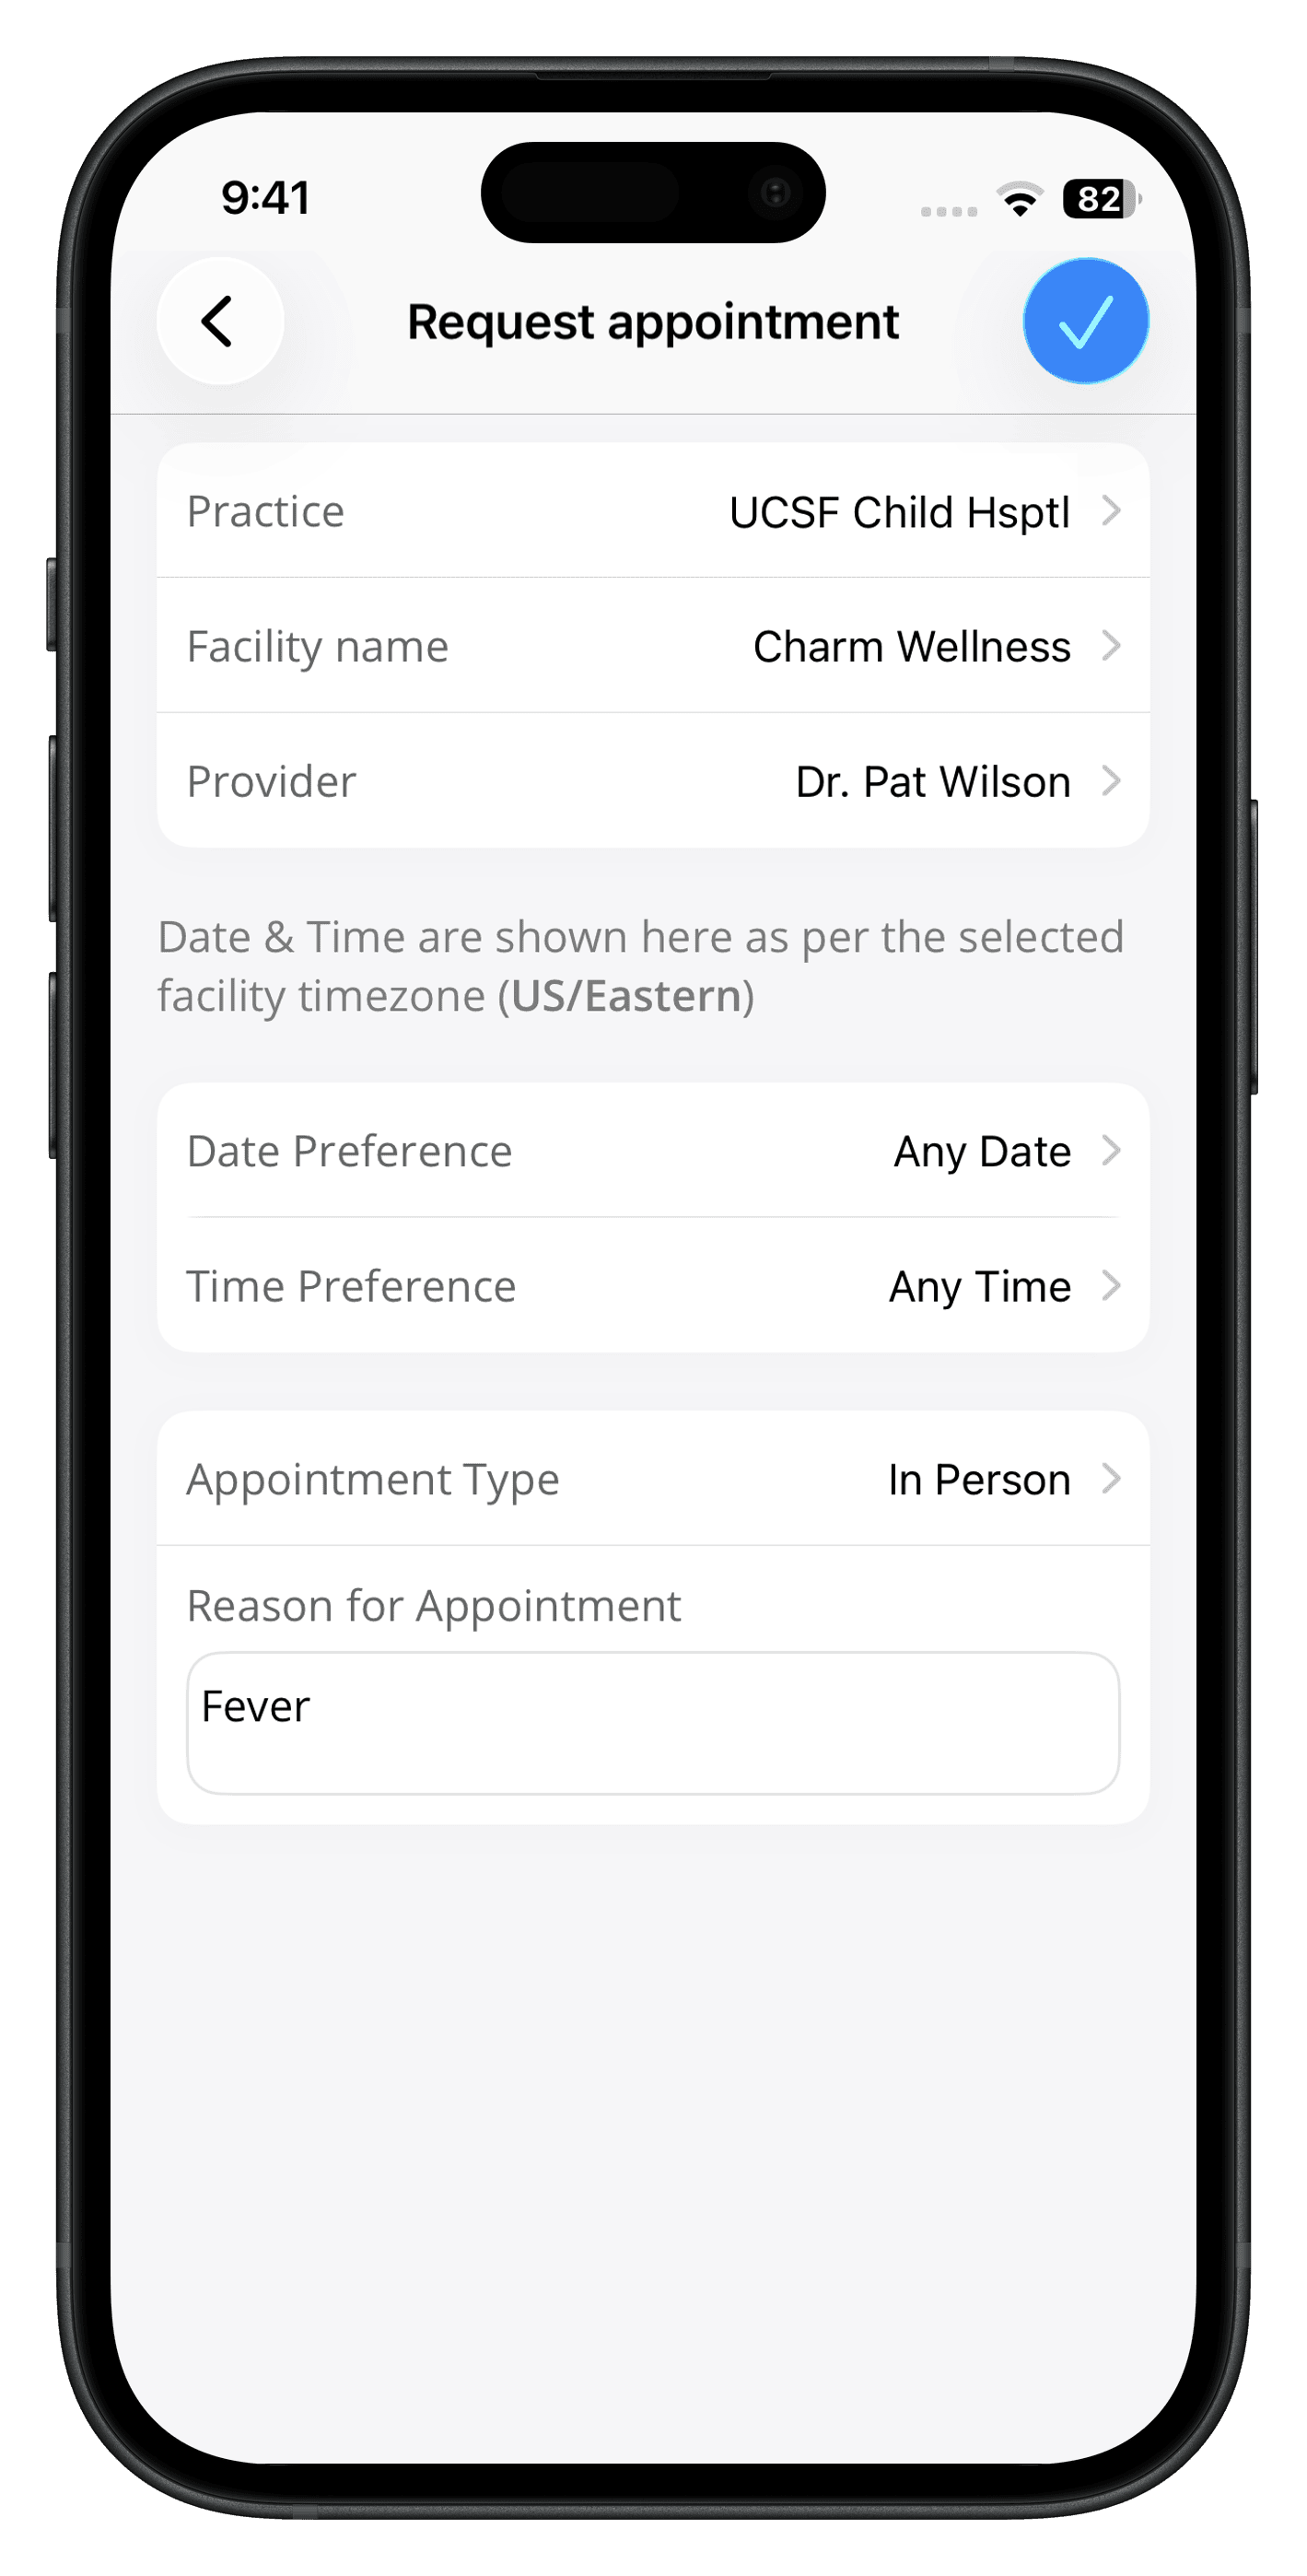
- Enter the Reason for appointment
- Tap on the 'Done' icon to request an appointment.
The booking is submitted as an appointment request, which the Practice may then confirm or deny based on factors such as provider availability.
You can also prepay for your appointment using the mPHR application during the booking process. (If enabled by your Practice)
Note: If Pre-Payment is enabled by your practice, payment is mandatory when booking the appointment.
After booking, the appointment appears in the Dashboard and Appointments section of the My Health tab.
Note: Only patients with a Confirmed appointment receive a Confirmation email to their PHR-registered mail ID.
Adding Yourself to the Waiting List
If your preferred appointment slot is unavailable, you can add yourself to a waiting list. (If enabled by your practice)
- Choose a Provider's unavailable date.
- Tap on the 'Add wait list' checkbox under the calendar view.
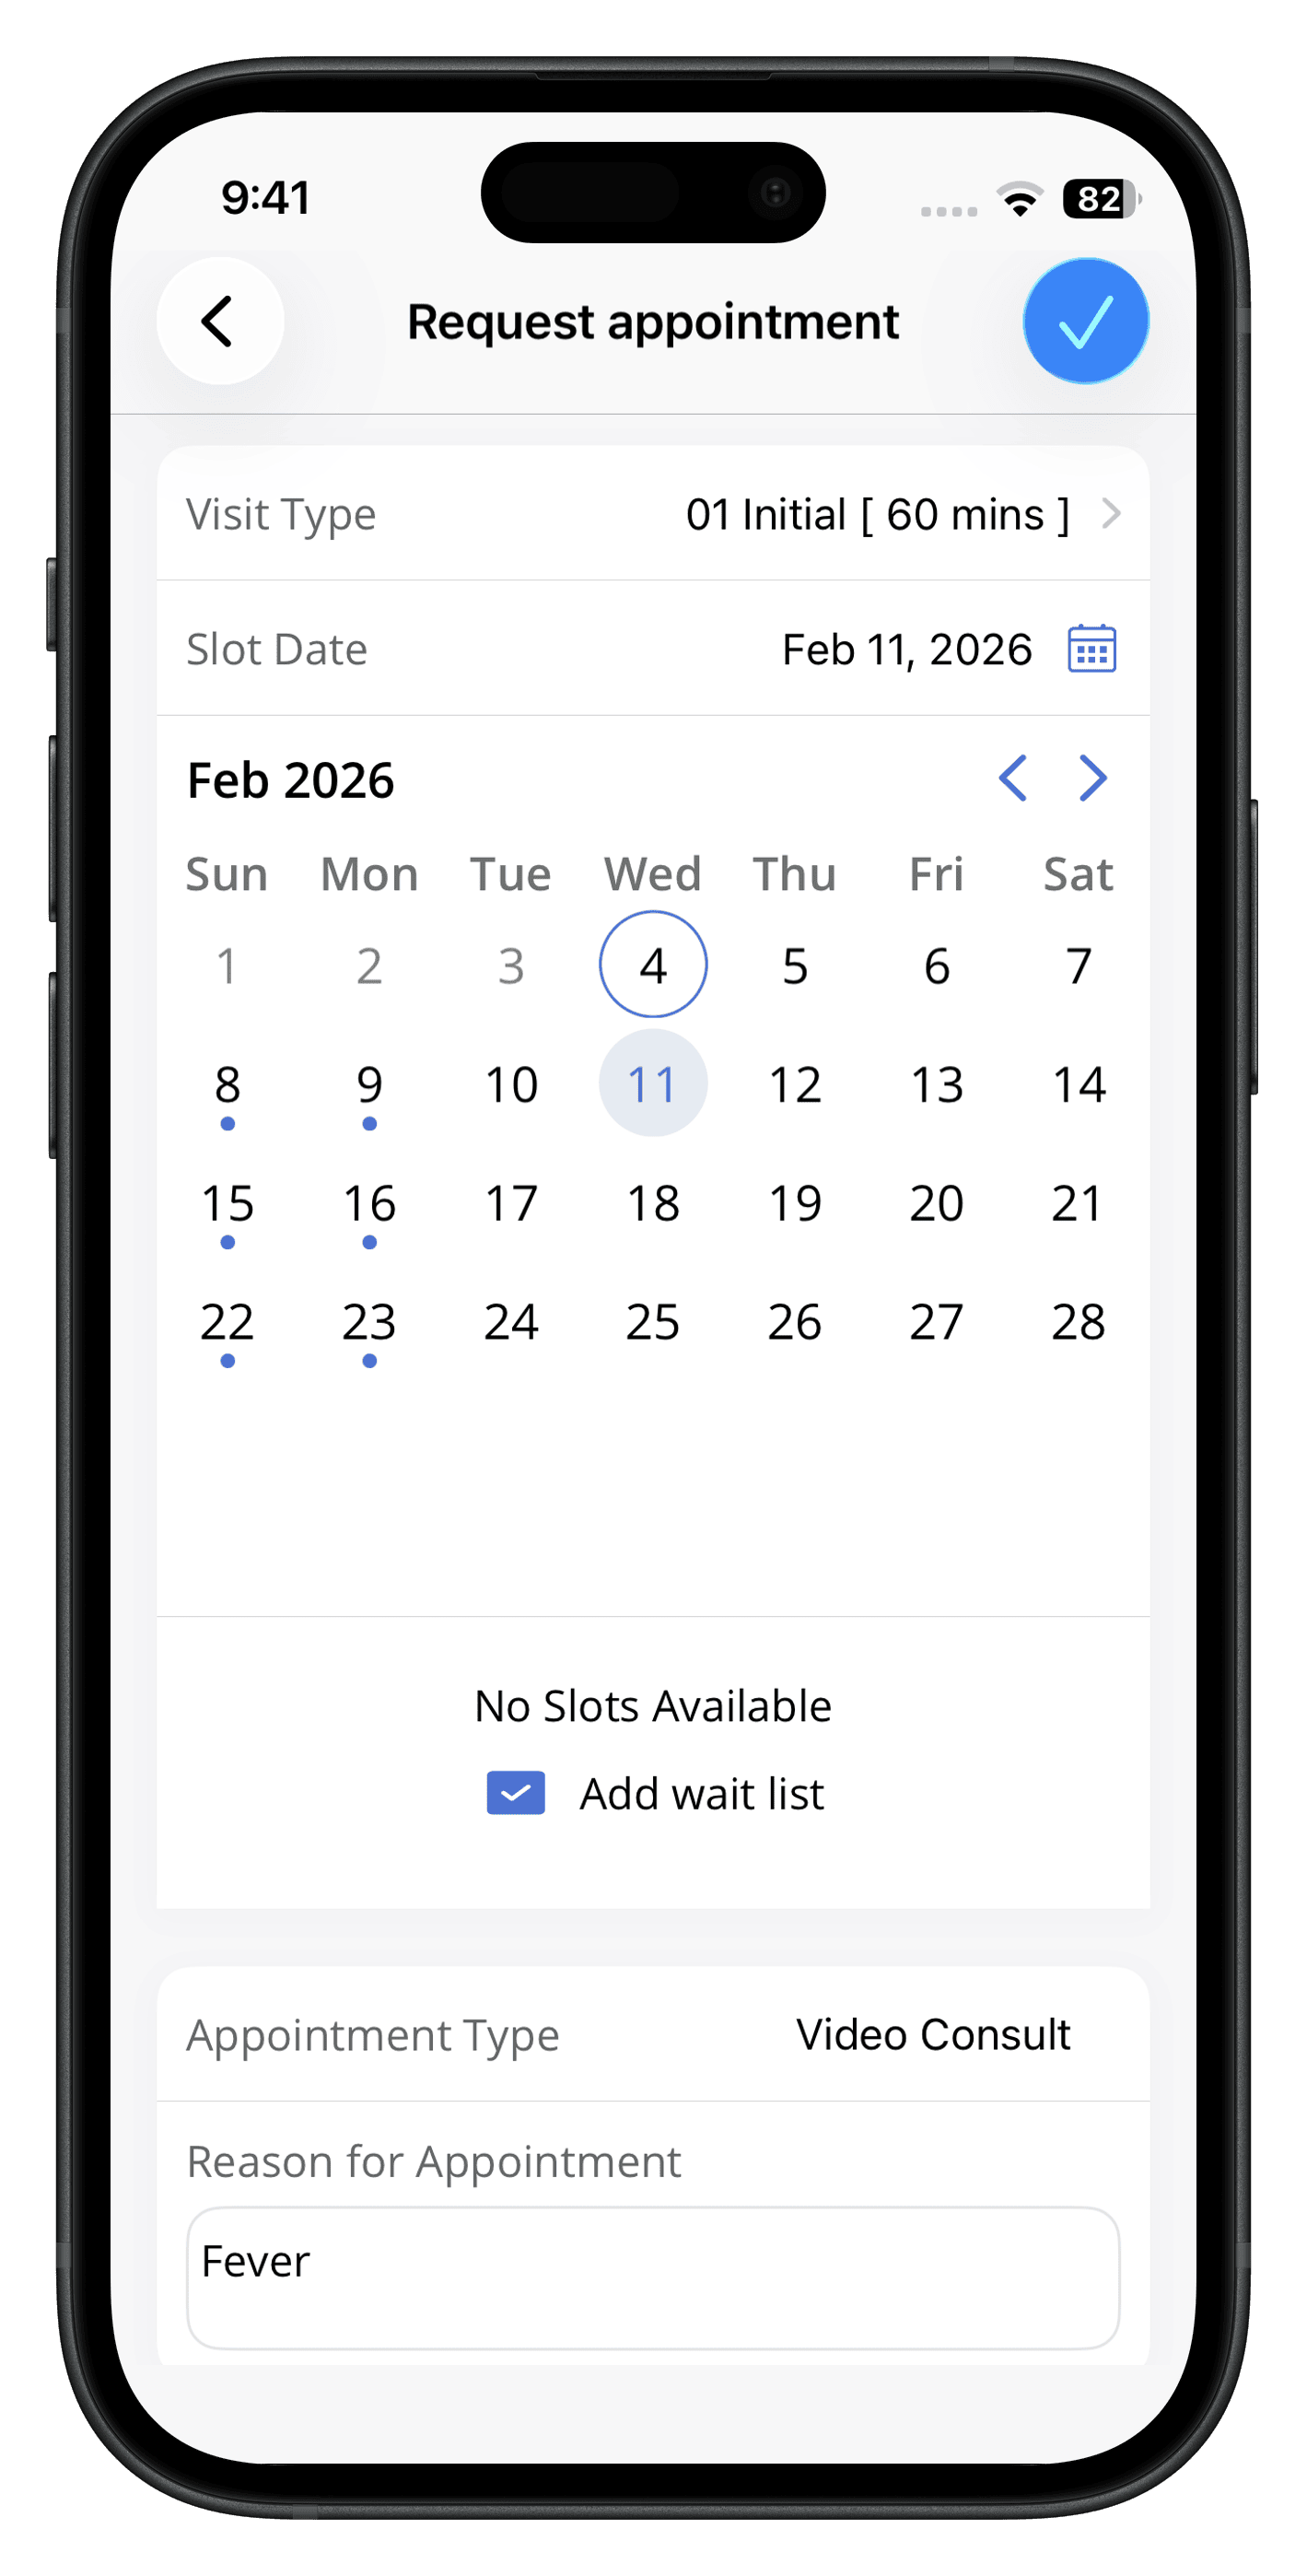
- Enter a reason for the appointment.
- Tap on the 'Done' icon.
The Provider may then assign you to an available slot on the selected date based on priority.
Cancel an Appointment
You can cancel your appointments within the time frame allowed by the Practice by following the steps below :
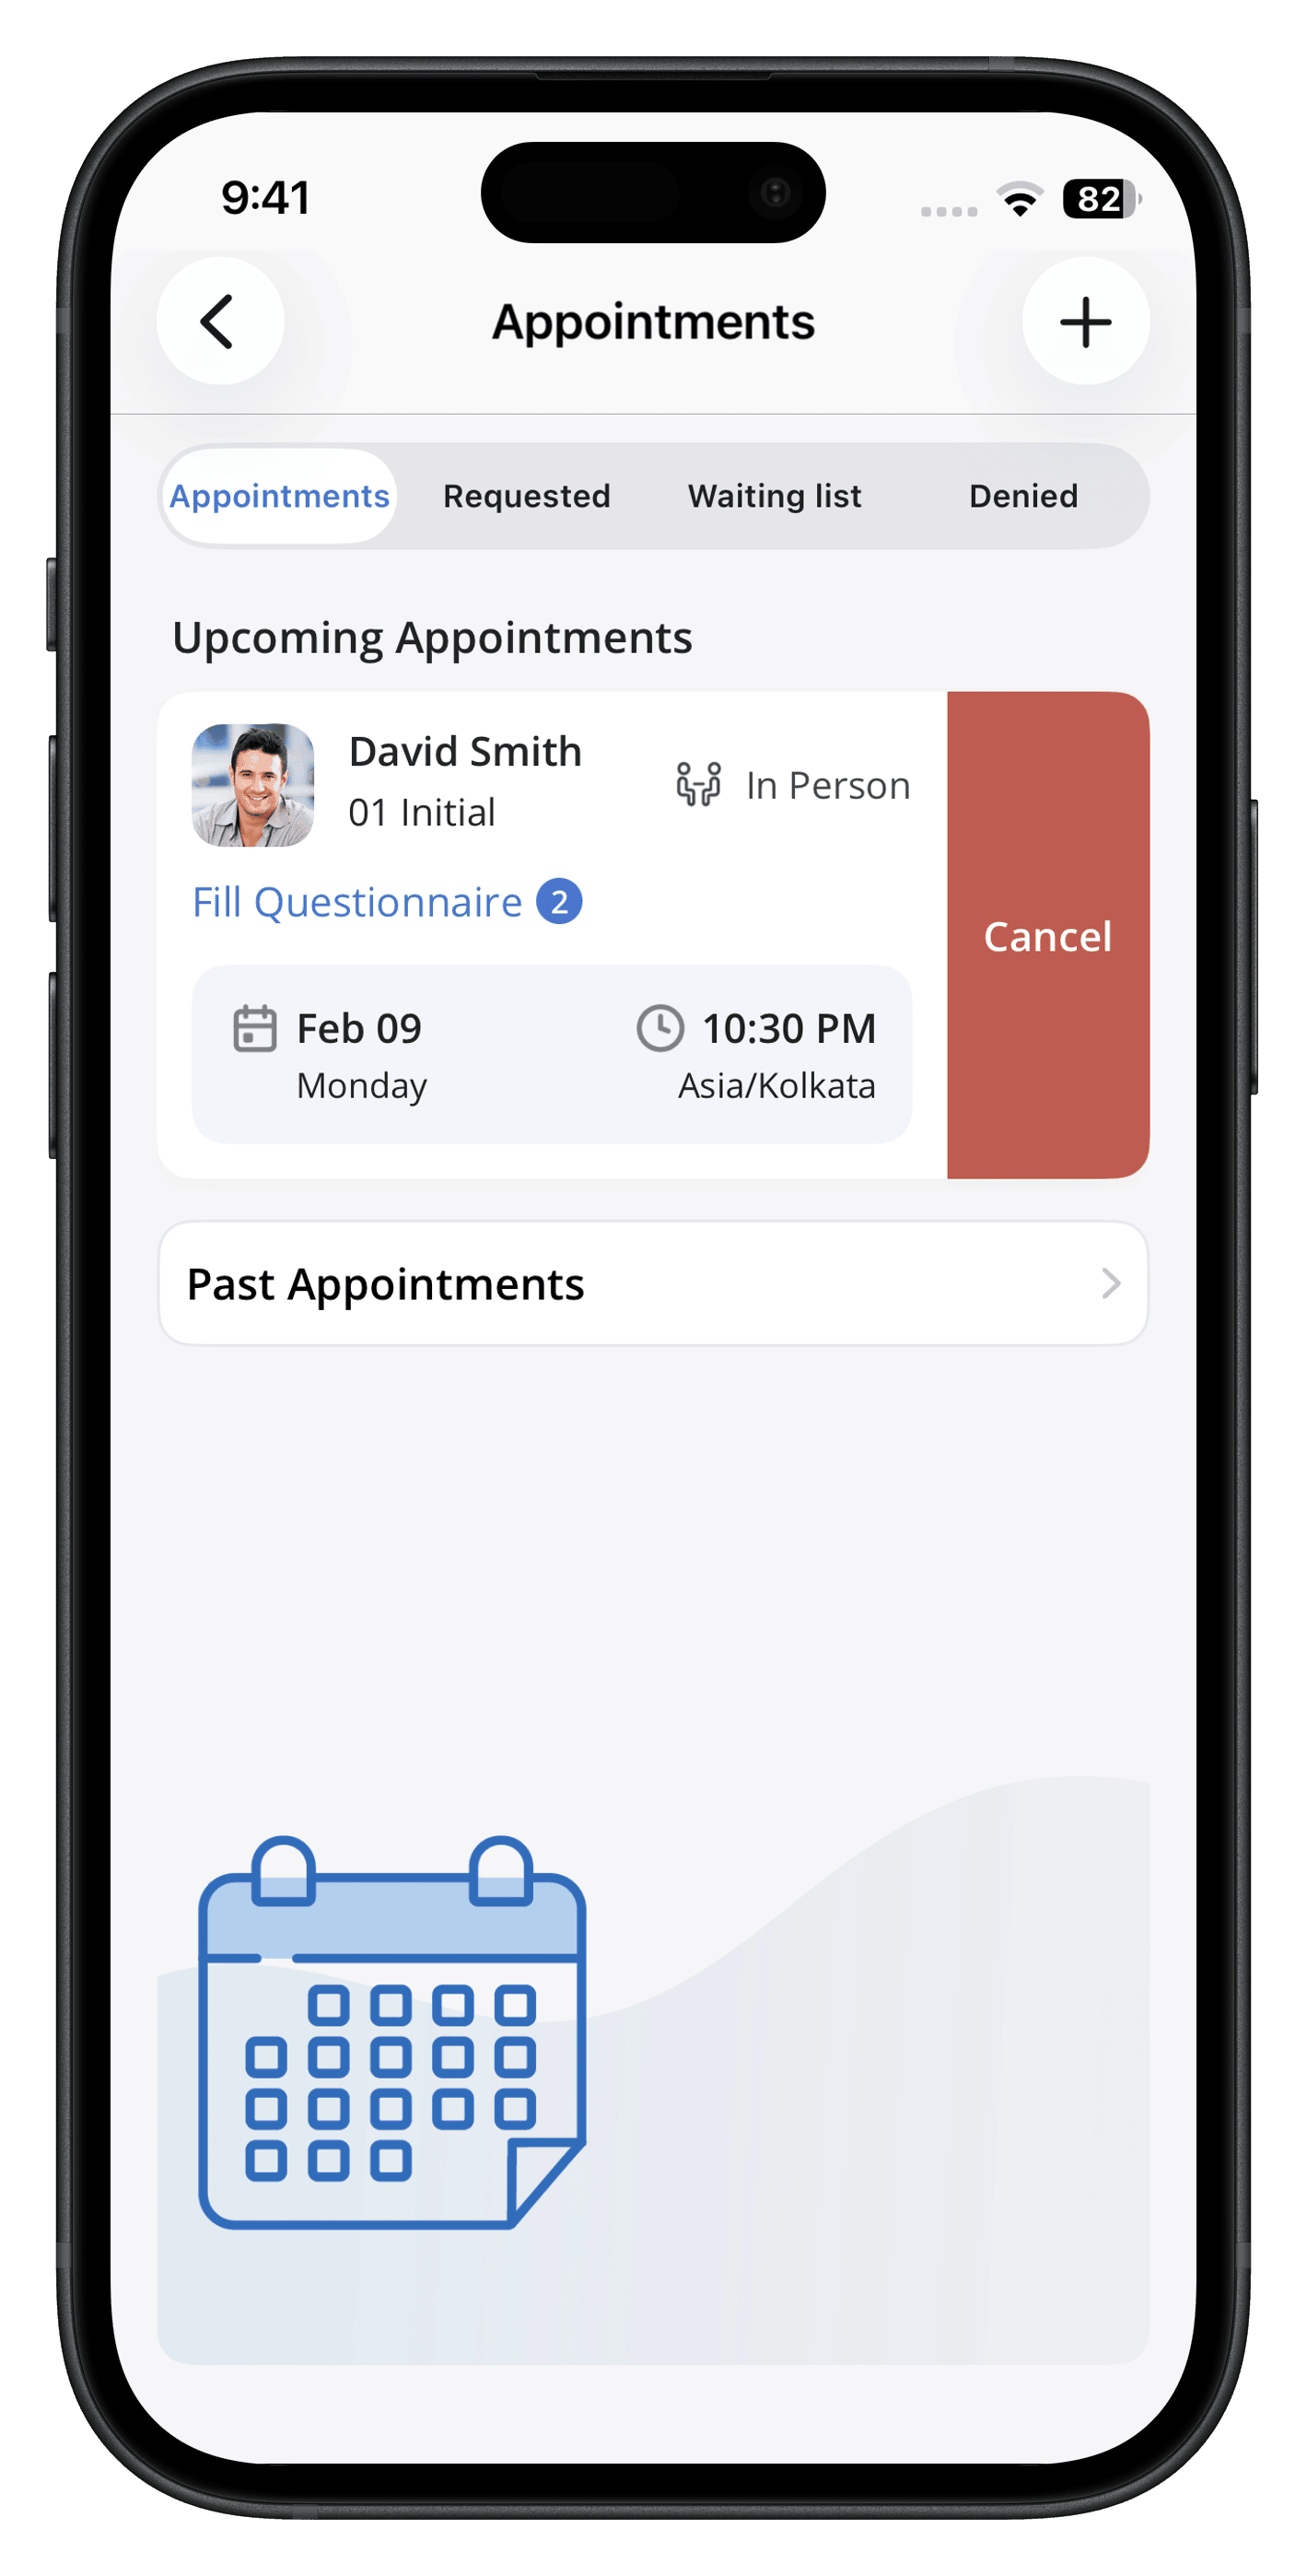
- Navigate to 'My Health > Appointments'.
- Select an appointment from the Upcoming tab.
- Swipe left and tap on the 'Cancel Appointment' button.
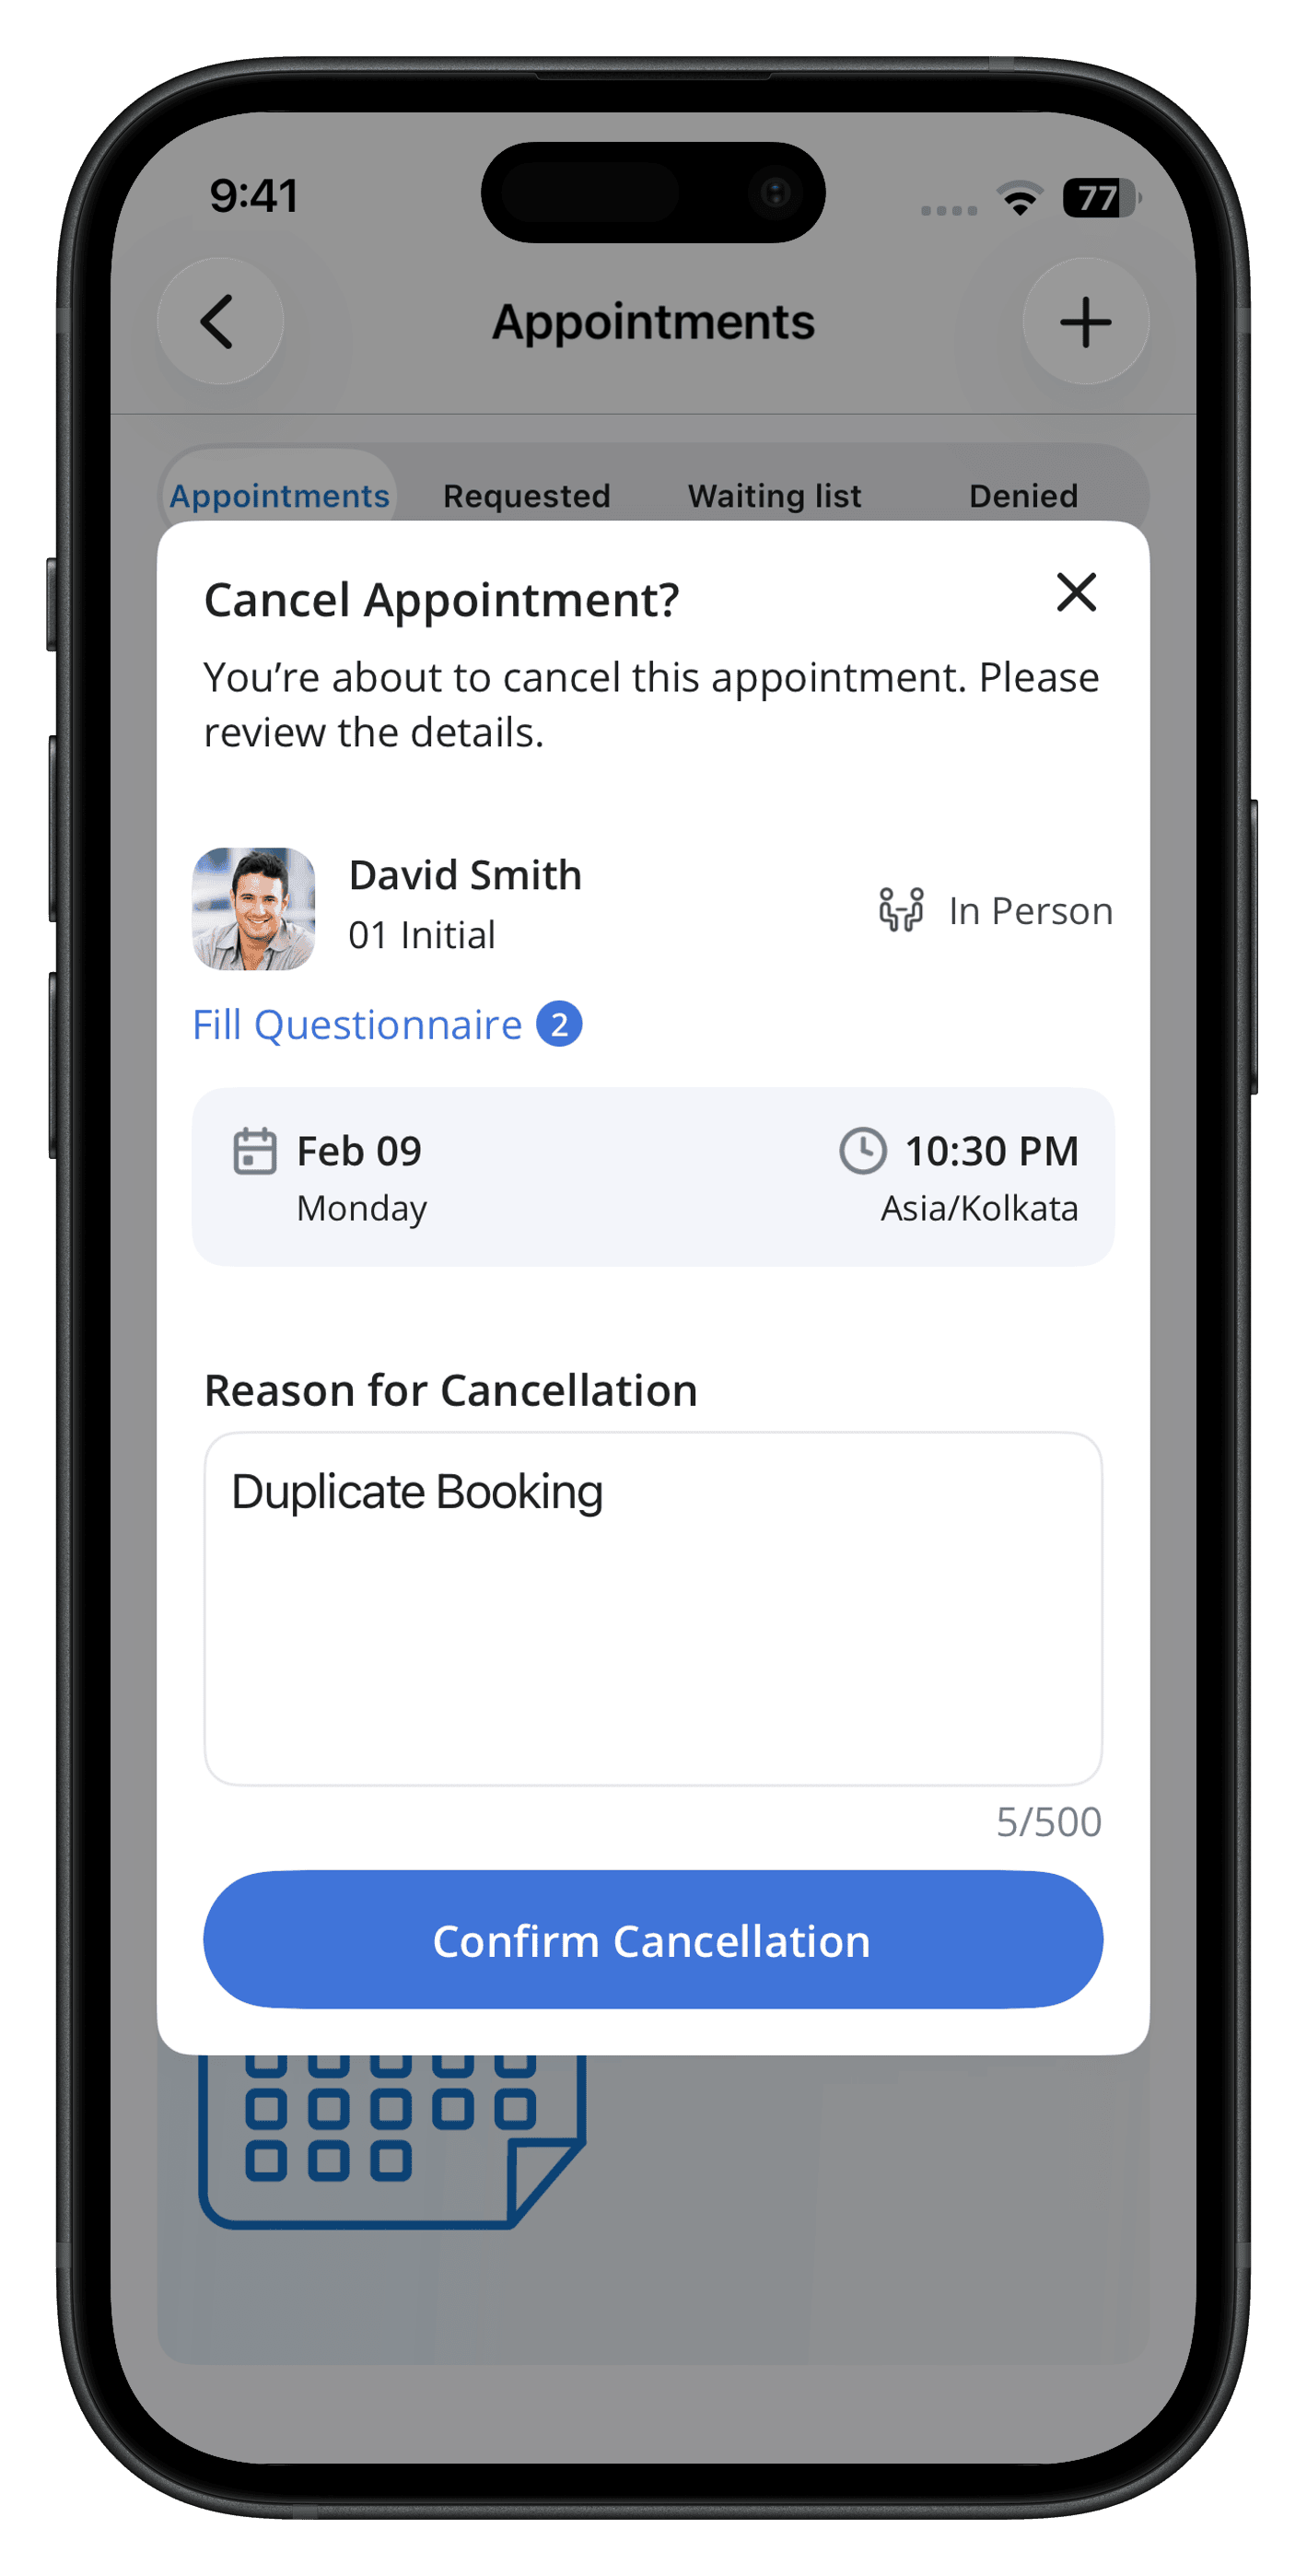
- Review the appointment details.
- Enter a reason for cancellation.
- Tap on the 'Confirm cancellation' Button.
The 'Denied' section displays all the Appointments denied by your provider.
TeleHealth Appointments
Patients can book and join TeleHealth video appointments right from their phones using the mPHR app.
Booking a TeleHealth Appointment
- Navigate to the 'My Health > Appointments' Section.
- Tap on the 'Add (+)' icon.
- Select your 'Practice', 'Facility', and 'Provider'.
- Choose a preferred date and time slot.
- Select 'Video Consultation' as the appointment type
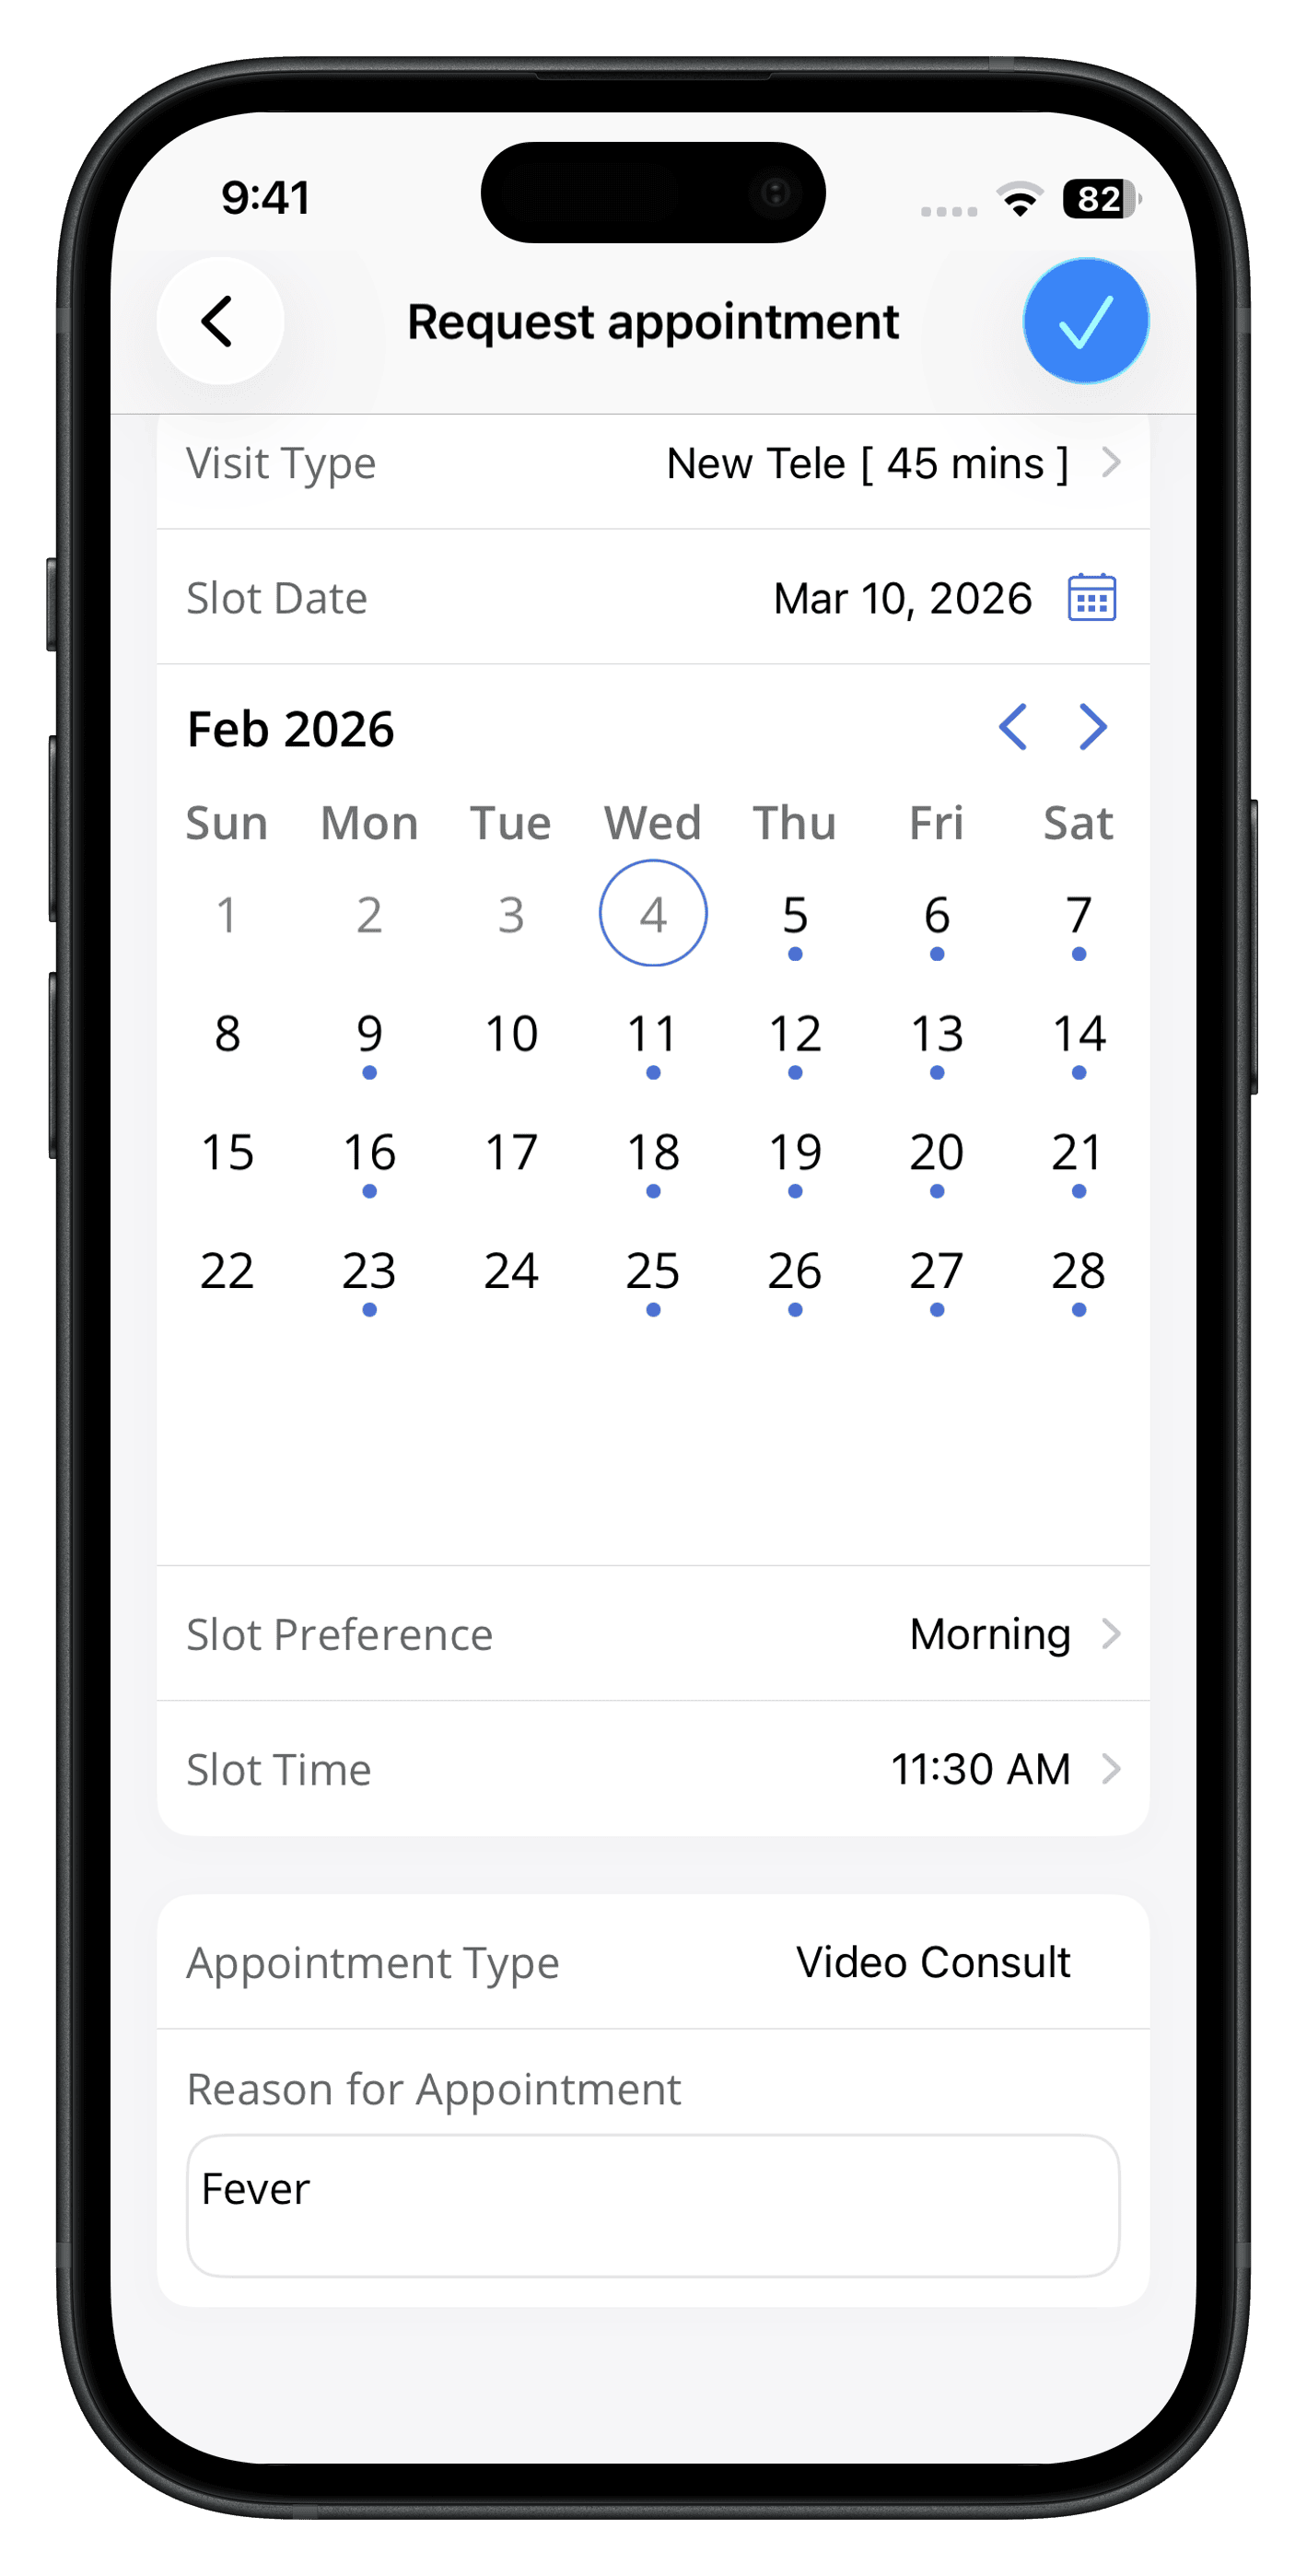
- Enter a reason for the appointment.
- Tap on the 'Done' icon.
Joining a TeleHealth Consultation
Patients can join a TeleHealth session up to a practice-configured joining window.
- Locate the appointment under Upcoming Appointments in the Dashboard or in the 'Appointments' section.
- Tap on the 'Join' button.
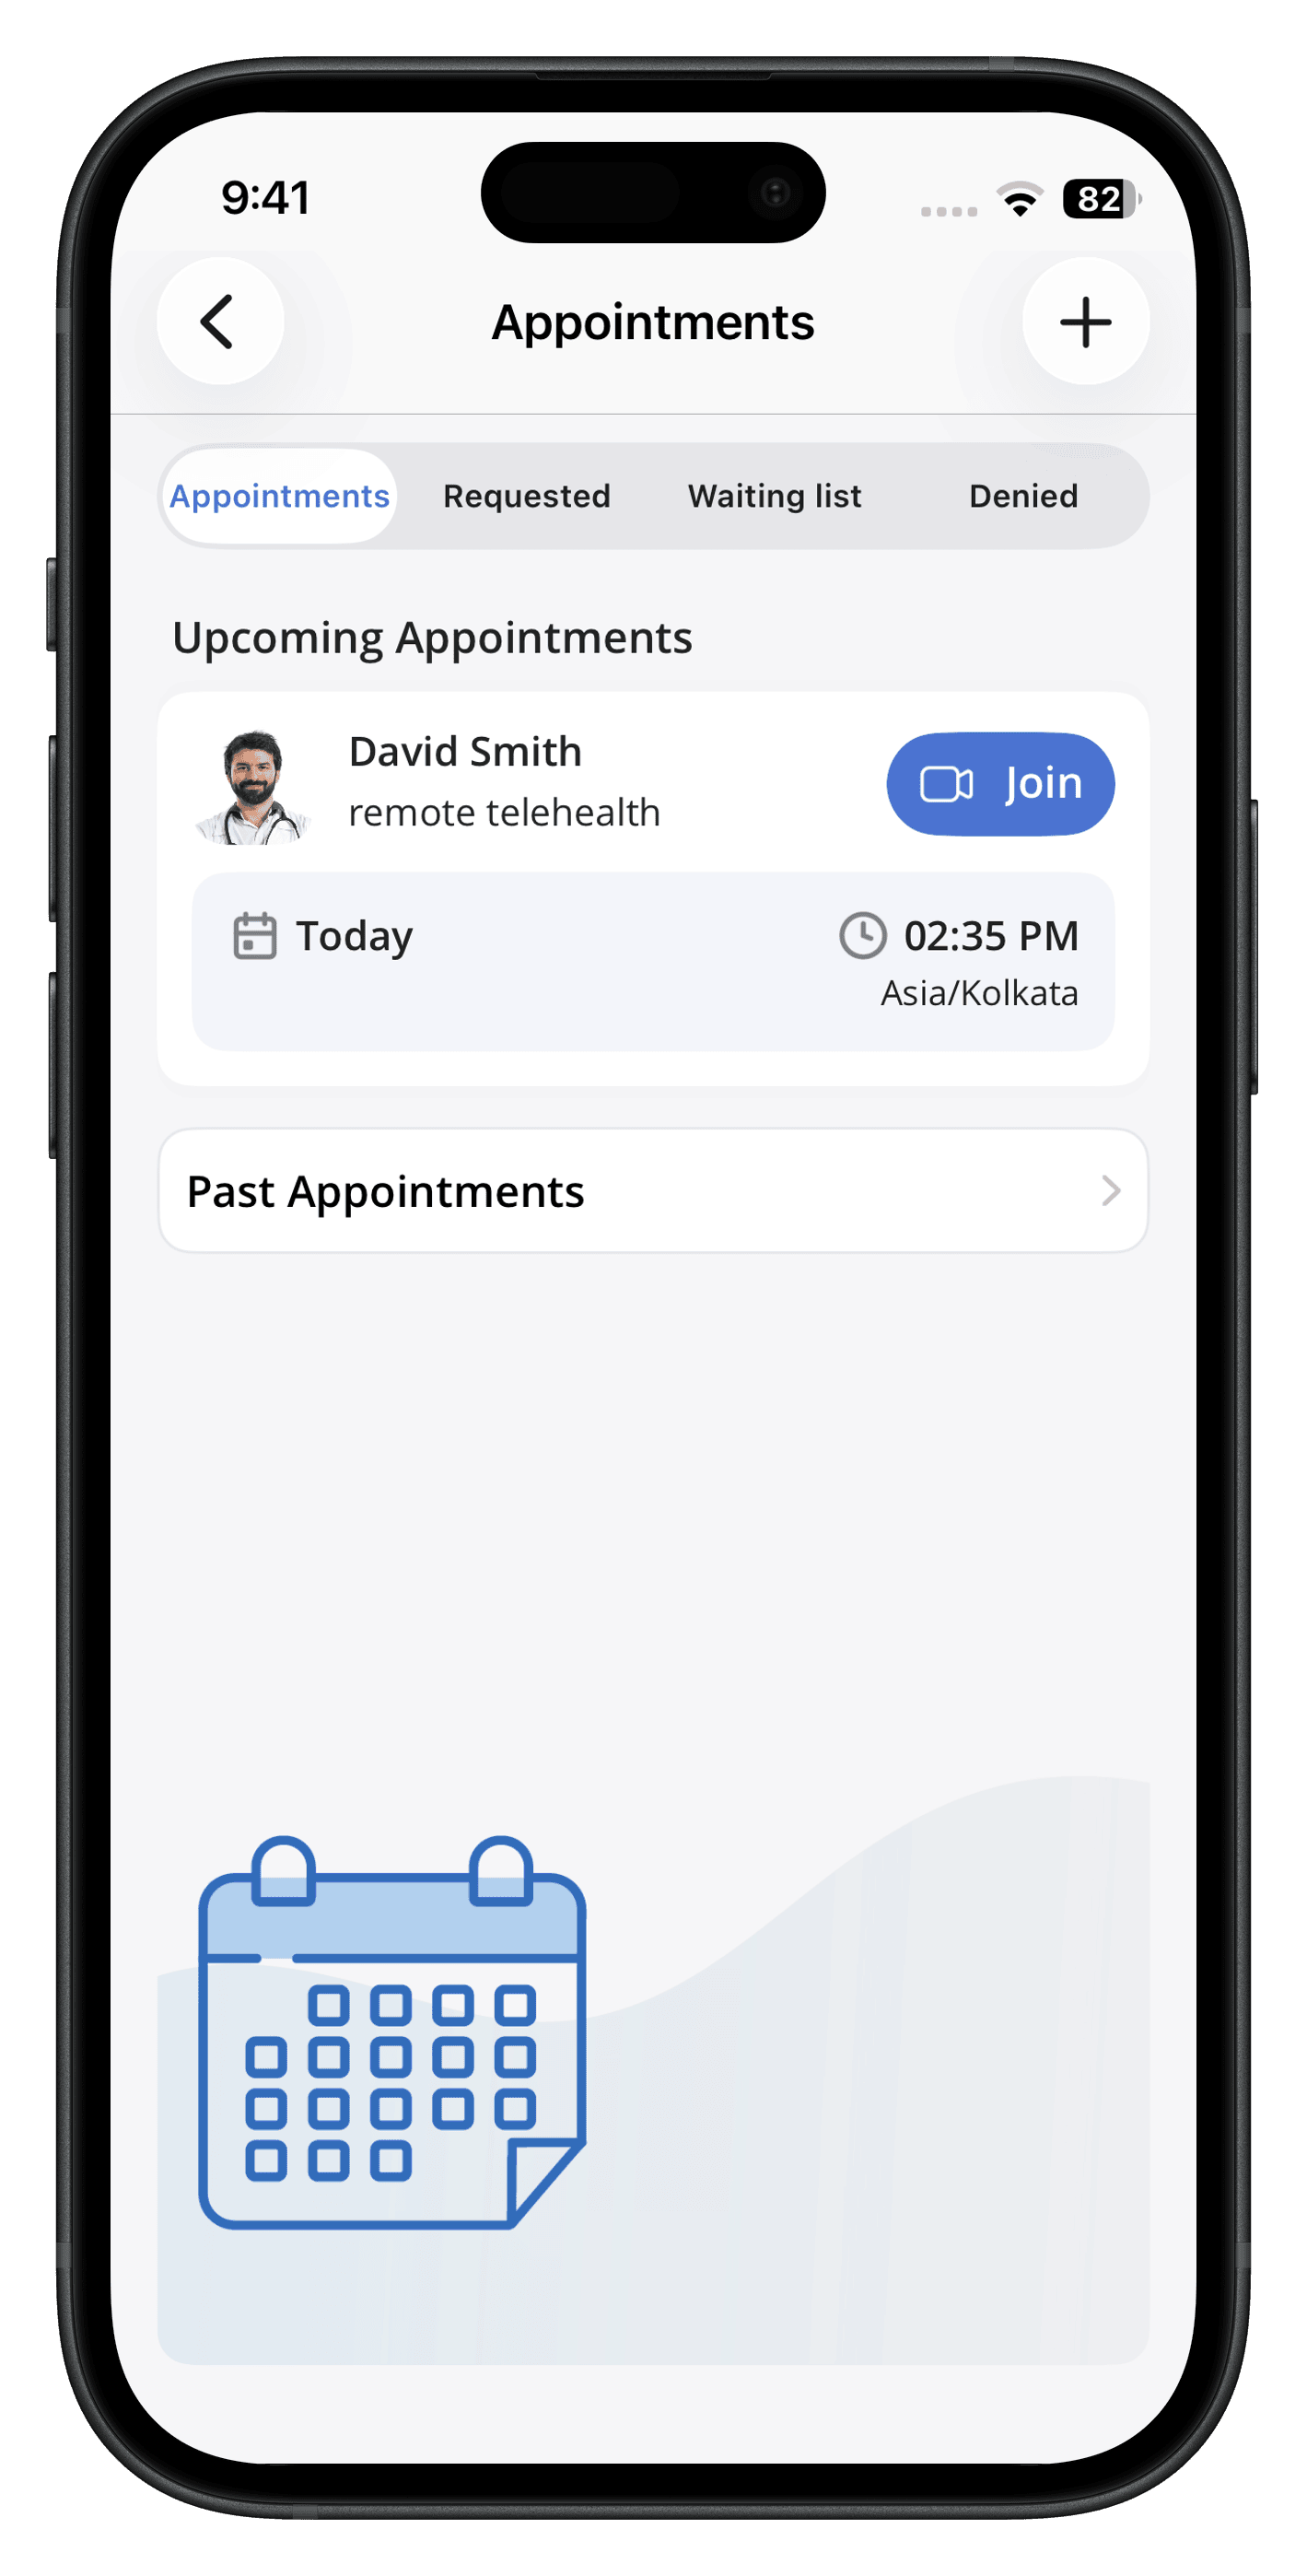
If your Provider has not joined, please wait for them to start the visit.
Flowsheets
Your Provider might request that you record health information such as your daily glucose or blood pressure readings in the 'Flowsheets' section of the mPHR app. Flowsheets help record and monitor your health over time.
When you enter the readings, your provider automatically receives the inputs.
Filling Flowsheets:
- Navigate to the 'My Health > Flowsheets' section,
- Select the relevant flowsheet to view or edit your entries.
- Tap on the 'Add (+)' icon to add new observations.

- Tap on the 'Done' icon.
Note: A warning message will appear when saving the flowsheets if the entered values are significantly abnormal compared to normal values.
Messages
The mPHR app allows you to communicate securely with your Practice or Provider and send or receive attachments such as lab reports and images.
ll Unread, incoming, and outgoing messages are displayed respectively under the 'Unread', 'Inbox', and 'Sent' tabs in the 'Messages' section.
Sending a Message
Messages can be composed from the Home page or the Messages section.
- Tap on the 'Add (+)' icon from the home page and choose 'Compose Message', or
- Navigate to 'My Health > Messages' and tap on the 'Compose' icon.
- Select your Provider.
- Enter the message subject and content.
- Use the attachment icon to upload files if required.

- Tap on the 'Send' icon.
Replying/Forwarding a Message
- Select a message from the Dashboard or Messages section.
- Tap on the Reply/Forward icon.
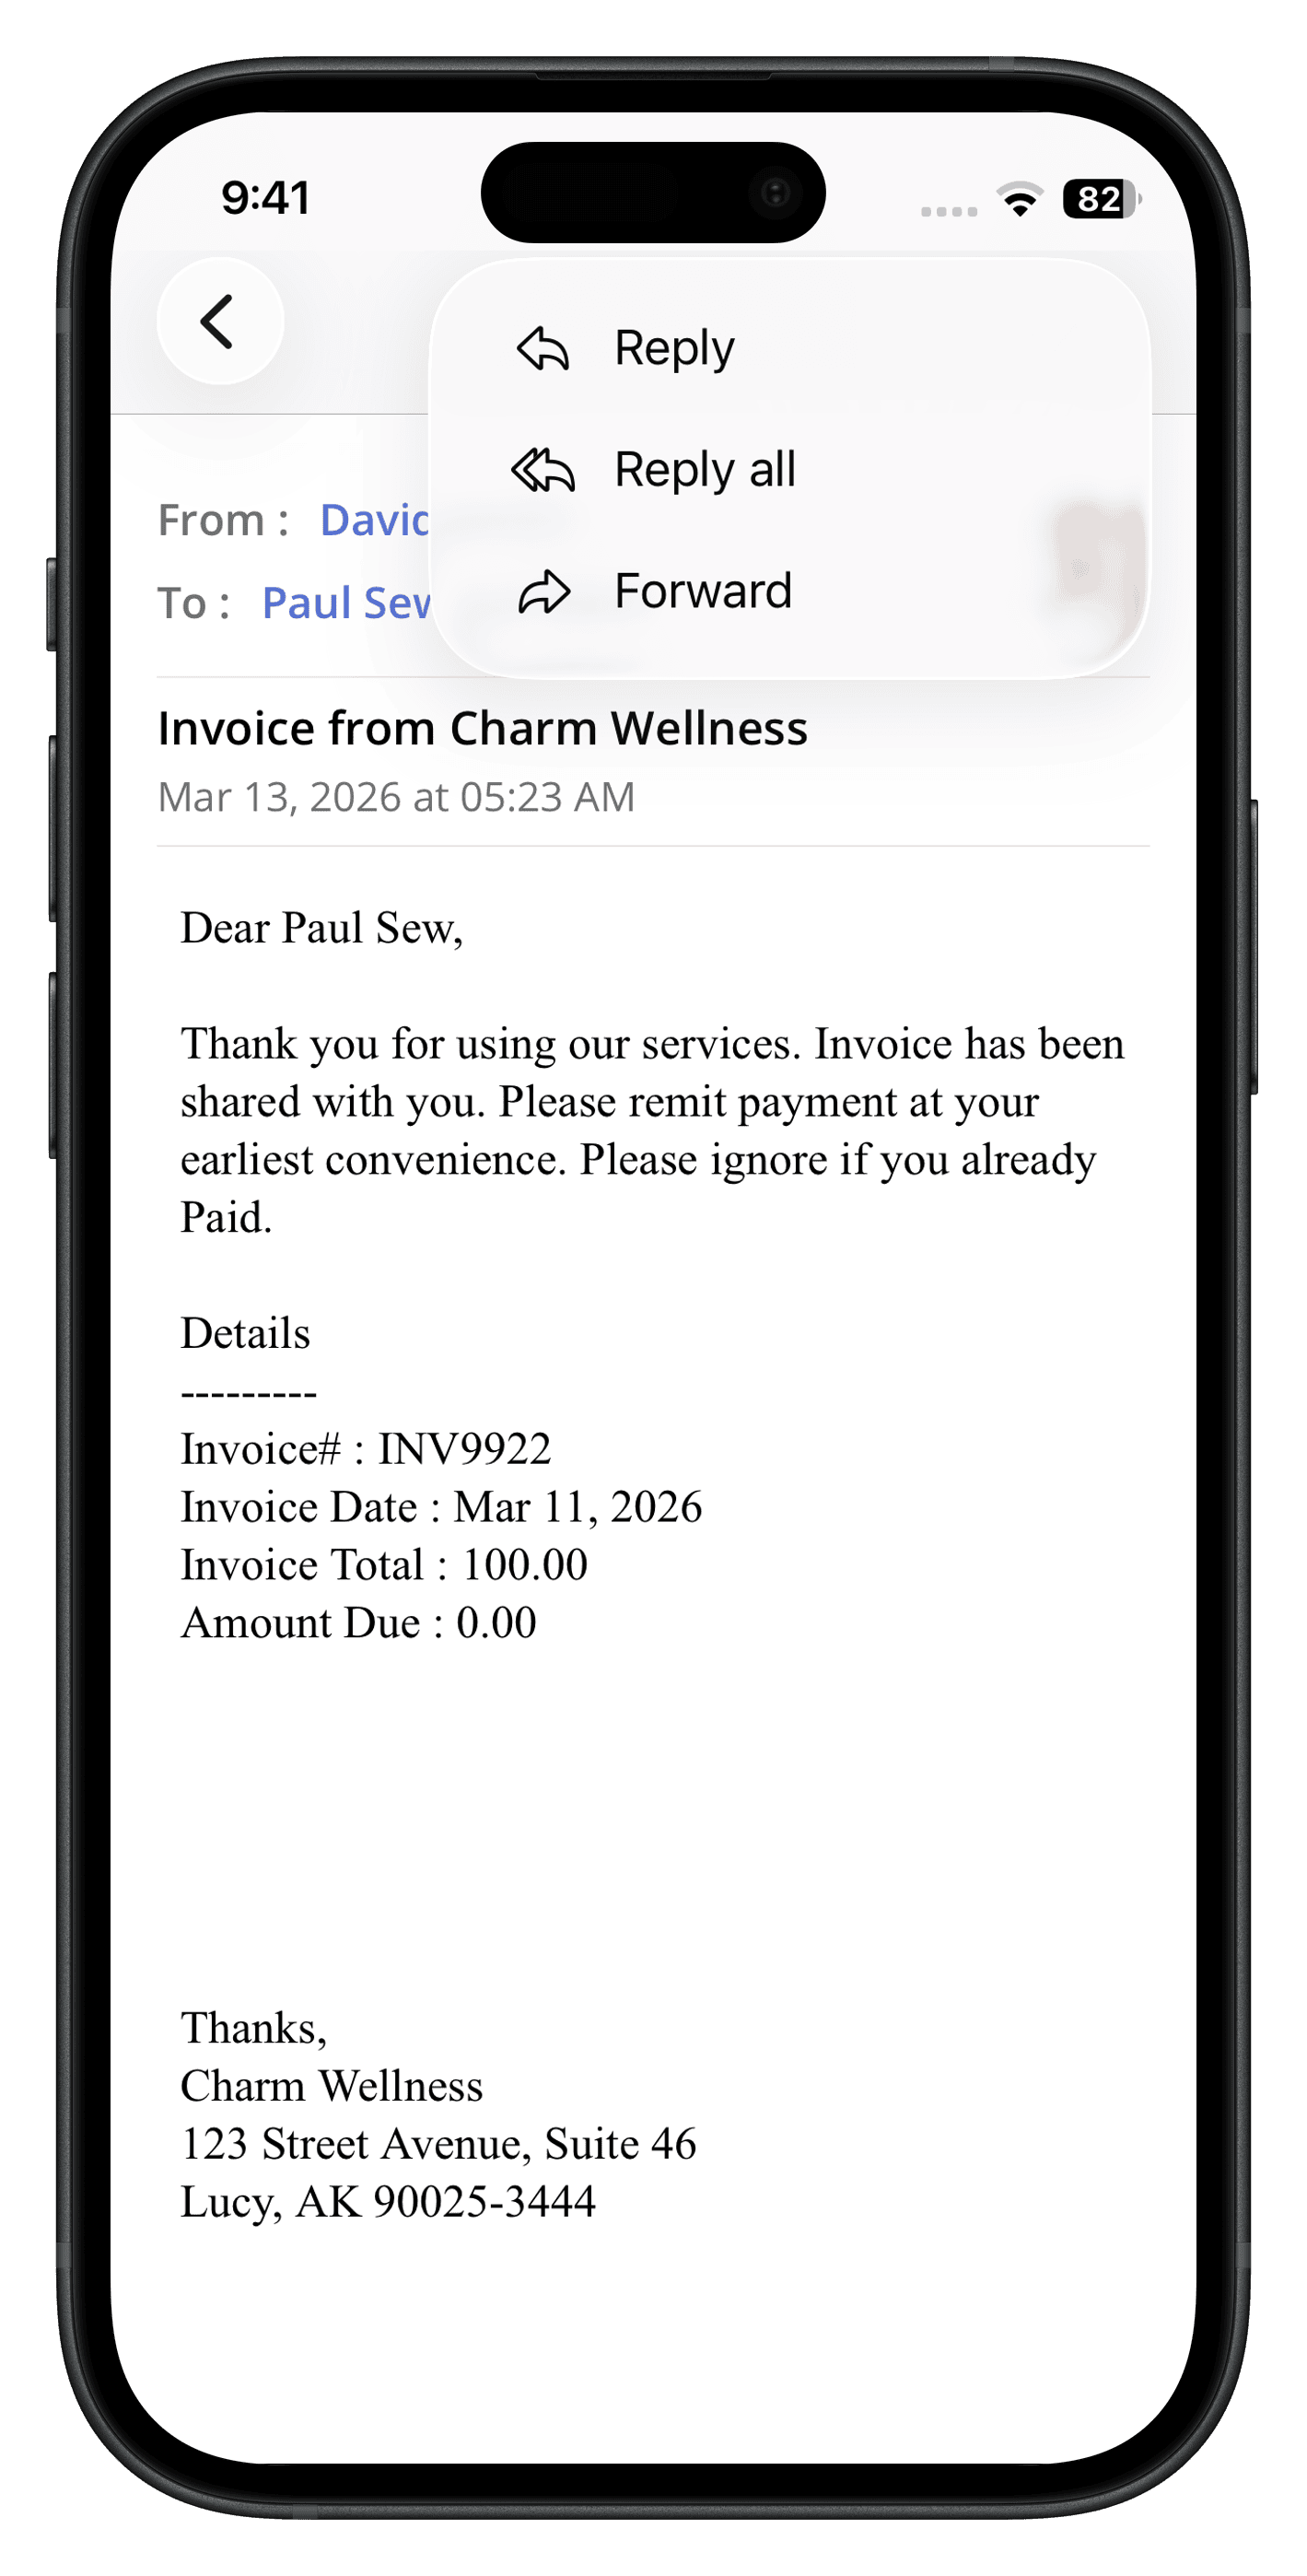
- Enter your response.
- Tap on the 'Send' icon.
Questionnaires
The Questionnaire section allows you to view and answer all the practice-shared questionnaires and consent forms. They help inform providers about the patients' health history before an encounter.
Questionnaires are grouped under the following tabs:
- Current – pending questionnaires
- Past – questionnaires from past appointments

Note: Questionnaires under the 'Past' tab are view-only. Users cannot fill in or make changes to them.
Filling up Pre-Visit Questionnaires
Before your scheduled appointment, the clinic may send you a questionnaire to complete. You can conveniently fill out these forms in the mPHR app in advance.
This can be done by :
- Navigate to the 'My Health > Questionnaires' section or 'Dashboard > Today's/ Upcoming Appointment and tap on the 'Fill Questionnaire' button.
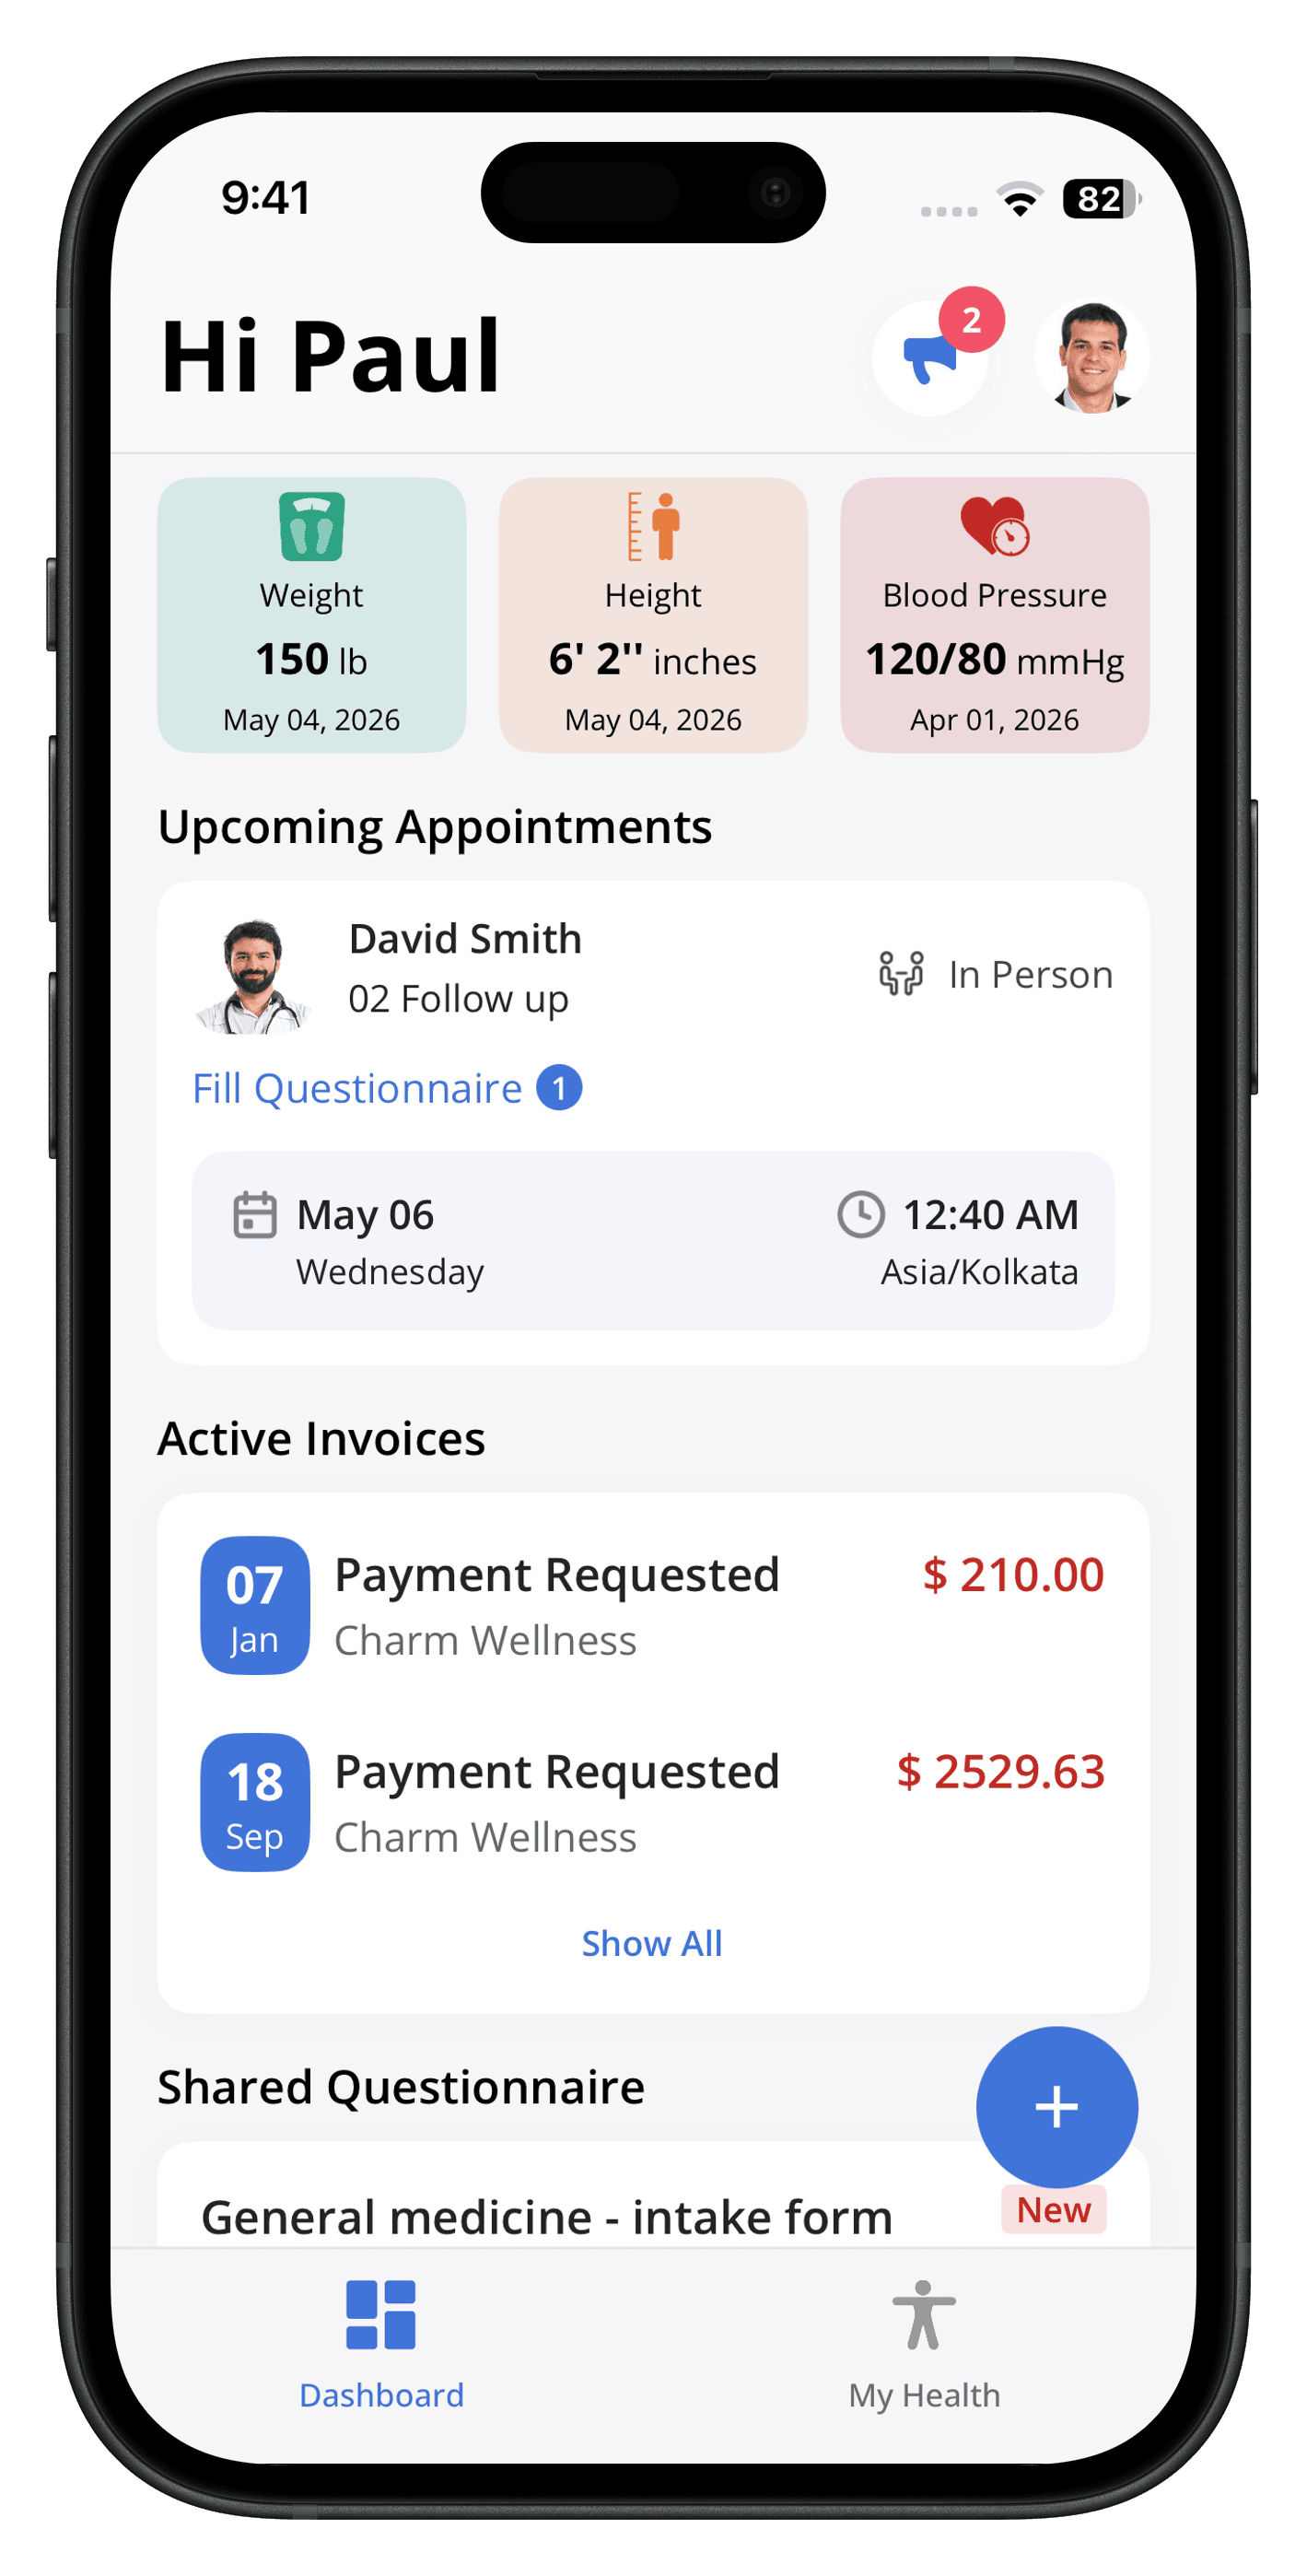
- Tap on the questionnaire that you need to complete from the 'Current' tab.
- Fill in the required fields.
- Tap on the 'Submit' button.

Note: You can view the completion status against each questionnaire.
Reminders
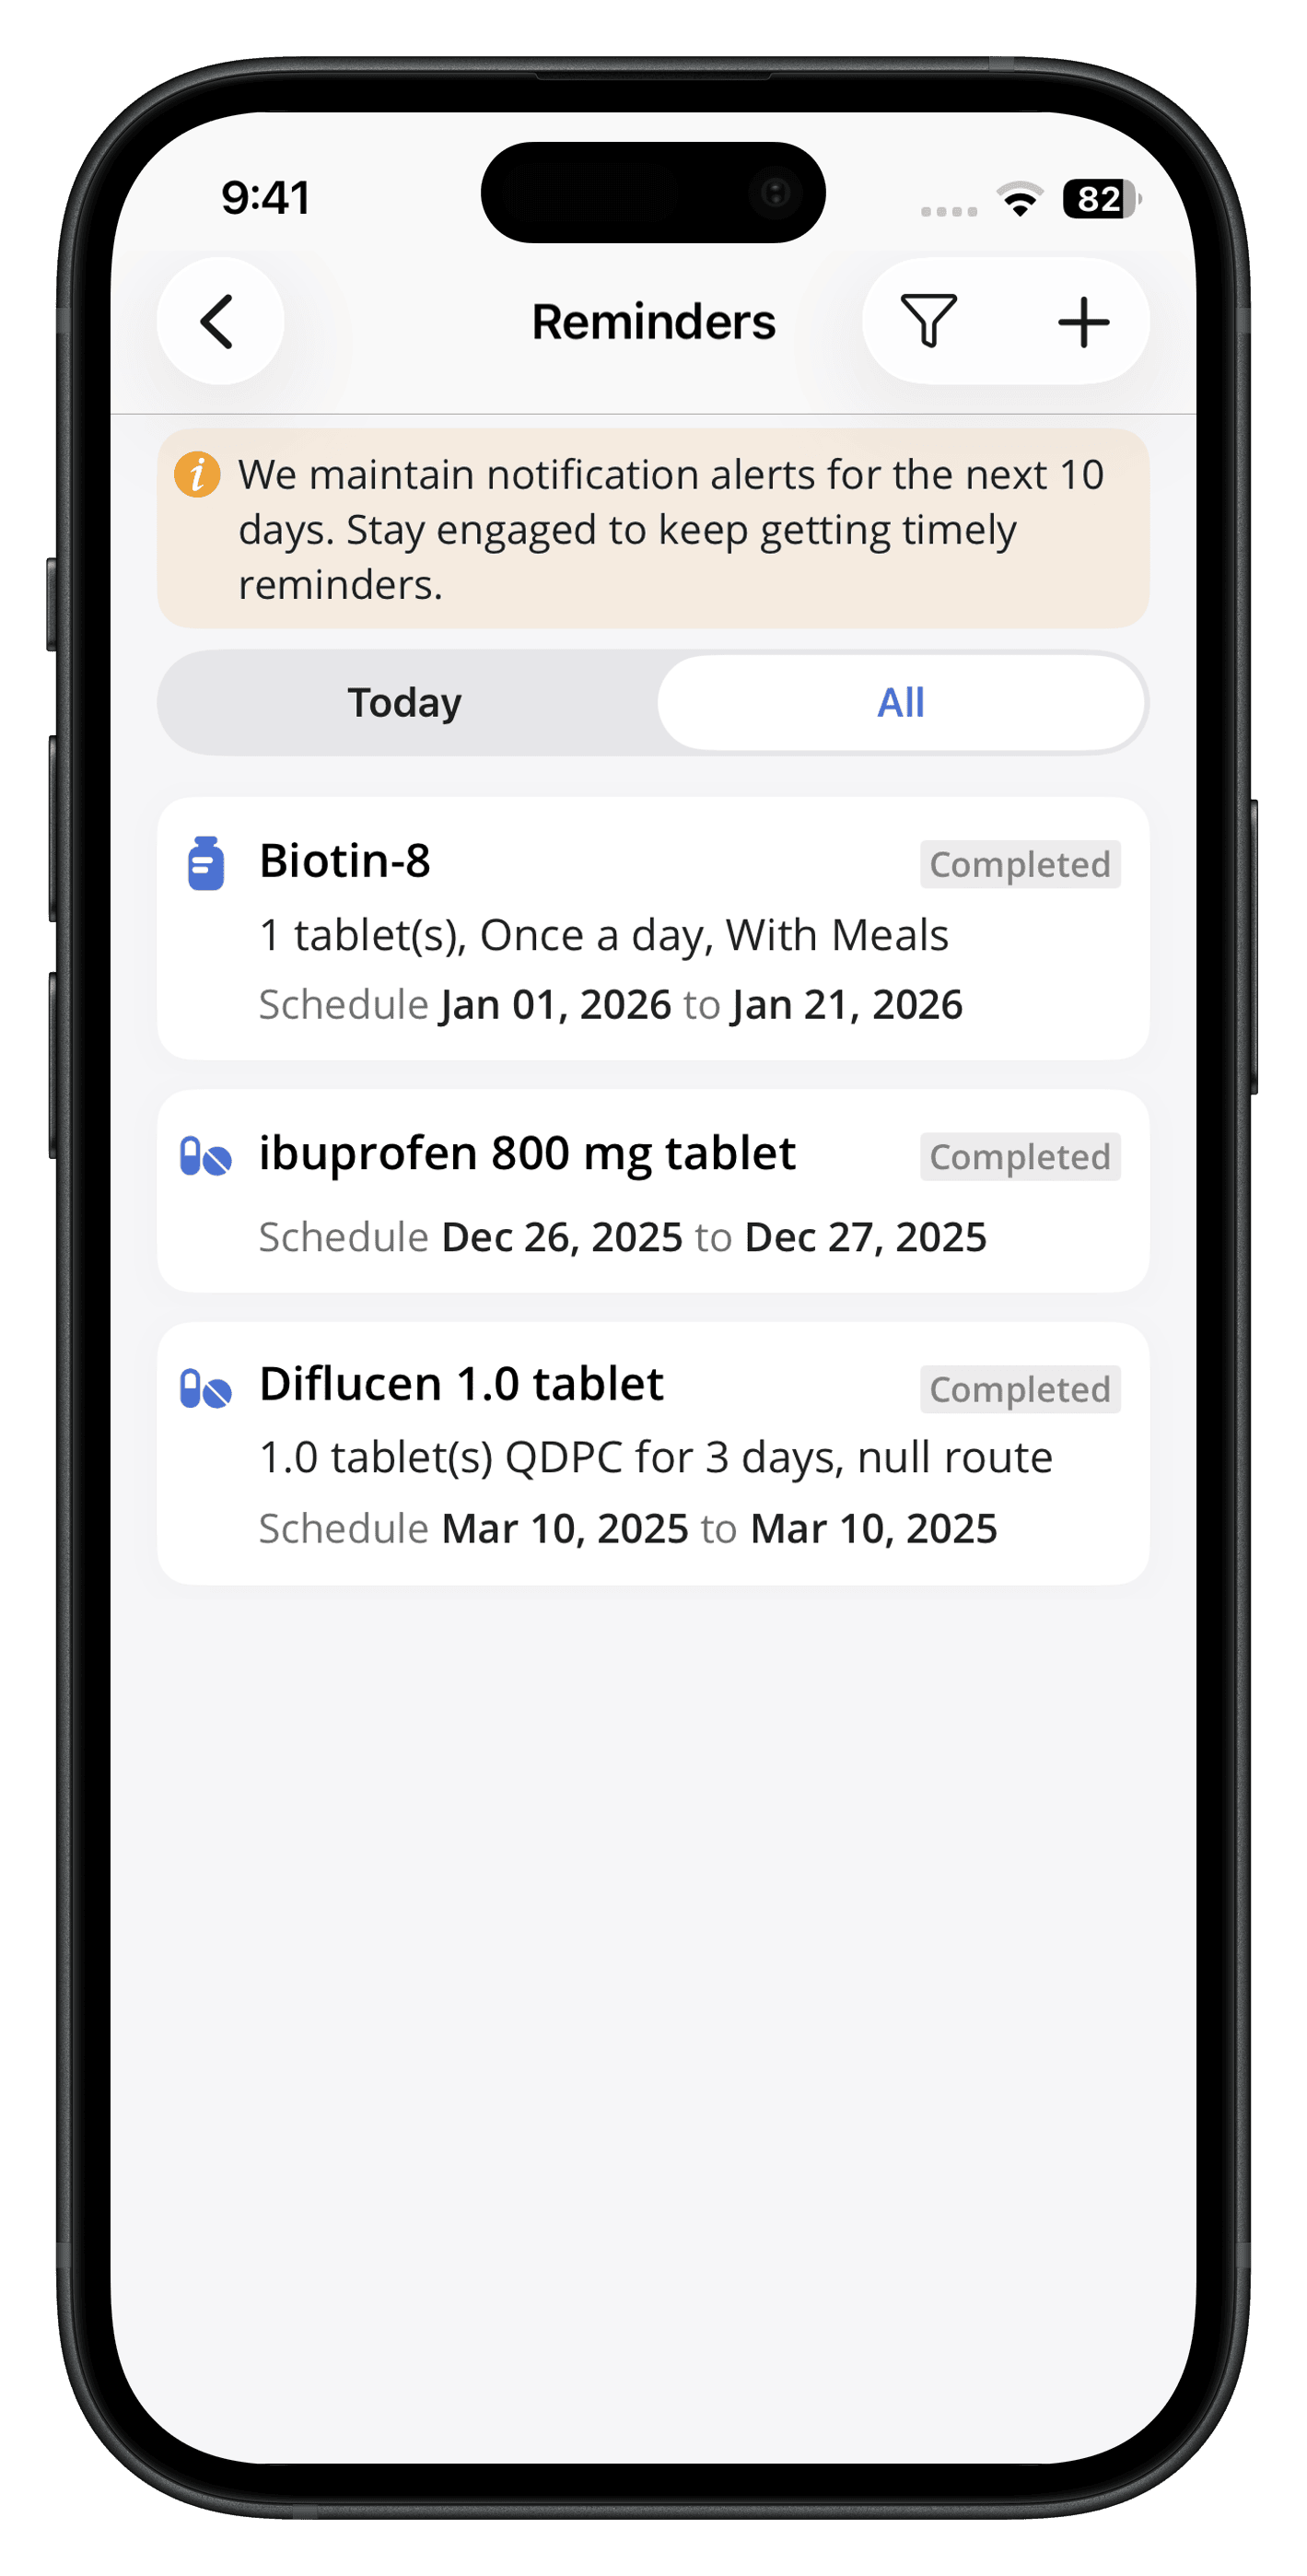
The Reminders feature allows you to set reminders to ensure medications and supplements are taken on time.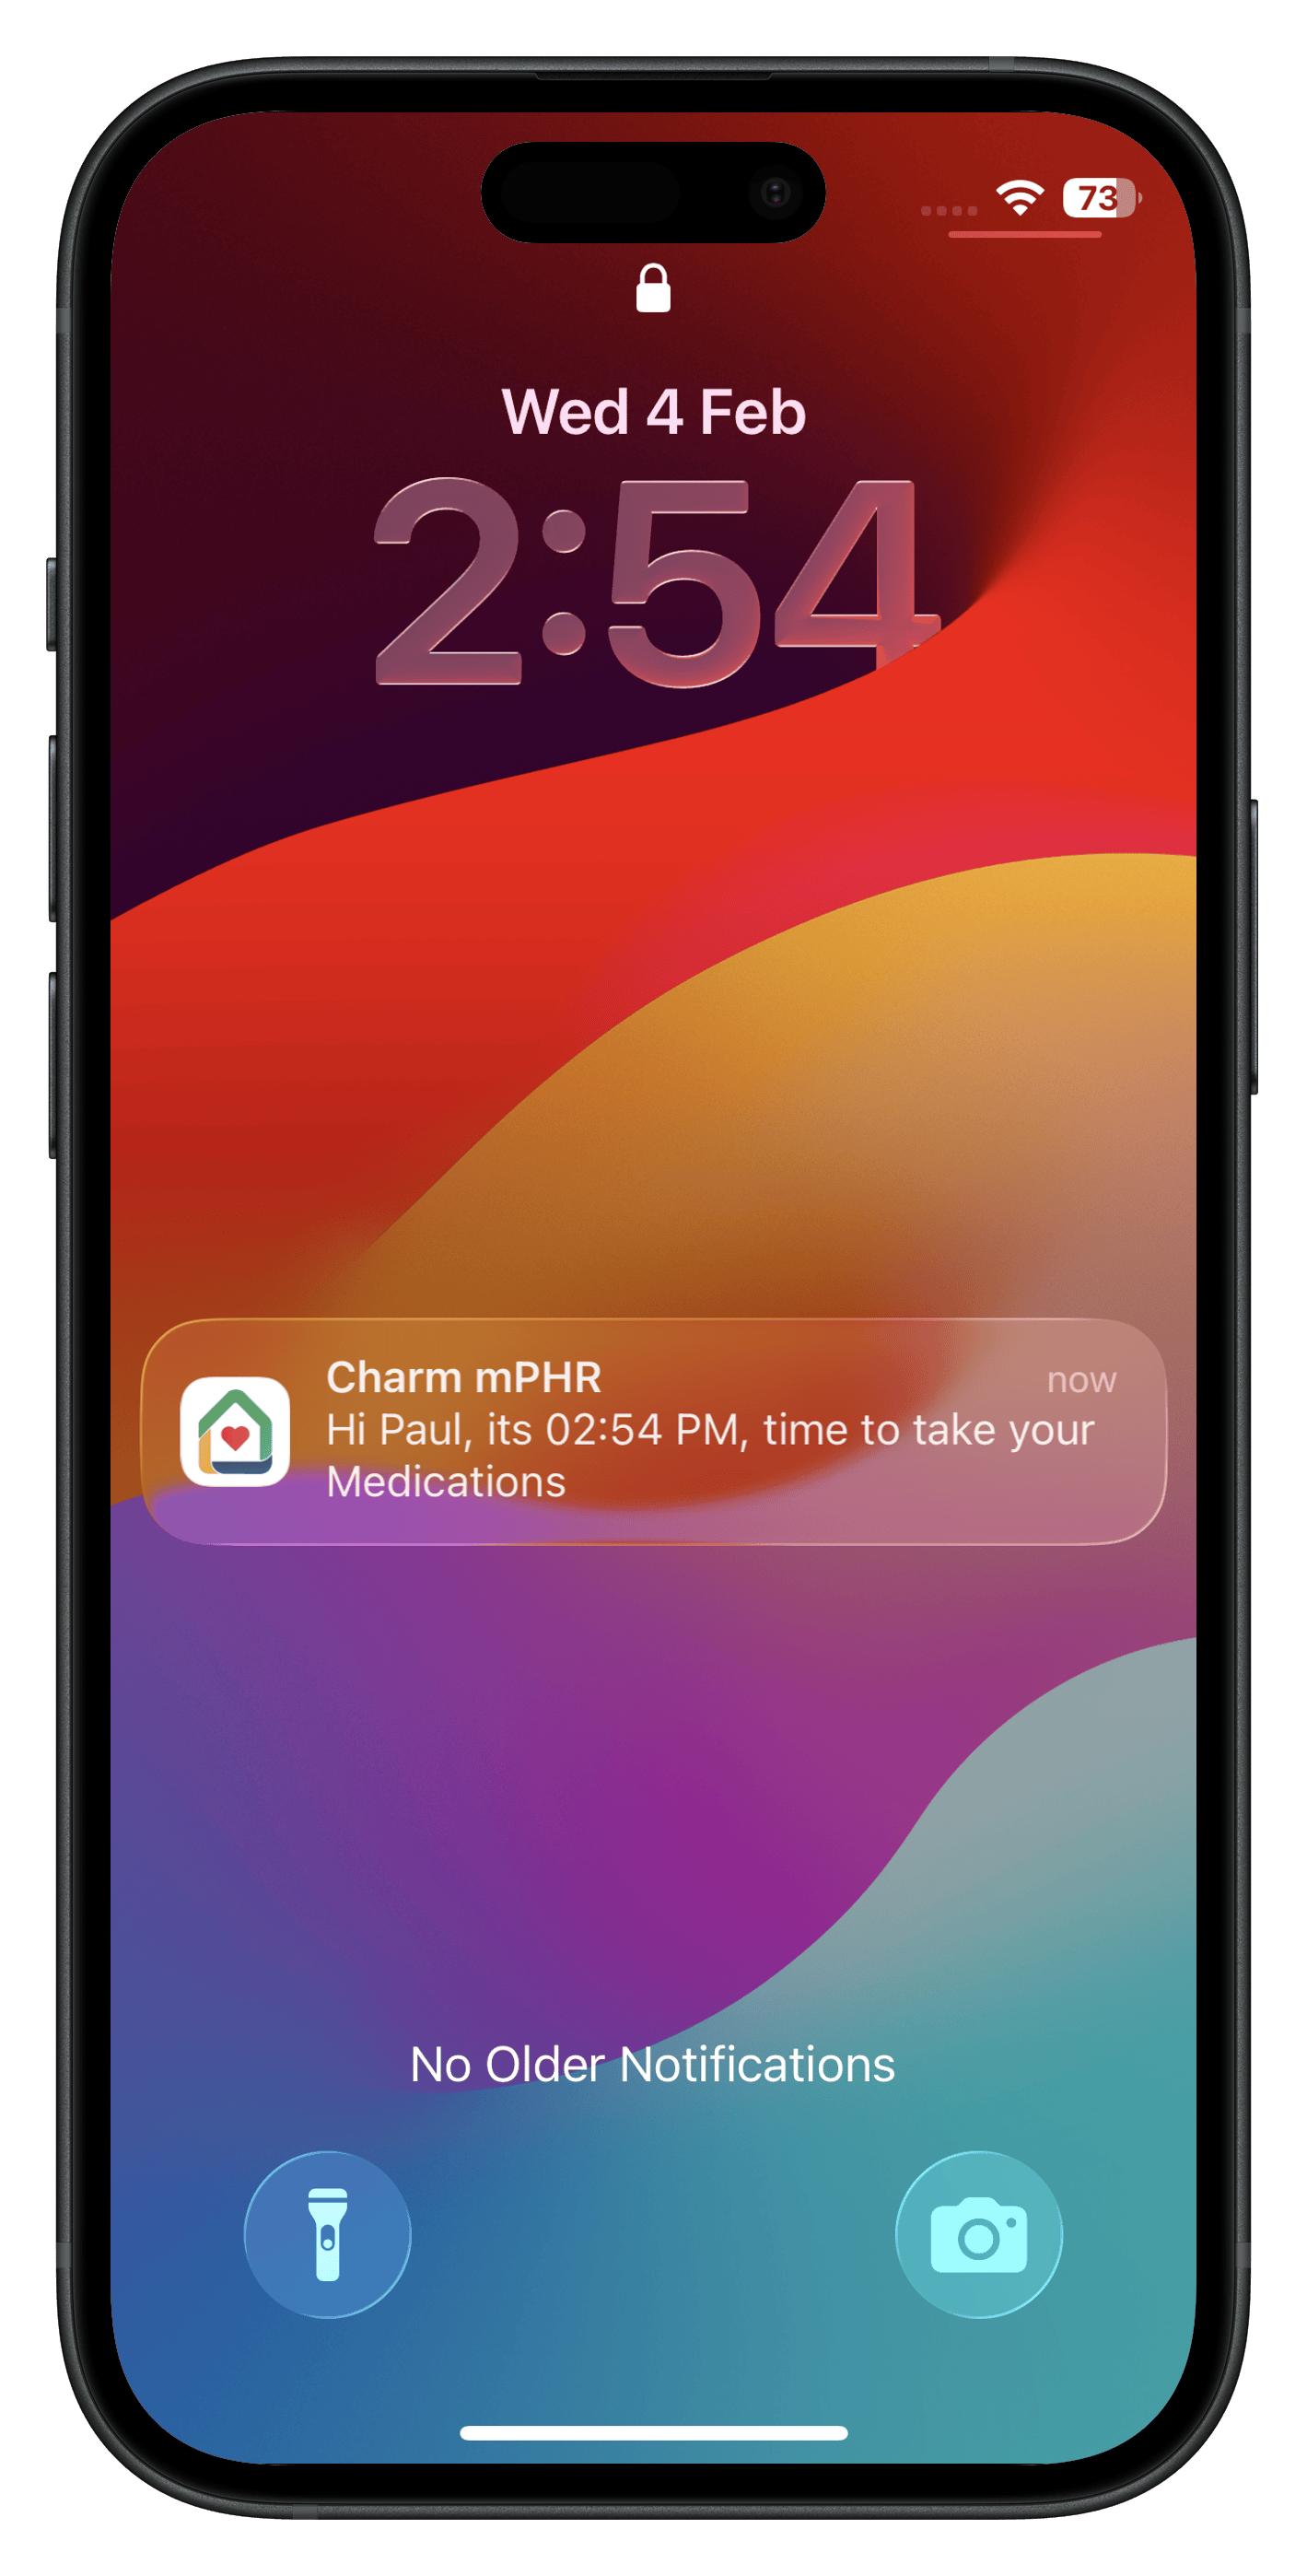
Creating a Reminder
- Navigate to the 'My Health > Reminders' section.
- Tap on the 'Add (+)' icon.
- Select the 'Medication' or 'Supplement' option.
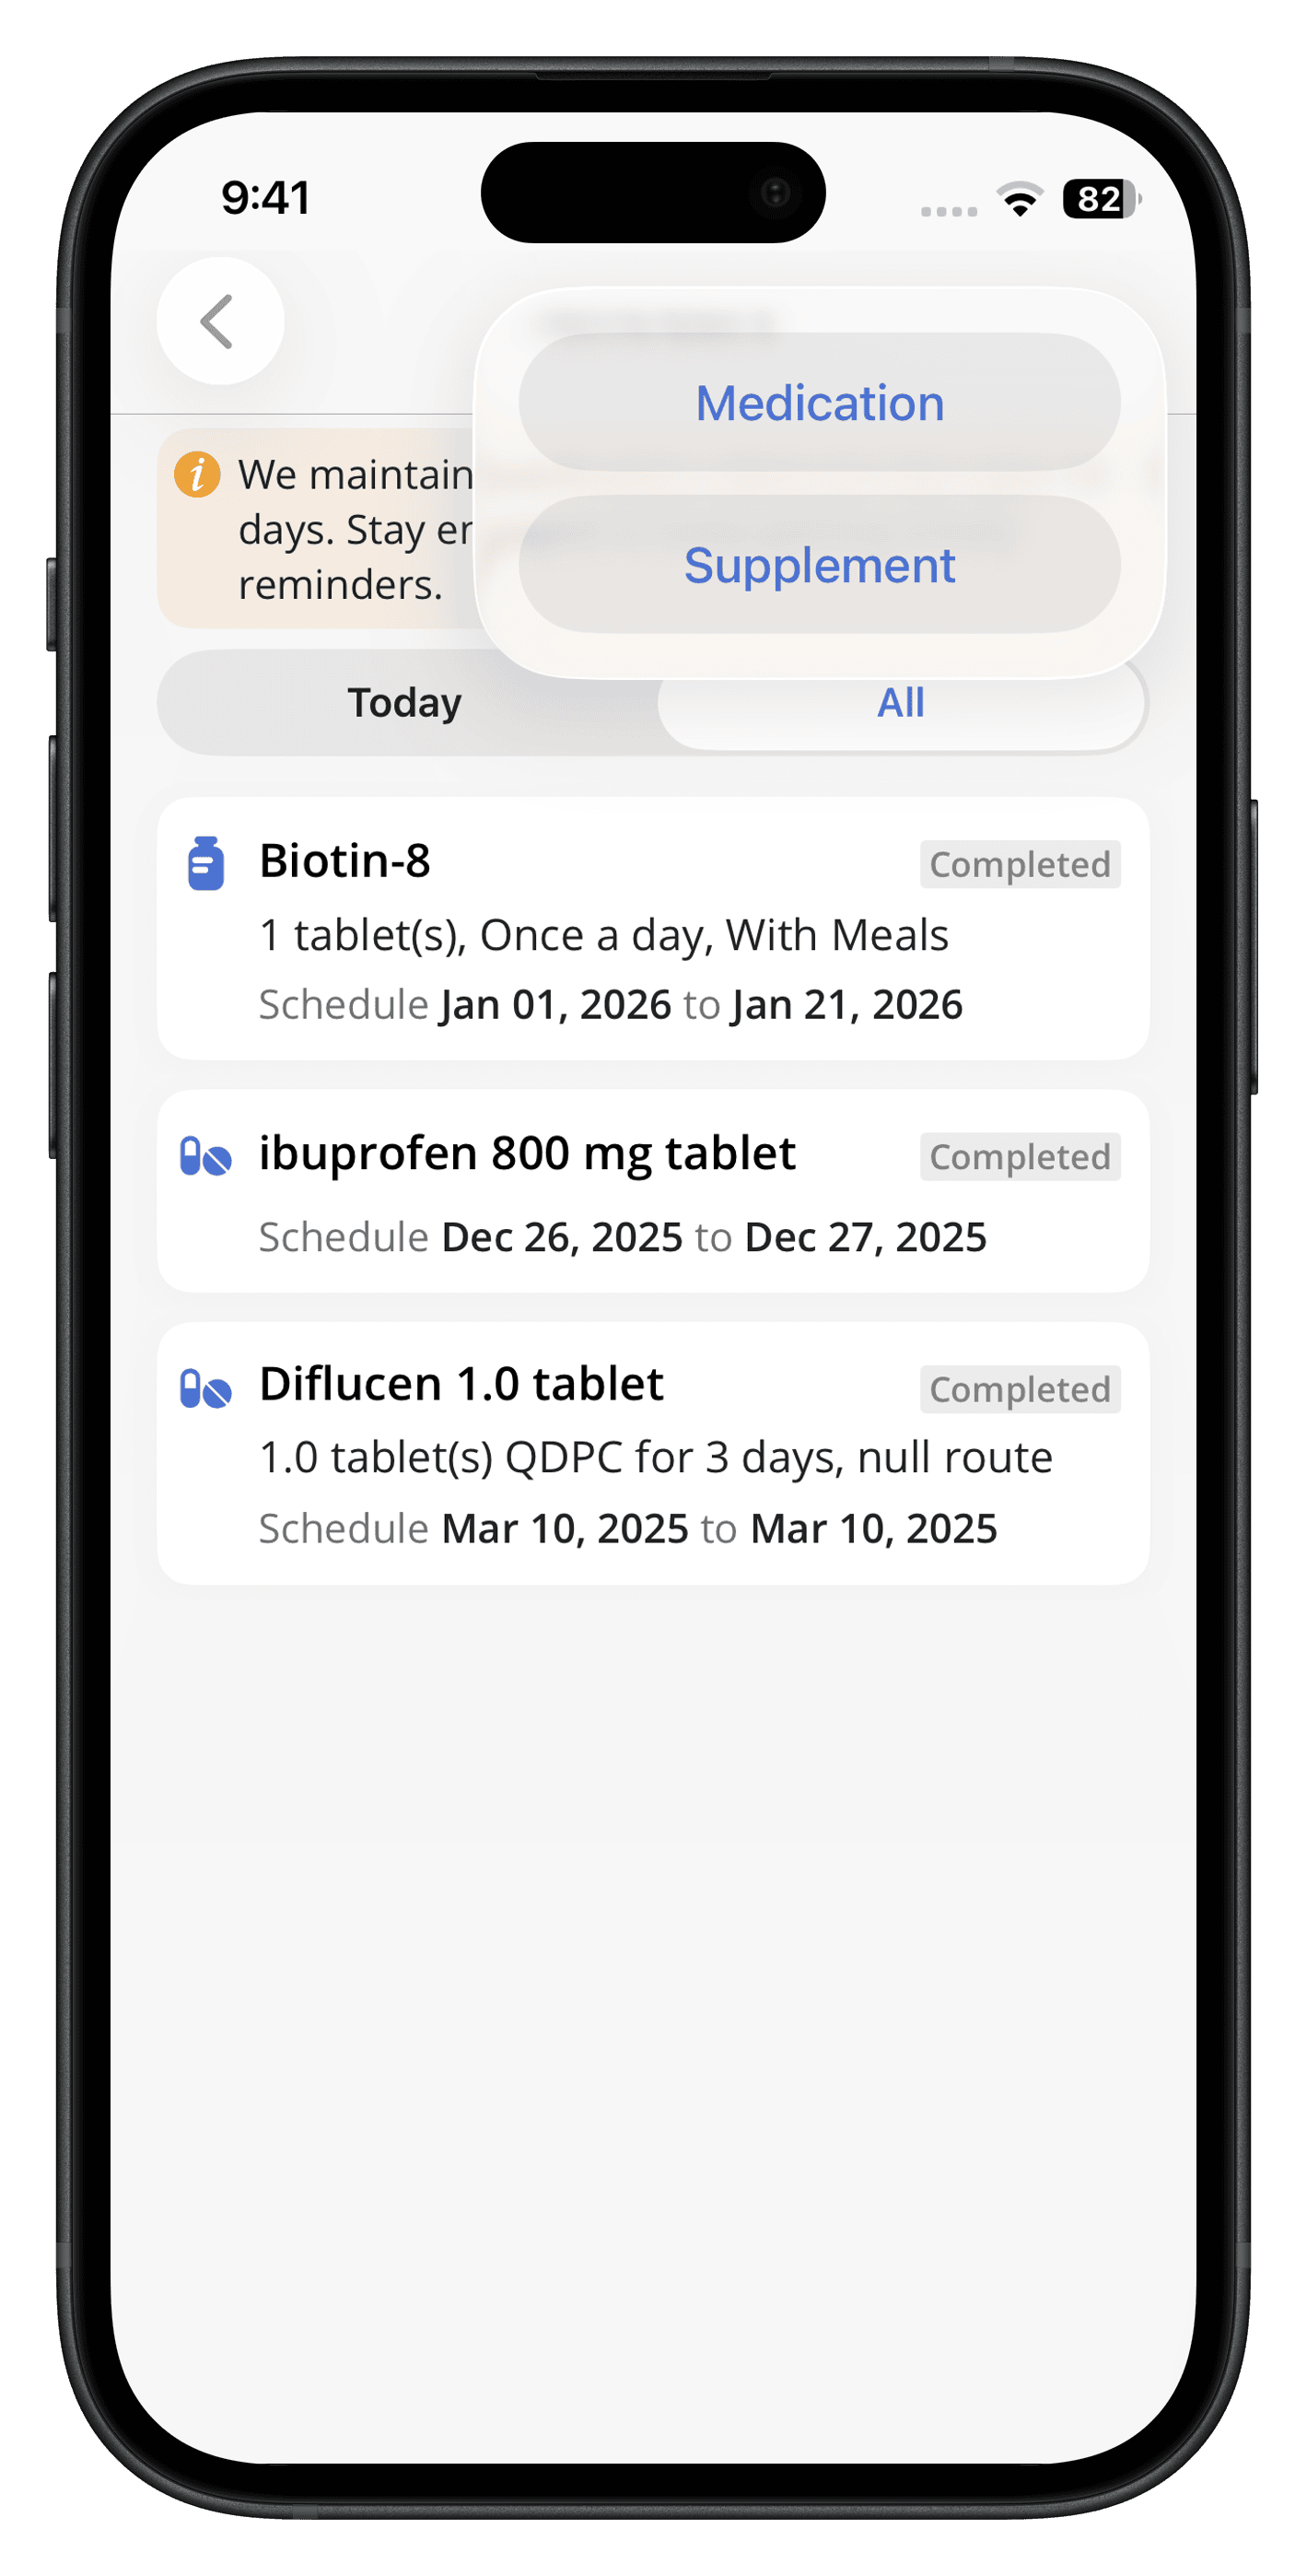
- Choose an active Medication or Supplement
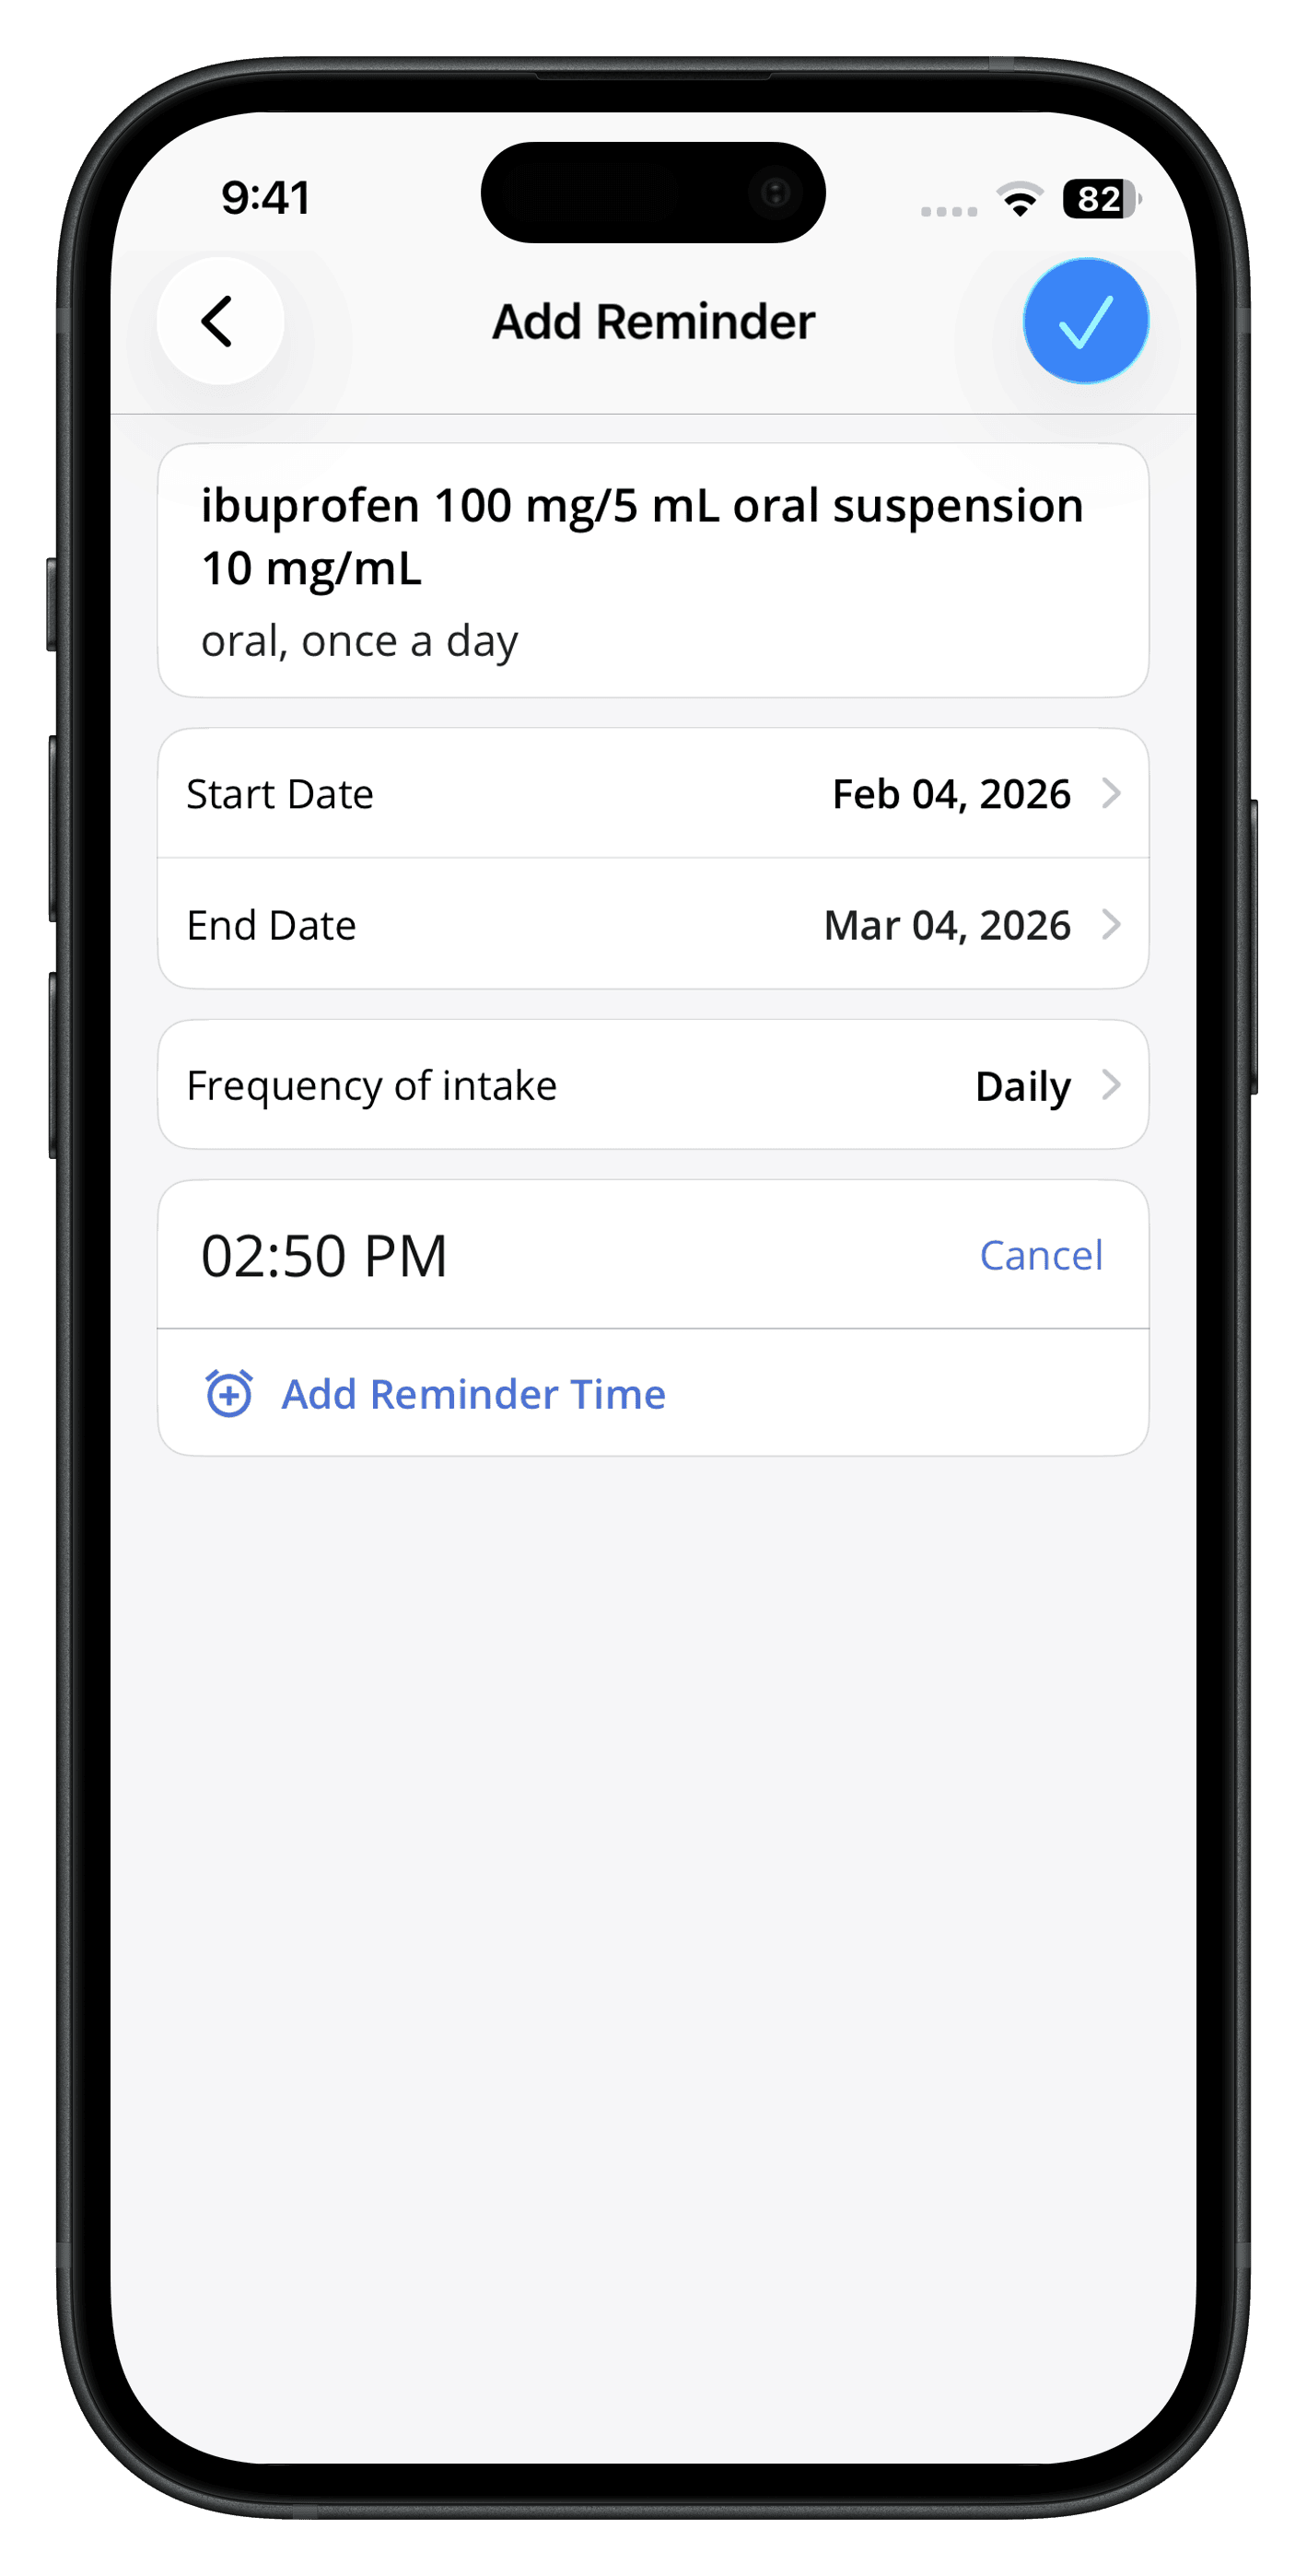
- Schedule by entering the start date, end date, Frequency, and Reminder timing.
- Tap on the 'Done' icon.
Note: App notifications must be enabled on the phone to receive reminders.
Updating Reminder Status
- Tap the reminder notification to update the status as Taken or Skipped, or
- Navigate to 'My Health > Reminders > Today' and update the status manually.
You can also view the reminder history by tapping on the 'Clock' icon of the selected Medication or Supplement. Tap on the 'Edit' icon to edit the reminder.
Wellness
The wellness section on the mPHR app allows you to track your wellness goals and measurements. It can help you view and record various health vitals and fitness metrics such as Pulse rate, Blood sugar, Calories burned, and Sleep. You can also Sync Health Records to Charm mPHR from your Health App.
You can tap on each metric to track and record your progress.
- Navigate to 'My Health > Wellness'.
- Choose a metric to update
- Tap on the 'Add (+)' icon.
- Enter the values.
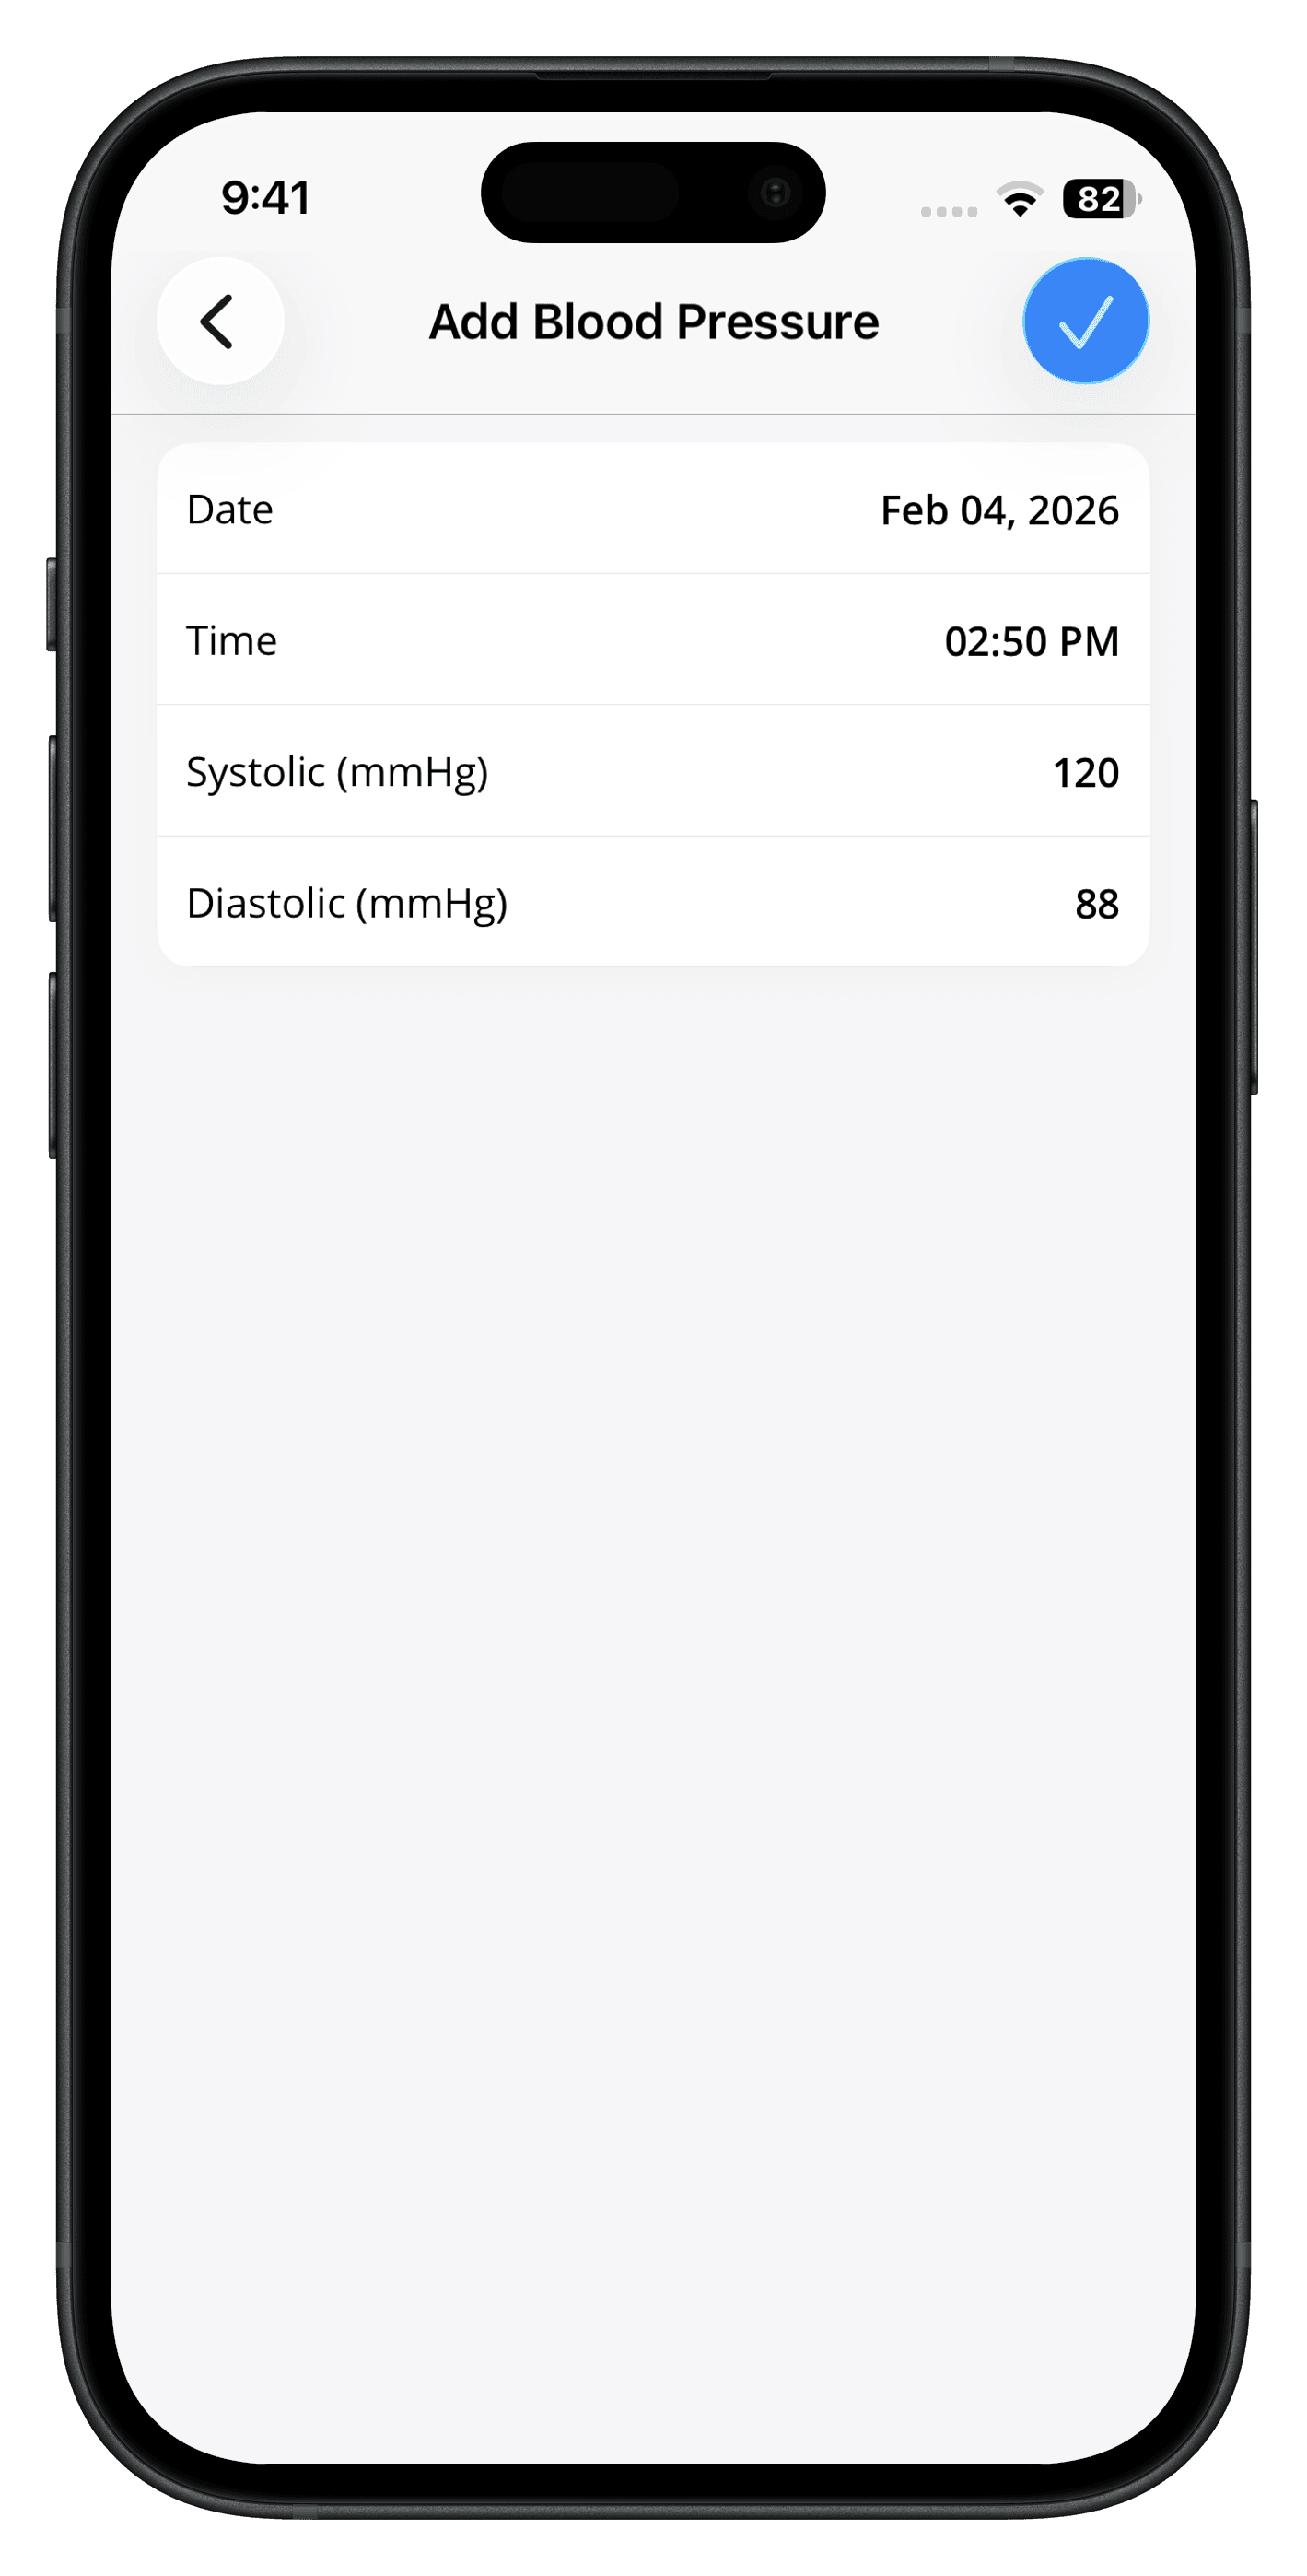
- Tap on the 'Done' icon to record your metric.
Share Sections
The Share section feature enables you to share the clinical data added in Charm mPHR with the Practice members.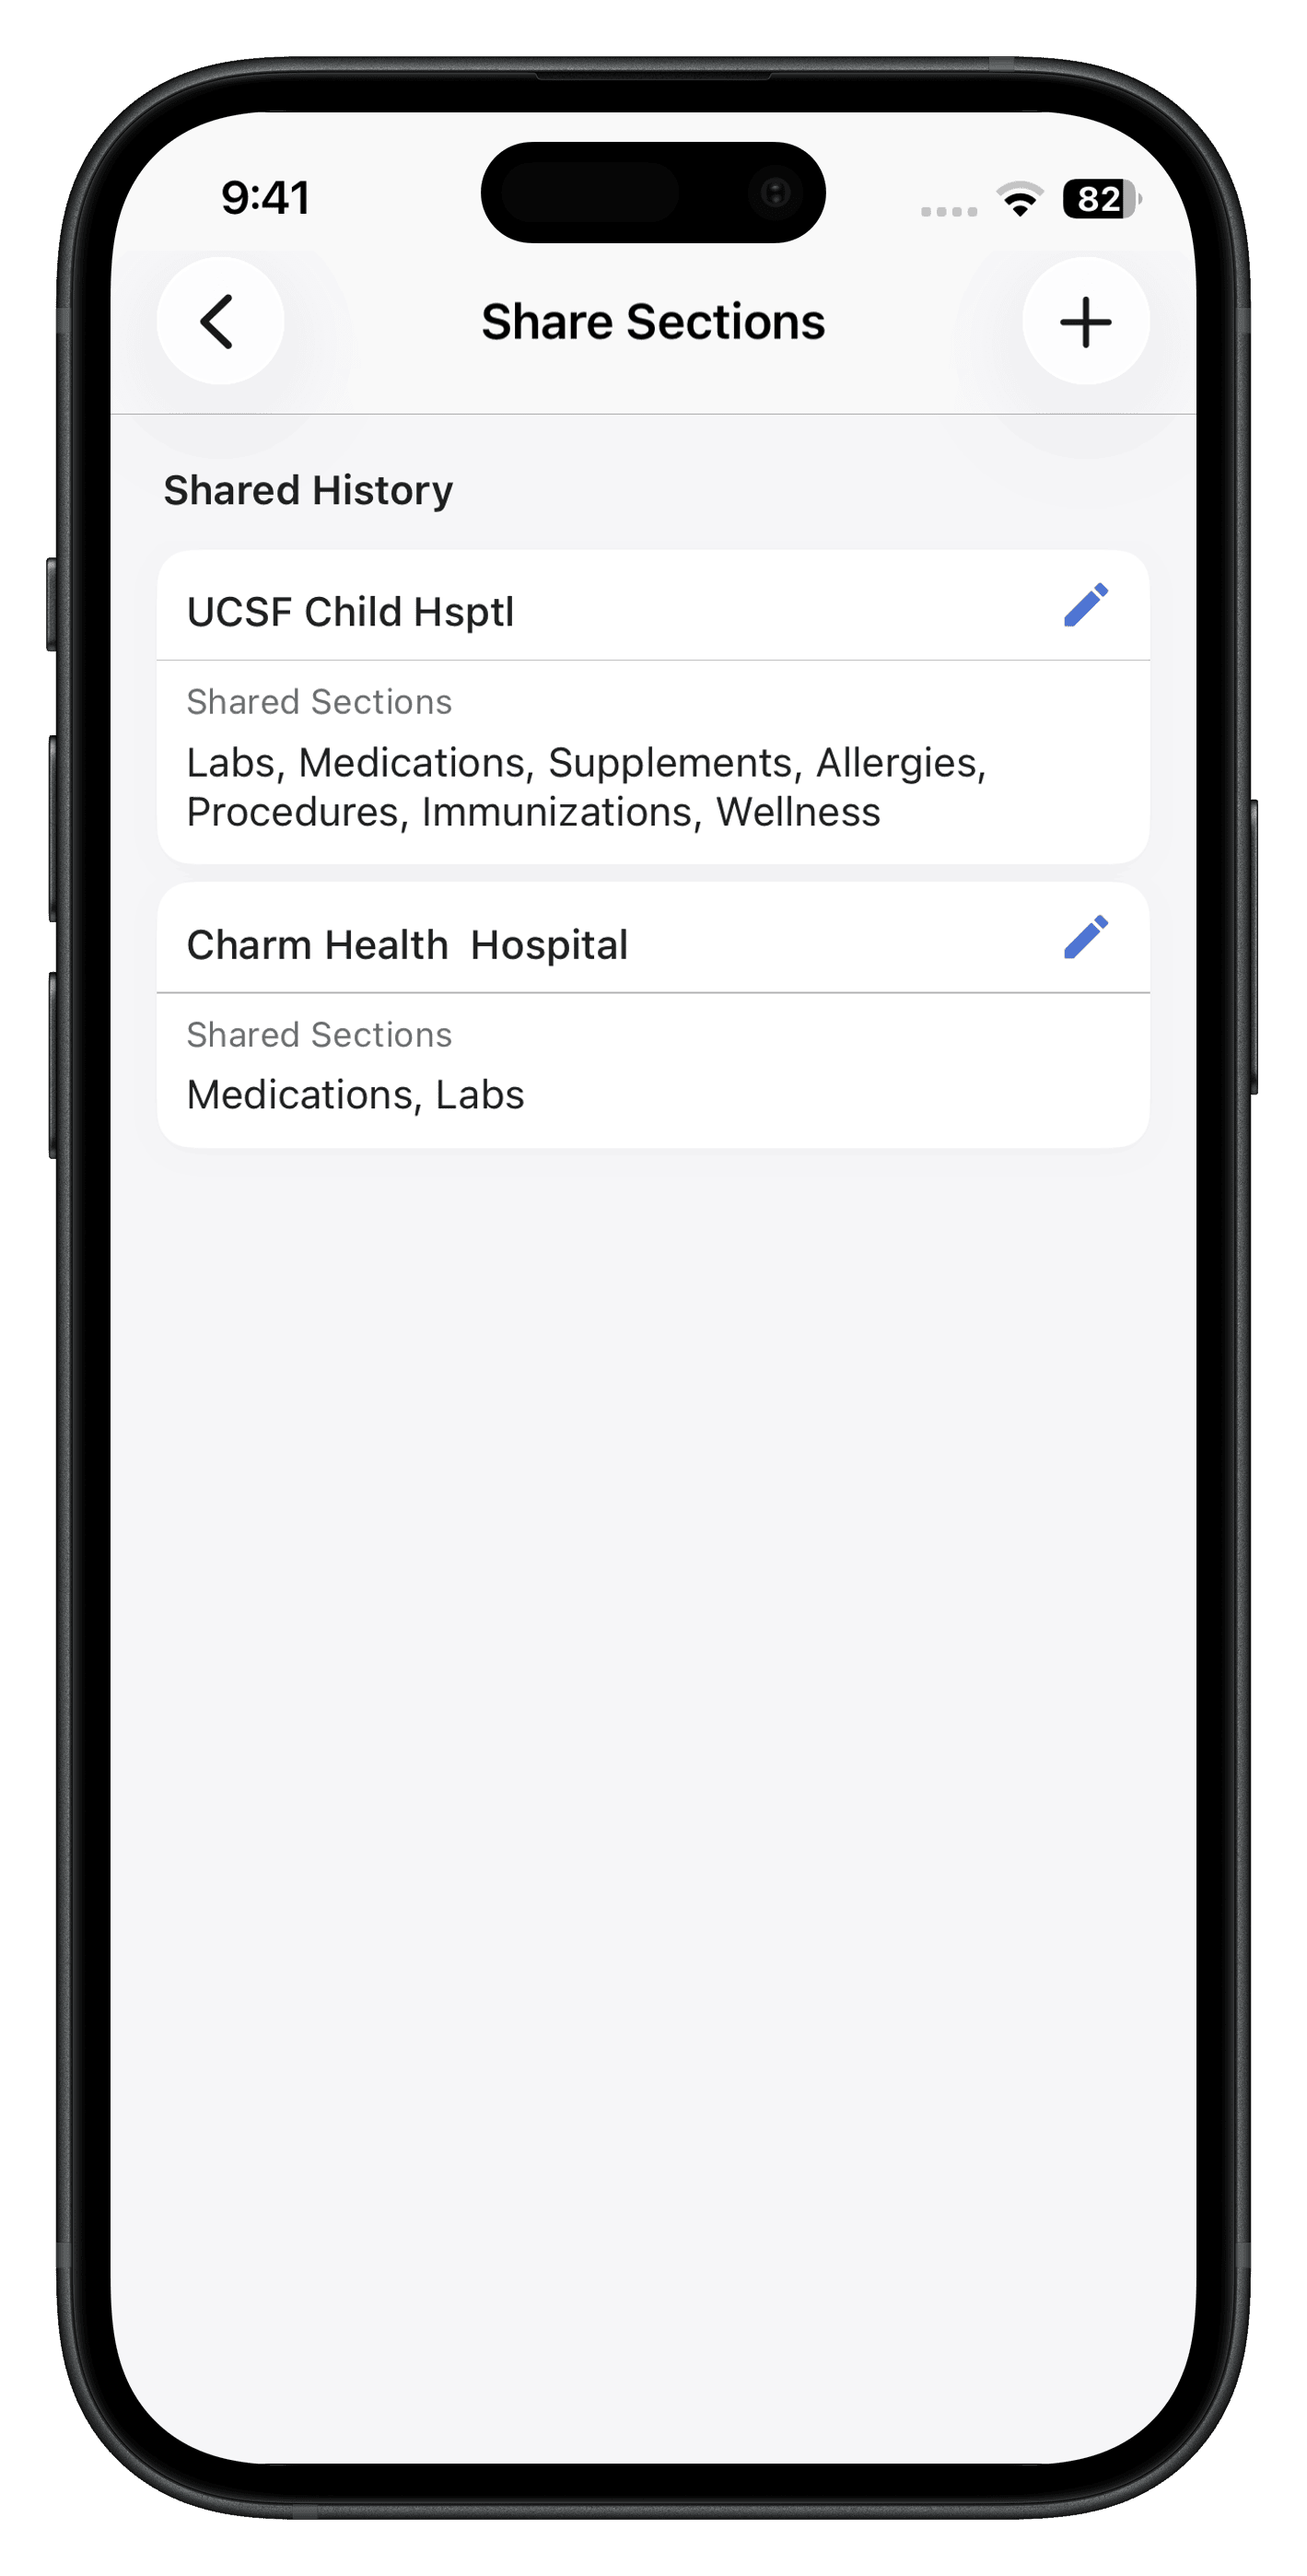
- Navigate to 'My Health > Share sections'
- Tap on the 'Add icon (+)' icon.
- Choose the Practice name from the drop-down list.
- Select the section(s) to share with the selected Practice.
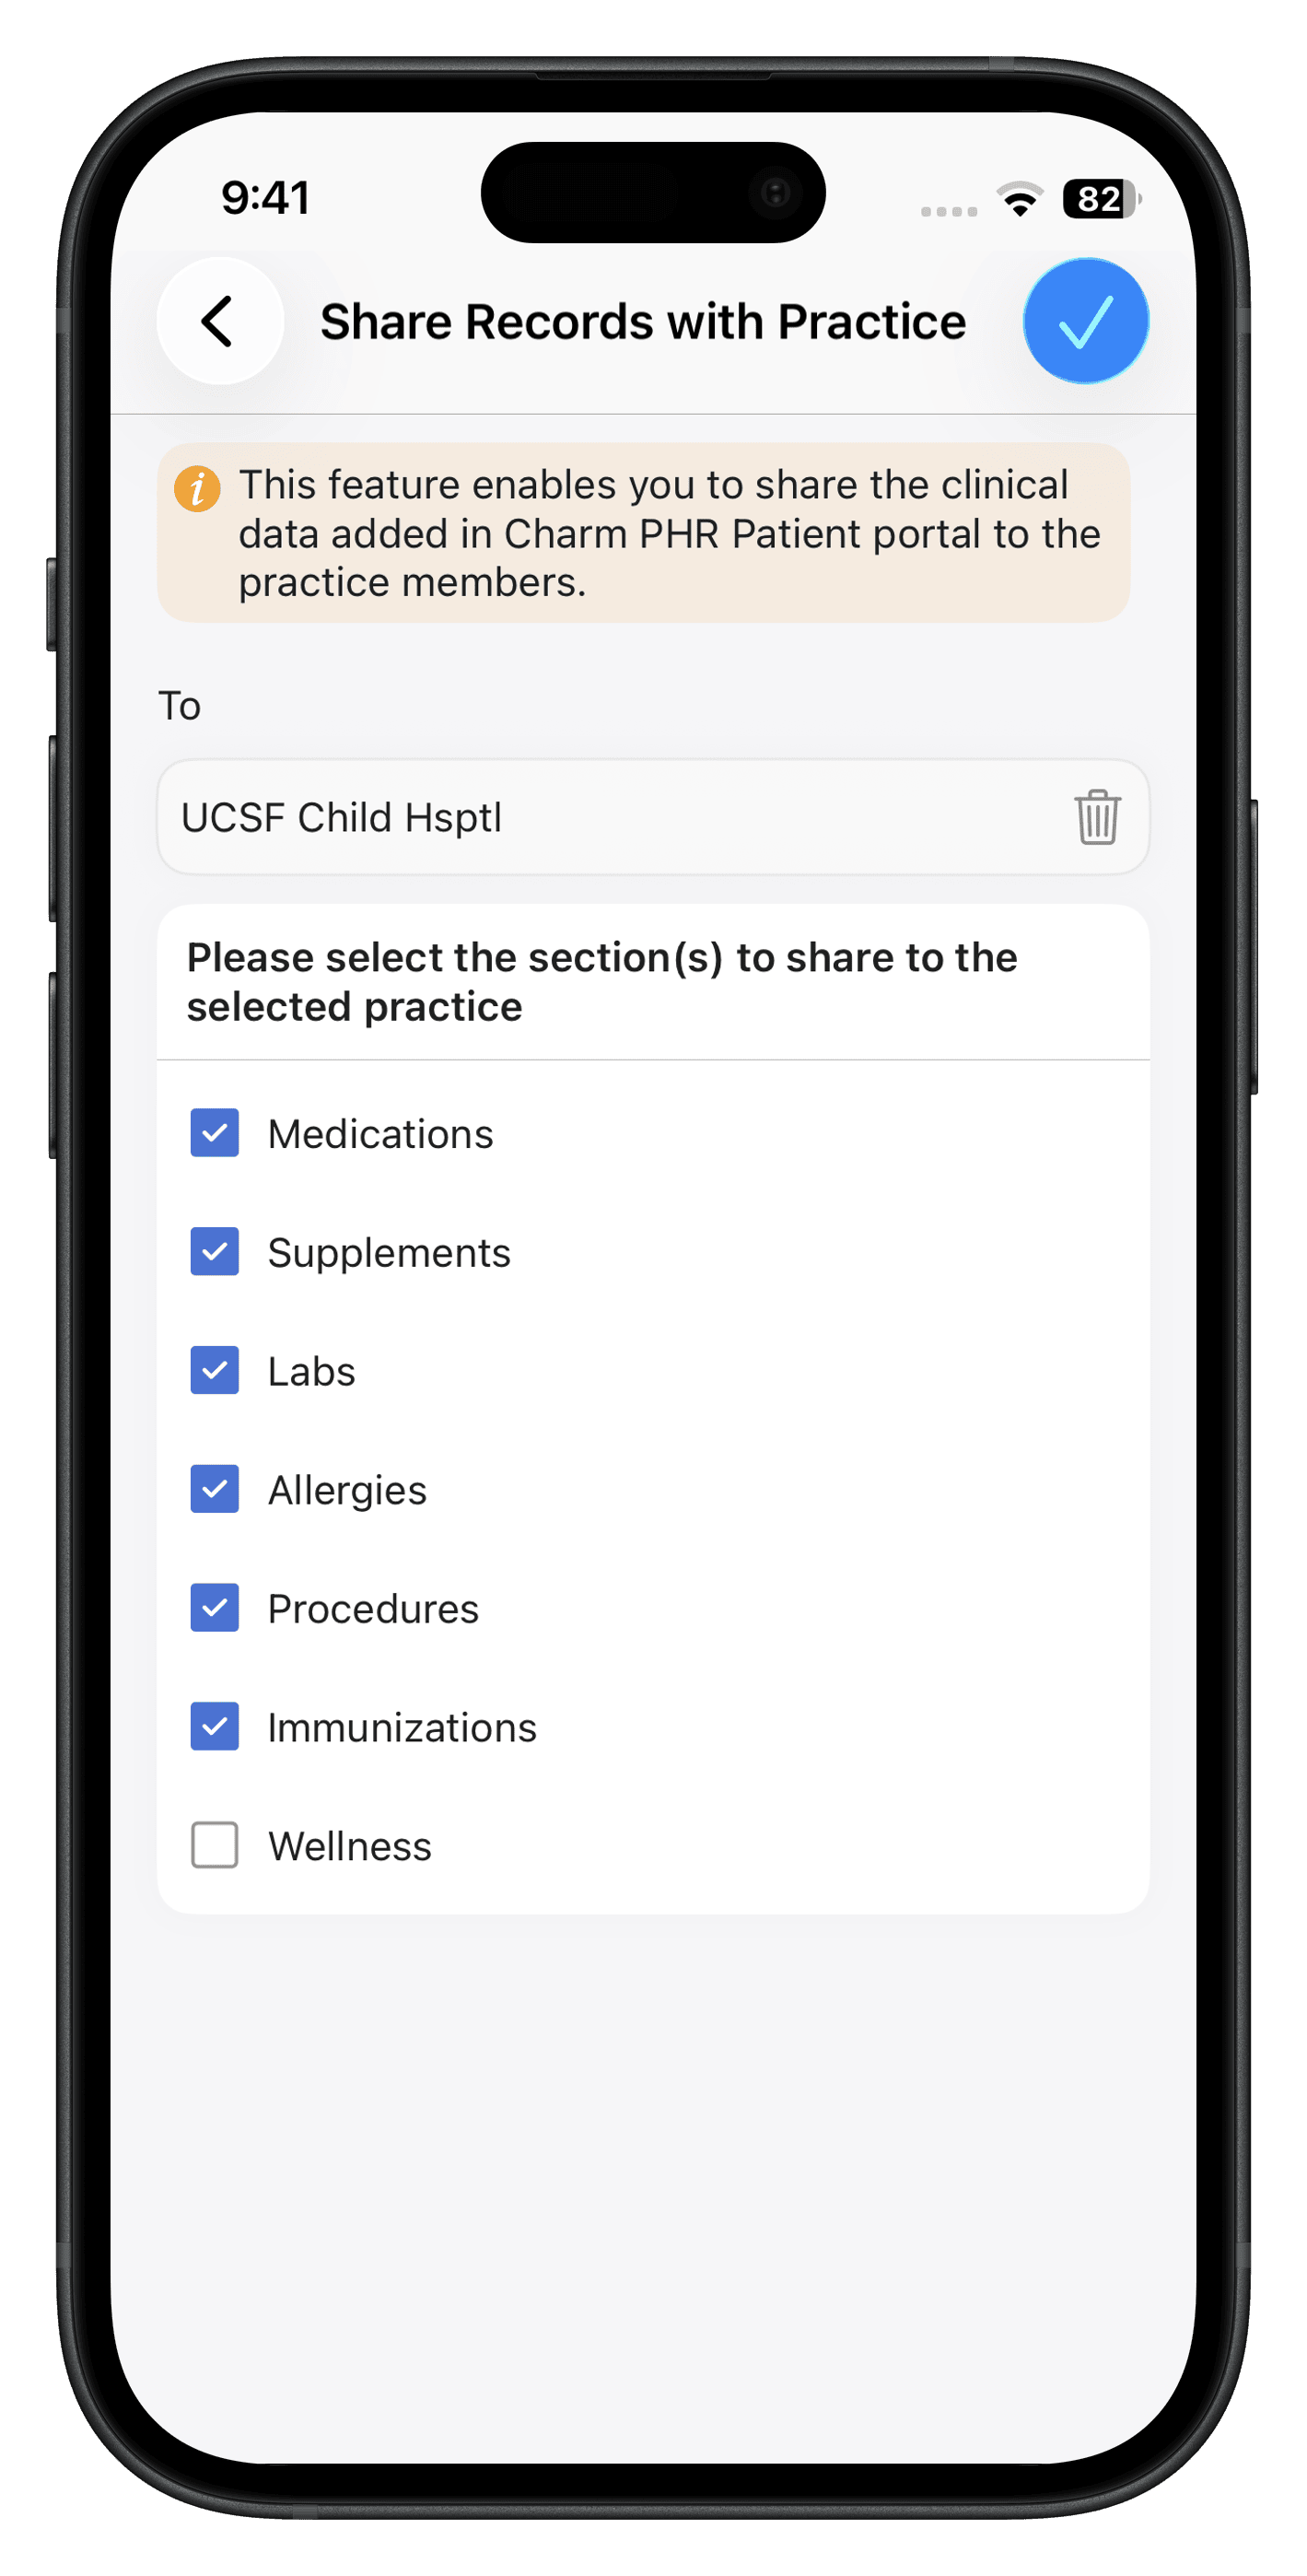
- Tap on the 'Done' icon.
You can tap on the 'Edit' icon under 'Shared History' to share or unshare the sections.
Billing
The Billing section allows you to view invoices, receipts, and make payments through your Phone.
Make Payment
- Navigate to 'My Health > Billing'.

- Select an invoice or statement.
- Tap 'Pay' to complete the payment.
Note: Cards that are saved can be used for payment.
Payment statements made for the Invoices can be viewed in the 'Receipts' Tab. You can view or download the invoices, statements, and receipts. 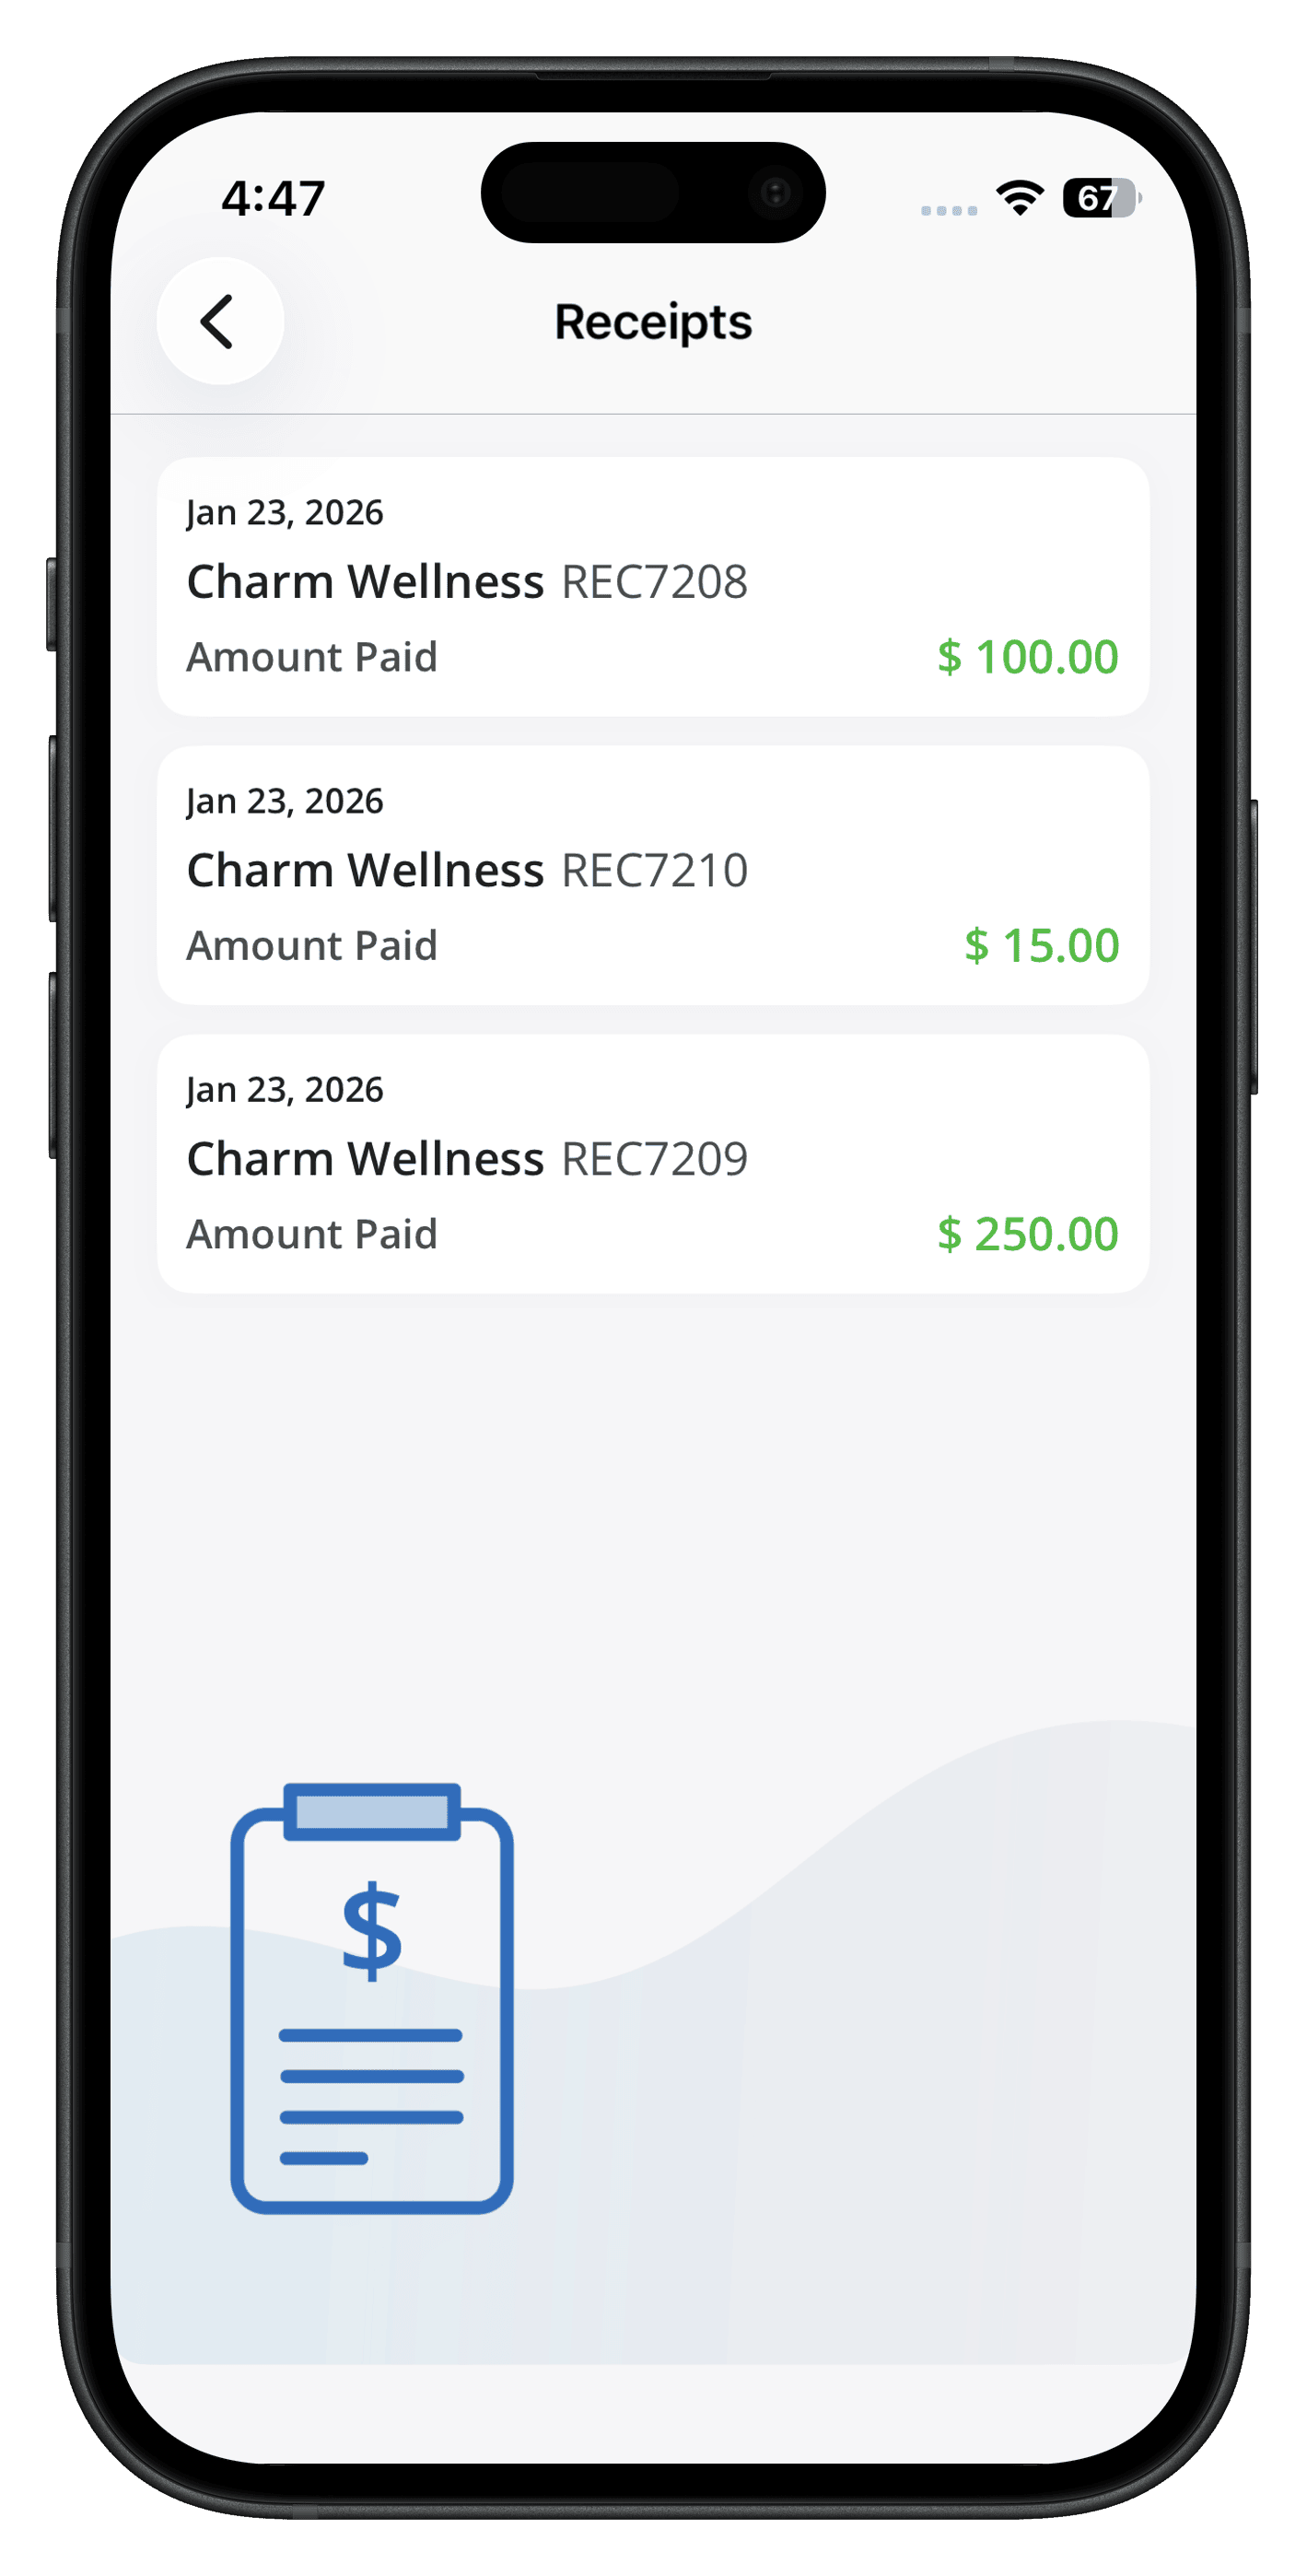
Partial Payment
Patients can make partial payments for invoices and statements to the requested amount if allowed by your practice. To make a partial payment:
- Navigate to 'My Health > Billing > Invoice'
- Choose an invoice that you want to pay partially
- Select 'Pay'
- Tap on the Amount field and edit it to the partial sum you wish to pay
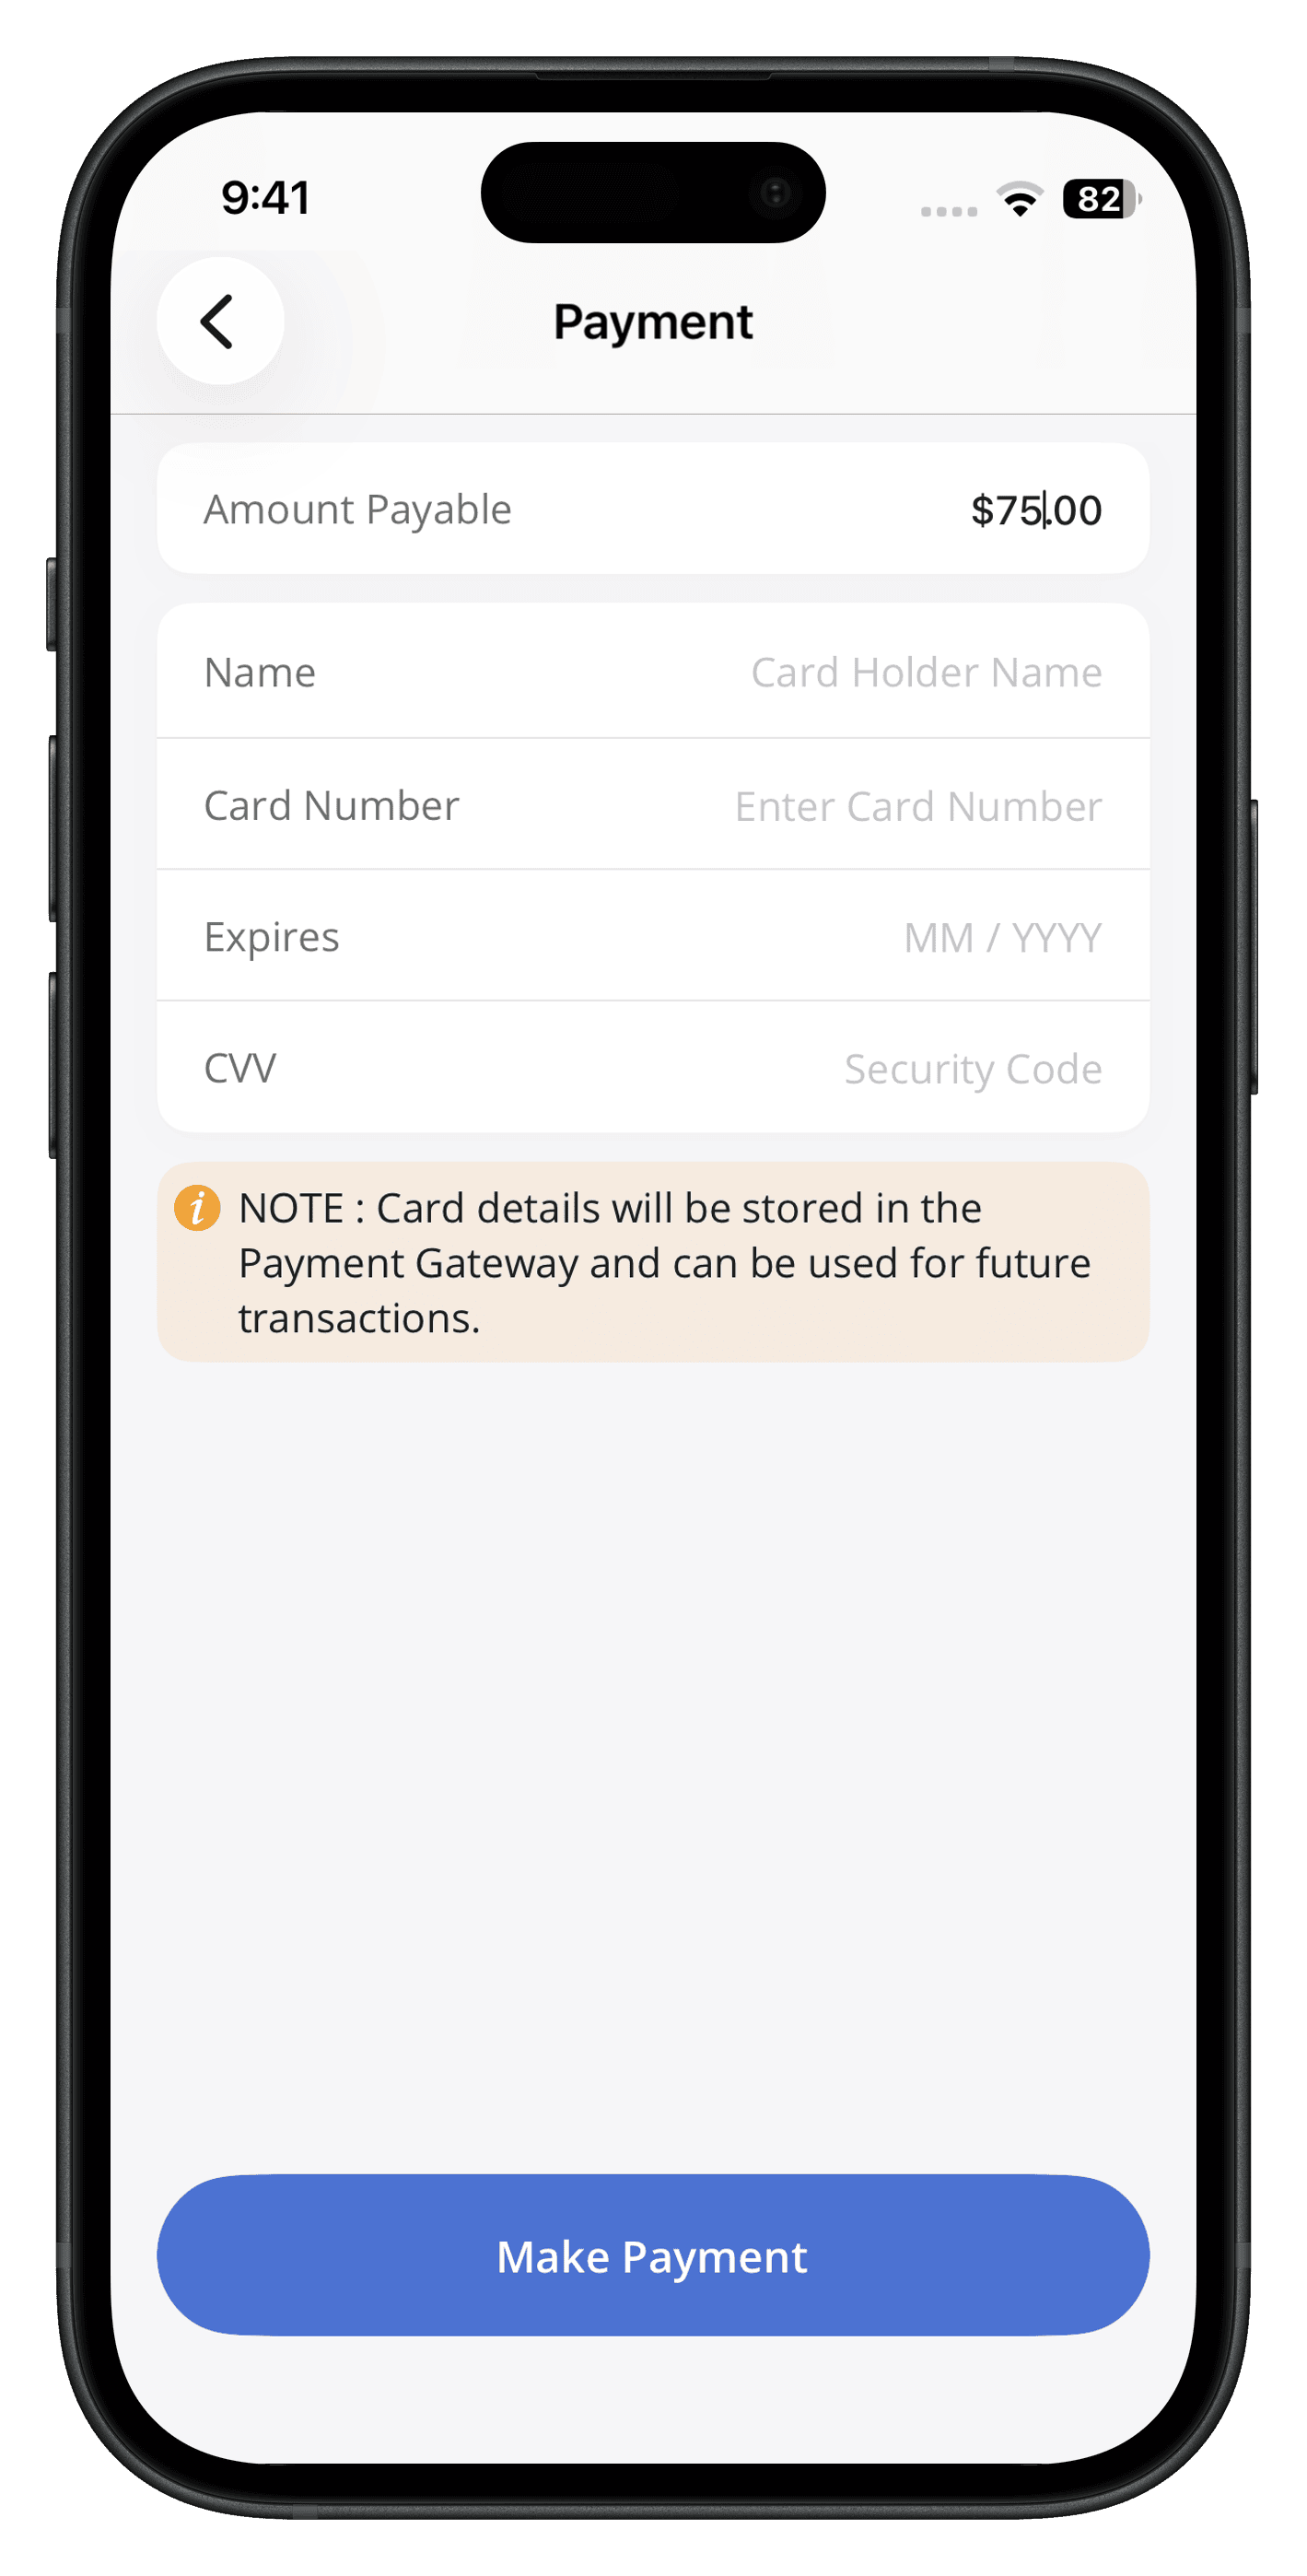
- Tap on the 'Make Payment' Button to complete the transaction.
The Invoice status will be updated to Partially Paid.
Card on File
The Card on File section displays saved cards used for default payments by you and your Practice.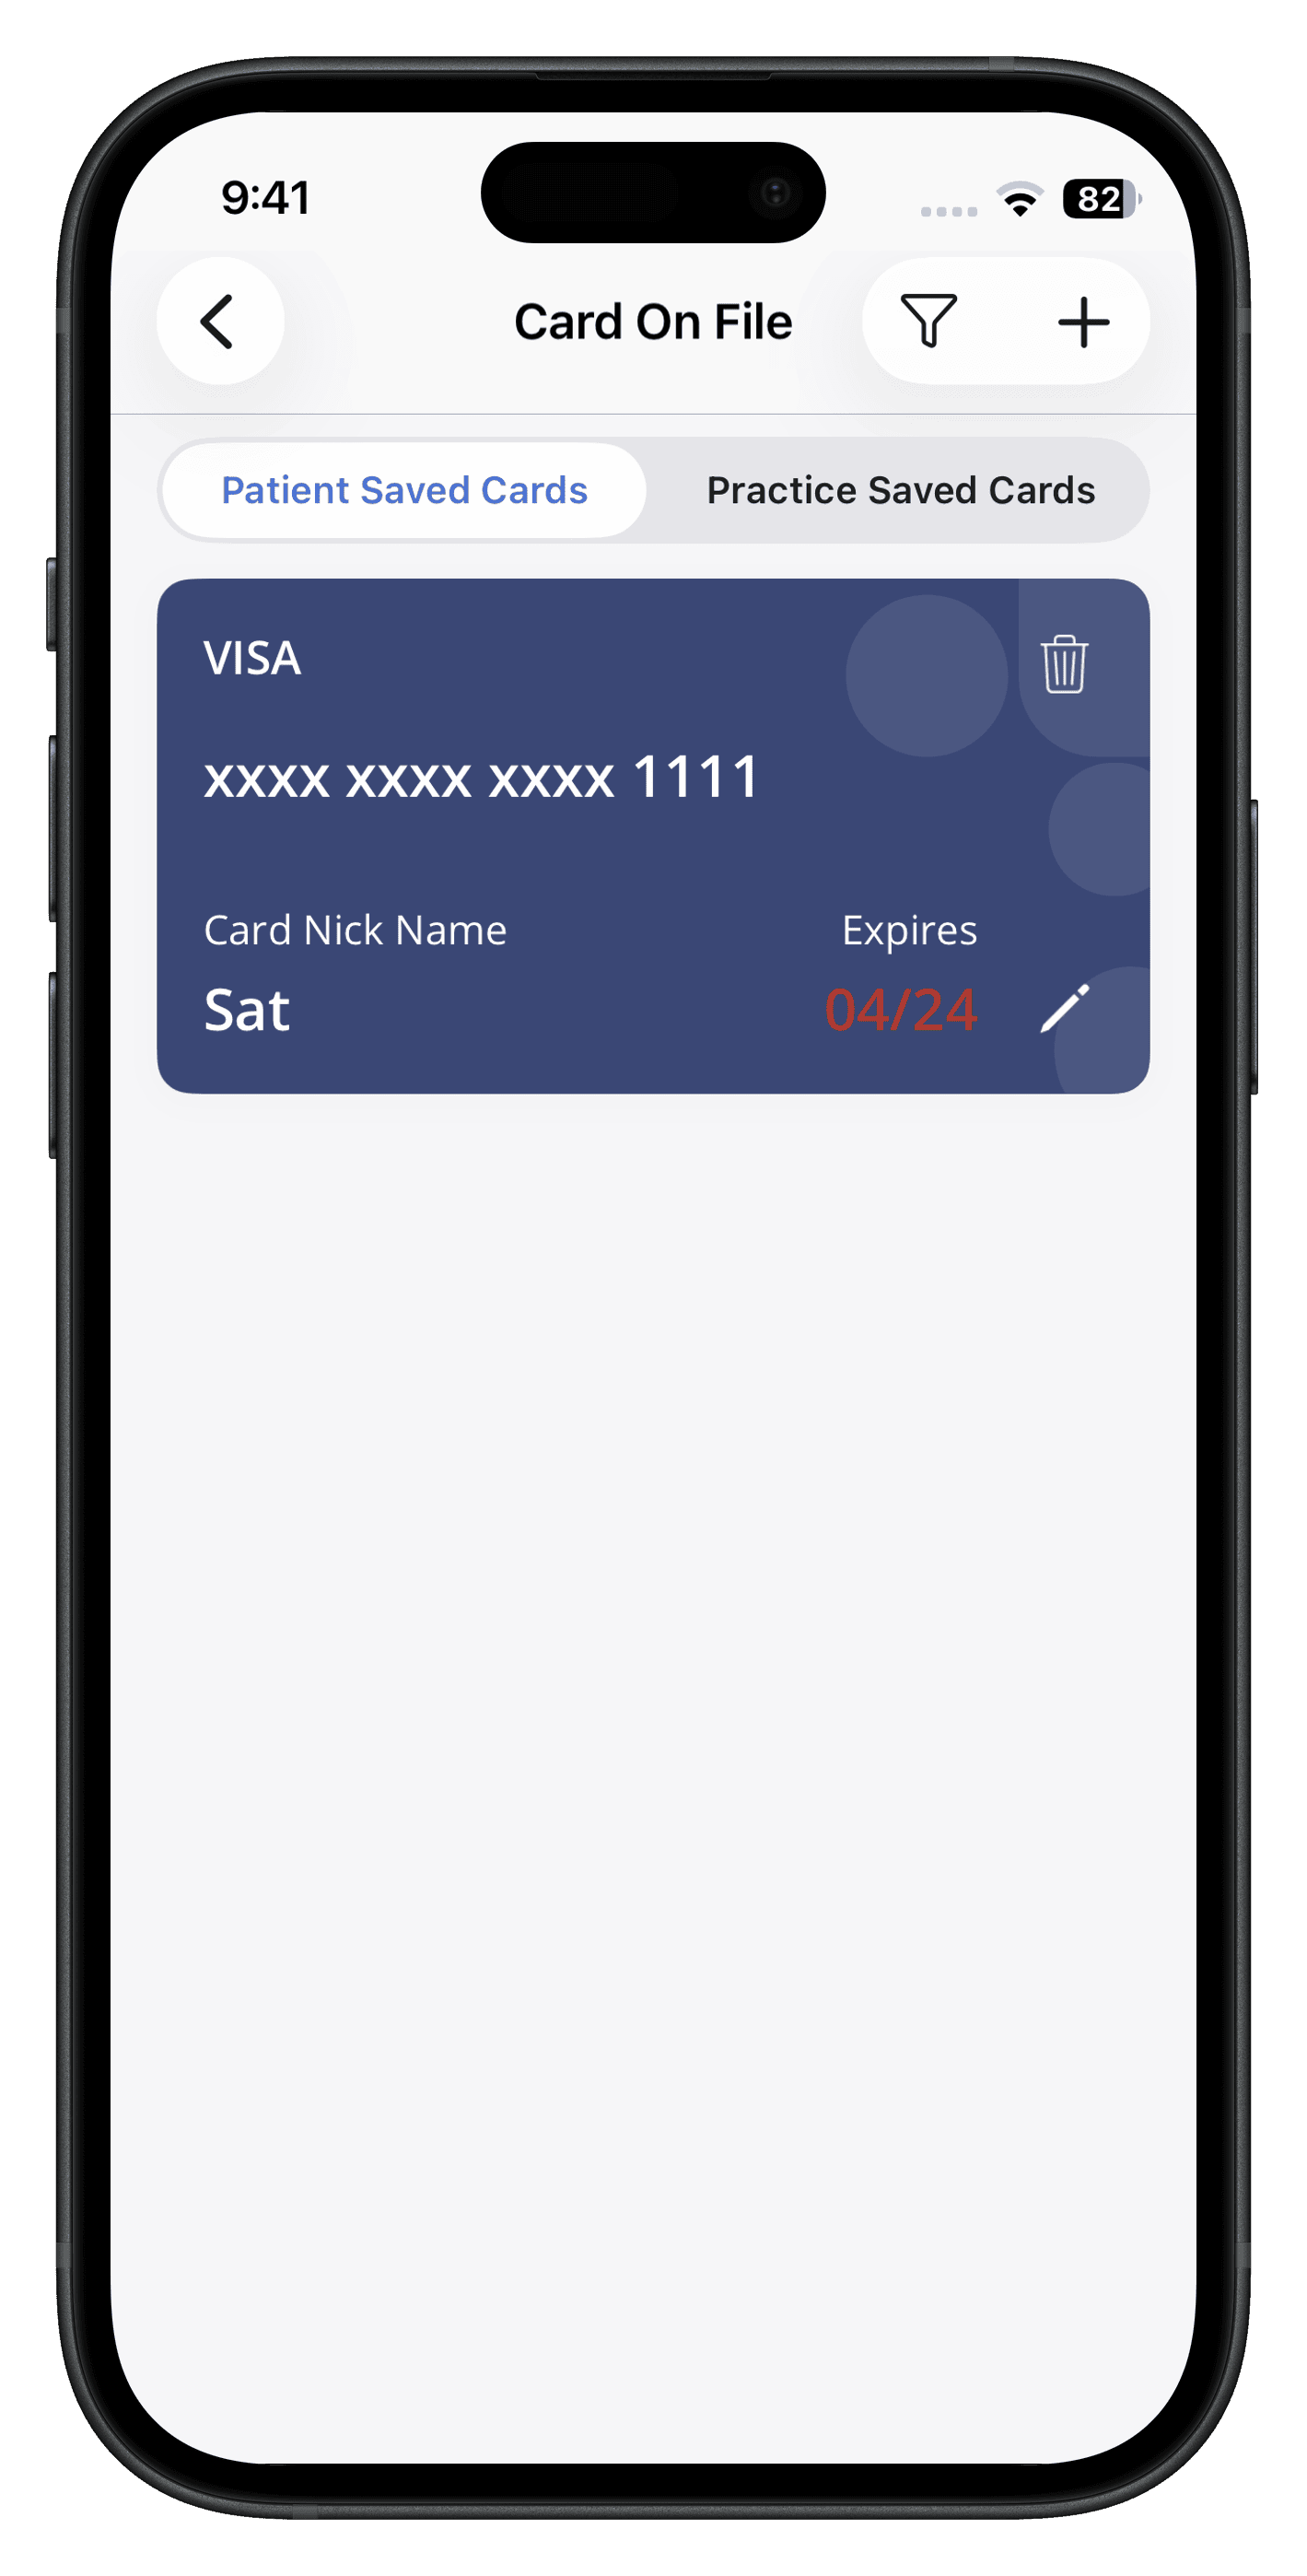
You can view and manage stored cards for future payments.
Health Passport
The health card displays the patients name, gender, date of birth, blood group, address, and personal and caregiver information.
Patients can also carry a physical copy of their Health Passport with them to help first responders and providers access important health information during medical emergencies.
The Health passport can be shared as :
- a PDF, or
- a secure URL with time-limited access.
Recipients require an OTP or your passcode from the Health Passport section to access the URL.
Note: Shared URLs expire after ten days.
Documents
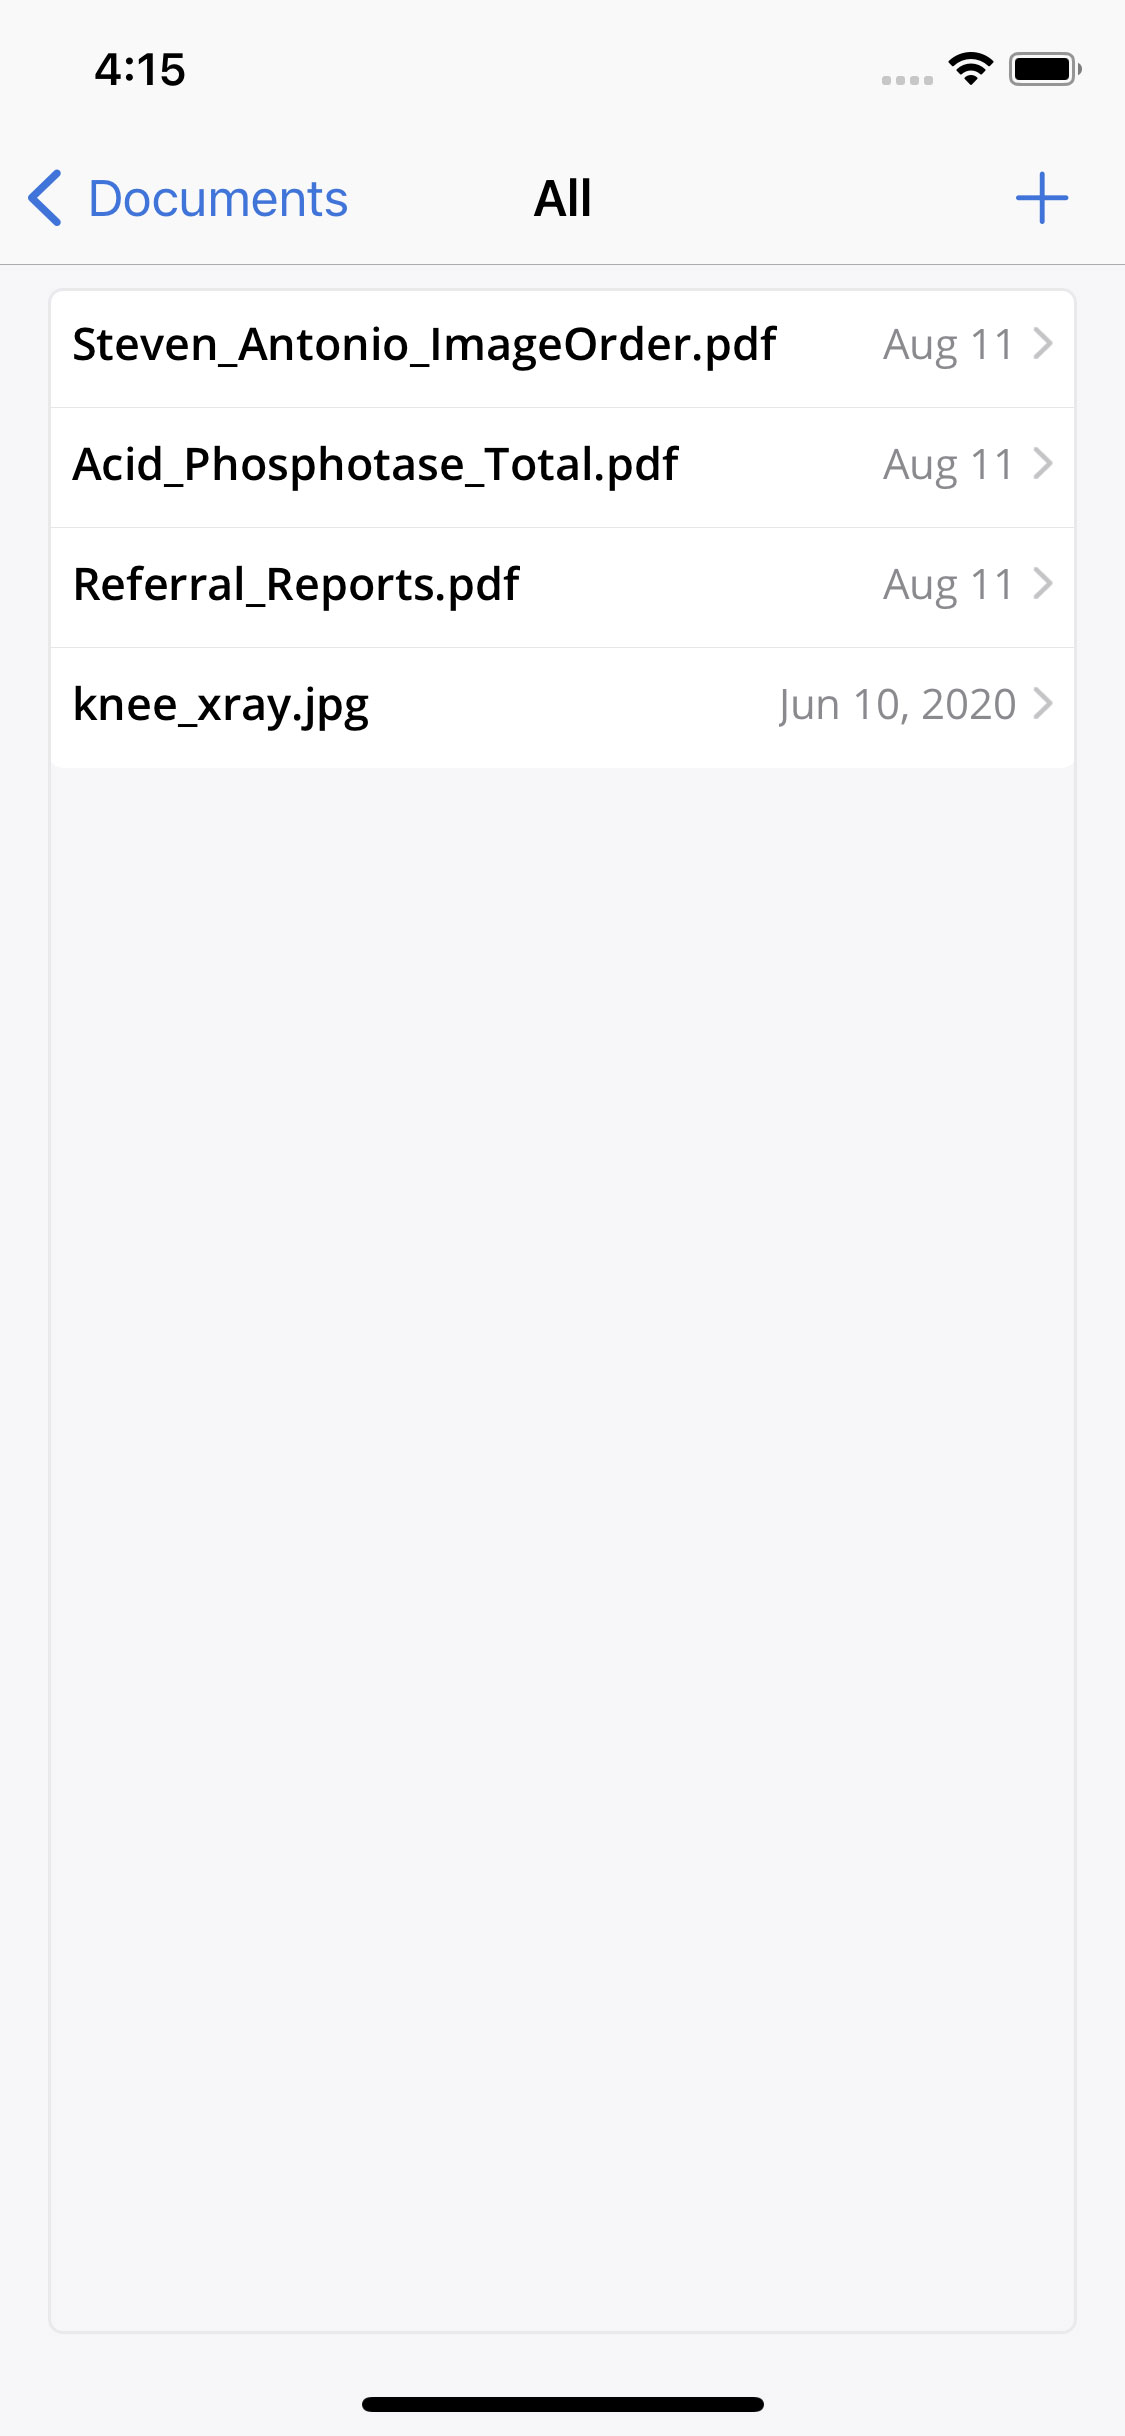
The document section stores a shareable list of documents, such as consent forms you have signed, office visit documents, lab reports, and images, all in one place.
Documents are organized under:
- All
- Folders
- Shared with Me (Documents shared by your Practice Provider)
- Shared by Me (Documents shared by you)
Uploading a Document
- Navigate to 'My Health > Documents'.
- Tap on the 'Add (+)' icon to upload a photo or document.
Note: Supported file formats (.jpeg, .png, .txt, .pdf).
- Enter a document name.
- Select a folder if required.
- Tap on the 'Done' icon.
Sharing Documents
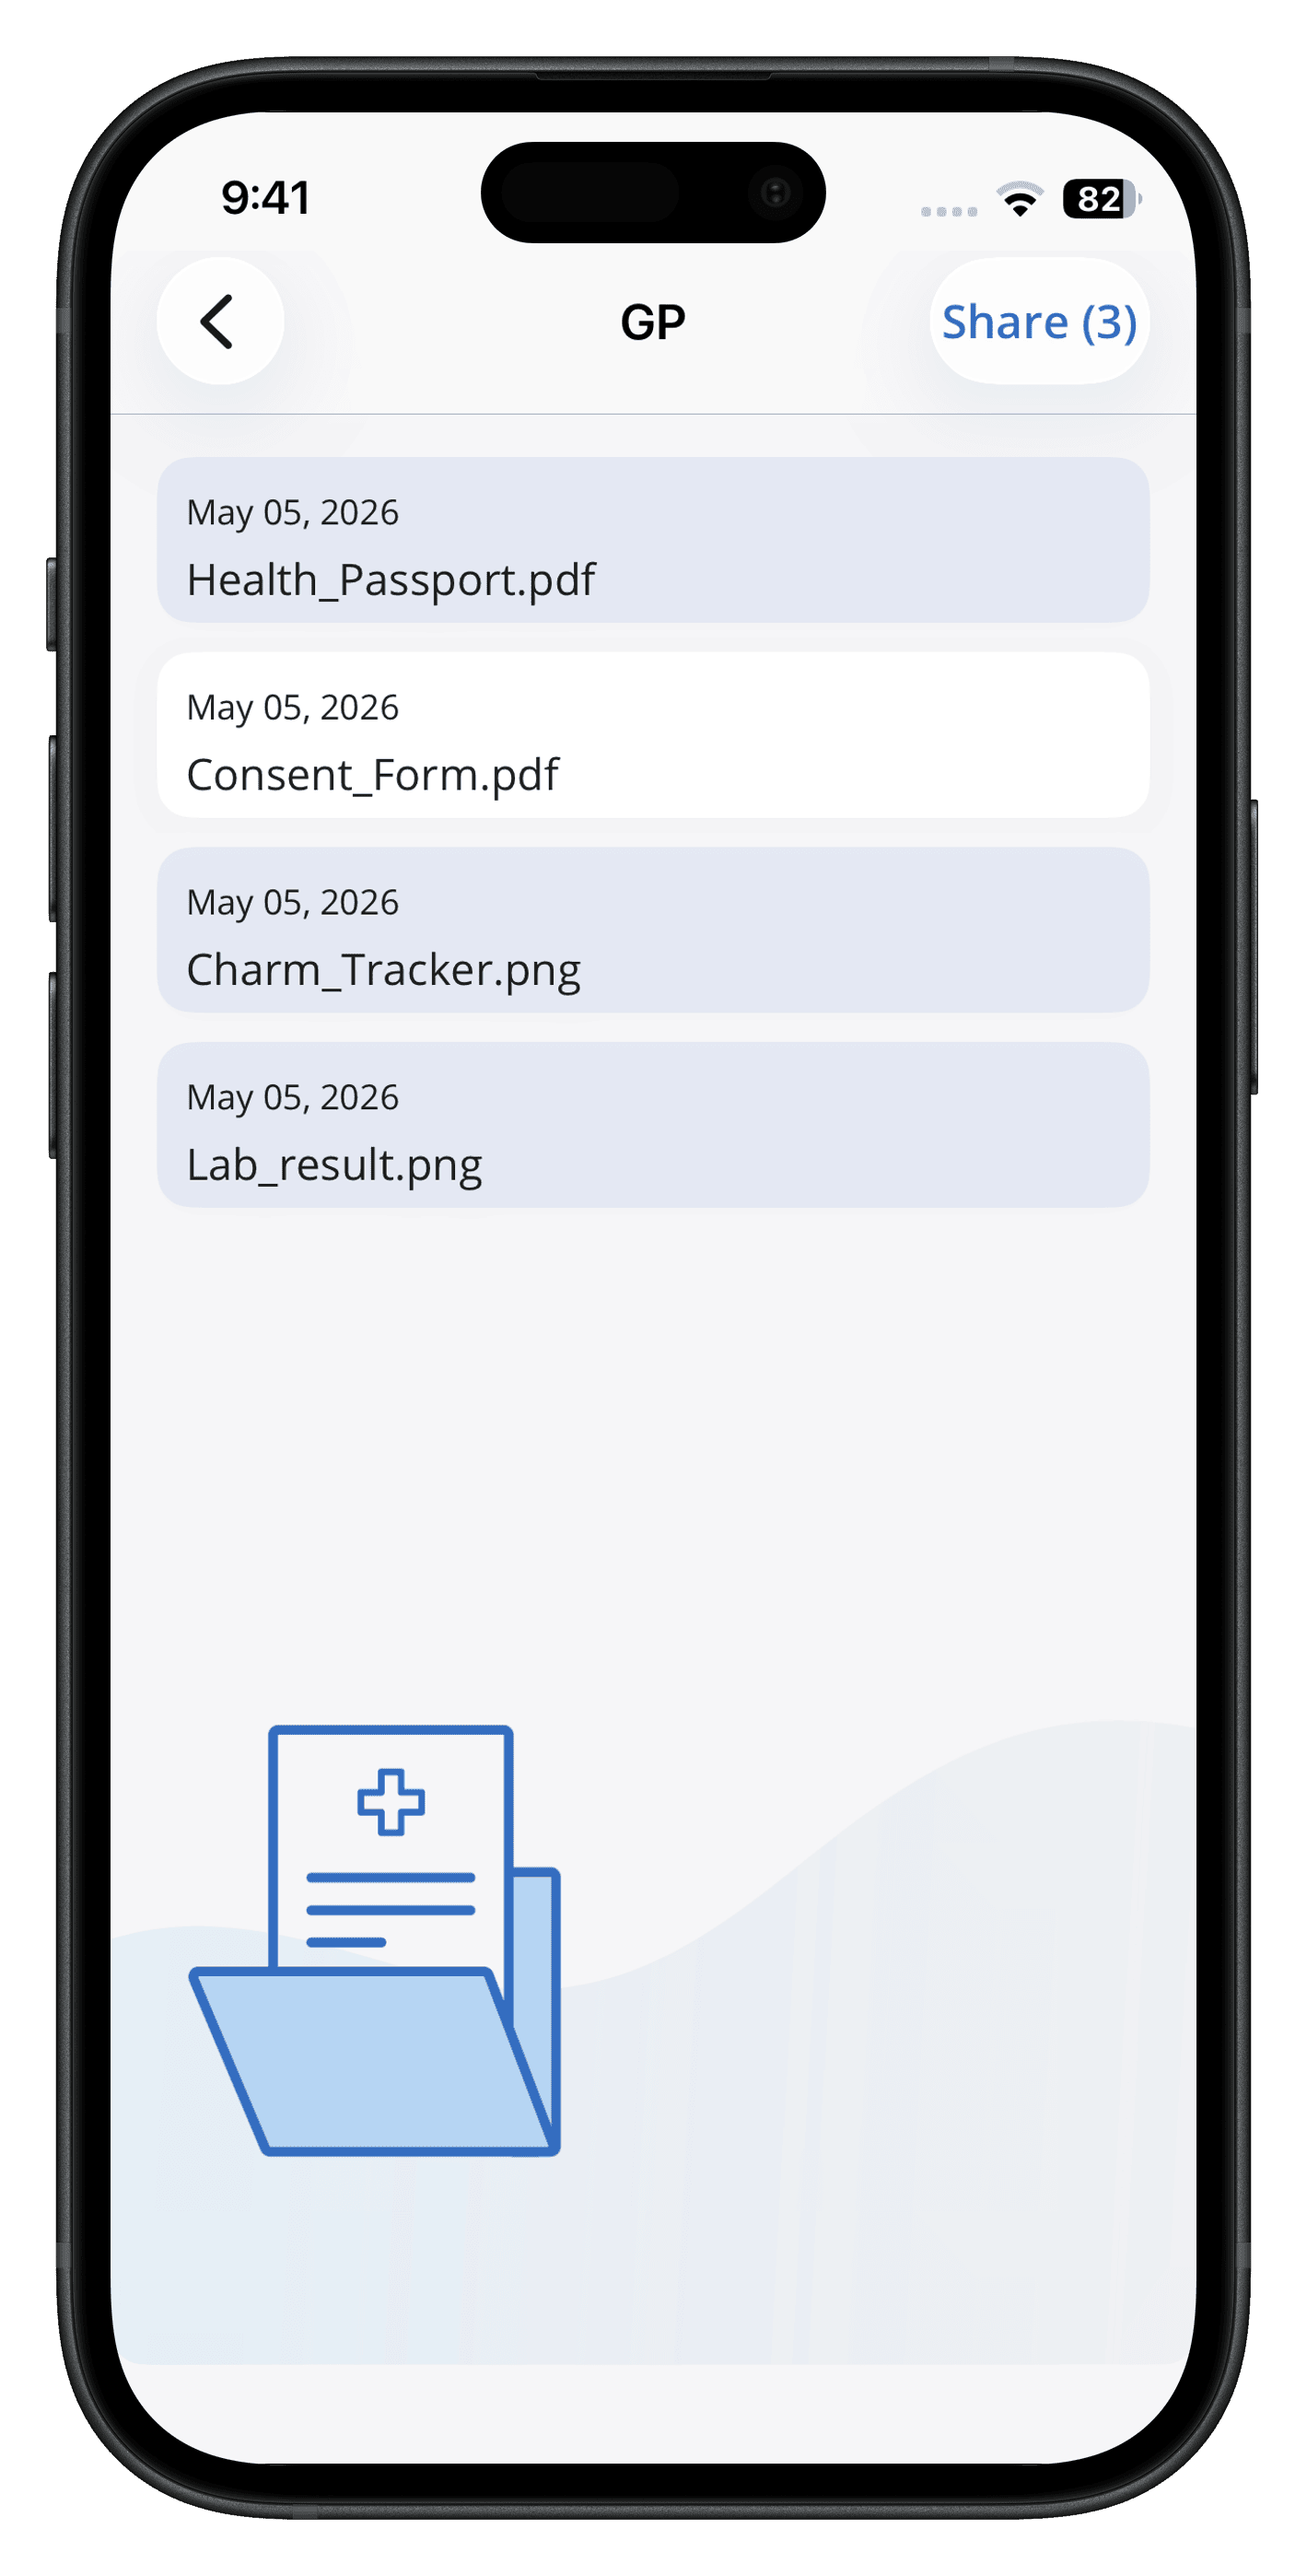
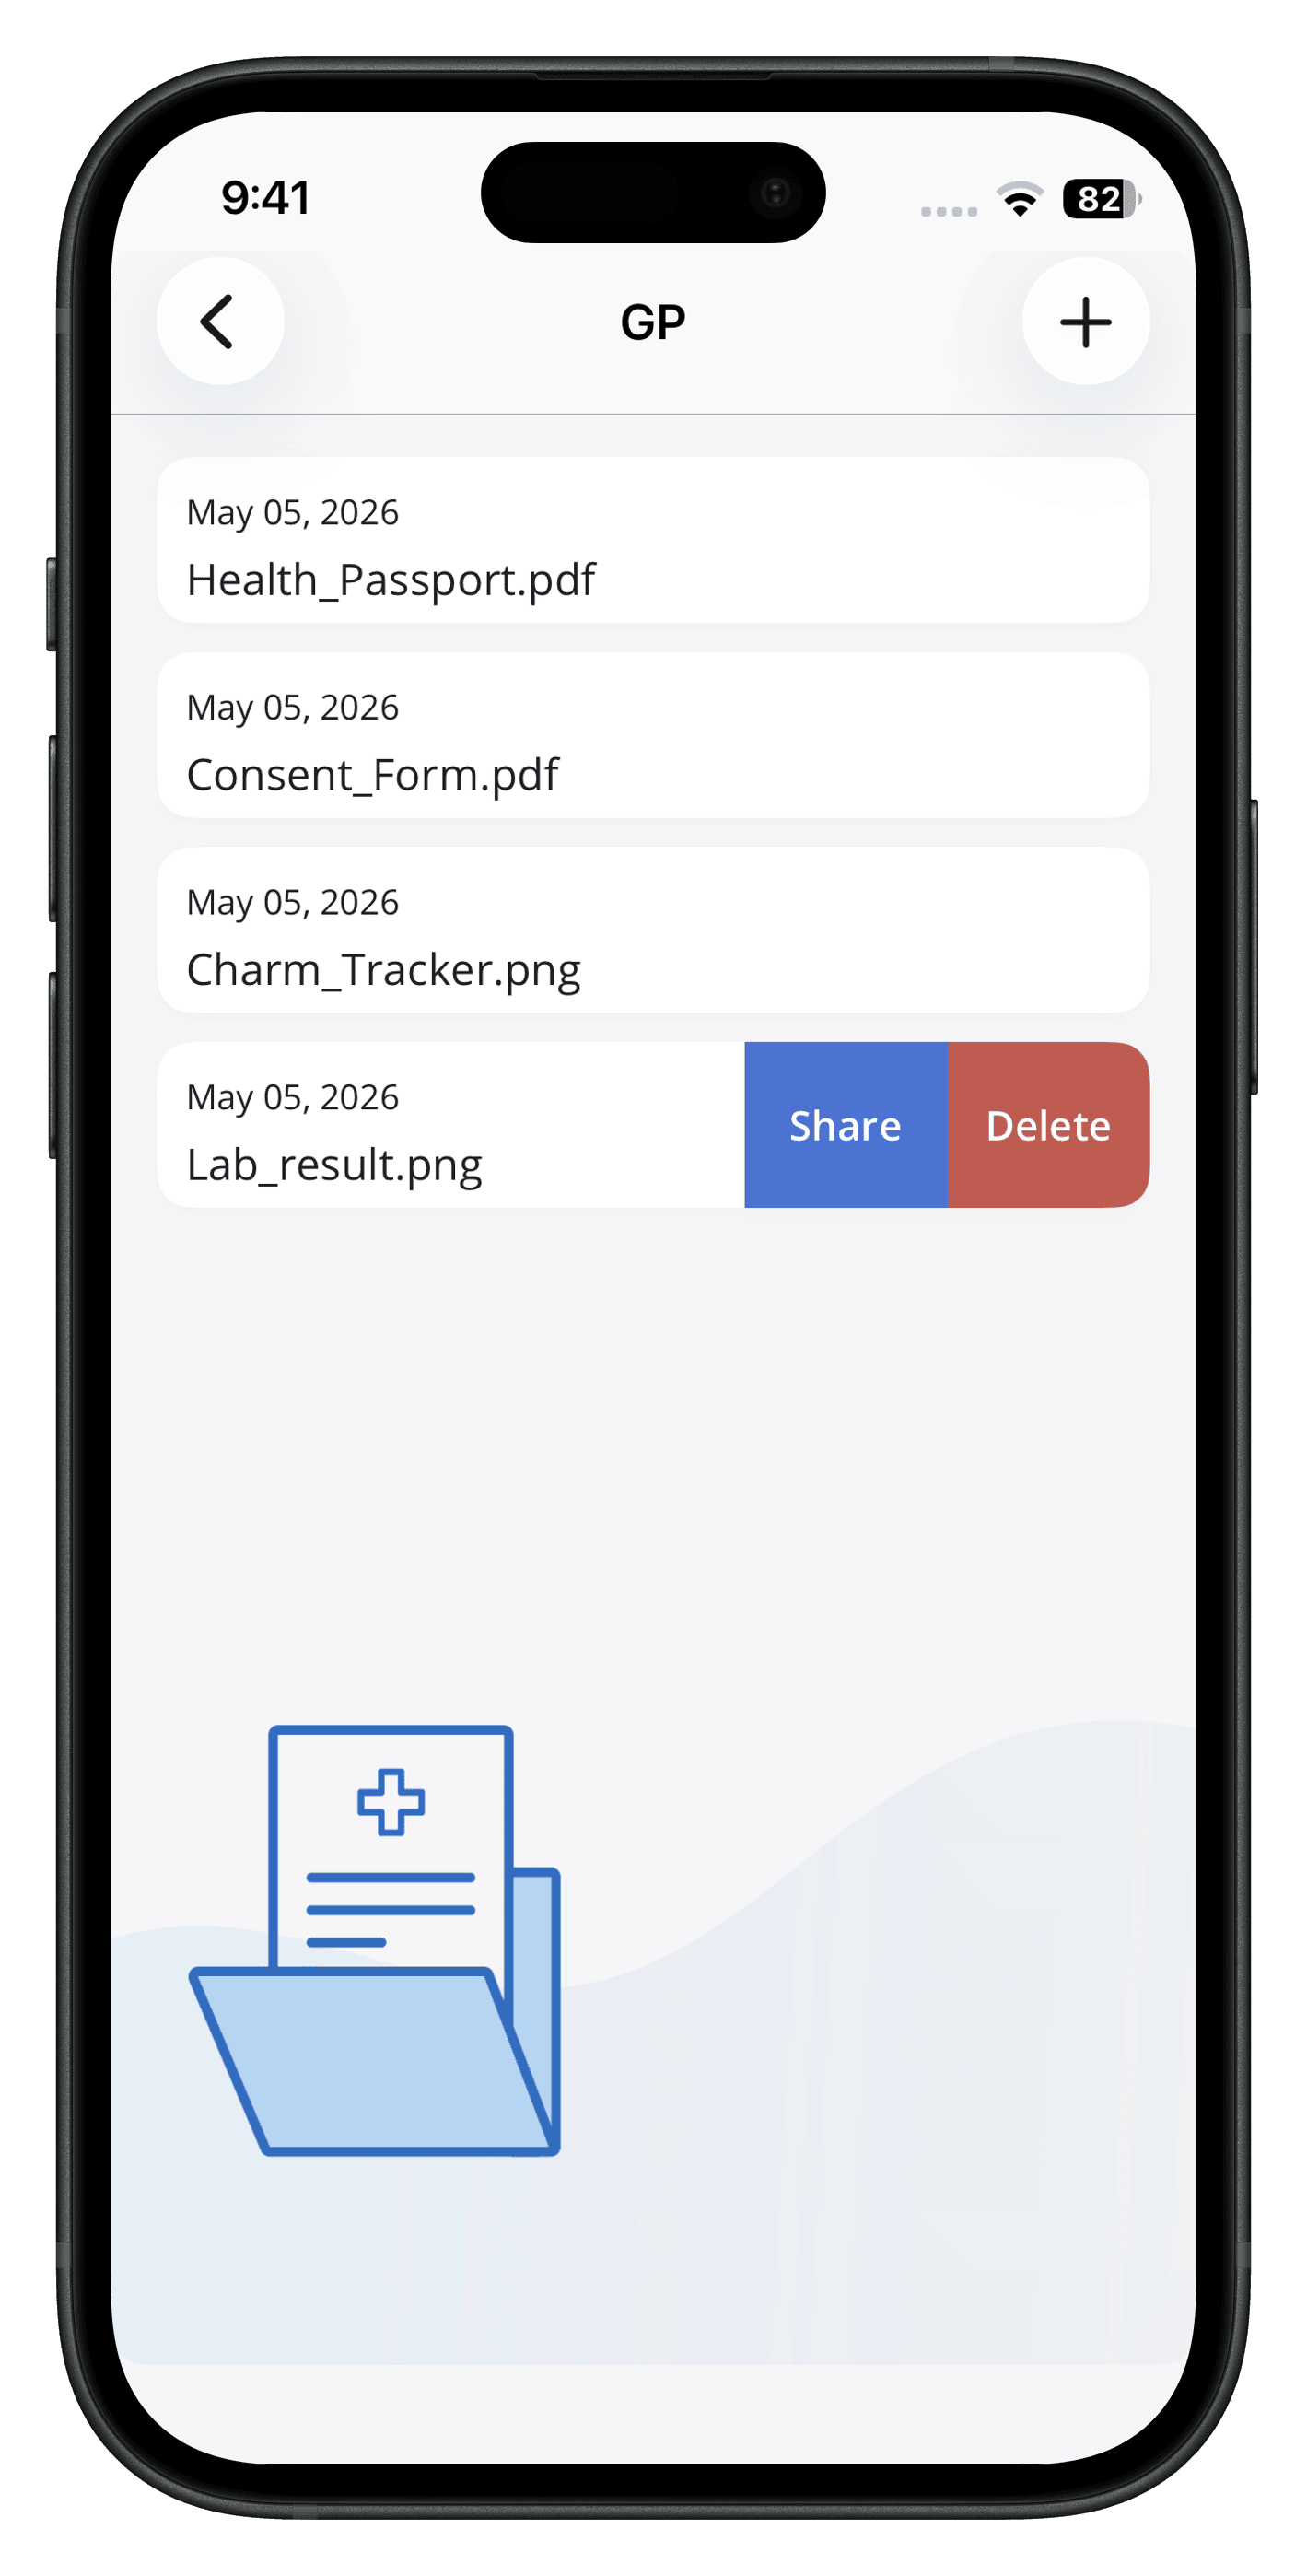
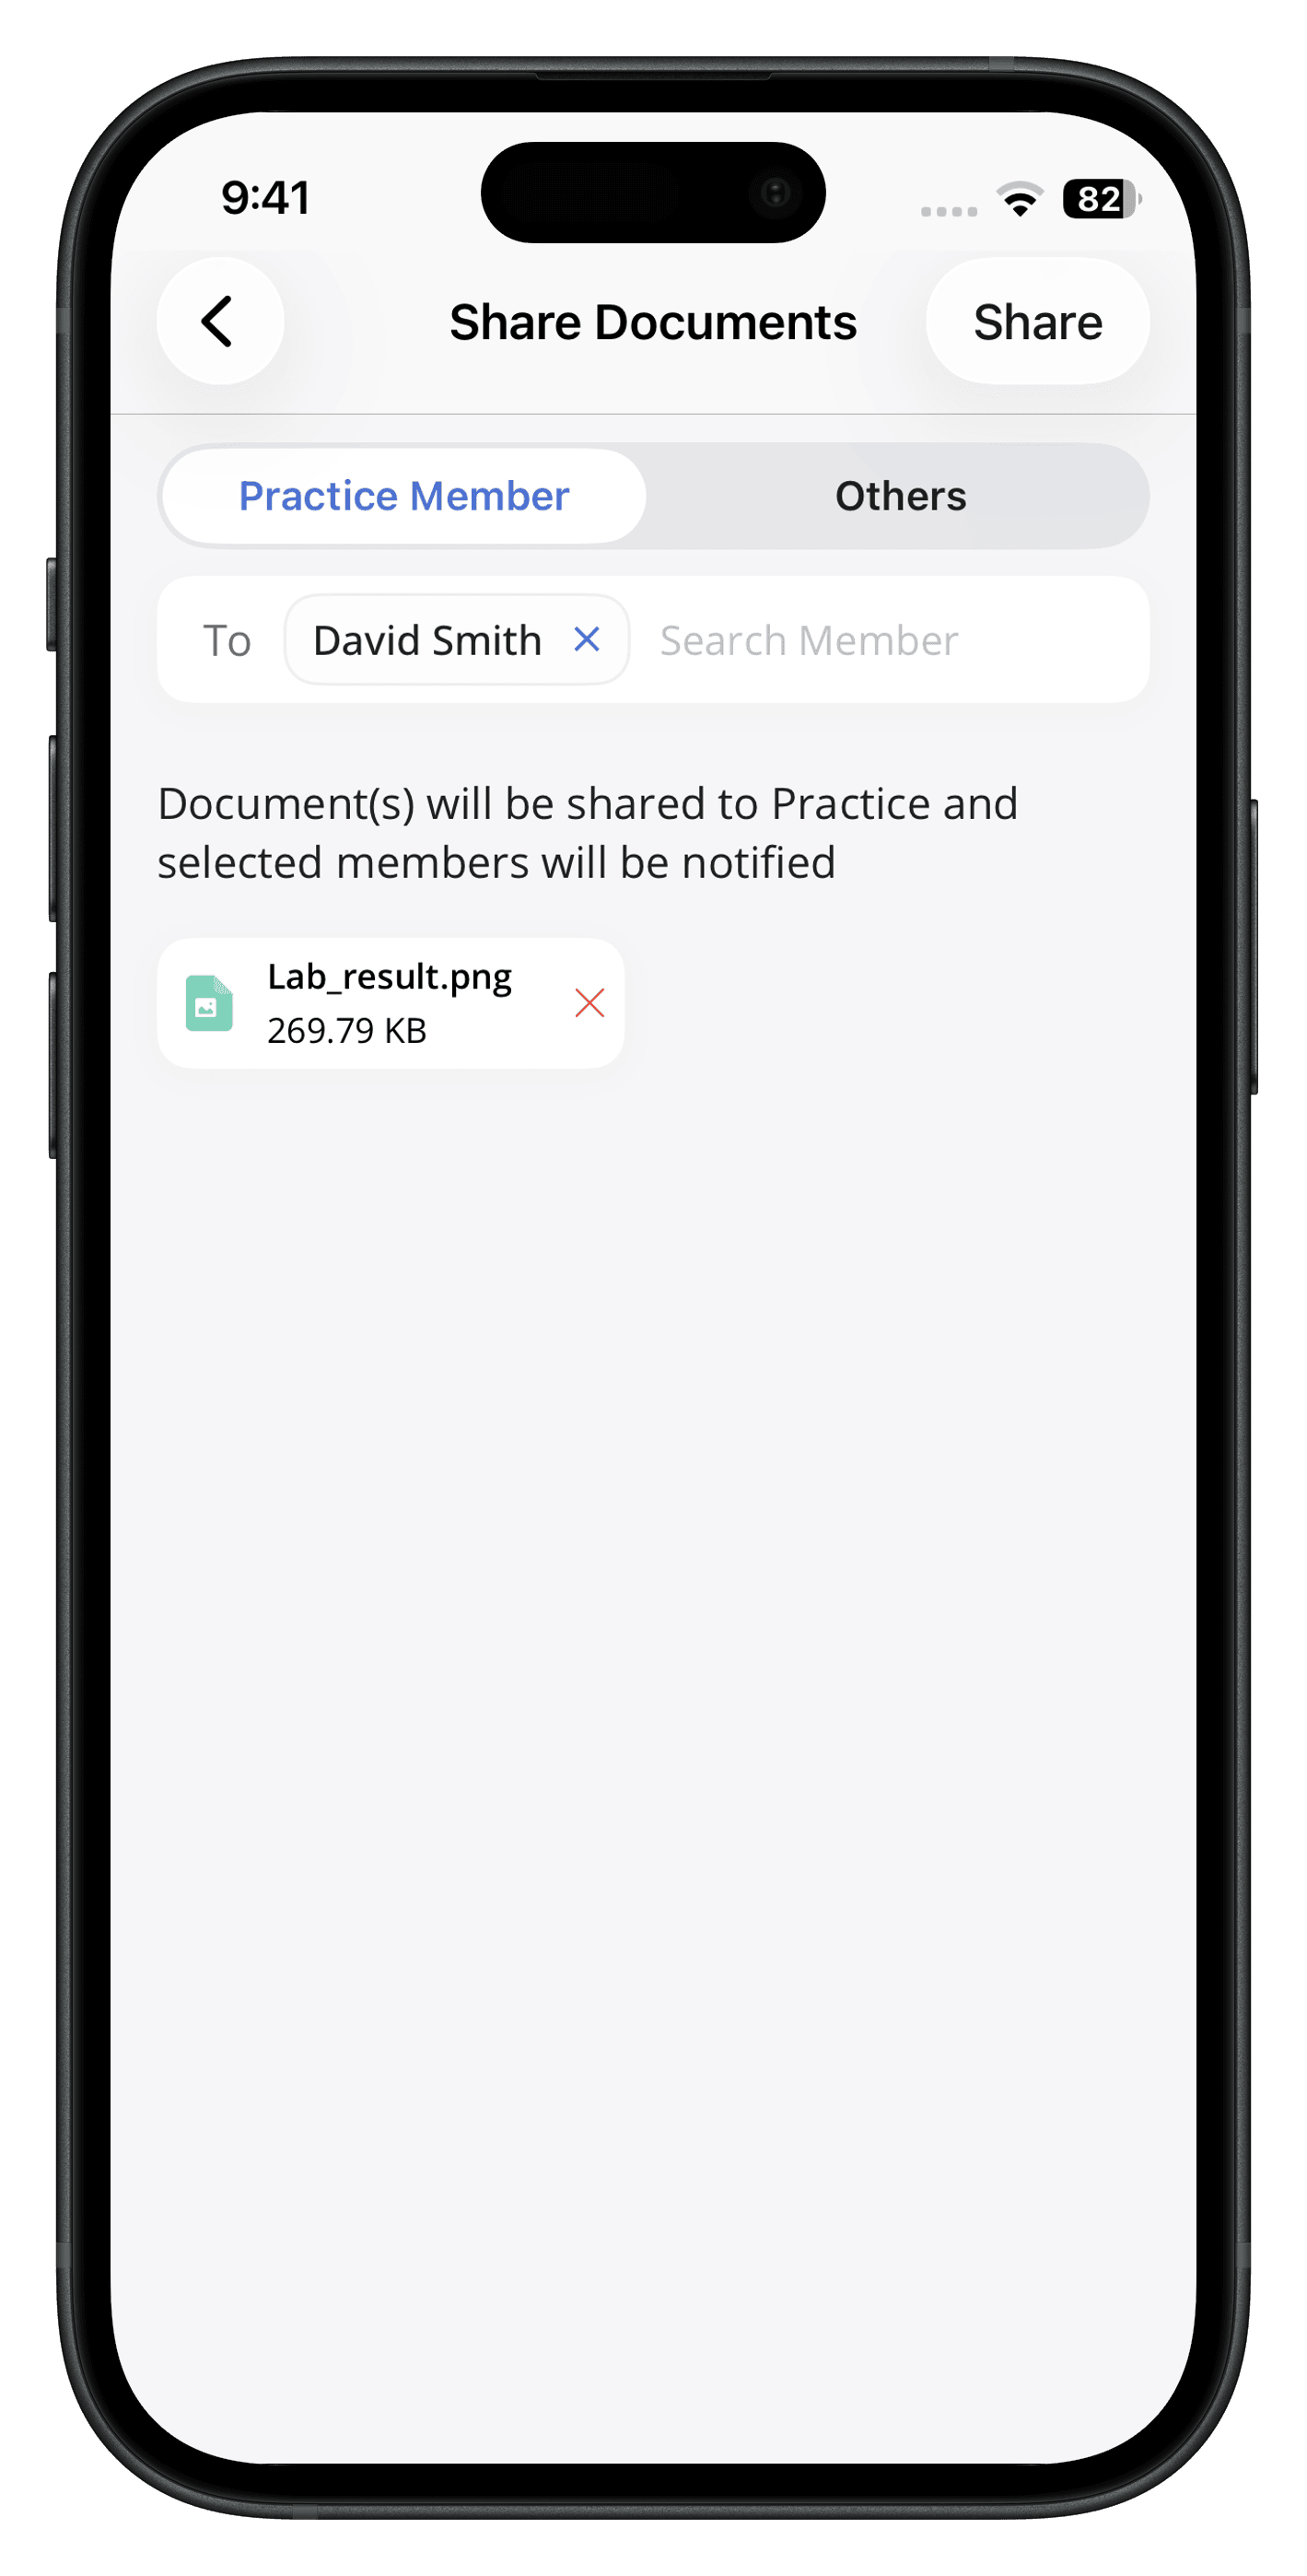
You can share documents either internally with a Practice member or an External Contact.
- Navigate to 'My Health > Documents'.
- To share multiple documents, swipe left or long-press to select them and then tap the 'Share' button.
Sharing Document Externally
- Tap on the 'Others' section and search for saved contacts or add a new contact by entering a name and email address.
- Set a preferred Expiry time for the Document. By default, it is set to 1 day.
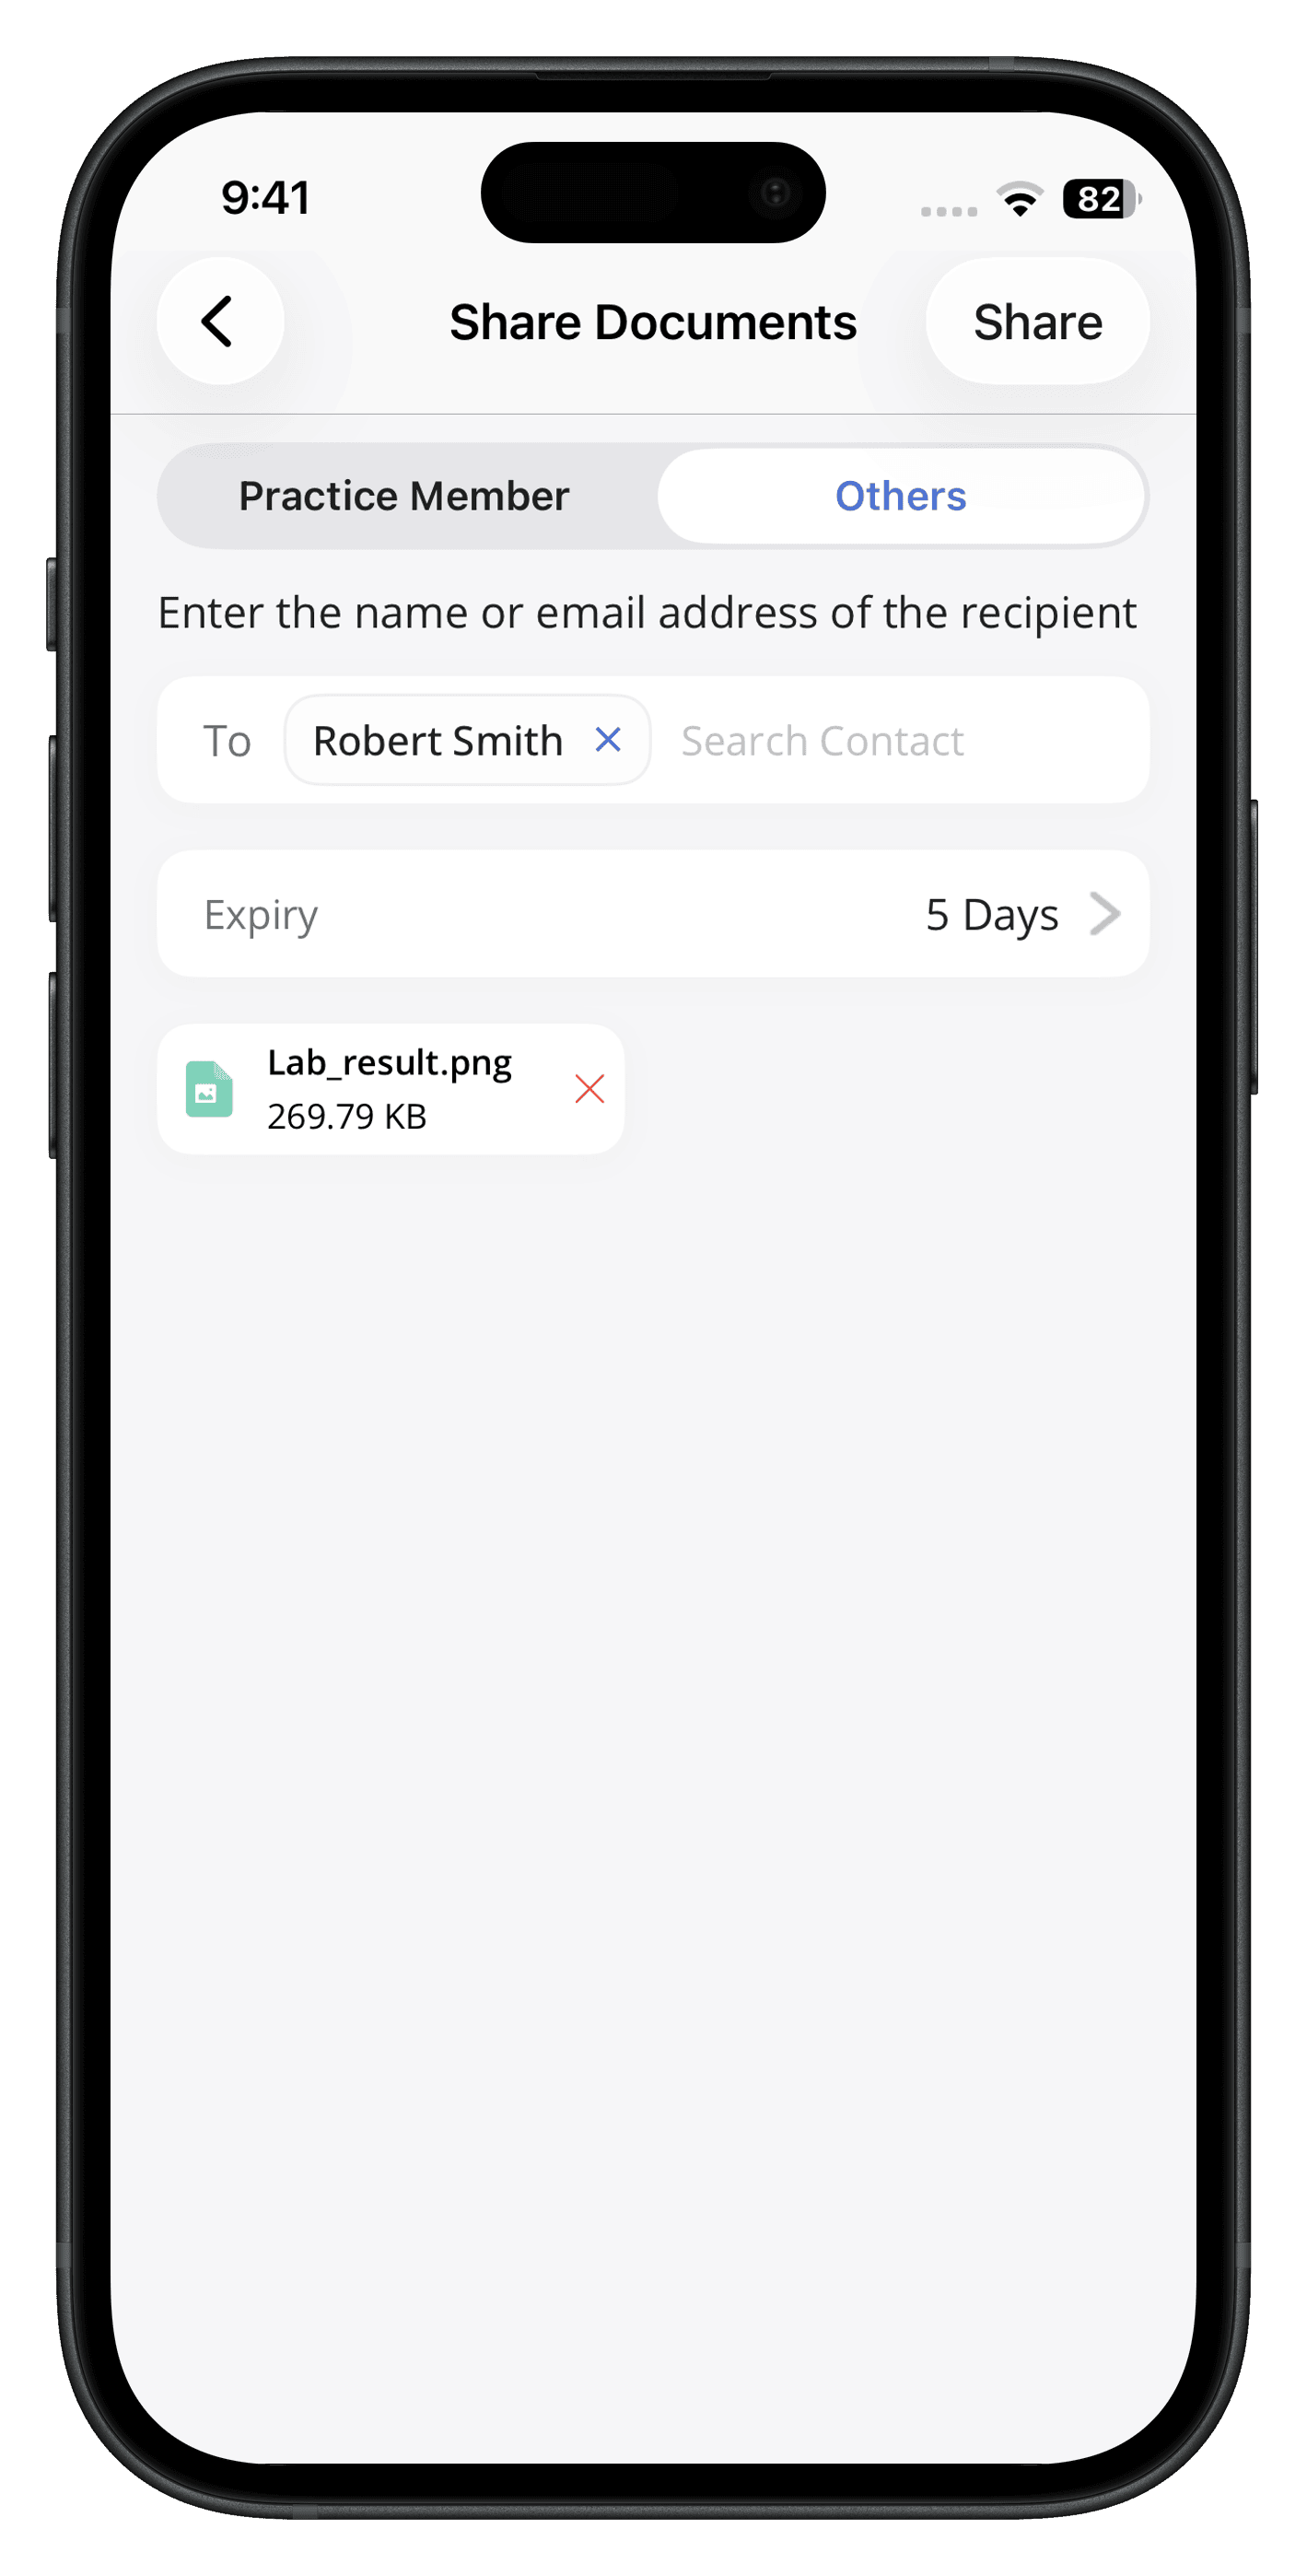
- Tap on the 'Share' button.
Note: When you share a document externally, the recipient also receives a secret key via email, which is required to access the shared document.
Visit Summary
The provider generates a summary of the visit for the patient at the end of each appointment. The visit summary includes information on vitals, allergies, medication lists, orders, diagnoses, and upcoming appointments.
- Navigate to 'My Health > Visit Summary'.
- Tap on a visit to view in detail.
Prescriptions
The Prescriptions section displays medications and supplements.
- Active medications are shown by default.
- Use filters to view Active, Inactive, or All medications.

Note: Patients can edit medications added by them. Provider-added medications cannot be edited.
Requesting a Refill
- Navigate to 'My Health > Prescriptions'.
- Find the medication that you would like to have refilled.
- Select 'Refill'.
- Enter a reason.
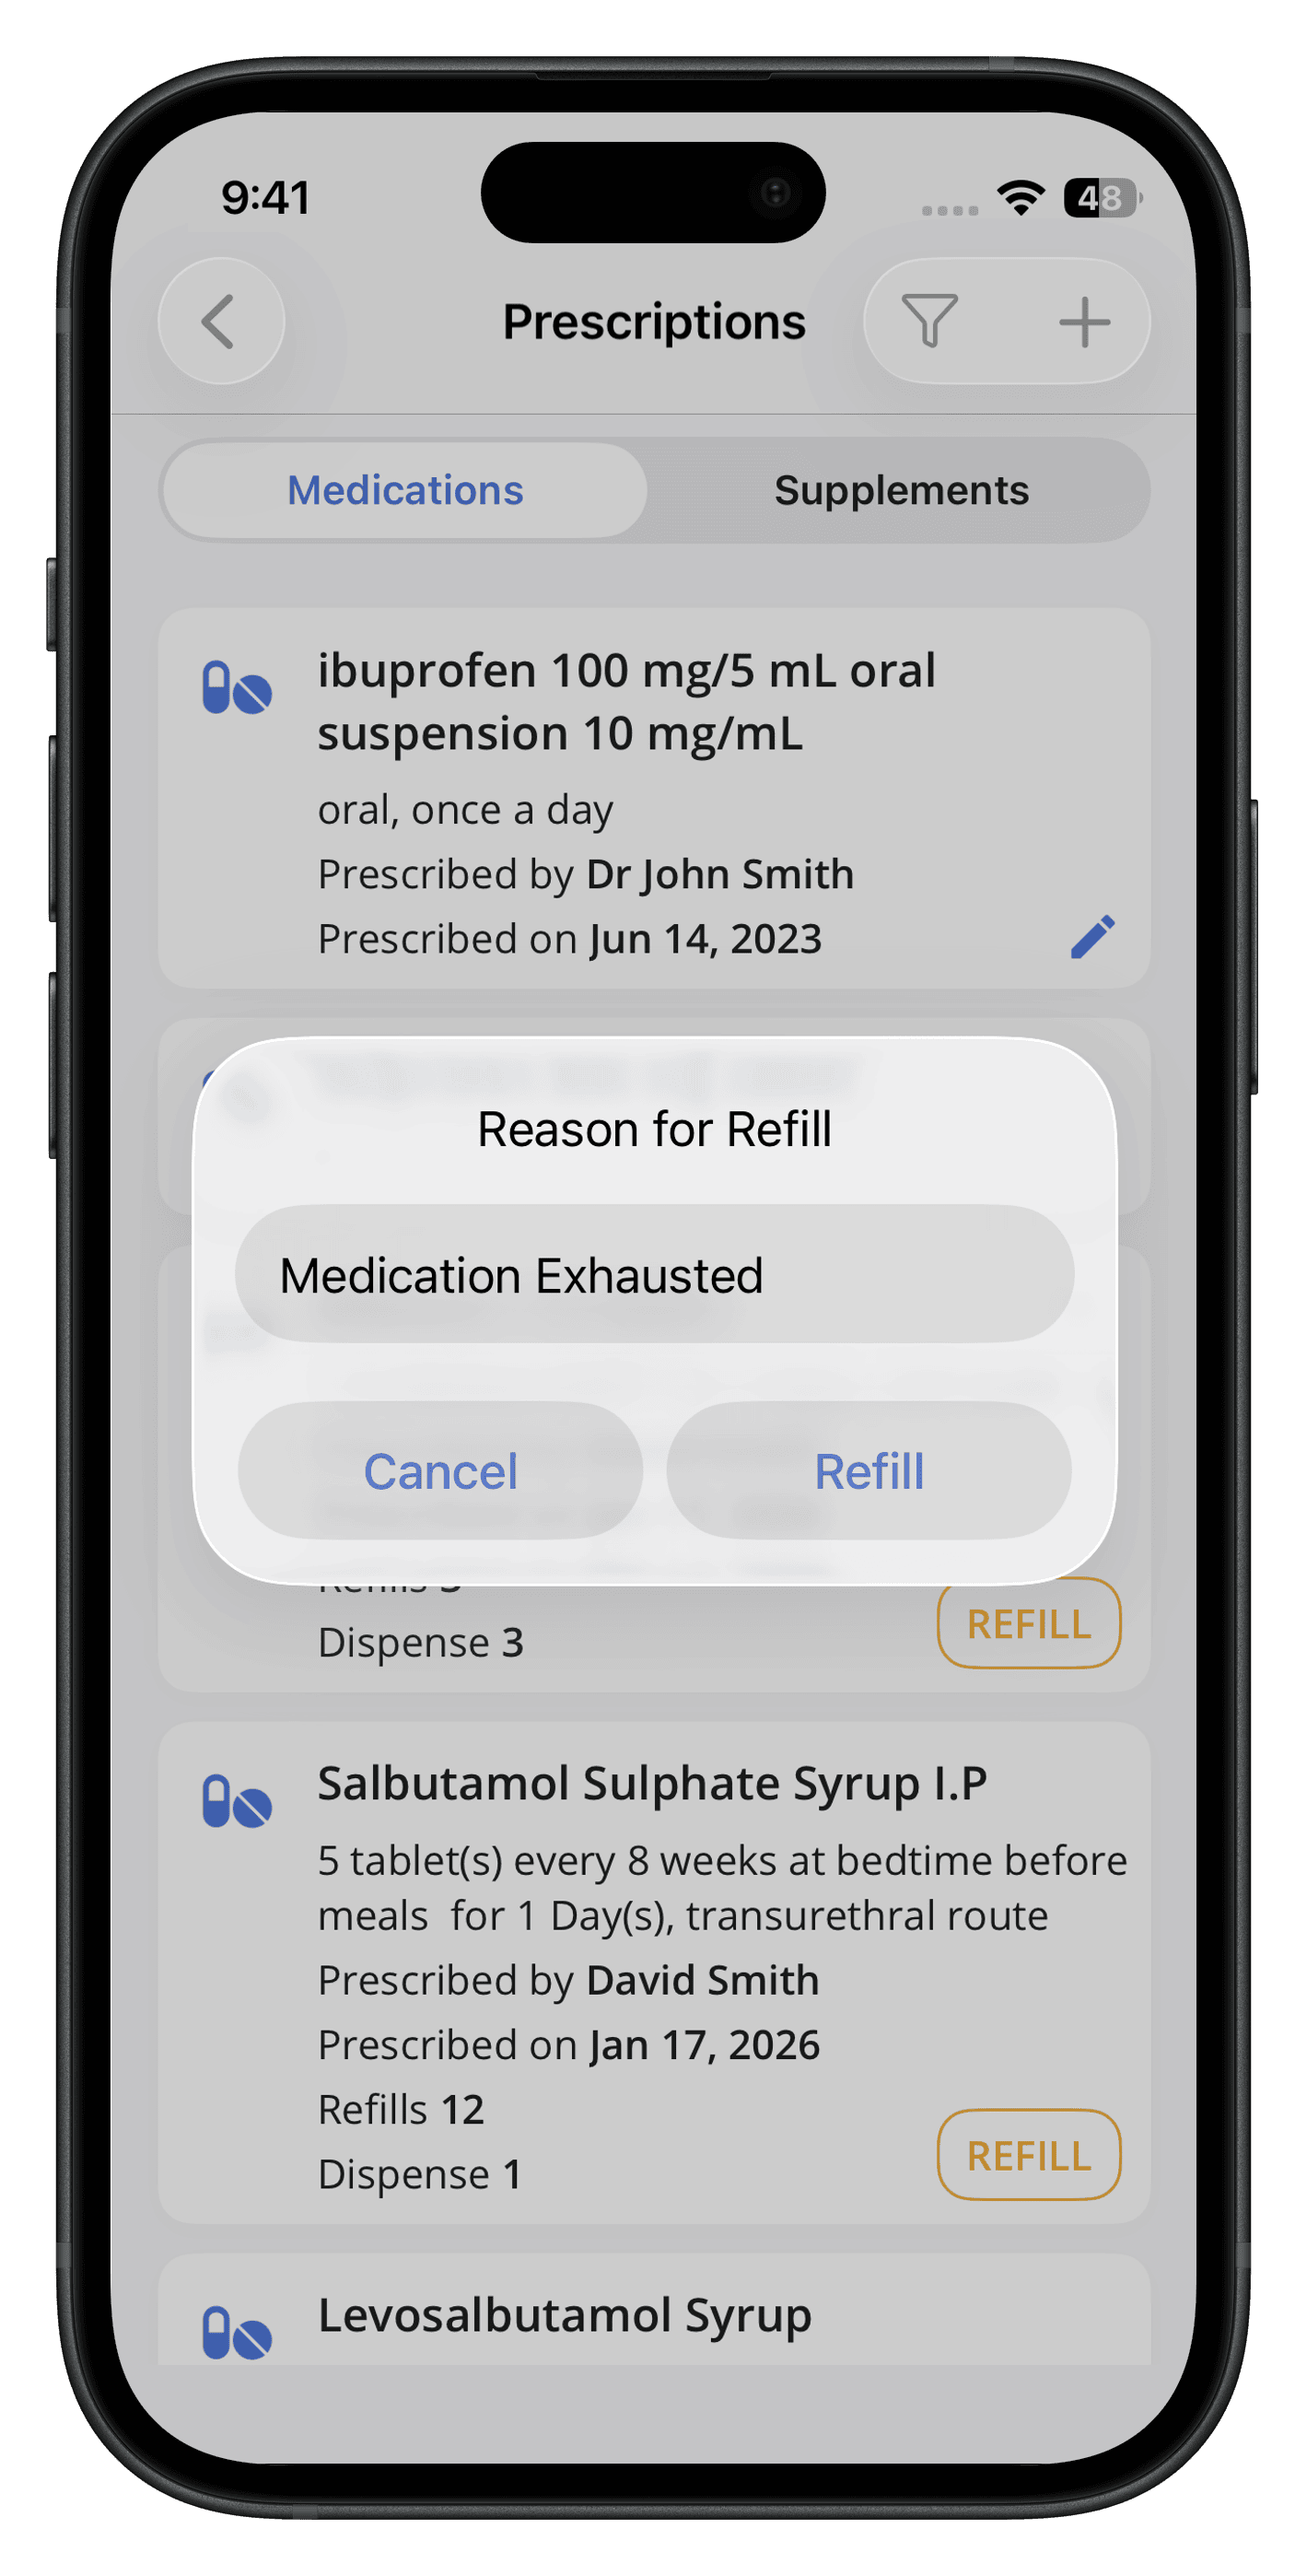
- Tap on the 'REFILL' button.
Refill request will be successfully submitted.
Adding a Medication or Supplement
- Navigate to 'My Health > Prescriptions'.
- Tap on the 'Add (+)' icon.
- Enter drug name, start and end date, and reason for taking.
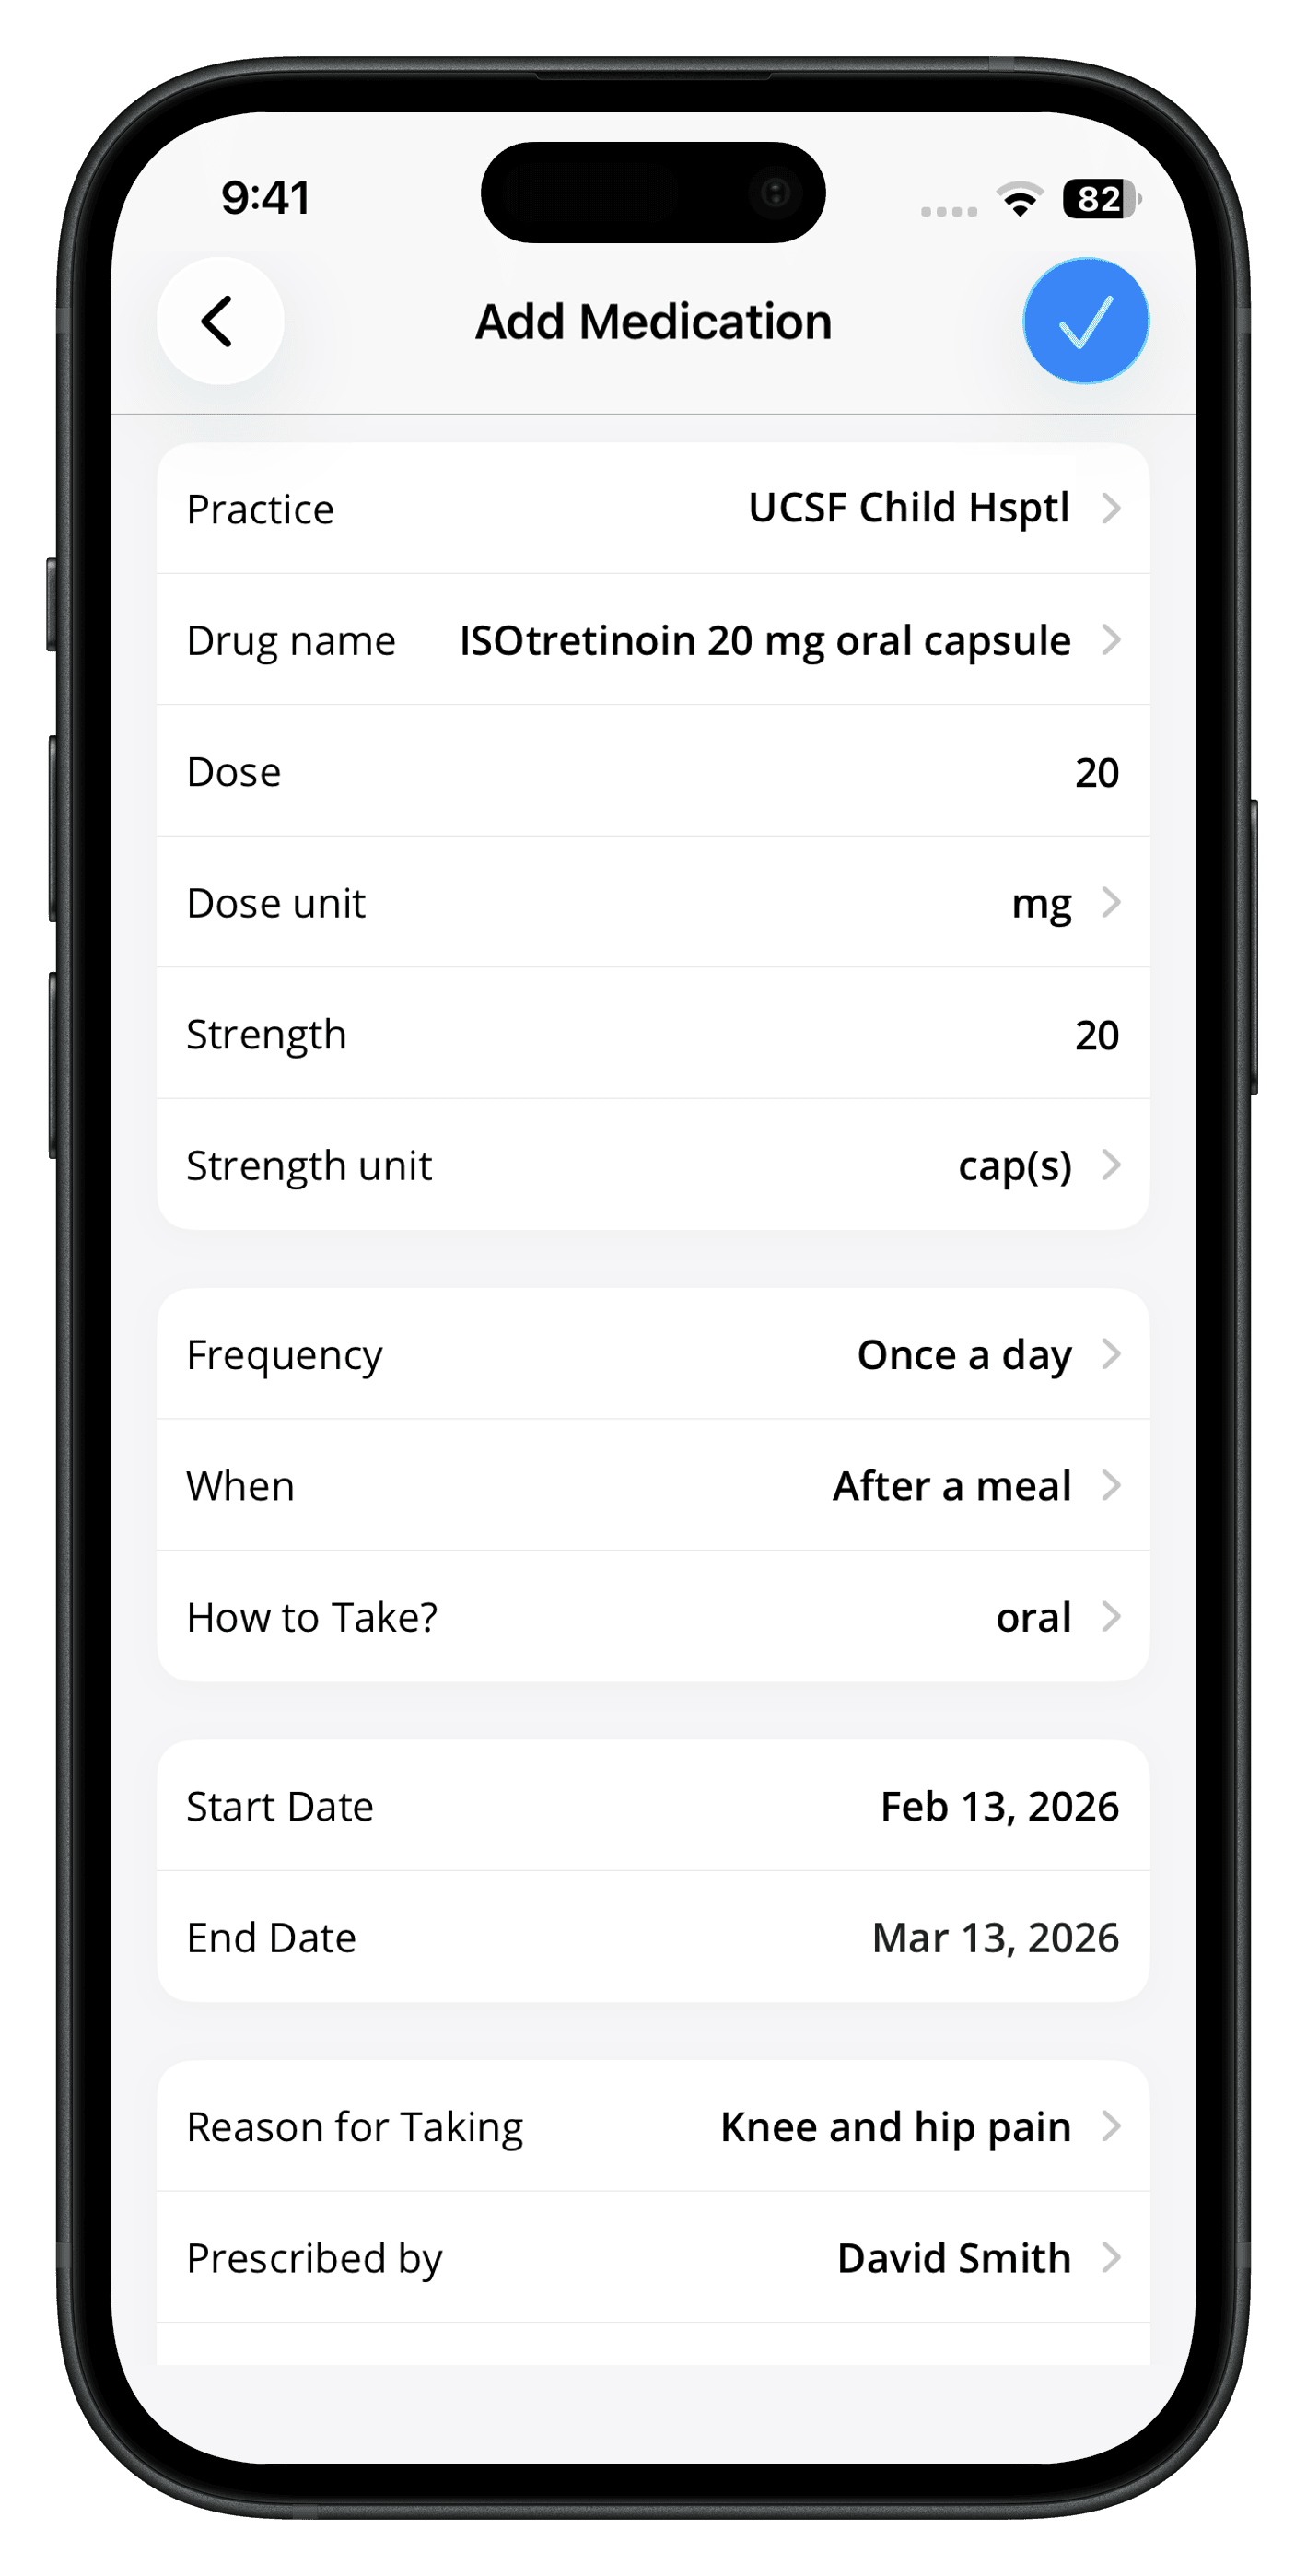
- Tap on the 'Done' icon.
Allergies
The Allergies section allows you to add, edit, and manage allergy information by type, status, and severity.
You can filter allergies based on the status of Active and Inactive.
Adding an Allergy
- Navigate to 'My Health > Allergies'.
- Tap on the 'Add (+)' icon.
- Enter allergen details, type, status, severity, and observed date.
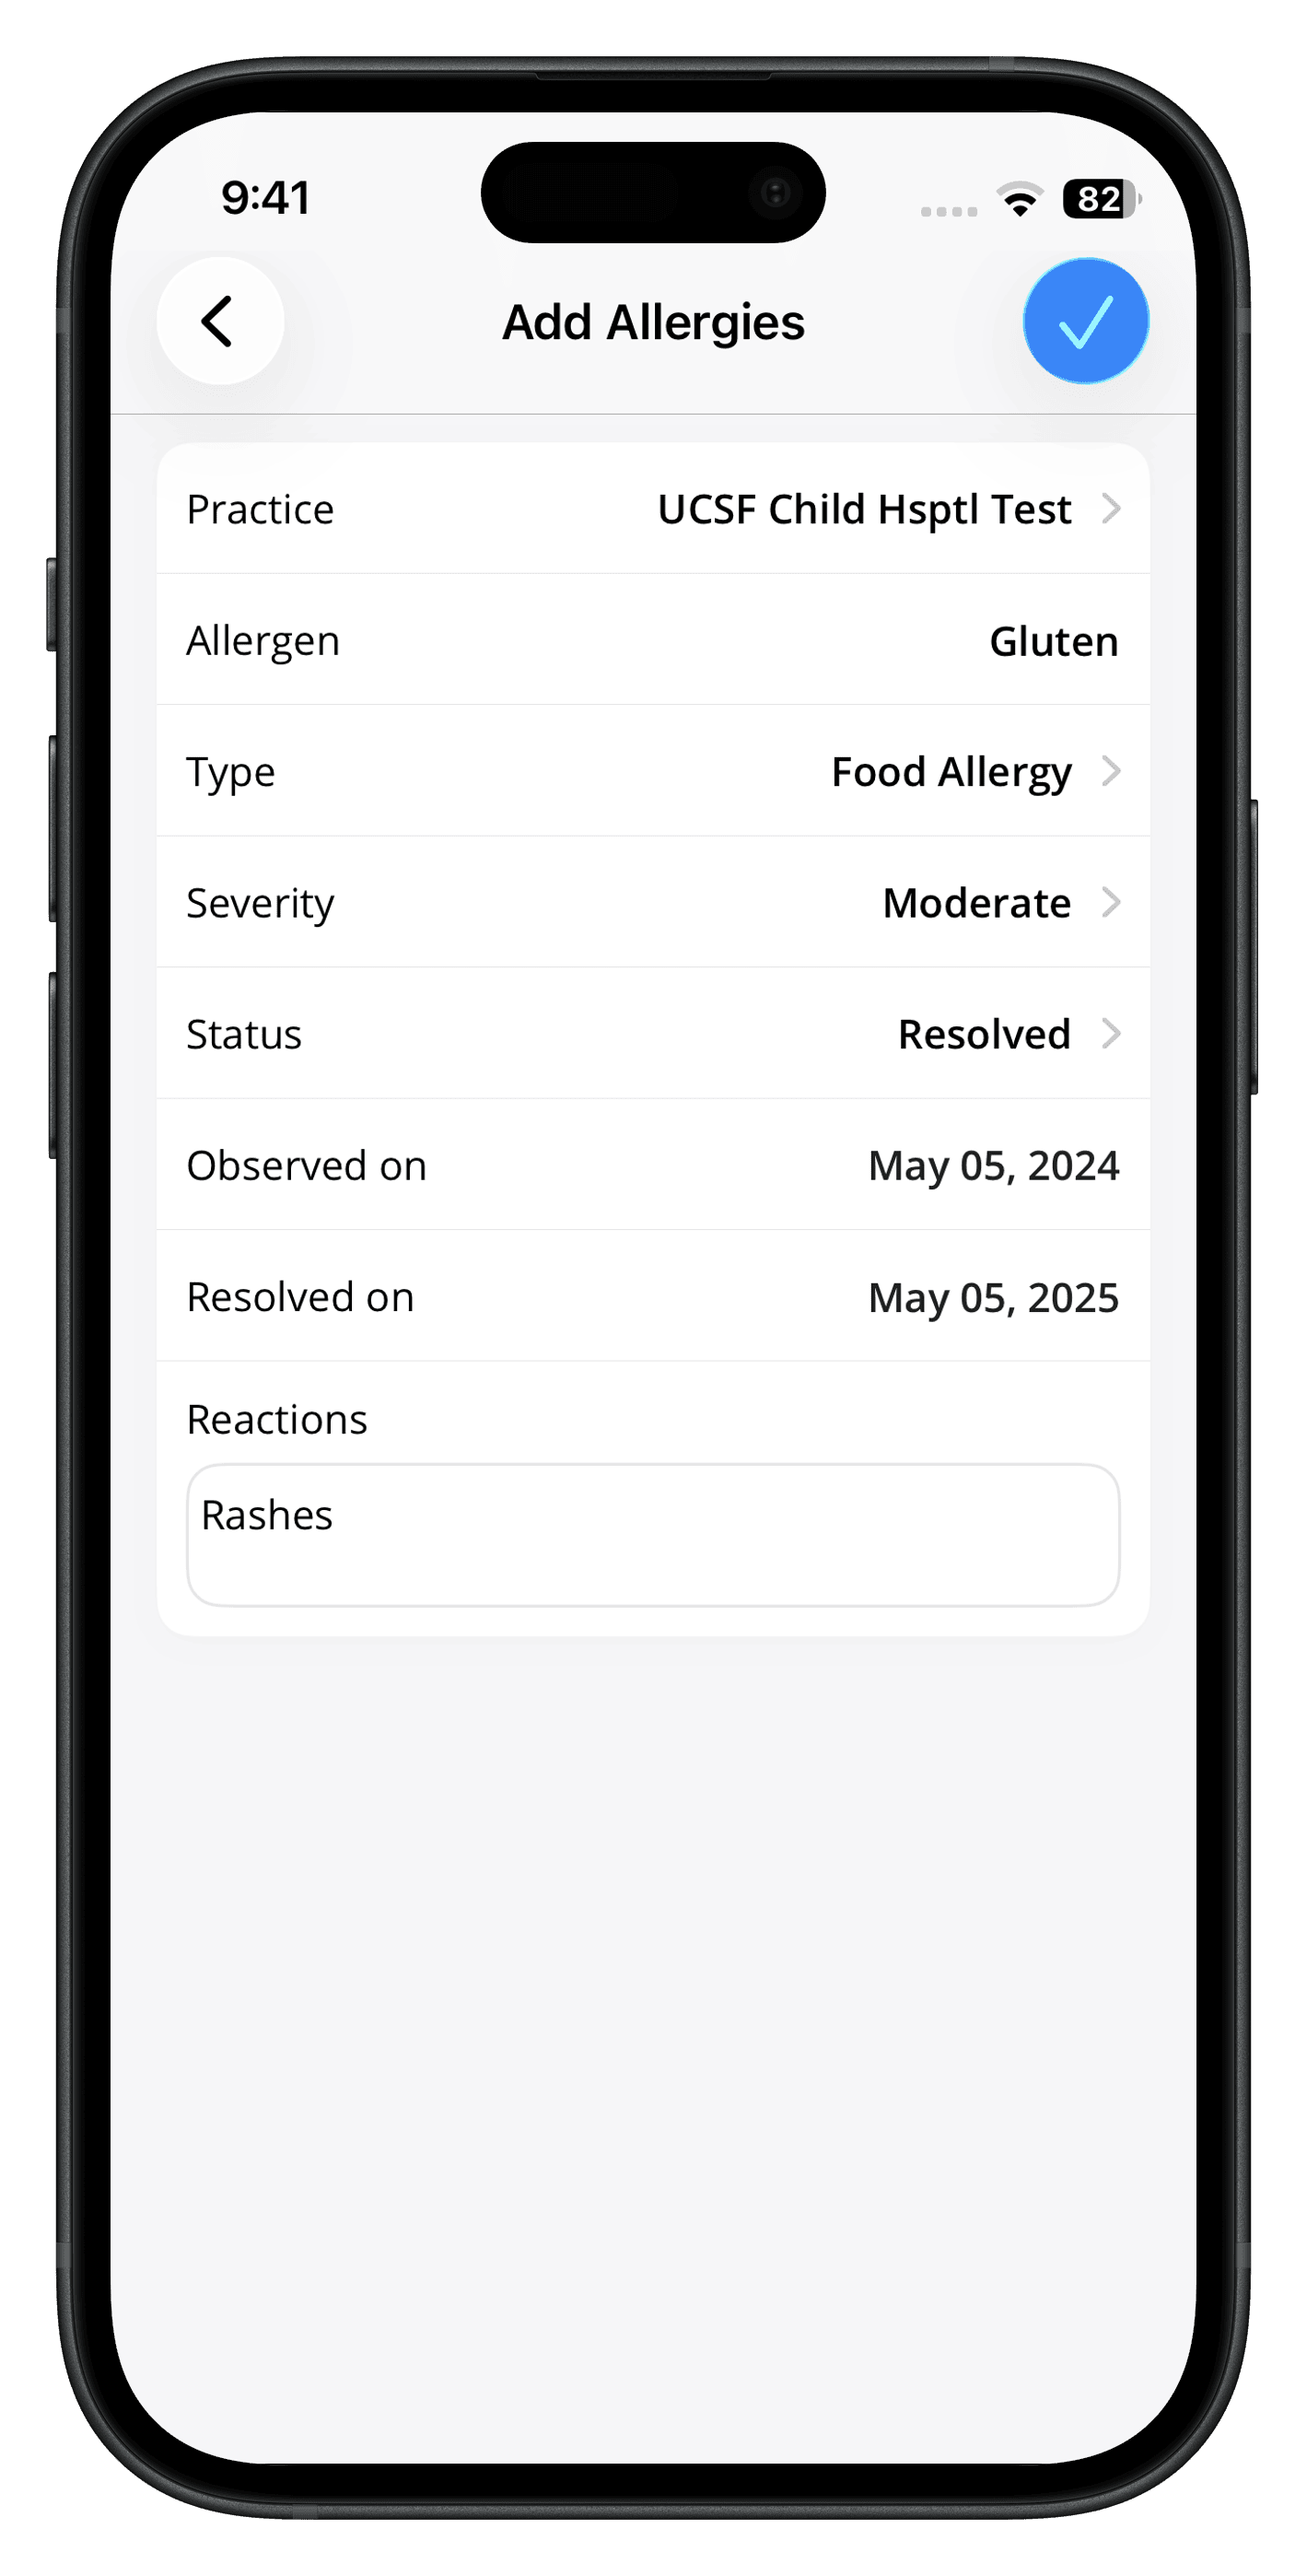
- Tap on the 'Done' icon.
You can tap on the Allergy to edit severity, status, and Observed date.
Note: Patients can edit entries added by them. Provider-added entries cannot be edited.
Labs
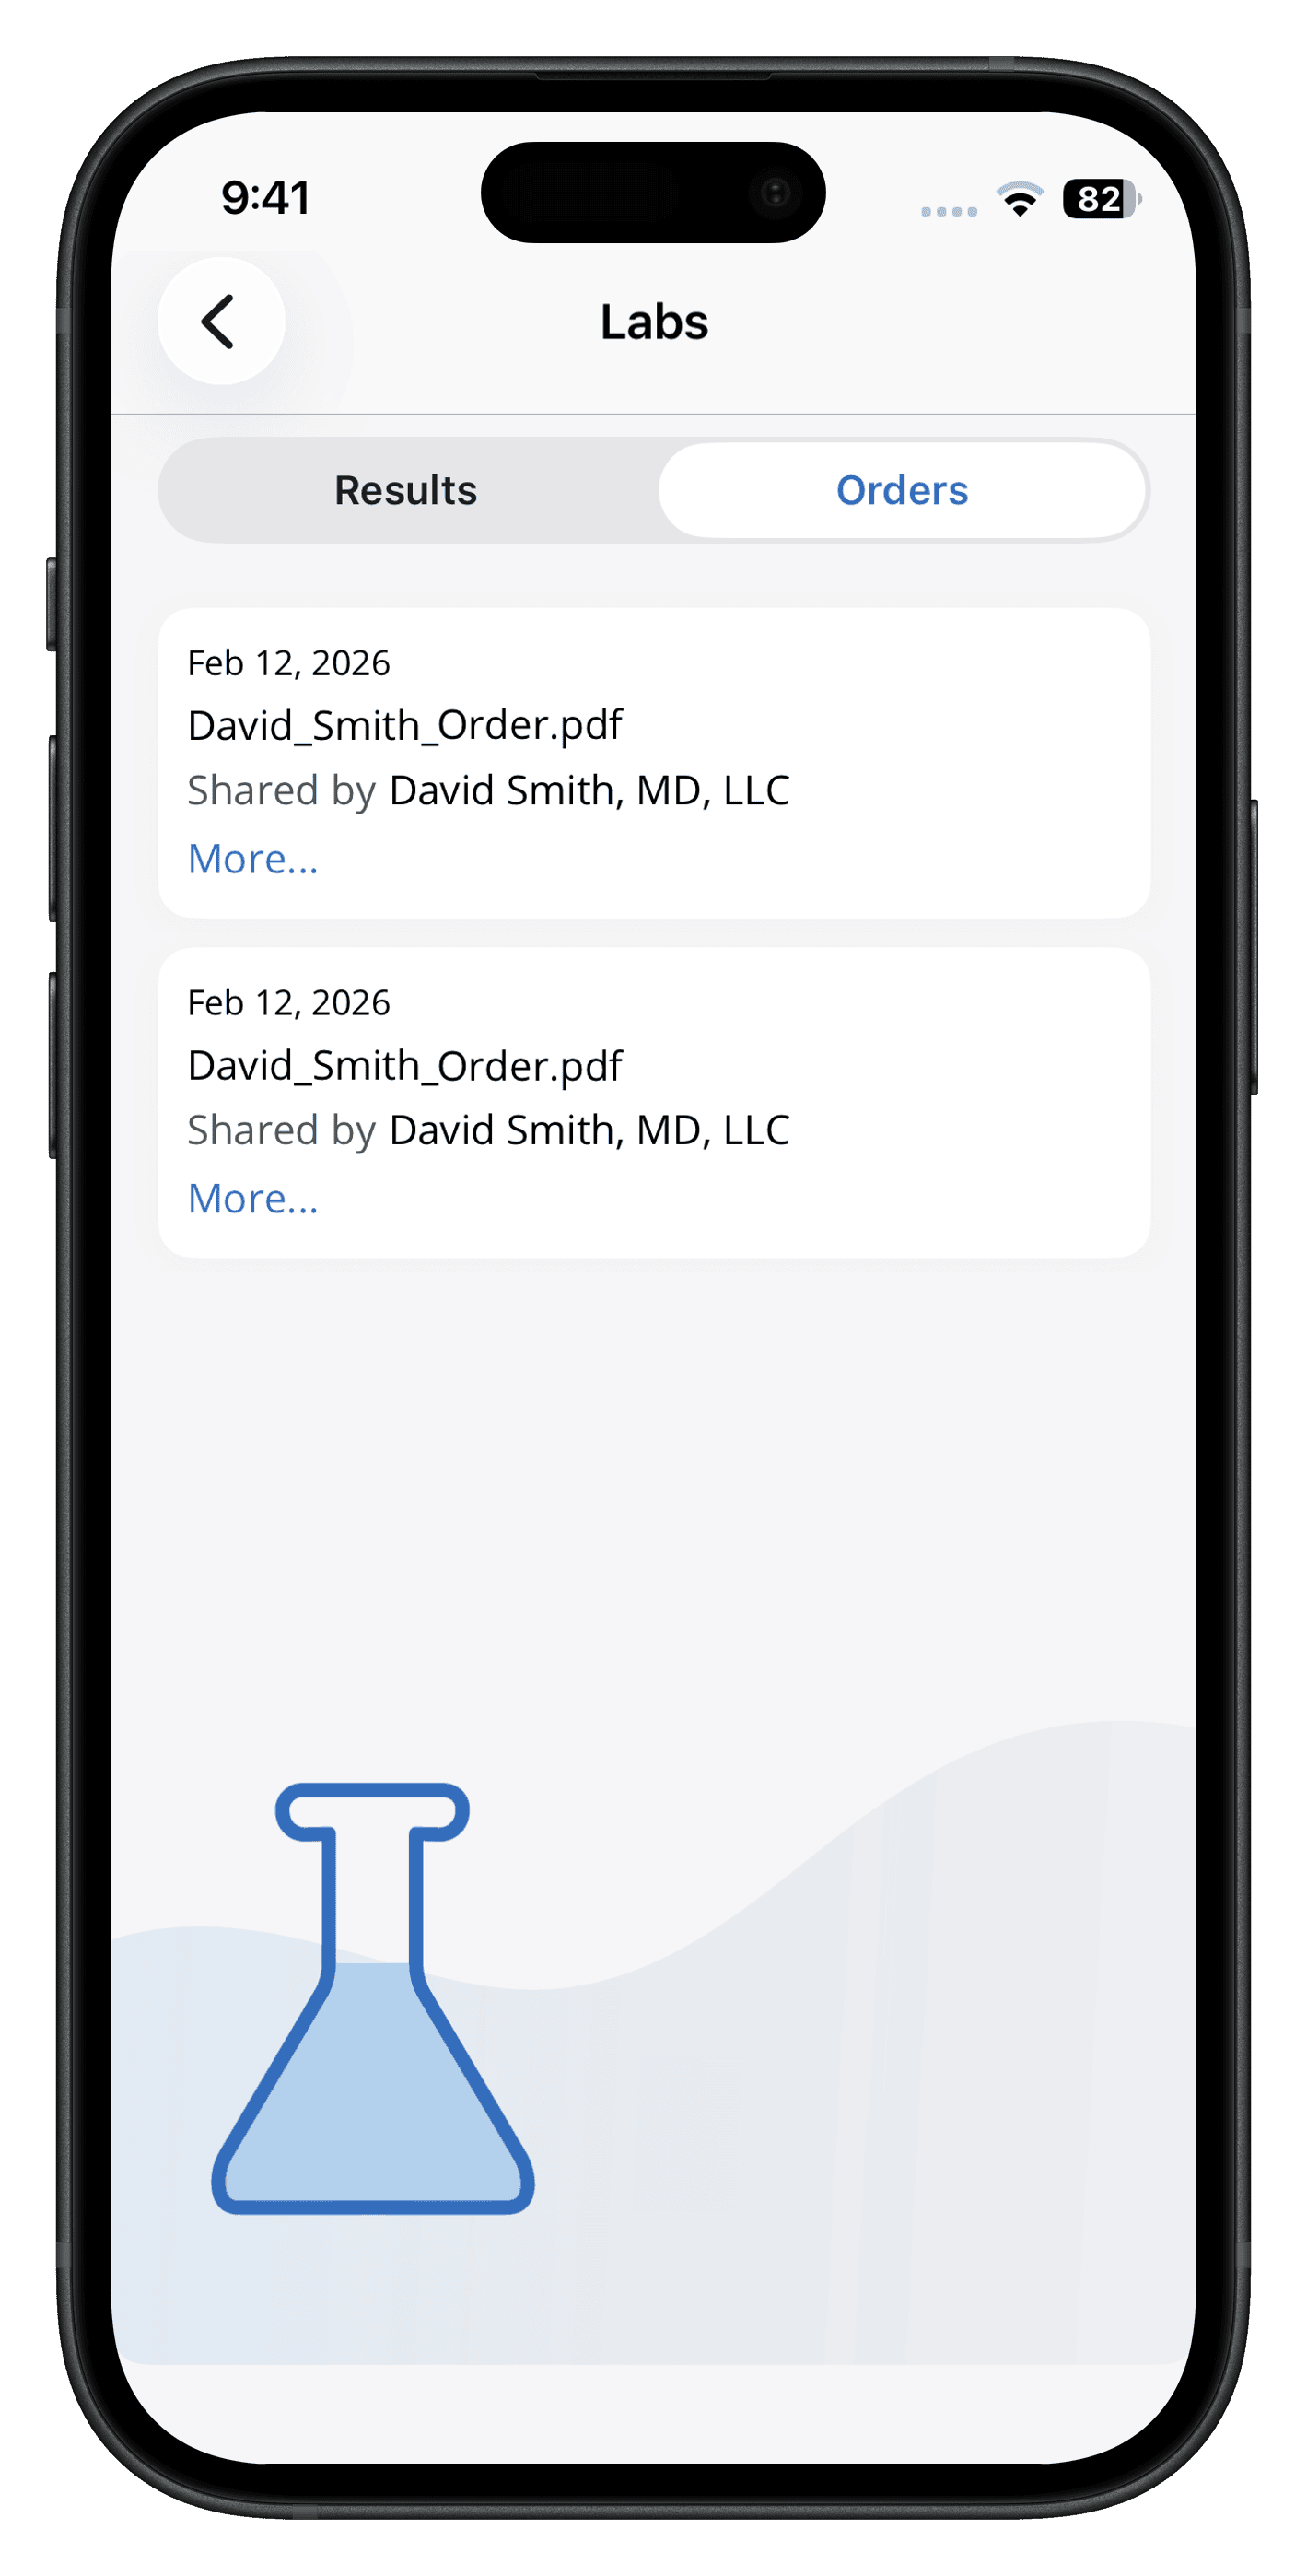
The Labs section displays Lab results and Lab orders issued by the Provider for you to complete the required tests.
- Abnormal values are highlighted automatically.
- Select a lab entry to view the full report.

Procedures
The procedure section displays all your past procedures. Entering procedure details automatically updates your health passport, which can be shared with your provider before the visit to decide on an appropriate treatment plan.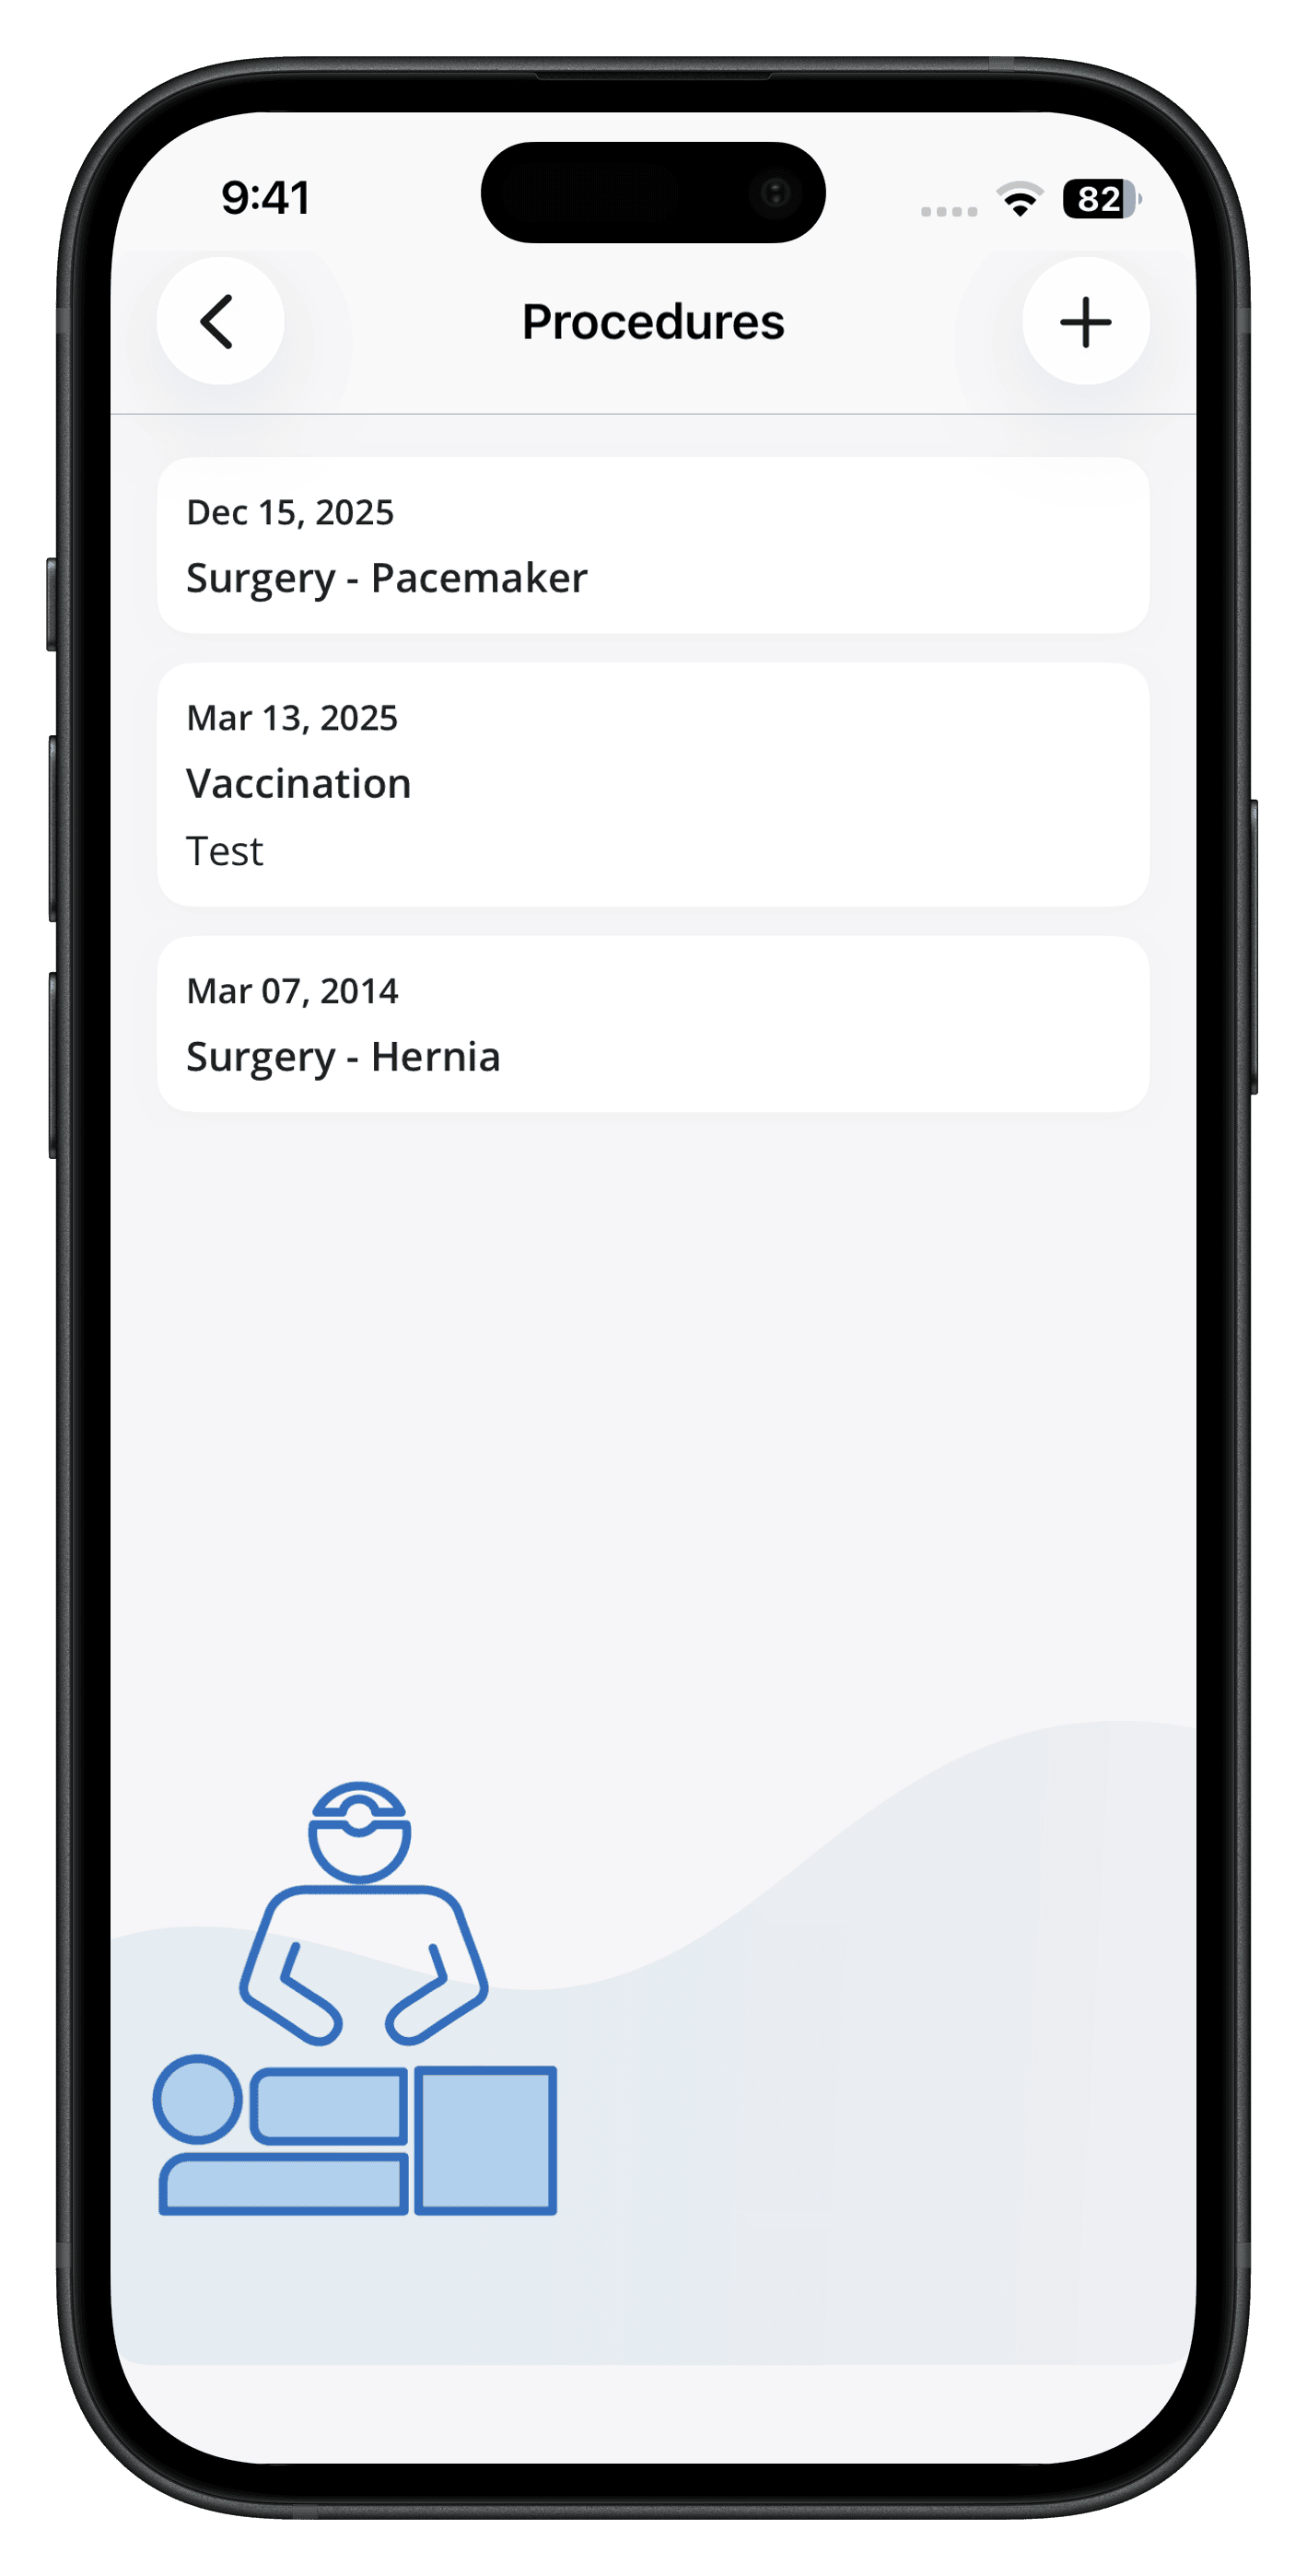
Adding a Procedure :
- Navigate to 'My Health > Procedures'.
- Tap on the 'Add (+)' icon to add a new entry.
- Enter procedure details.
- Tap on the 'Done' icon.
You can tap on an added Procedure to update the date and notes.
Immunizations
You can view your vaccination history, add, edit, and delete immunizations from the Immunizations section.
Immunizations are listed based on the date of Vaccination.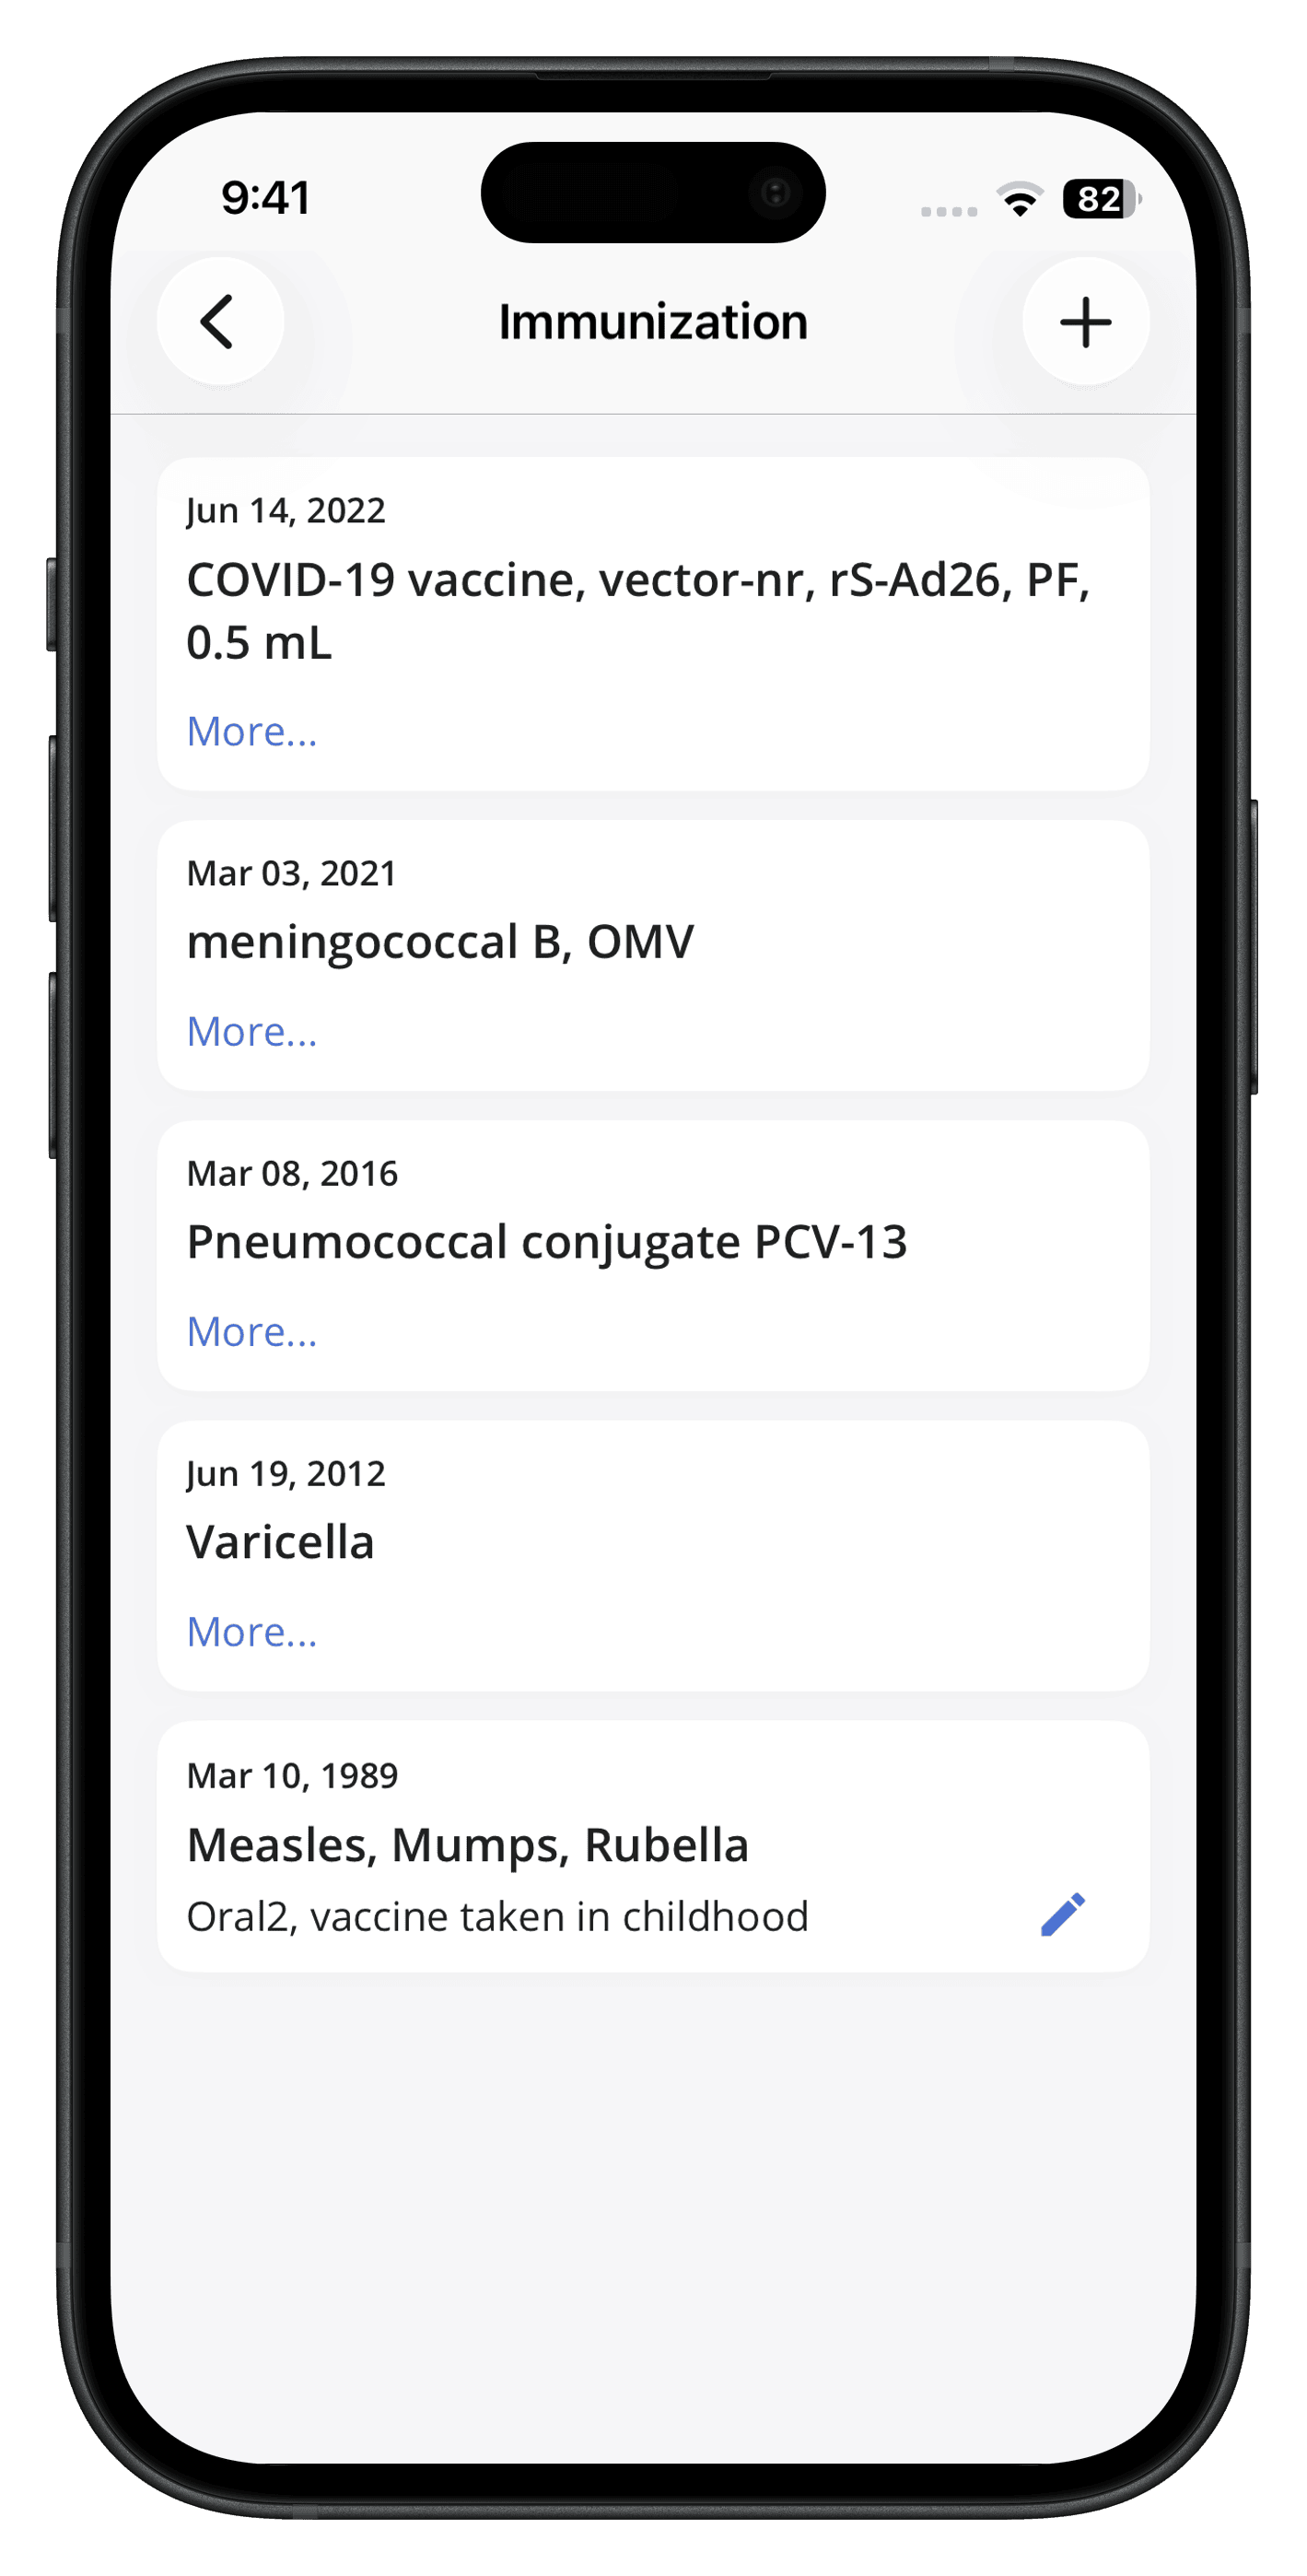
Adding an Immunization
- Navigate to 'My Health > Immunizations' section.
- Tap on the 'Add (+)' icon.
- Enter the Vaccine details.
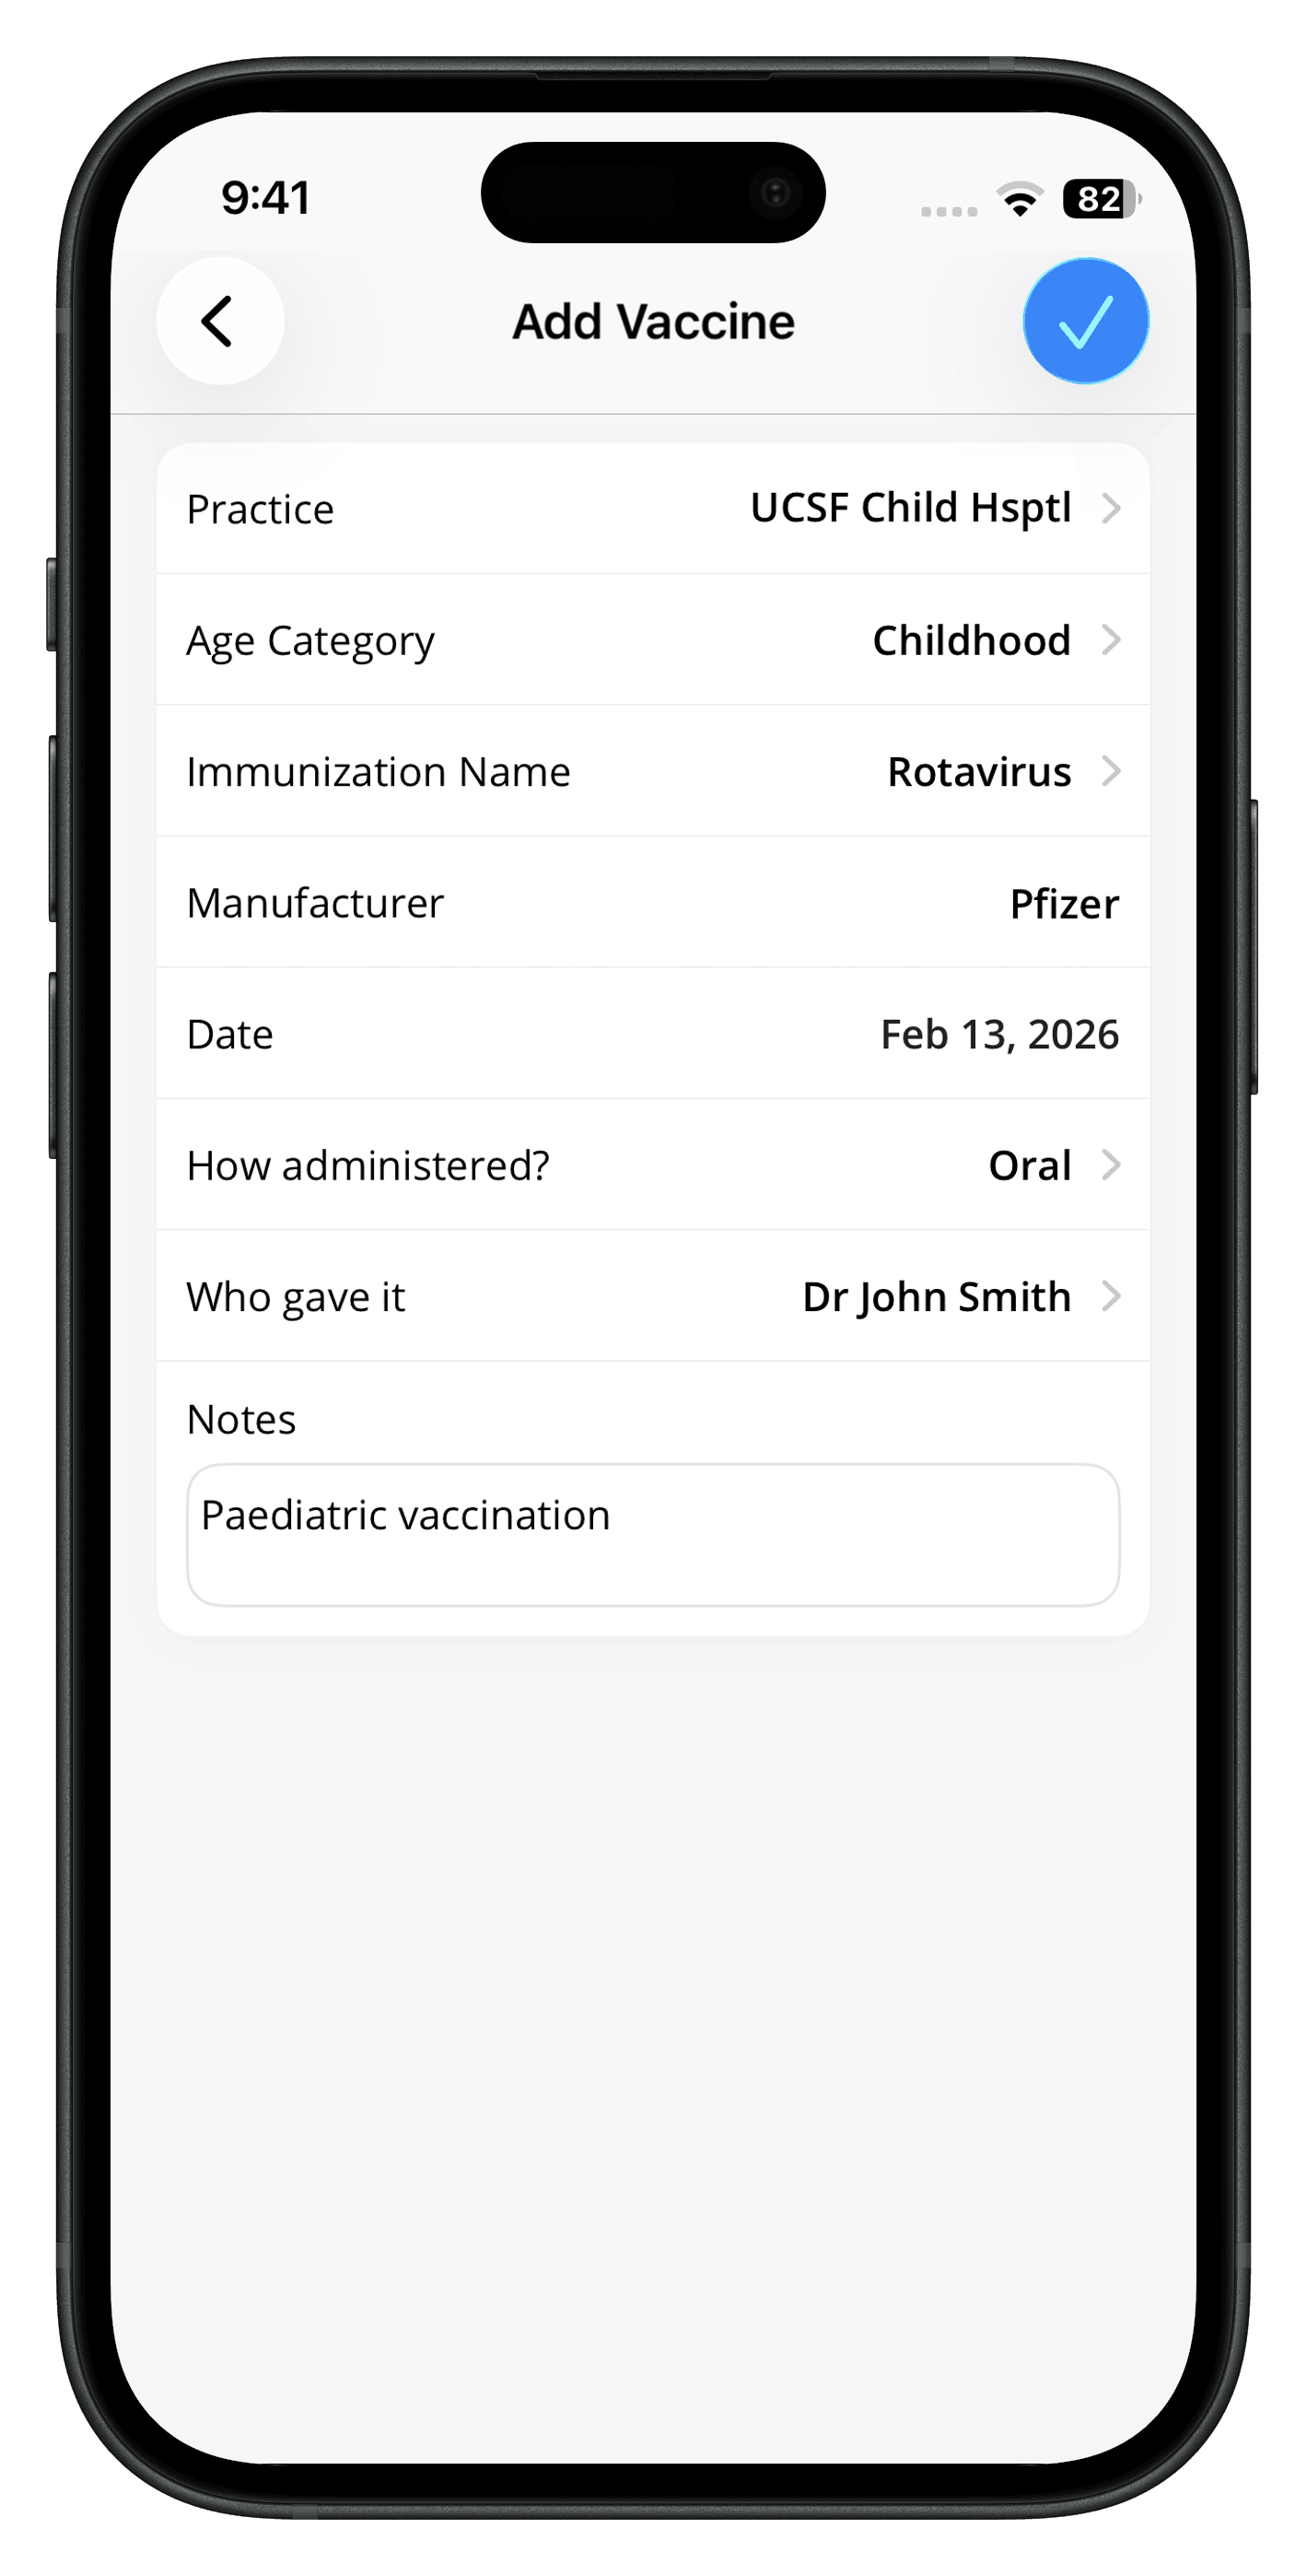
- Tap on the 'Done' icon.
Note: Patients can edit entries added by them. Provider-added entries cannot be edited.
Insurance
The Insurance section provides access to your insurance plan and validity details, covering primary and secondary insurance information.
Adding Insurance
- Navigate to 'My Health > Insurance'.
- Tap on the 'Add (+)' icon.
- Fill out the required fields.
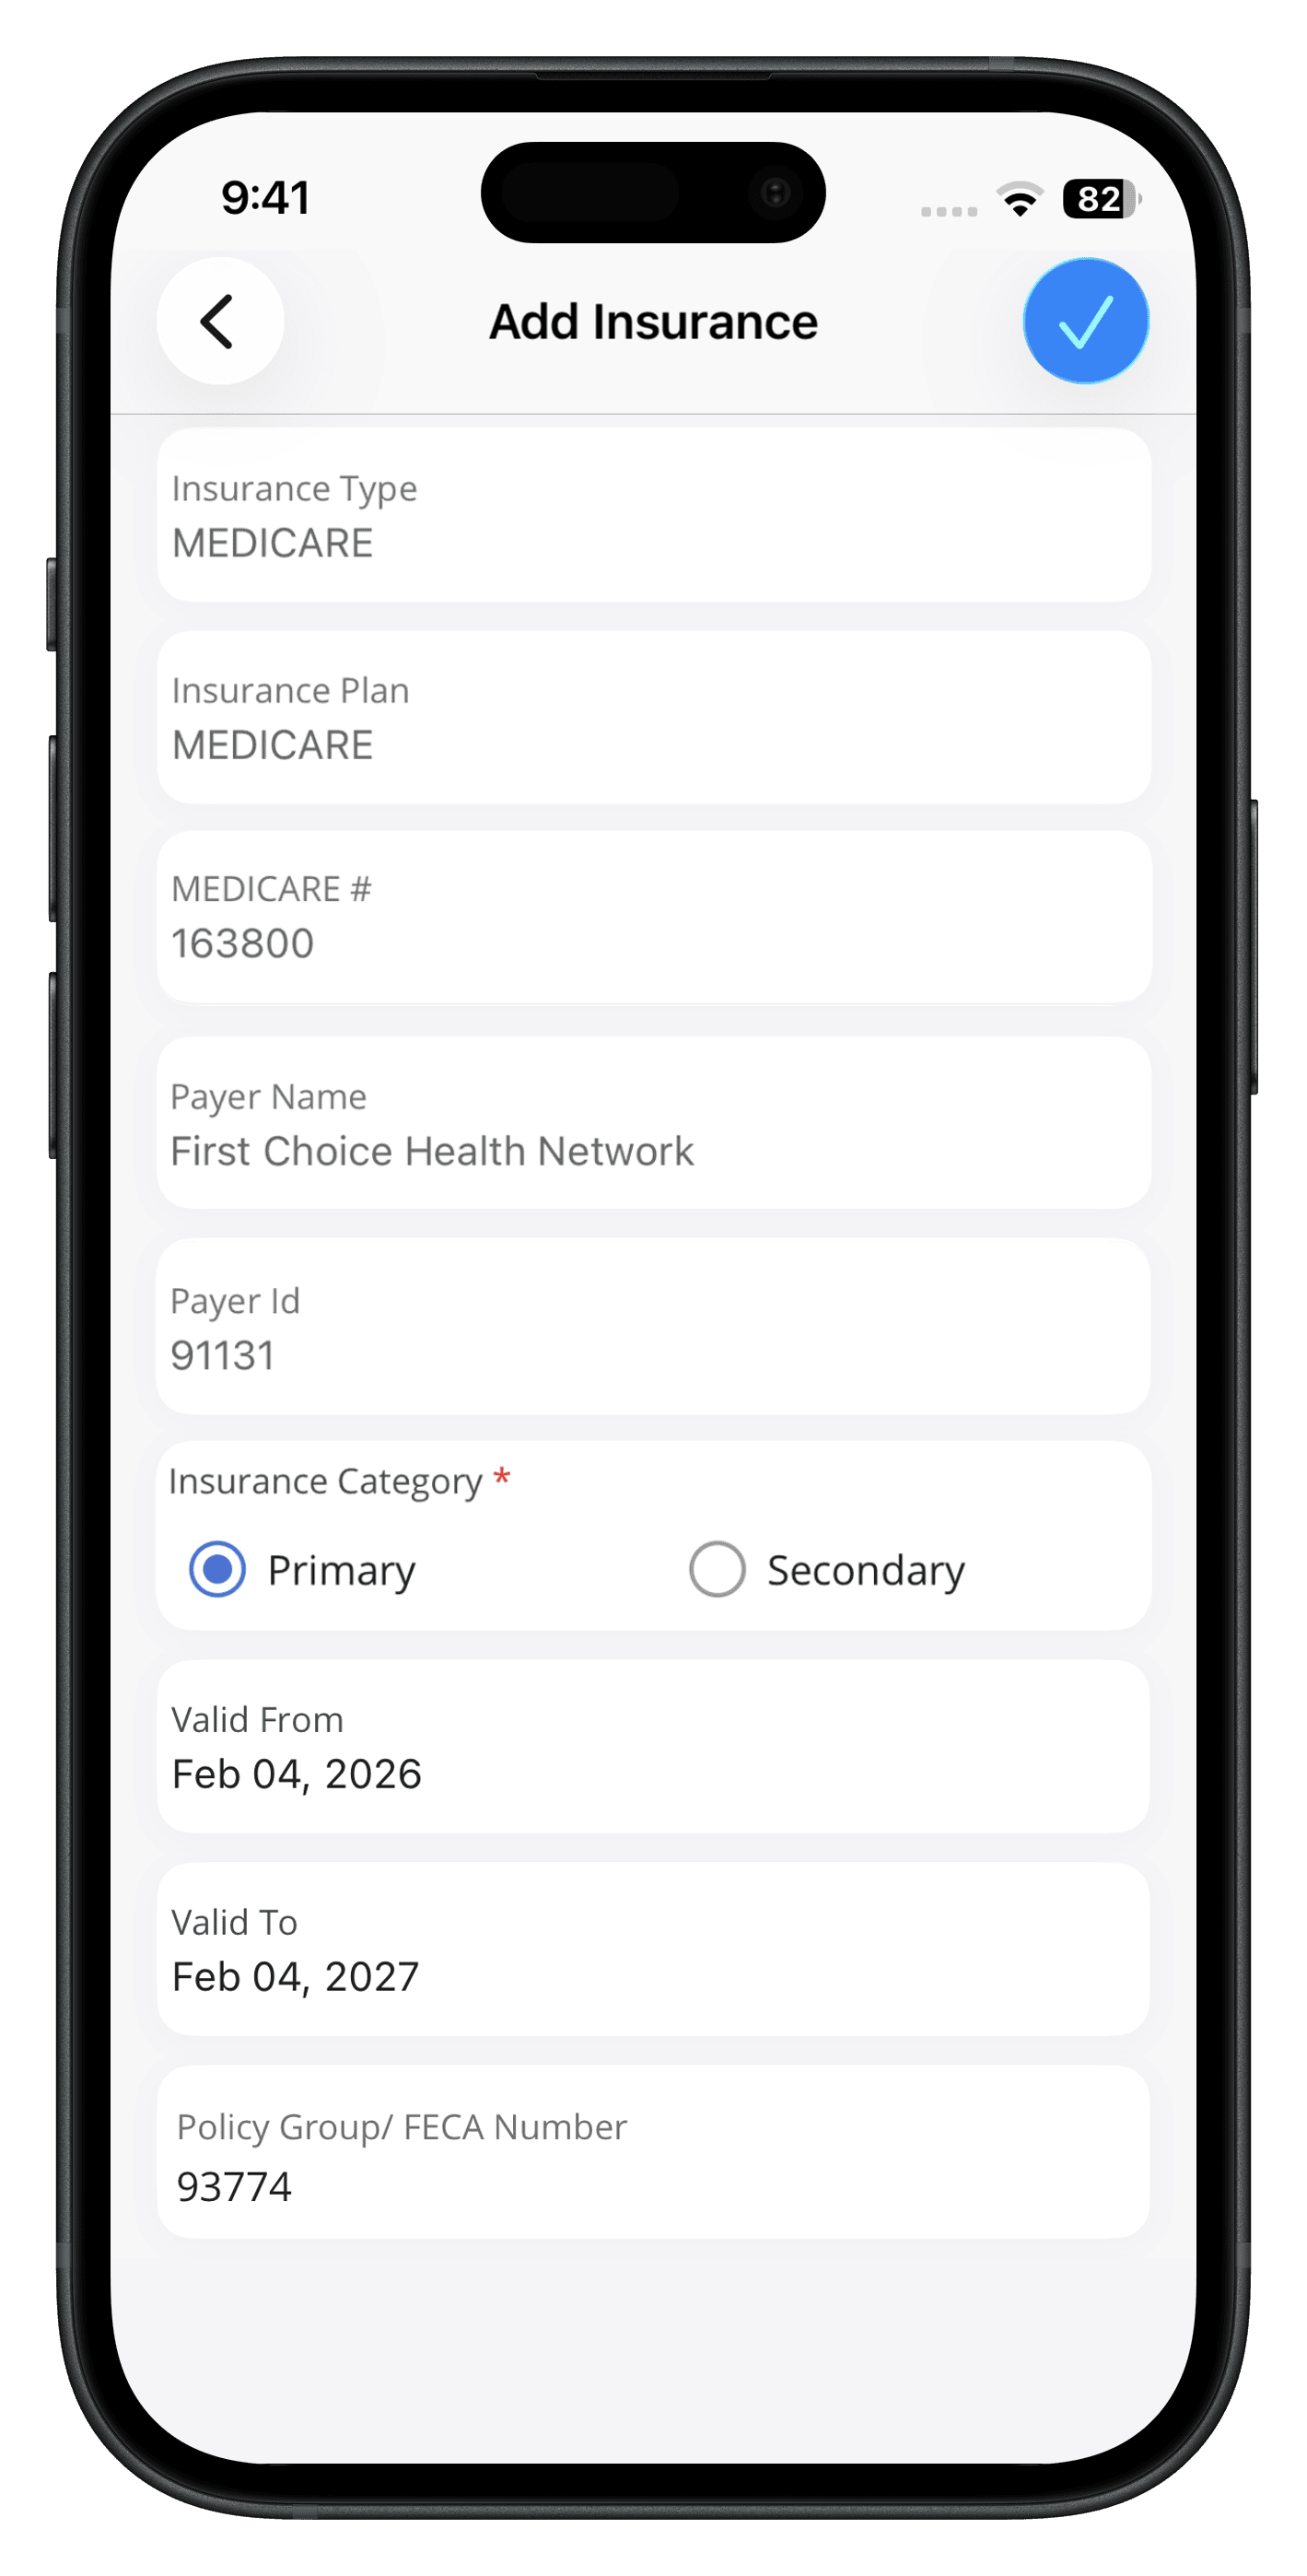
- Tap on the 'Done' icon.
Note: The Insurance details added here will not be shared with your provider or practice.
The 'Useful Info' section displays any additional information updated by the Practice or Provider, and the 'About' section shows the information of your linked Facility and Provider.
Sync Health Record to Charm mPHR
You can now sync Health records from your Apple Health to Charm mPHR.
Keep Track of vitals like height, weight, heart rate, and more.
New users can enable this feature by :
- Navigate to the 'My Health > Wellness' section and tap on 'Get Started', or tap on the Profile icon and enable the 'Sync Health Record' option.
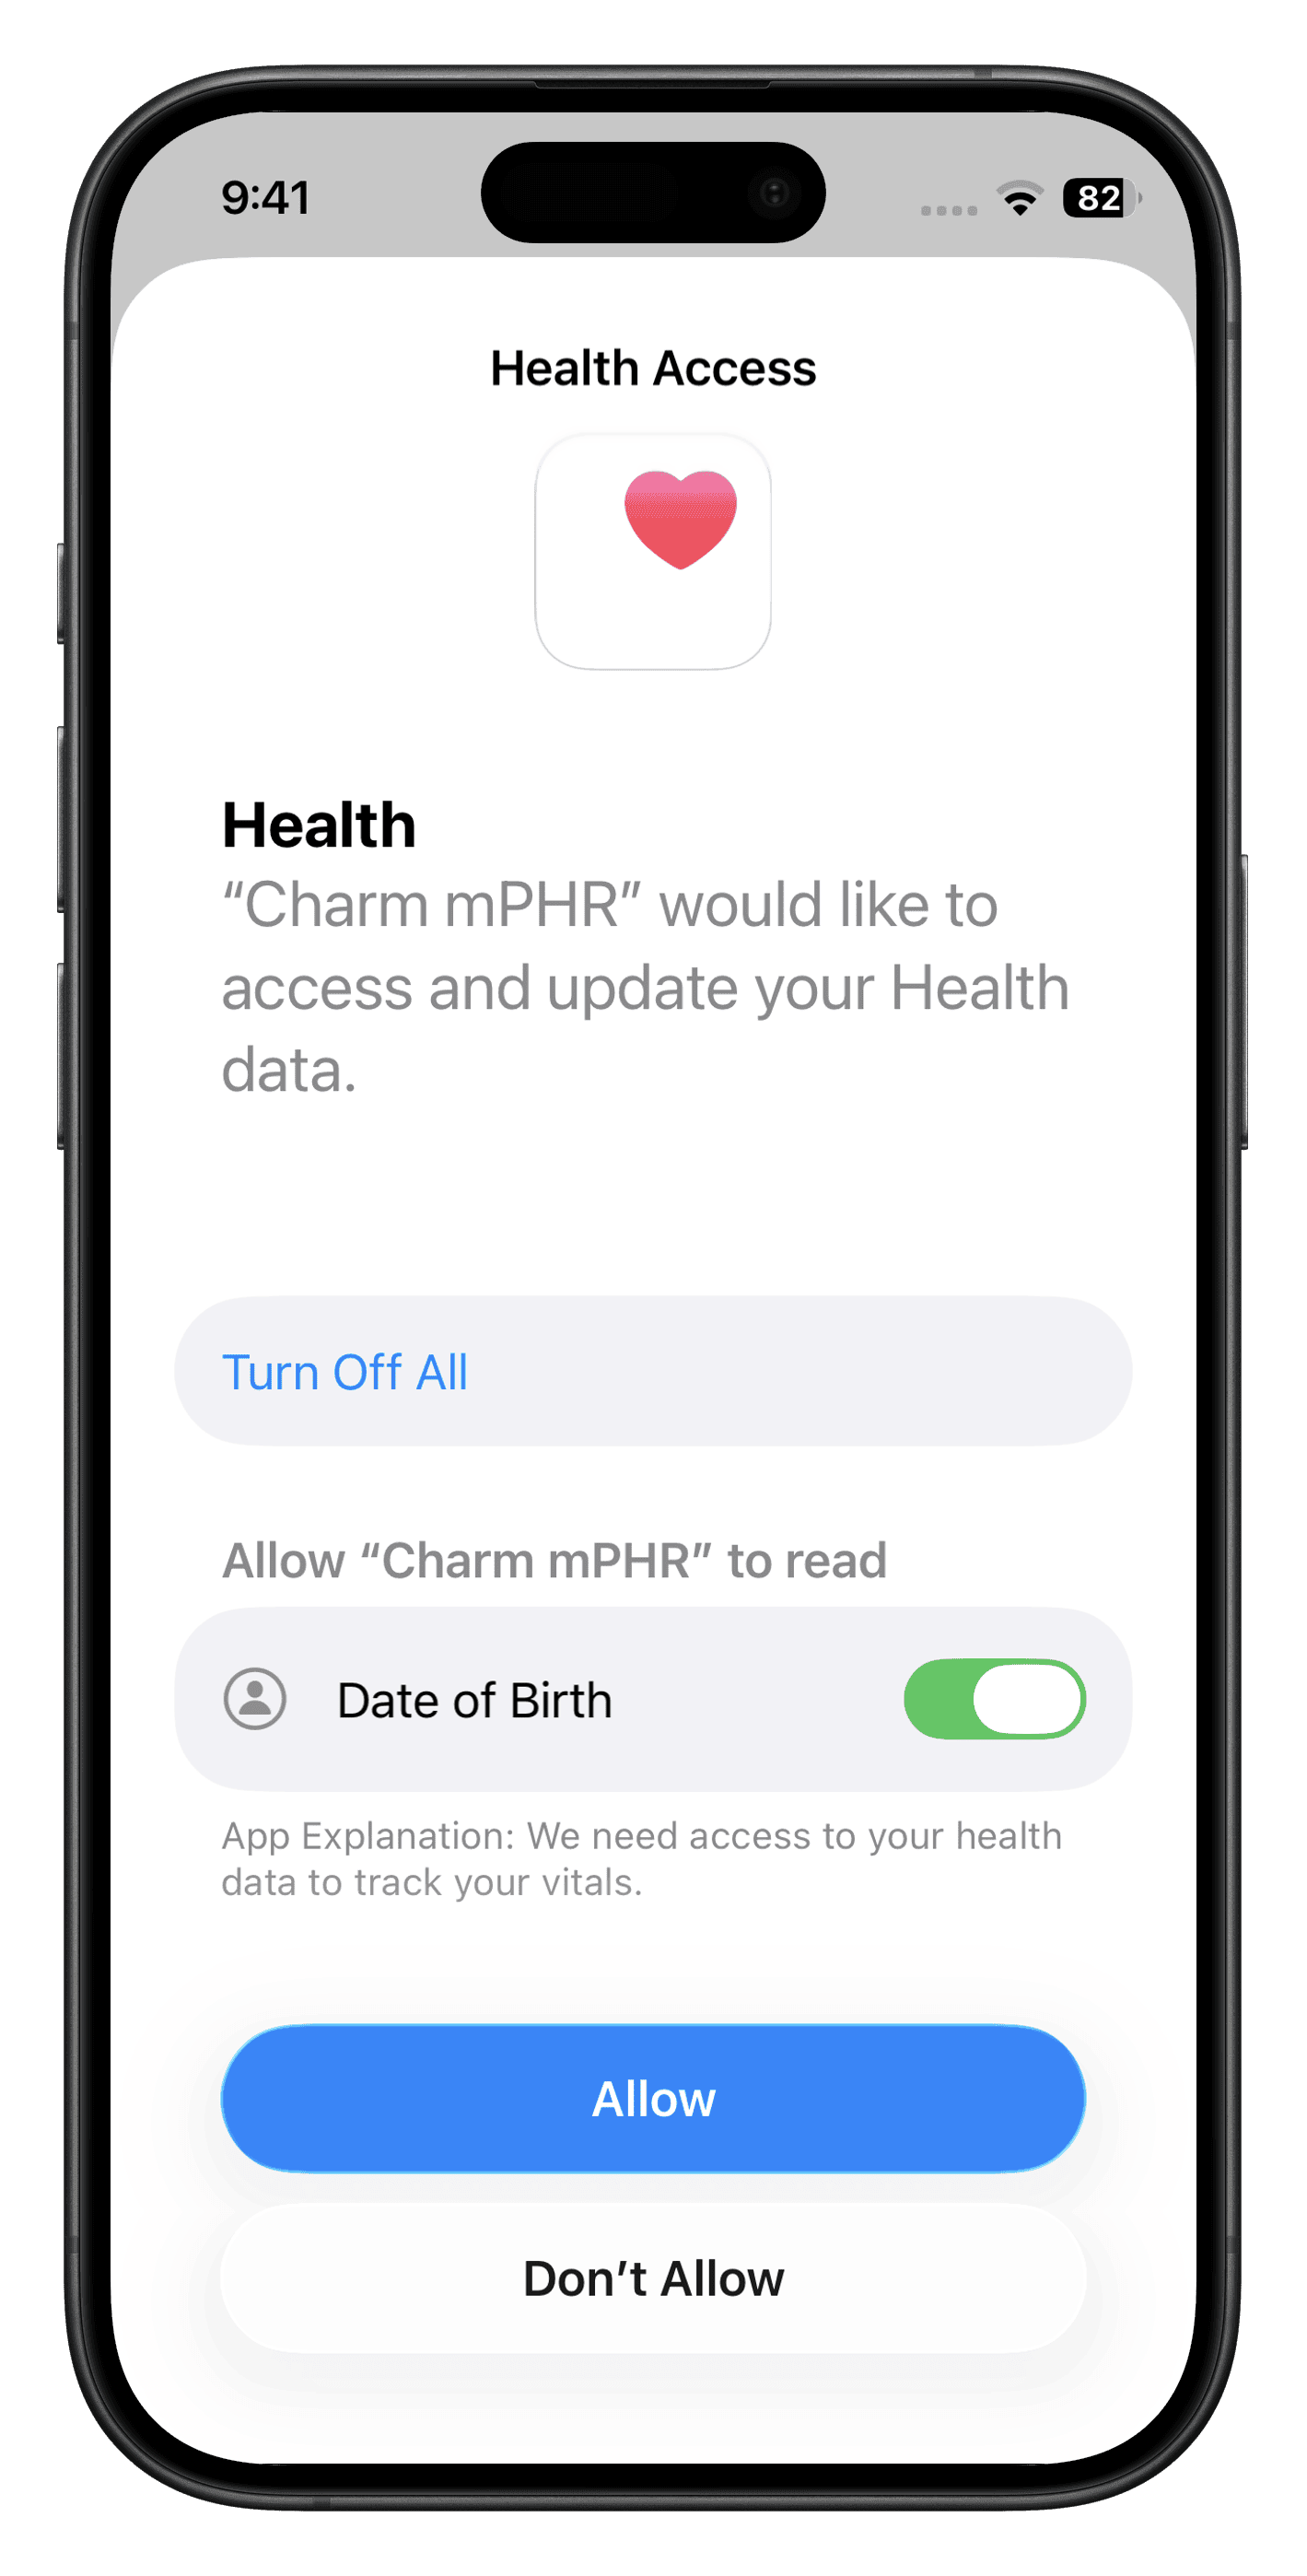
- In the Health Access pop-up, enable access to Date of Birth and tap on the 'Allow' button.
- Select your profile and tap on the 'Continue' button.
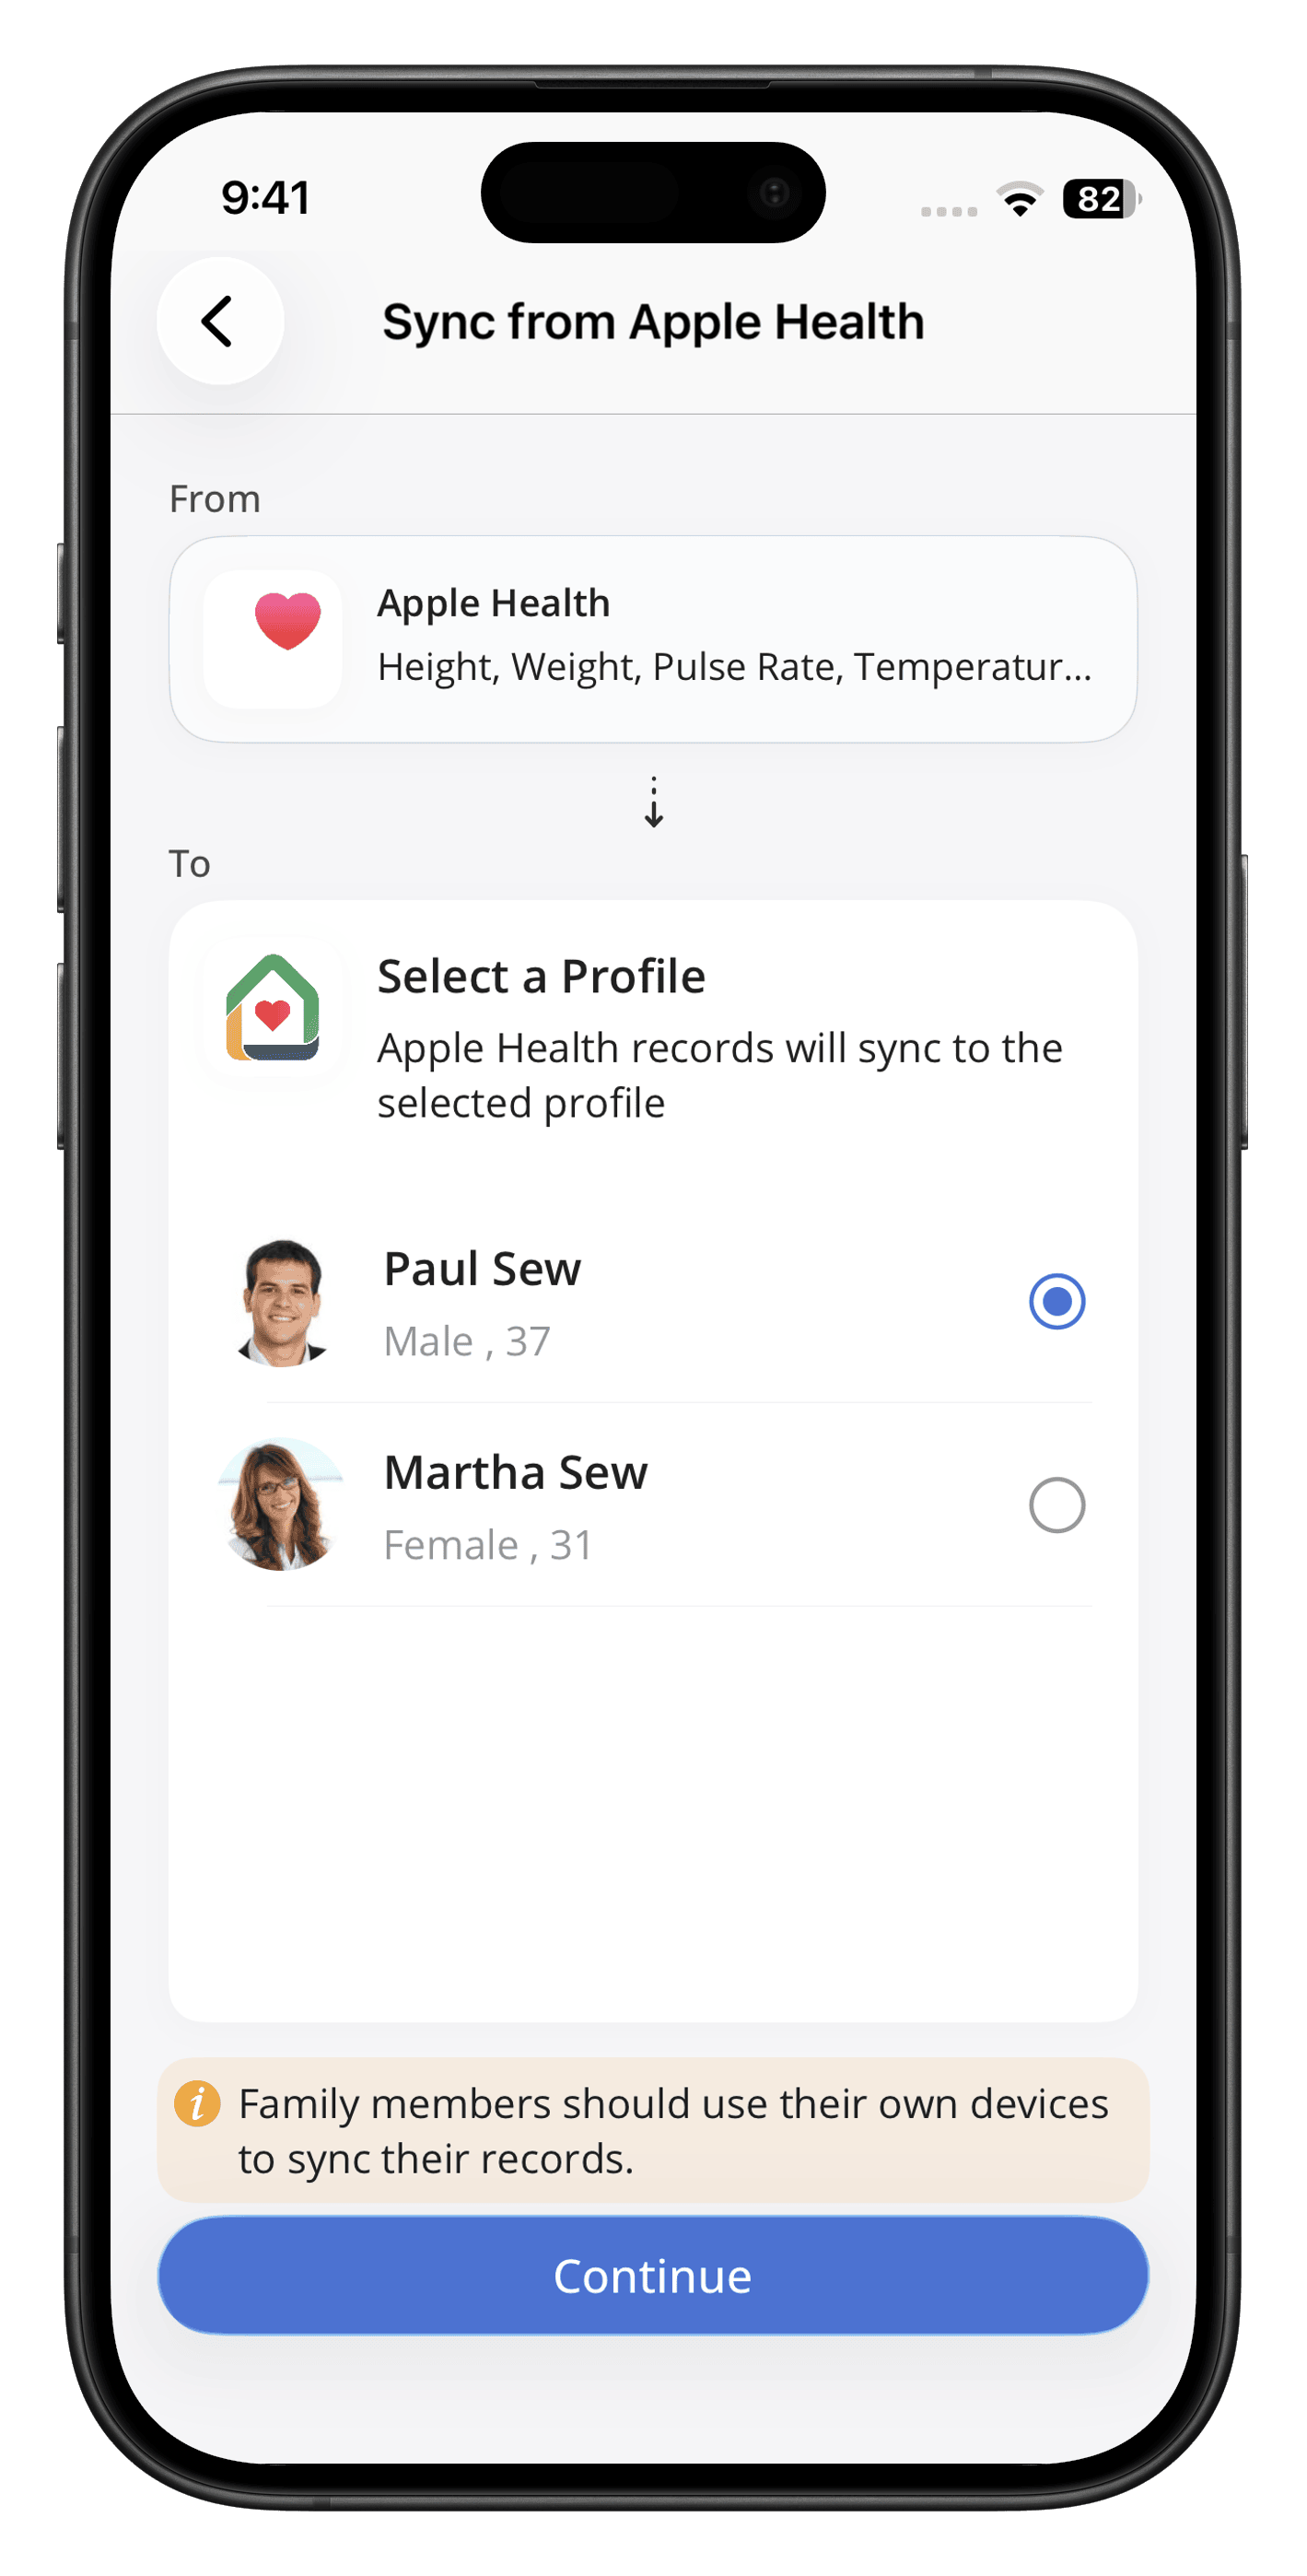
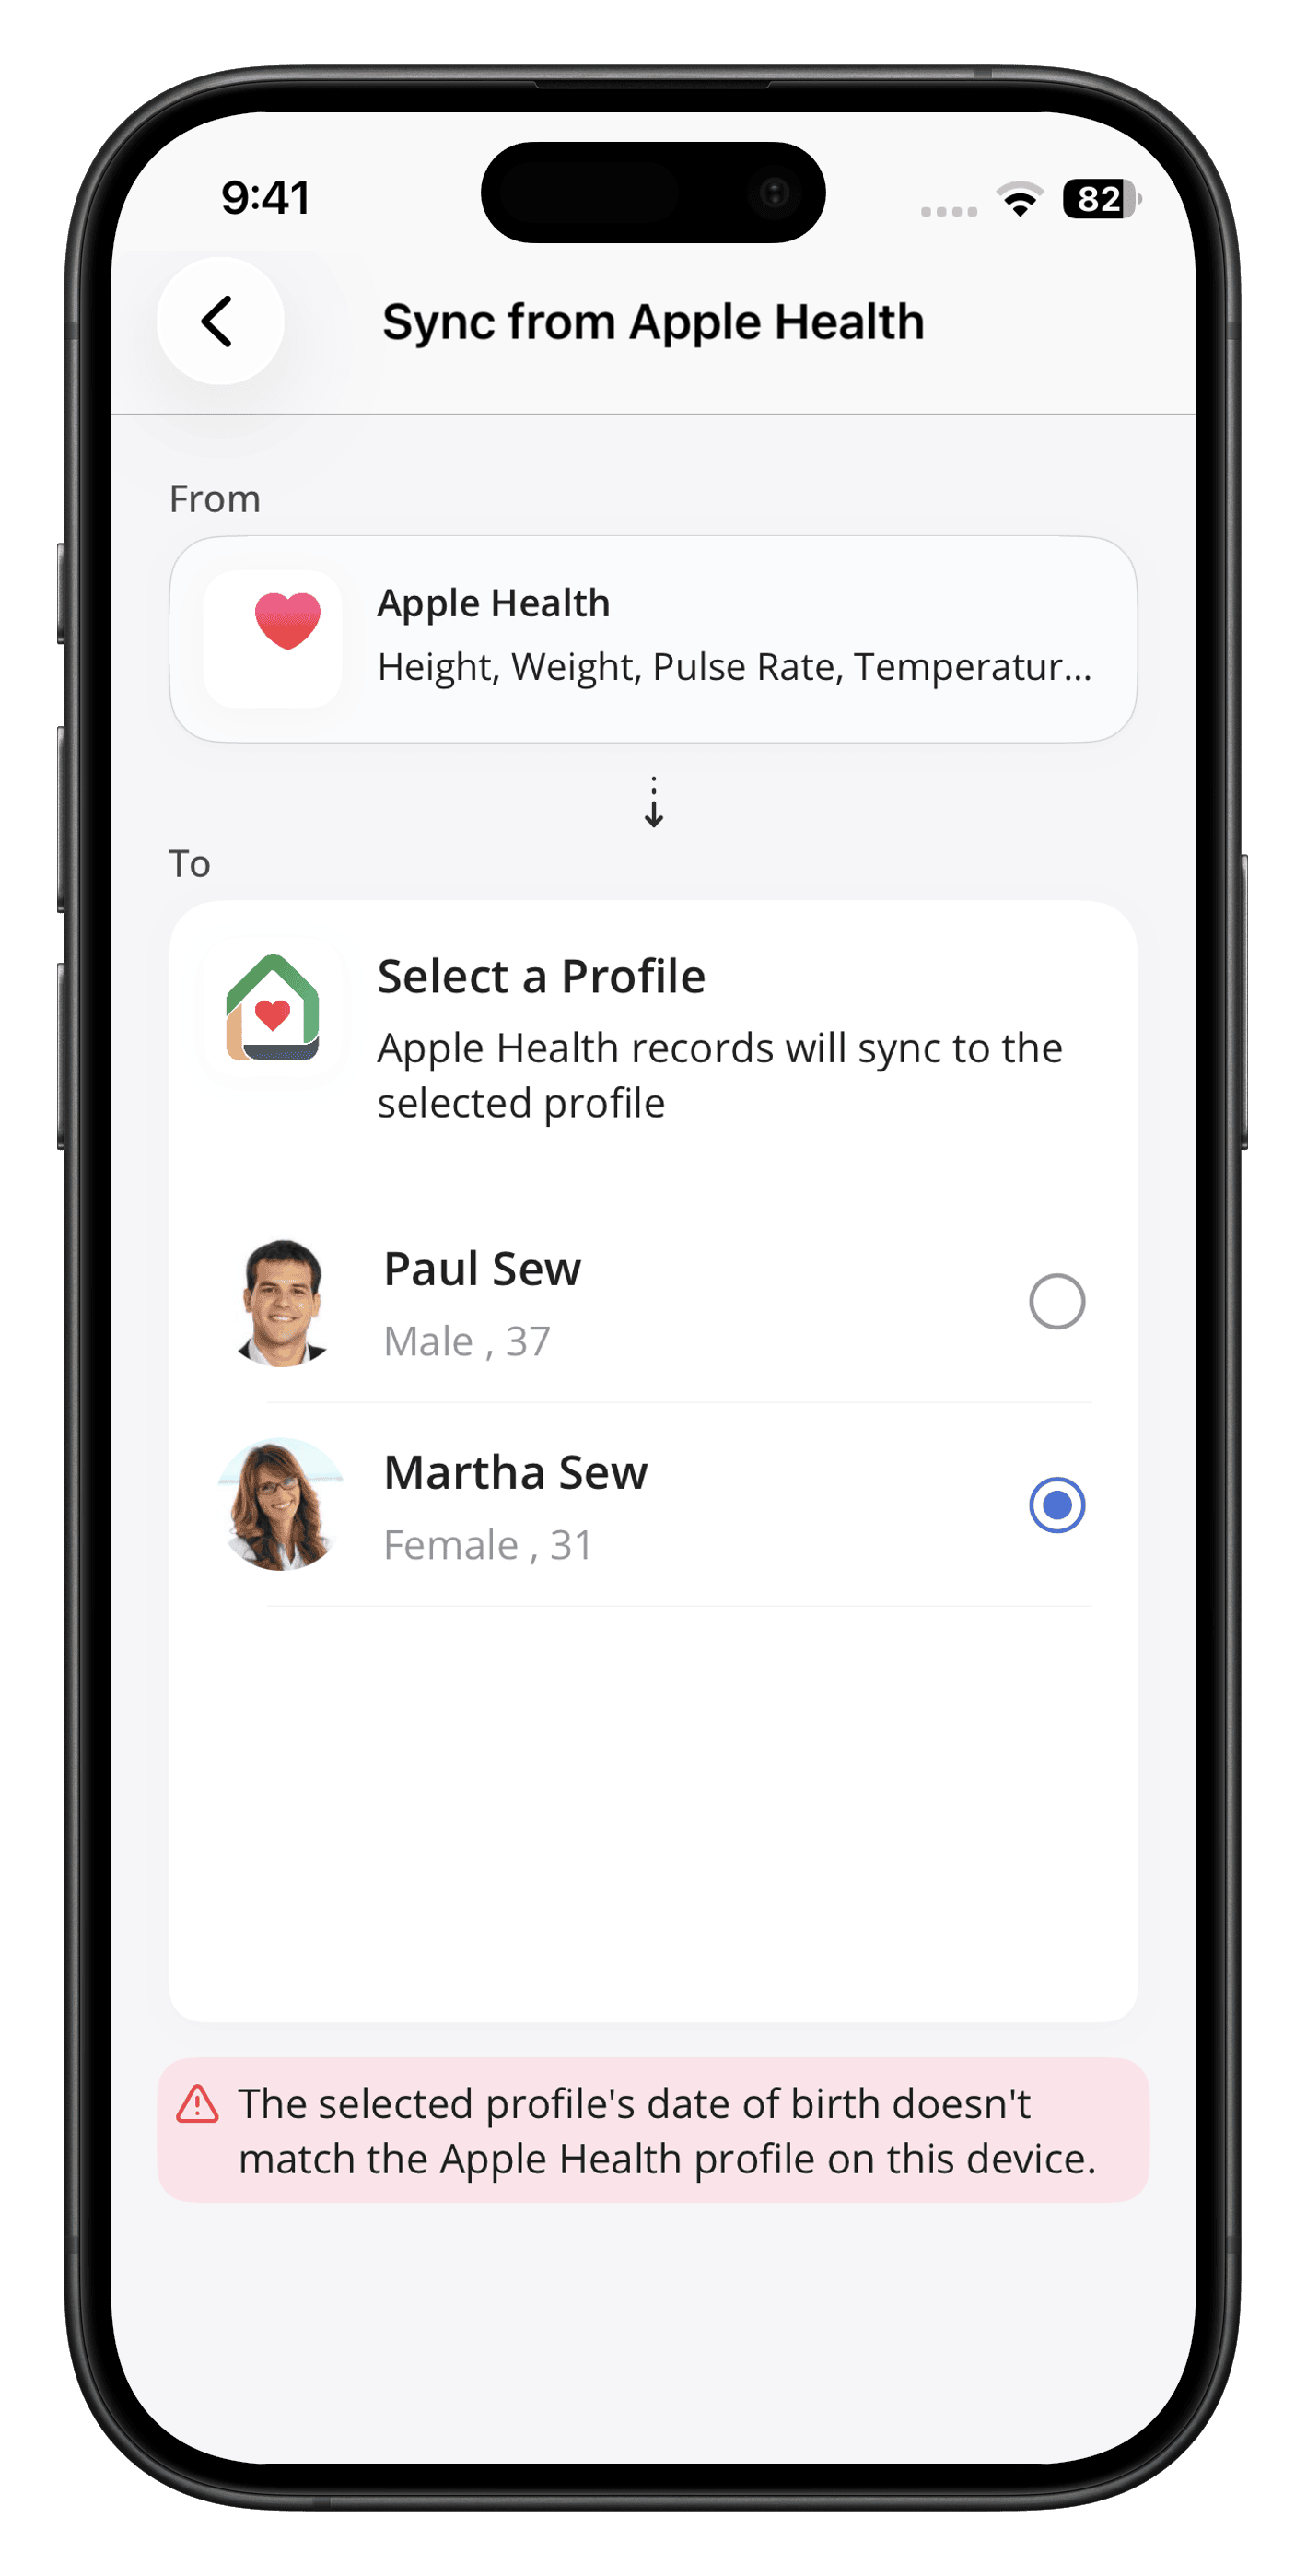
Note: Ensure the selected profile matches your Apple Health profile (Date of Birth must match). Each family member should use their own device to sync their records.
Sync Health Record
Once Access is Enabled, Sync the Health record by :
- Navigate to the 'My health > Wellness' section
- Tap on the 'Sync' icon in the top right. Alternatively, to sync individual metrics, navigate to the desired metric and tap the 'Sync' icon.
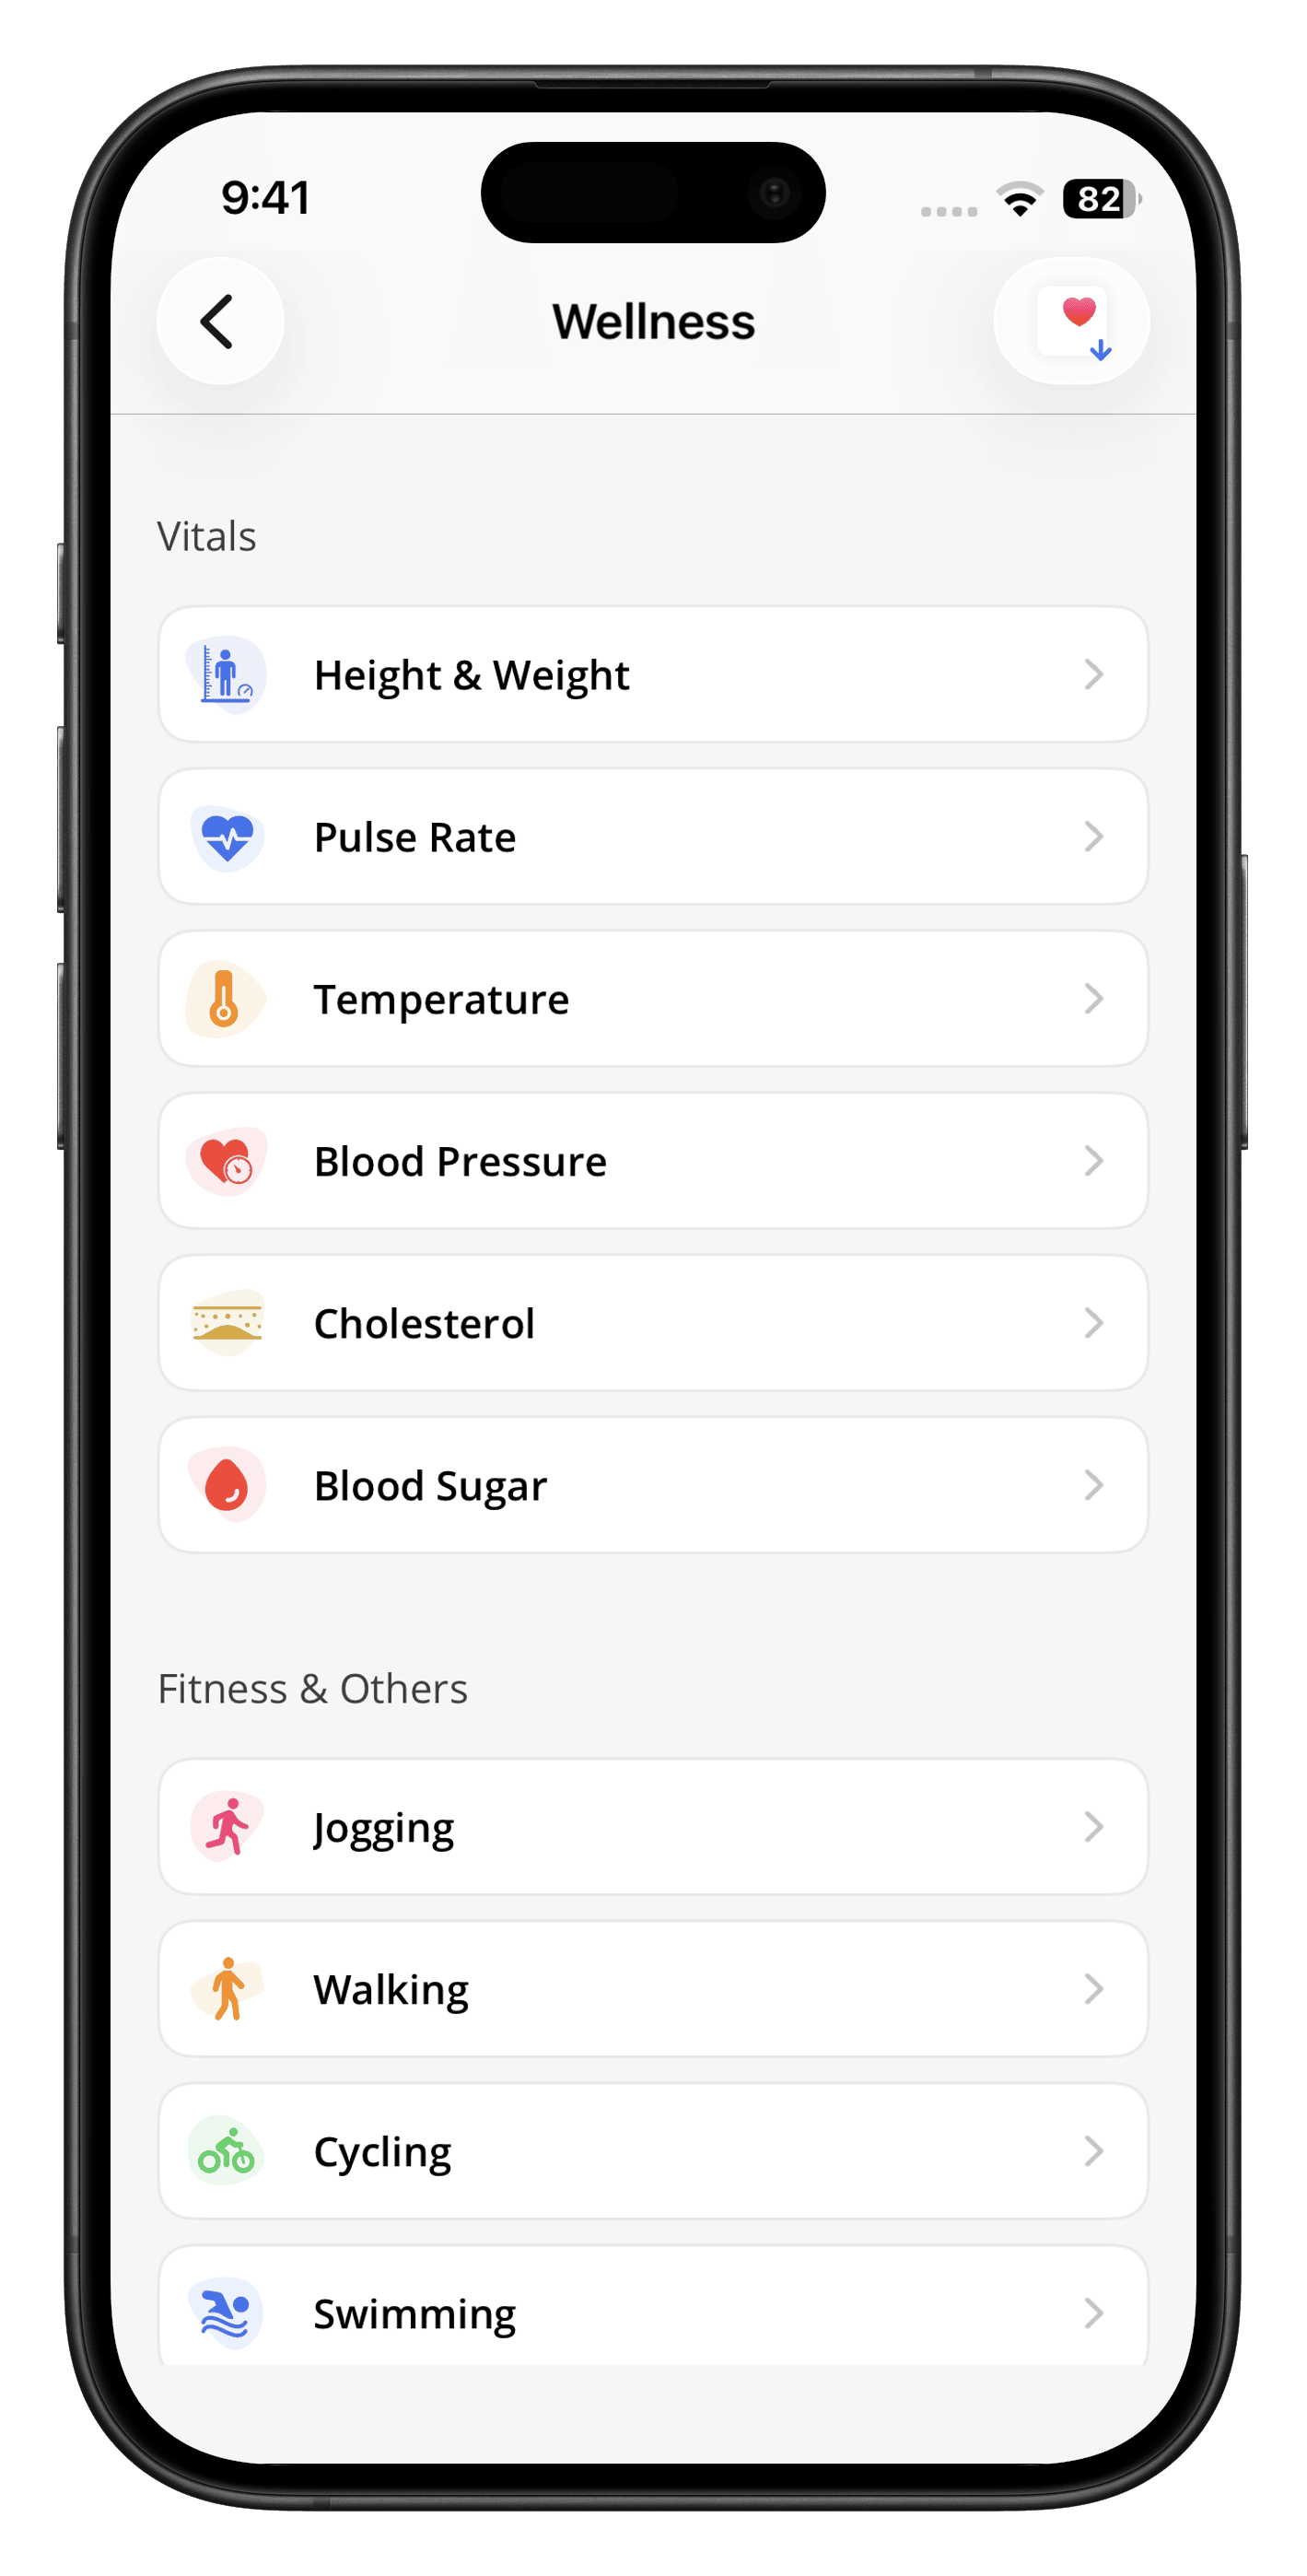
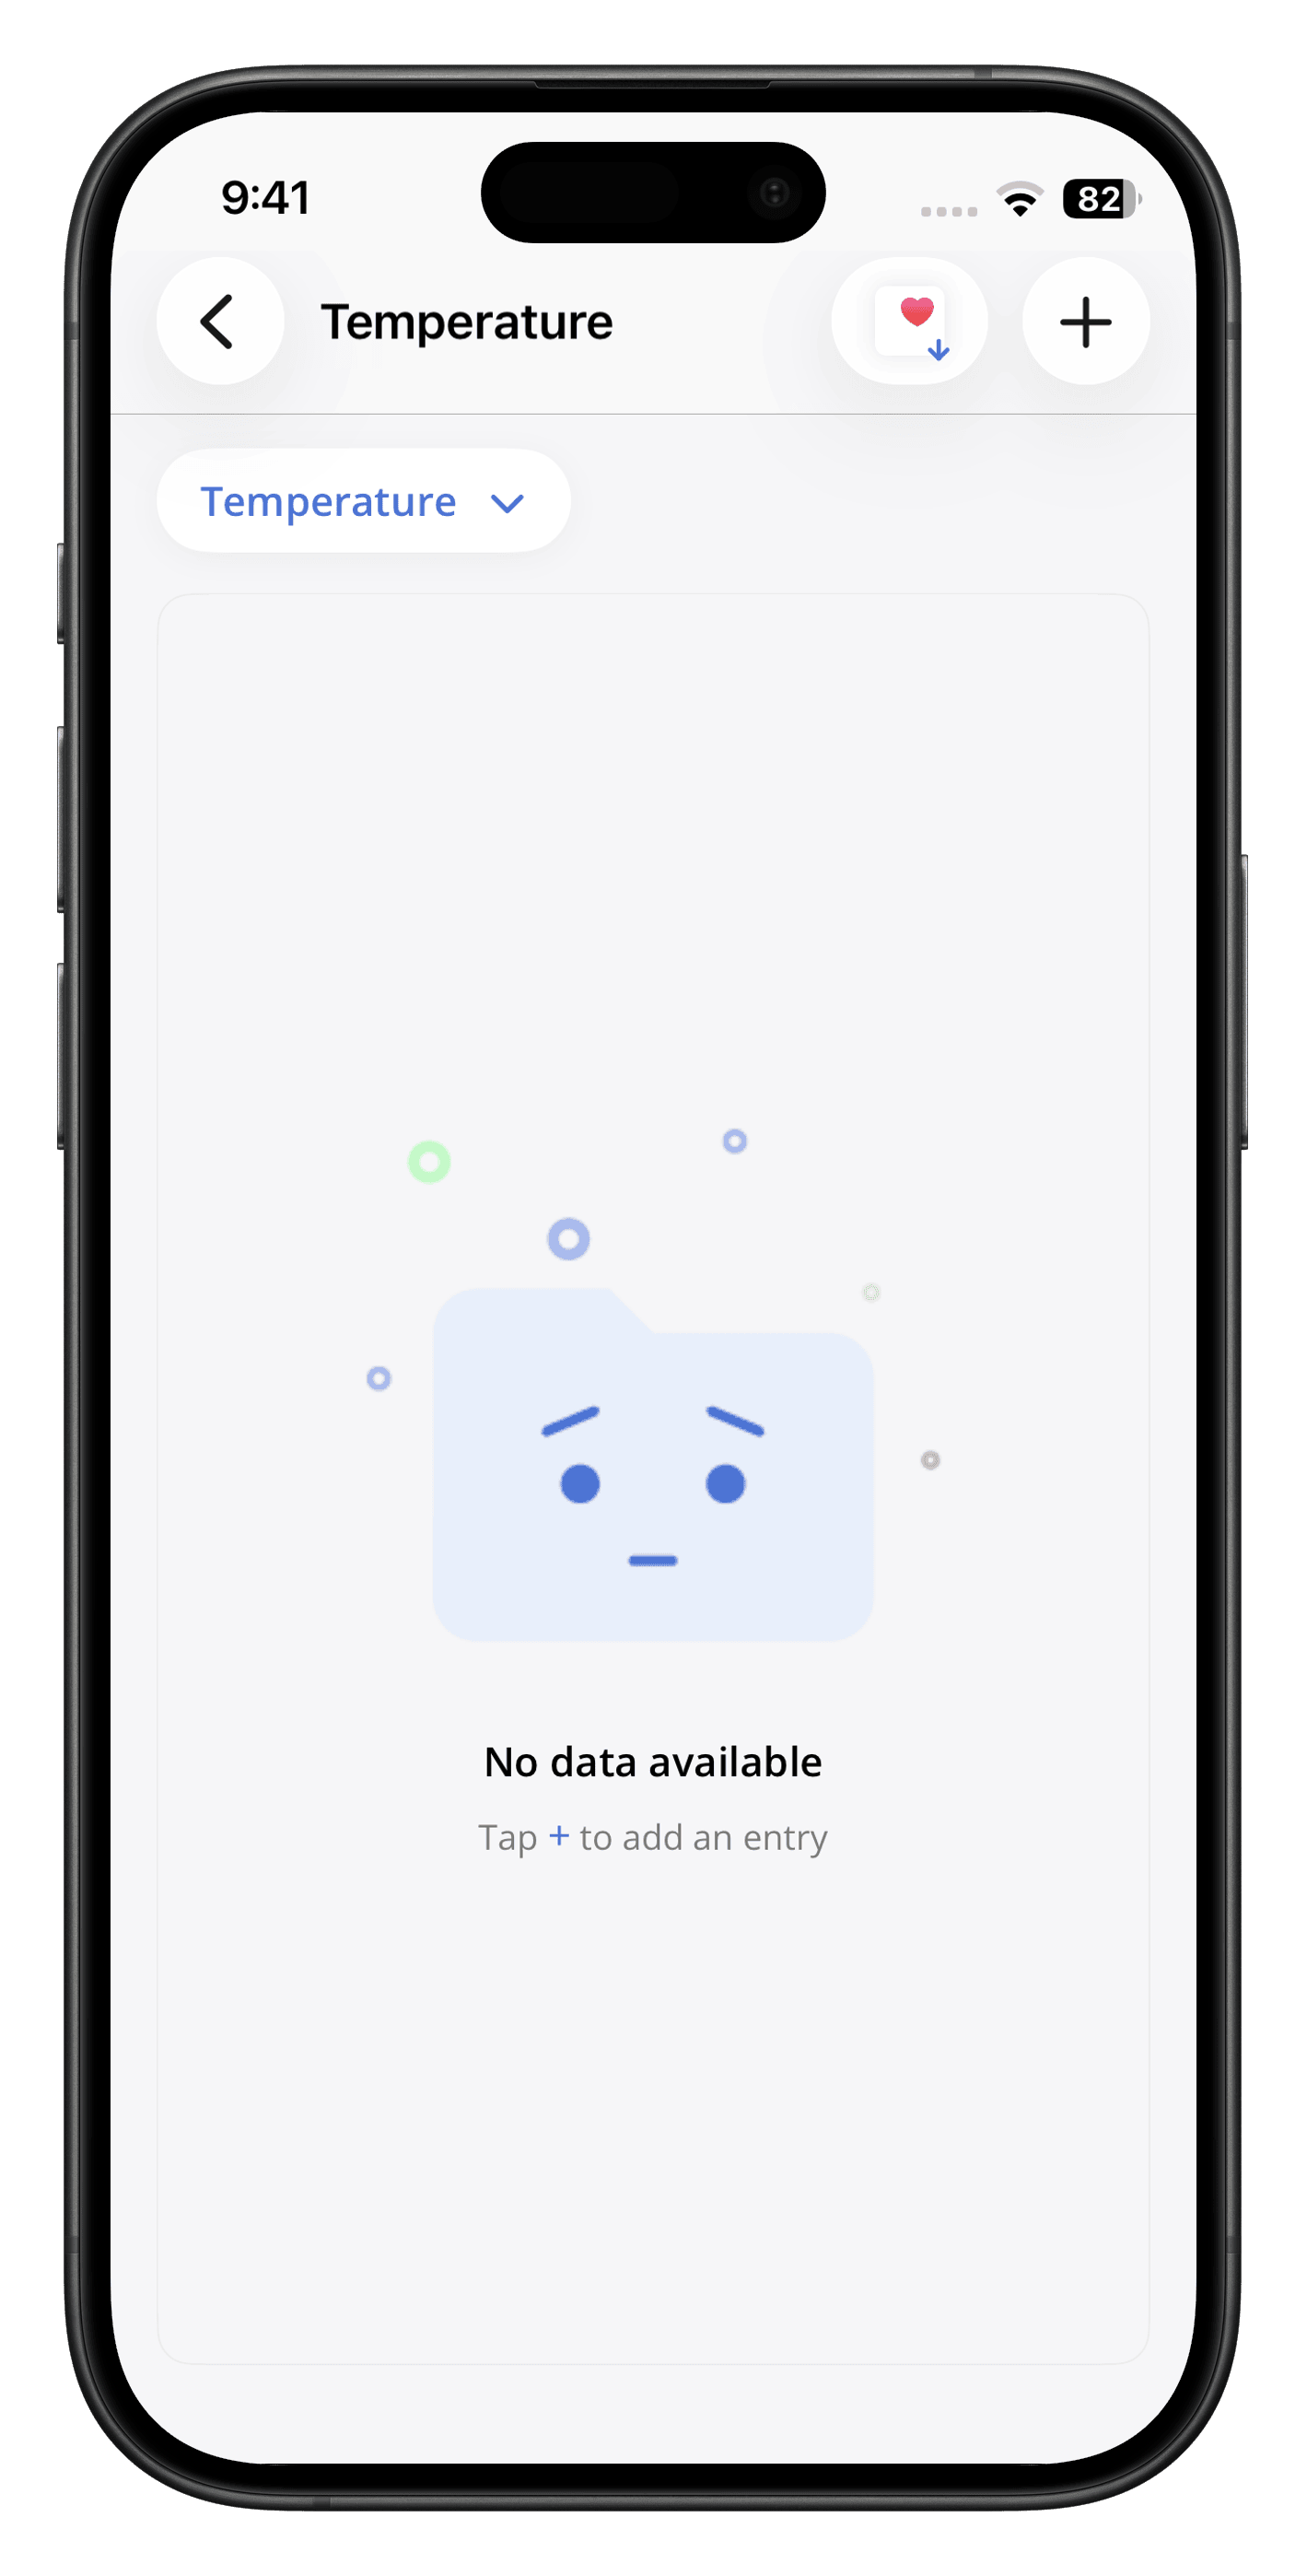
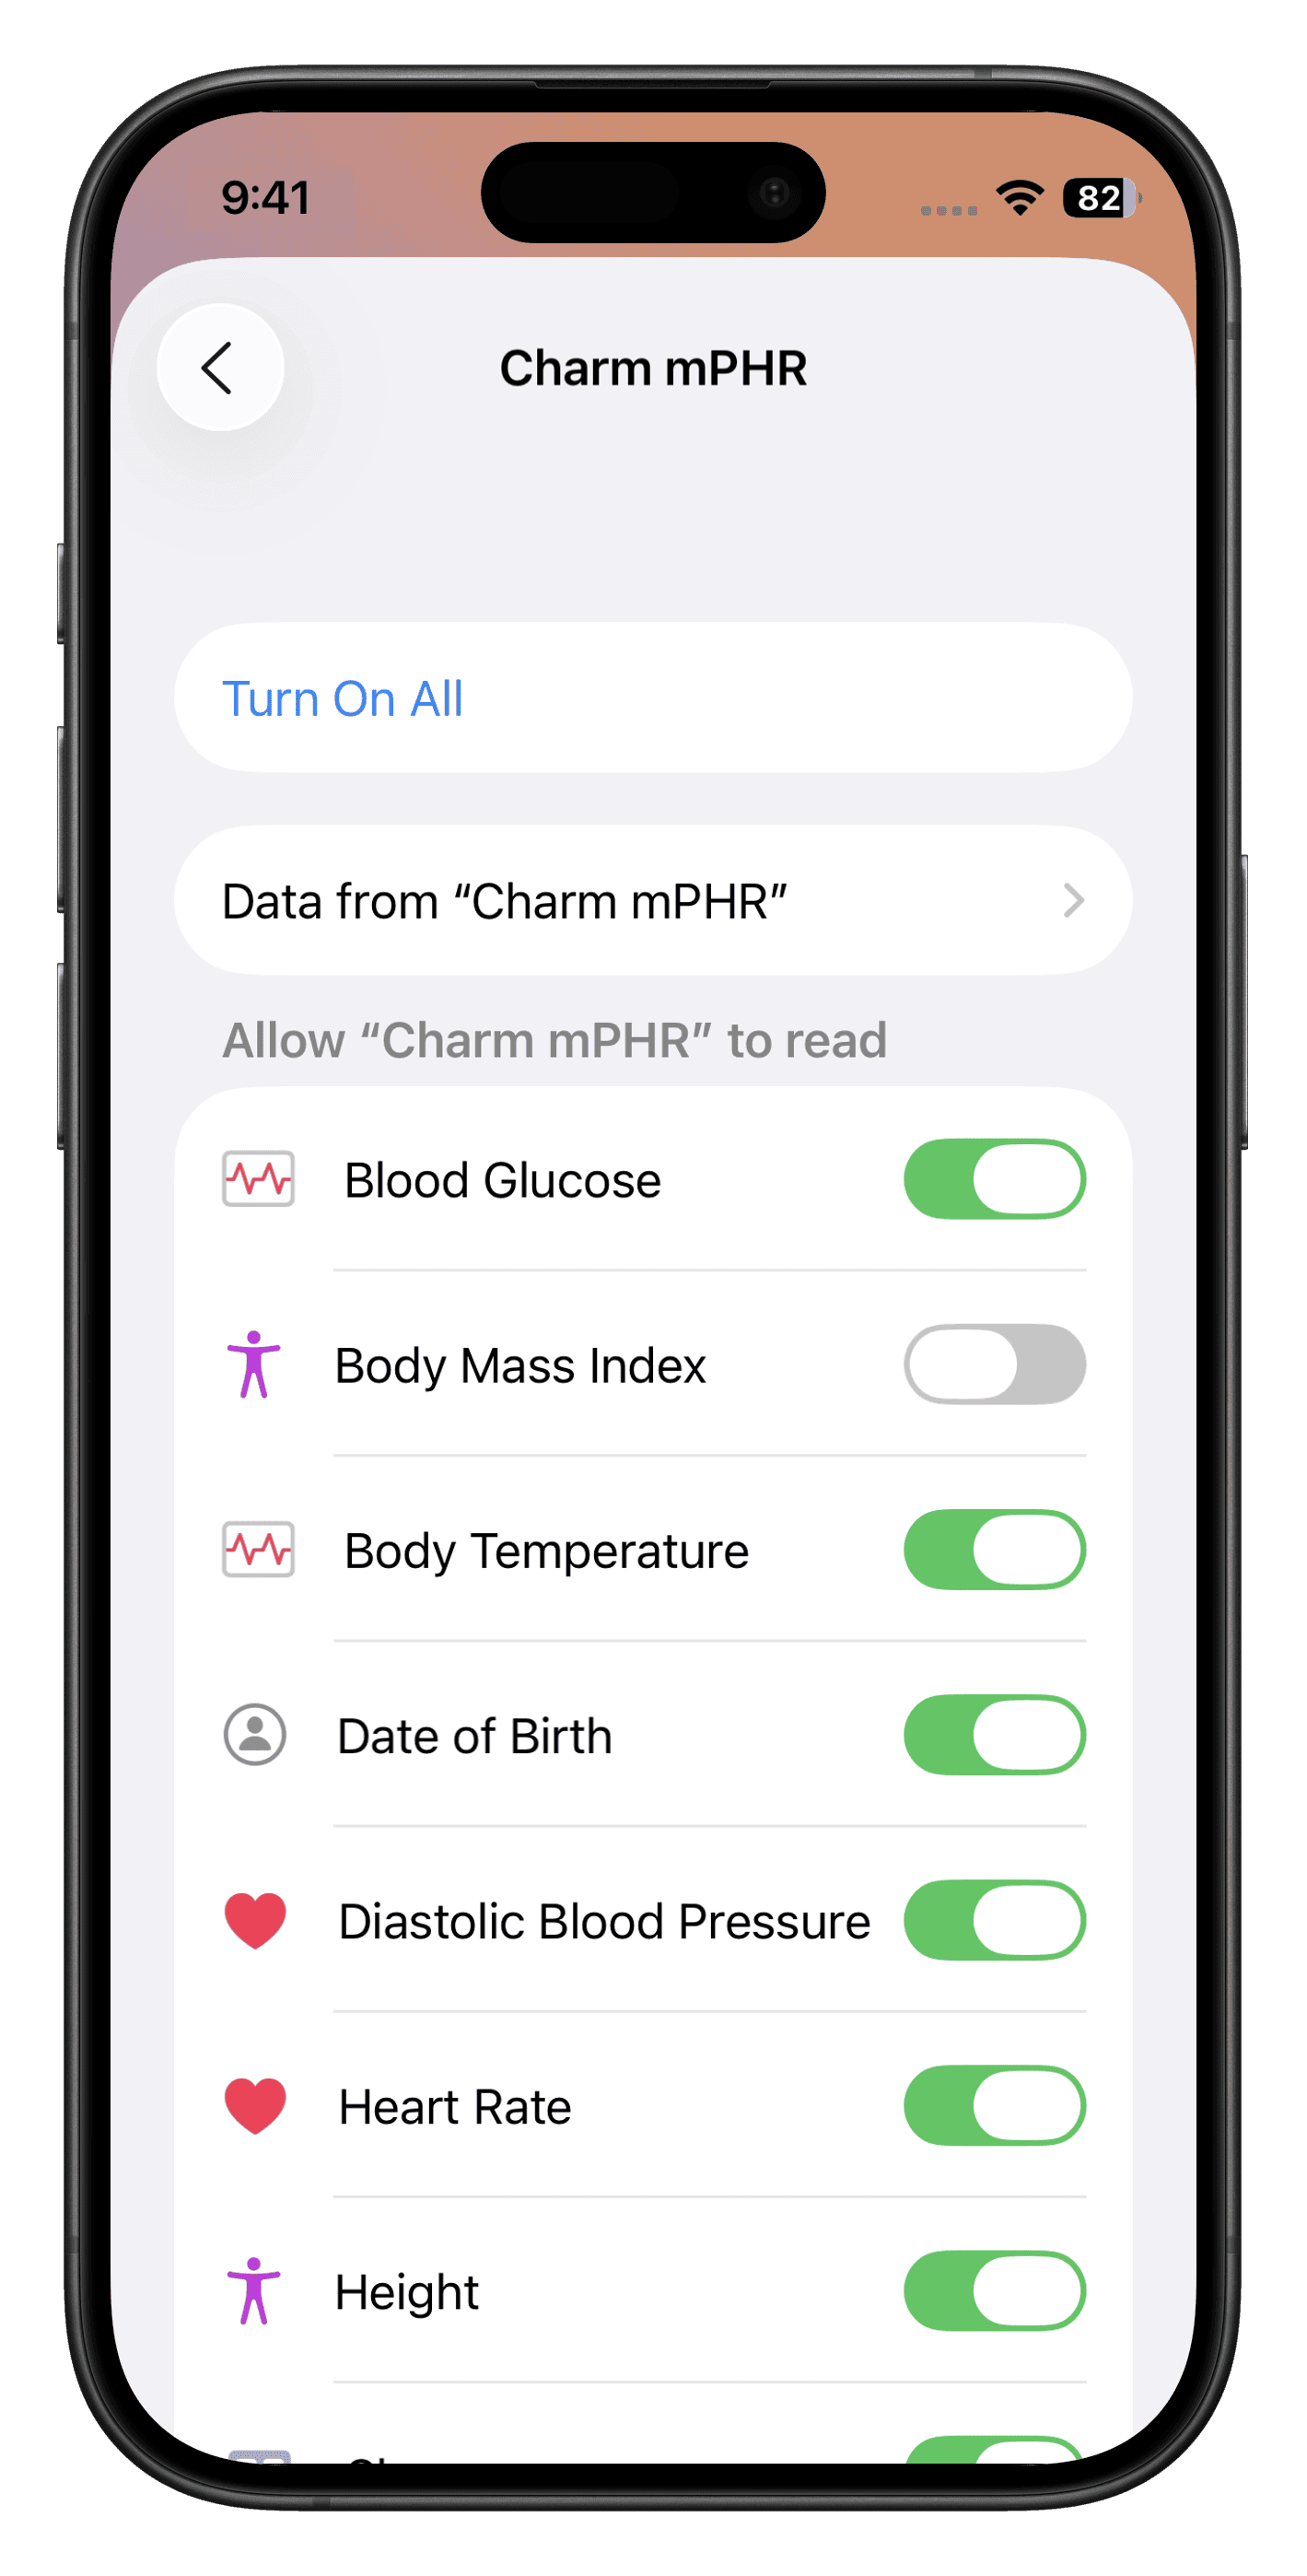
- Allow Charm mPHR to read your Health record from the Apple Health app. Enable the required Health metrics individually, or tap on 'Turn On All'.
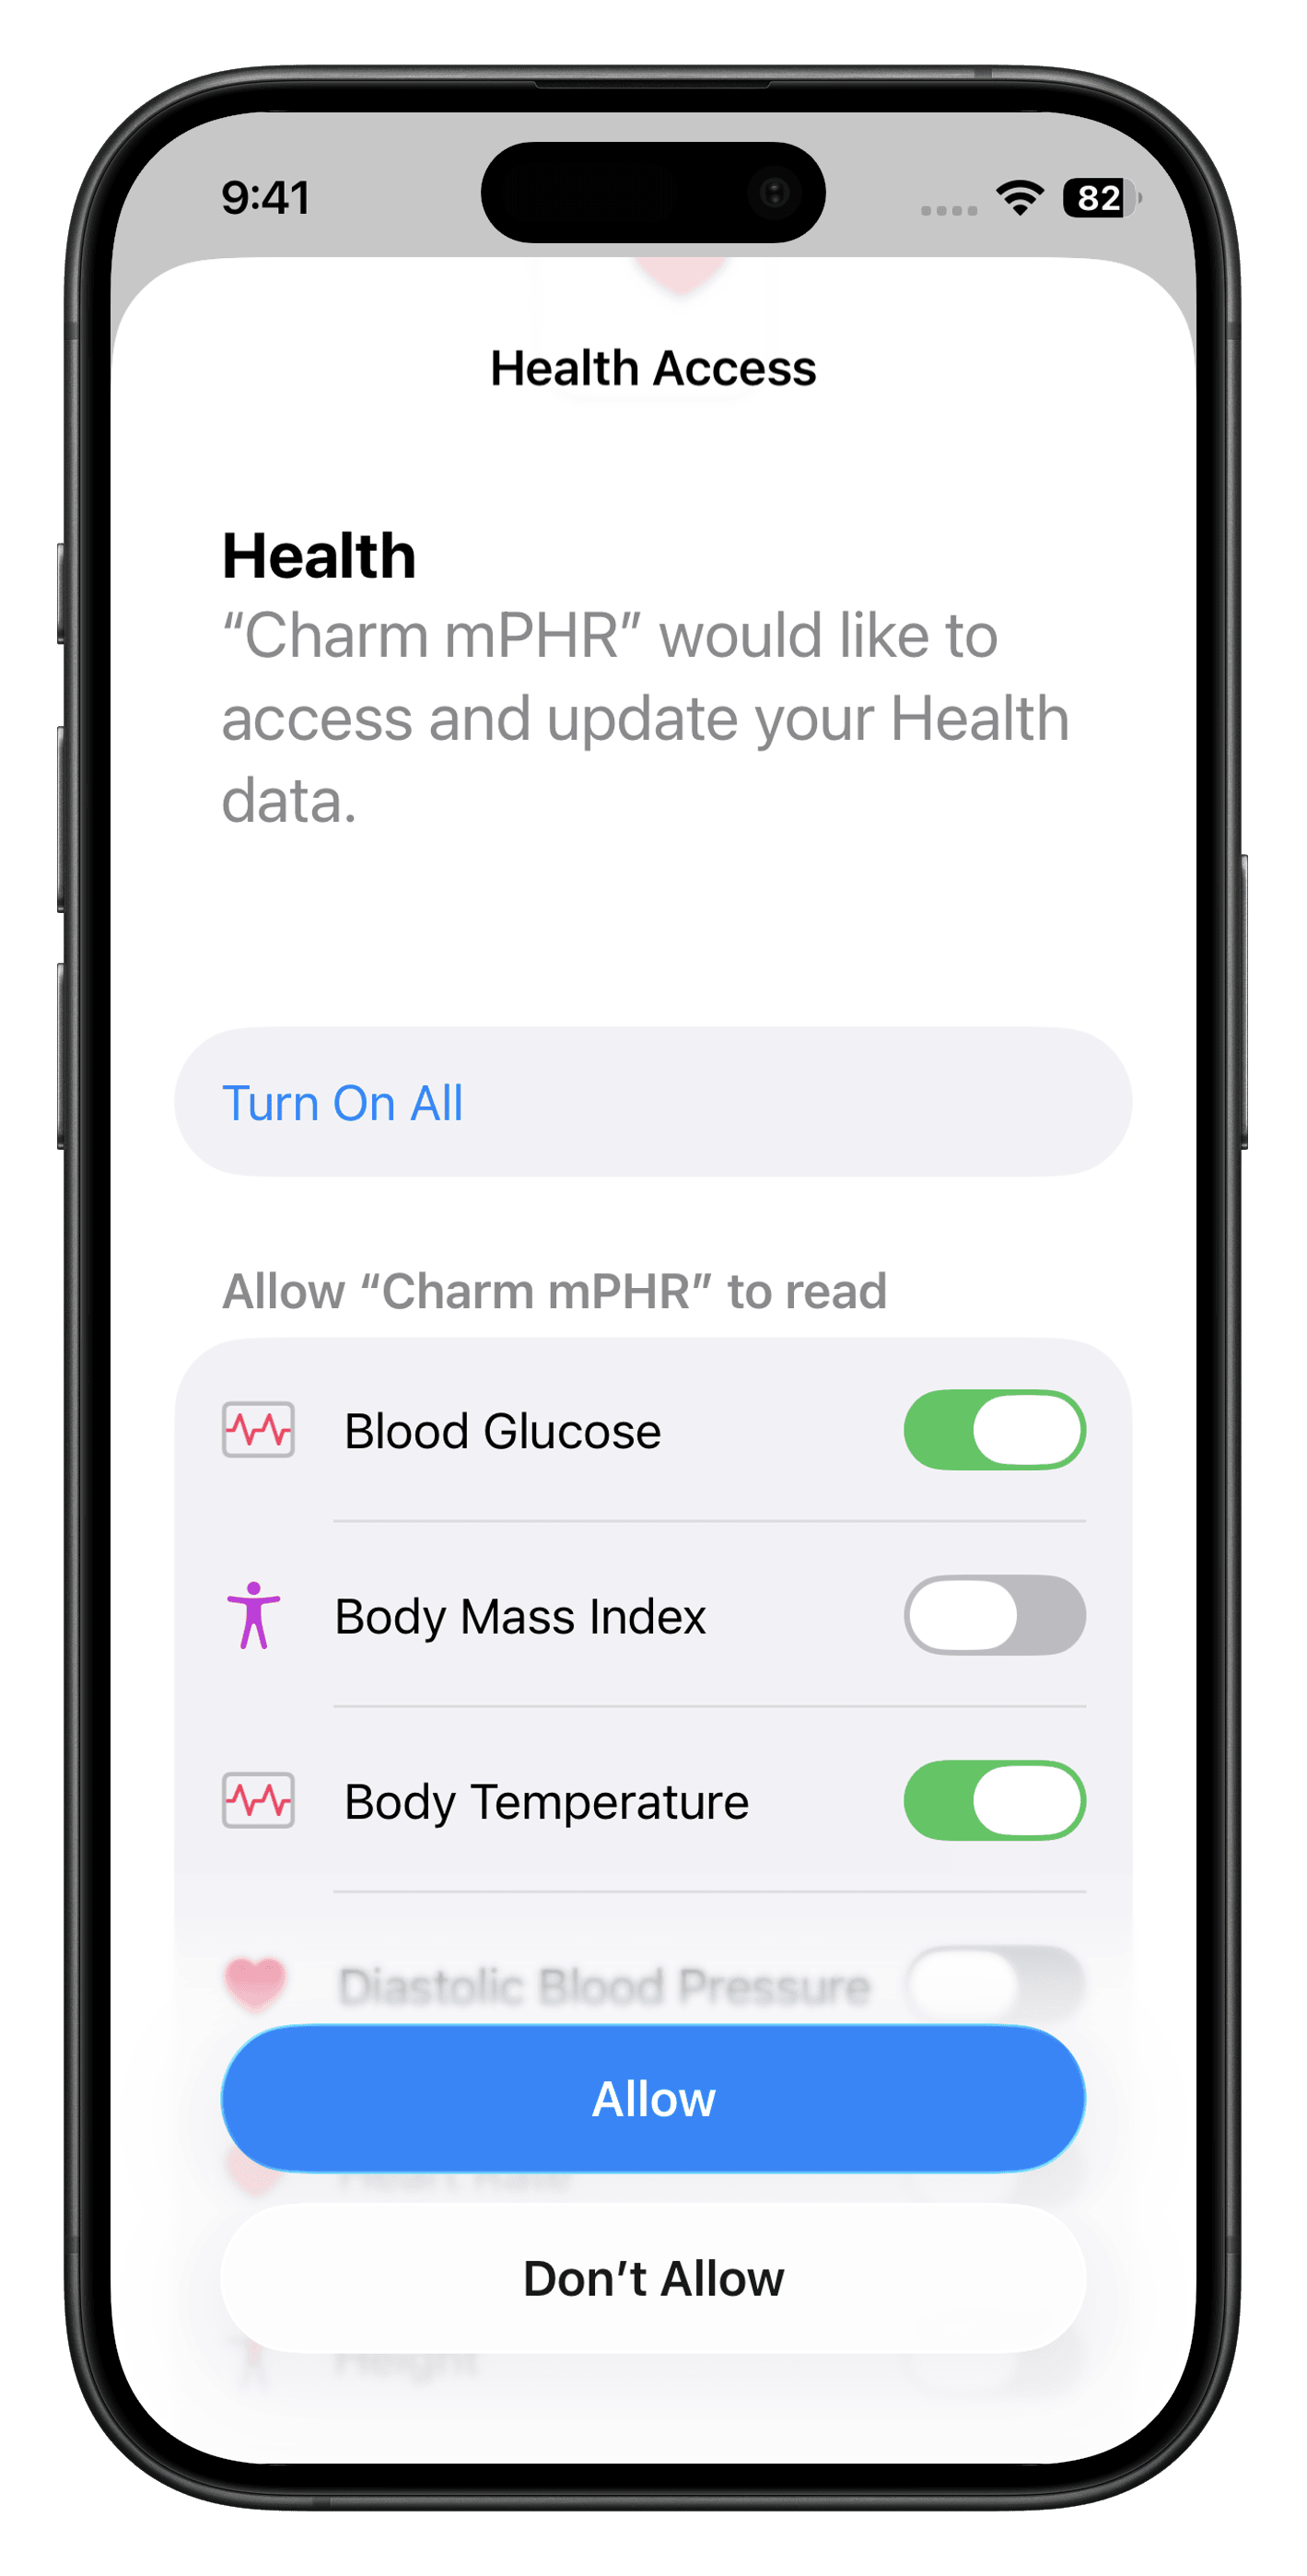
- Tap on the 'Allow' button.
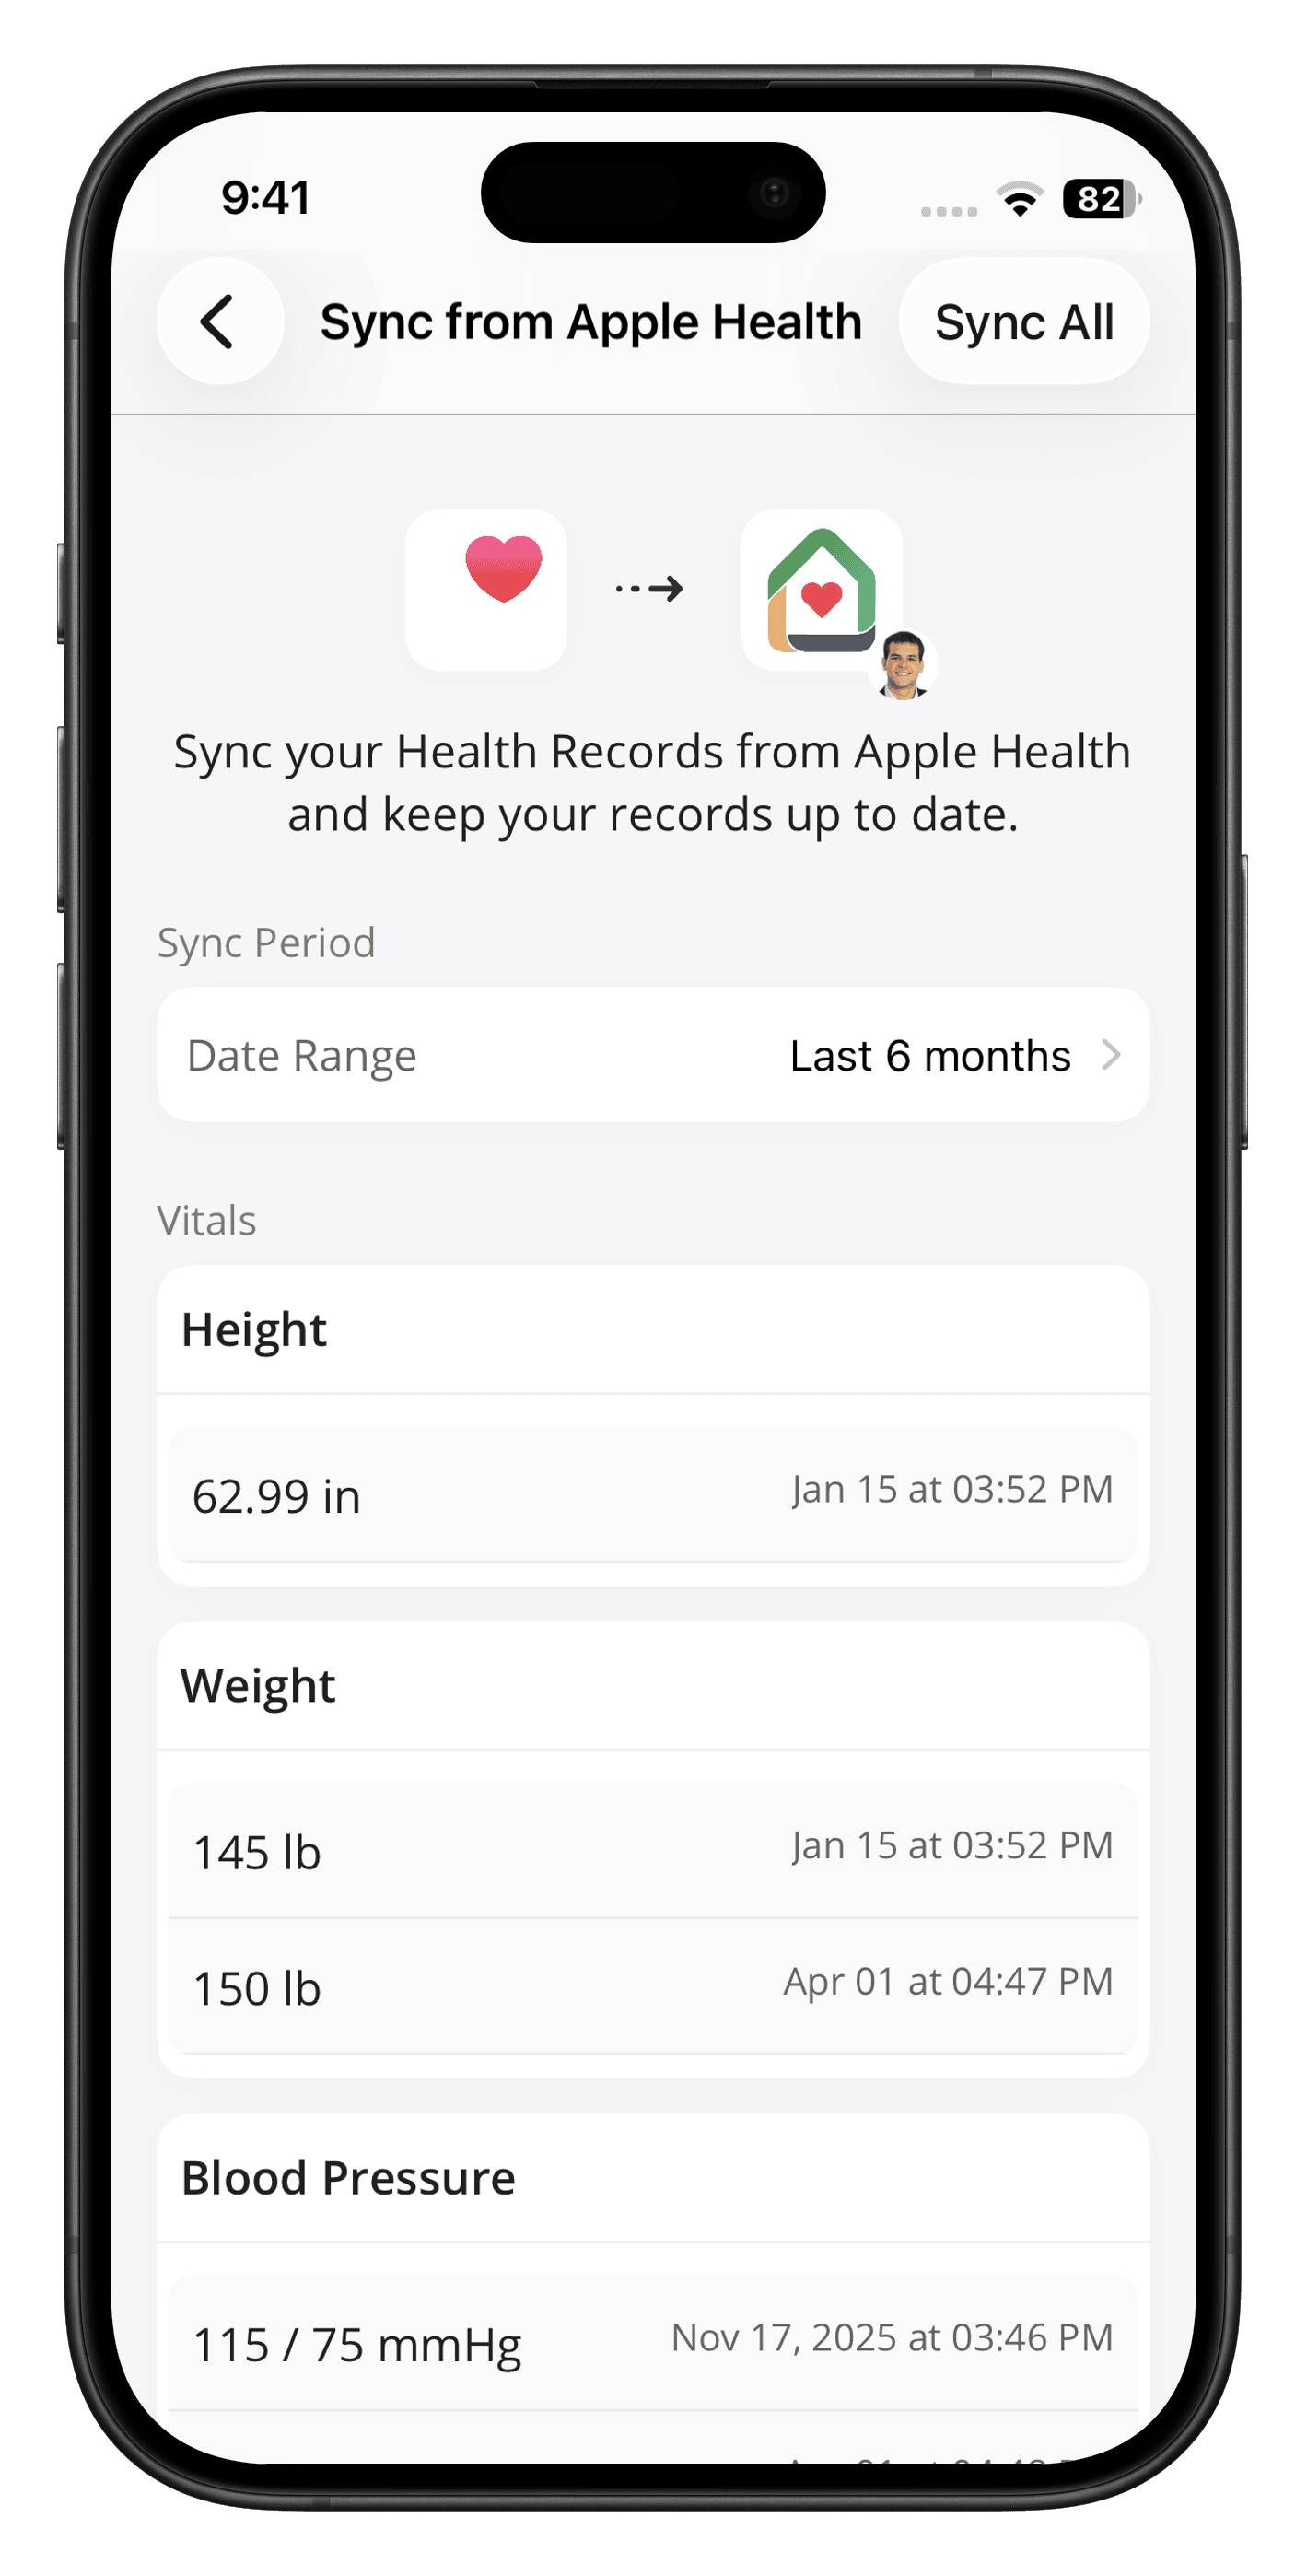
- Select a date range to sync your health record from Apple Health.
Note: You can select a custom date range; however, the selected range cannot exceed 6 months.
Note: If no data is displayed in mPHR after importing, open the Apple Health app and navigate to Profile icon > Apps > Charm mPHR, and ensure the required health data permissions are enabled.
- Tap on 'View All' to review your vitals record.
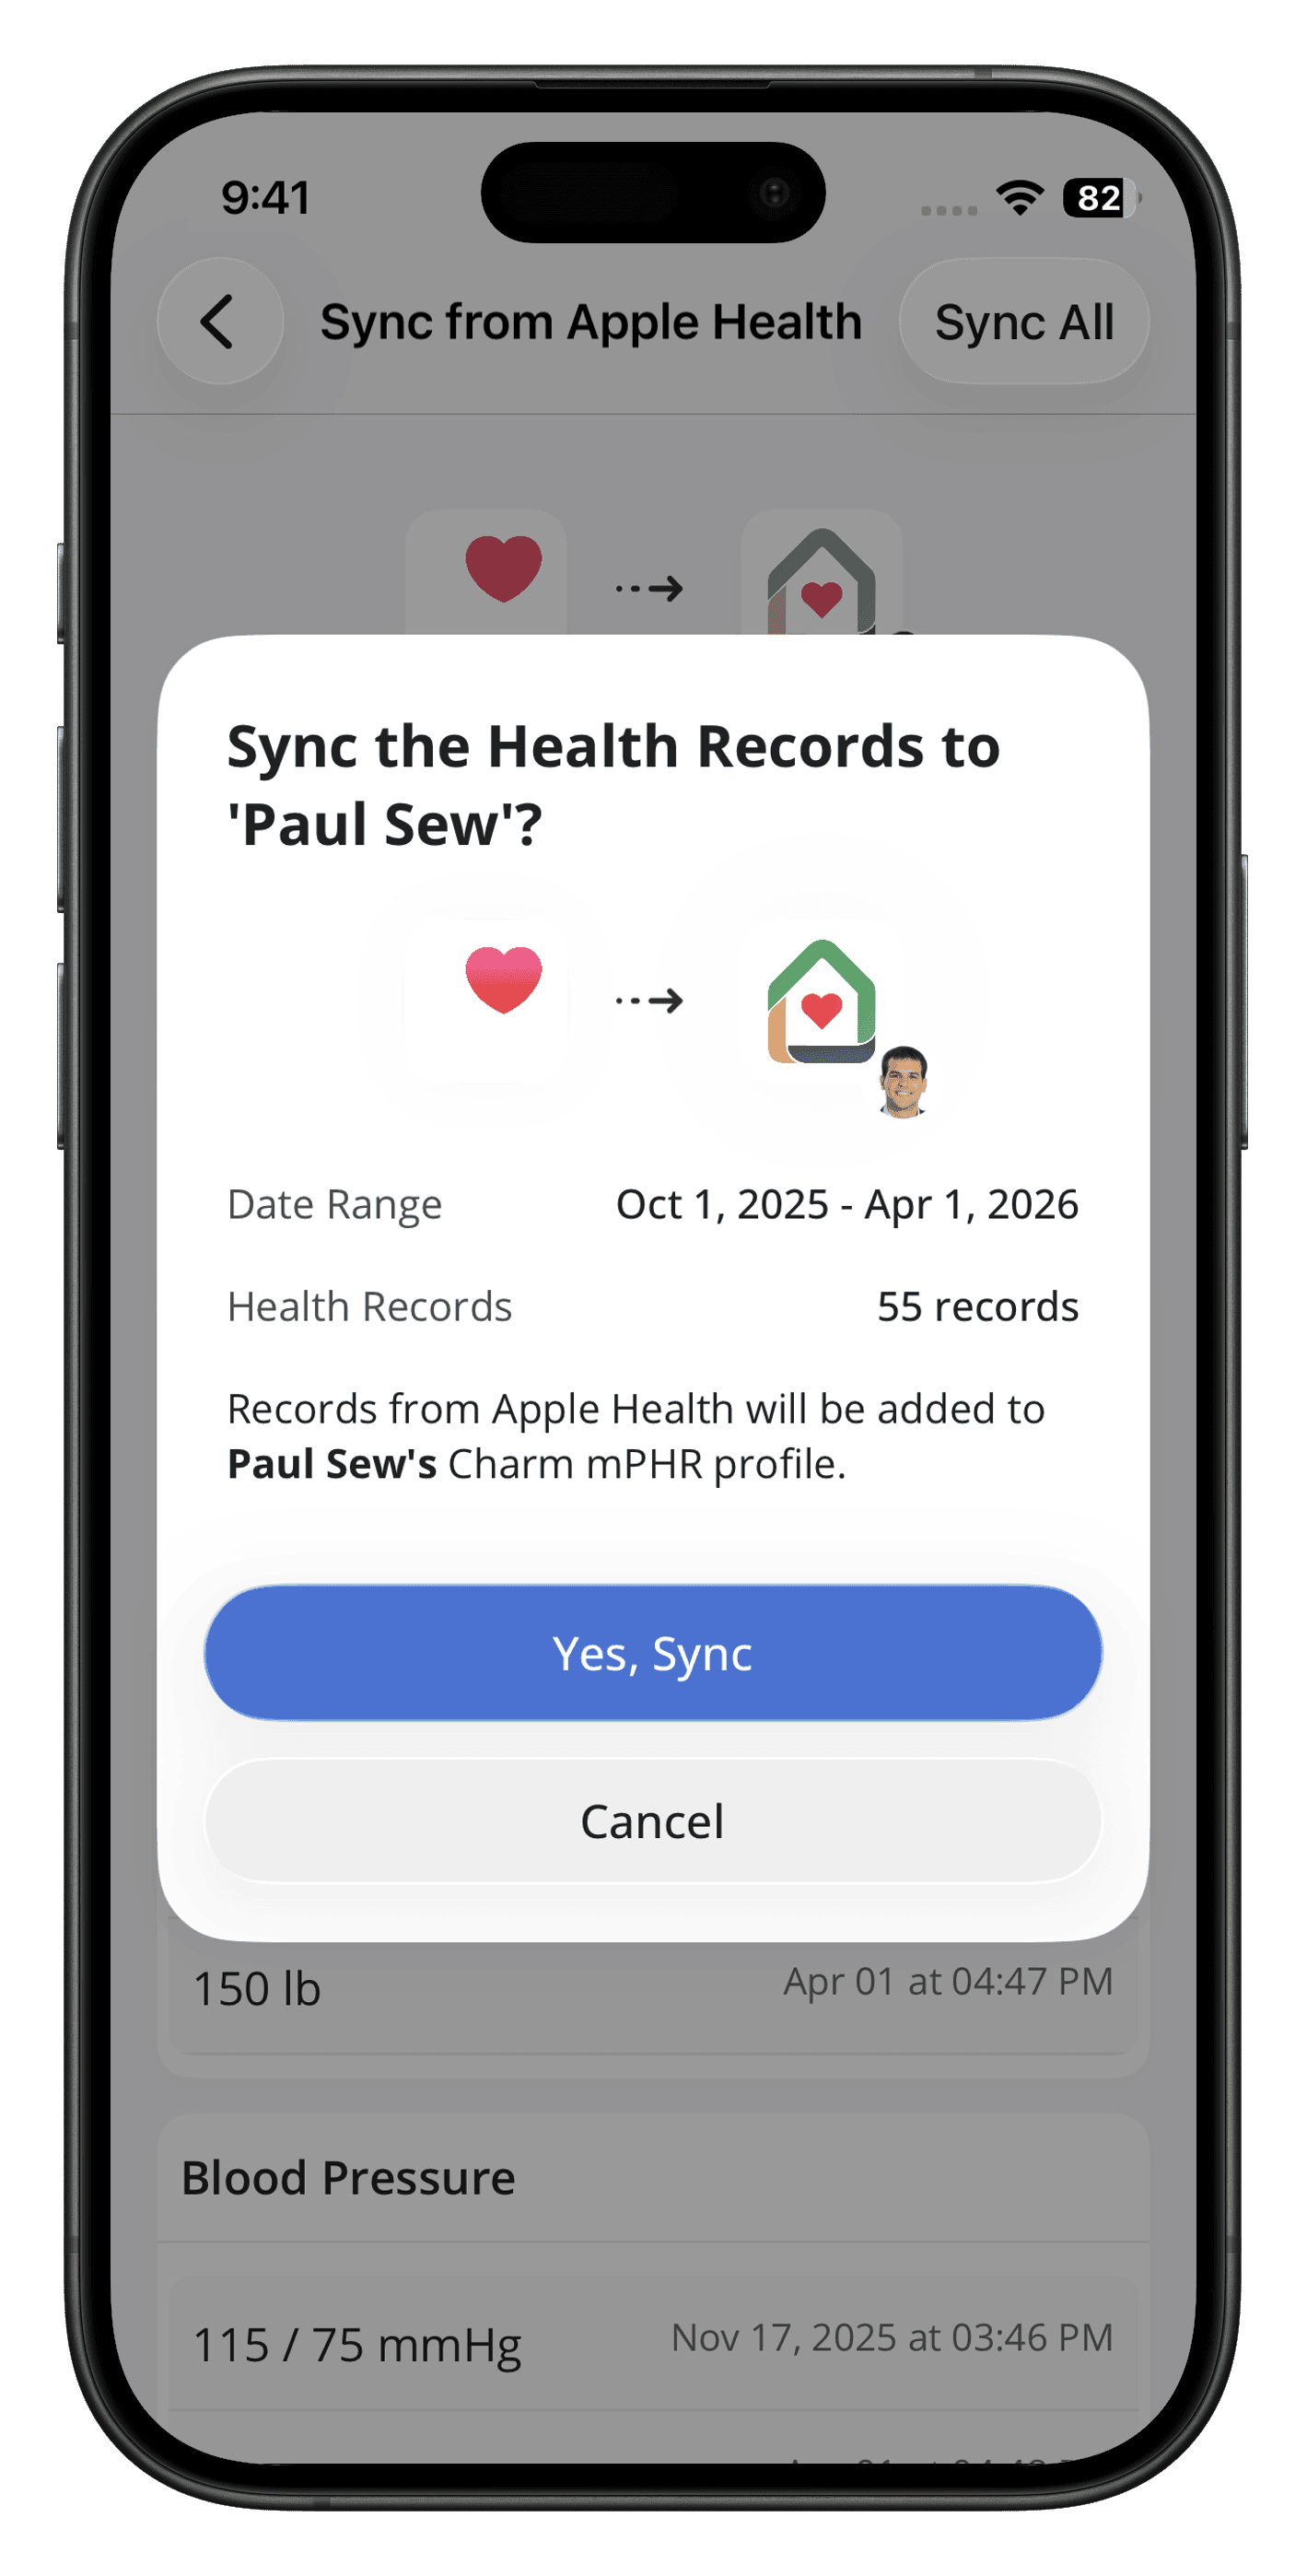
- Tap on 'Sync All'.
- Review the details in the confirmation pop-up and tap on the 'Yes, Sync' button.
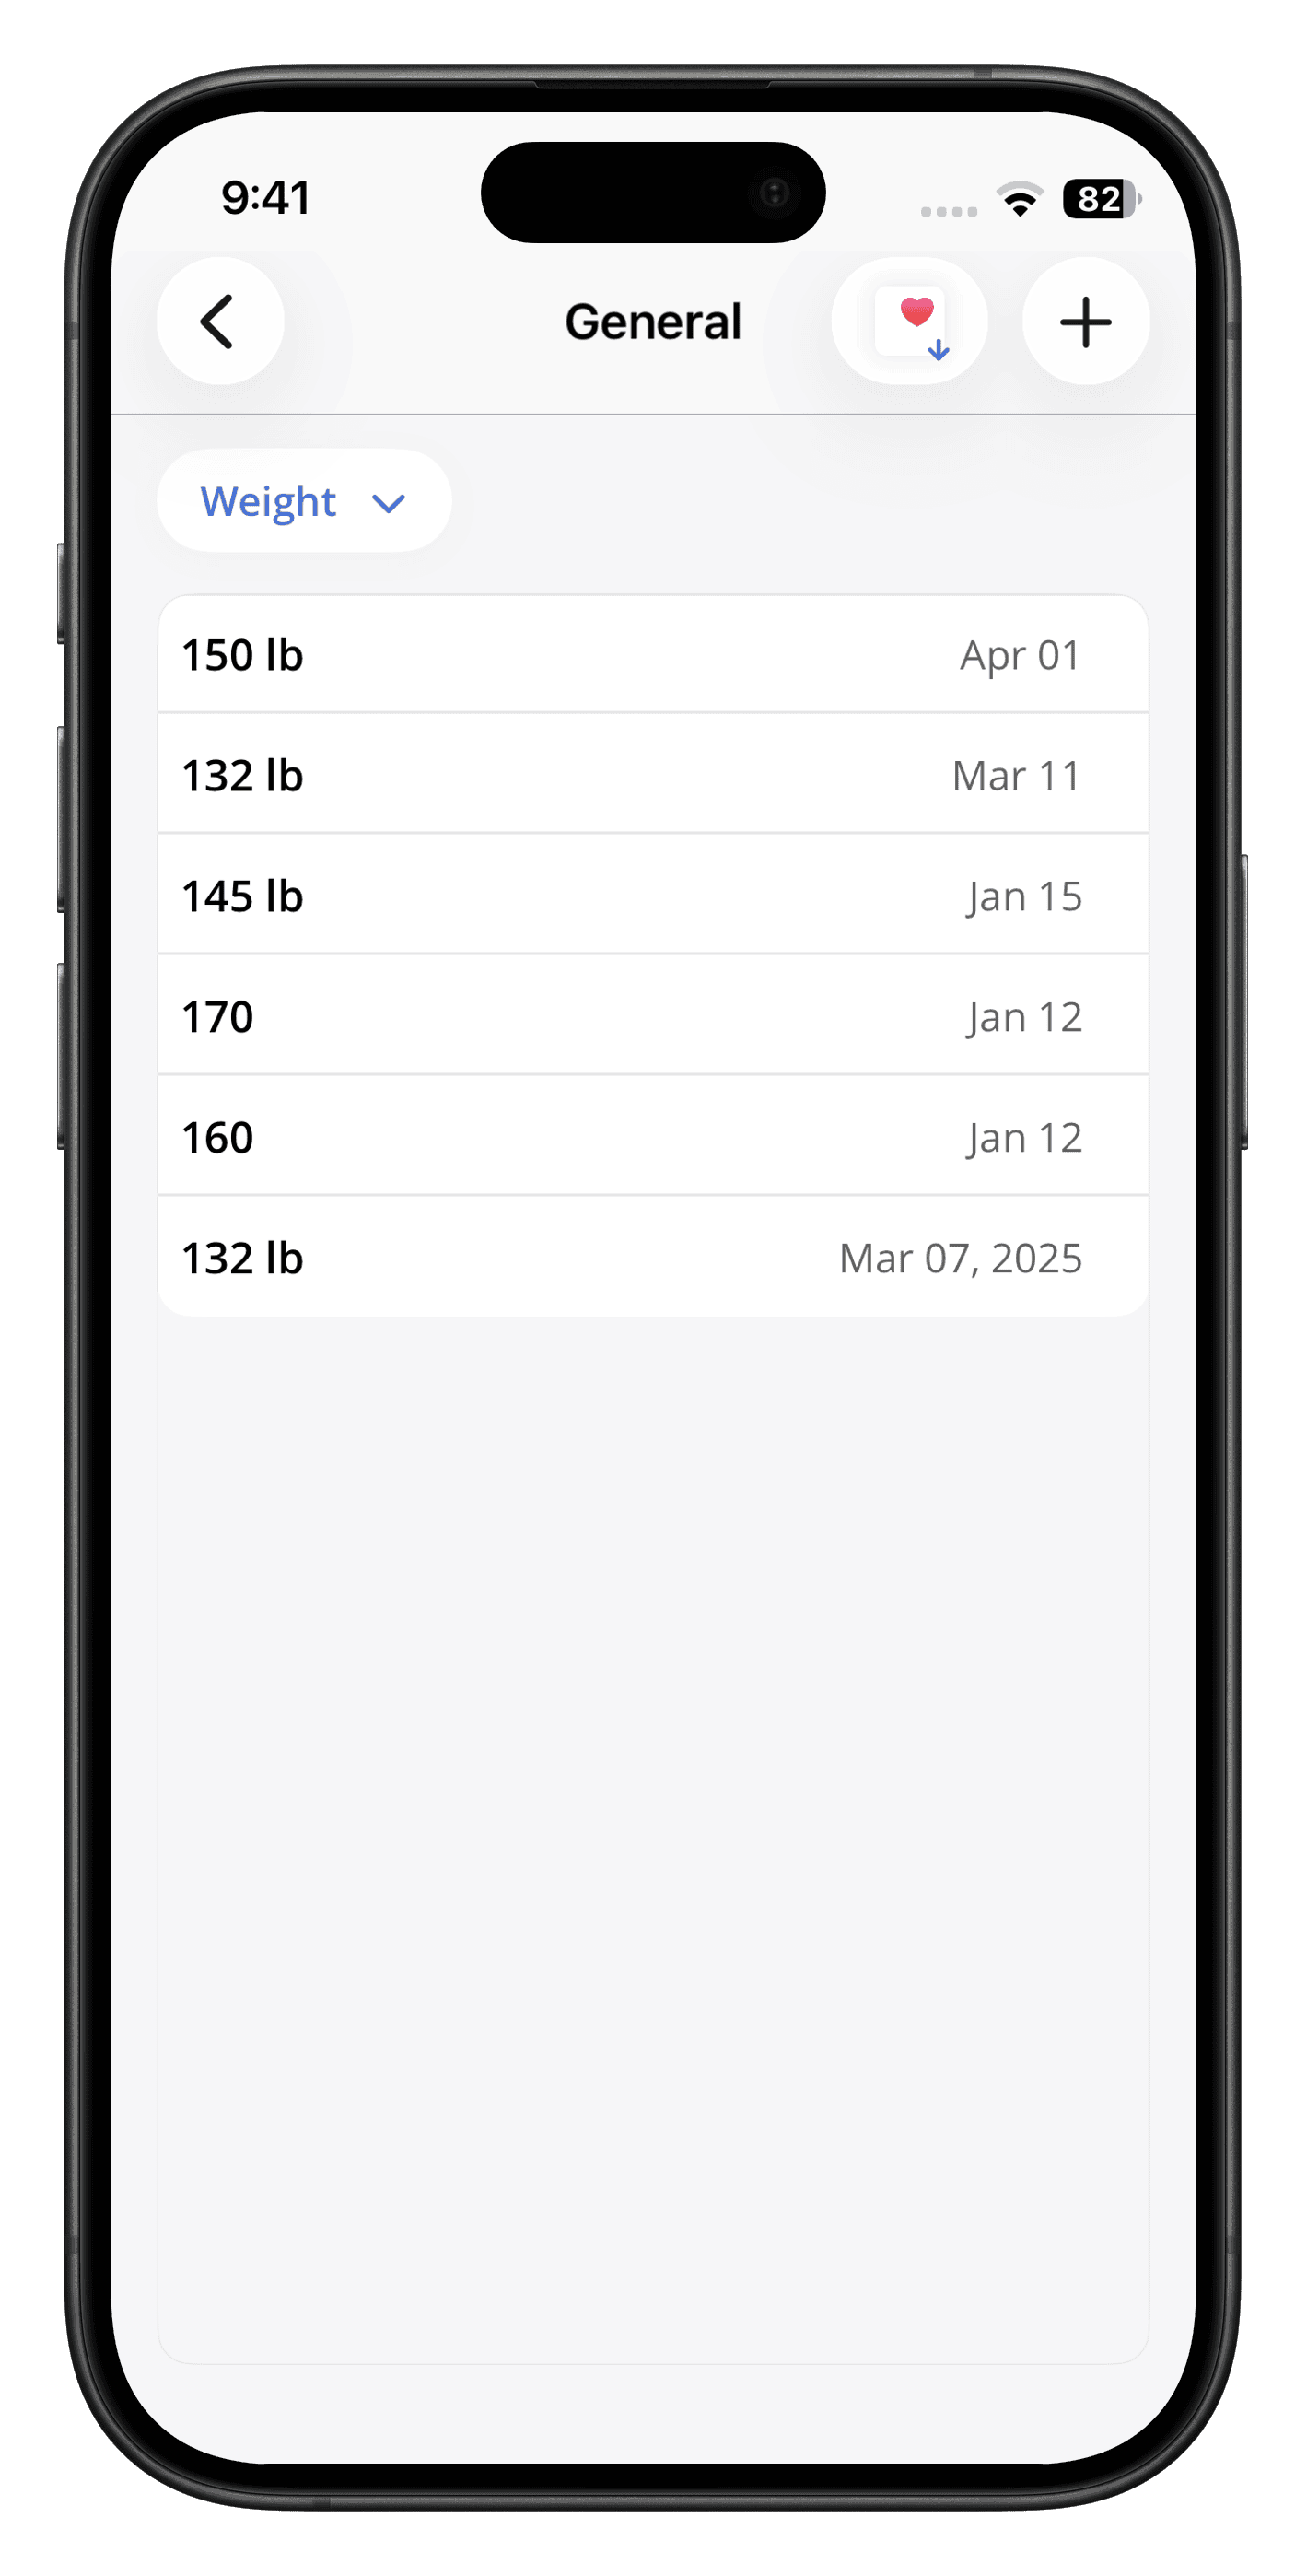
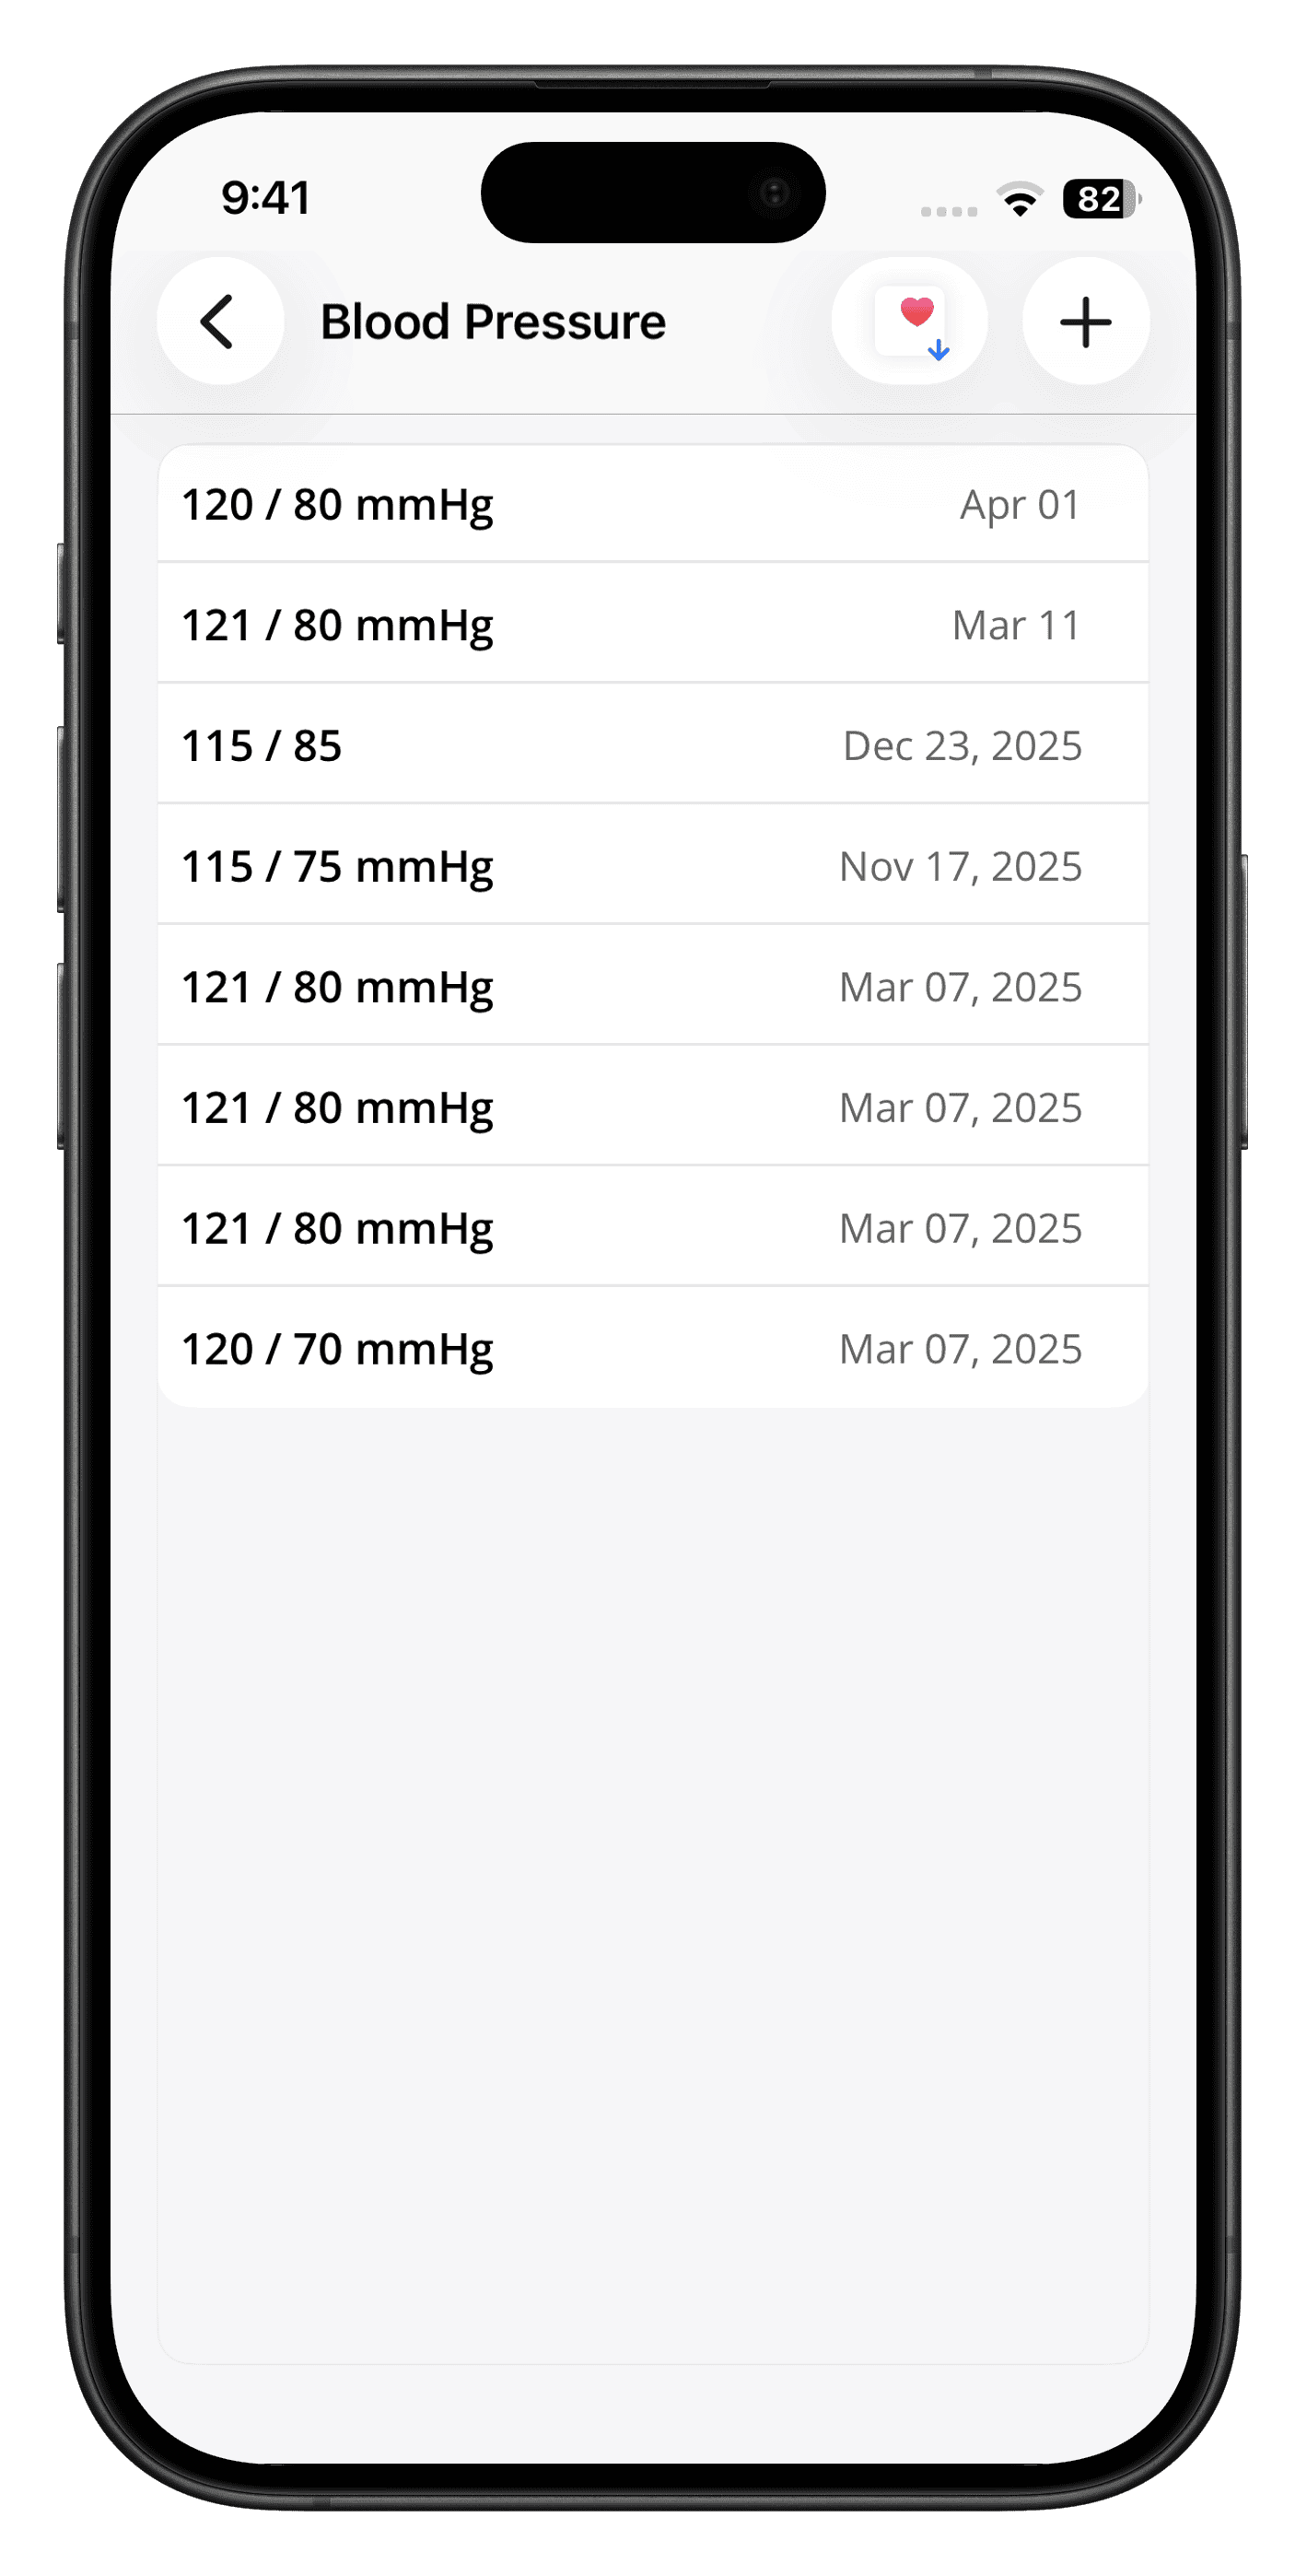
- To view synced records, navigate to the 'My Health > Wellness' section and select a specific metric (e.g., Weight, Blood Pressure). The synced records will be displayed within that section.
Note: You can enable or disable Apple Health sync anytime by toggling the 'Sync Health Data Record' option in the Profile section.