Working with Claims
Click on 'Claim Submission' under 'RCM Actions' to view and work on claims and its related details. For quick access, buttons like 'Patient Info', 'Billing Info' and 'Settings' are provided on the top right corner of the claim submission view.

Providers & CPT setup
Quick access button 'Billing Info' can be used to add various providers, procedure codes, service facilities, payers, outside labs and other items needed to generate claims.

The details of already available Rendering Providers, CPTs, Billing Providers and other items can be listed and edited by selecting the corresponding type in the type combo as shown below.

Patients, Procedure Codes, Billing Providers, Referring Providers, Ordering Providers, Outside Labs, Payer and Pay to Address are common and shared between EHR practice and RCM.
Claim Generation Settings
Practices can configure how claims are generated, either manually or automatically, with customized default values that make the process faster and more consistent.
Navigate to 'RCM Actions > Settings > Claim Generation Settings'.
Configure the options below to set the default values while generating Claims.
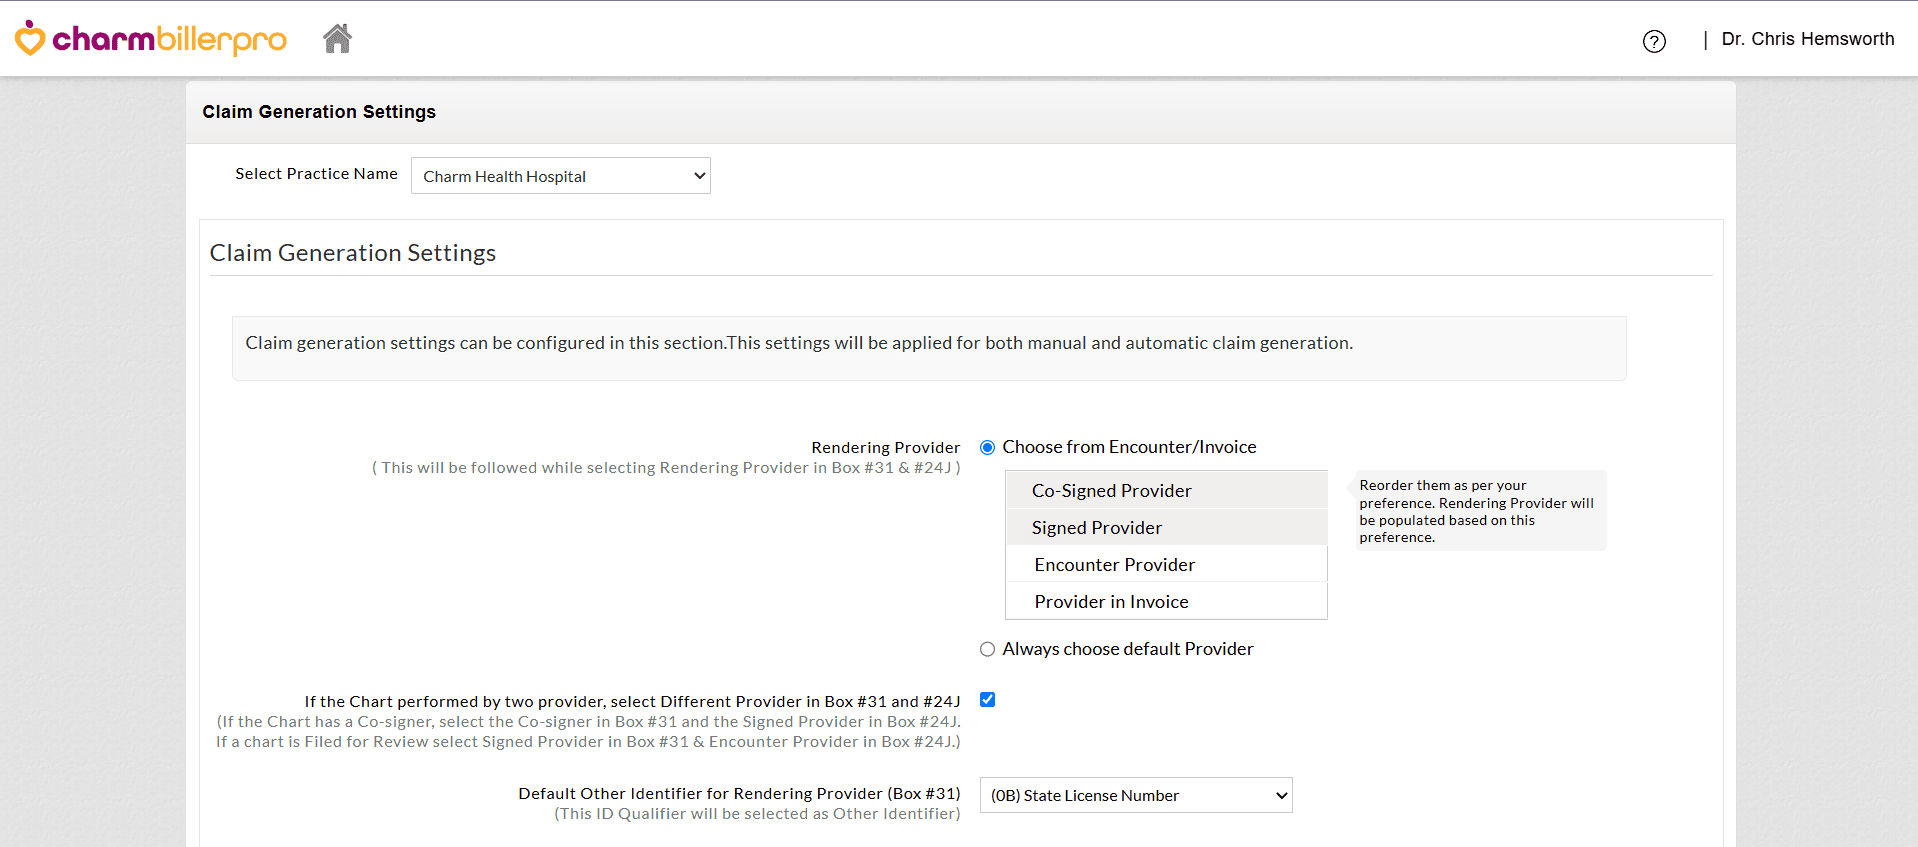
a. Renderring Provider (Box #31 & #24J)
- Choose the Provider to be populated as the Rendering Provider in Box#31. You can either set a priority ( e.g., Co-signed Provider > Signed Provider > Encounter Provider > Provider in Invoice) or select a default Provider.
- If two different Providers sign the encounter, enabling this option will automatically populate one Provider in Box #31 and the other in Box #24J.
For example,- If the Chart has a Co-signer and Signed Provider, the Co-signer will be selected in Box #31 and the Signed Provider in Box #24J.
- If the Chart is Filed for Review, the Signed Provider will be selected in Box #31 and Encounter Provider in Box #24J.
- Configure the default Other Identifier for Rendering Provider to be selected automatically in Box #31 (e.g., State License Number) if required by the Payer.

b. Service Facility (Box#32)
- Set the default Service Facility to be selected for Box#32. You can select either the Facility of the Encounter or choose any required Facility.
- Select the default Other Identifier for Service Facility to be selected in Box#32.

c. Billing Provider (Box#33)
- Select the default Other Identifier for Billing Provider (Box #33). This additional identifier will be populated automatically alongside the primary National Provider Identifier (NPI) for the Billing Provider
- This option allows the Practices to select either the default Billing Provider for all Claims generated across the Practice or configure a unique Provider for each Facility.

d. Claim Primary Insurance Selection
Reorder the Primary Insurance to be selected as per the Practice's preference from the following: Patient's Active Primary Insurance, Patient's Any Active Insurance, or Insurance in Invoice.
e. Pay to Address
Set a default 'Pay to Address' for all Facilities or select a unique address for each Facility.
f. Electronic Claim Generation Settings
Practices can decide how the Electronic Claims are transmitted to the Payers
These settings focus on generating Electronic Claims for efficient submission and faster processing.
Send the Service Facility detail even if it matches the Billing Provider
- As per the ANSI 5010 specification for Electronic Claim Submission, if the Billing Provider and Service Facility Identifiers are the same, then the Service Facility details should not be sent as part of the Claim.
- By default, CharmHealth will not send Service Facility details in the Claim if it is the same as the Billing Provider.
- However, a few Payers require Service Facility details for processing the Claims, even if it is the same as the Billing Provider.
- In such cases, the user should select this option to send the Service Facility details in the Claim.
Send Rendering Provider detail even if it matches with Billing Provider
- As per the ANSI 5010 specification for Electronic Claim Submission, if the Billing Provider and Rendering Provider Identifiers are the same, then the Rendering Provider details should not be sent as part of the Claim.
- By default, CharmHealth will not send Rendering Provider details in the Claim if it is the same as the Billing Provider.
- However, a few Payers require the Rendering Provider details for processing the Claim, even if they are the same as the Billing Provider.
- In such cases, the user should select this option to send the Rendering Provider details in the Claim.
Send Other Identifier (ex: Taxonomy Code, State License Number) even if the Facility/Provider has NPI
- As per the ANSI 5010 specification for Electronic Claim Submission, if a Facility or a Provider (i.e, Billing Provider/Rendering Provider/Referring Provider/Supervising Provider/Ordering Provider) has an NPI then any other identifier (ex: State License Number) of that Facility/Provider should not be sent as a part of the Claim.
- By default, CharmHealth will not send additional identifiers if NPI is available for that Facility/Provider.
- However, a few Payers require additional identifiers for Claim processing even if the NPI is available.
- For such Payers, the user should select this option to send an additional identifier in the Claim.
- The Electronic Claim form allows any of the five qualifiers in the Claim, namely:
- State License Number [0B],
- Provider UPIN Number [1G],
- Provider Commercial Number [G2],
- Location Number [LU]
- Taxonomy Code [ZZ].
Payer-Specific Claim Generation Settings
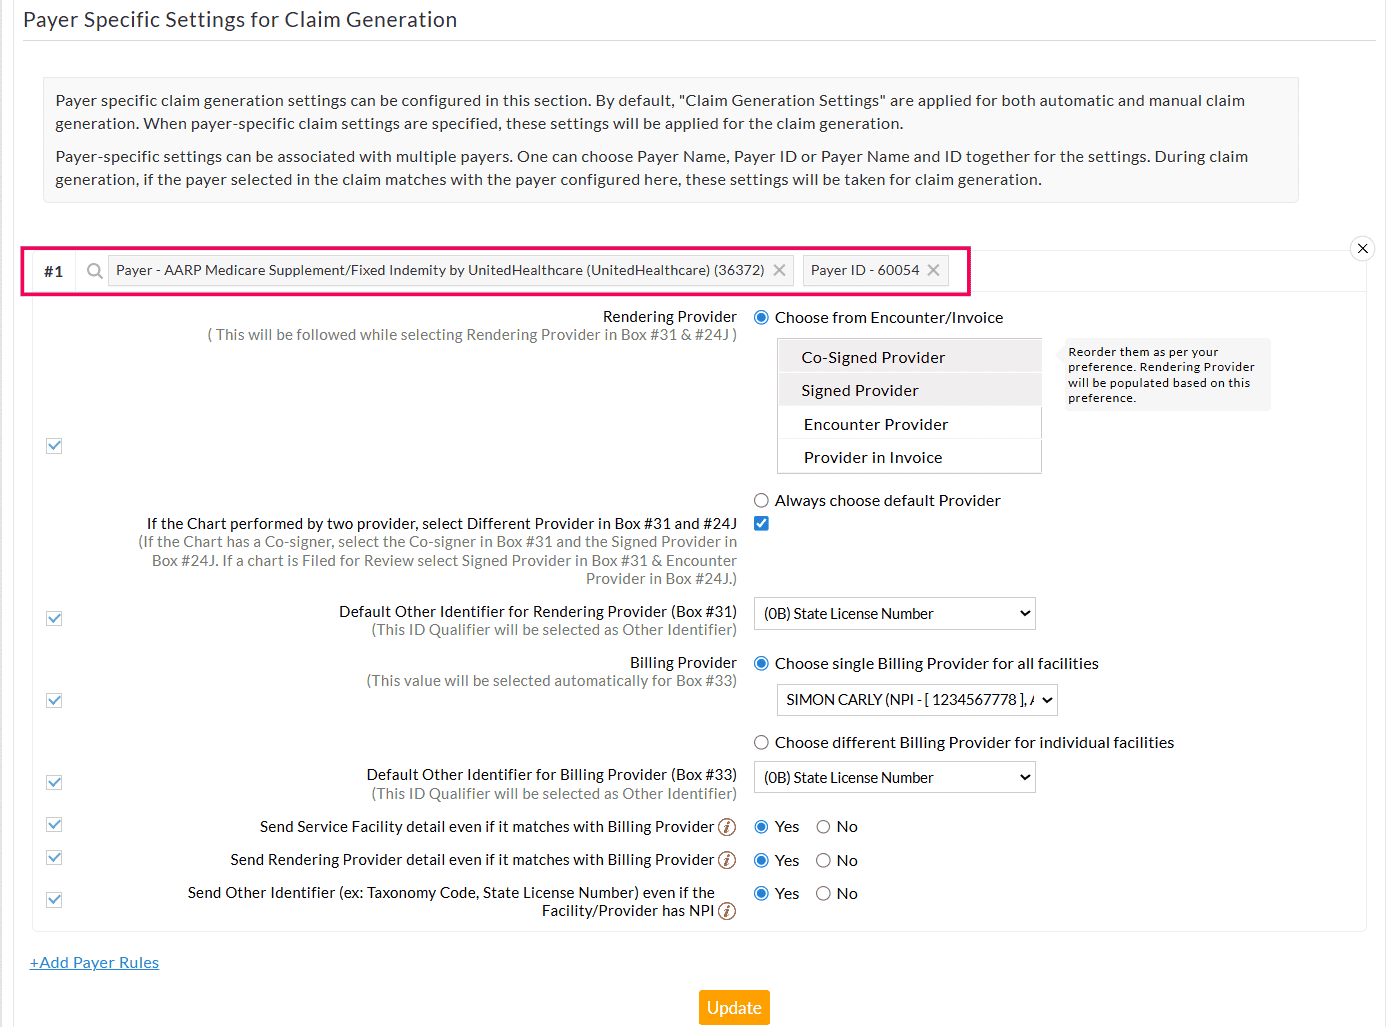
Practices can tailor Claim generation settings for specific Payers. These settings streamline the automatic Claim generation process, minimize manual intervention, and facilitate faster Claim processing.
- By default, the system uses the general 'Claim Generation Settings' for both manual and automatic Claim generation. However, when you create Payer-specific configurations, these settings override the general settings for the selected Payer during Claim generation.
- Practices can create multiple Payer-specific configurations and choose values or options to address the specific Payer requirements.
- Payer-specific settings can be associated with multiple Payers, allowing users to choose either the Payer Name, Payer ID, or a combination of both.
During Claim generation, if the Payer selected in the Claim matches the Payer configured, these settings will be applied automatically.
To configure the Payer-Specific Claim Generation settings, follow the steps given below.
- Navigate to the 'Payer Specific Settings for Claim Generation' section.
- Click the '+ Add Payer Rules' option.
- Search and select the relevant Payers to configure the settings.
- Enable the checkbox for appropriate settings and select the required option for each setting to meet the Payer's requirements.
- To add more Payer configurations, click the '+ Add Payer Rules' option.
- Click the 'Update' button to save the settings.
Generating and Editing Claim
Encounters that are ready for generating claims can be listed on searching 'Encounters for Claim Generation' in the type combo. Encounter summary, insurance details, and patient insurance eligibility can be viewed for that encounter using the action items.

Claims can be generated by clicking 'Generate Claim' action which takes through a simple four-step claim wizard as shown below. Data provided on the encounter in chart notes will be automatically get filled up in these wizards.
Claim Wizard 1 (Patient, Guarantor & Patient condition Information)

Claim Wizard 2 (Insurance Information)

Claim Wizard 3 (Patient Treatment Details)

Claim Wizard 4 (Facility and Provider Details)

The generated claim can be saved as 'Draft' or 'Verified'. A claim can also be generated without an encounter by clicking the 'Generate New Claim' button. Claims in 'Draft' or 'Verified' status are not included in any of the reports.
Generated claims can be viewed by searching 'Generated Claims' in the type combo. Various actions are provided against the claim as shown below.

- Change Claim Status - Status of a claim can be changed using this action.
- Claim History - Lists activities done on a claim by members. This can be used for audit.
- Notes / Remarks - Claim related comments or notes can be added.
- Generate / Preview Claim
- Generate PIF - PIF file of this claim will be generated for submission.
- Claim PDF for Print - A PDF file will be generated for printing in the CMS1500 form.
- Patient Details - Patient insurance details, Notes and Eligibility History can be viewed.
- Patient Details - Patient insurance details, Notes and Eligibility History can be viewed.
- Others
- Add Attachments - Files like EOB and any consent forms can be attached and viewed in this section.
- Tasks - Tasks related to this claim can be added and assigned to another RCM member.
Claim Submission
PIF files can be exported in bulk by clicking on 'Batch Claim PIF' which lists the claims in 'Verified' or 'Ready for Resubmission' state. One or more claims can be selected and downloaded as a PIF file. Claim status can be updated to 'Submitted' on generating Batch Claim PIF.

Transaction Status
Transaction status can be used to track the status of a claim until it reaches the payer. This can be viewed by clicking 'Transaction Details' in the claim action items. The transaction details view lists the claim's transaction history. New transaction status can be added using the 'Add New Transaction' link on the top right corner of the dialog as shown below.

Member with privileges can change the transaction status which can be managed in Admin Settings → Member List → Member Privileges.
Claims marked with transaction status 'Rejected by Payer' are pulled in the Reports → Denial / Rejection → Rejection Report.
Secondary Claim Generation
A secondary claim can be generated using 'Generate Secondary Claim' under 'Others' in the claim action items. Claims will have the same information of the primary claim which can be modified in a four-step claim wizard. Secondary claim id will be generated with primary claim id appended with the letter 'S'.