We are excited to announce several enhancements to the billing module designed to improve efficiency and streamline key billing workflows.
Real- time Eligibility allows the Practices to verify a Patient’s insurance coverage with the Payer before the visit and review benefit details such as Co-pay, Co-insurance, and Deductible.
We have introduced the ability to configure Payer-specific Real-time Eligibility Inquiry Settings, giving Practices the flexibility to define unique rules for individual Insurance Payers. This update ensures that eligibility requests are tailored to the specific requirements of each Payer without impacting your global Practice defaults.
Key Enhancements
Custom Service Type Codes: Set specific Service Type Codes for both the Eligibility Request (270) and the Eligibility Response (271) to ensure you receive and read the most accurate benefit details, such as Copay, Co-Insurance, and Deductible.
Default Eligibility Providers: Designate a specific Default Provider for inquiries on a per-payer basis to satisfy unique Payer validation requirements.
When an Eligibility check is initiated for a configured Payer, these custom settings automatically take precedence over the Practice-wide defaults. All other Payers will continue to follow the standard global configuration.
To configure,
- Navigate to 'Settings > Billing-eClaims > Real-Time Eligibility Settings > Payer-specific Eligibility Inquiry Settings'.
- Search
and select the Payer(s) you want to configure. You can search using the
Payer name or the Eligibility Payer ID. If the Eligibility Payer ID is
not available, the Payer ID is taken as the Eligibility Payer ID.
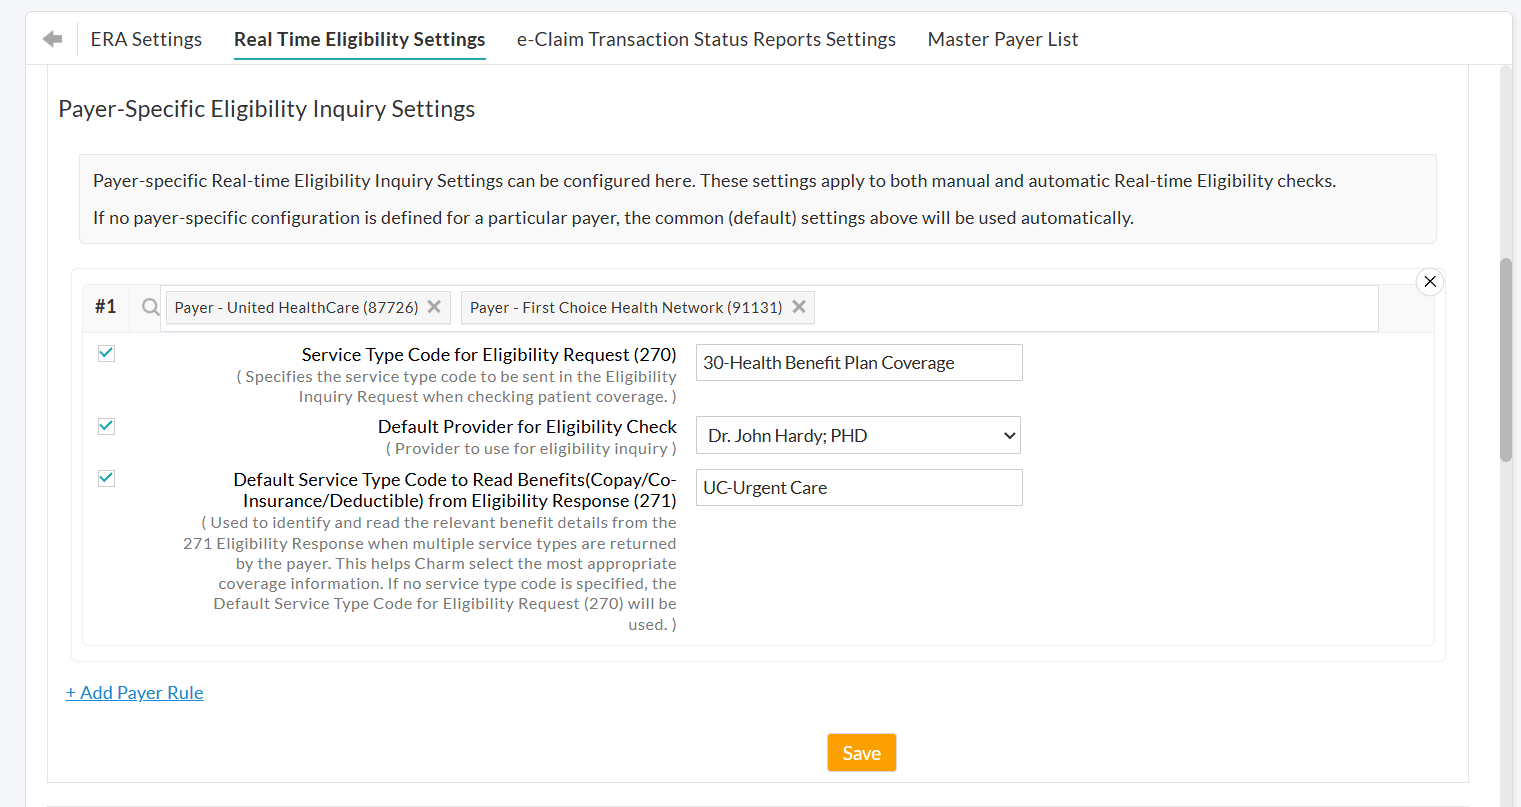
- Enable the required settings and enter the appropriate value for that Payer(s).
- To add more Payer rules, click on the '+ Add Payer Rule' option.
- Save the settings.
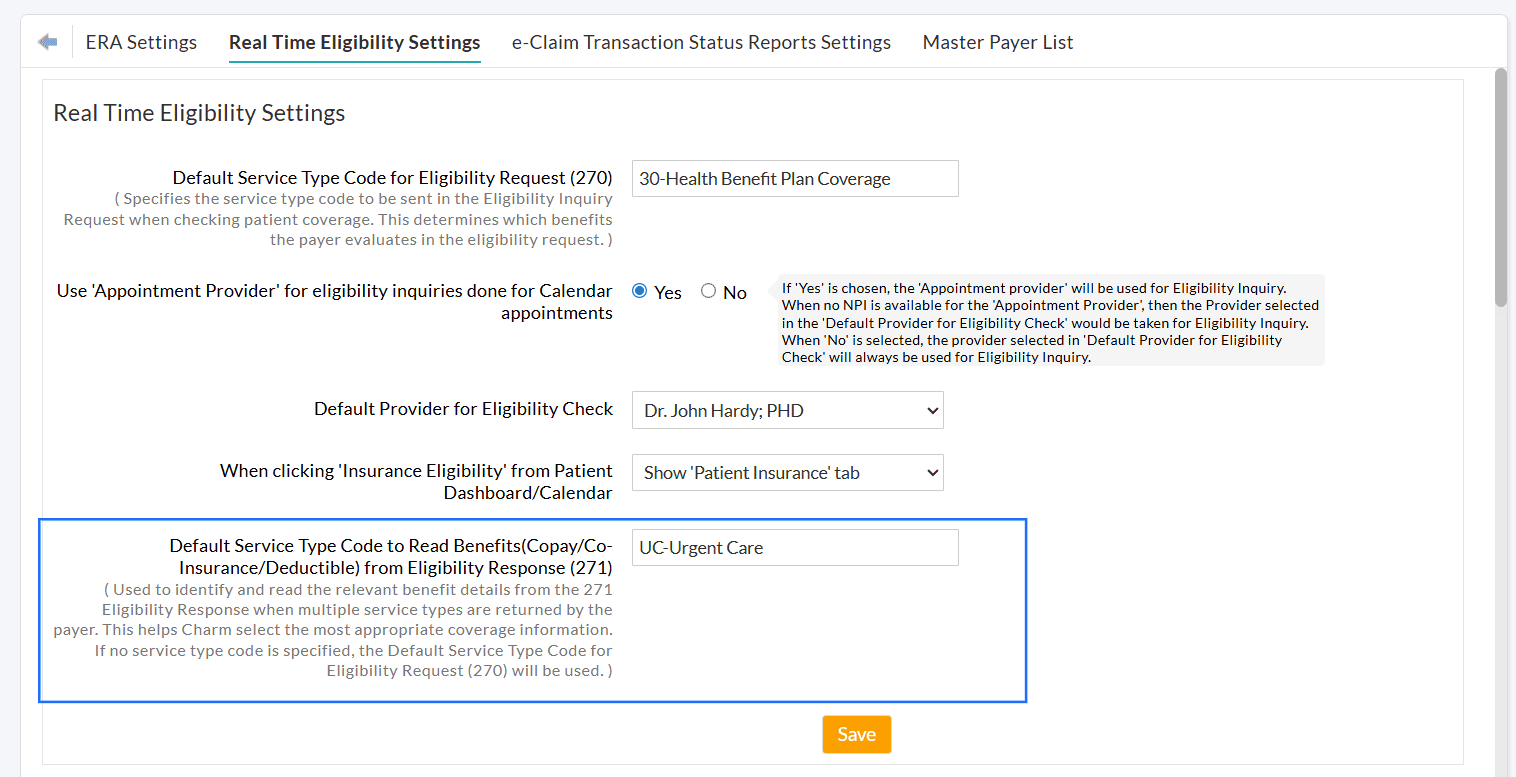
We have updated the Real-time Eligibility settings to allow Practices to define different Service Type Codes when sending eligibility requests (270) and when reading the responses (270). This update ensures that Payers can successfully process eligibility checks and provide accurate benefit details for your specialty.
Why are separate codes necessary?
Some Payers may reject eligibility requests when the Service Type Code is not supported. To avoid this, Practices often use Service Type Code 30 (Health Benefit Plan Coverage), as it is widely accepted across Payers.
However, the eligibility response (271) typically includes benefit details for multiple supported service types, not just Code 30.
Since the details such as Copay, Co-insurance, and Deductible are service-specific, relying solely on Code 30 may not always return the most accurate benefit information.
With this update, Practices can now configure a separate Default Service Type Code to Read Benefits (271).
This allows Practices to:
- Send a generic request to improve acceptance rates.
- Retrieve and display benefit details based on a more relevant, specialty-specific service type.
Practical Example
If a Practice verifies eligibility for a Patient scheduled for an Urgent Care visit:
- Request (270): The Practice sends the Service Type Code 30 to ensure the Payer accepts the eligibility inquiry.
- Response (271): The Payer returns benefit details for multiple service types, such as General (30), Office Visit (11), and Urgent Care (UC).
- Result: Since the Default Service Type Code to Read Benefits 271 is configured as UC, CharmHealth bypasses the general information and displays only the Urgent Care Copay and Deductible.
If
the 271 field is left blank, the system will use the same Service Type
Code sent in the initial request (270) to read and display the benefit
from the response.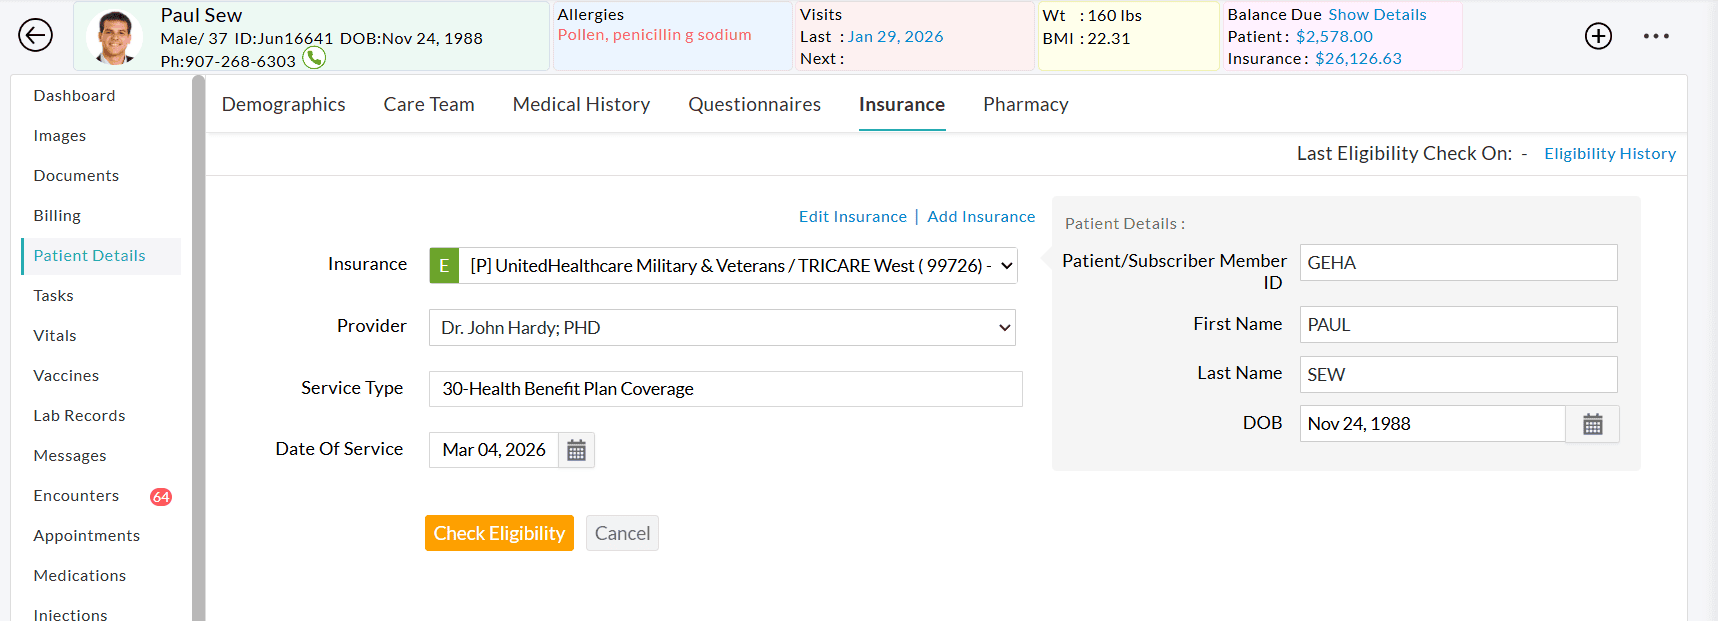
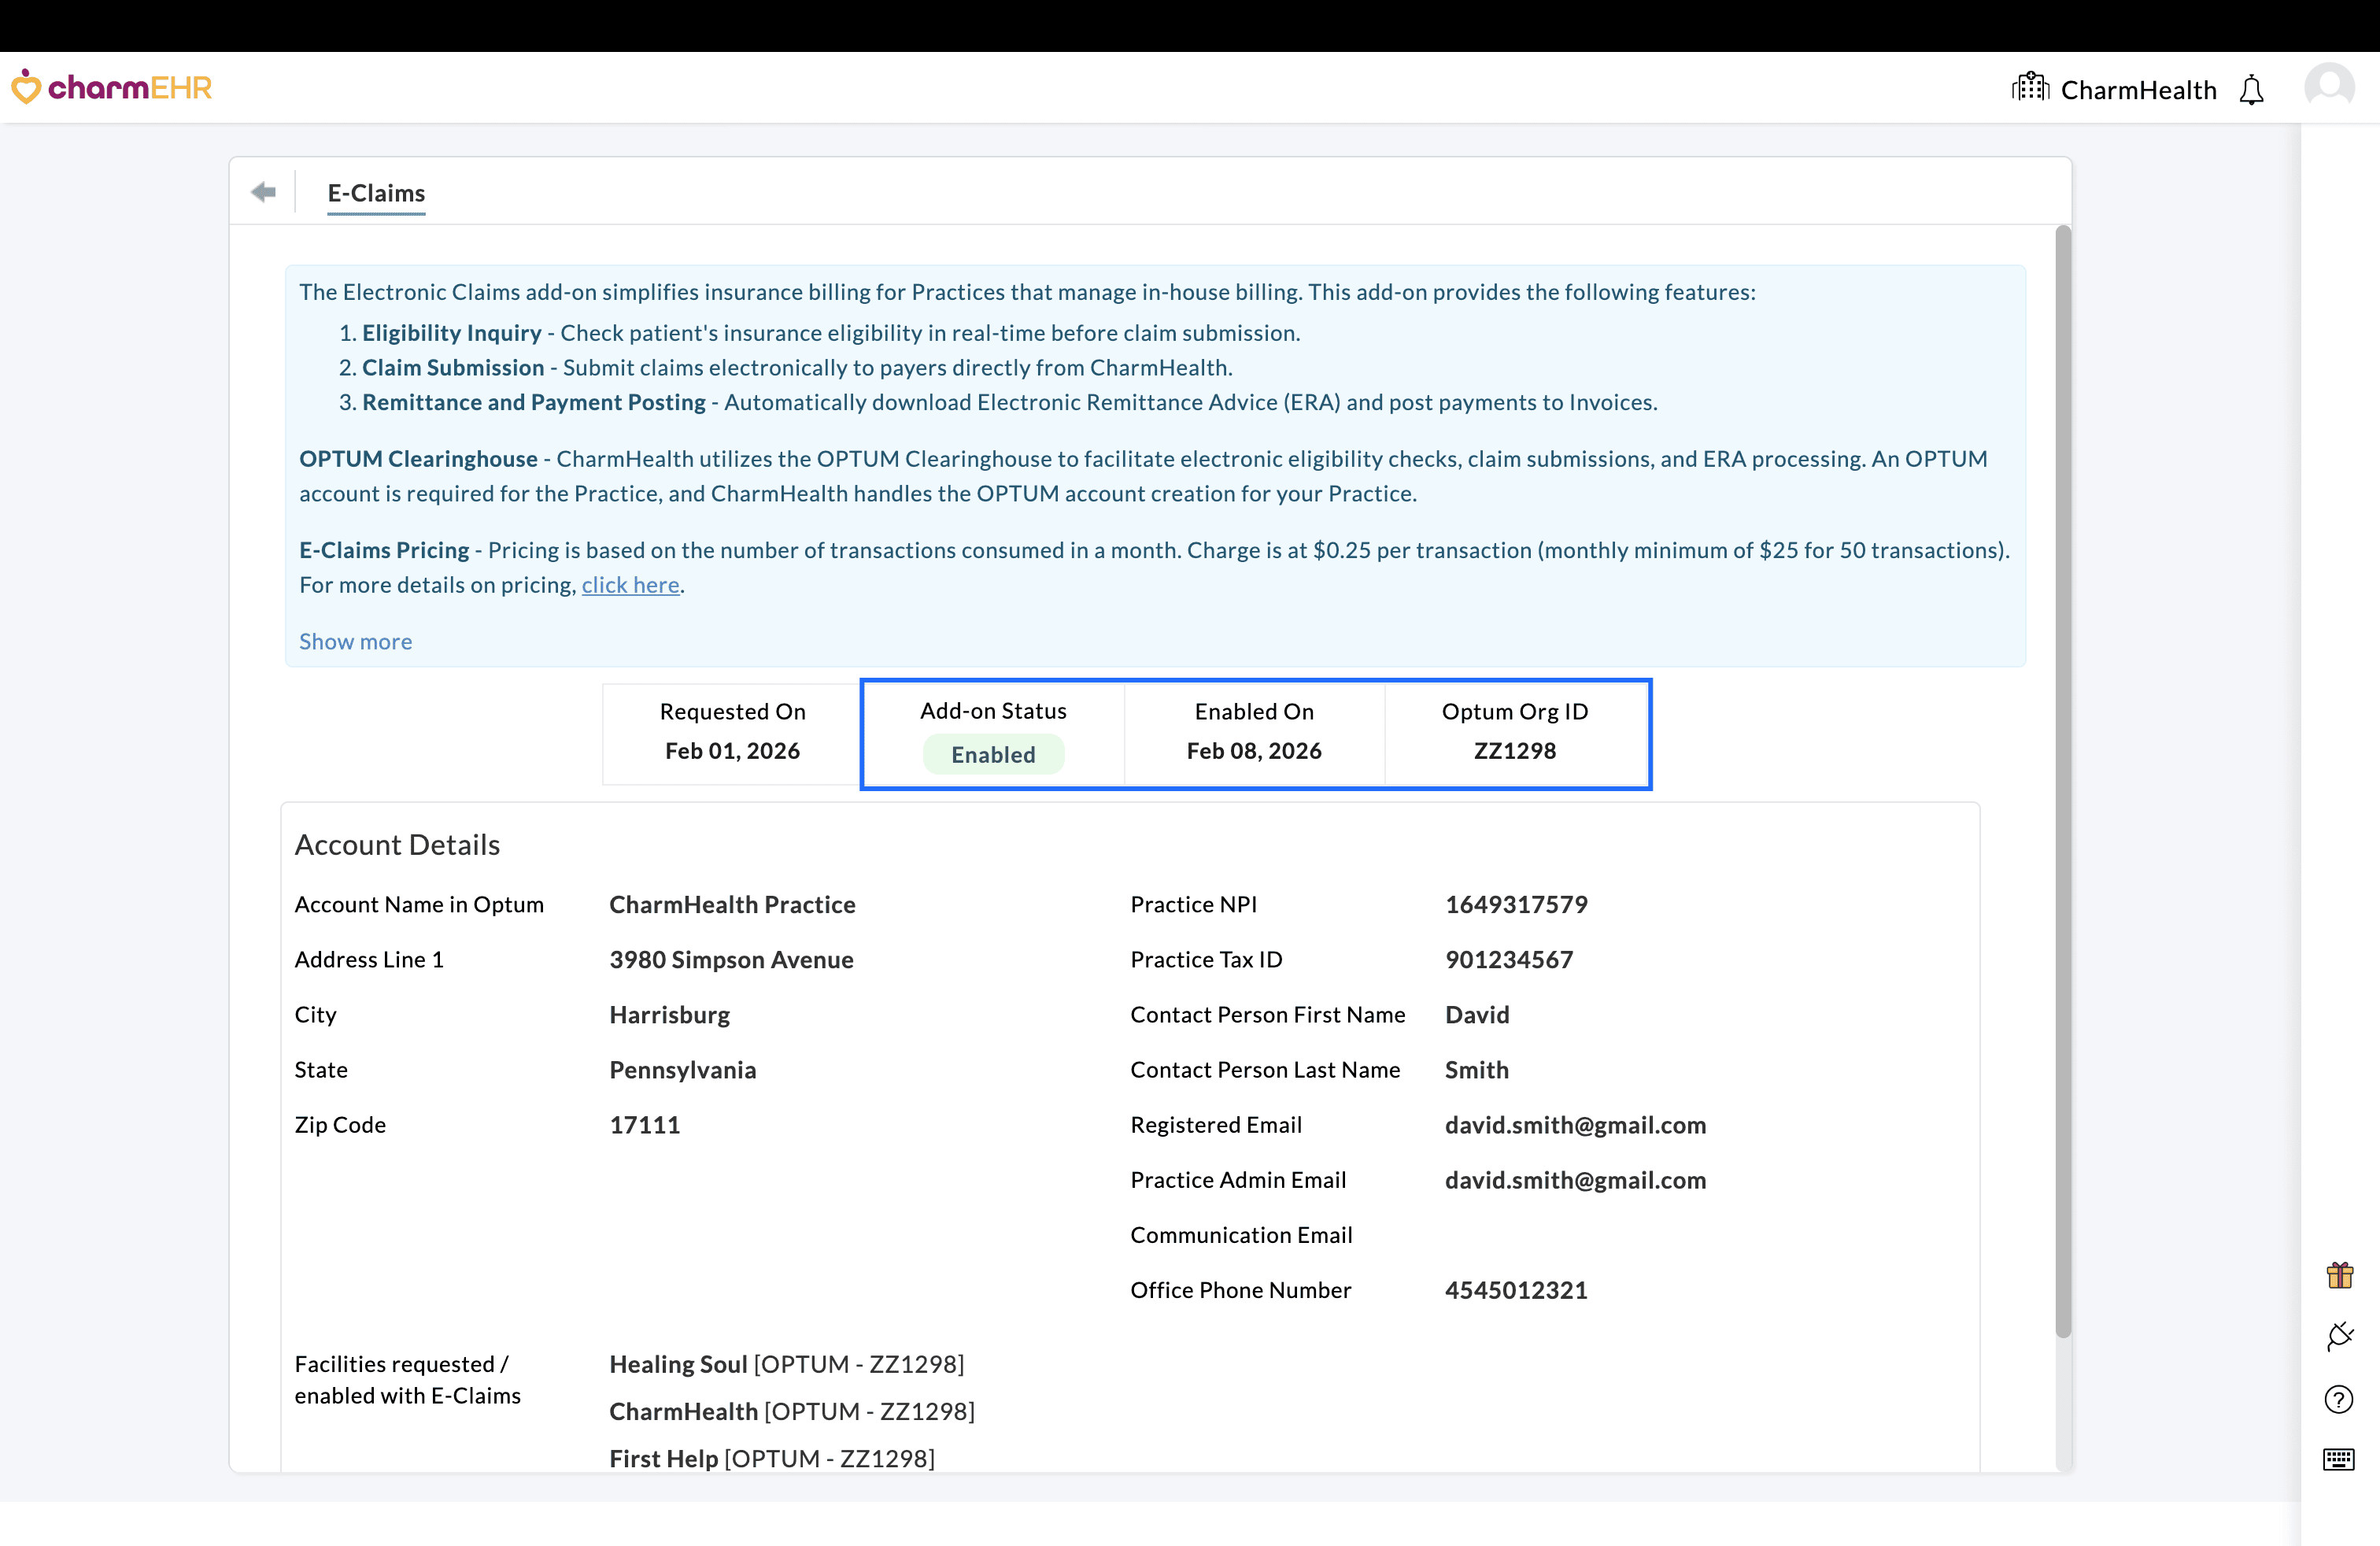
We have enhanced the enabling of the Electronic Claims add-on to make onboarding faster and more convenient for Practices. Practices can now request the Electronic Claims add-on and also provide the required details for Clearinghouse account setup in a single setup.
This expedites the setup time for the Practice's E-Claims account and helps in tracking the progress of the account setup.
Key Benefits
- Self-service activation: Practices can request the Electronic Claims add-on within CharmHealth EHR.
Note: CharmHealth creates a Clearinghouse account for the Practice to facilitate E-Claims submission. - Faster onboarding: Automatically populated Practice details reduce manual data entry and accelerate Clearinghouse account creation.
- Flexible Facility mapping: Set up E-Claims either for all or only for the required Facilities of your Practice, based on your needs.
- Real-time status tracking: Practices can monitor the progress of their activation request directly from the Add-Ons page.
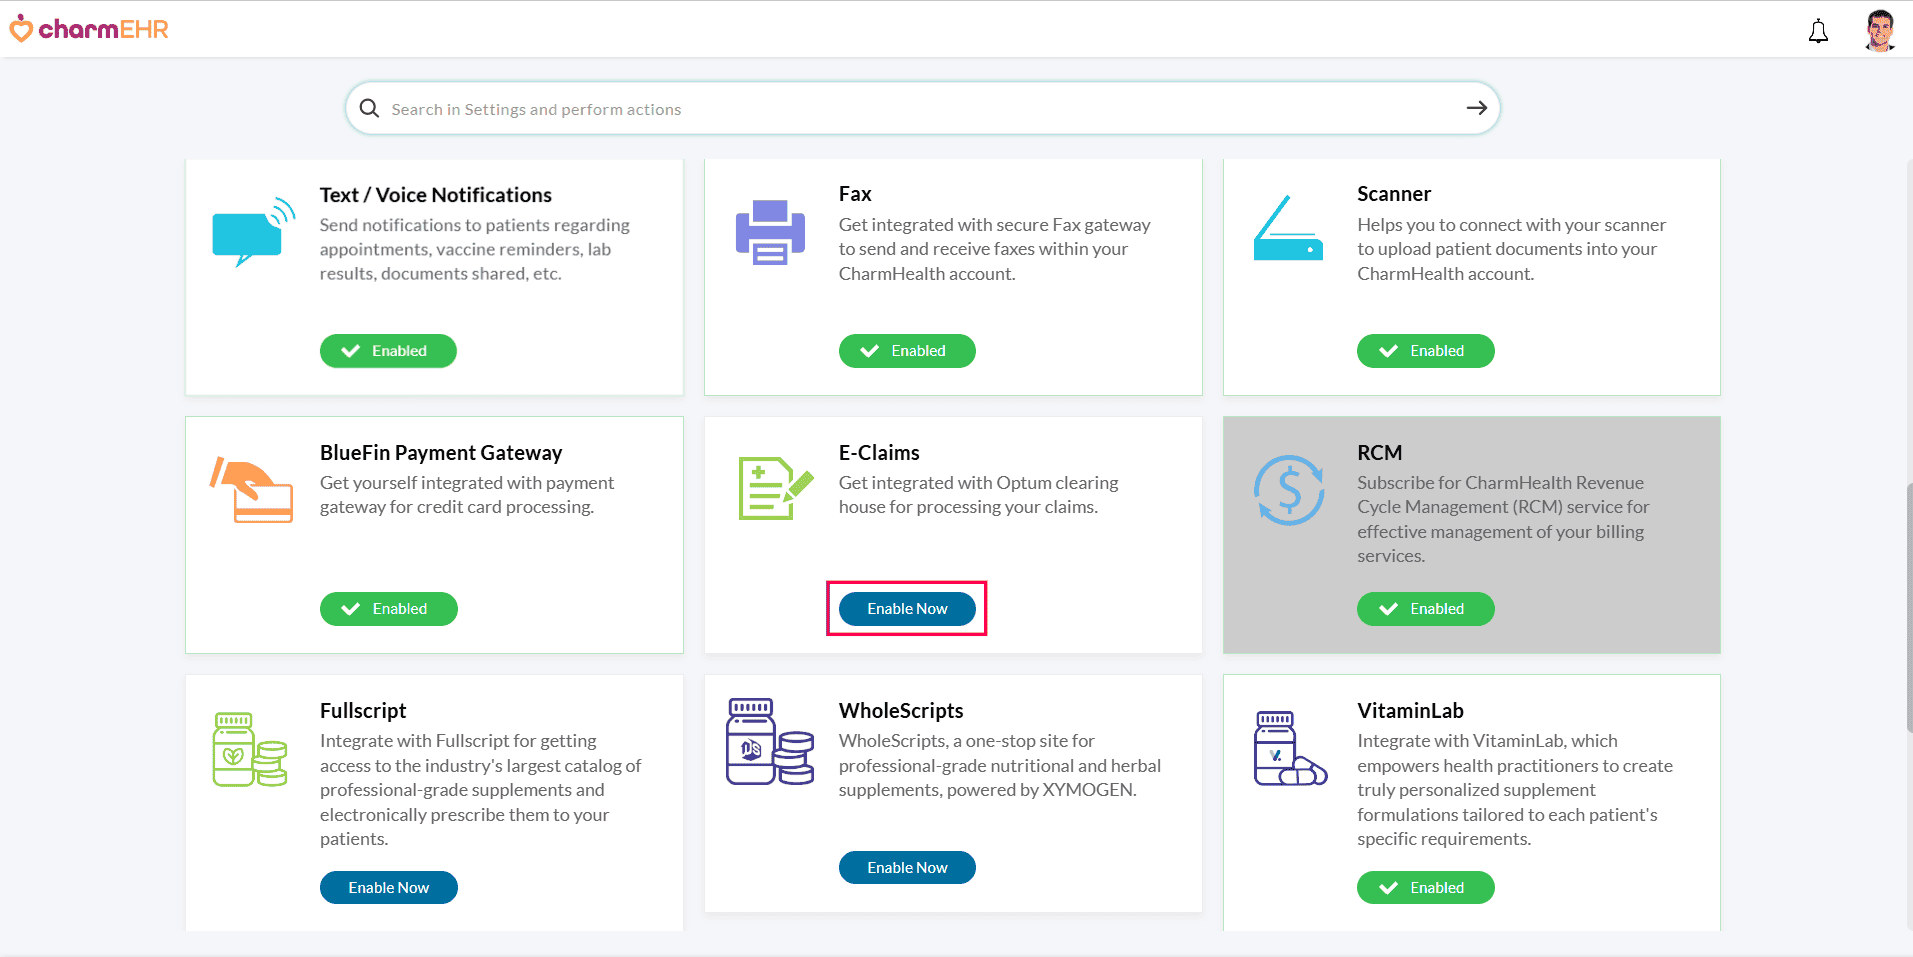
To Request the Electronic Claims Add-On:
- Navigate to 'Add-Ons' by clicking the 'Plug icon' in the CharmHealth EHR dashboard.
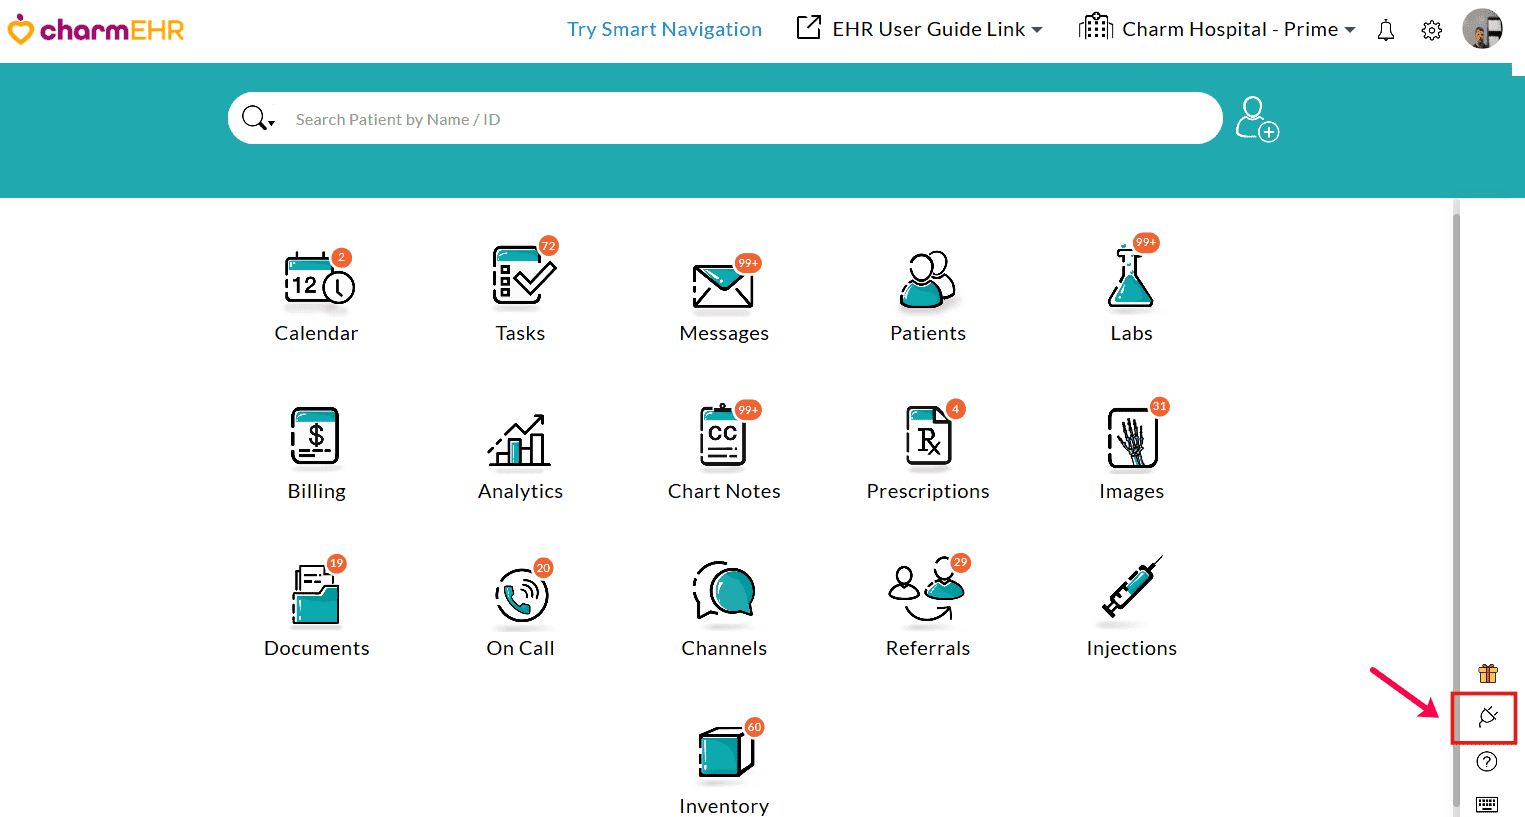
- In the E-Claims section, click 'Enable Now'.
- The
request form will be displayed with key Practice details, including
Practice Name, Address, NPI, Tax ID, Contact Person details, etc., that
are required for Clearinghouse account creation.
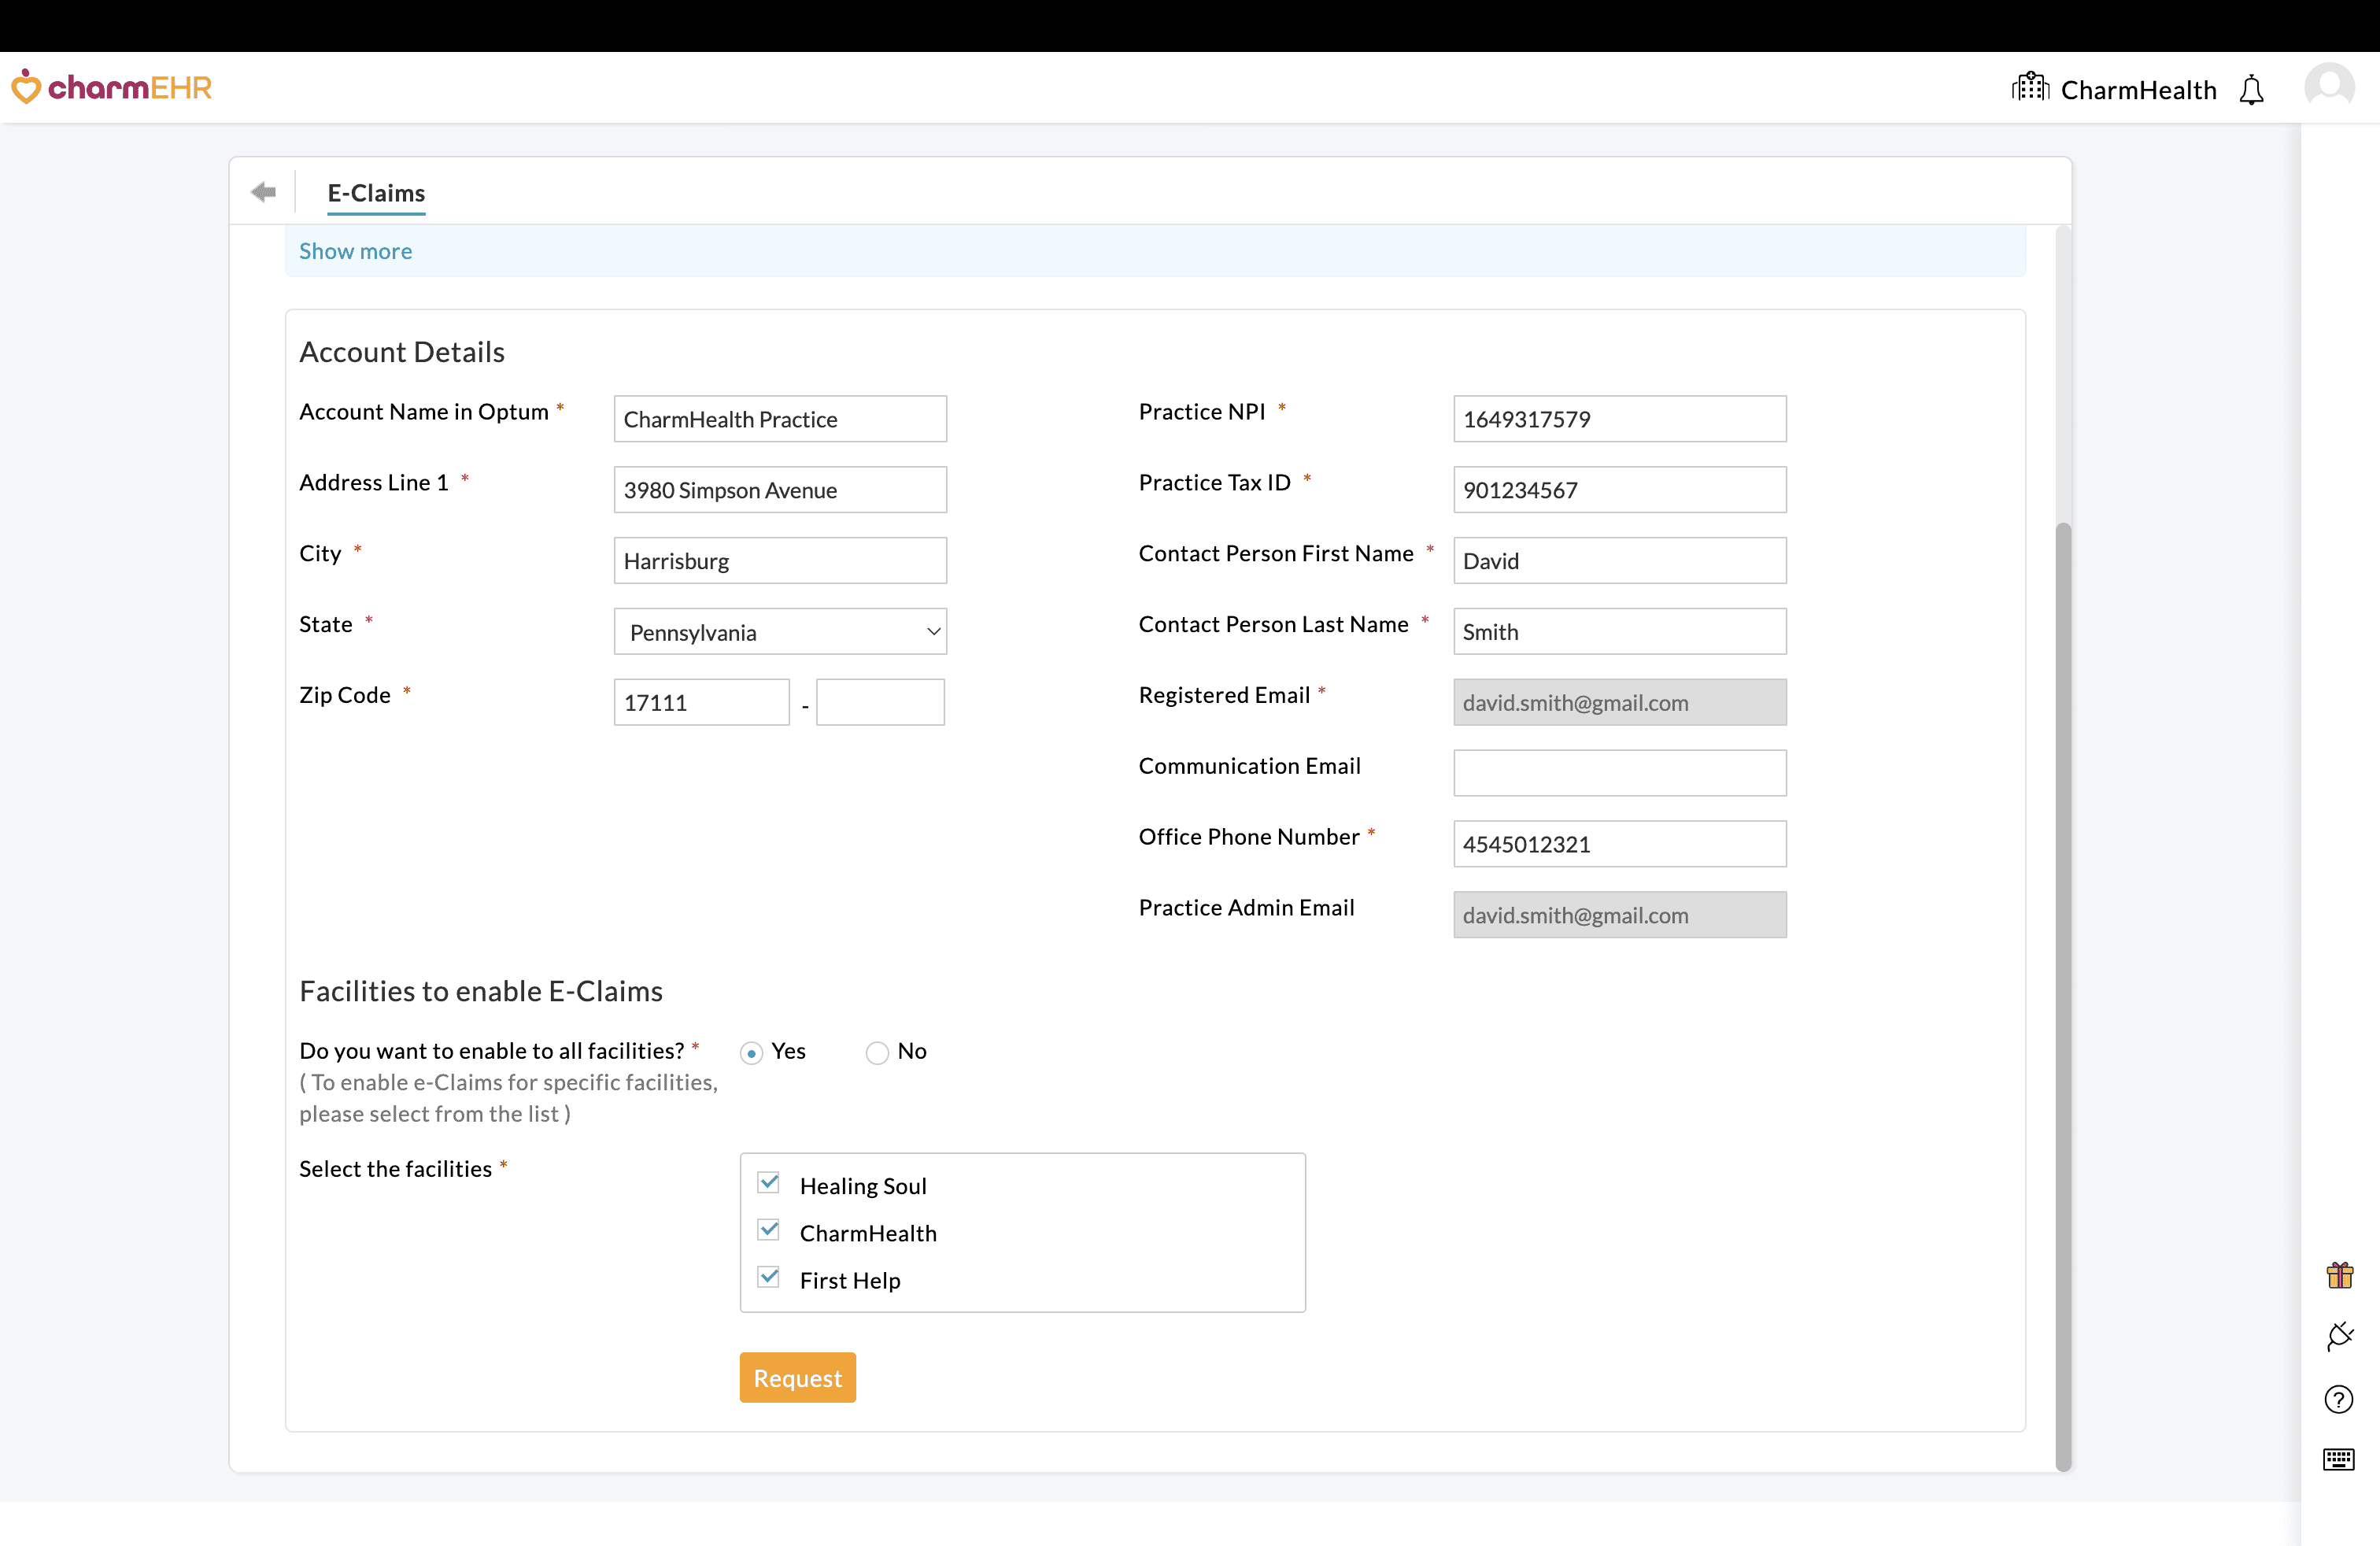
- Review the information and make necessary changes if required.
- You can enable the E-Claims add-on either for all Facilities or only for the required Facilities.
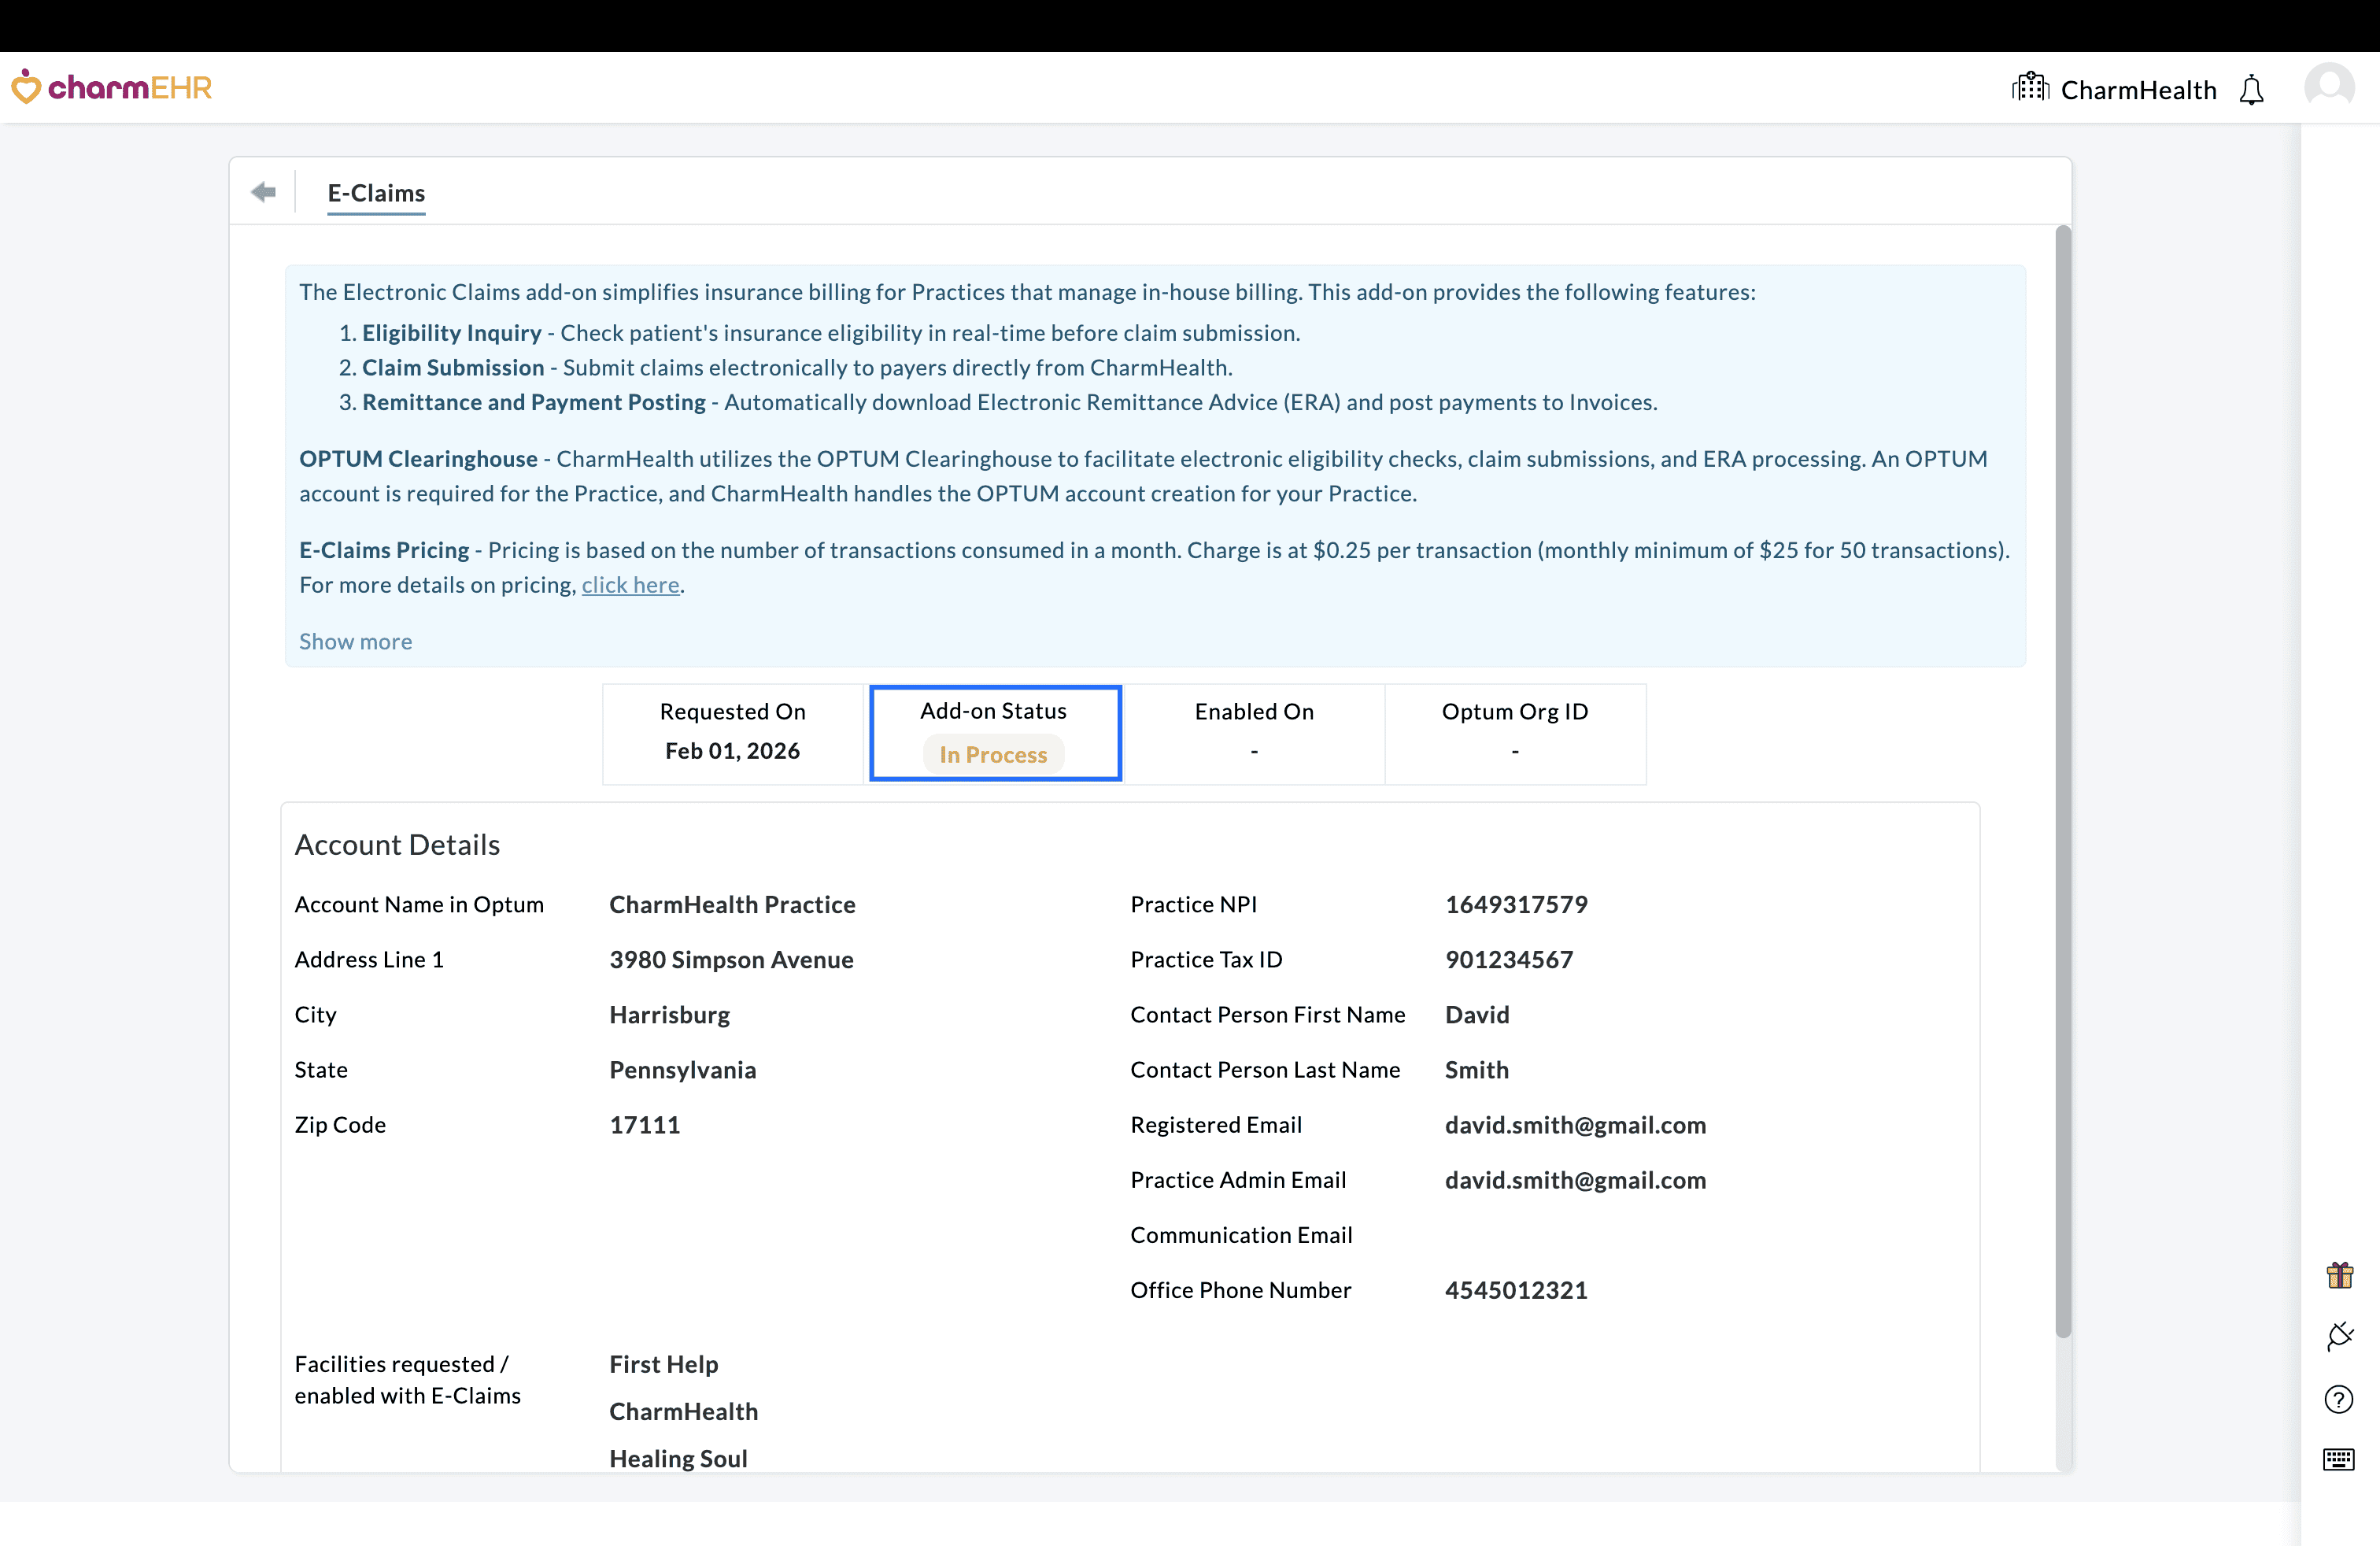
Tracking the Activation Request:
The following status indicates the current state of your activation request.
- Requested - Your activation request has been submitted and is under review.
- In Process - Verification is complete, and the Clearinghouse account setup has been initiated.
- Enabled - The Clearinghouse account is set up, and the E-Claims add-on is active. Practices can start submitting Claims electronically.
Once the request is submitted:
- The status will be updated to Requested on the 'Add-Ons > E-Claims' page.
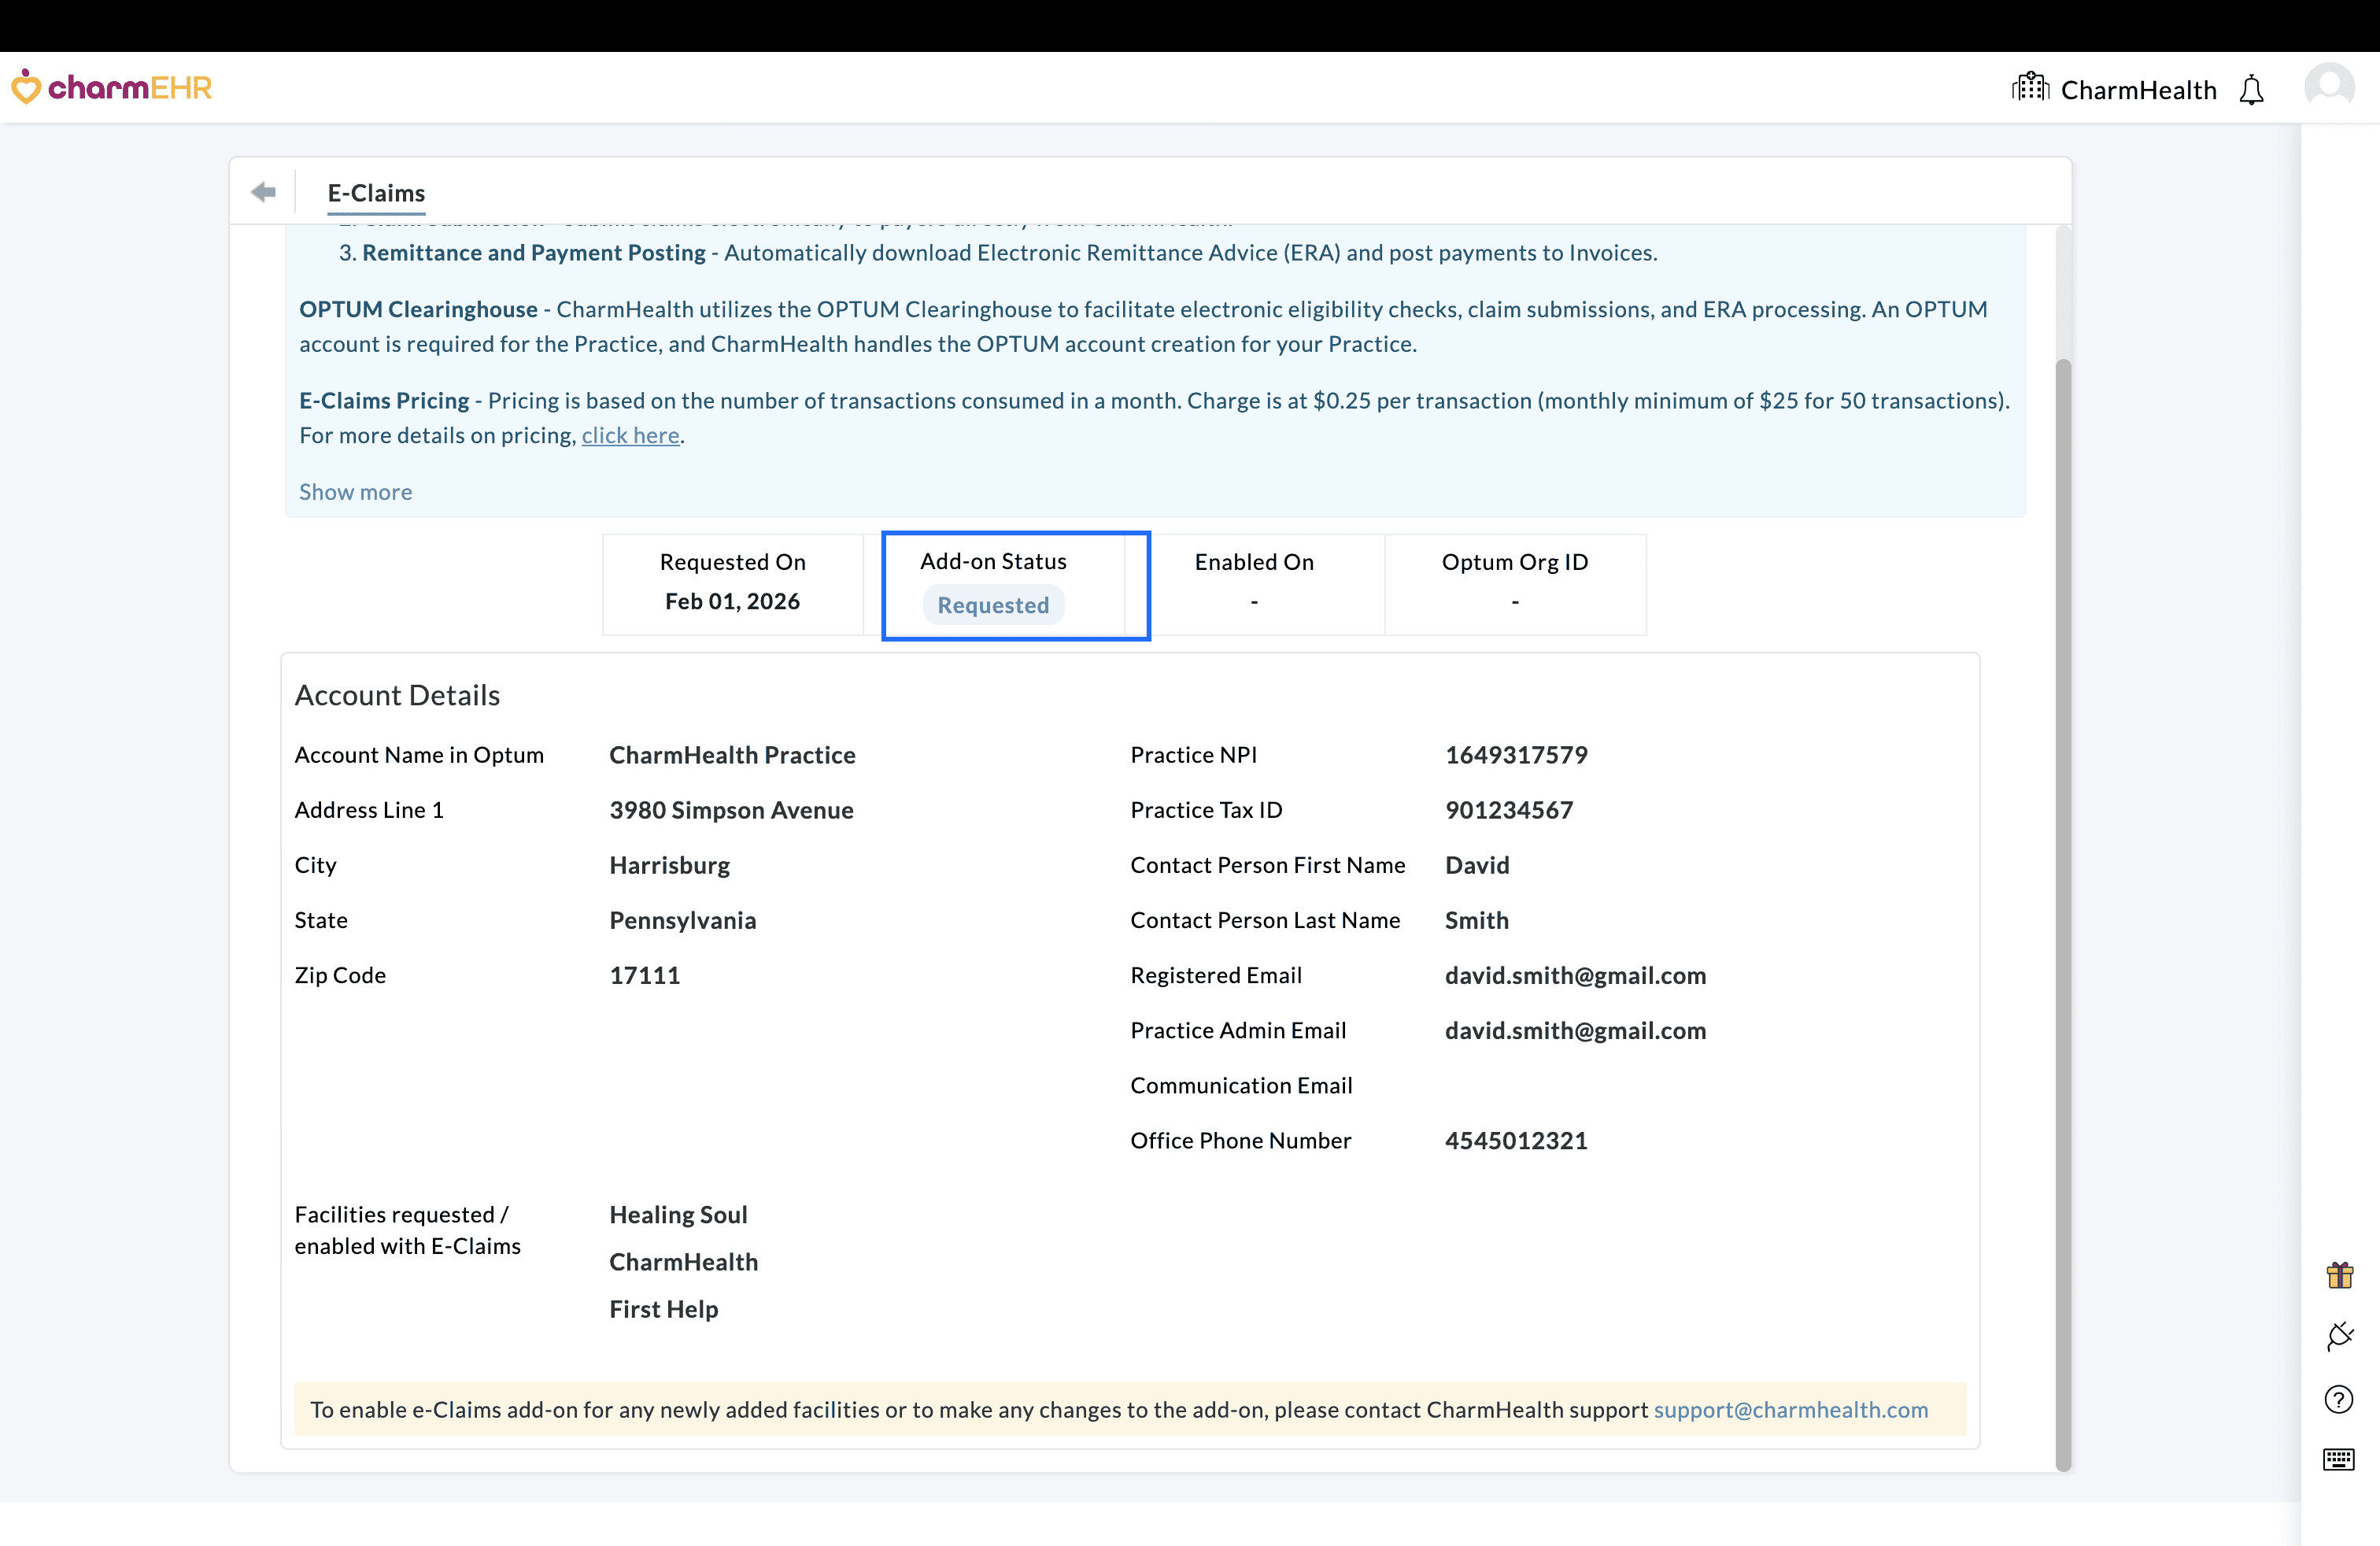
- CharmHealth team verifies the submitted information and initiates the process of setting up the Clearinghouse account.
- You can track the progress of your request from the same page
After the Clearinghouse account is successfully created:
- The E-Claims add-on will be enabled, and the status will change to Enabled.
- A notification email will be sent to the Practice with instructions to help you get started with Electronic Billing.
What’s Changed?
Previously, Practices had to contact the CharmHealth support team to request activation of the Electronic Claims add-on, which involved multiple steps and coordination. With this enhancement, Practices can now initiate and track the request directly within their CharmHealth account, making the setup process faster and more streamlined.
To begin submitting Claims electronically, refer to the Guidelines to Get Started with Electronic Billing section.
We hope that with these updates, Practices can manage Eligibility checks and Electronic Claims setup more efficiently within CharmHealth.
For any questions or feedback, please contact our support team at support@charmhealth.com.
We are excited to introduce a few enhancements to CharmEasyCare, a secure, HIPAA-compliant Care Coordination platform that helps your Practice manage Patient consultations with ease.
These updates focus on improving the experience of Scheduled Consultations for both Patients and Providers.
- Additional Filter Options for Patients While Scheduling Appointments
- Manage Provider Listing in CharmEasyCare Calendar
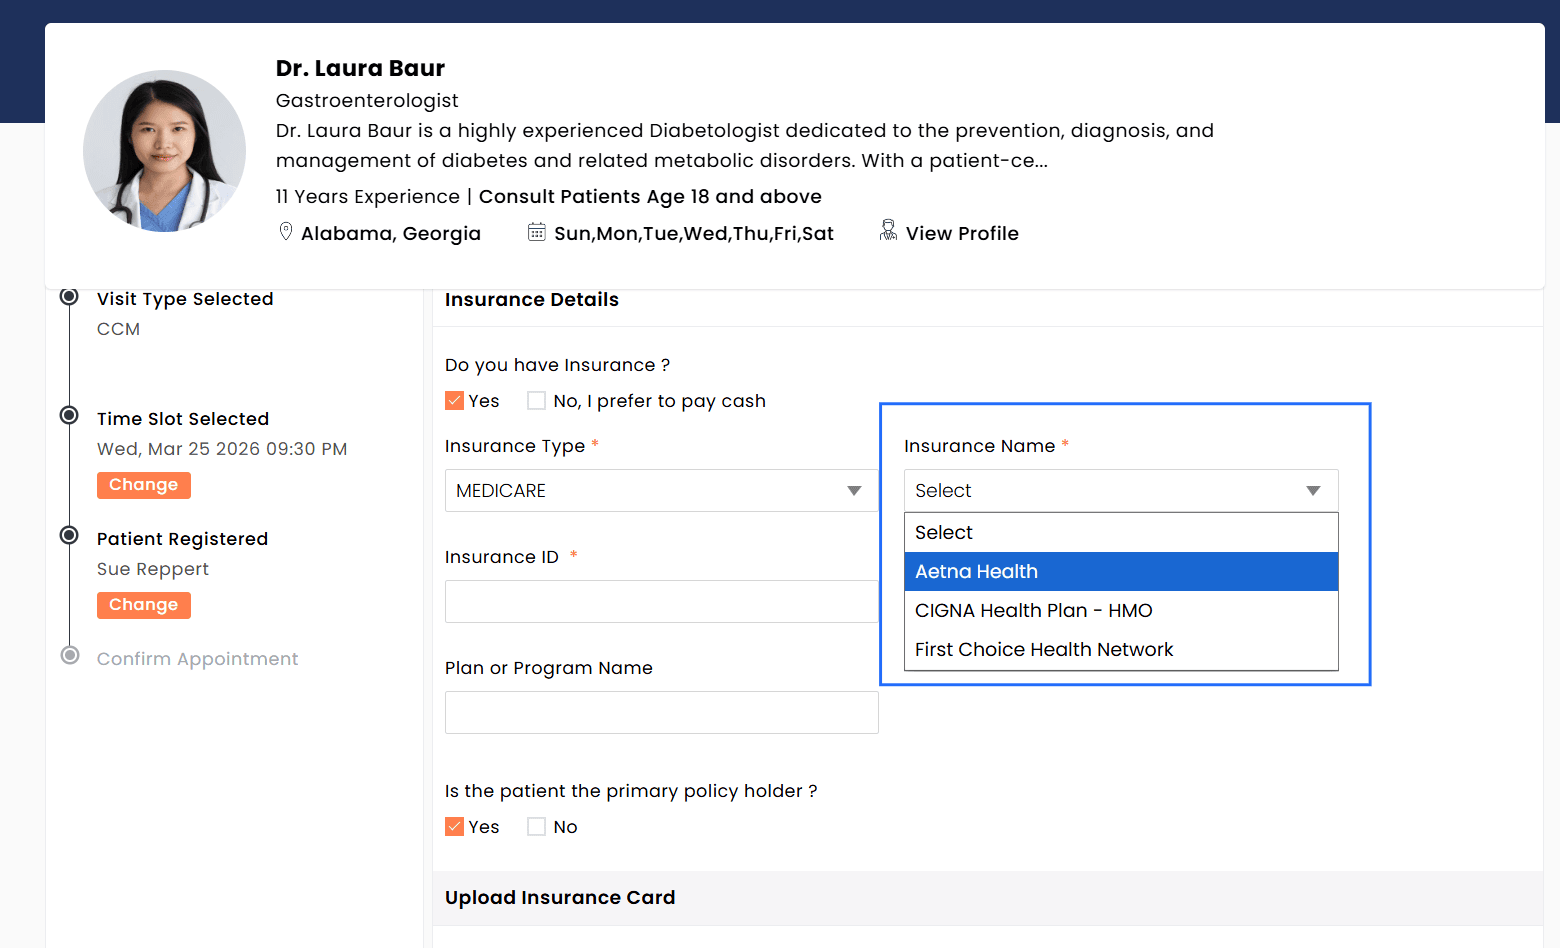
Patients can now use additional filtering options when booking appointments through the CharmEasyCare-enabled Practice website. These enhancements help Patients find the most relevant Providers based on their preferences.
The following filters are added:
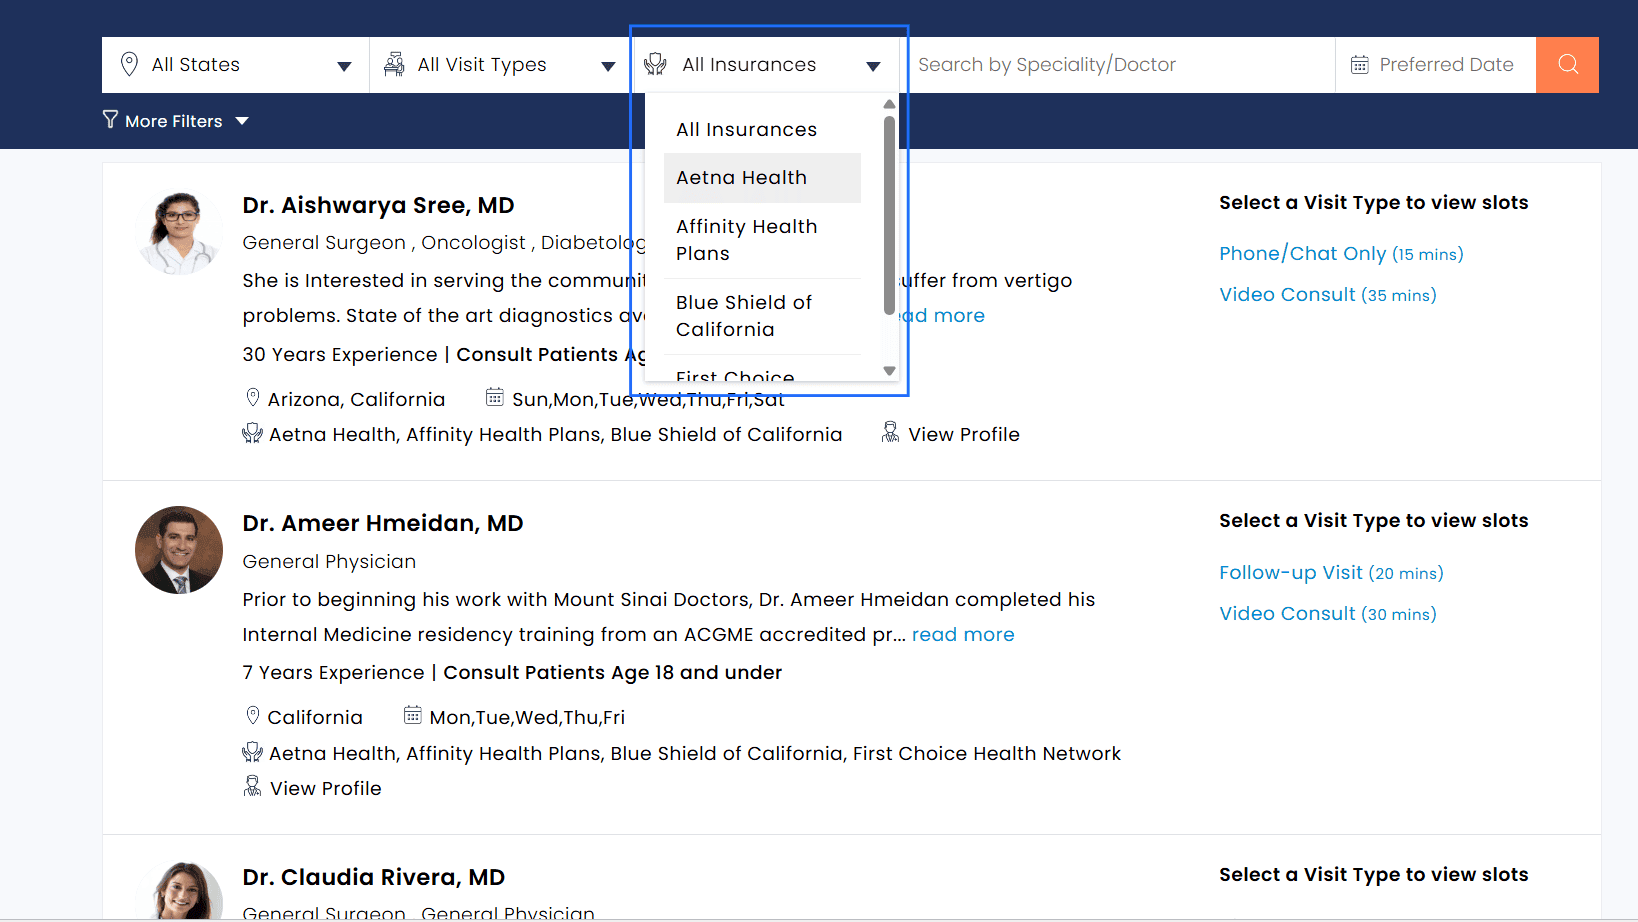
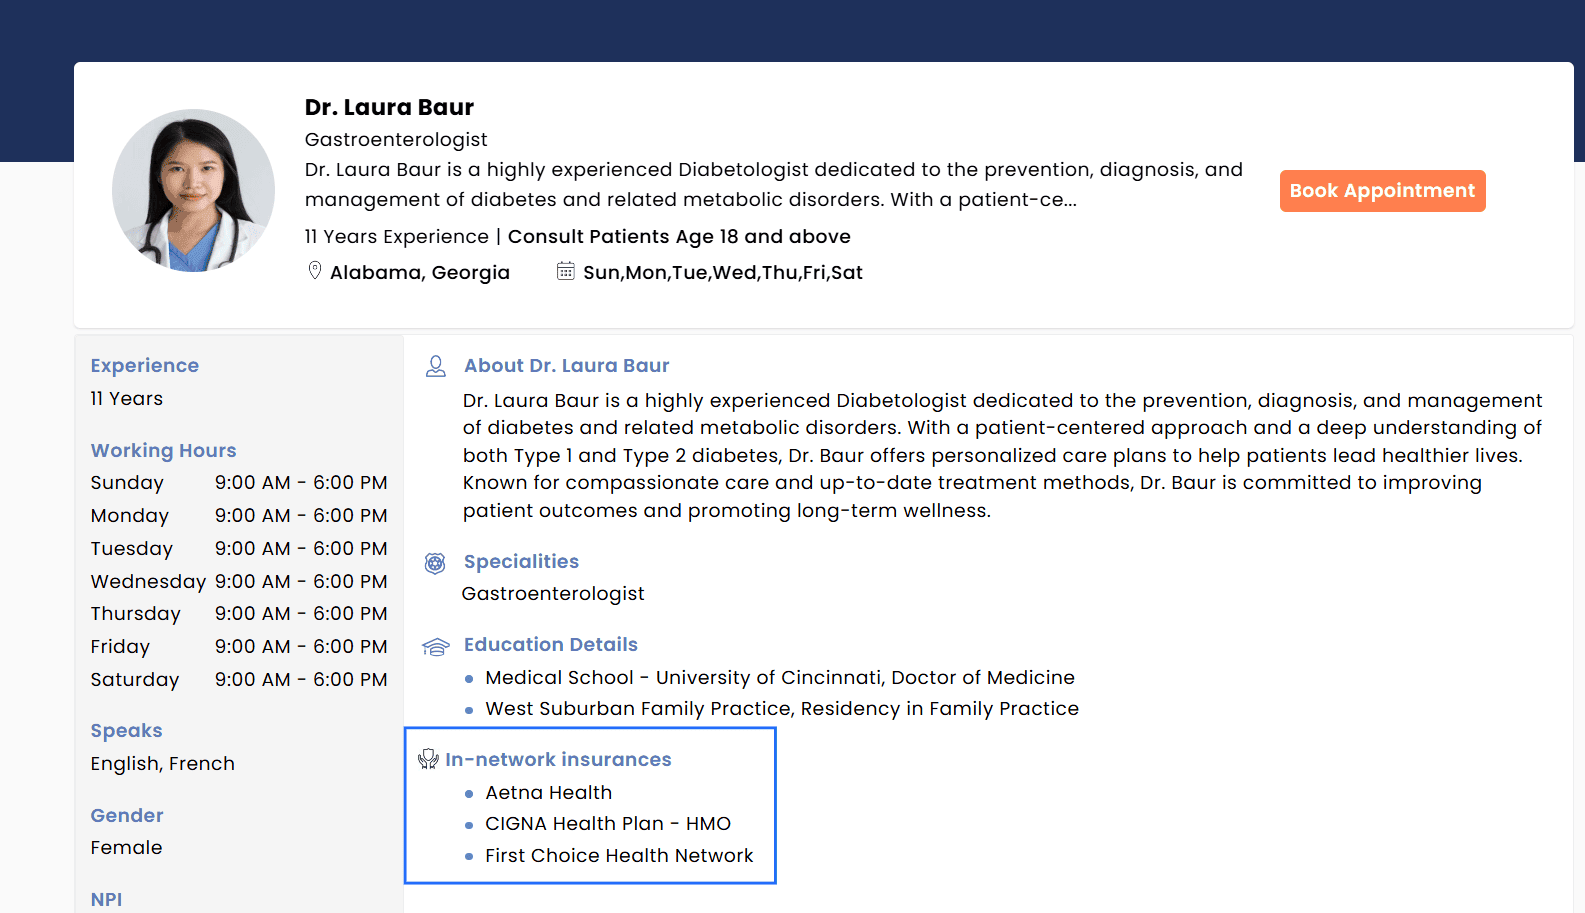
i. Filter Providers By Insurance
Patients can now search for Providers based on supported Insurance Payers. Only the Payers configured for each Provider during onboarding are displayed, and the same list is also shown within the Provider’s profile during appointment booking.
Patient View
Insurance Selection During Provider Onboarding
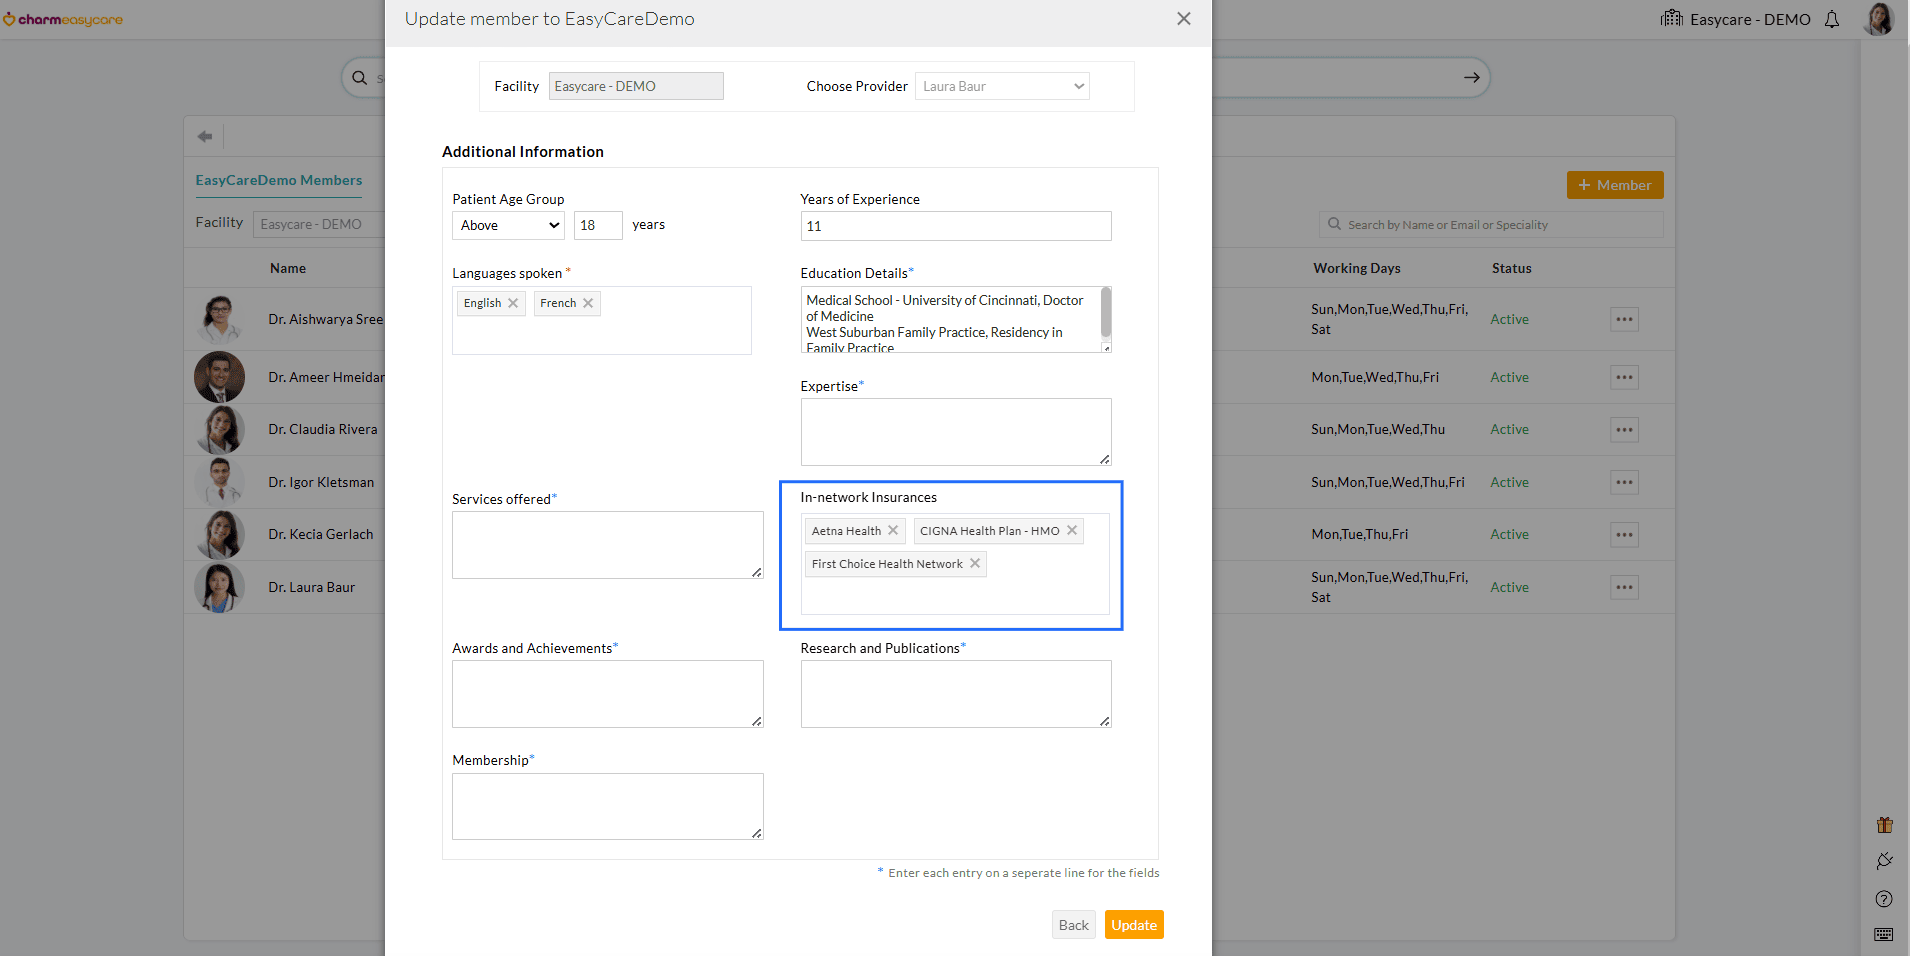
Note: Practices can include only Payers added under the 'Settings > Billing-Claims > Payers' section.
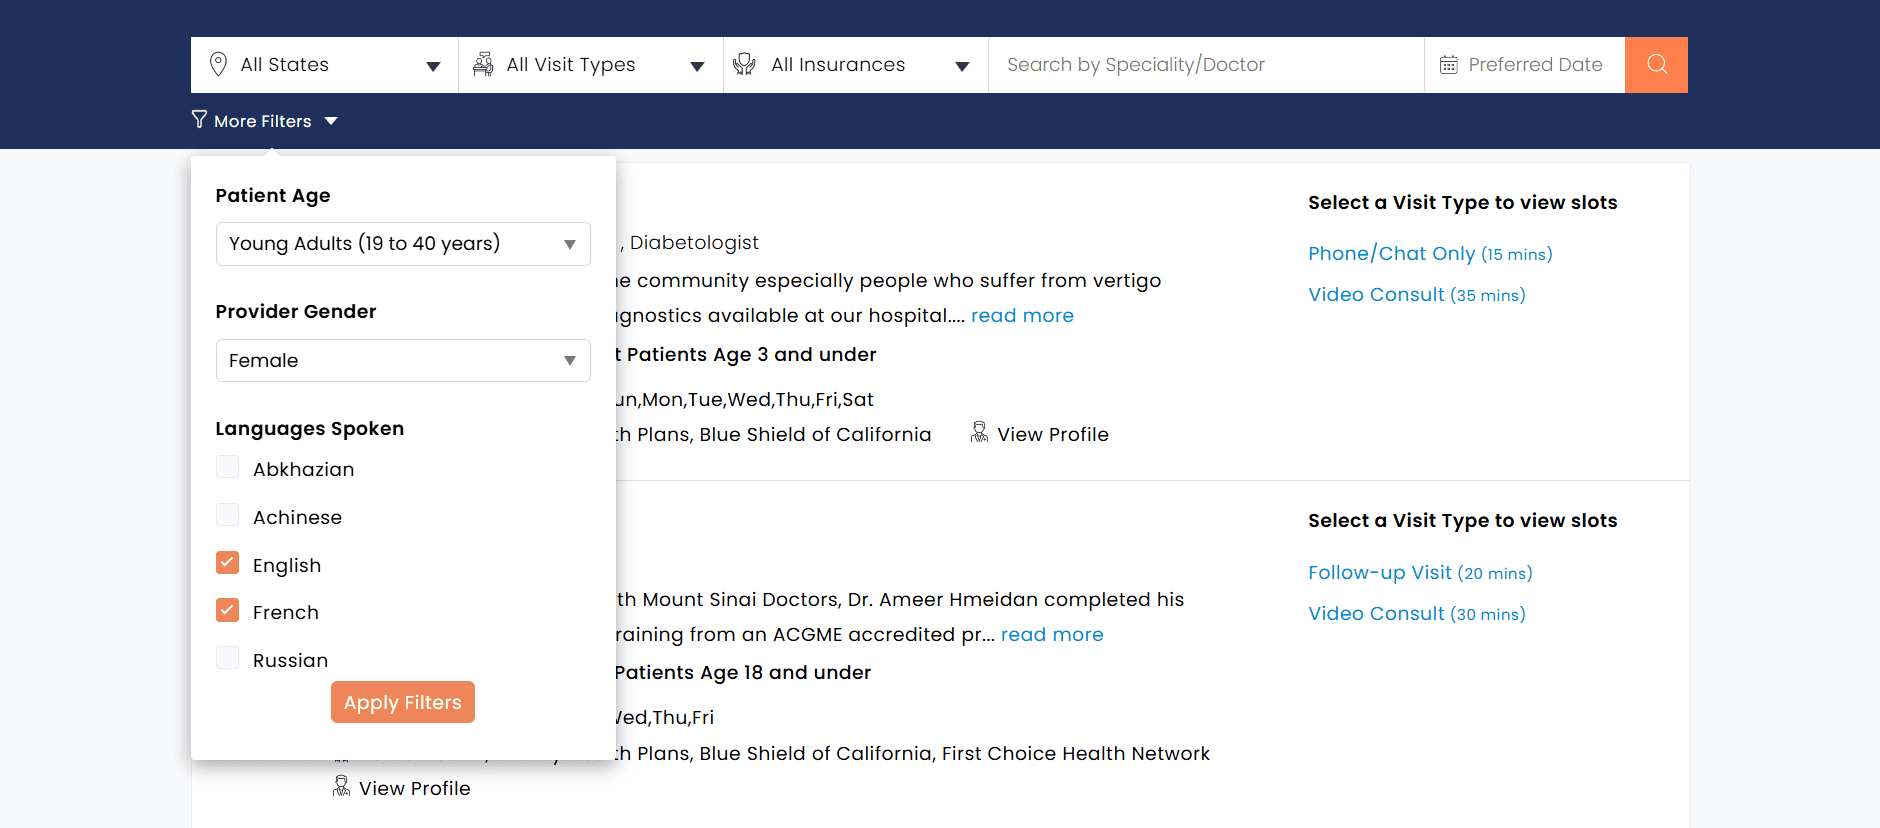
ii. Filter Providers By Patient Age
Patients can filter Providers by the age group they serve, such as children (0–12) or adolescents (13–18).
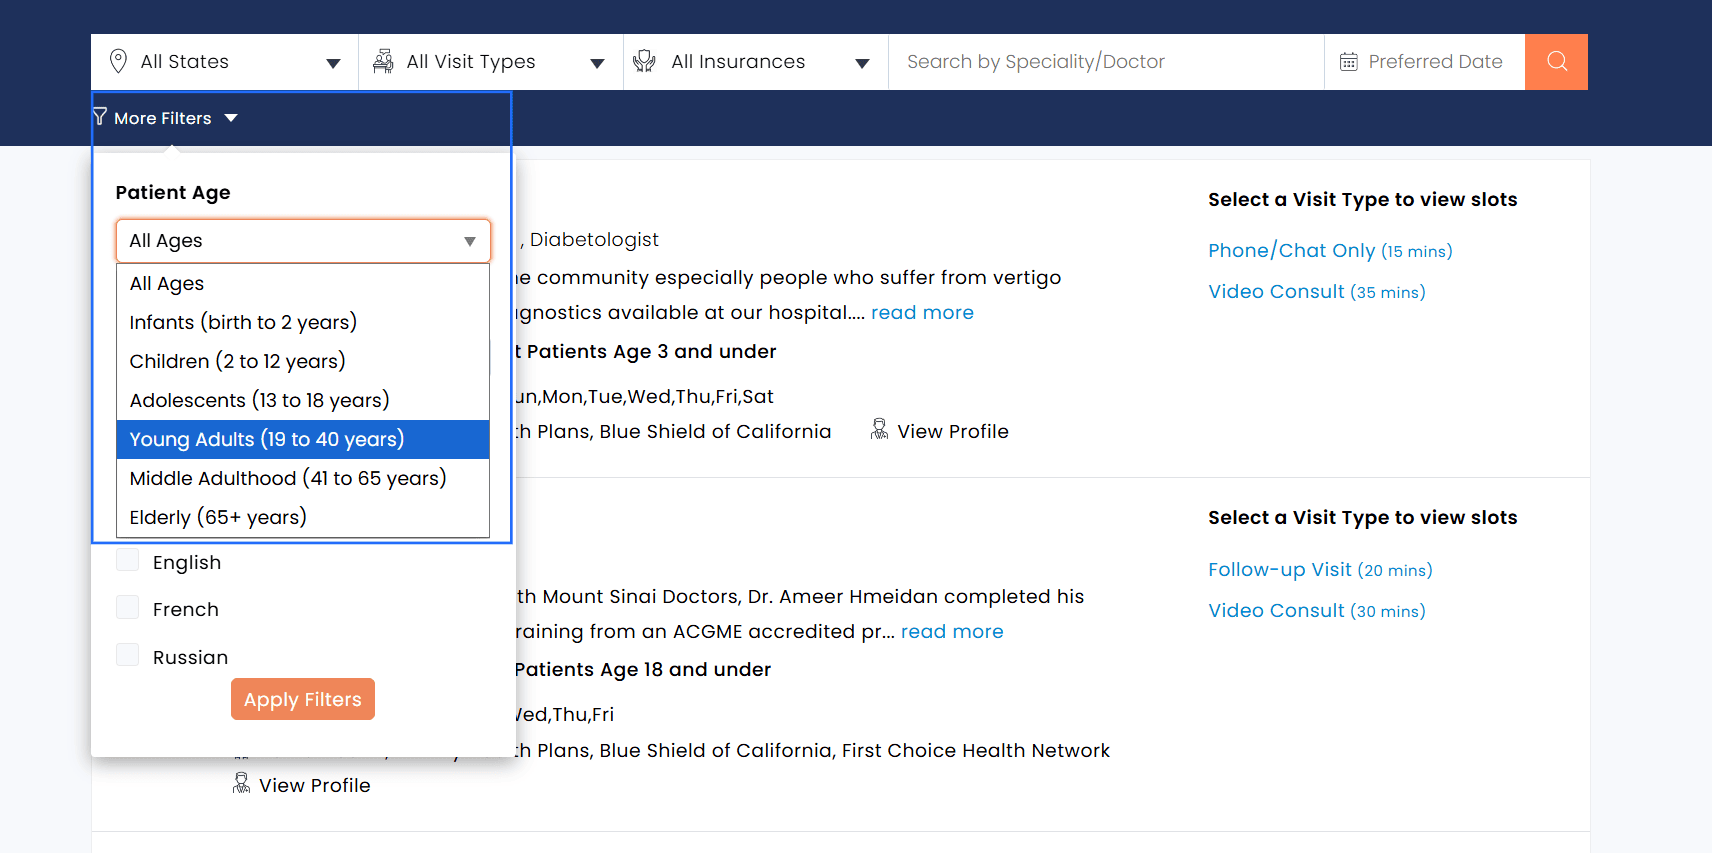
iii. Filter Providers By Gender
Filter Providers based on gender preference. This option helps Patients choose Providers they are more comfortable with, supporting a more personalized and patient-centric care experience.
iv. Filter Providers By Languages Spoken
Select Providers who speak the Patient’s preferred language. This enables Patients to communicate effectively during consultations, minimizing language barriers and ensuring a better understanding of medical concerns and treatment plans.
Practices can use the Patient Age Group setting to control which age groups can book appointments with a Provider and specify the languages spoken during onboarding.
This enhancement improves the Patient experience by enabling faster and more personalized appointment selection.
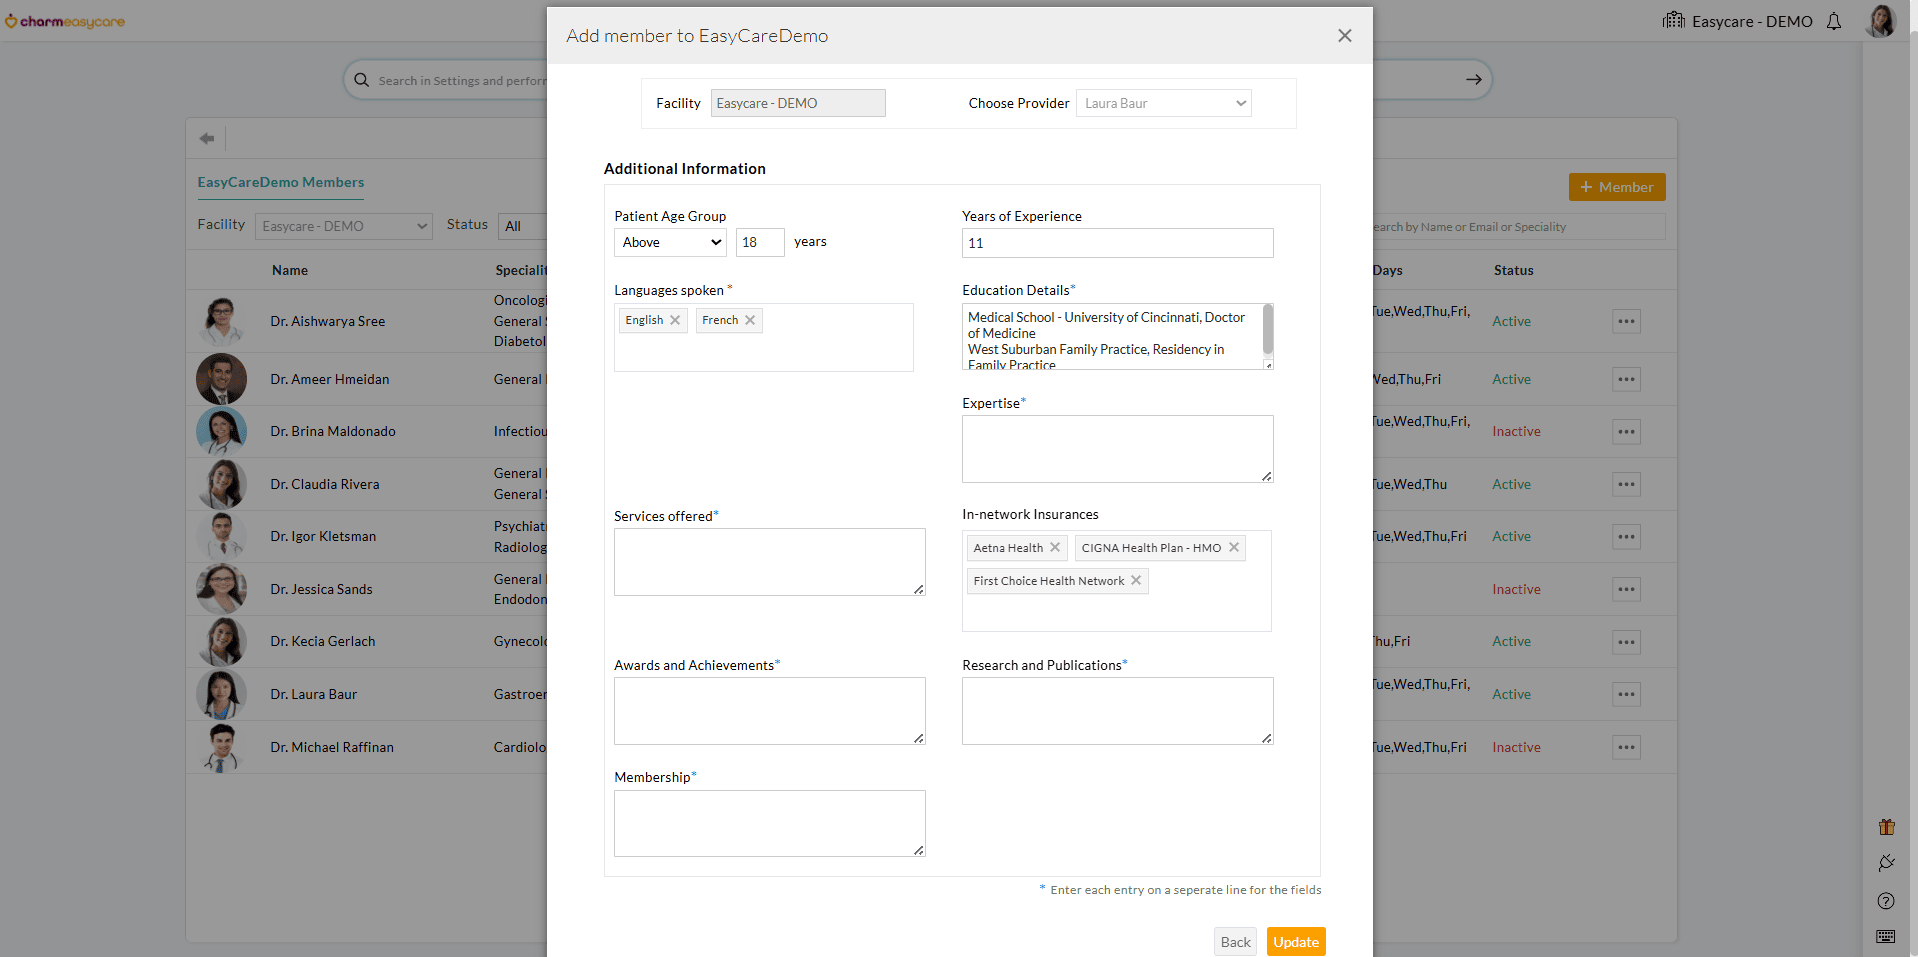
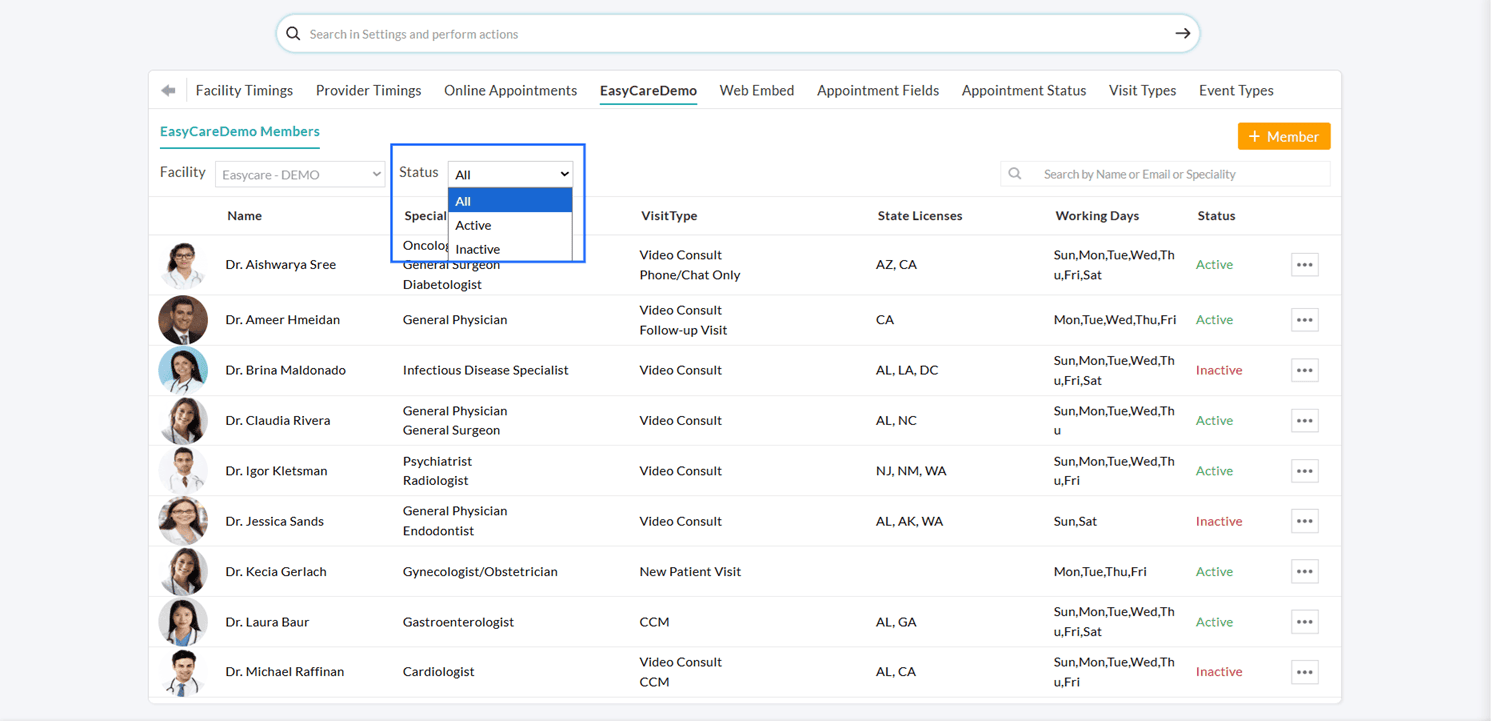
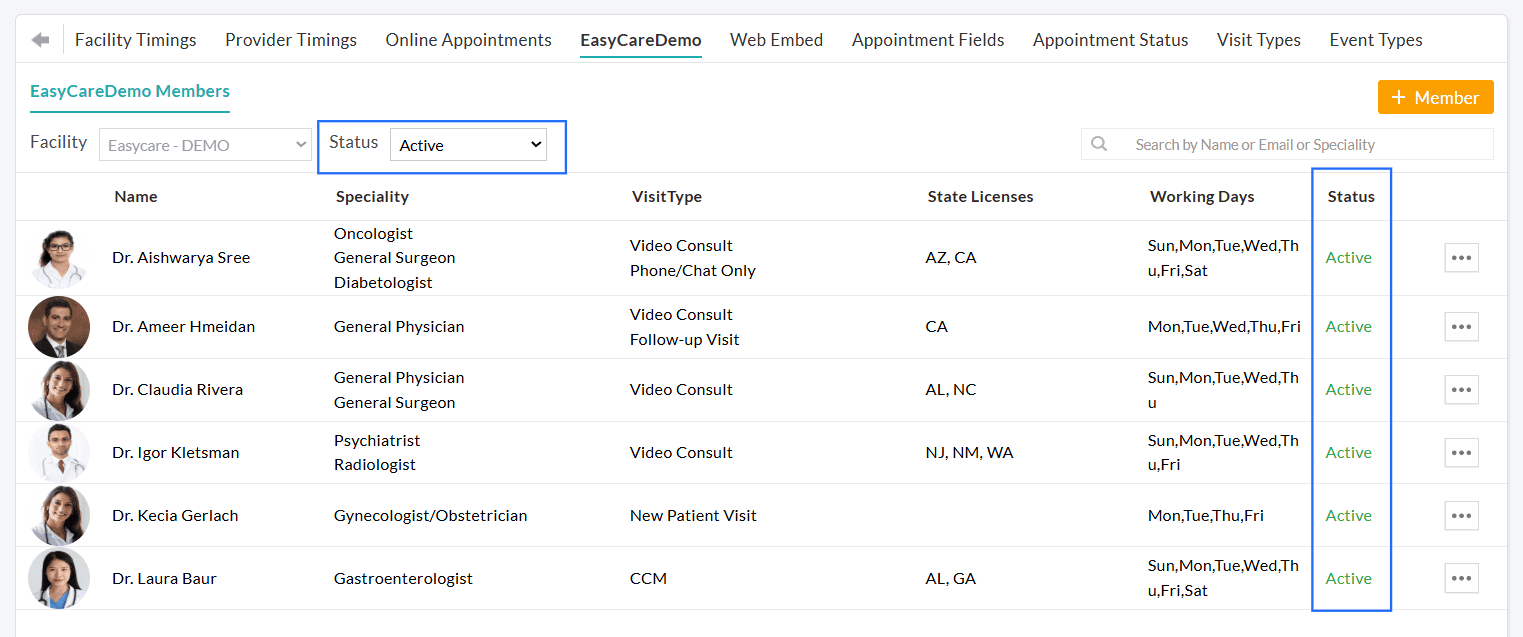
Practices can now manage Provider visibility in the CharmEasyCare calendar with greater flexibility.
Providers can be temporarily hidden by marking them as 'Inactive' when they are unavailable for consultations and made 'Active' again when they are ready to consult Patients. This ensures that only available Providers are displayed on the Practice’s CharmEasyCare website for Patients to book appointments.
To update a Provider’s status, navigate to 'Settings > Calendar > [Practice Name]', click on the 'More Options' (⋯) icon next to the member, and select the 'Make Active' or 'Make Inactive' option as needed.
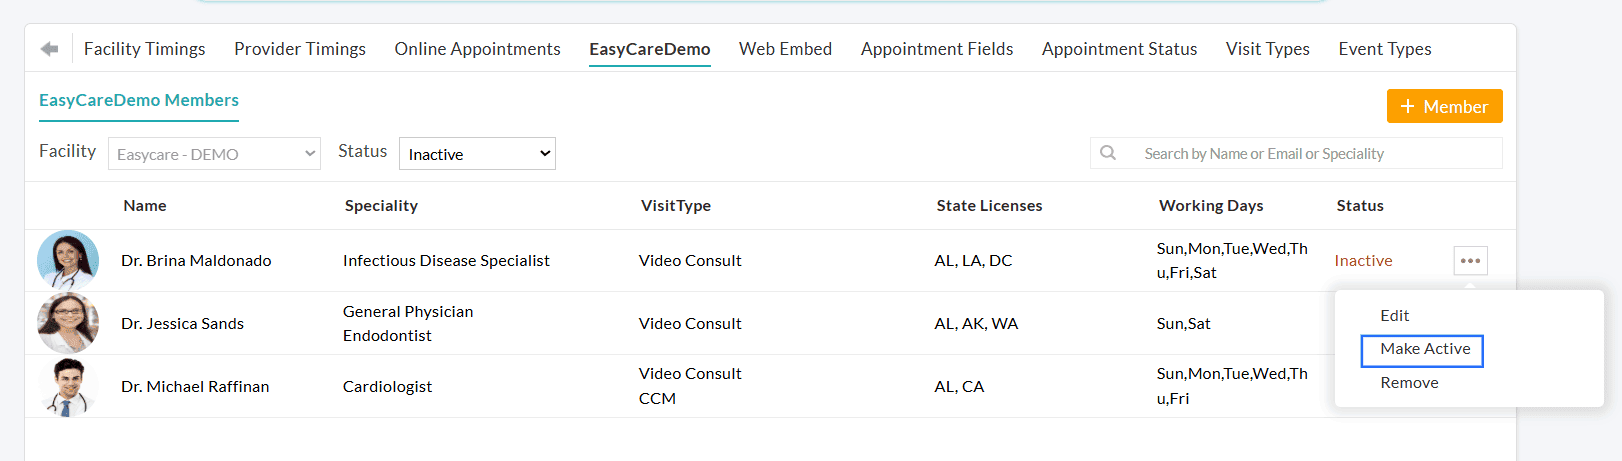
Additionally, Practices can filter Facility Members onboarded to CharmEasyCare by their status, making it easier to identify members enabled for Scheduled Consultations. You can use the 'Status' filter to view All, Active, or Inactive members.
We hope these enhancements streamline appointment booking and provide greater control over Provider availability for Scheduled Consultations.
Explore our Resource Center to get started with CharmEasyCare and start simplifying your scheduling process.
If you have any questions or feedback, please reach out to our support team at support@charmhealth.com.
We are excited to introduce the latest enhancements in the Calendar module, designed to make appointment tracking and navigation within the Calendar more efficient.
The Provider Quick Search feature enables Practice members to easily find and view the schedules of a specific Provider, making Calendar navigation faster and more organized.
To search for a Provider:
- Navigate to the 'Calendar' section.
- Locate the 'Provider Quick Search' bar at the top-right corner.
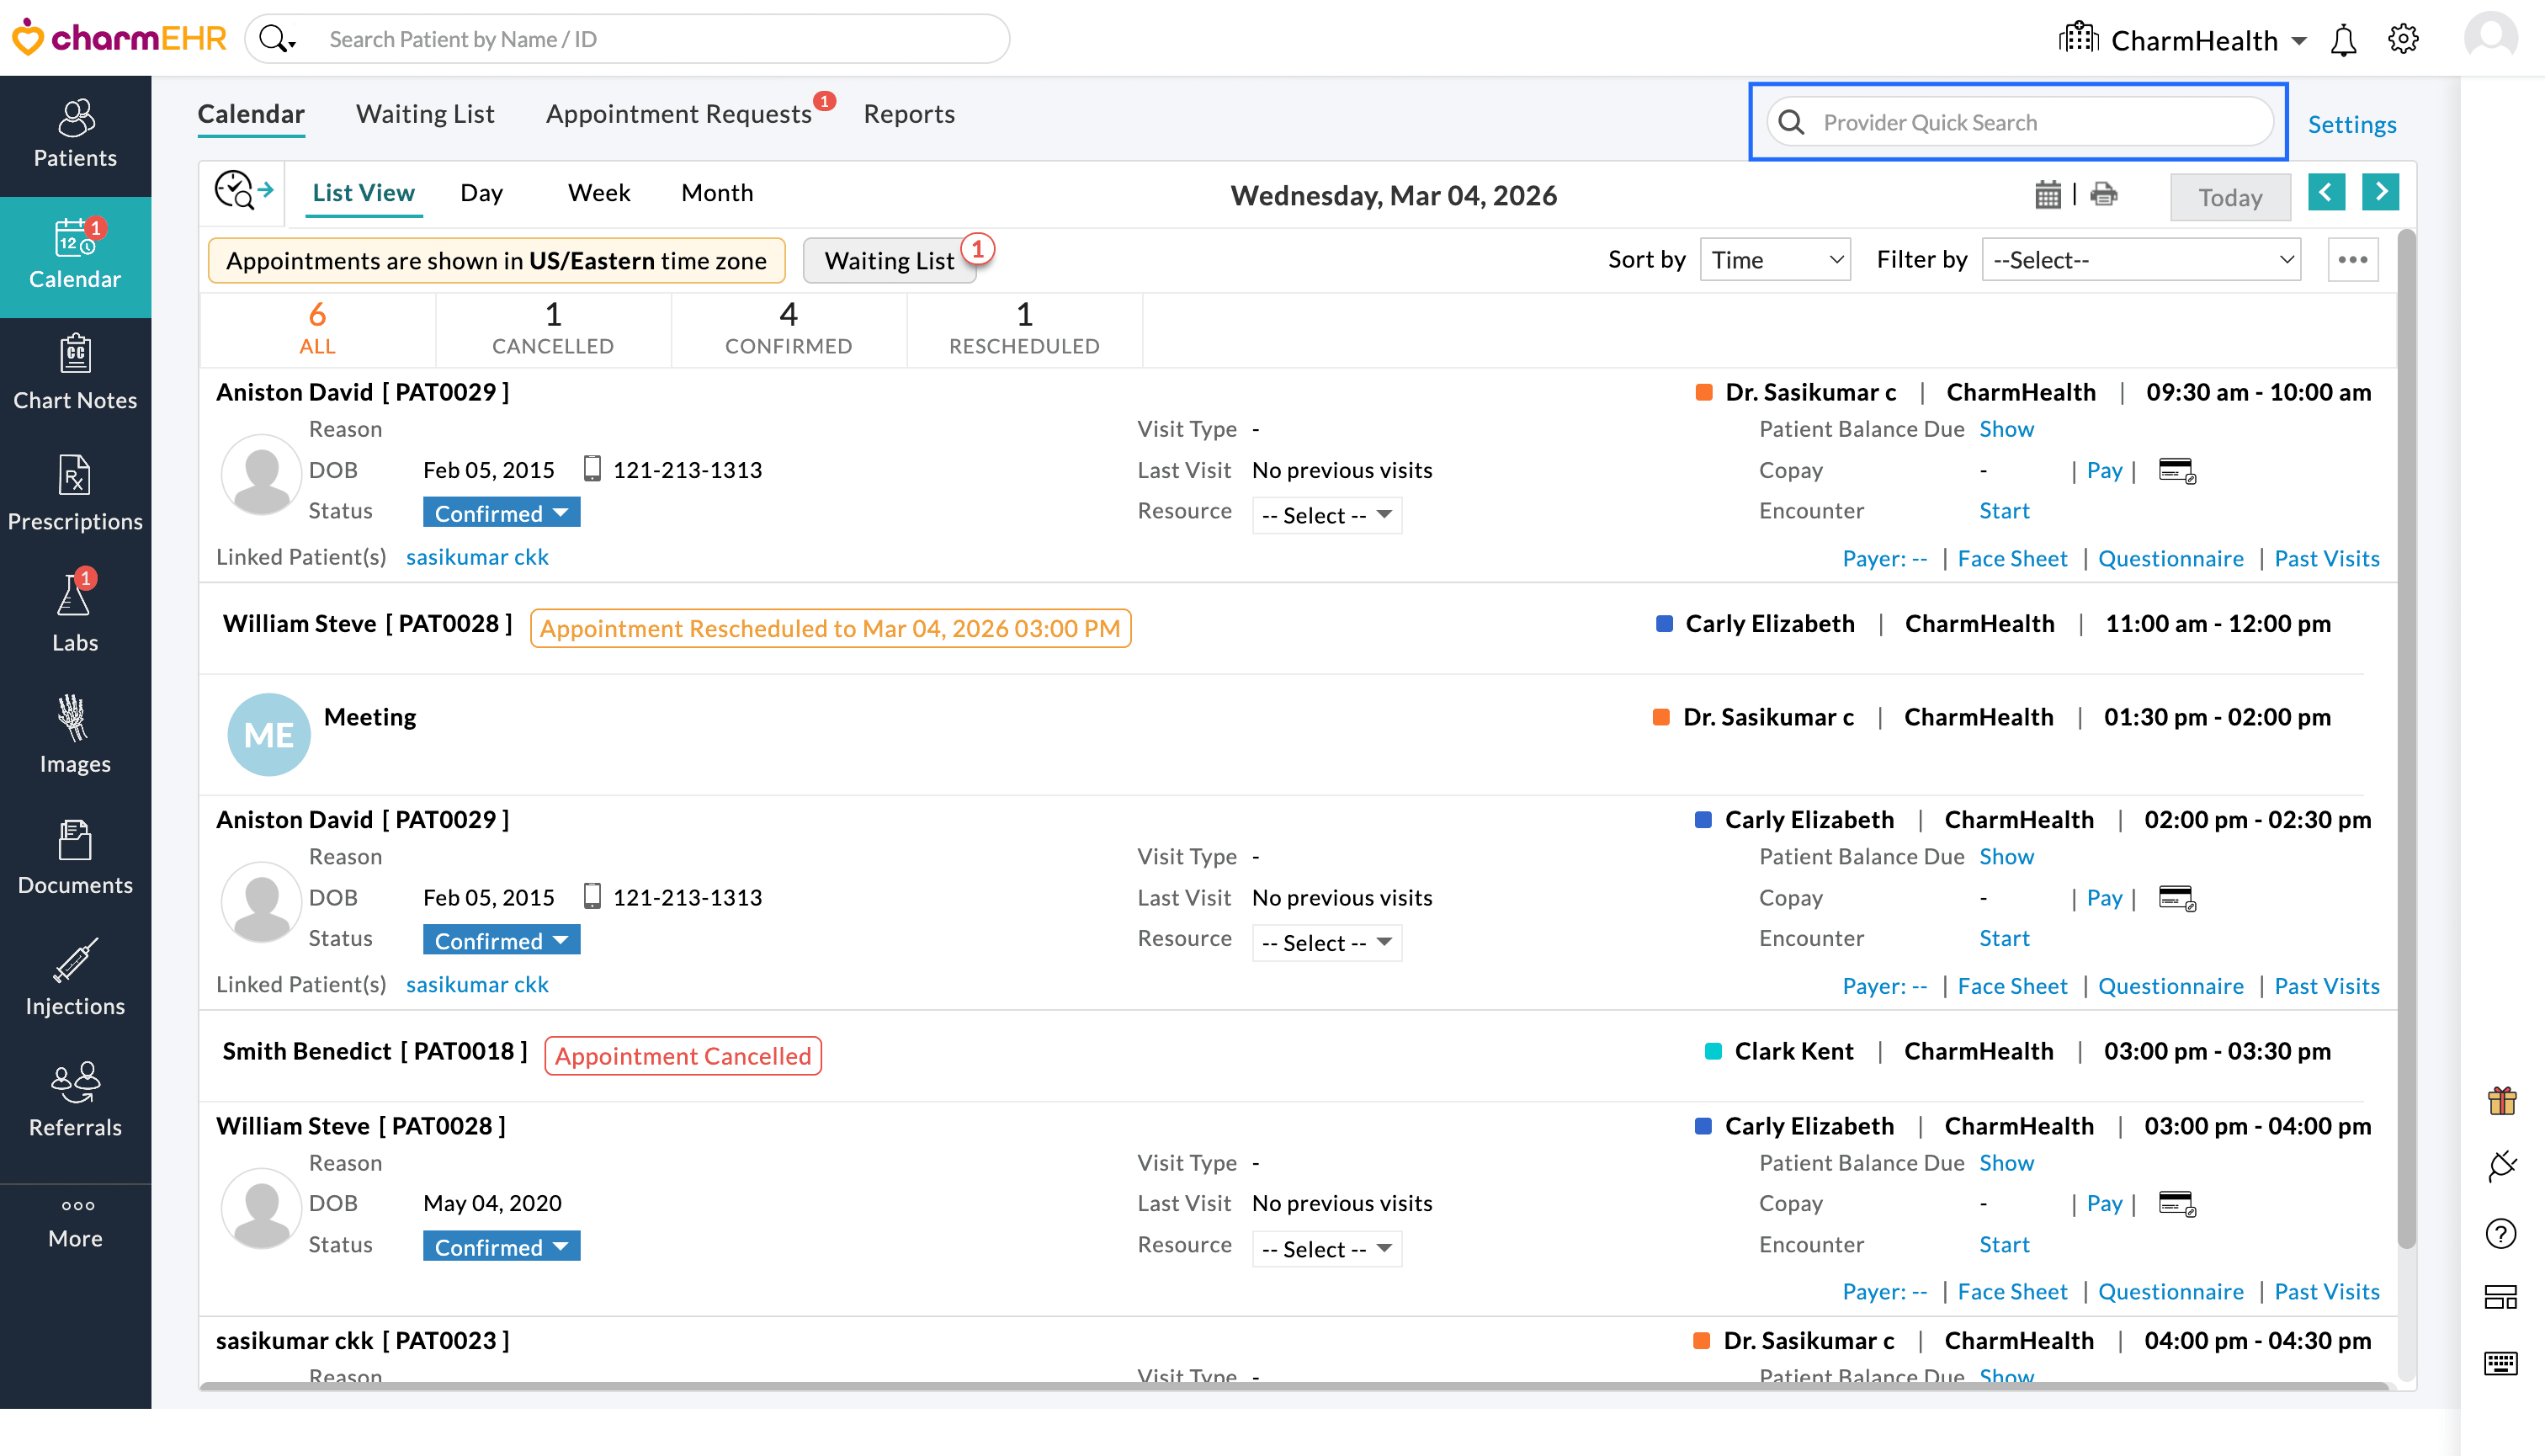
- Enter the name of the Provider and search to view their availability and scheduled appointments.
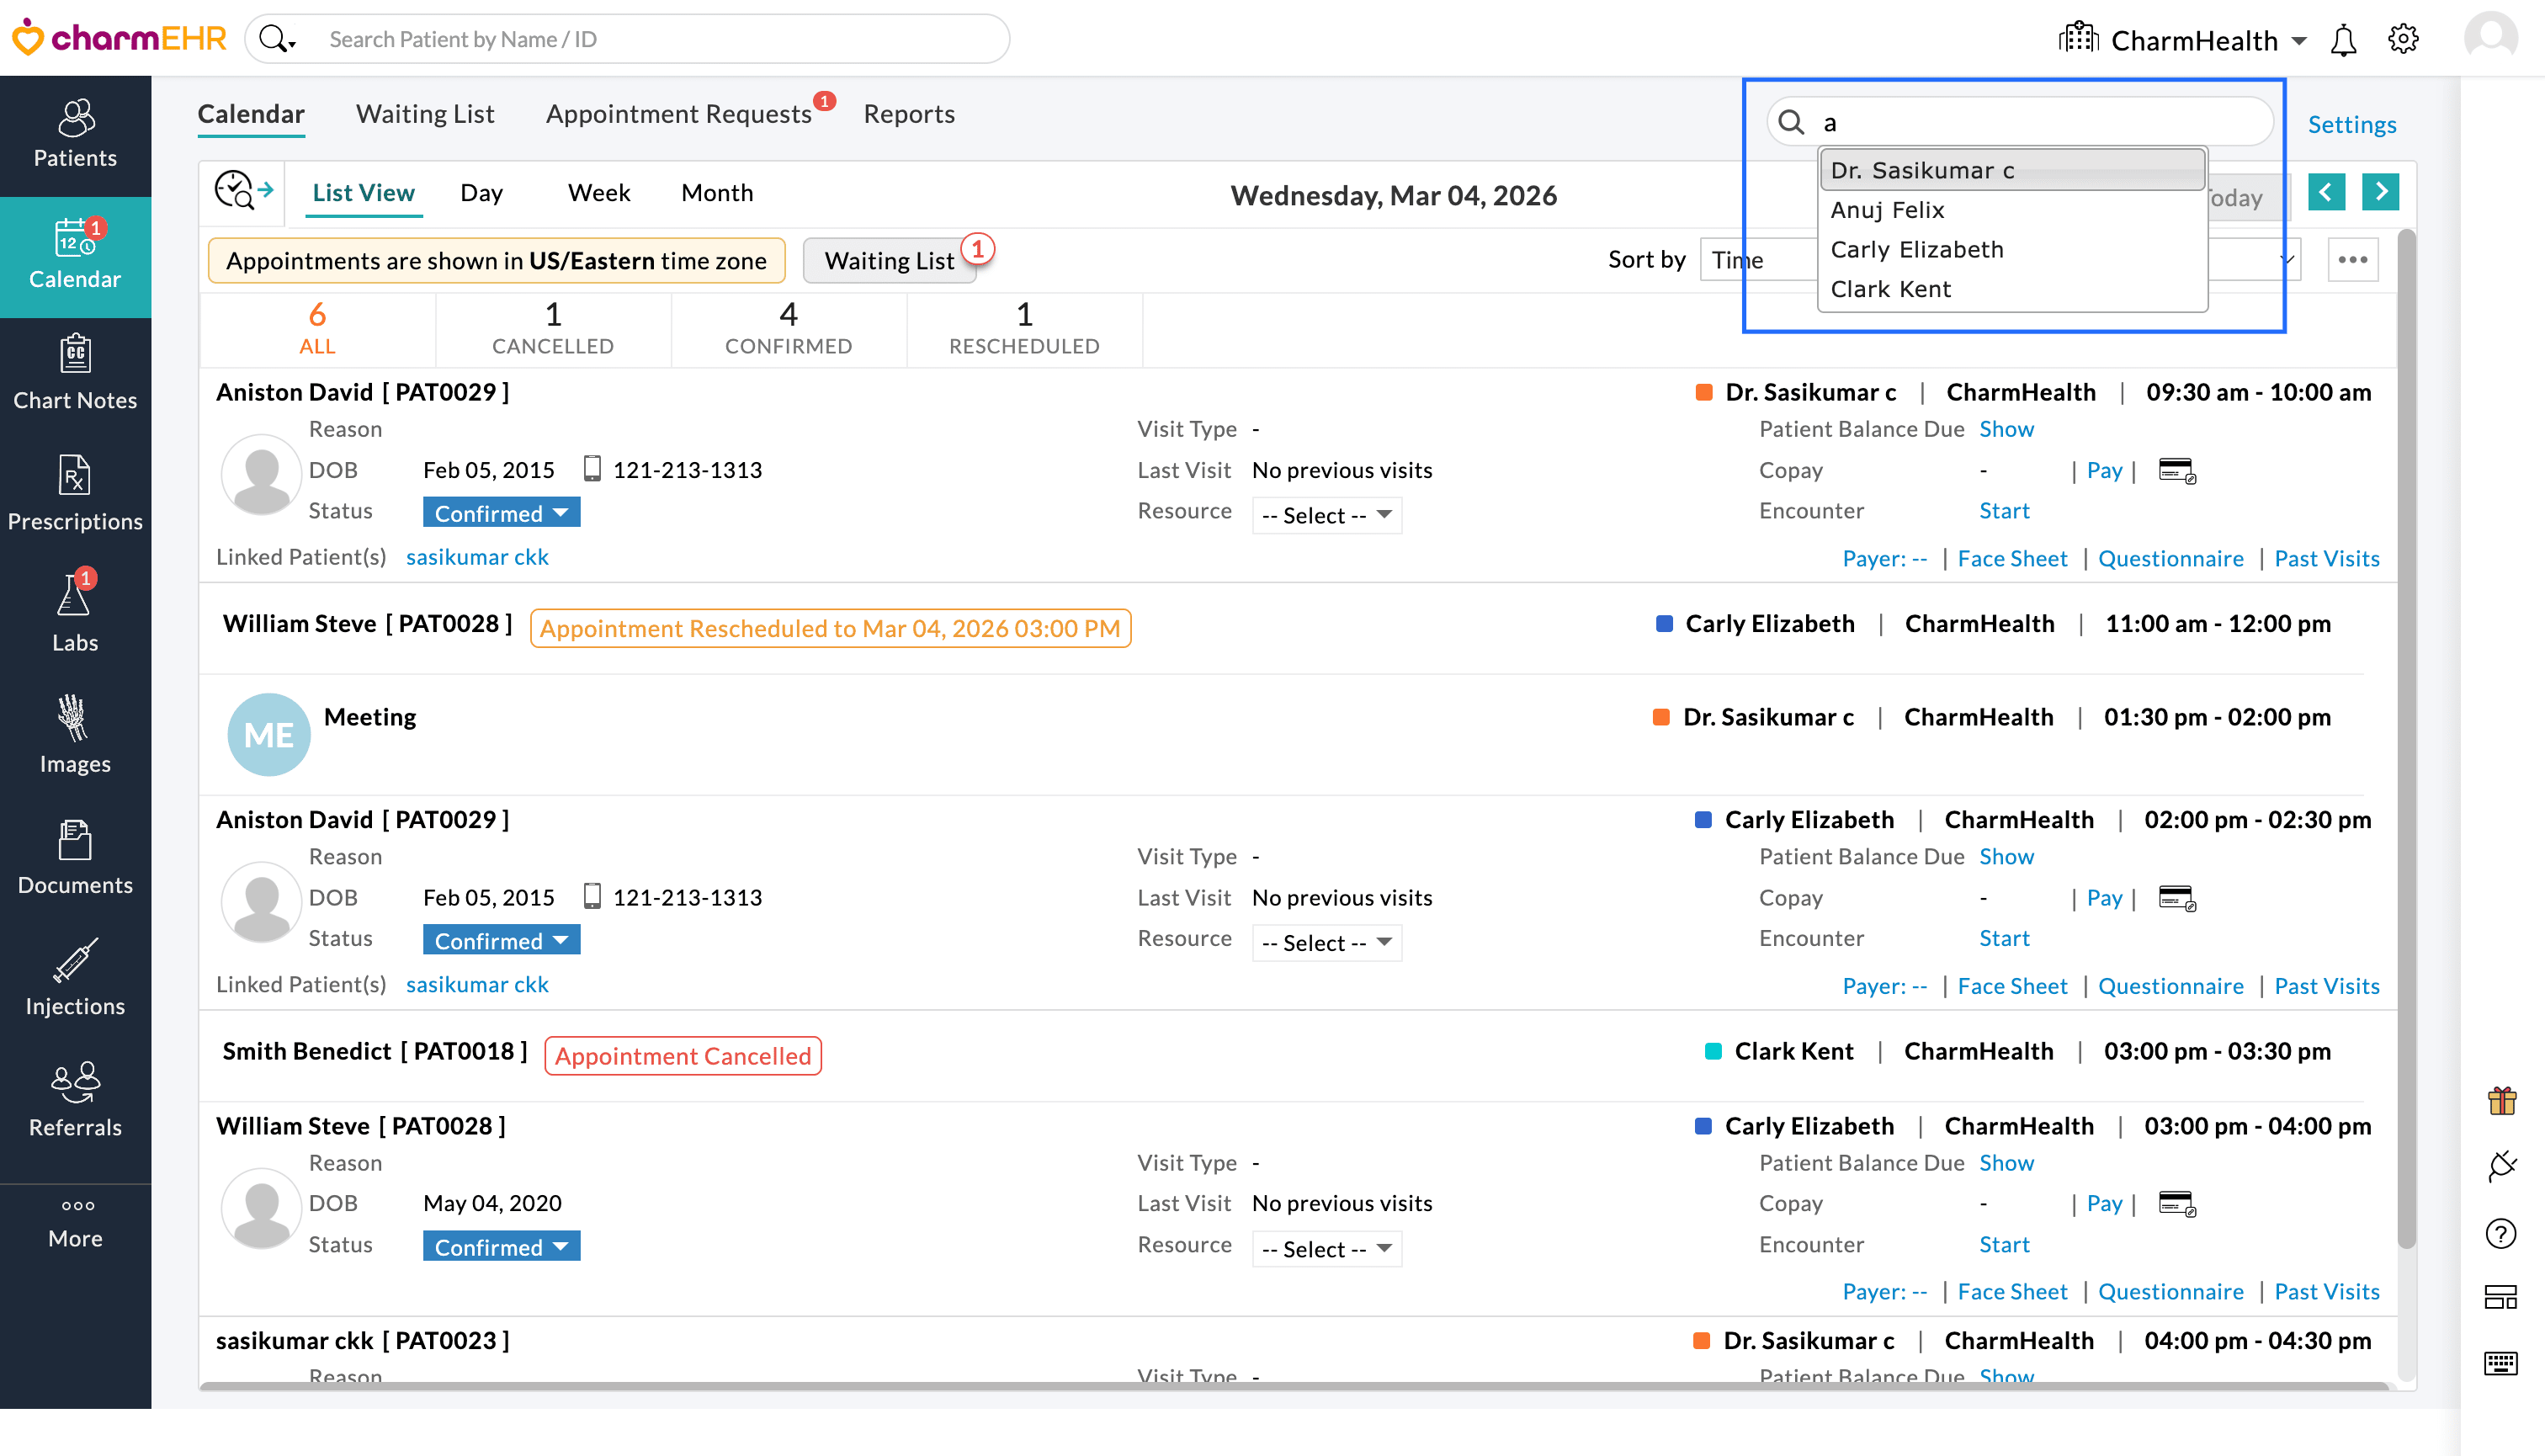
The Calendar view updates to display appointments for the selected Provider, allowing Practice members to quickly review the respective Provider’s schedule.
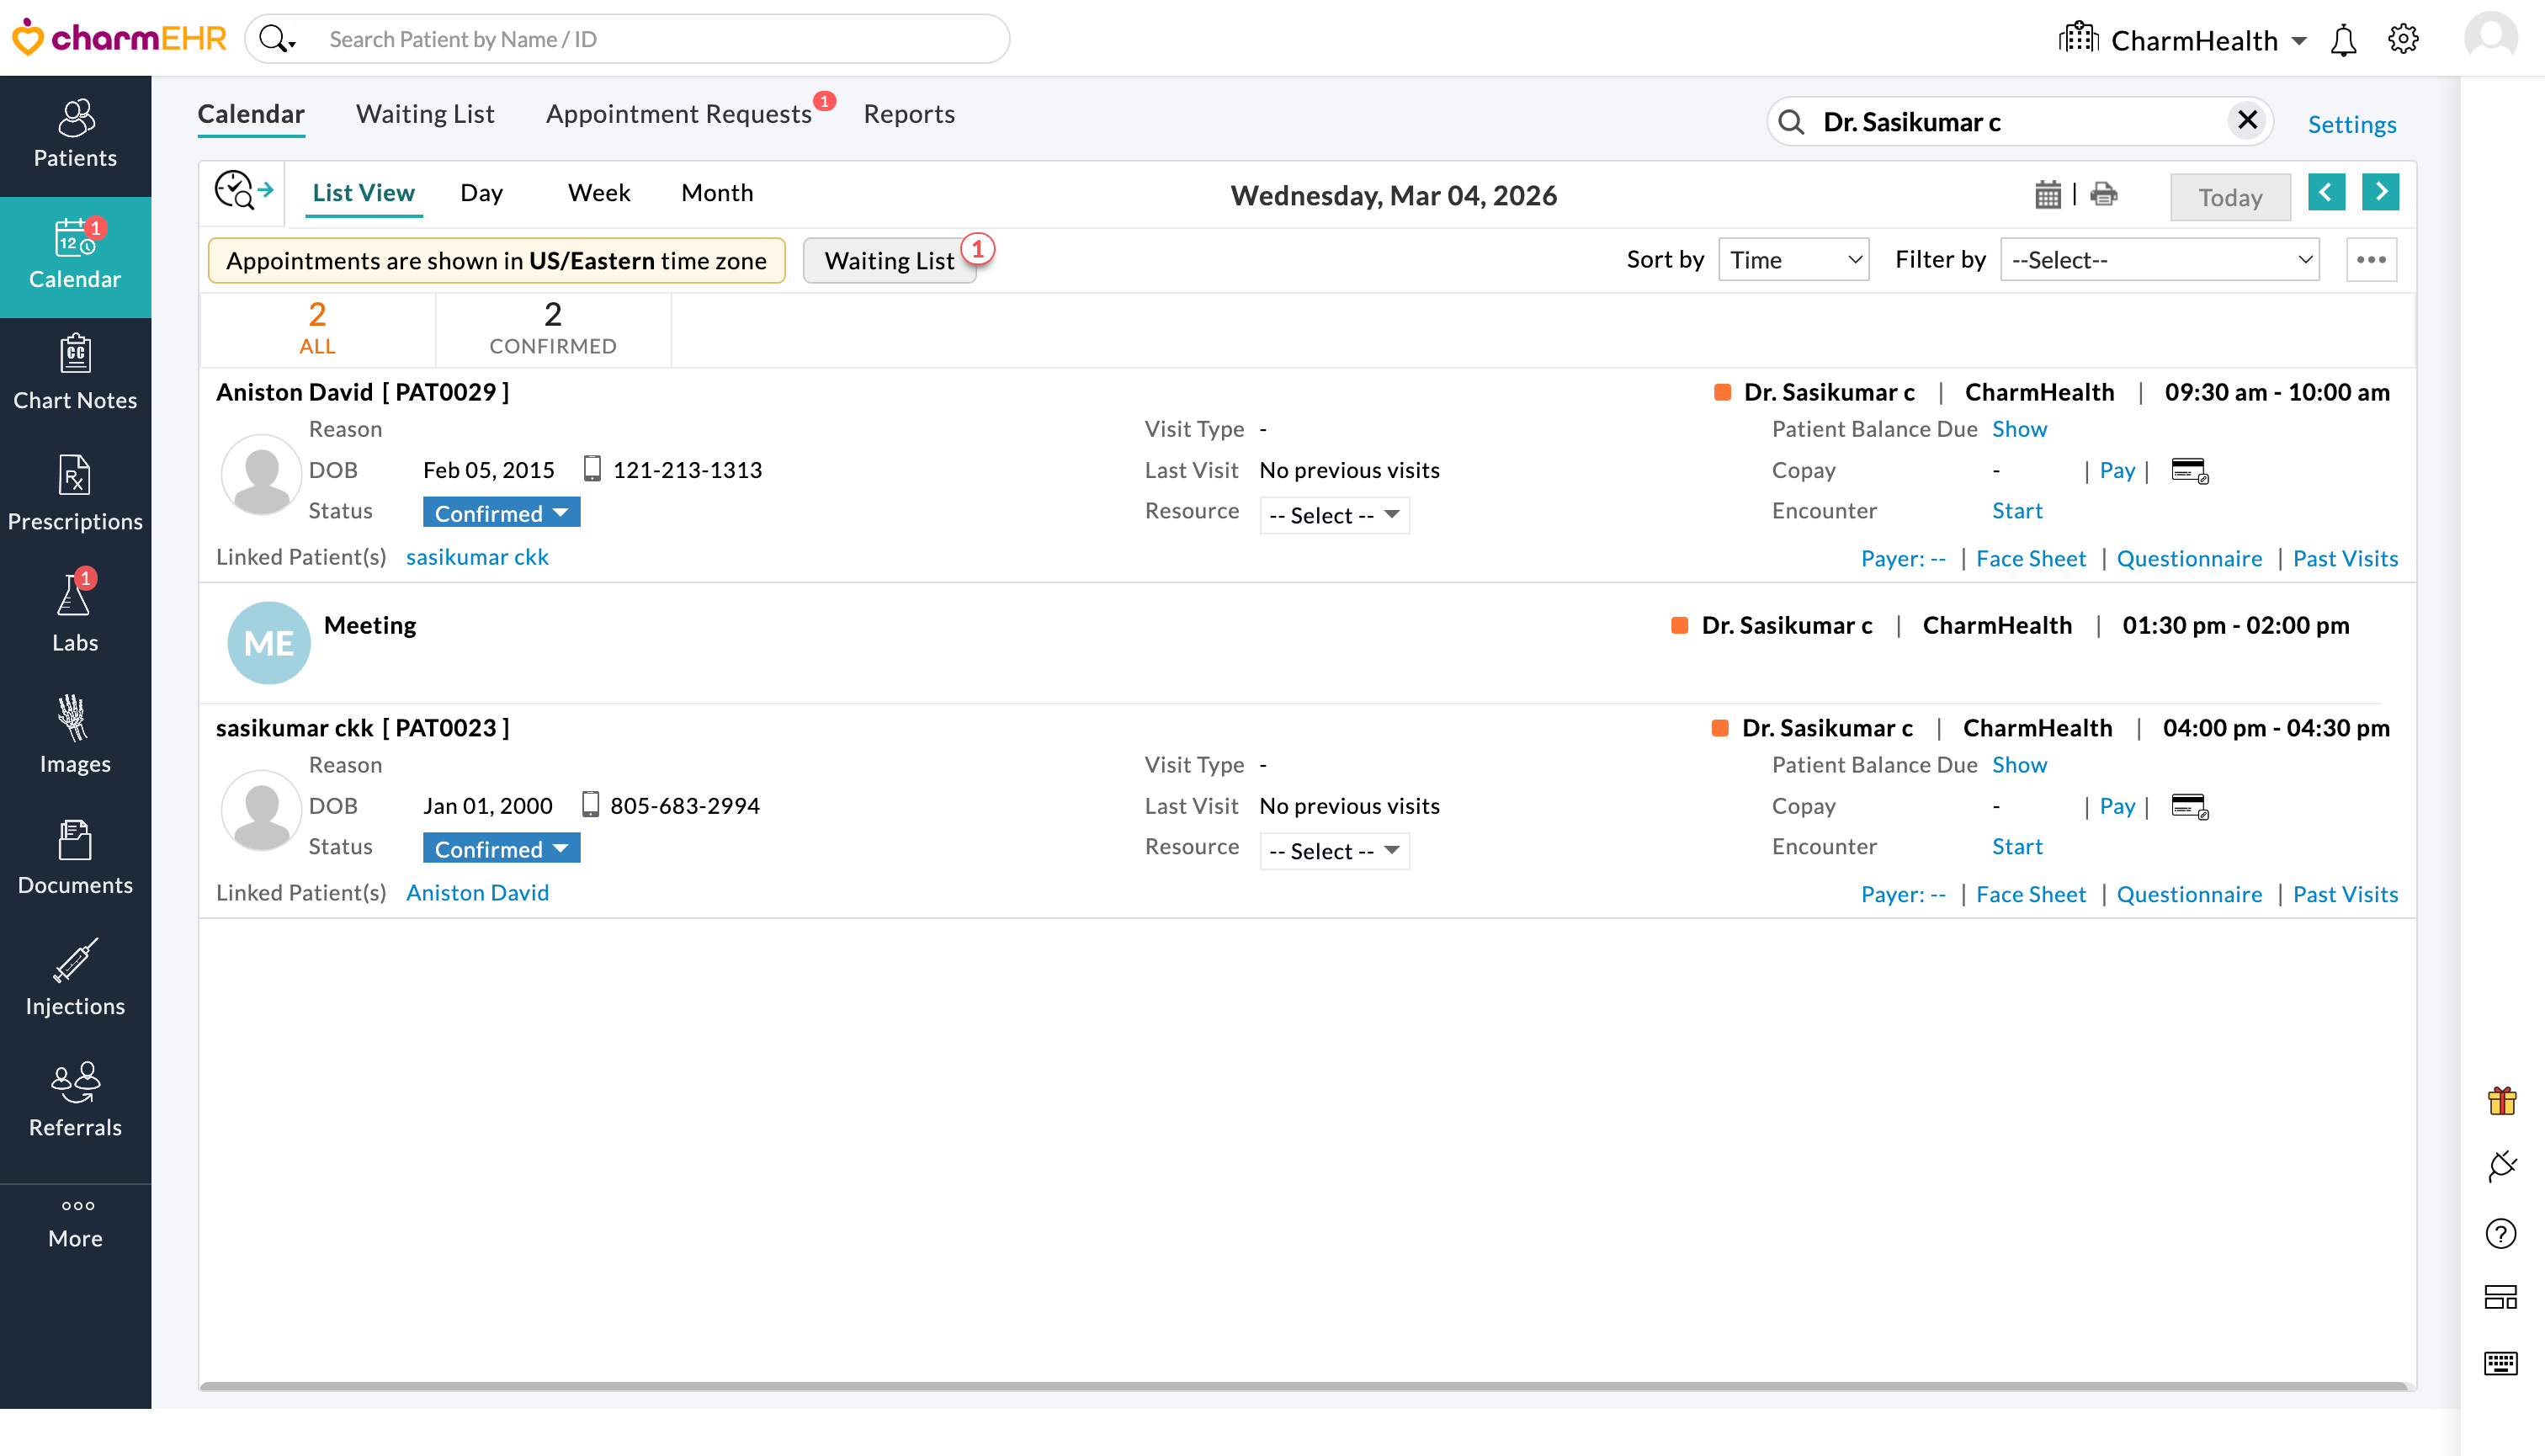
This enhancement is especially useful for front office staff when checking a provider’s availability during appointment booking. By searching for a specific provider, all other providers are filtered out, making it easier to view and identify the available time slots.
Click on the 'Close' icon next to the provider search bar to clear the search and return to the default calendar view.
Note: The Provider Quick Search feature does not modify your default calendar settings. The search will be automatically cleared when you navigate away from the calendar section.
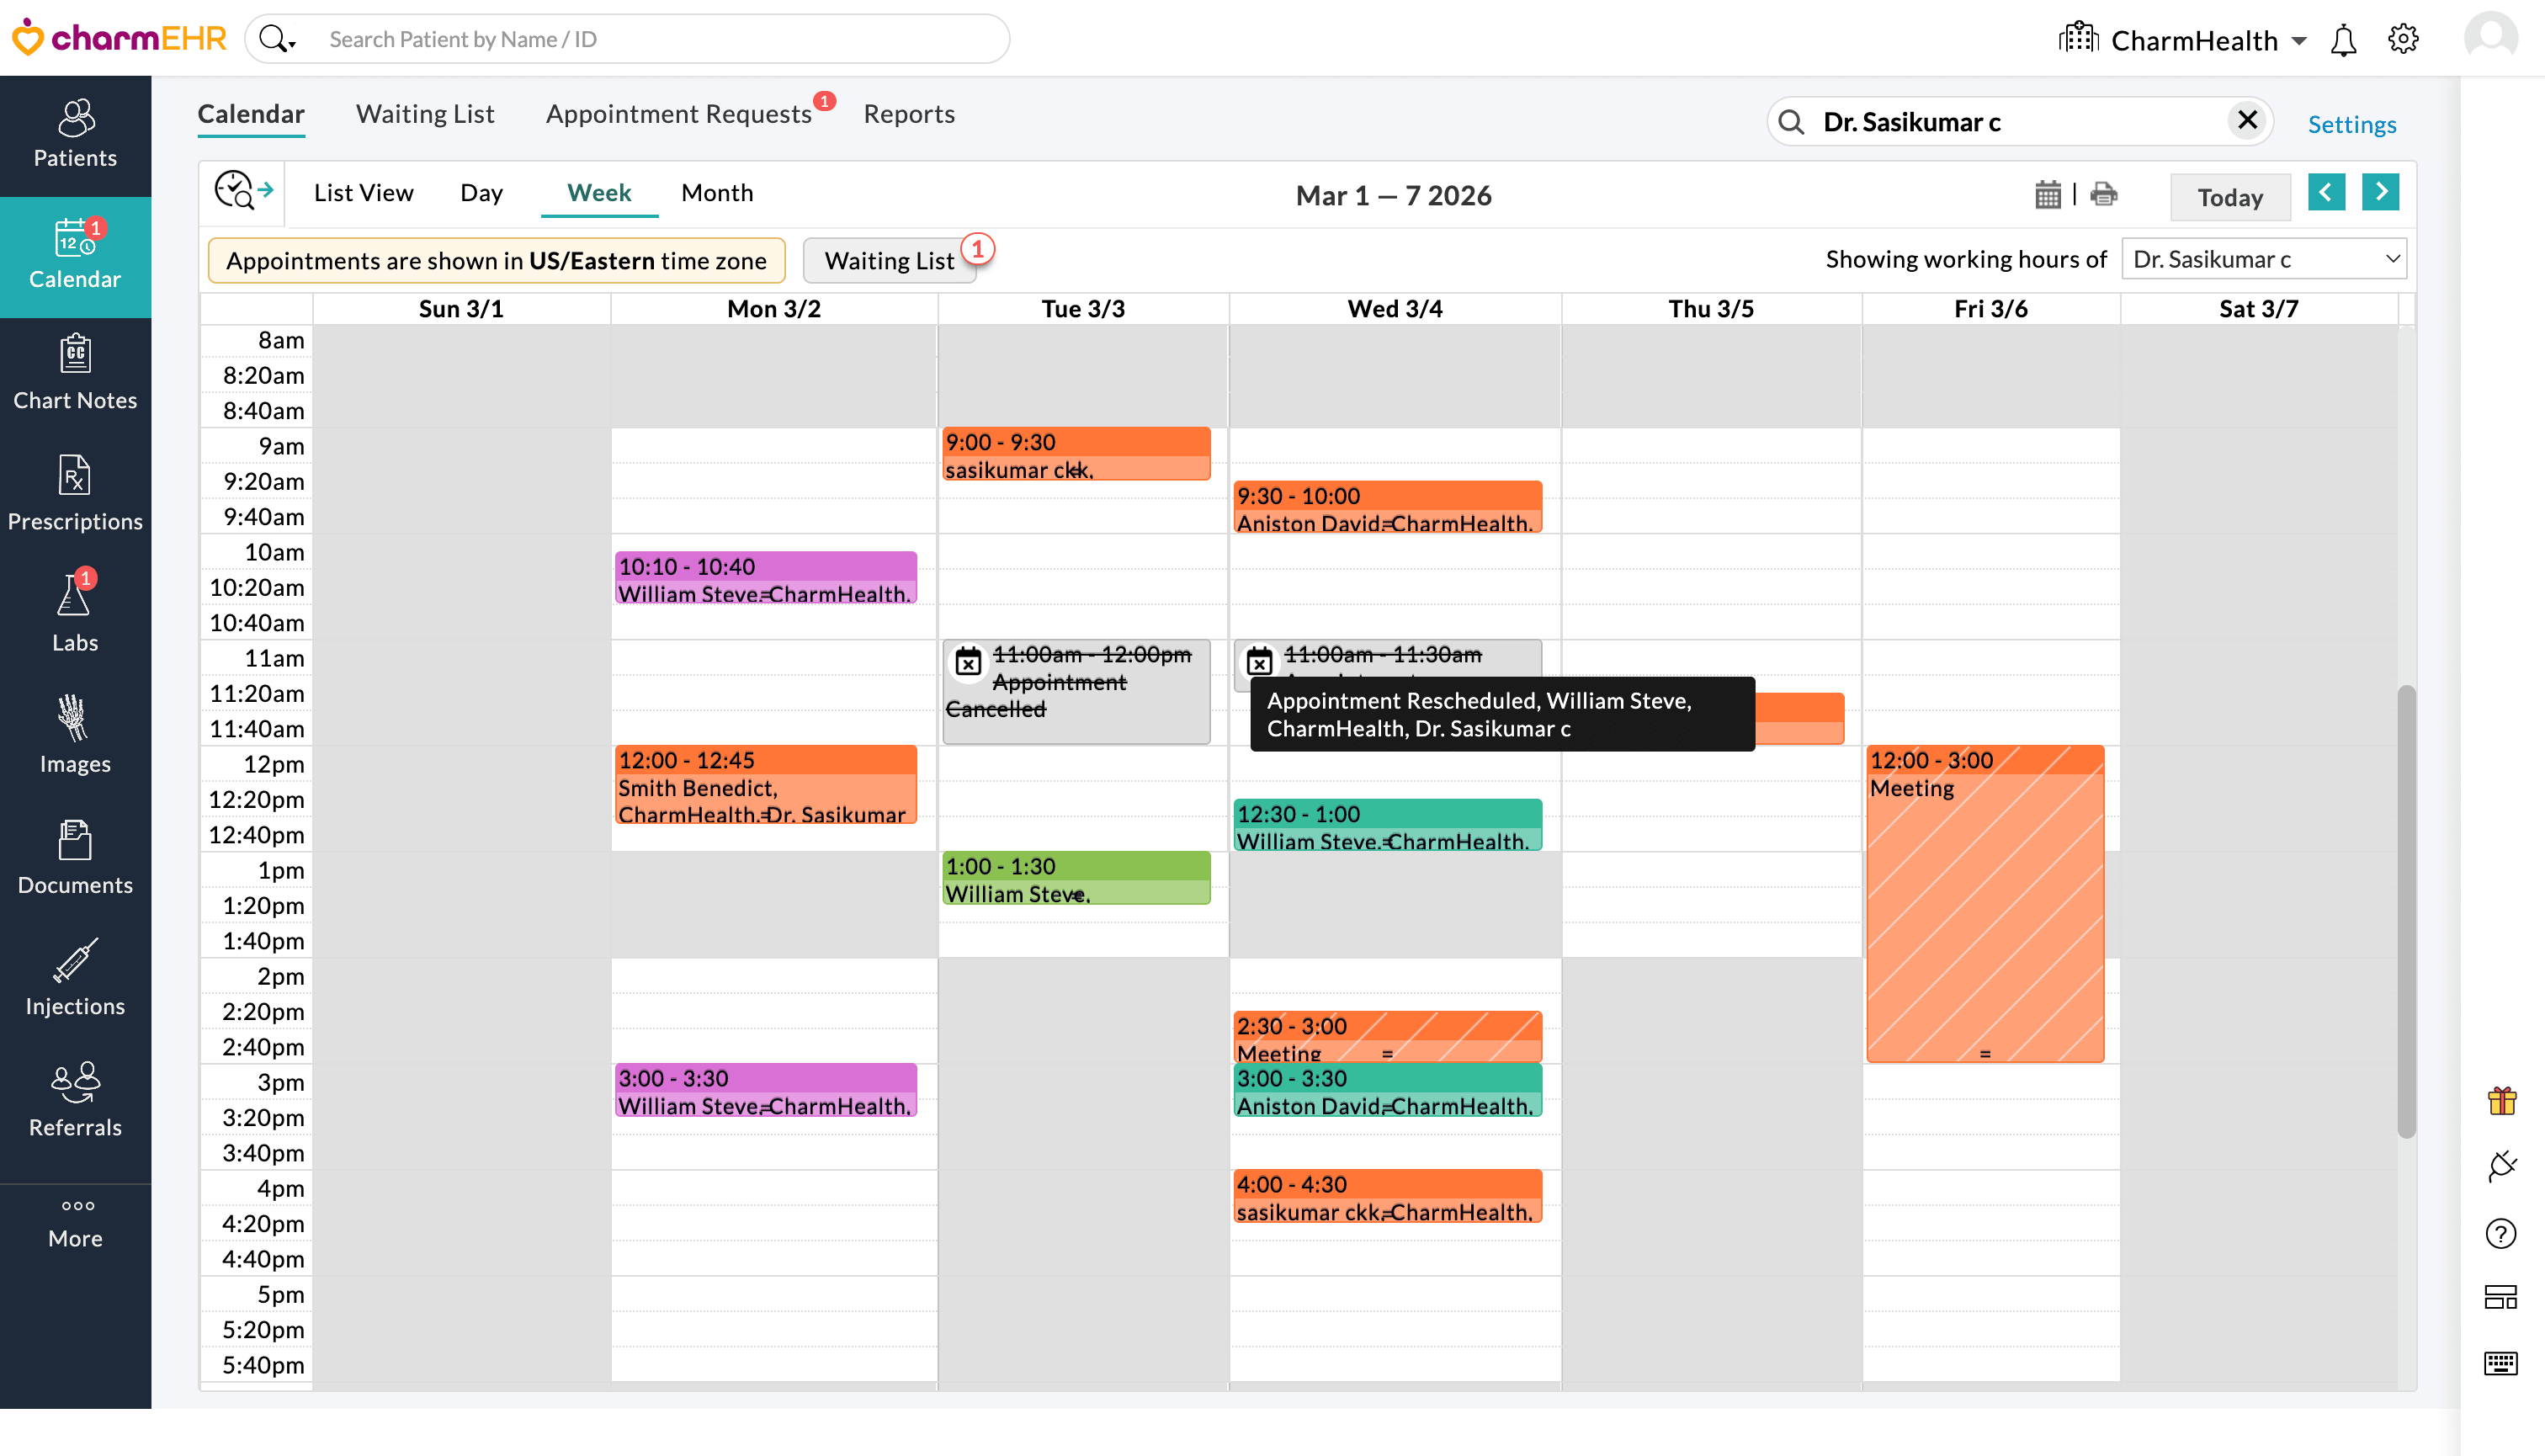
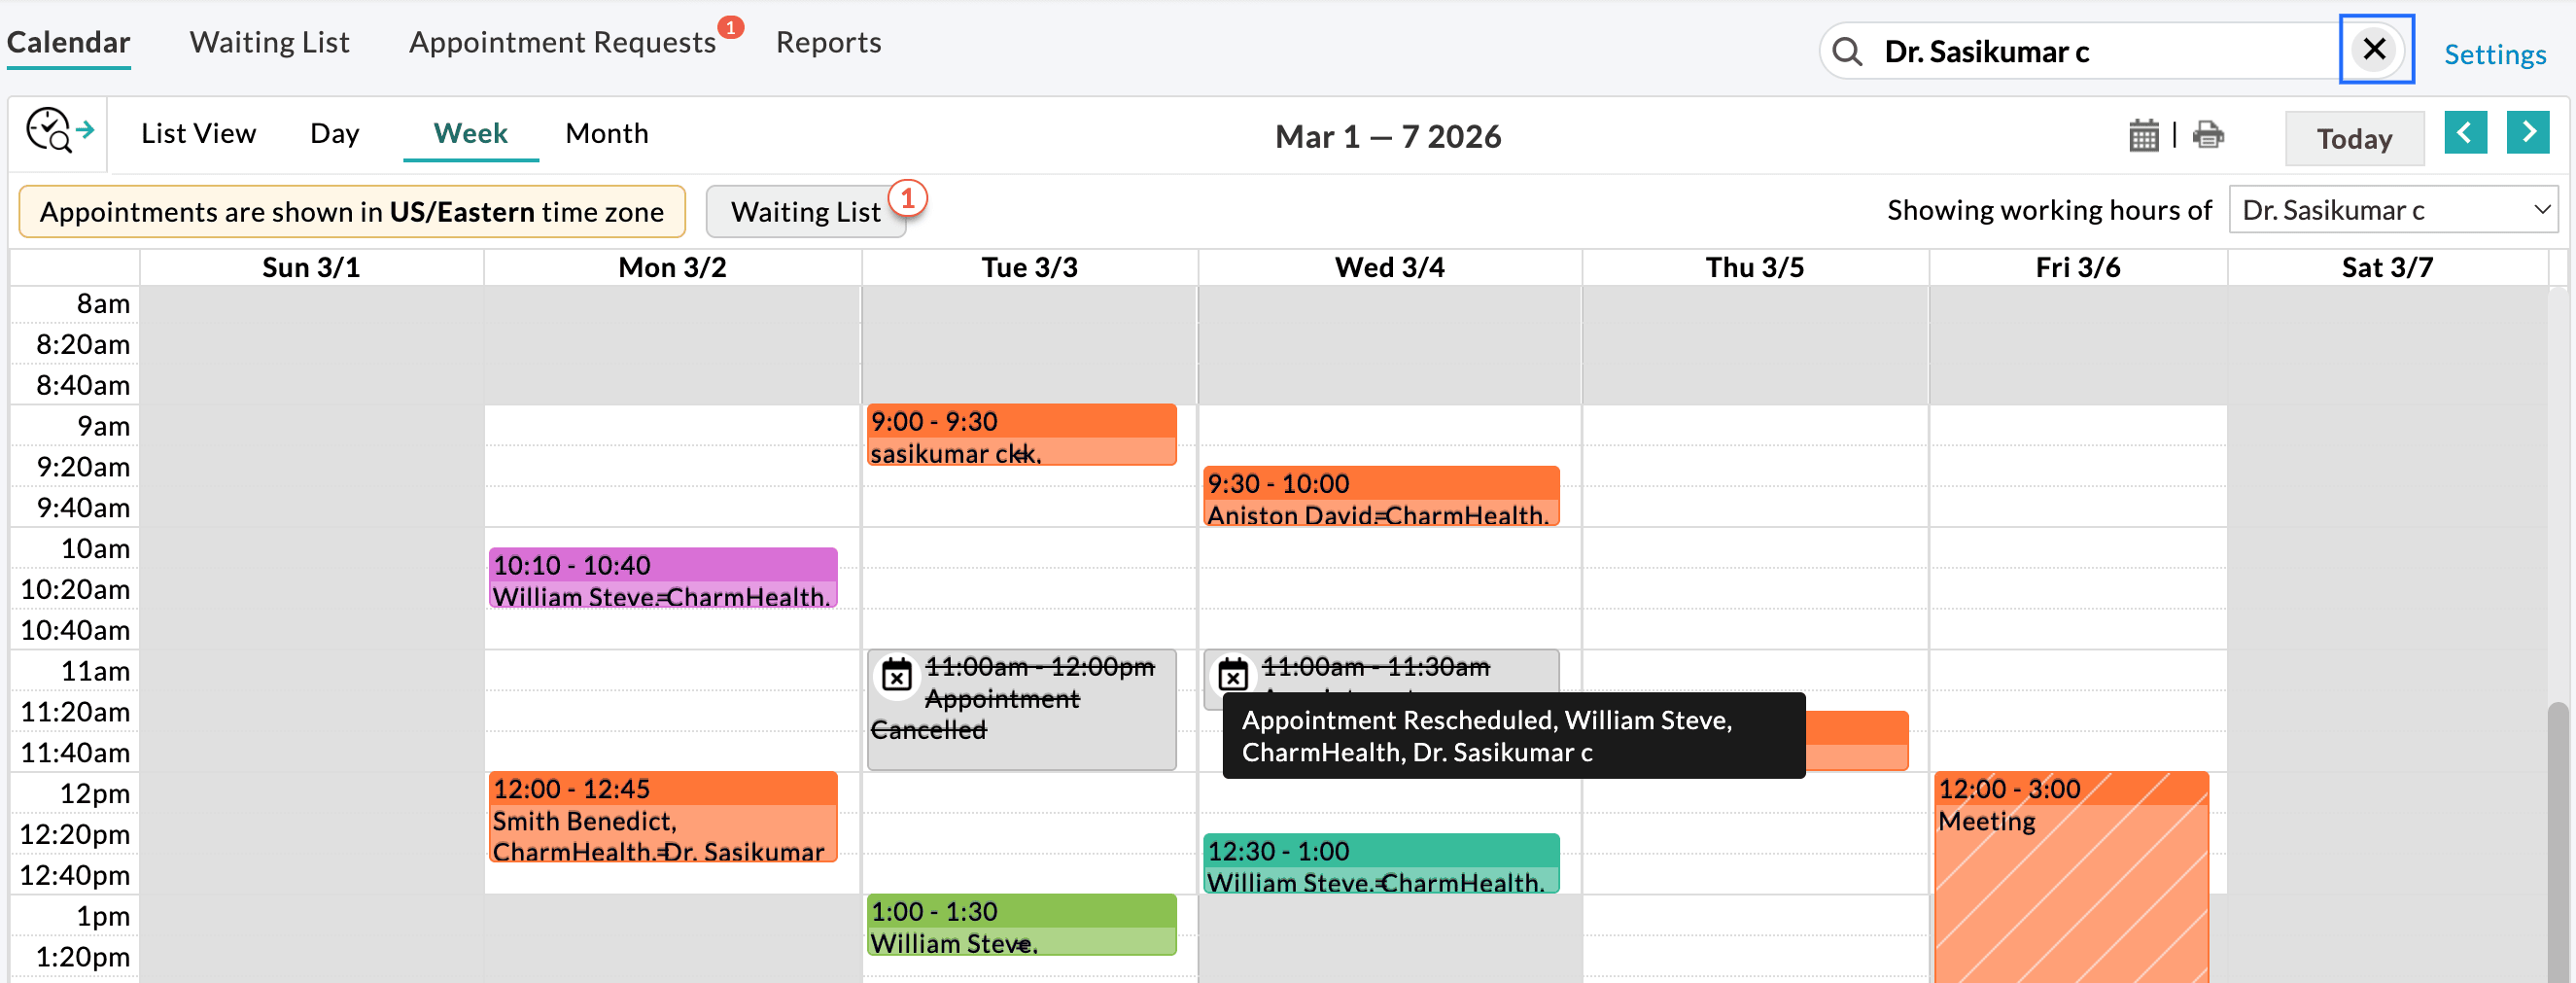
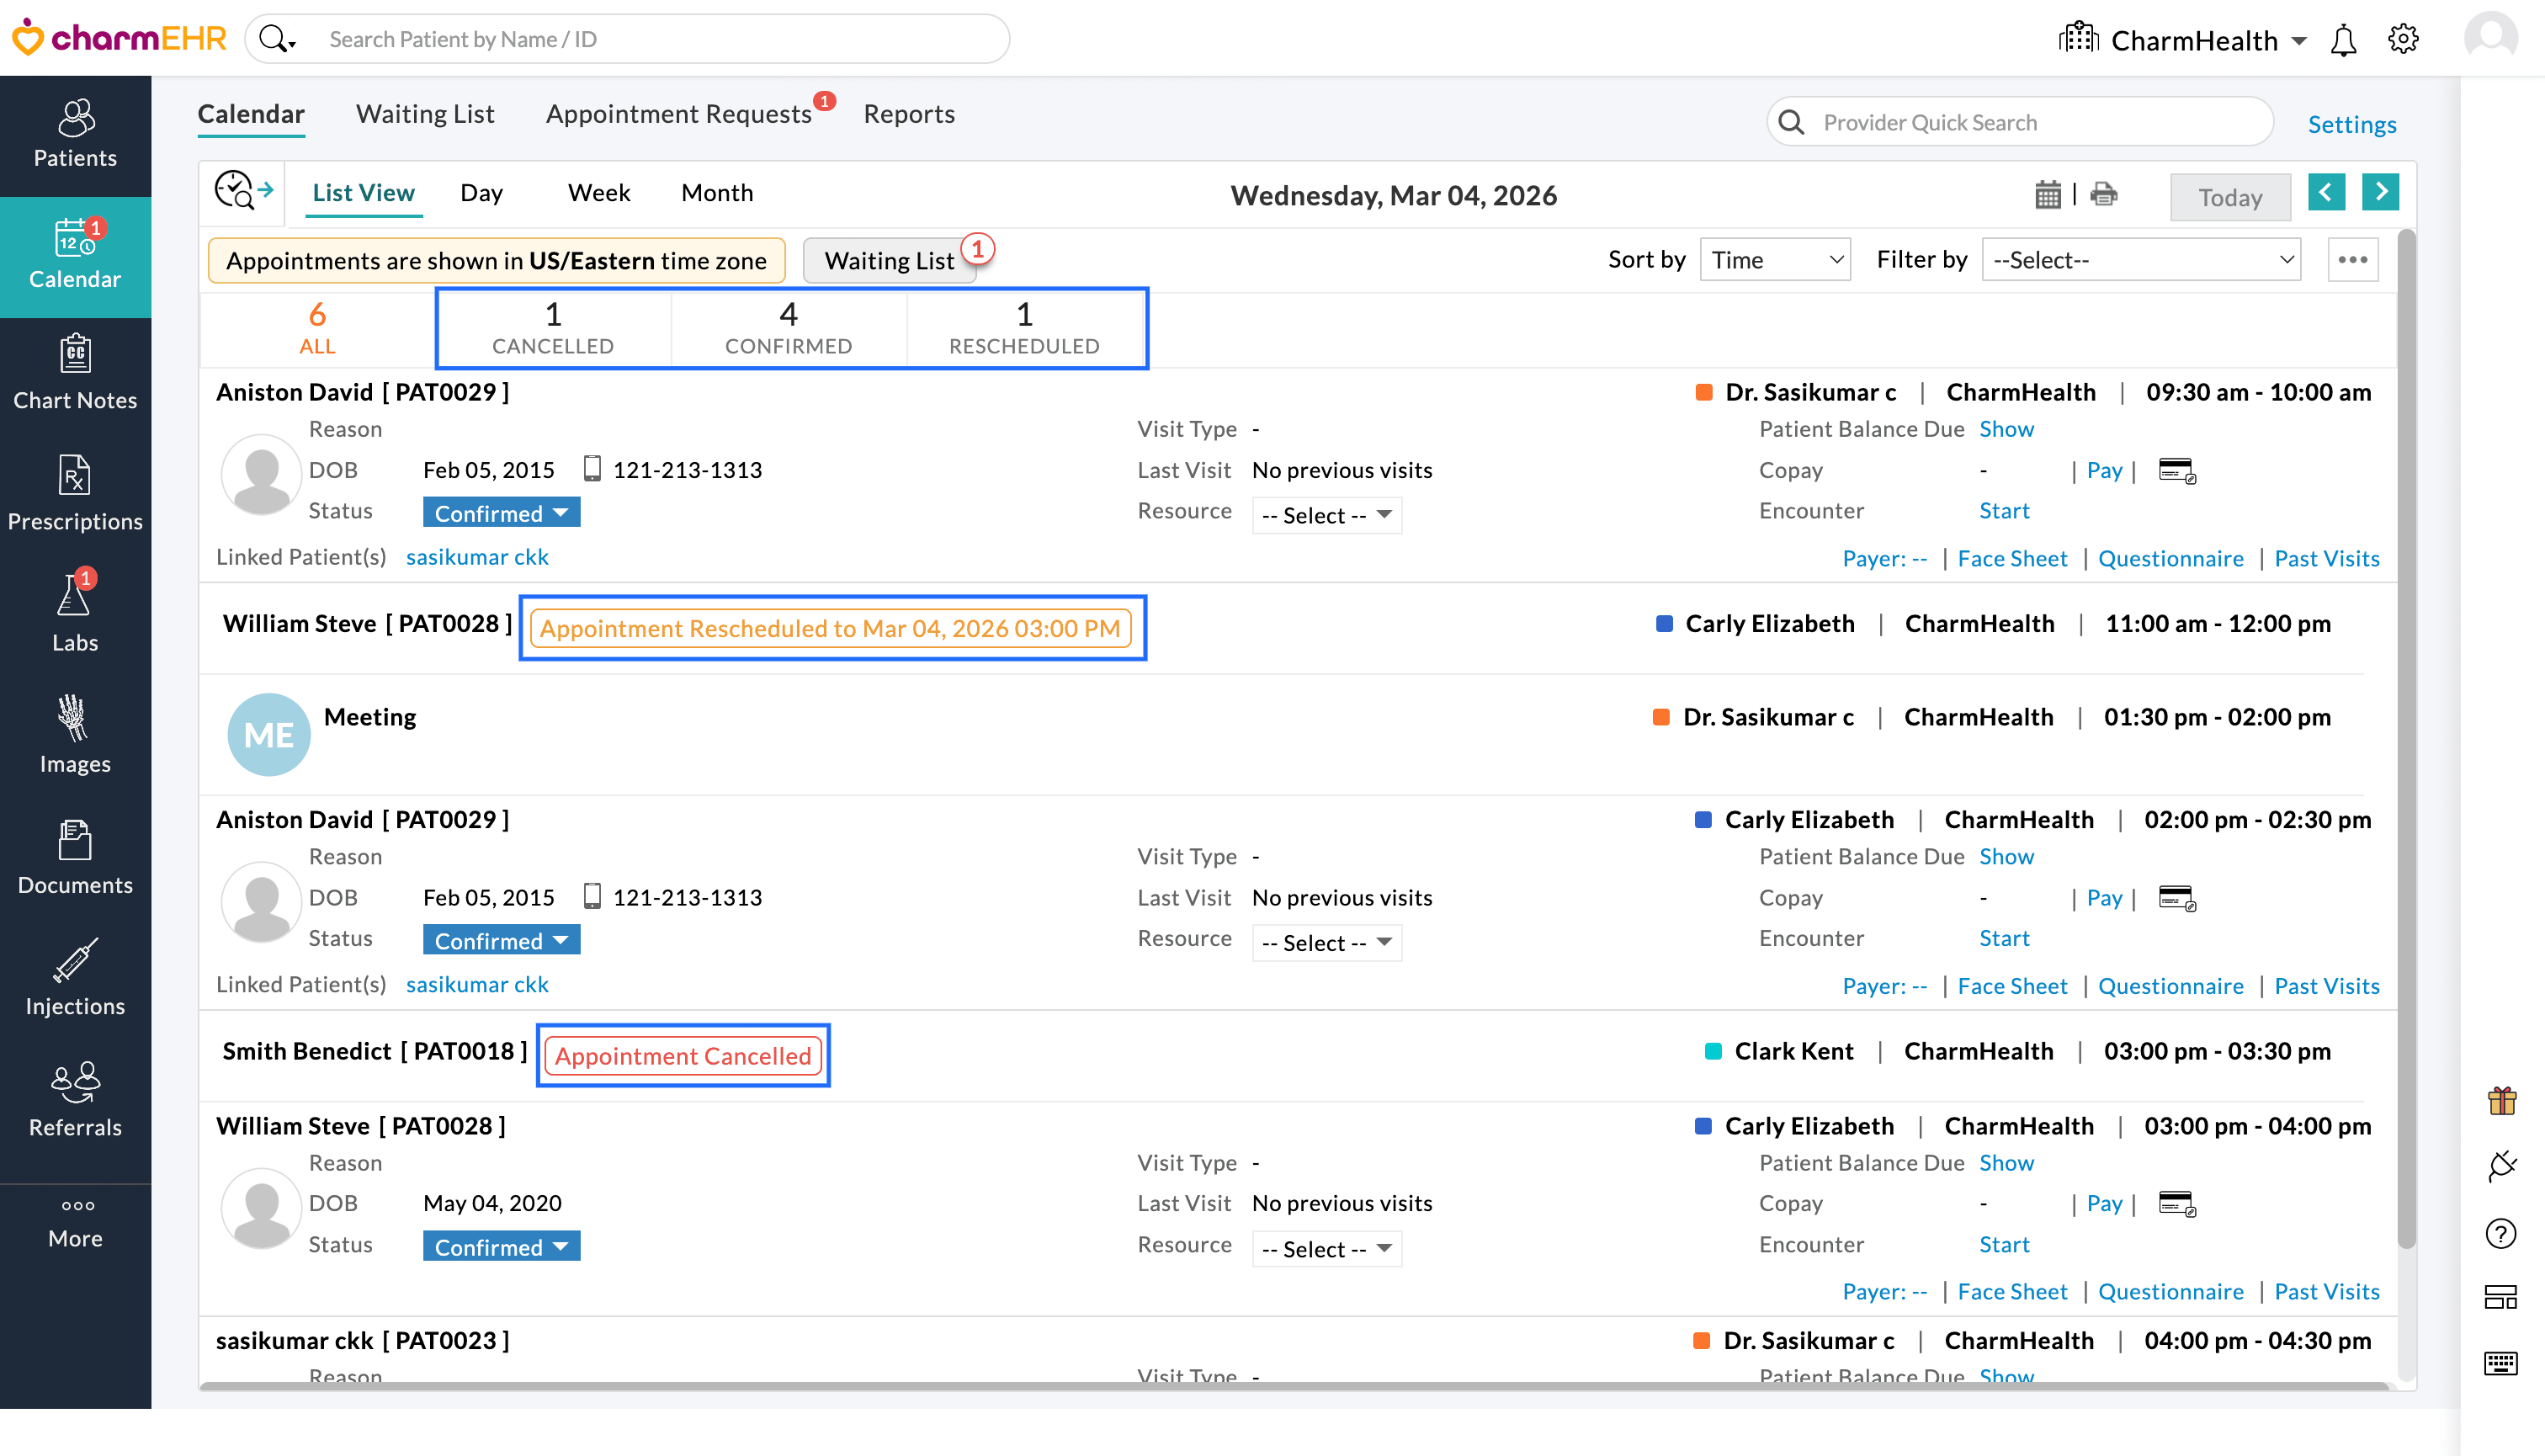
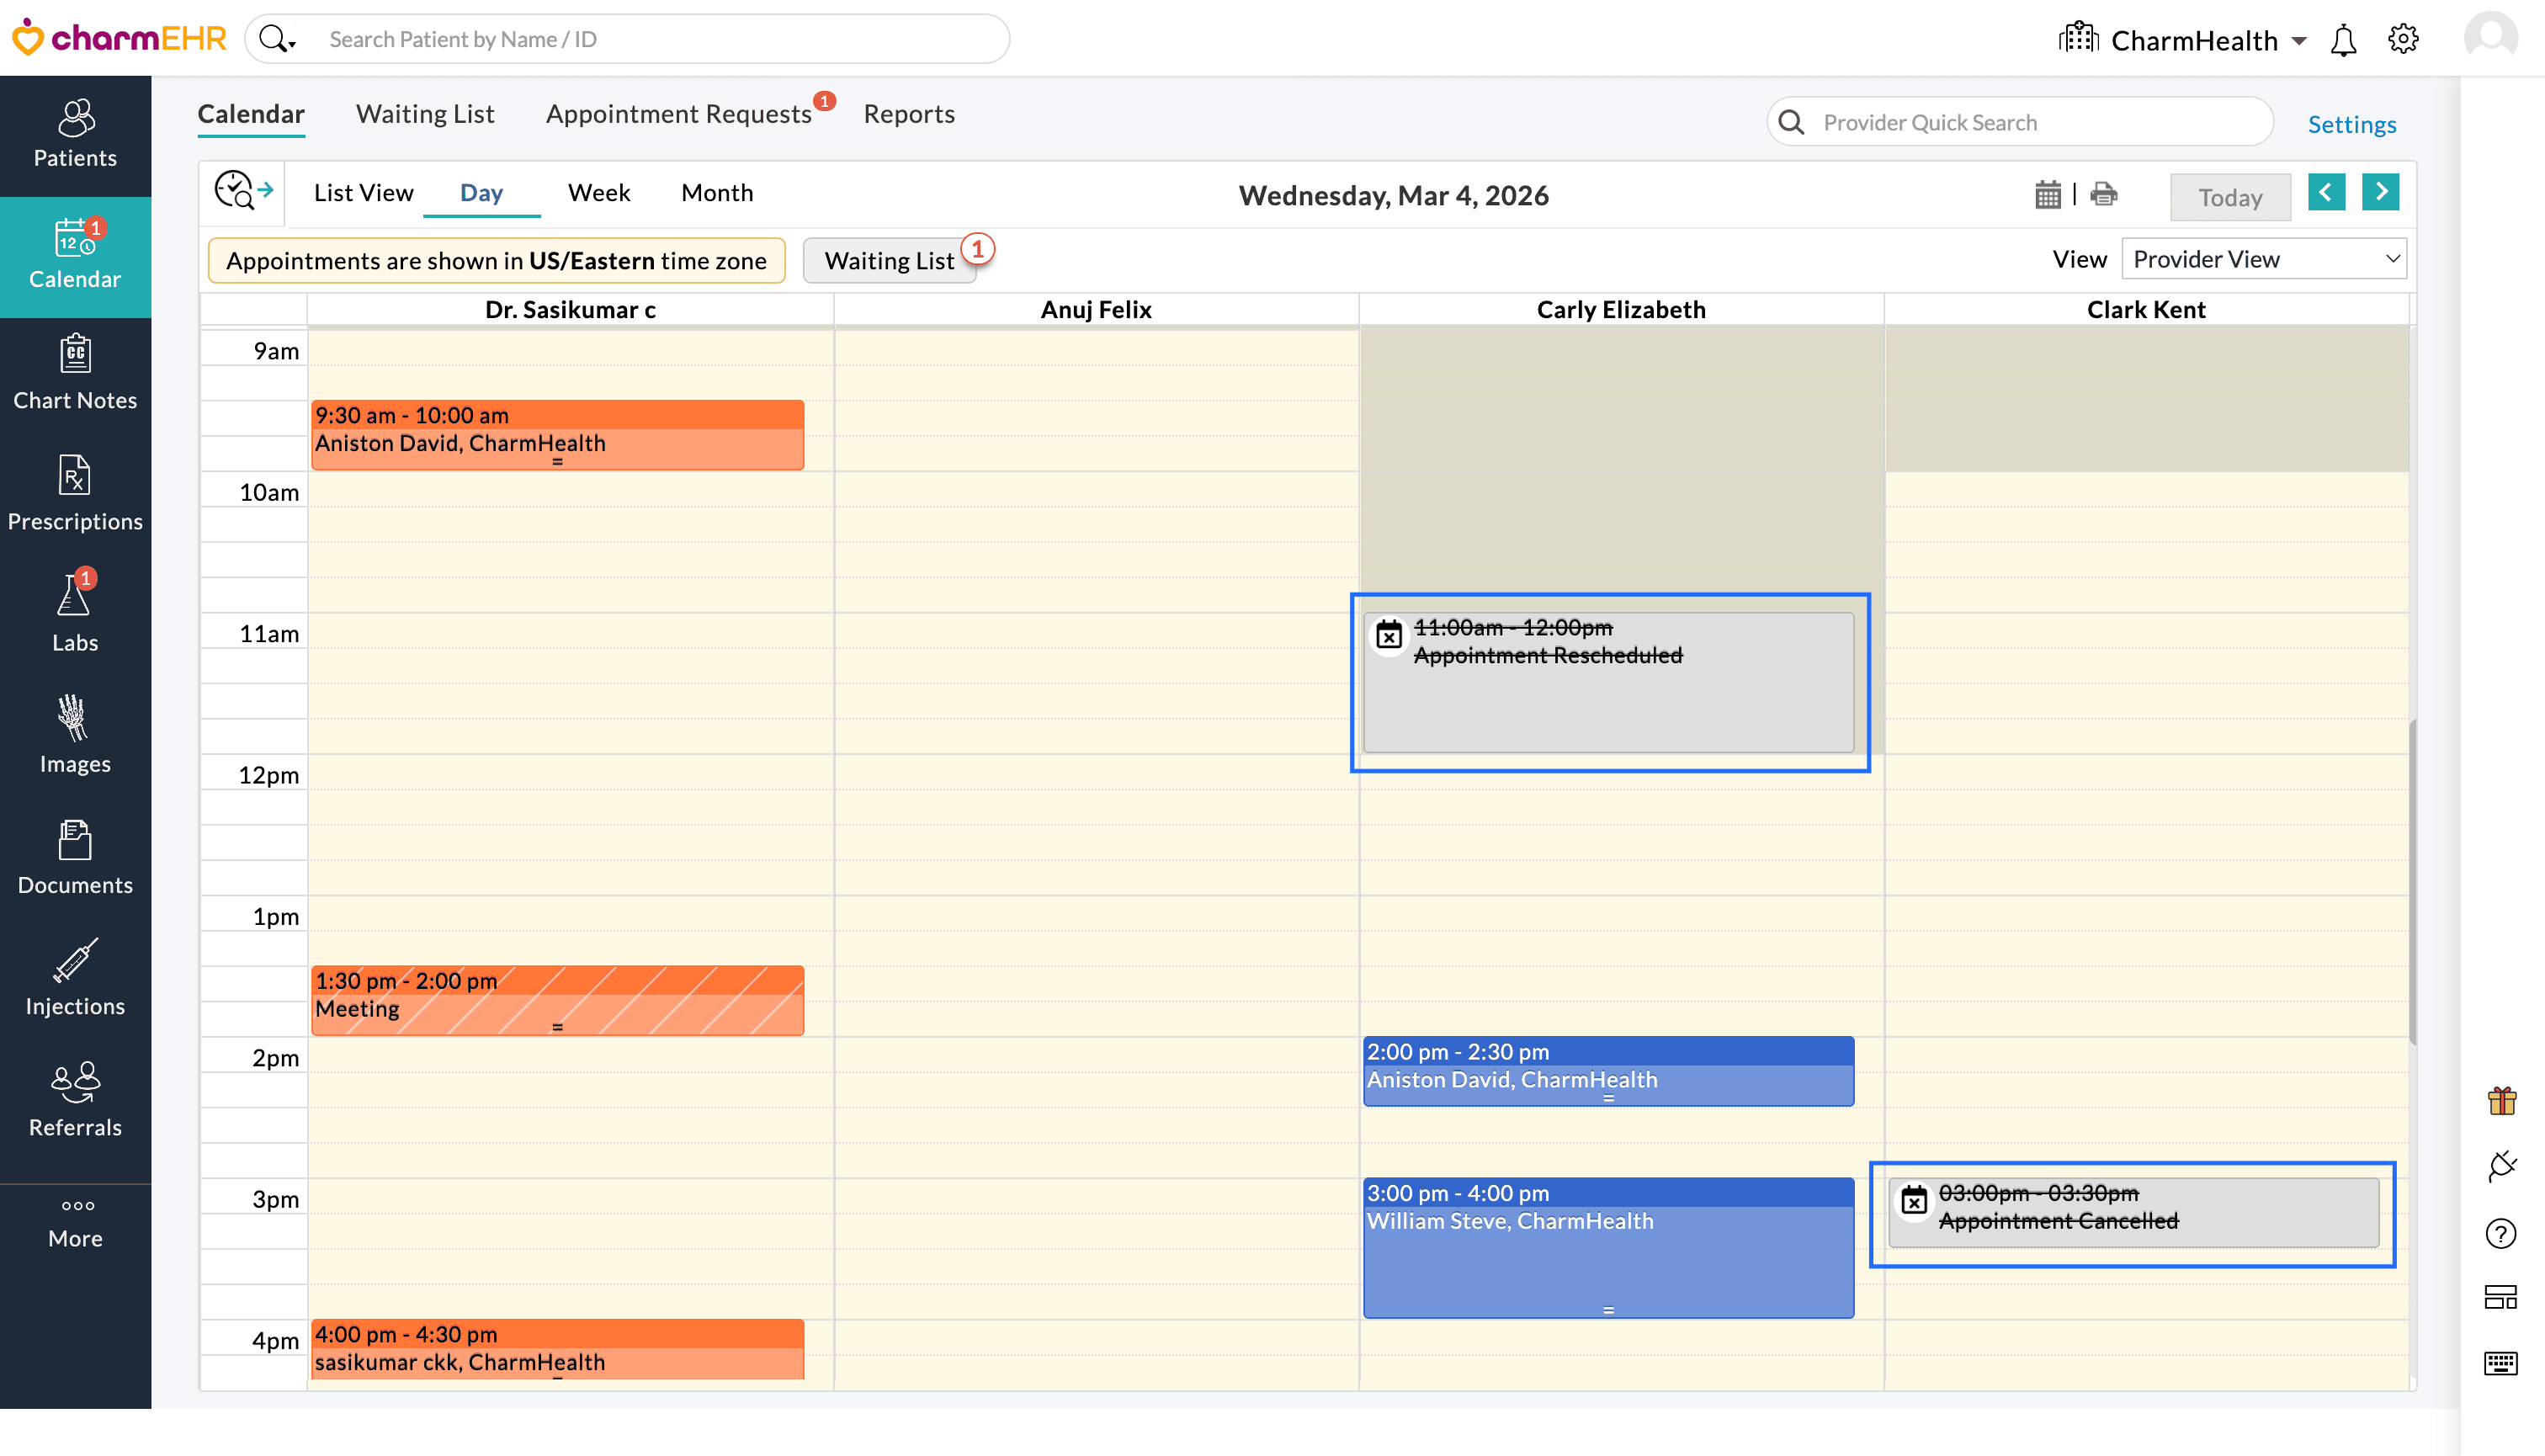
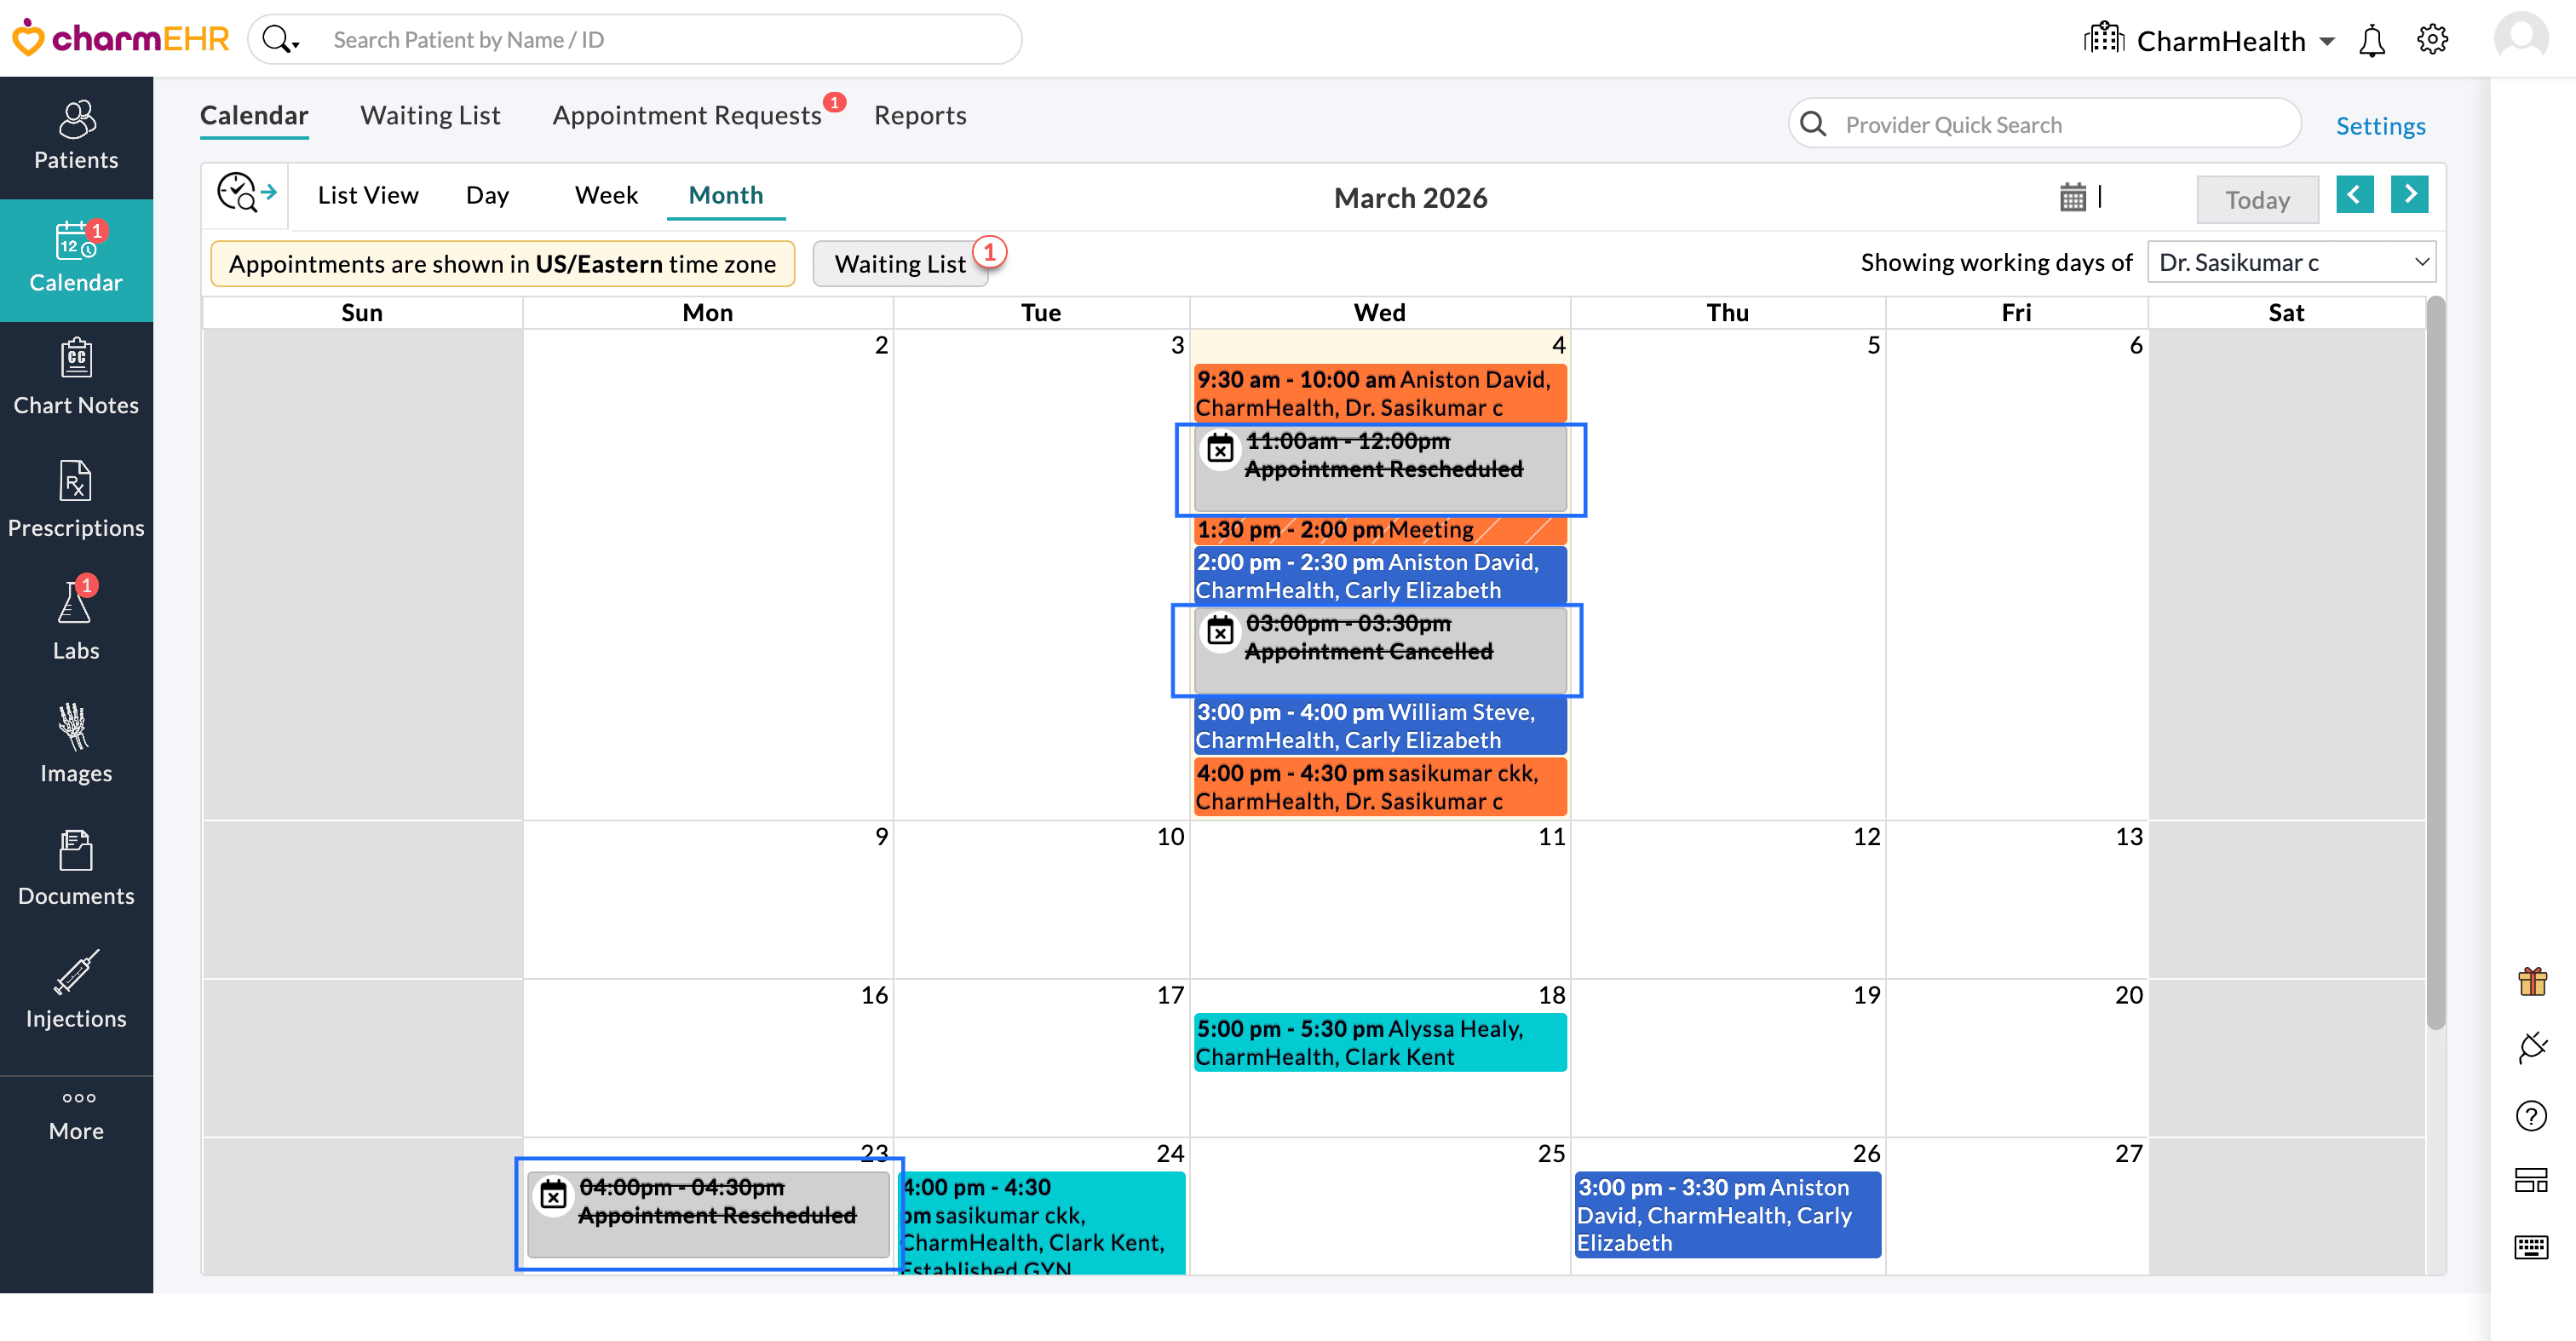
Practice members can now view cancelled and rescheduled appointments directly in the Calendar view. This enhancement improves the visibility of appointments and makes it easier to track changes in the schedule.
To enable this option:
- Navigate to the 'Calendar' section.
- Click on the 'Settings' option.
- Enable the 'Show Cancelled and Rescheduled Appointments' checkbox.
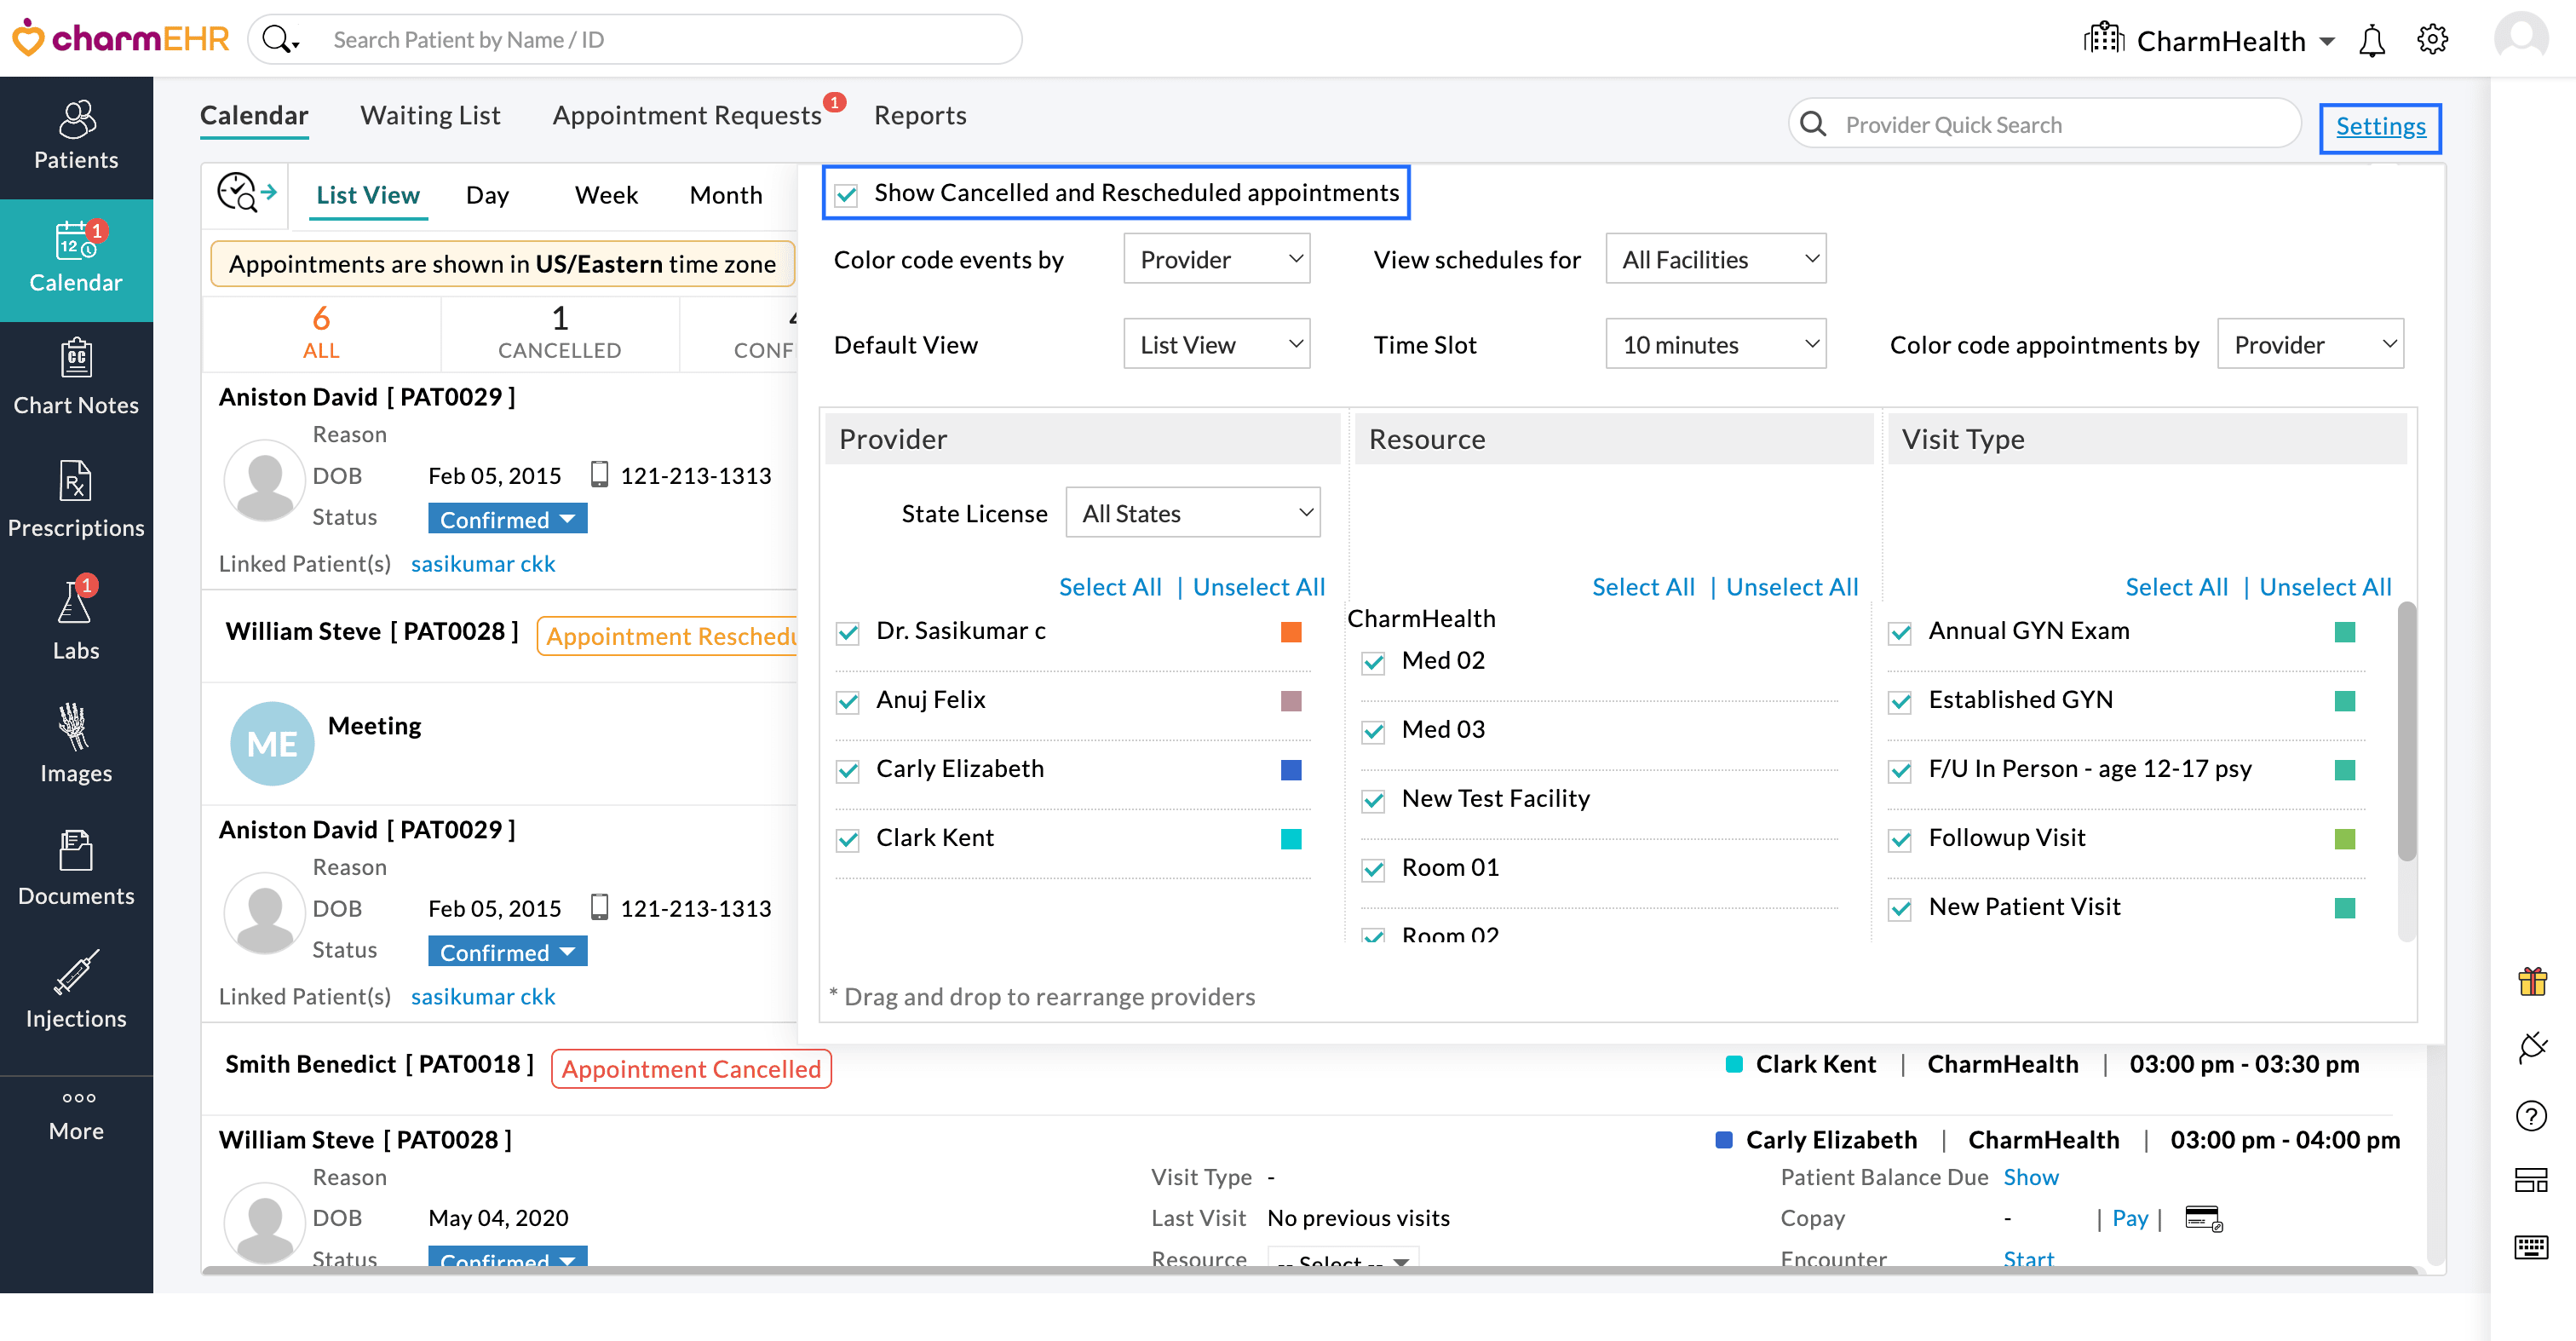
Once enabled, cancelled and rescheduled appointments will be displayed in the Calendar view, making it easier to monitor appointment updates.
List View
Day view
Month view
We hope these enhancements will improve the staff productivity, user experience, and provide more flexibility in managing appointments in Charm Calendar.
If you have any questions or need assistance, please reach out to our support team at support@charmhealth.com.
We are excited to announce enhancements to the billing module, featuring the Receipt Summary Report to improve payment collection analysis and the ability to export Patient Encounters as HL7 messages to support external billing workflows.
- Receipt Summary Report
- Option to Export Patient Encounter as HL7 Messages for Billing Outside CharmHealth
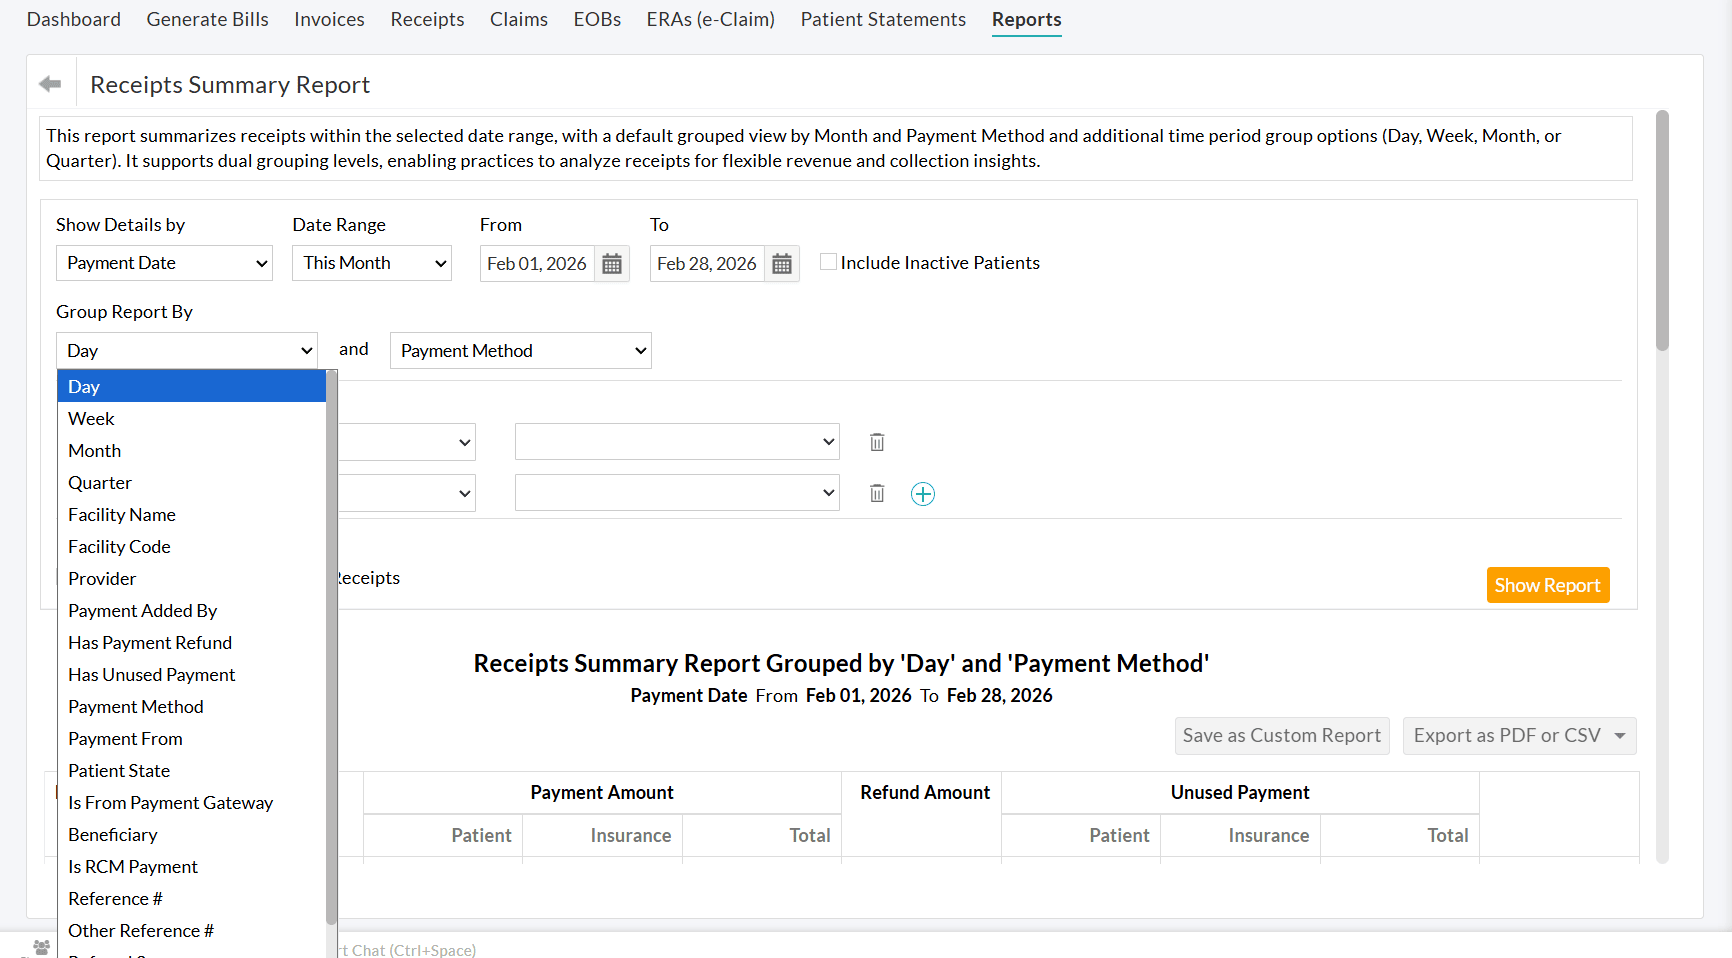
The Receipt summary Report provides a consolidated view of all payments collected, grouping them based on two selected entities. For example, payments can be grouped by Month and then by Payment Method, or by Week and then by Provider, providing a clear breakdown of collections across categories.
While the Receipt List Report displays detailed, receipt-level transaction data, the Receipts Summary Report organizes the same information into grouped totals, making it easier to review collections, compare trends, and analyze performance at a glance.
Using this report, Practices can review collections, track revenue trends, and perform flexible financial analysis.
To access the Receipts Summary Report,
- Navigate to 'Billing > Reports > Receipt Report > Receipt Summary Report'.
- Select the primary and secondary grouping options based on your reporting needs, then click 'Show Report'. By default, the report is grouped by Month as the primary grouping and Payment Method as the secondary grouping. Note: Practices may opt to group the receipts based on a single criterion.
- To view the detailed payment information for a specific entry, click on the 'View Details' against the corresponding payment method.
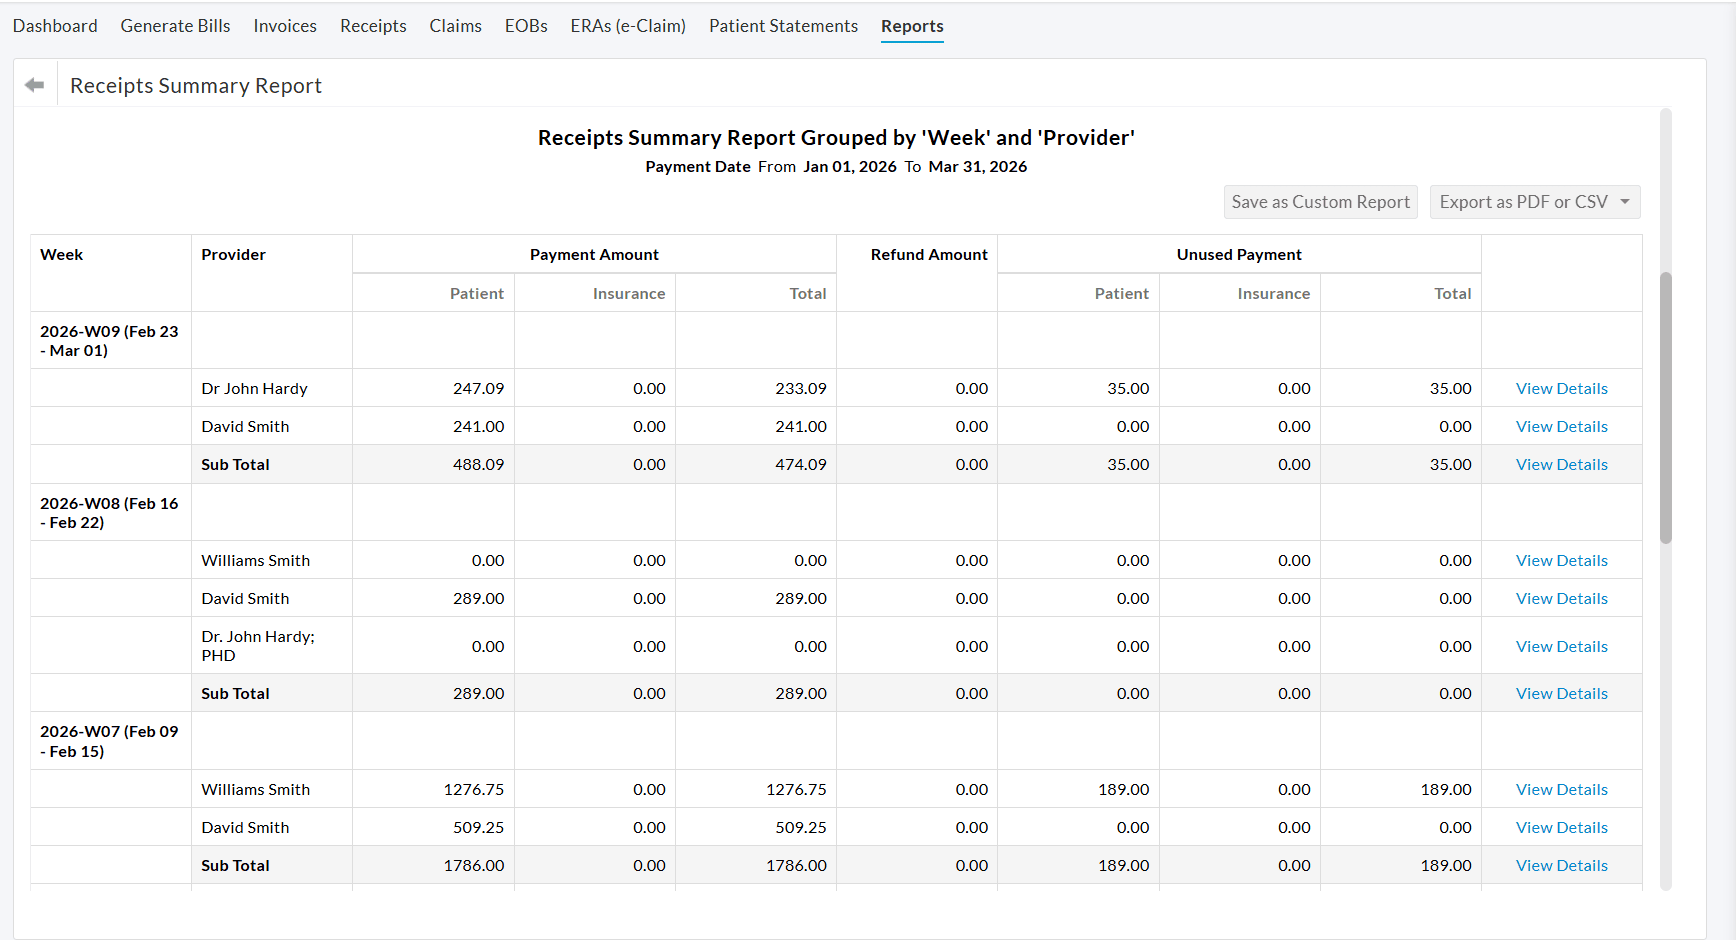
Practices can analyze the weekly payment collections associated with each Provider by grouping the report by Week and Provider, as shown in the screenshot below.
To learn more about the Receipt Summary Report, visit our Resource Center.
Practices can now export Patient Encounter details in the HL7 format to share clinical and billing data with external systems.
HL7 is a widely adopted healthcare standard that enables reliable data exchange between EHR and billing platforms. This export helps Practices transfer Encounter and Procedure details required for downstream billing processes.
CharmHealth supports the following HL7 message types:
- DFT (P03) - Detail Financial Transaction Includes Encounter details, procedure codes, charges, Dx details, Patient insurance, demographics, and other financial transaction information required for billing and Claim processing.
- ADT (A03) - Admit/Discharge/Transfer
Includes Encounter and Procedure details, typically used to communicate visit-related information to downstream systems.
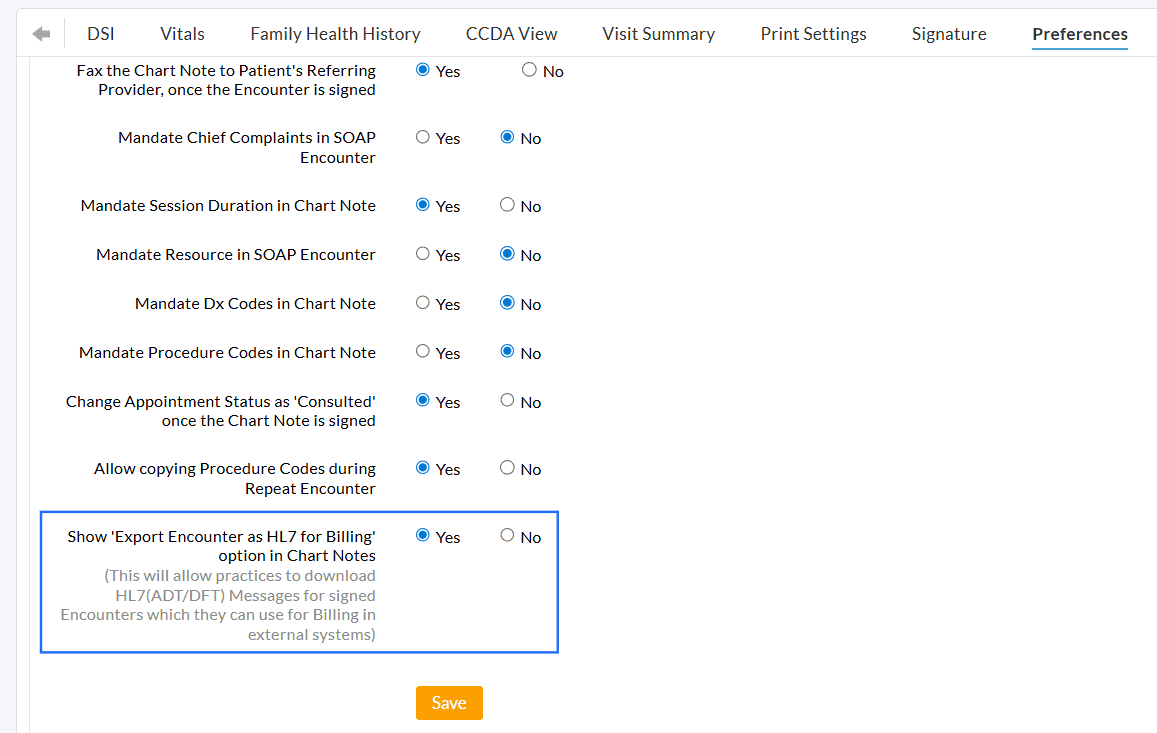
To enable the export option, navigate to the 'Settings > Encounter > Preferences' section and choose 'Yes' for the 'Show Export Encounter as HL7 for Billing option in Chart Notes' setting.
To export the Encounters, follow the steps below.
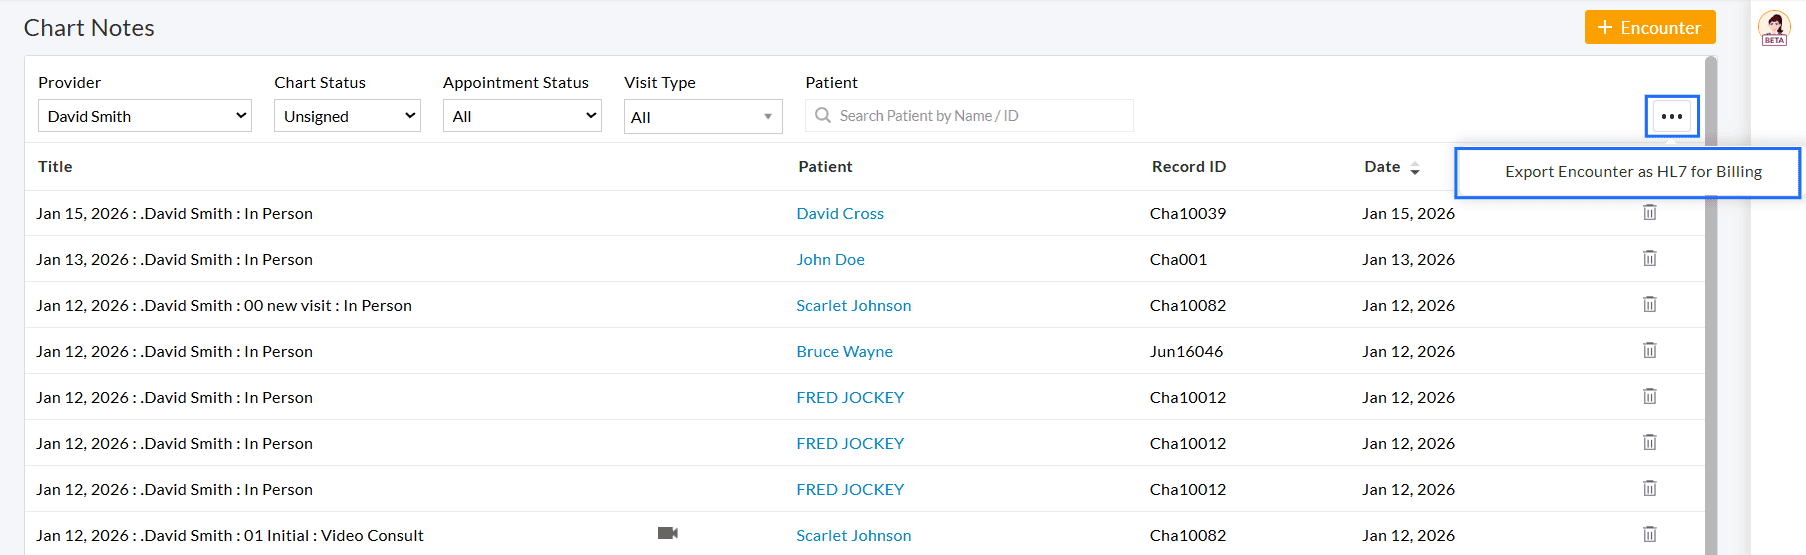
- Navigate to 'EHR Dashboard > Chart Notes'.
- Click on the 'More Actions' (...) icon in the top-right corner.
- Select the 'Export Encounter as HL7 for Billing' option.
- Choose the date range to export the Encounter details. The selected date range must be within seven days.
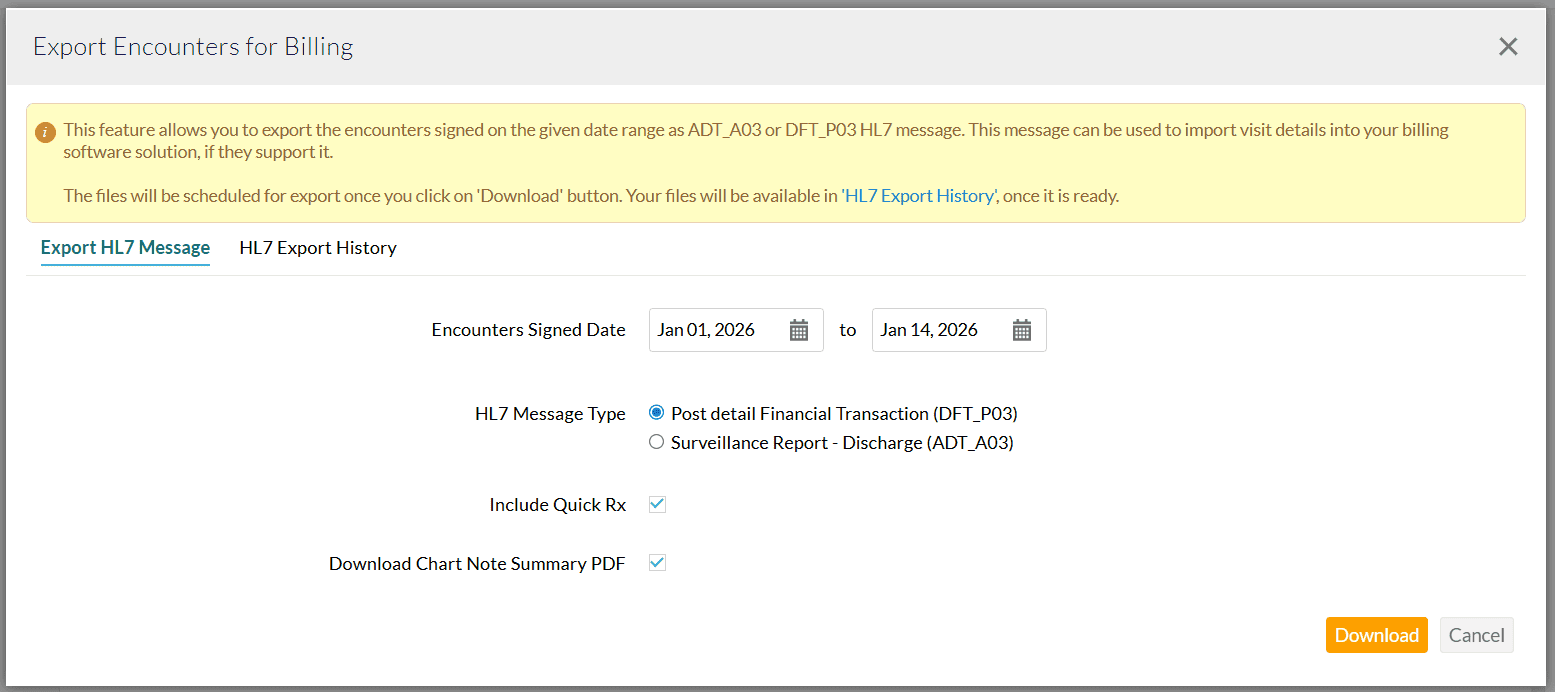
- Select the required HL7 Message Type. You can choose between:
- DFT_P03 - Post Detail Financial Transaction and
- ADT_A03 - Admit Discharge Transfer (Surveillance Report)
- Enable the 'Include Quick Rx' option to add prescription details to the HL7 file if needed.
- To download the Encounter summary PDF along with the HL7 files, enable the 'Download Chart Note Summary PDF' option.
- Click on the 'Download' button. The Encounters are scheduled for export and will be listed under the 'HL7 Export History' section.
- Once the file is ready, click on the 'Export' button to download the zip file.
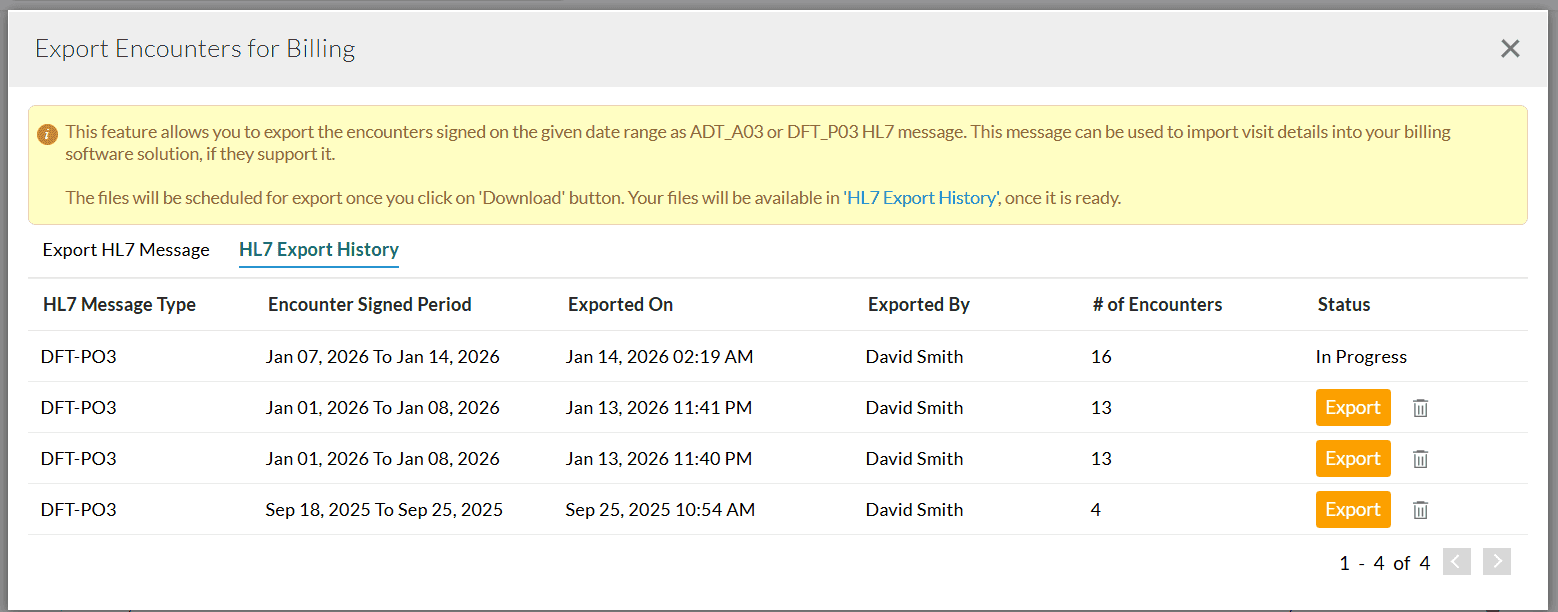
The downloaded zip file contains the HL7 Message File (txt) and Encounter Summary PDF required for billing.
Note: Only Providers with the 'Export Encounter as HL7 for Billing' privilege can export the Encounter in HL7 format.
Refer to our Resources to learn about the information included in the HL7 Messages.
We hope the above enhancements will help Practices gain better visibility into payment collections and simplify data transfer with the external billing platforms.
Have any doubts or suggestions? Drop us an email at support@charmhealth.com.
We are excited to introduce the Claim Denials feature that provides a centralized view to monitor, track, and manage all denied Claims from a single location. By offering clearer insights into denial patterns, this feature helps Practices streamline denial management, improve visibility, and take timely action to reduce repeat denials.
- Denial Watchlist
- Automatic Grouping of Denials by Denial Category
- Denial Reports
- Denied Claims List by Denial Category
- Top 10 Denial Codes
- Payer Wise Denials
- View Denials Within the Claim
- Enhanced Denial Procedure Report
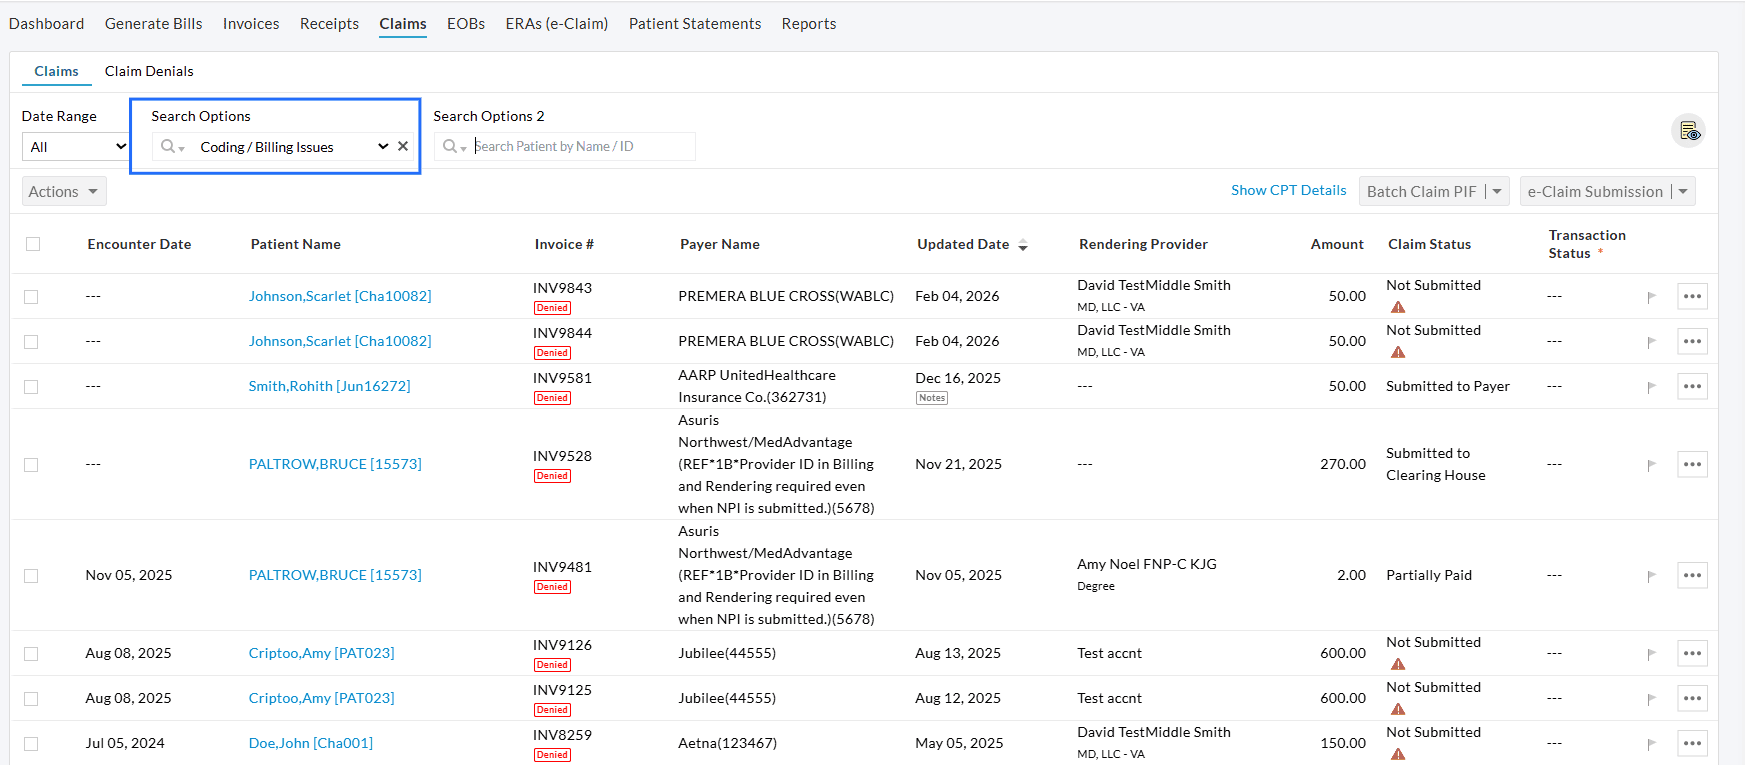
To access this feature, navigate to 'Billing > Claims > Claim Denials'. Practices can filter by Facility, Denial Date, Submission Date, Encounter Date, and more to analyze denial trends and reasons.
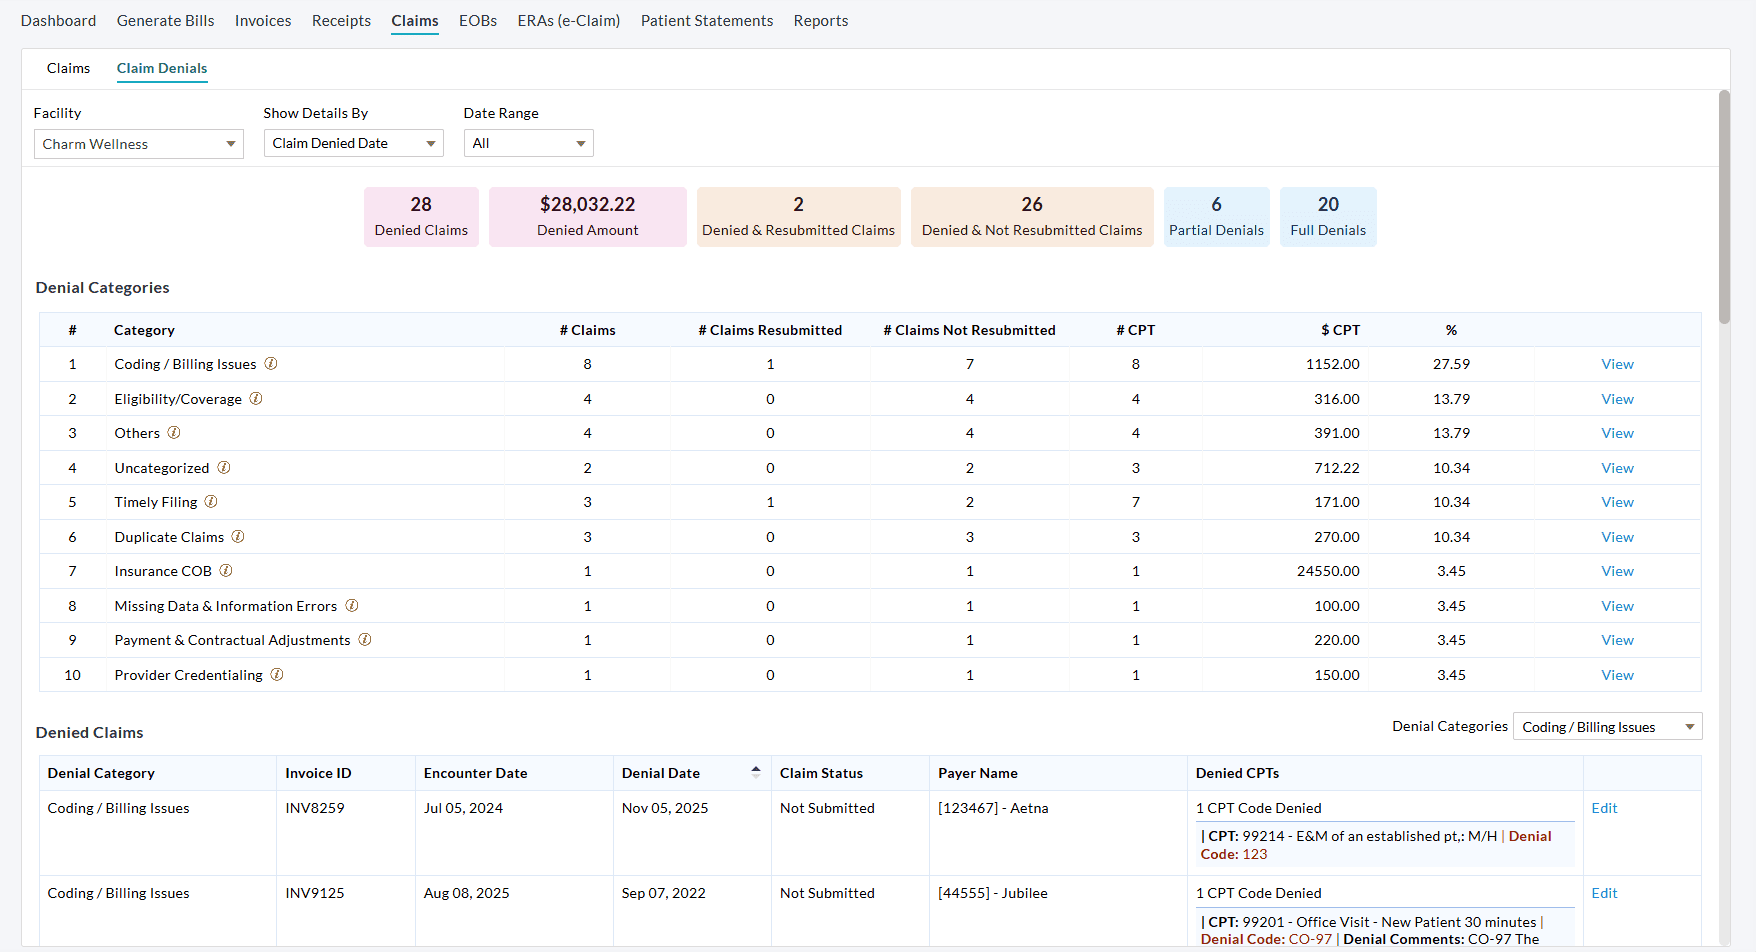
The Denial Watchlist provides a quick summary of denial activity, including:
- Total number of denied Claims
- Total denied amount
- Number of denied and resubmitted Claims
- Number of denied but not resubmitted Claims
- Number of partially denied Claims
- Number of fully denied Claims

Click on any widget to access a detailed Claim list view of the corresponding denial activity.
All denied Claims are now automatically grouped by Denial Category, making analysis easier and intuitive.
For each Denial Category, Practices can view:
- Total Number of denied Claims
- Number of resubmitted and not resubmitted Claims
- Number of denied CPTs
- Total denied amount
- Average number of CPTs denied in the Category
Selecting a category automatically applies the Denial Categories filter and displays the related Invoice-level details for that specific denial category, as shown in the screenshot below.
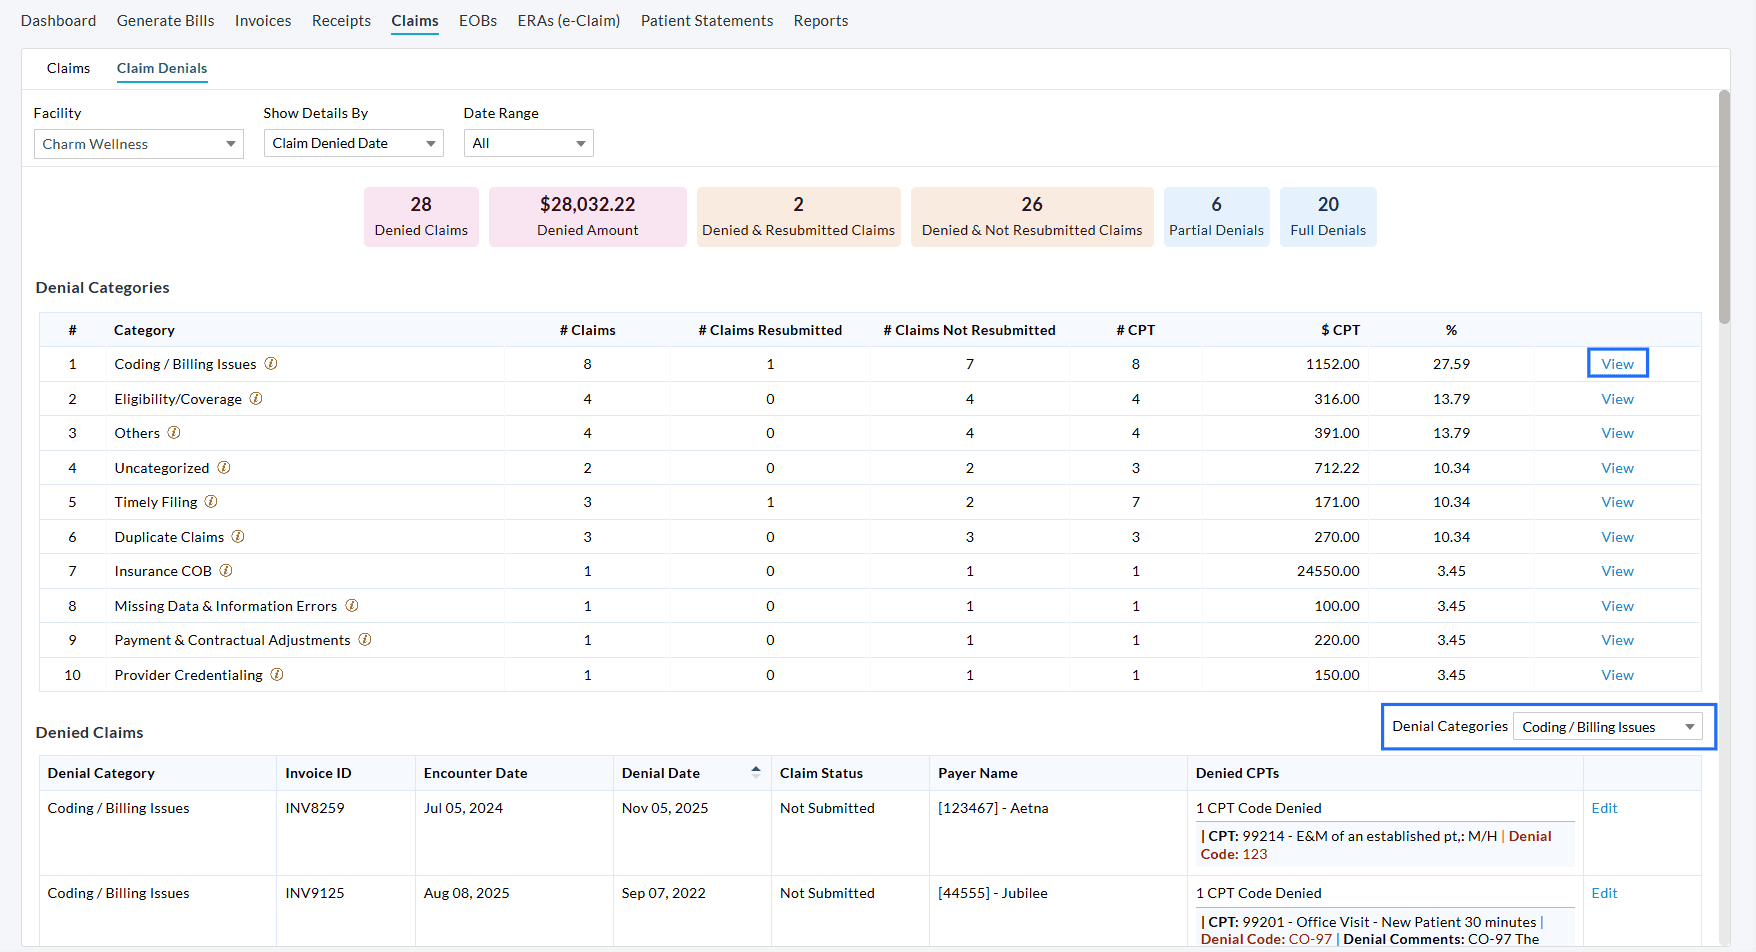
Click on the 'View' option next to a category to display the list of Claims denied under that category. You can review, edit, and manage these Claims as needed from the Claims List View.
Practices can:
- View a complete list of denied CPTs with descriptions and denial reason codes grouped by Denial Category
- Track the Top 10 denial codes for the Practice
- Analyze Payer-wise denial trends
a. Denied Claims List by Denial Category
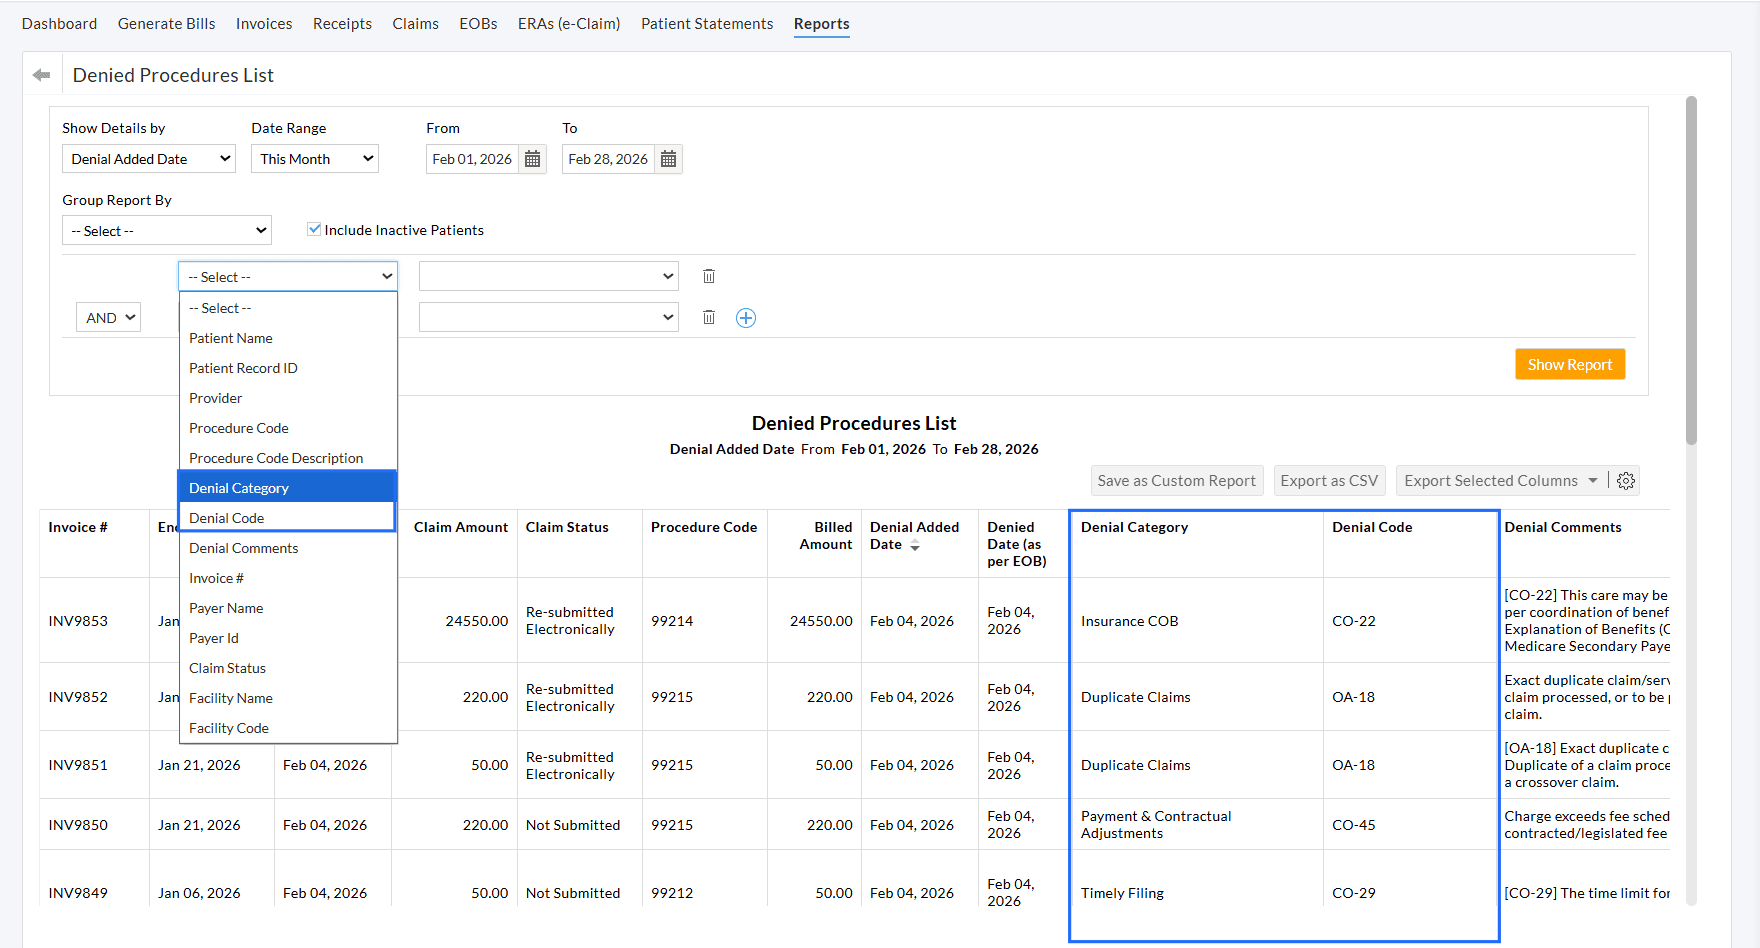
The Denied Claims section displays all denied Claims along with their associated denial details, including:
- Invoice ID and Encounter details
- Denial date and Claim status
- Payer details
- Number of denied CPTs
- CPT-level denial codes and comments
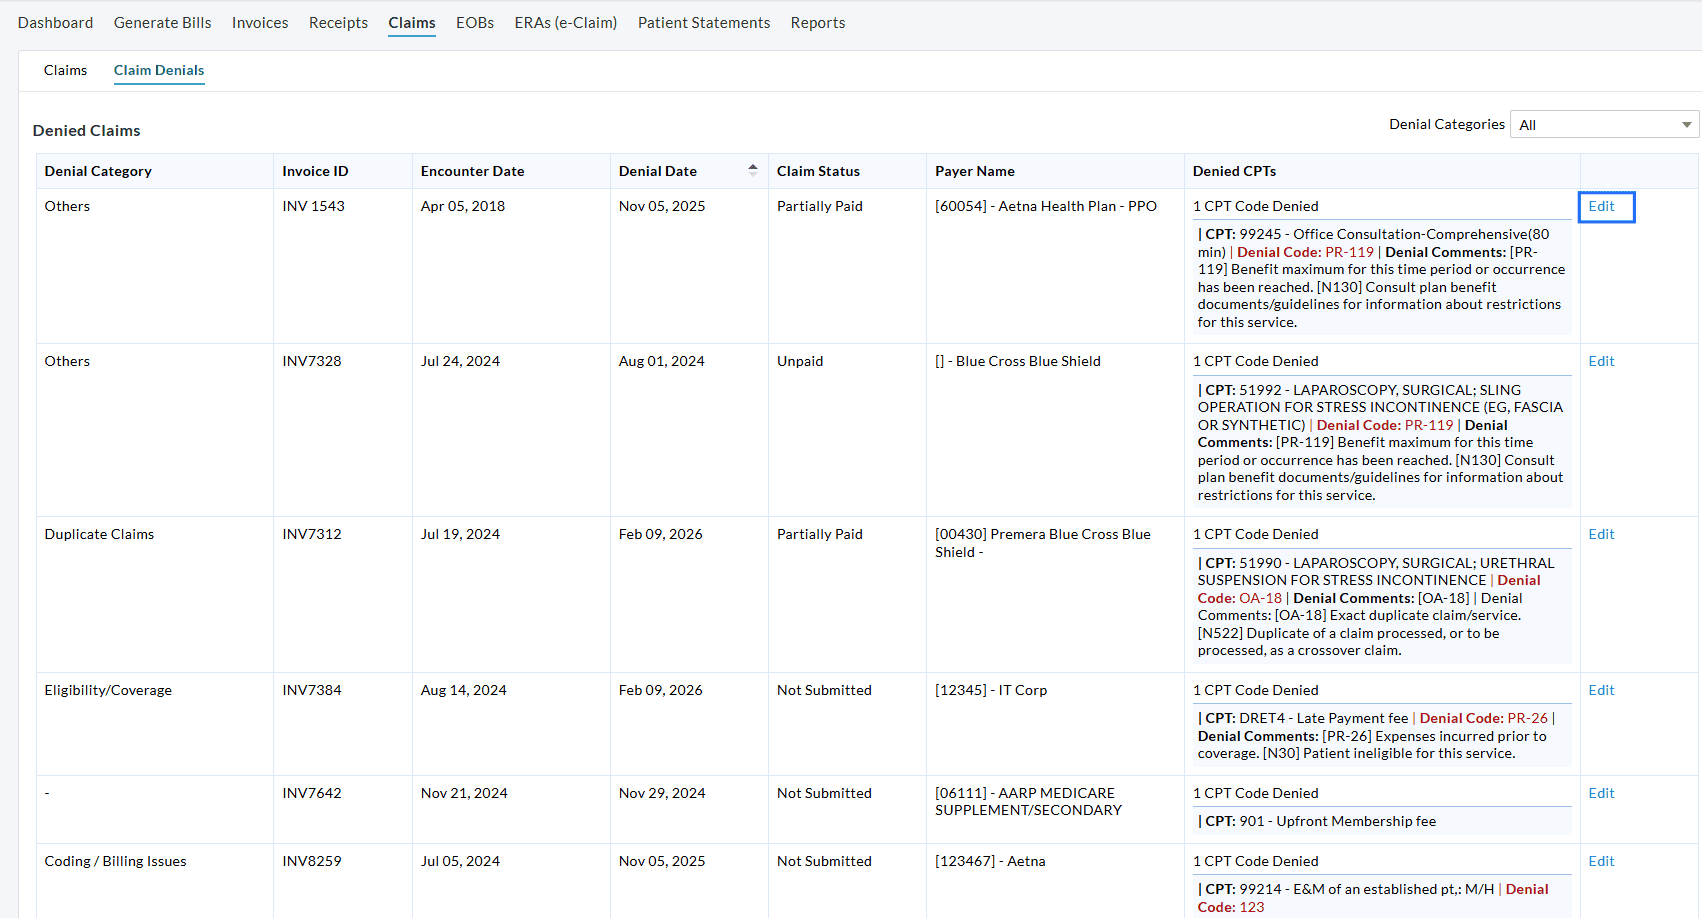
Click 'Edit' to view the Claim and make required corrections or resubmissions.
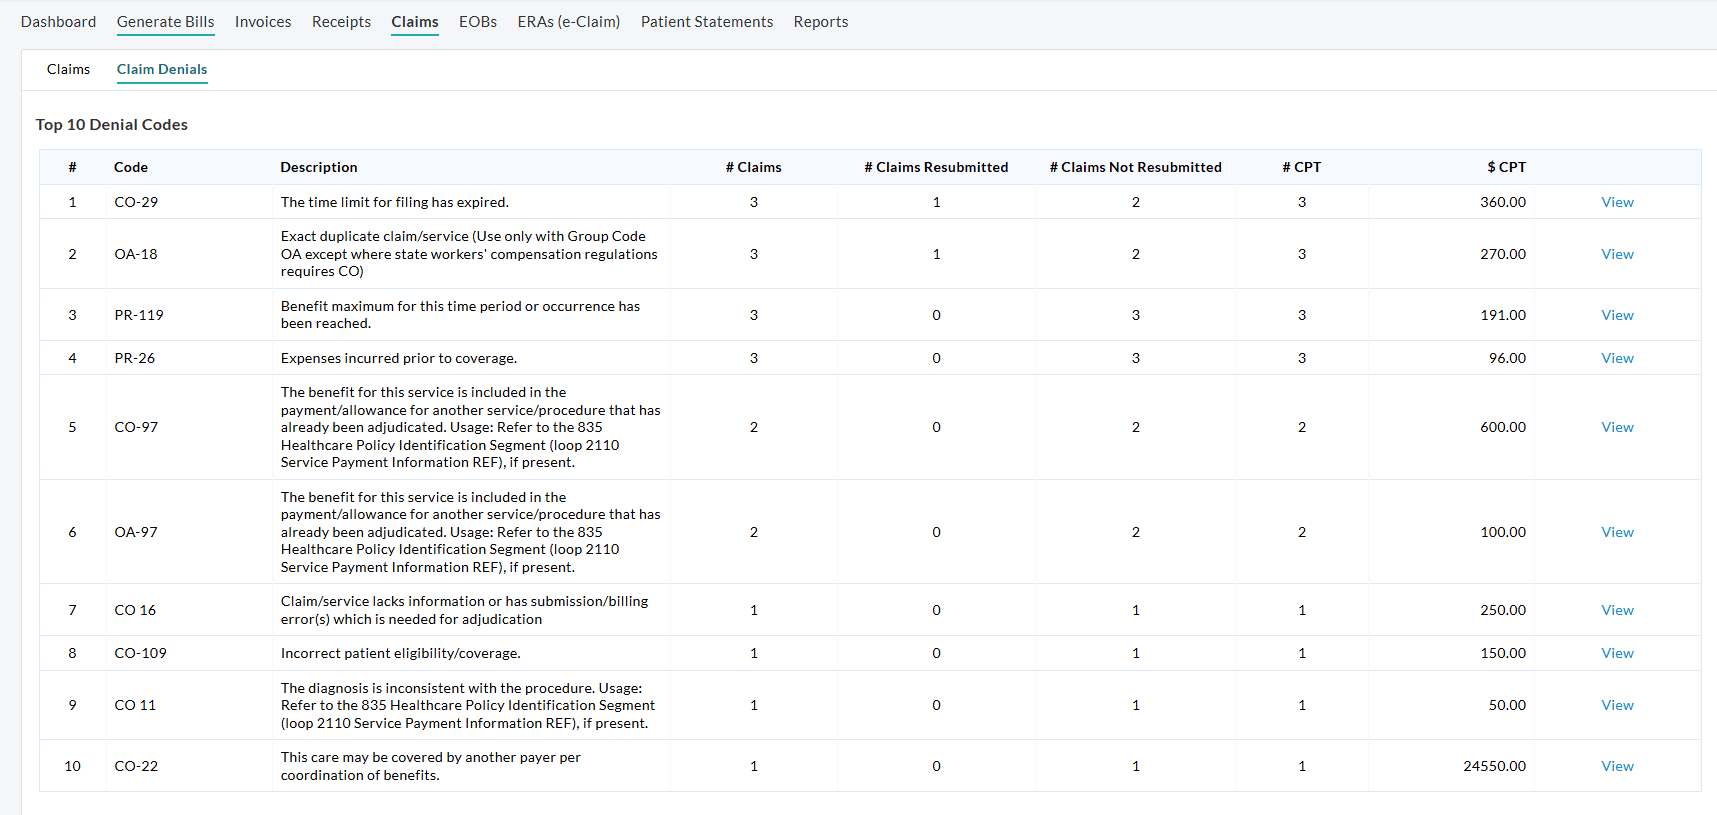
b. Top 10 Denial Codes
Identify the most frequently occurring denial codes for the selected Facility.
Clicking on the 'View' option displays the Claims grouped by Denial code in the Claims List View
c. Payer-Wise Denials
This section shows denial details grouped by Payer, enabling Practices to analyze the Payer-specific denial trends.
Click on the 'View' option to list all denied Claims grouped by Payer Code.

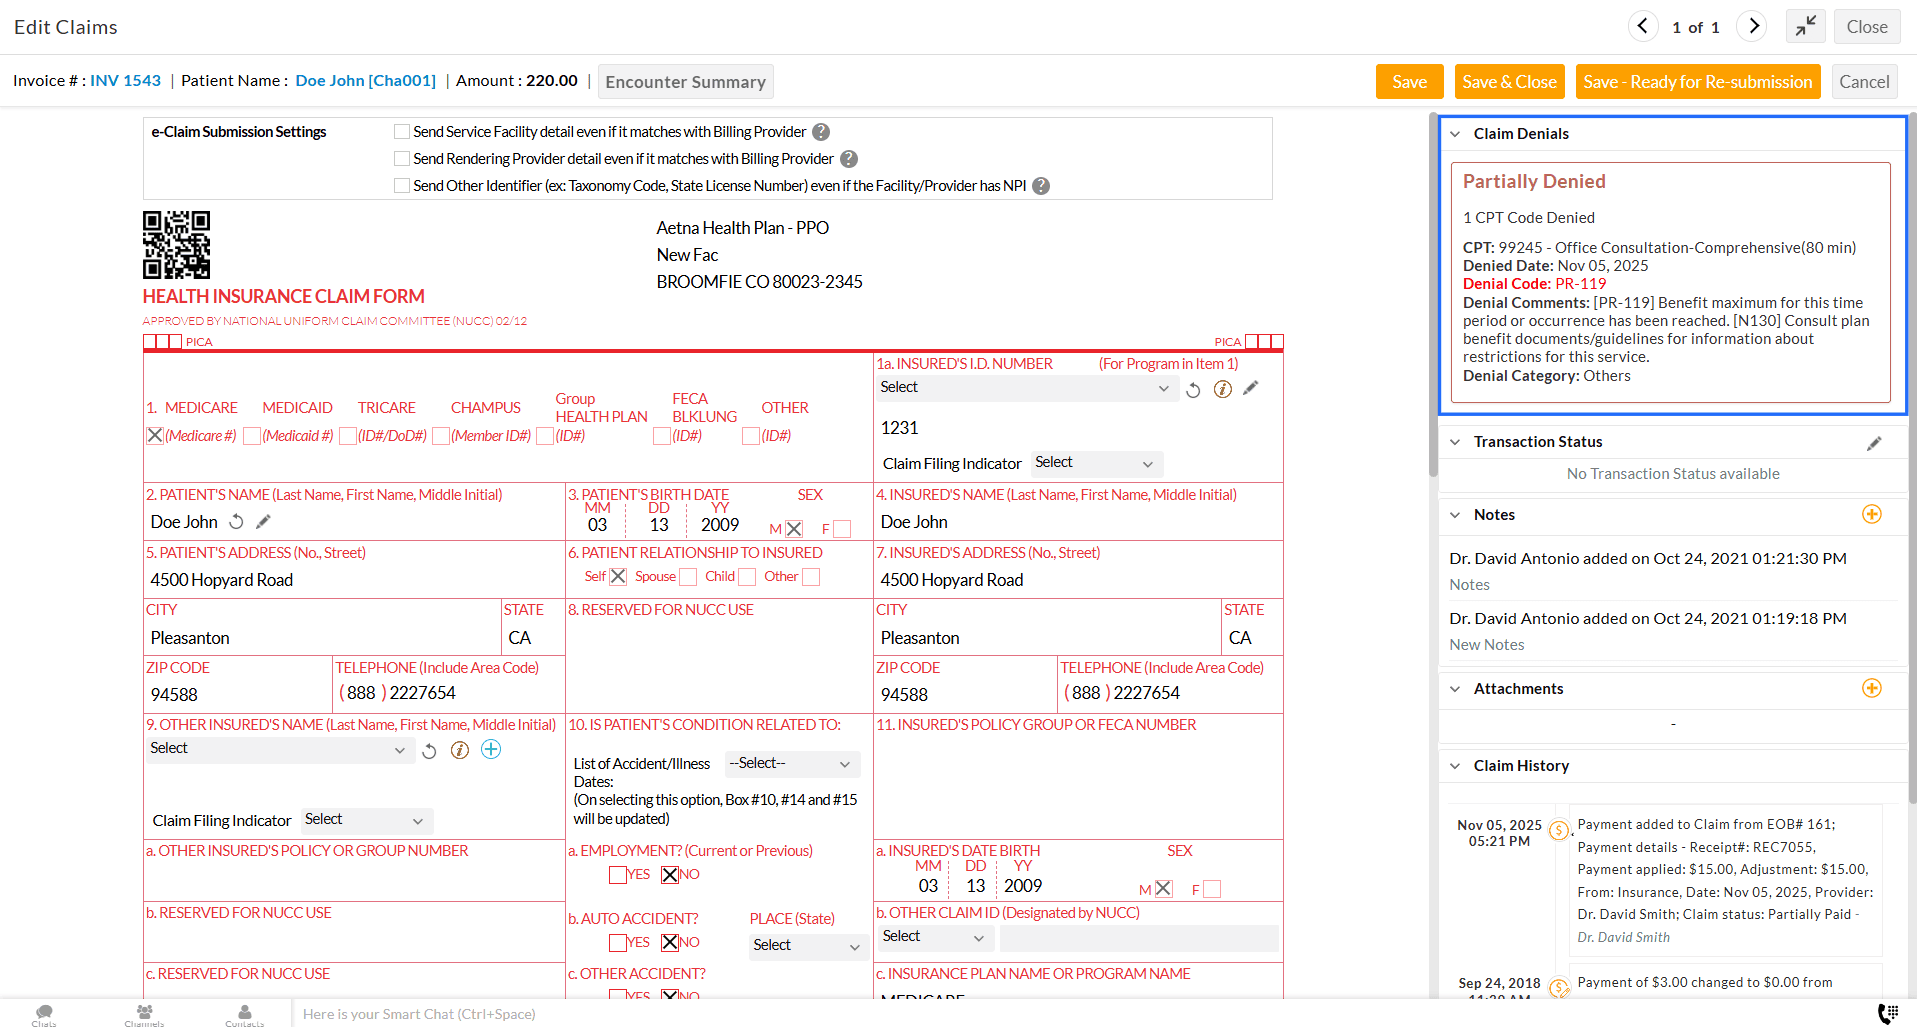
Practices can now view the Denials of a particular Claim in the right pane of the Claim view, including denied reasons and codes.
We have added new columns to the Denial Procedures List Report that include Denial codes and Denial reasons for improved reporting.
We hope this feature provides Practices with clearer denial trends and helps them track, analyze, and manage denials more effectively.
If you have any questions or feedback, please contact our support team at support@charmhealth.com.
We are excited to introduce the Group Messages feature, designed to streamline and enhance Patient communication across your Practice.
Group Messages facilitate secure, organized message communication between Patients and a predefined group of members within the Practice. Instead of messaging individual members, Patients can contact the right team, such as Billing, Front Office, or Lab Services, ensuring faster and more consistent responses.
Key Features:
- Allows Patients to contact the appropriate team for their inquiries
- Reduces response delays when individual members are unavailable
- Prevents misdirected or missed Patient communication
- Protects privacy by displaying the Group name instead of the individual member
- Enables Admins to assign, manage, and track the message progress
Follow the steps below to start using the Group Message feature in your Practice.
- Create Message Groups
- Configure PHR Messaging Settings
- Send Message to a Group (By Patient)
- Manage Group Messages
- Assign Role Privileges
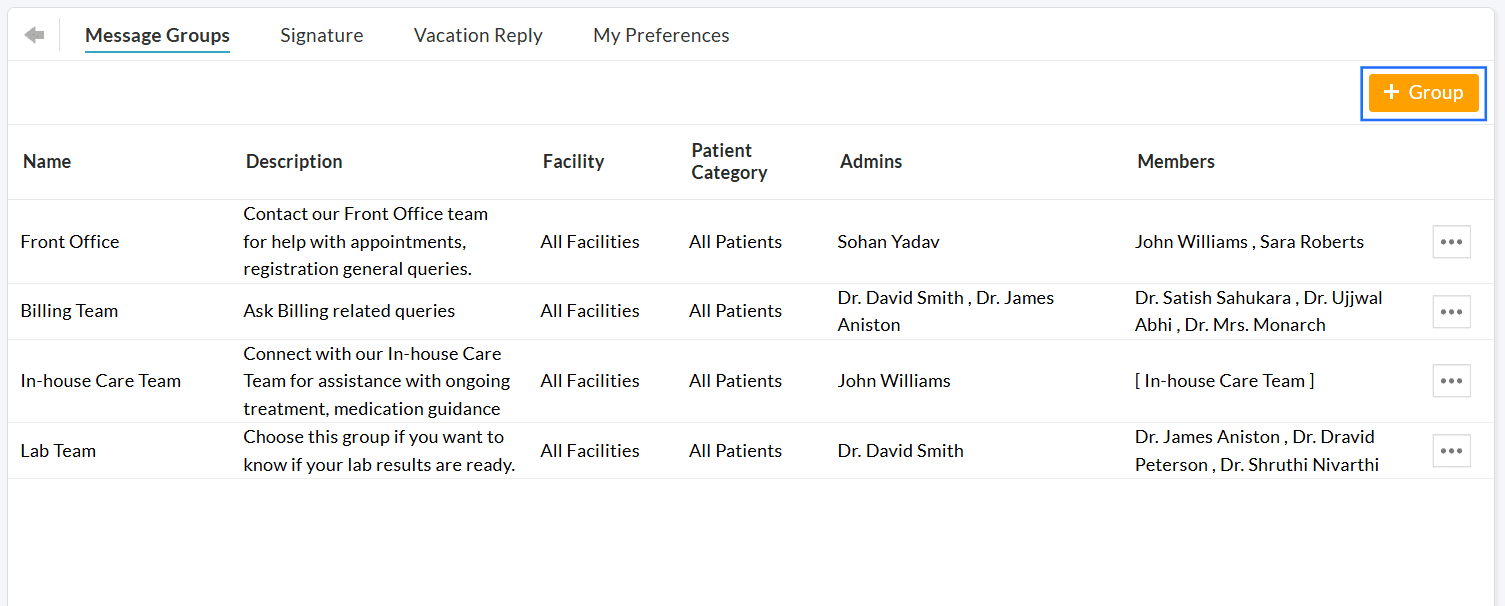
Members with the necessary role privilege can create message groups by following the steps below.
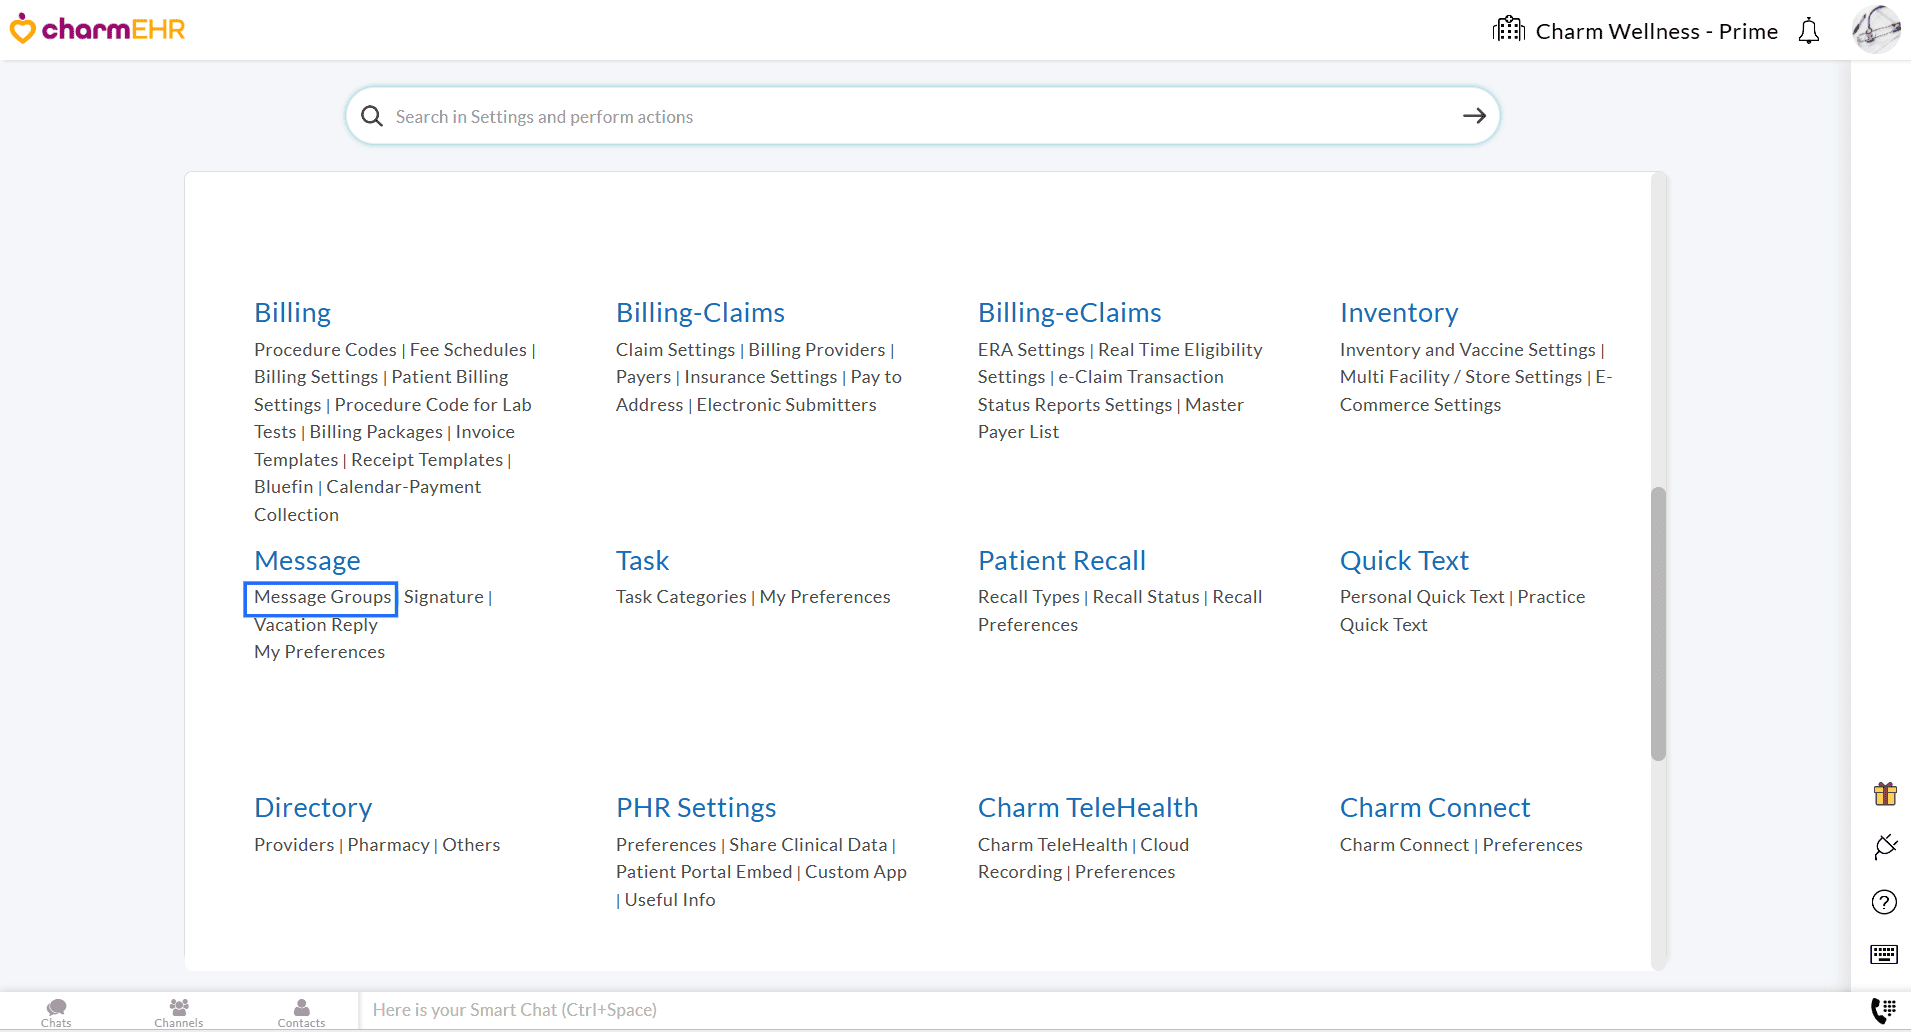
- Navigate to the 'Settings > Messages > Message Groups' section.
- Click on the '+ Group' button.
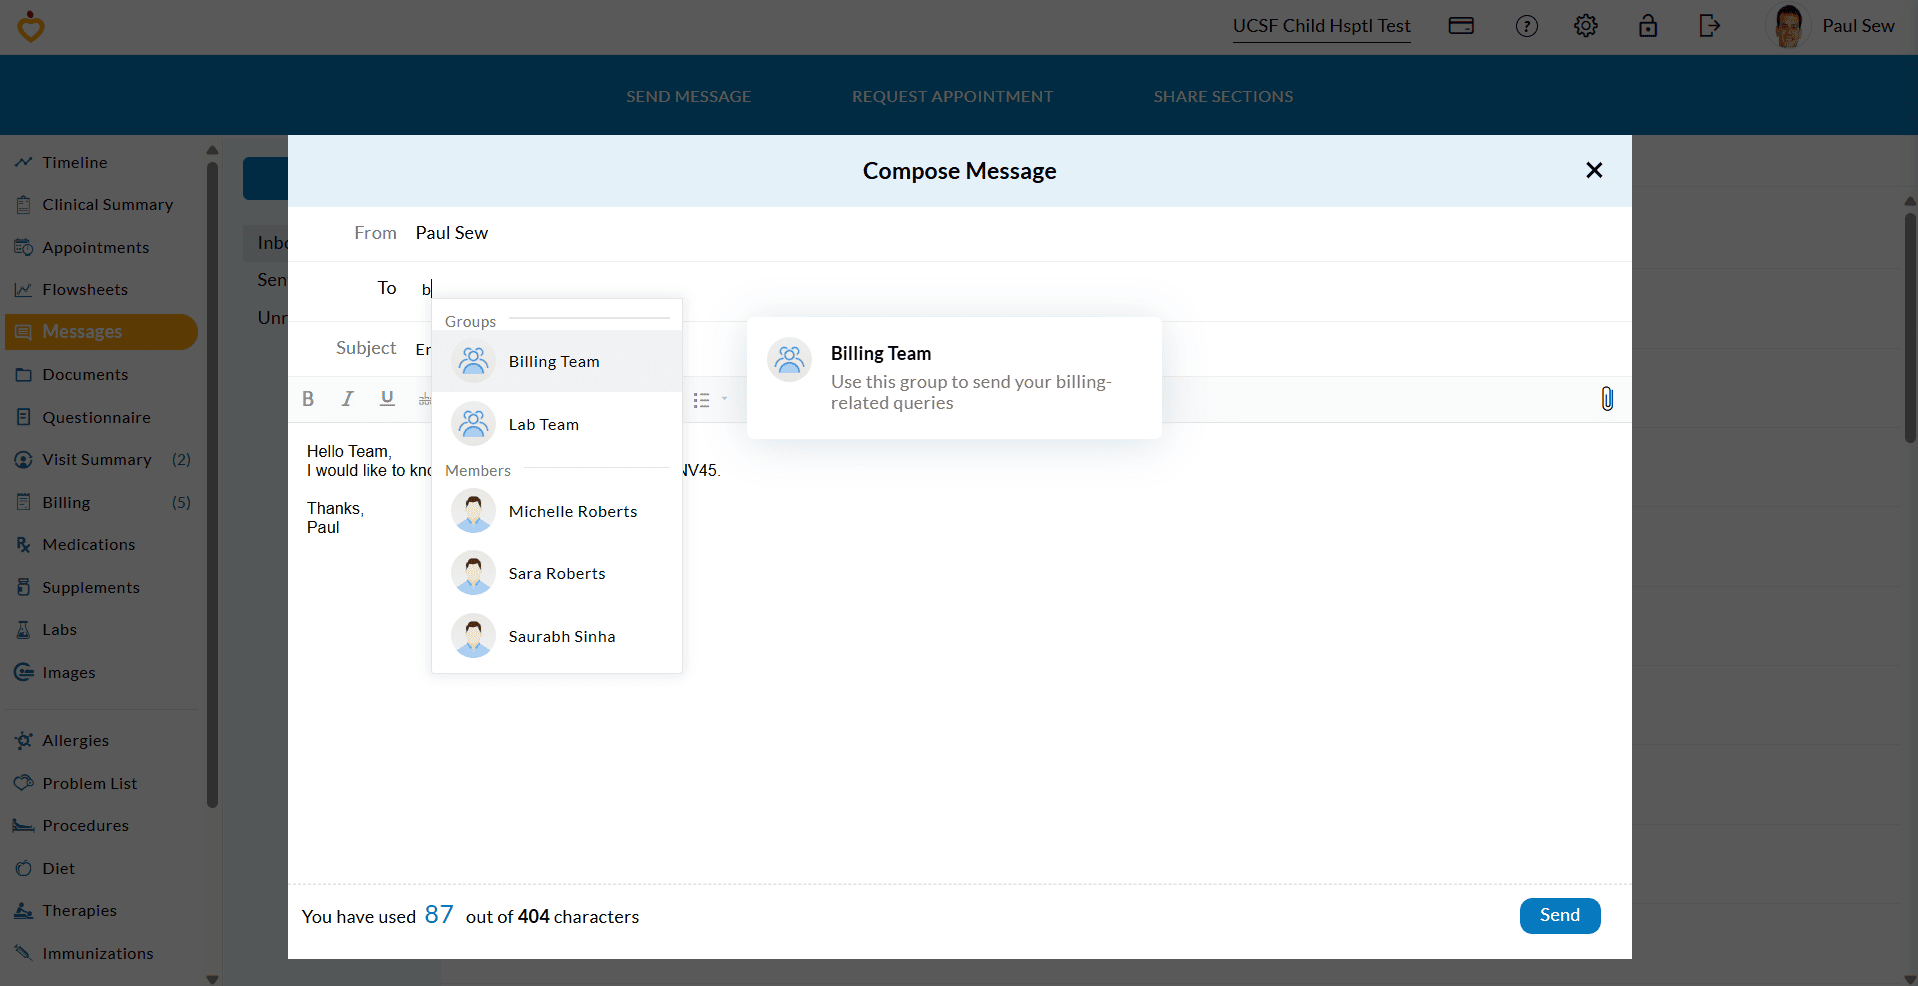
- Enter the Group Name (e.g., Billing Team) and give a short Group Description (e.g., Use this group to send your billing-related queries). This
description is shown when Patients compose a message from their PHR
account and helps them choose the right group for their inquiries.
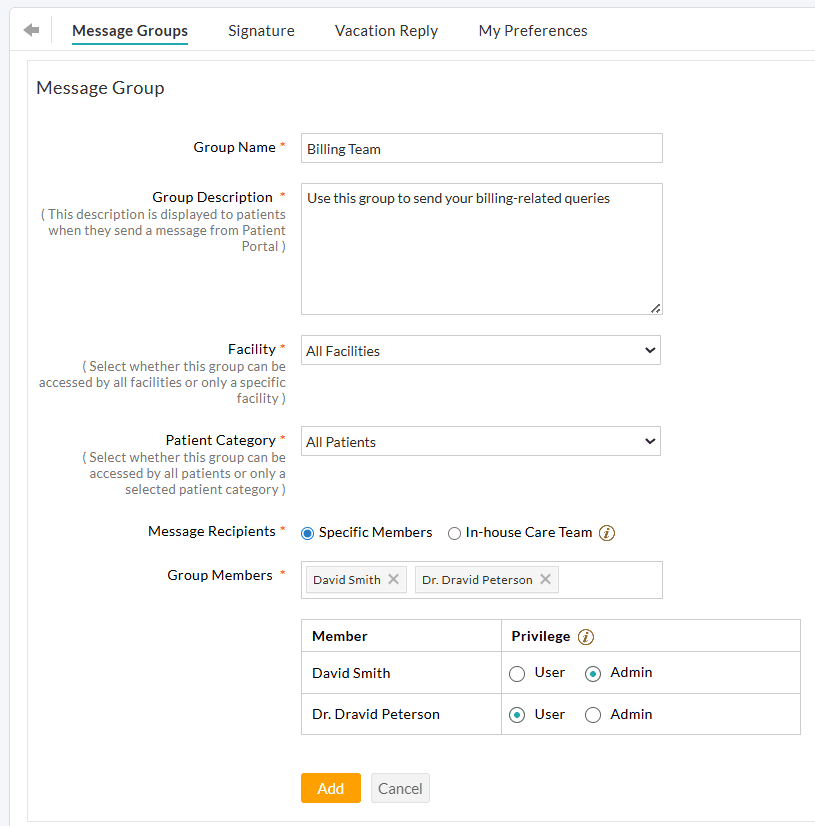
- If your Practice has multiple Facilities, choose whether the group is accessible to Patients of All Facilities or limited to a specific Facility.
- Select the Patient Category allowed to send messages to the group. You can choose from the following options.
- All Patients: The group is available to all Patients.
- Selected Category: The group is available only to a specific Patient Category. Select a specific Patient Category from the list. Only Patients who are a part of the selected Category can send messages to the group (e.g., Diabetes Program Patients).
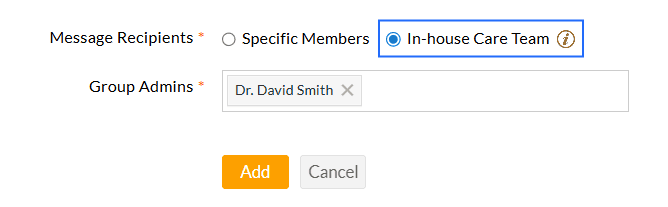
- Choose the Message Recipients for the group. You can select either 'Specific Members' or 'In-house Care Team'.
- Specific Members: Search and add the Practice members to the message group. You can
assign one of the following privileges to each member.
- Admin: Members with the 'Admin' privilege can view all messages sent to the group, assign or reassign messages to other group members or to themselves, and track the progress.
- User: Members with the 'User' privilege can view and respond only to the messages assigned to them.

- In-house Care Team: When this option is selected, messages from Patients are sent
exclusively to their In-house Care Team members. Only Care Team members
can view and respond to the messages. However, for administrative
purposes, any Practice member can be assigned as a Group Admin and can access all Patients' messages, even if they are not a part of the Patient's In-house Care Team.
- Specific Members: Search and add the Practice members to the message group. You can
assign one of the following privileges to each member.
- Click on the 'Add' button to create the group.
Note:
- A maximum of 10 members can be added to a group.
- Each group must have a unique name.
- Every group must include at least one Admin.
- This feature is available only to Practices subscribed to the paid plan.
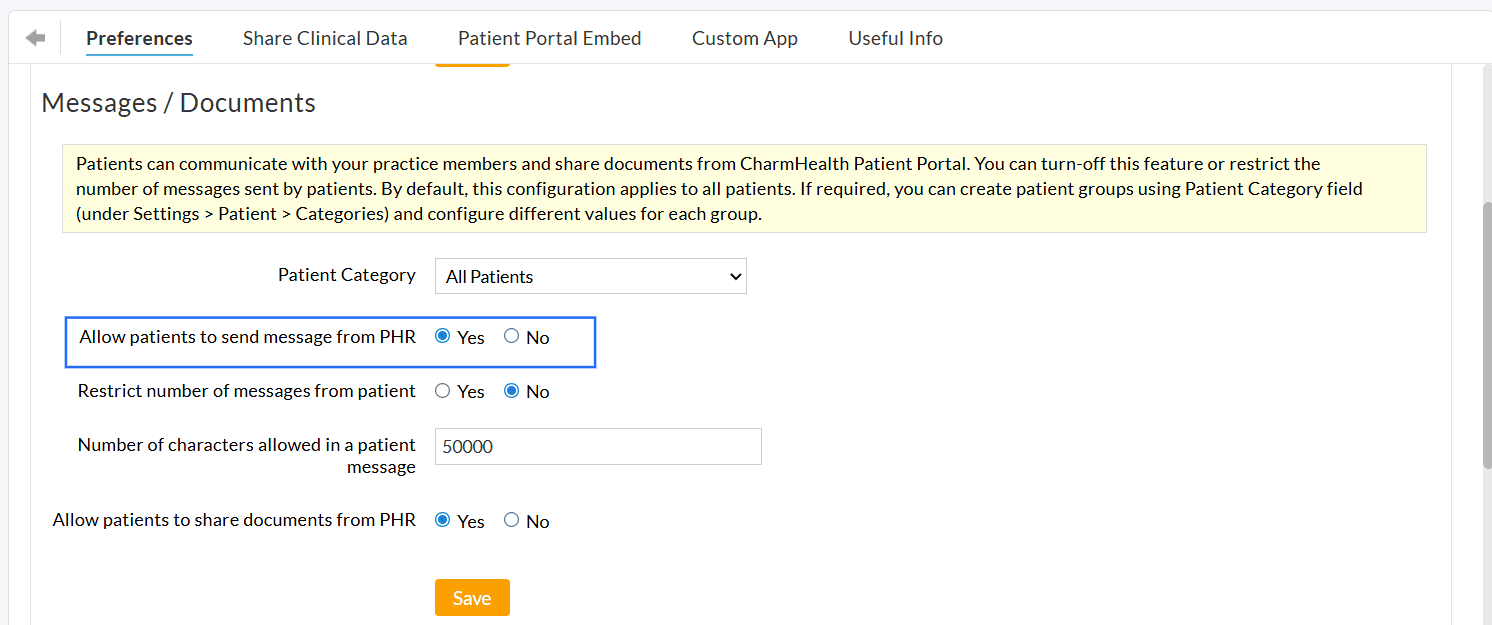
Follow the steps below to allow Patients to send messages through their Charm PHR account.
Navigate to the 'Settings > PHR Settings > Preferences > Message/Documents' section and choose 'Yes' for the 'Allow patients to send messages from PHR' option.
To configure messaging preferences, go to the 'Settings > PHR Settings > Preferences > Patient Message Preferences' section and choose either one of the following options:
- Groups Only - Patients can send messages only to the groups created in your Practice.
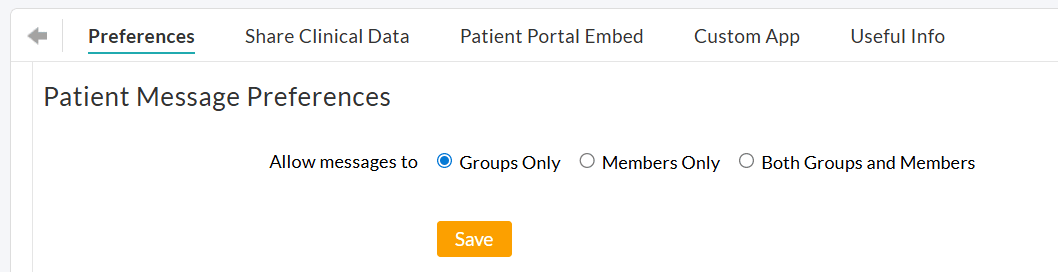
- Members Only - Patients can message only the individual Practice members.
- Both Groups and Members - Patients can message both Groups and individual Practice members.
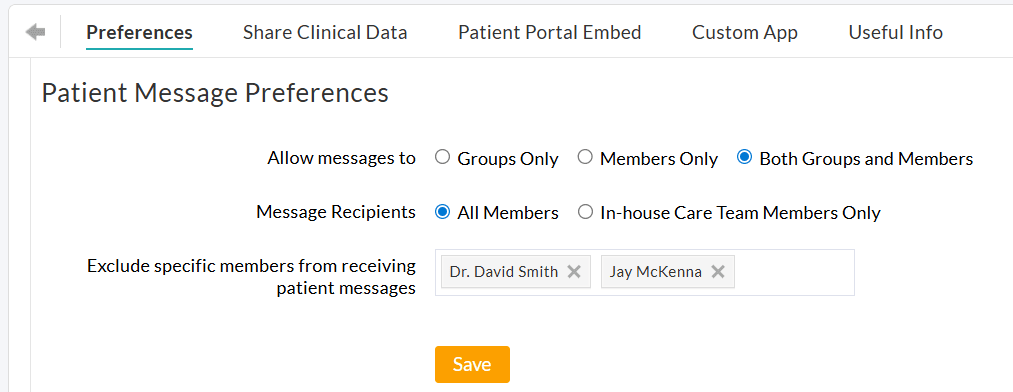
When enabling the Members Only or Both Groups and Members option, select the message recipients as either All Practice Members or only the Patient's In-house Care Team Members.
You can also exclude specific members from receiving Patient messages.
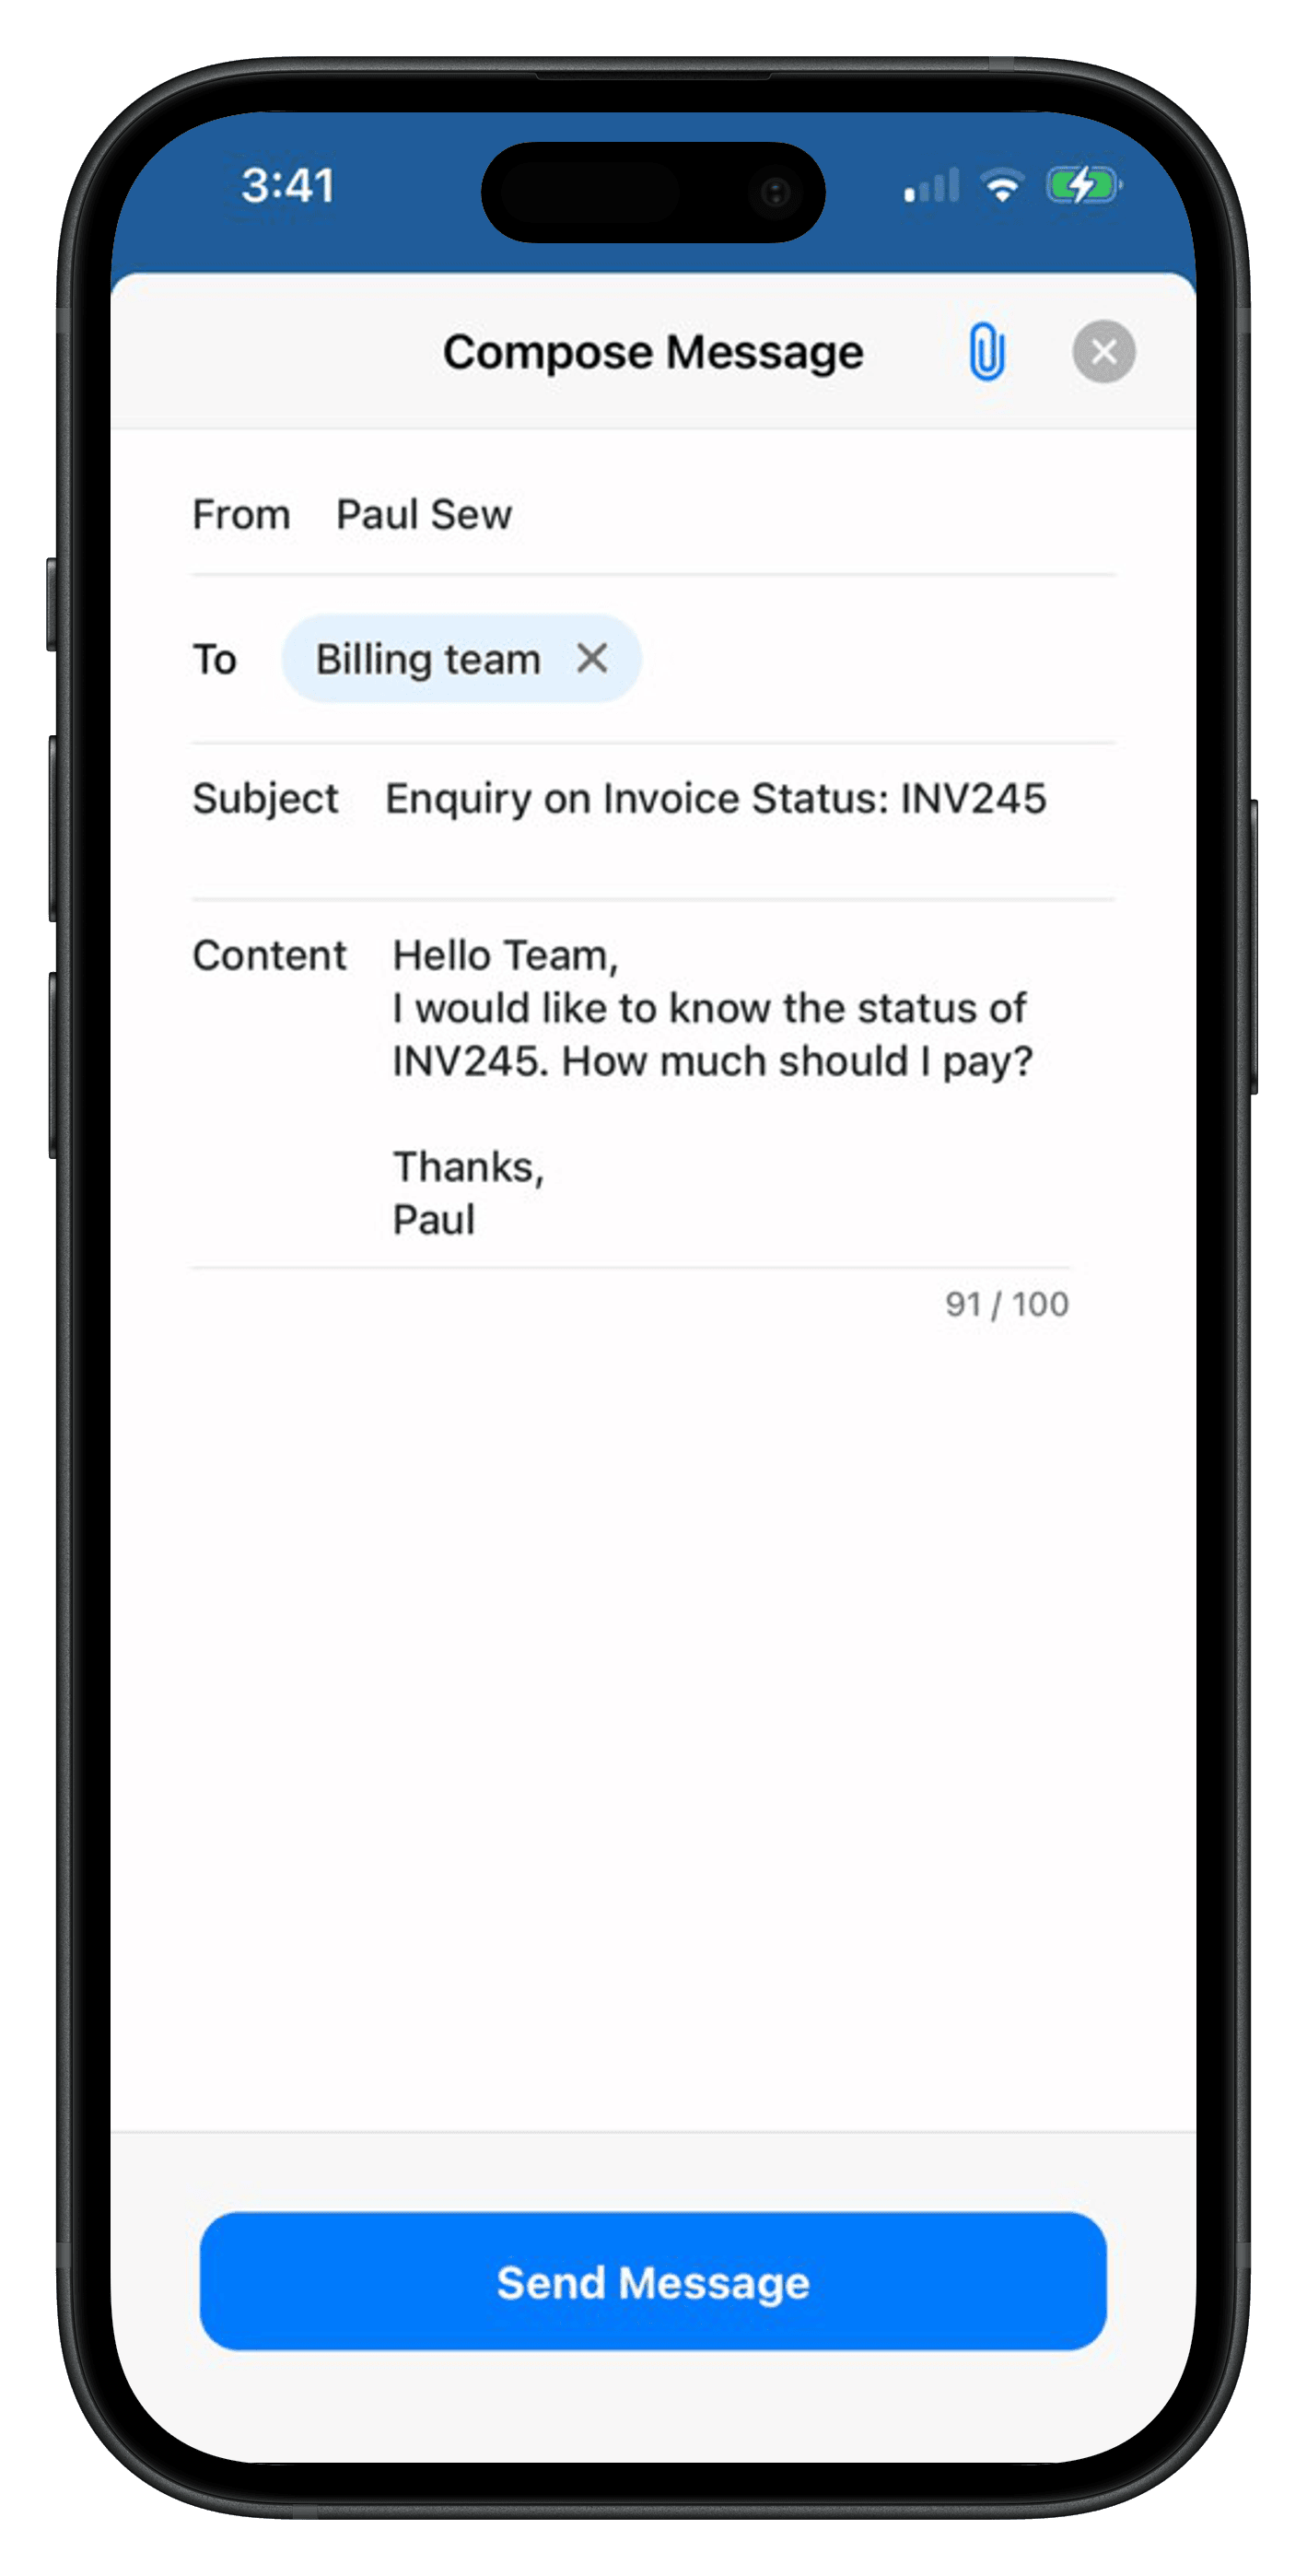
Based on your preferences configured in the steps above, Patients can send Messages to a group and/or an individual Practice member from their Charm PHR account by following the steps below.
- Log in to the Charm PHR account.
- Click on the 'Send Message' button in the Quick Menu bar.
- In the 'To' field, the recipients are displayed based on the Practice configuration.
- If the 'Group Only' option is enabled, only message groups are displayed.
- If the 'Members Only' option is enabled, only the individual Practice members are shown.
- If the 'Both Groups and Members' option is enabled, both groups and individual Practice members are shown.
For groups, only those matching the Patient’s Facility and Patient Category (if configured) are displayed.
For members, only those allowed by the 'Message Recipient' settings (All Members or In-house Care Team Only) are shown.
Any excluded members will not appear in the recipient list.
- Patients can select a group that best suits their requirements.
- Compose and send the message to the group.
Patients can view the Practice responses under the 'Messages > Inbox or Unread' section. They can also search for the responses using the Group Name.
From the mPHR App
Patients can also send Group messages from the Charm mPHR app.

From Custom Branded App
Group Messages are also supported in the Custom Branded Apps with the same workflow.
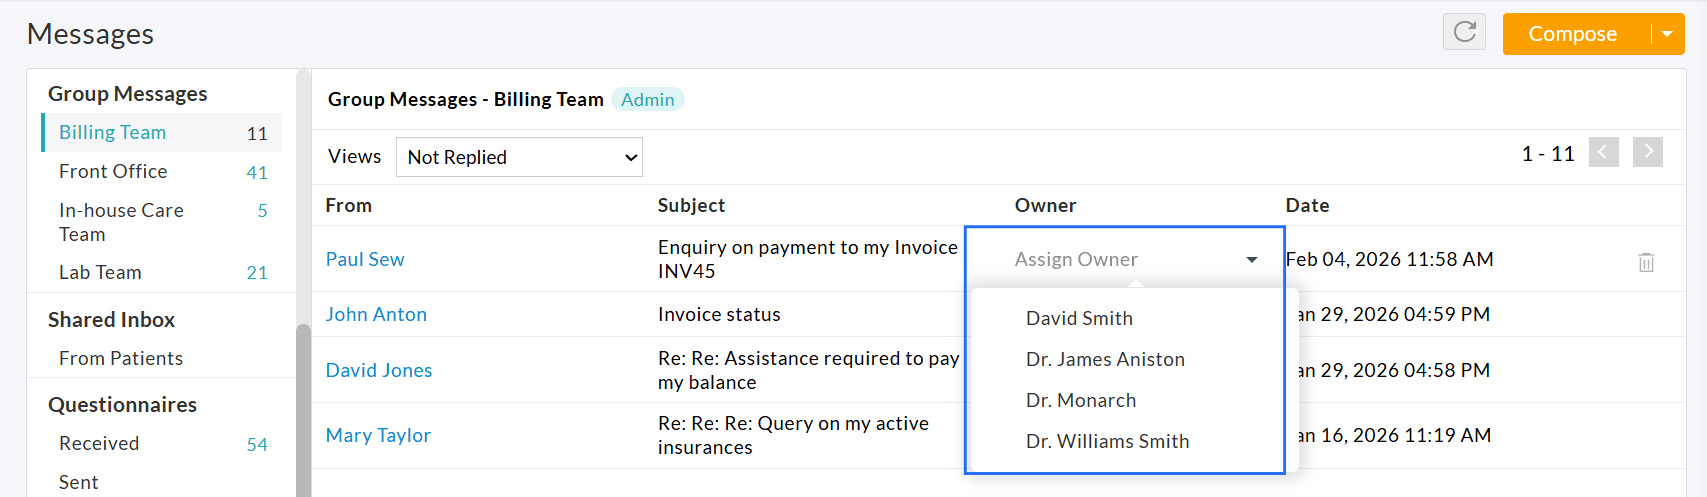
Practice Members can manage Group Messages from the 'Messages > Group Messages' section.
- All groups associated with the member are listed here.
- An 'Admin' tag appears next to the Group name for members with Admin privileges.
- Selecting a group displays all Patient messages sent to that group.
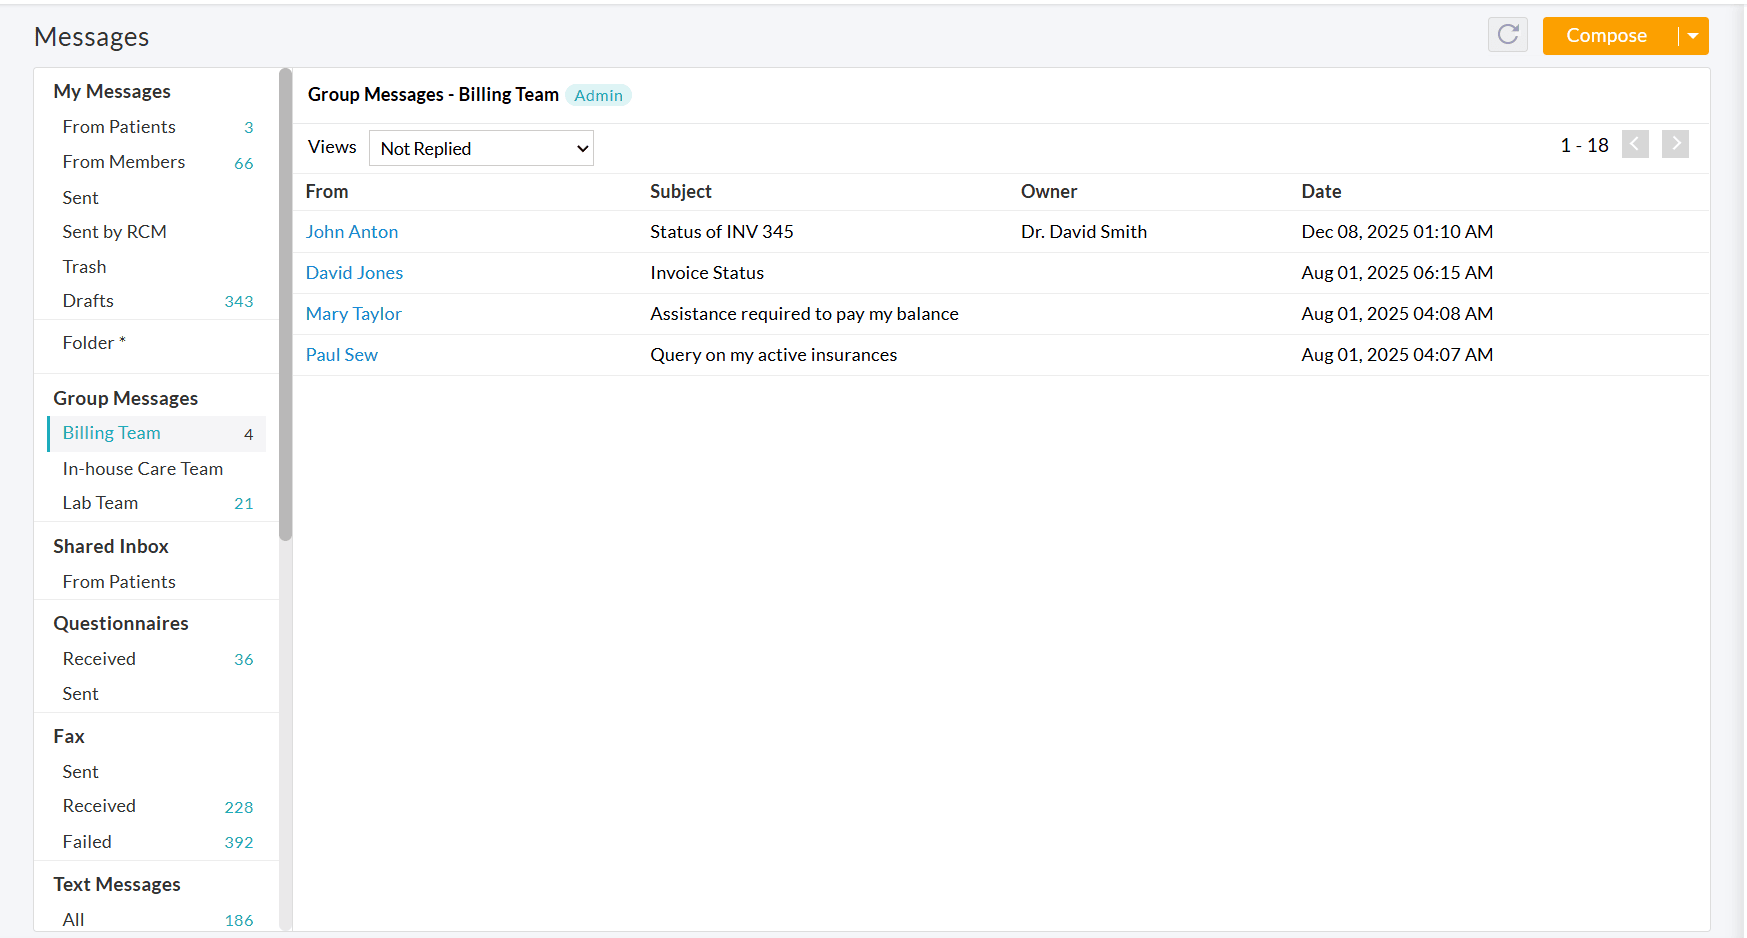
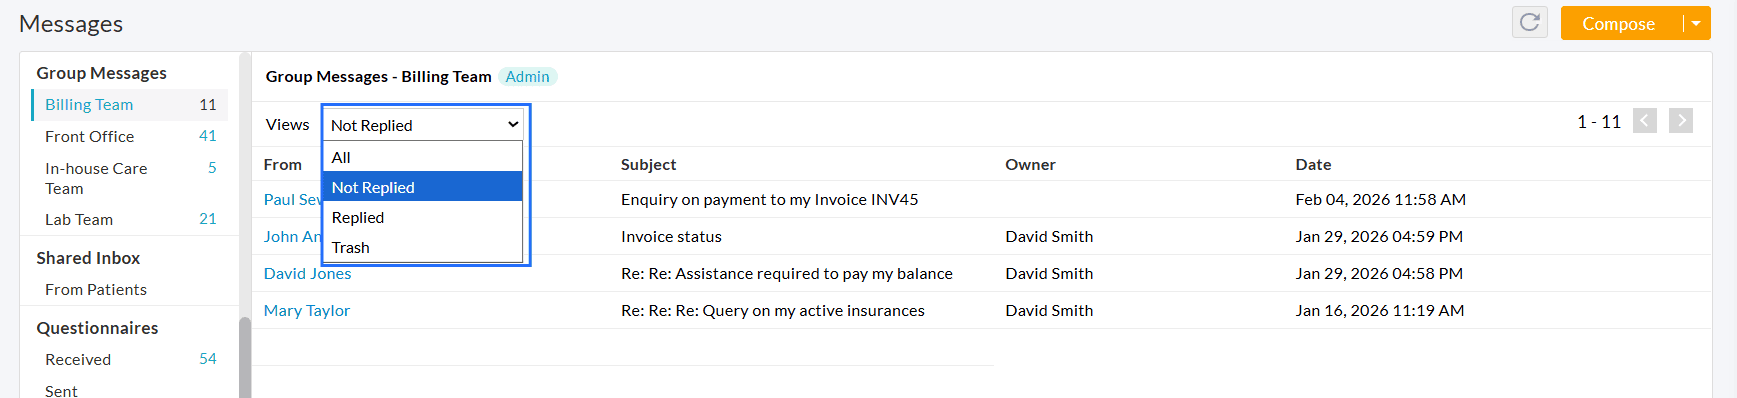
Messages can be filtered by status: All, Not Replied, Replied, or Trash. This feature helps members manage Patient messages effectively.
Depending on the configured privileges, members of the Practice can perform the following actions.
If you are an Admin:
- View all messages received in that group
- Reply to Patient messages
- Assign or reassign messages to group members
If you are a User:
- View only the messages assigned to you.
- Respond to the assigned messages.
If you are a part of the Patient's In-house Care Team:
- View and reply to your Patient's messages.
Note: All replies to Patients are sent using the Group name, ensuring individual staff identities remain private.
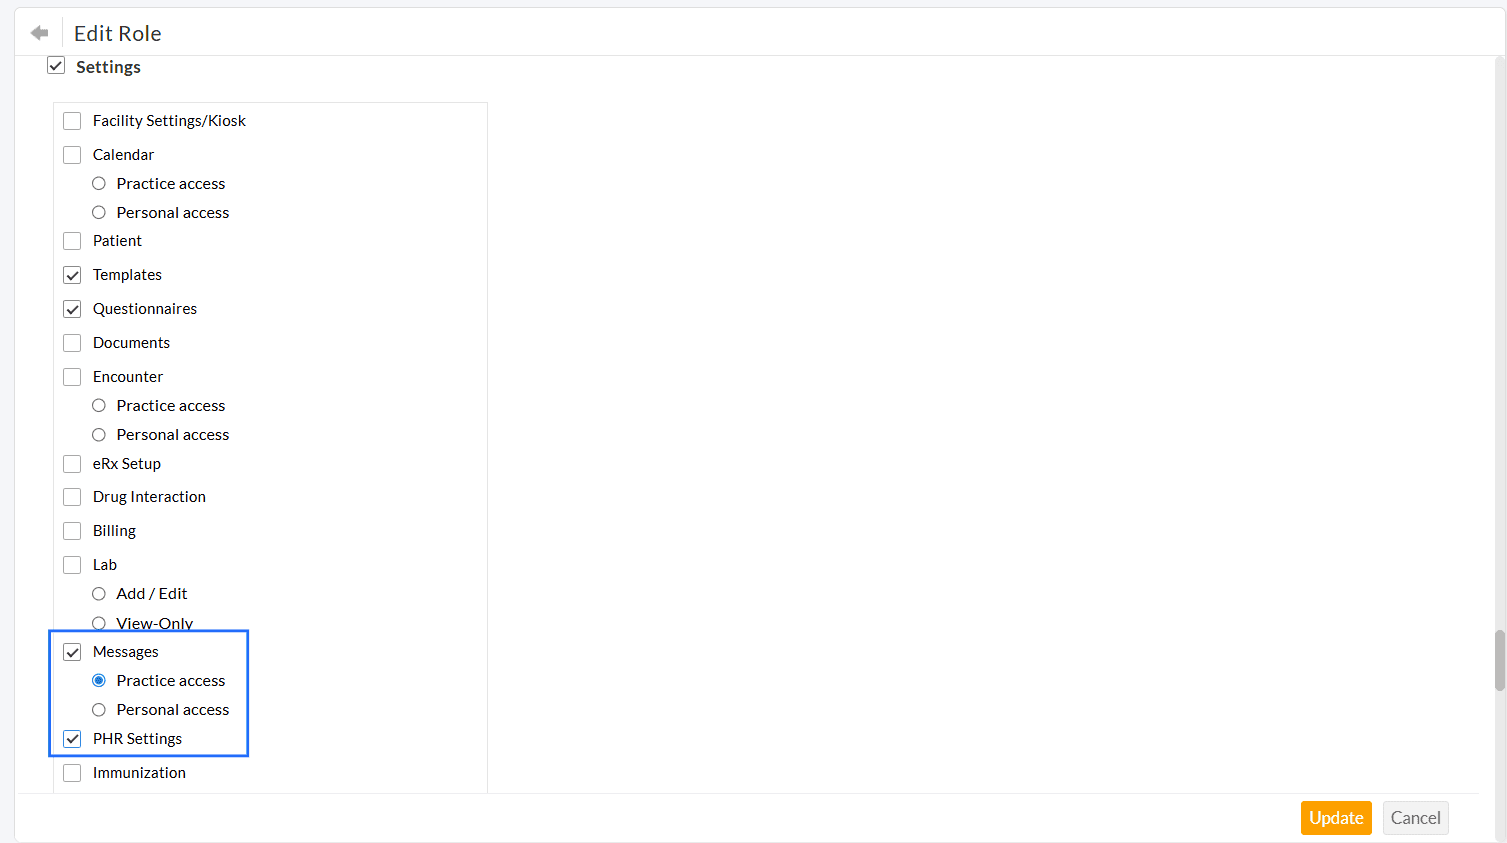
The Practice Admin can configure the role privileges for the Practice members to manage Group Messages under the 'Settings > Facility > Roles' section.
You can edit a role and enable the following privileges.
- Settings > Messages > Practice Access privilege allows members to create and edit Message Groups within the Settings.
- Settings > PHR Settings privilege allows members to edit the PHR Settings.
We hope this feature will help Practices improve Patient communication and facilitate better collaboration among the care teams.
If you have any questions or feedback, please contact our support team at support@charmhealth.com.
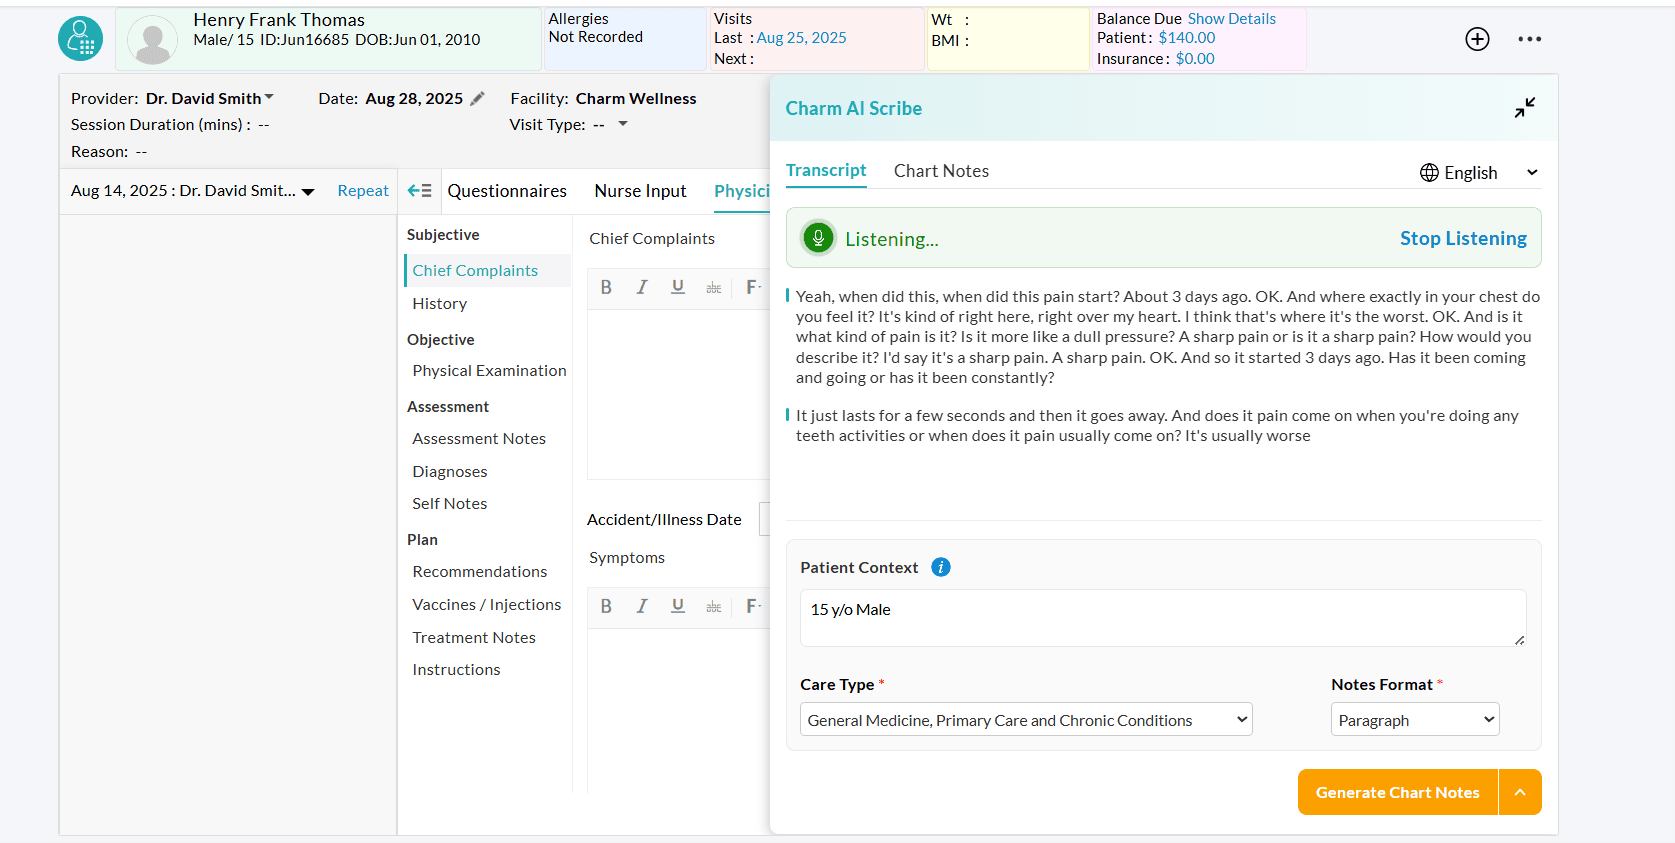
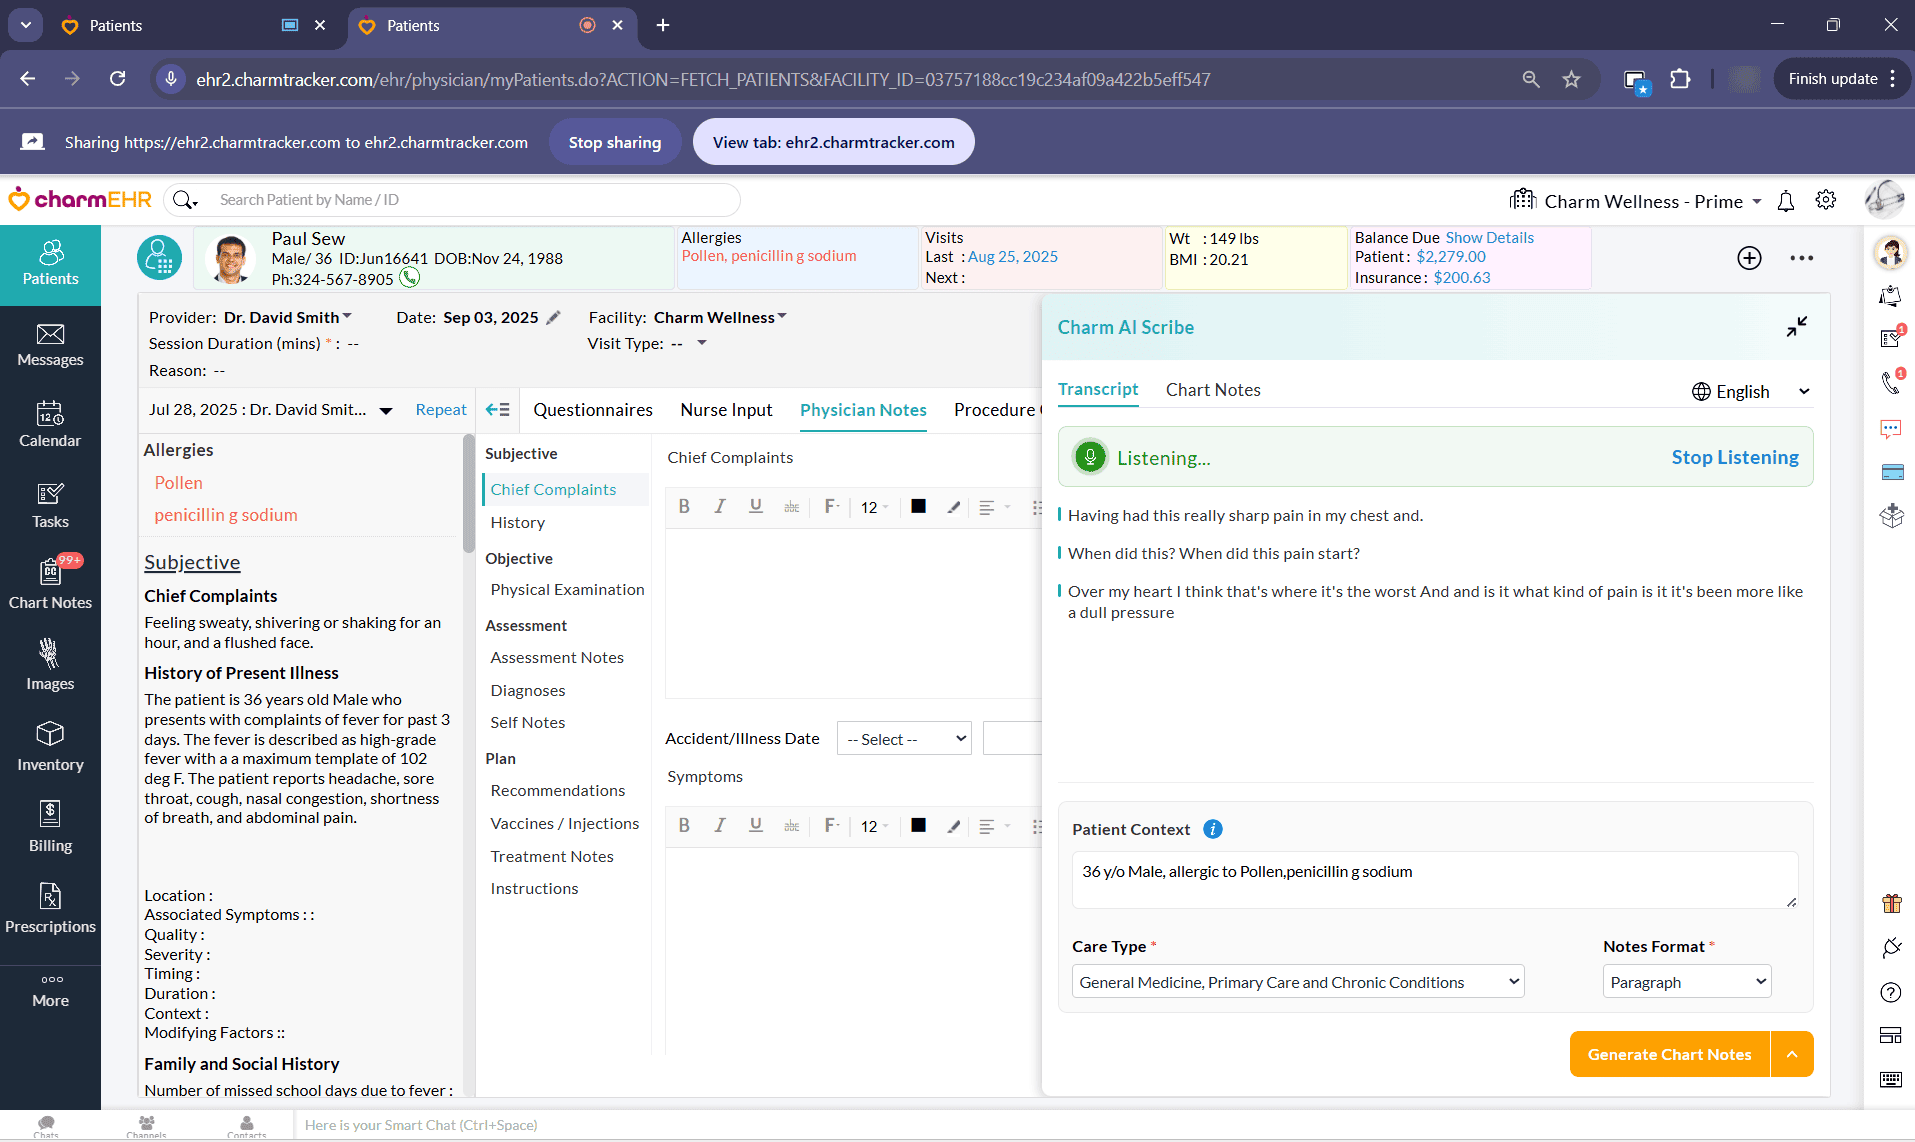
We are excited to announce the latest enhancements to Charm AI Scribe, our innovative add-on feature designed to streamline medical charting by transcribing Patient-Provider conversations in real time.
- Section-wise Customization for the Generated Chart Note
- Refine Generated Chart Notes
- Multi-language Support in Transcribing
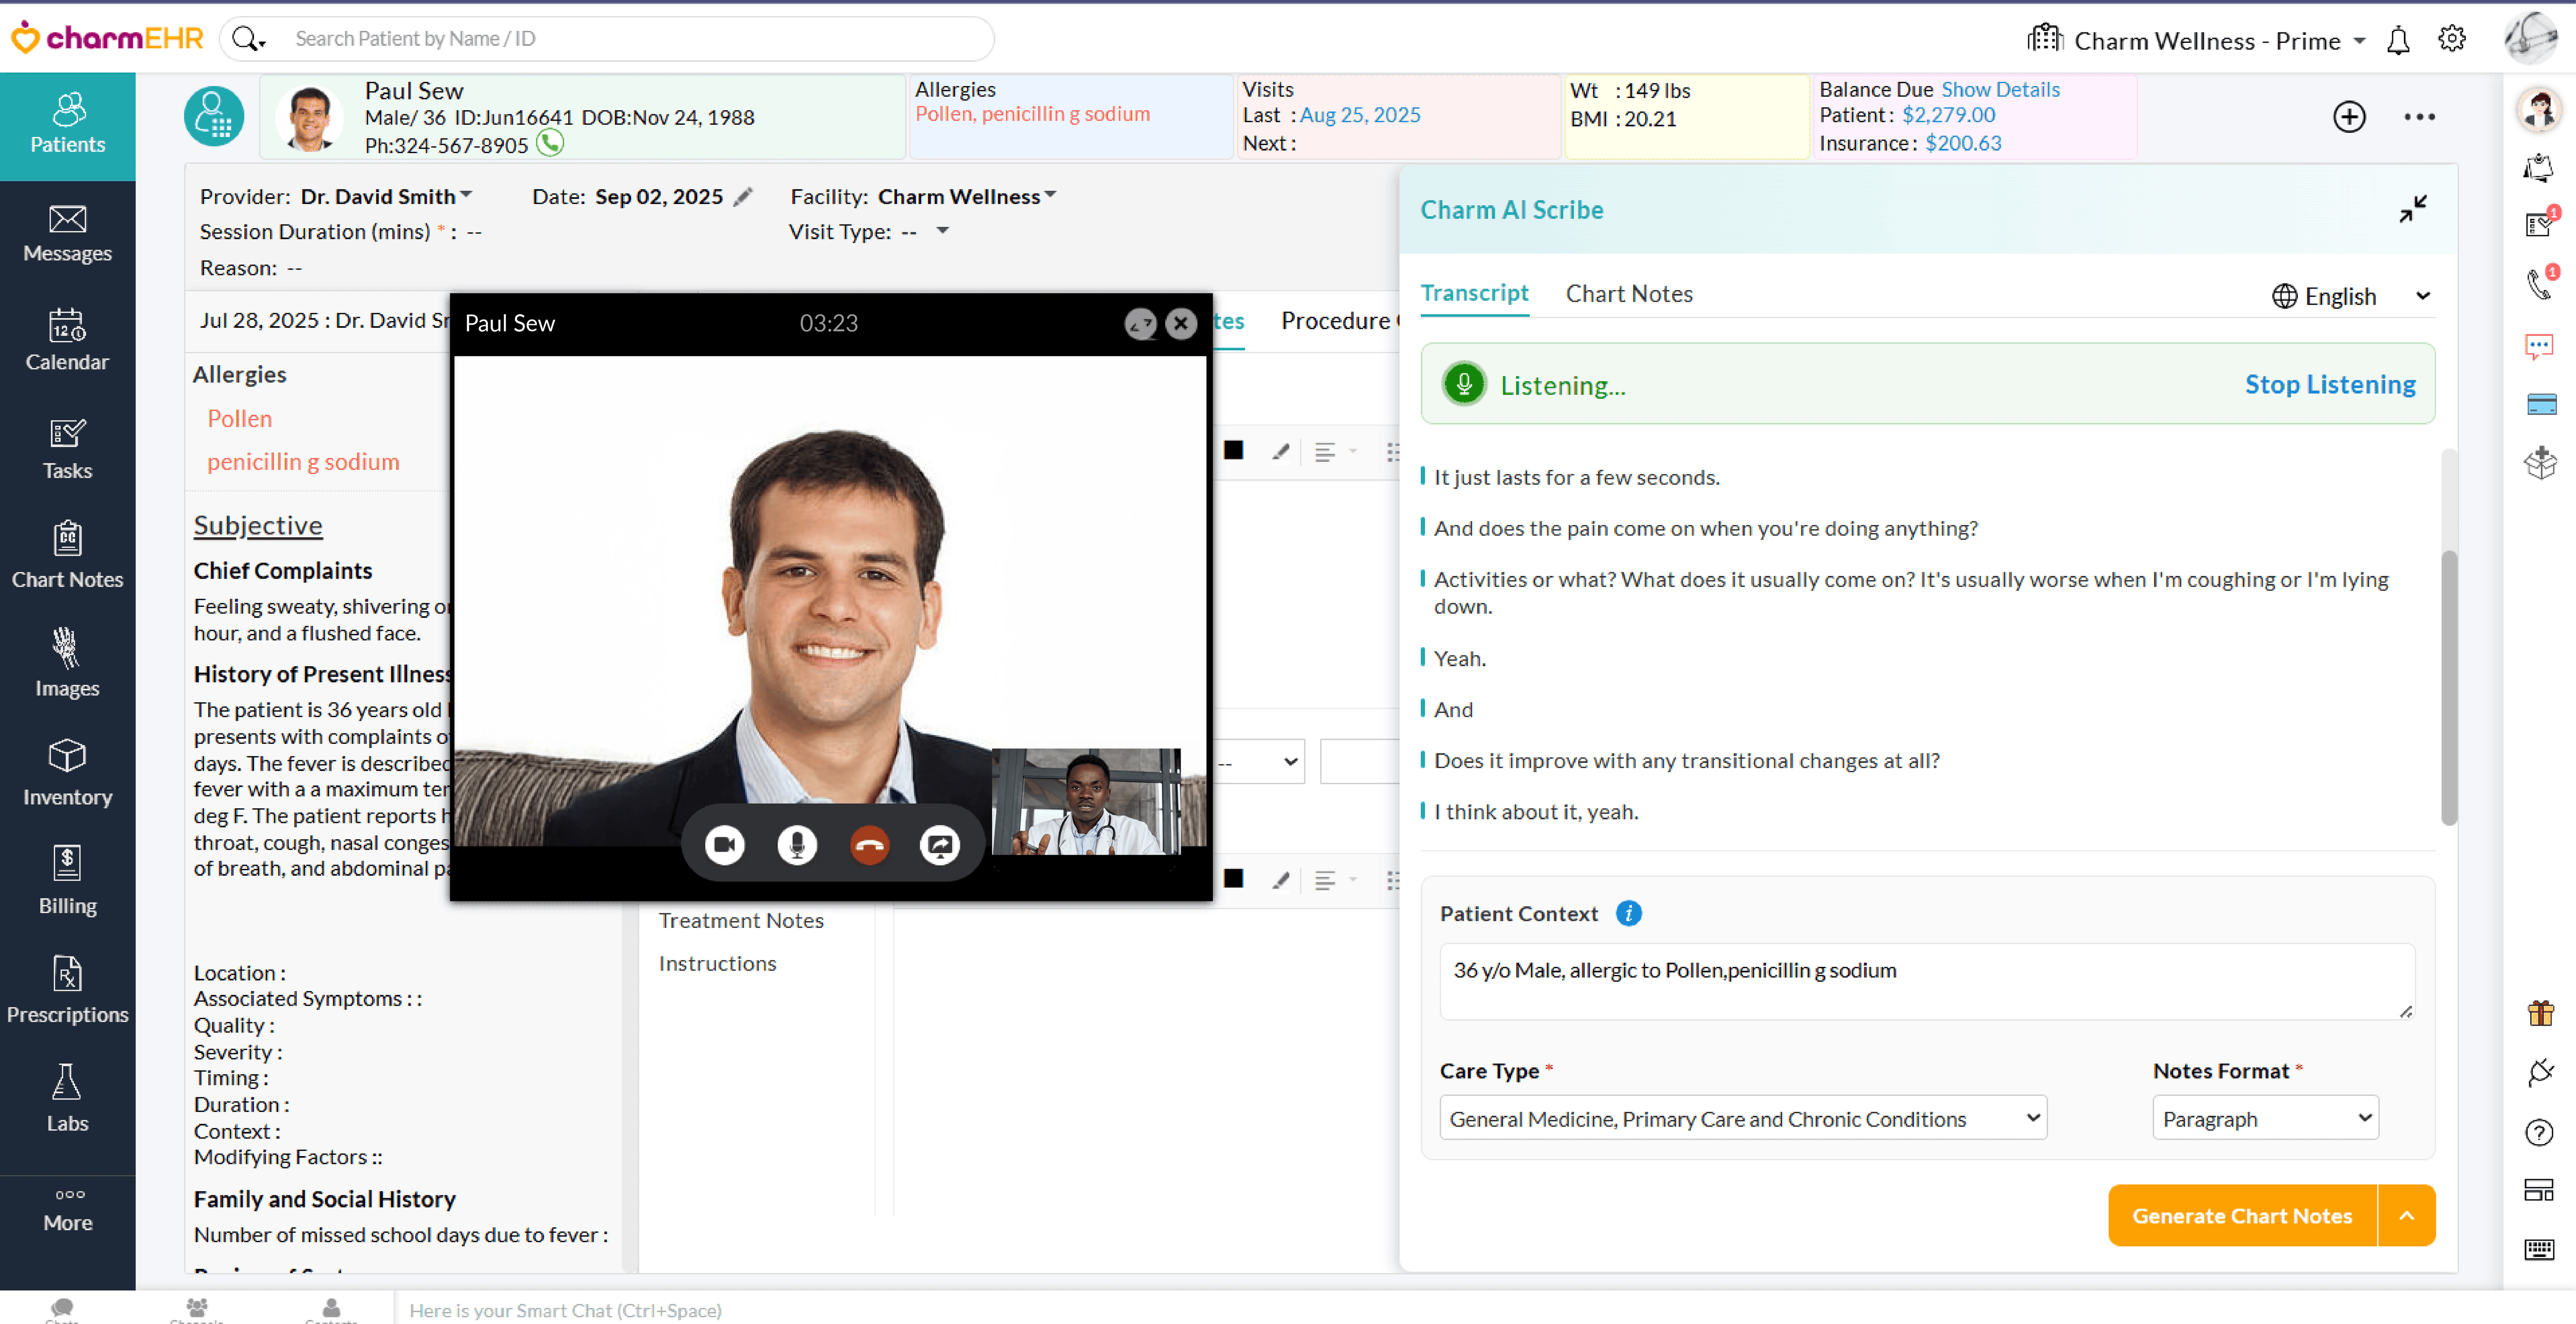
Providers can now tailor every section of the Chart Note generated by Charm AI Scribe to match the unique documentation style across different care types. This is a member-specific configuration and allows each Provider to have their own preferences. Follow the steps below to customize the generated Chart Note.
- Navigate to the 'Patient Encounter > Charm AI Scribe > Settings' section.
- Select the Care Type you need to customize.
- You
can customize each section of the Chart Note, such as the Chief
Complaint, History of Present Illness, Past Medical History, Family
History, and Physical Exam, for the selected Care Type.
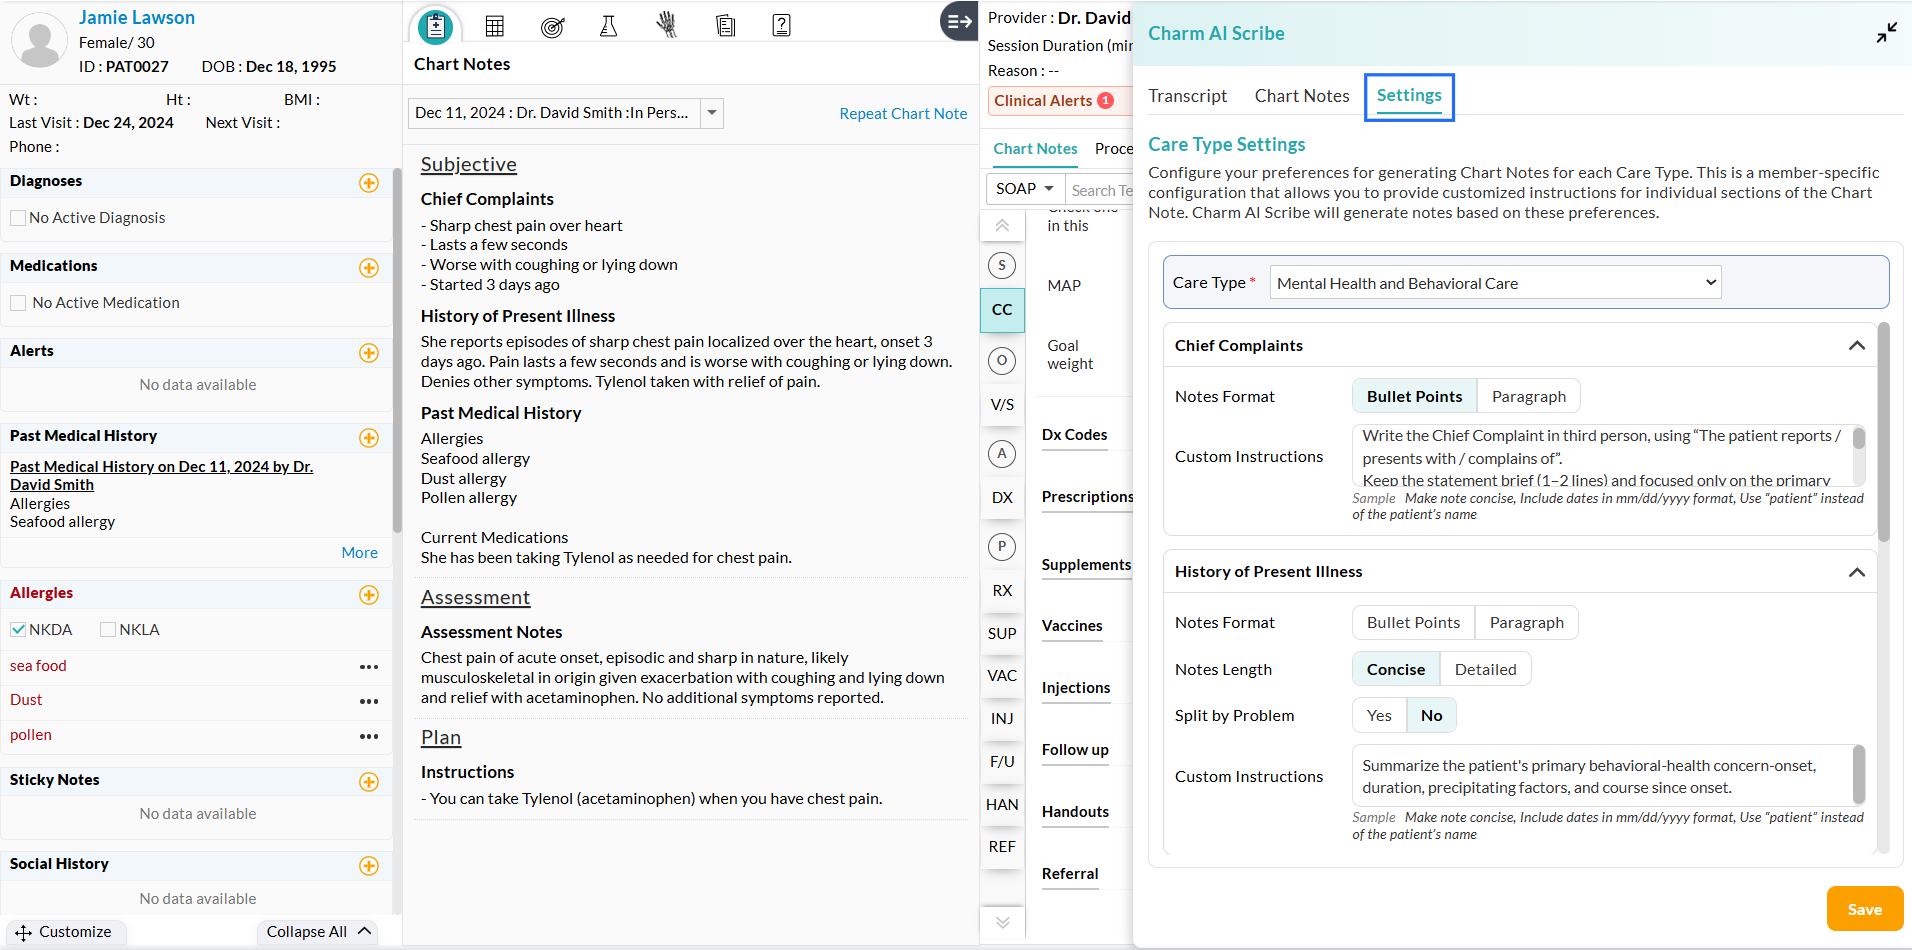
The customization options include:
- Notes Format
- Custom Instructions
- History of Present Illness-Specific Customization
a. Notes Format
Select the note format for each section that aligns with your documentation needs.
You can select between Paragraph format for detailed, narrative-style notes and Bullet points for a structured, concise summary.
The selected Notes Format will get saved as the default for the upcoming Encounters.
b. Custom Instructions
Providers can now define custom instructions for the required sections of the Chart Note.
While generating the Chart Note, Charm AI Scribe follows these instructions by extracting relevant details from the transcript, if available.
Note: Use clear and concise instructions for better results.
Example: Include information regarding therapy in the HPI section. Exclude the Physical Examination information in HPI.
c. History of Present Illness-Specific Customization
Notes Length
Providers can generate History of Present Illness notes either in a concise or detailed format, based on their documentation needs.
Split by Problem
You can enable this option to group History of Present Illness notes by specific symptoms or diagnosis, creating a clear and organized structure for complex Encounters. Each problem appears as a separate subsection, enhancing clarity and readability.
This helps the Providers read and understand the different issues discussed during the Encounter.
The Section-wise customization options mentioned above allow you to generate the Chart Note based on your preferences. If you need to make any further changes to the generated notes on specific Encounters, you can use the 'Refine Chart Notes' option.
Upon generating the Chart Notes, click on the 'Refine Chart Notes' button. Enter the instructions to modify the generated Chart Notes.
For Example, 'Rephrase the assessment to be more clinical' or 'Add that the patient declined a follow-up'.
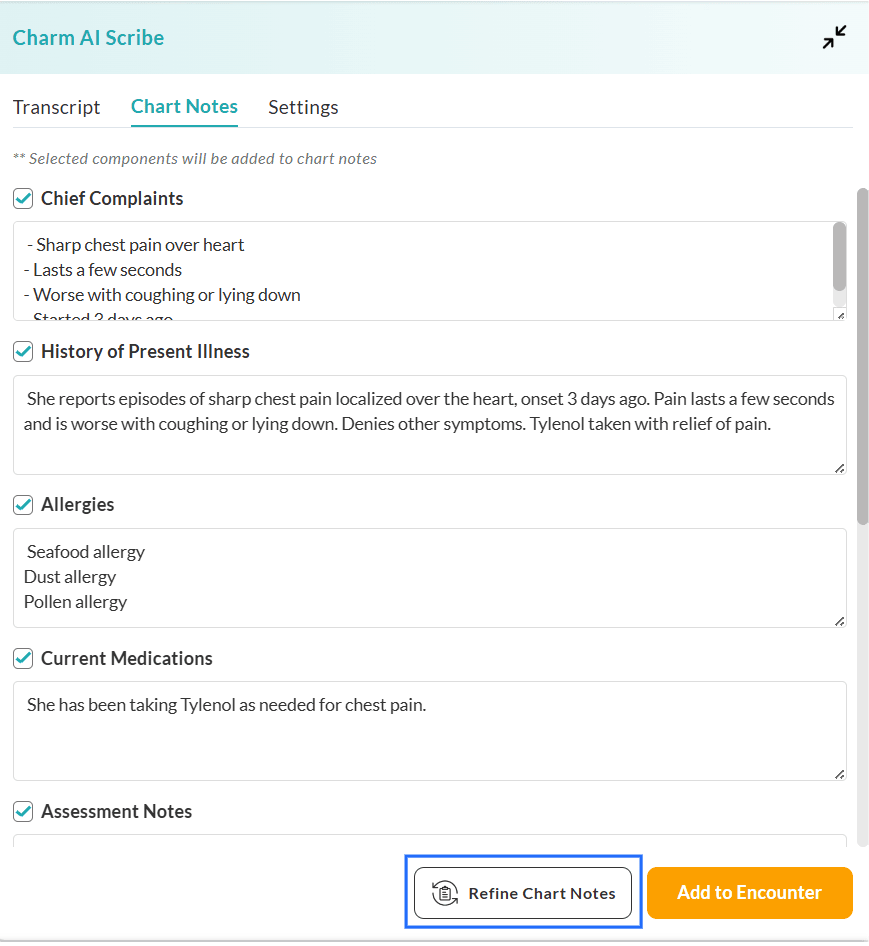
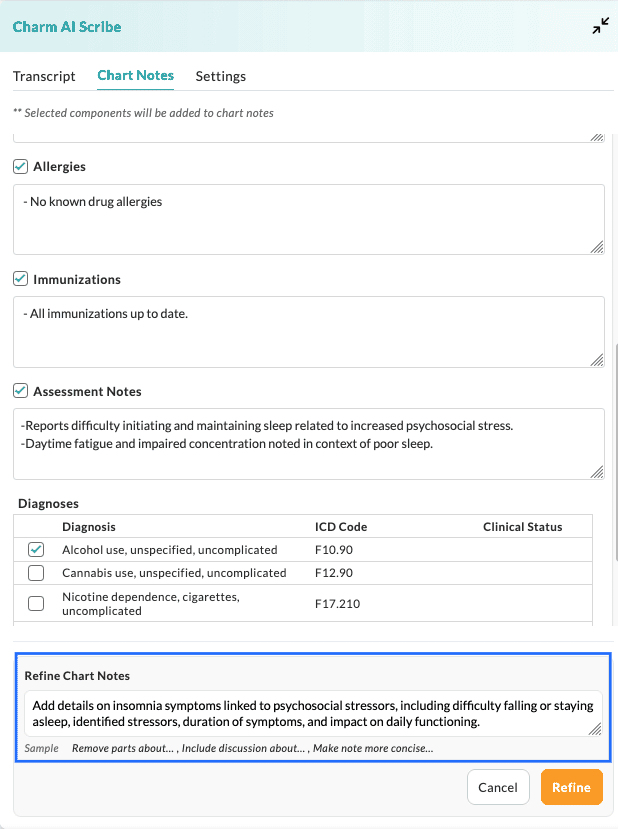
Click on the 'Refine' button to regenerate the Chart Note content based on your feedback.
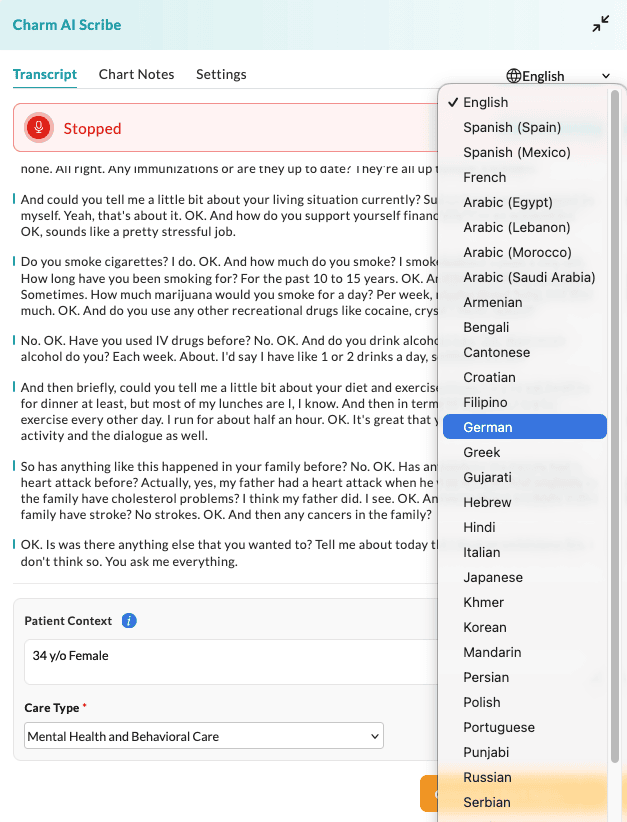
In addition to English, Spanish (Spain), Spanish (Mexico), and French, Charm AI Scribe now supports more languages, ensuring better understanding for non-English speaking Patients.
When generating the Chart Notes, the Instructions to Patients are generated in the selected language, while the remaining sections are generated in English to maintain consistency in clinical documentation.
To subscribe and learn more about Charm AI Scribe, please refer to our Resource Center.
Have any doubts or suggestions? Drop us an email at support@charmhealth.com.
We are excited to introduce new enhancements to the billing module that simplify Invoicing, improve authorization tracking, and provide greater Patient payment flexibility.
These enhancements include:
- Option to Generate Multiple Invoices/Claims for a Single Encounter
- Ability to Track Prior authorization based on Visits or Invoice CPT Quantity
- Option to View Encounters of 'All' Facilities in the Generate Bills Section
- Option to Save Card on File when Patients Make Payments for Invoices or Statements Sent via Email/Text
- Option to Allow Patients to Pay Online for Specific Items of Invoices
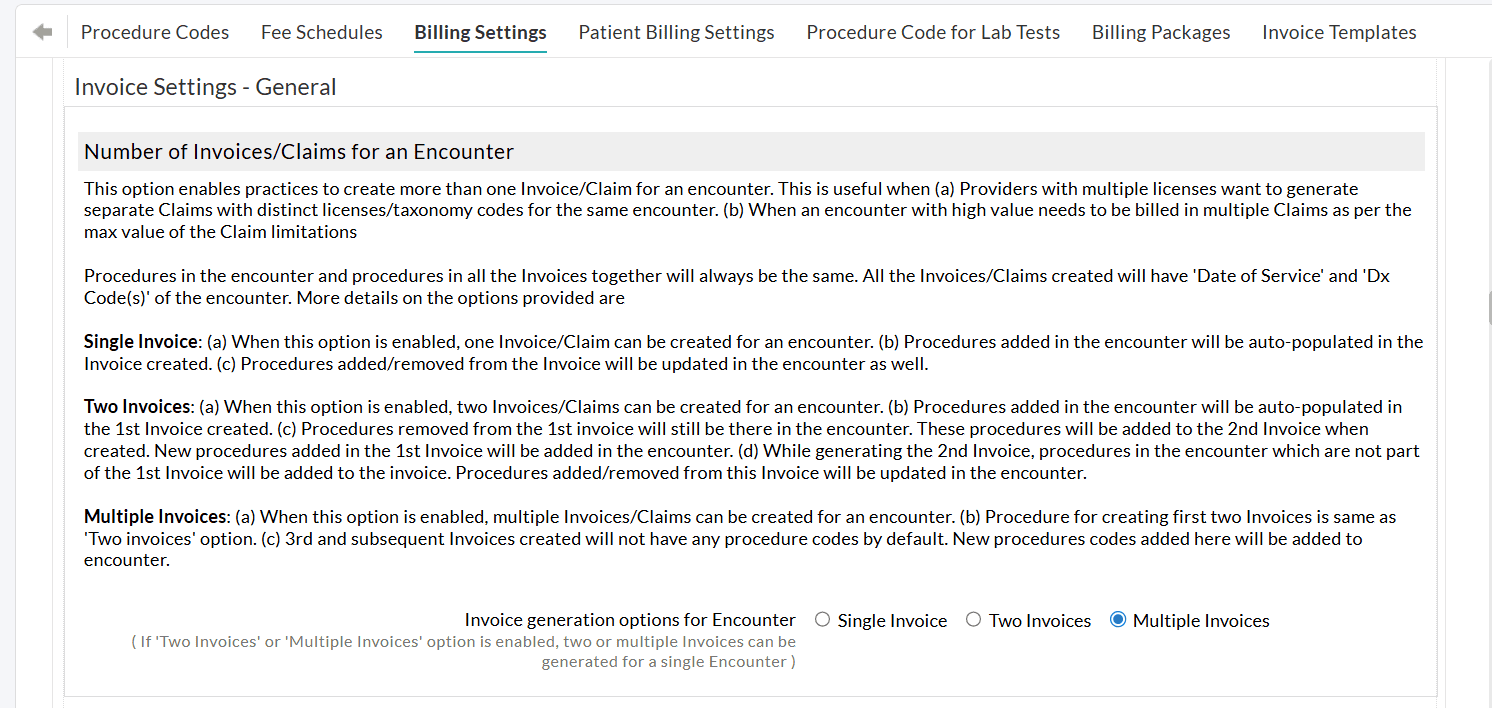
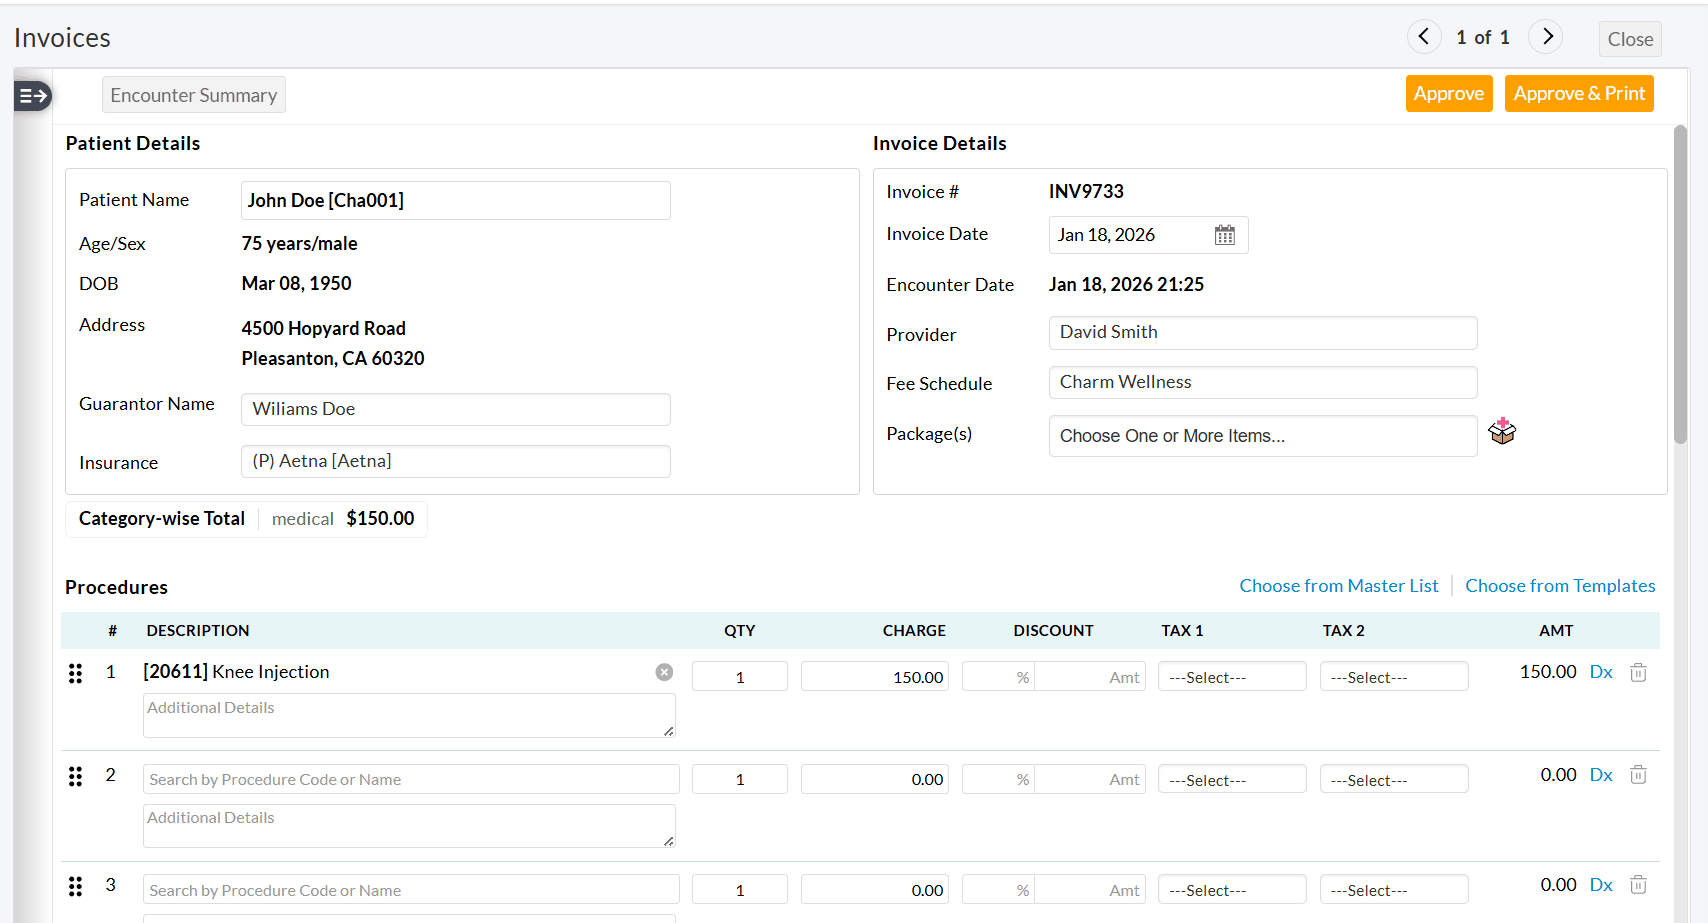
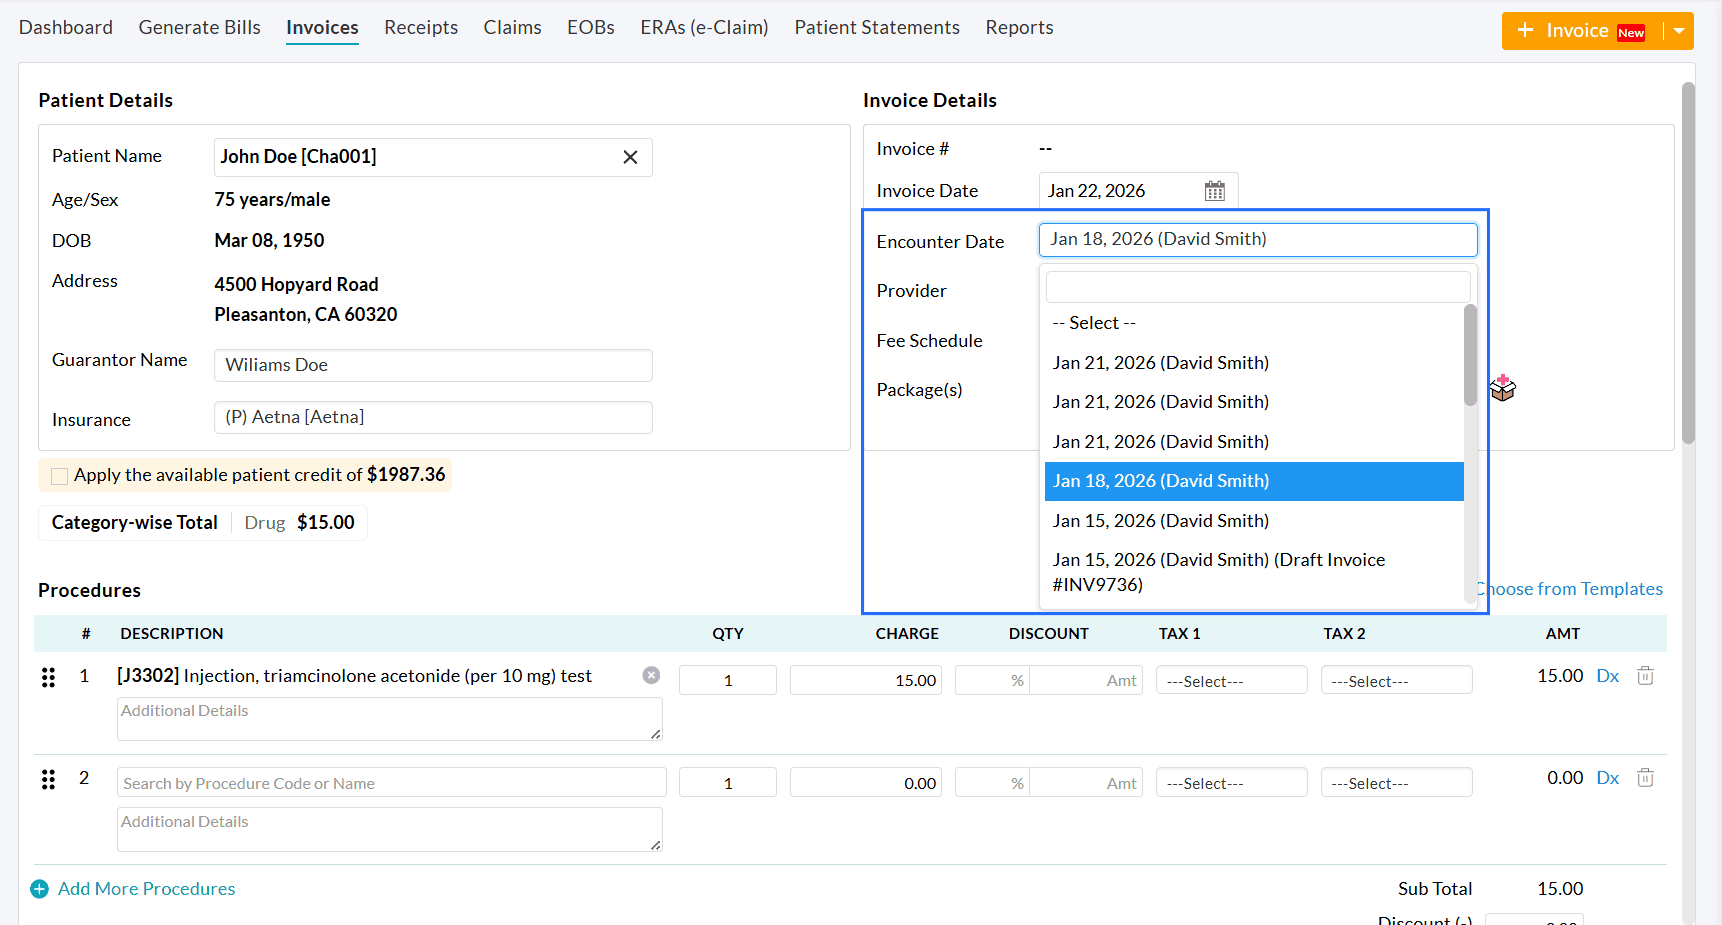
Previously, Practices were able to generate two Invoices for an Encounter. Now, we have provided an option to generate multiple Invoices/Claims for a single Encounter. This helps Practices with varying billing needs, such as:
- Separate Claims for multiple Provider licenses
- Split high-value charges into multiple Claims
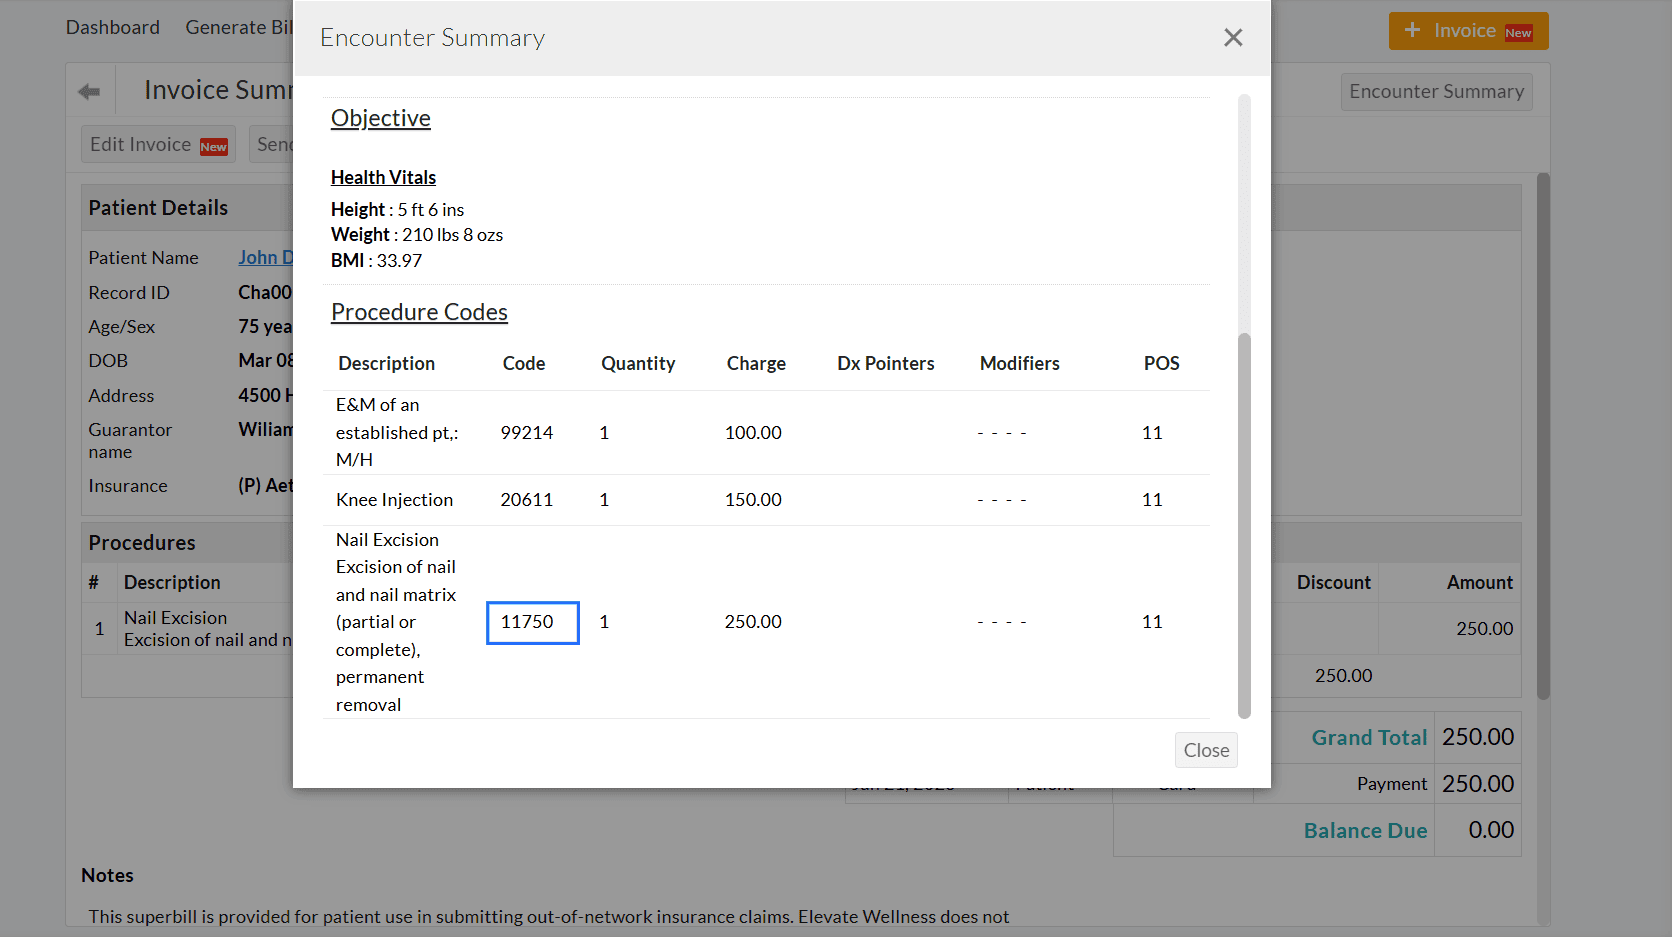
When two or more Invoices are generated for an Encounter, the total number of Procedures across all Invoices will match the number of Procedures recorded in that Encounter.
All Invoices or Claims generated will take the 'Date of Service' and 'Dx Code(s)' from the Encounter.
To enable this setting,
- Navigate to the 'Settings > Billing > Billing-Settings > Invoice Settings > Invoice Settings - General'.
- Choose the 'Multiple Invoices' option.
Upon enabling this option, Practices can generate the First Invoice with only the required Procedure code(s) and delete the Procedure code(s) to be billed on the second Invoice.
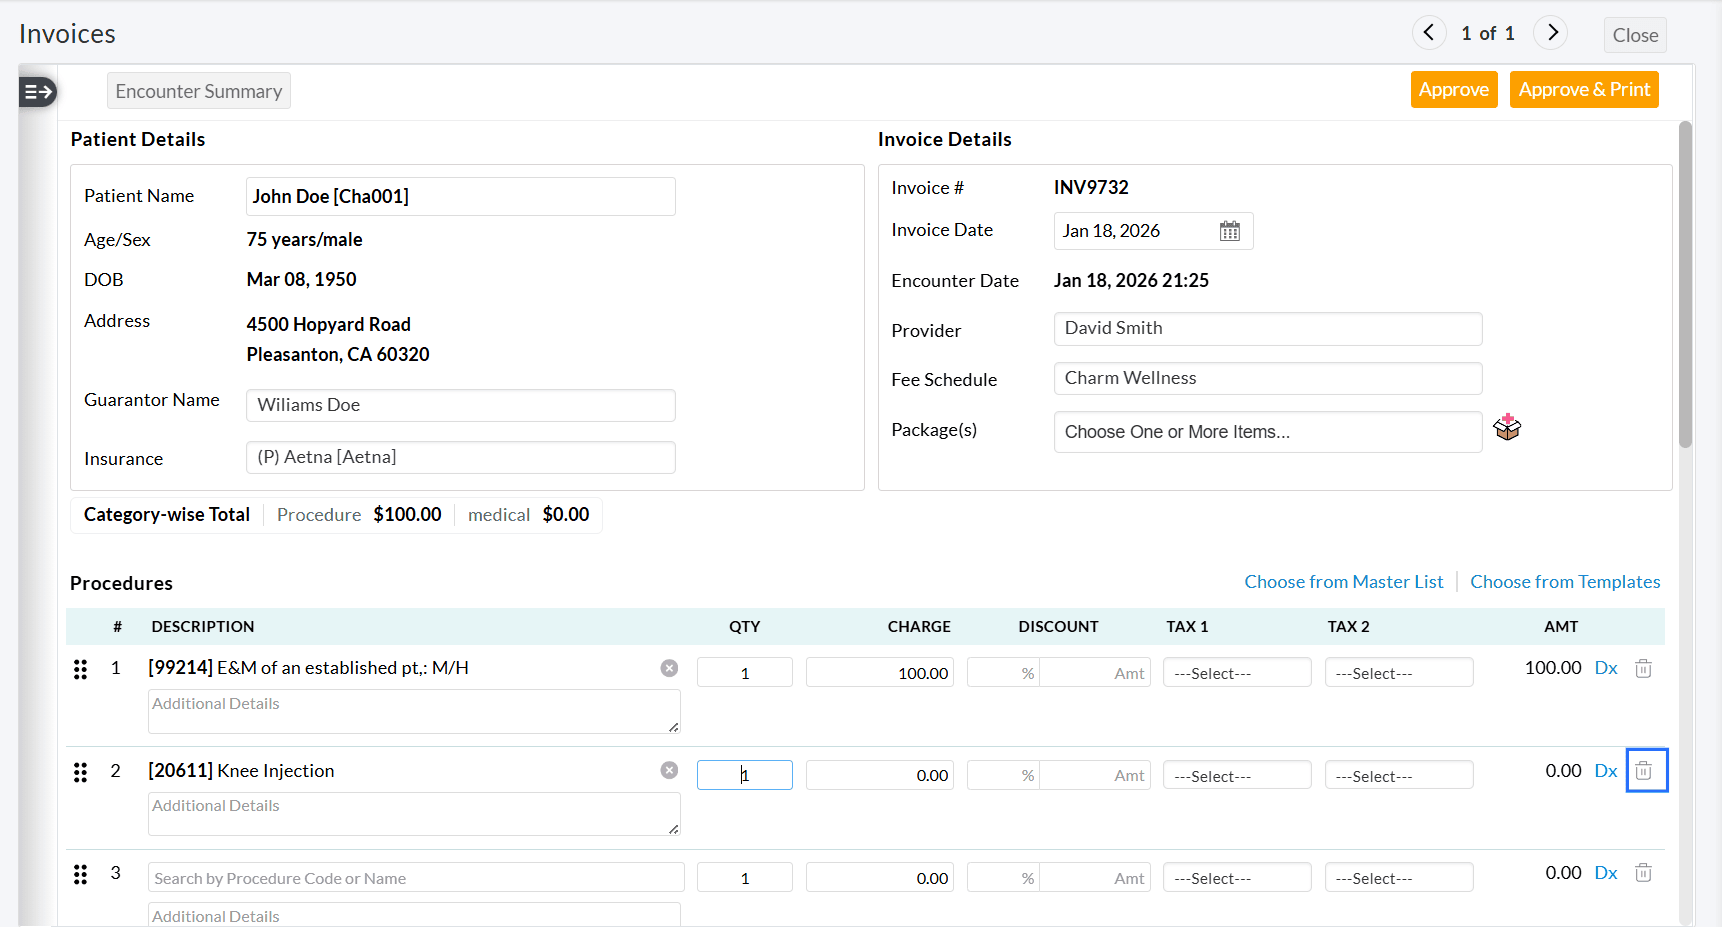
The second and subsequent Invoices can be generated by following the steps below.
- Generate additional Invoices from the 'Generate Bills' section.
- Under the 'Generate Bills' section, select 'Encounters for Multiple Invoices' for the 'Encounter' filter.
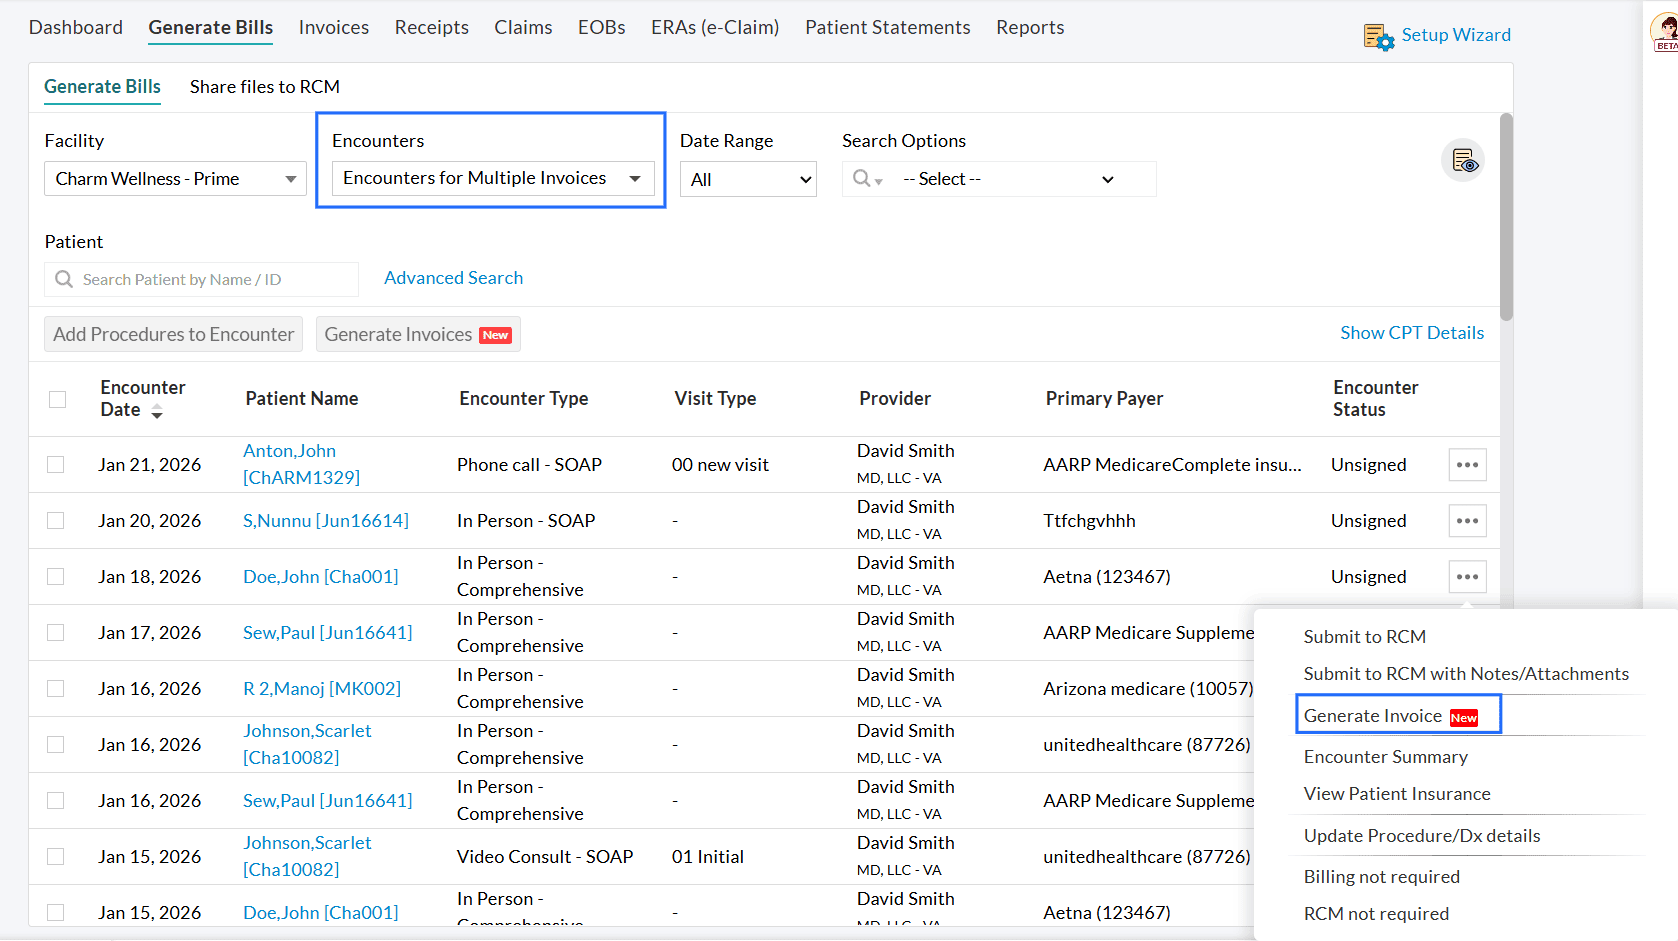
- When creating the second Invoice, only unbilled Procedures are added by default.
- For third or subsequent Invoices, manually add the required Procedure Code(s).
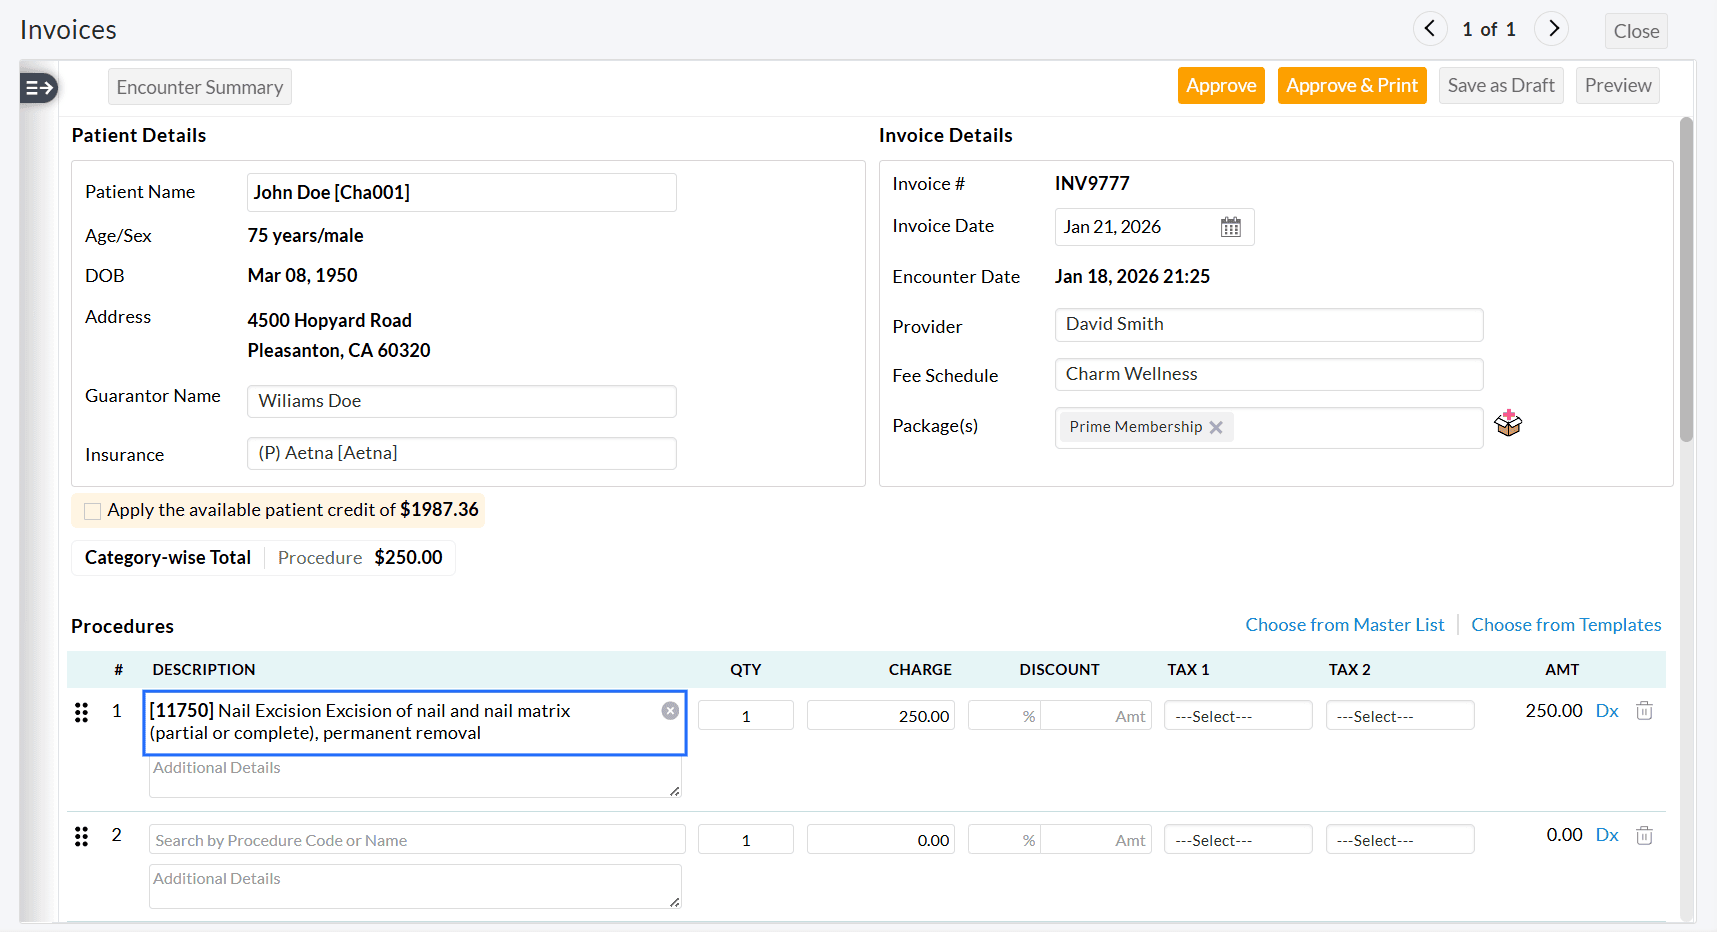
The newly added Procedure code(s) will be mapped to the Encounter.
Practices can also generate multiple Invoices from the 'Billing > Invoices > + Invoice' section.
To learn more about this feature, visit our Resource Center.
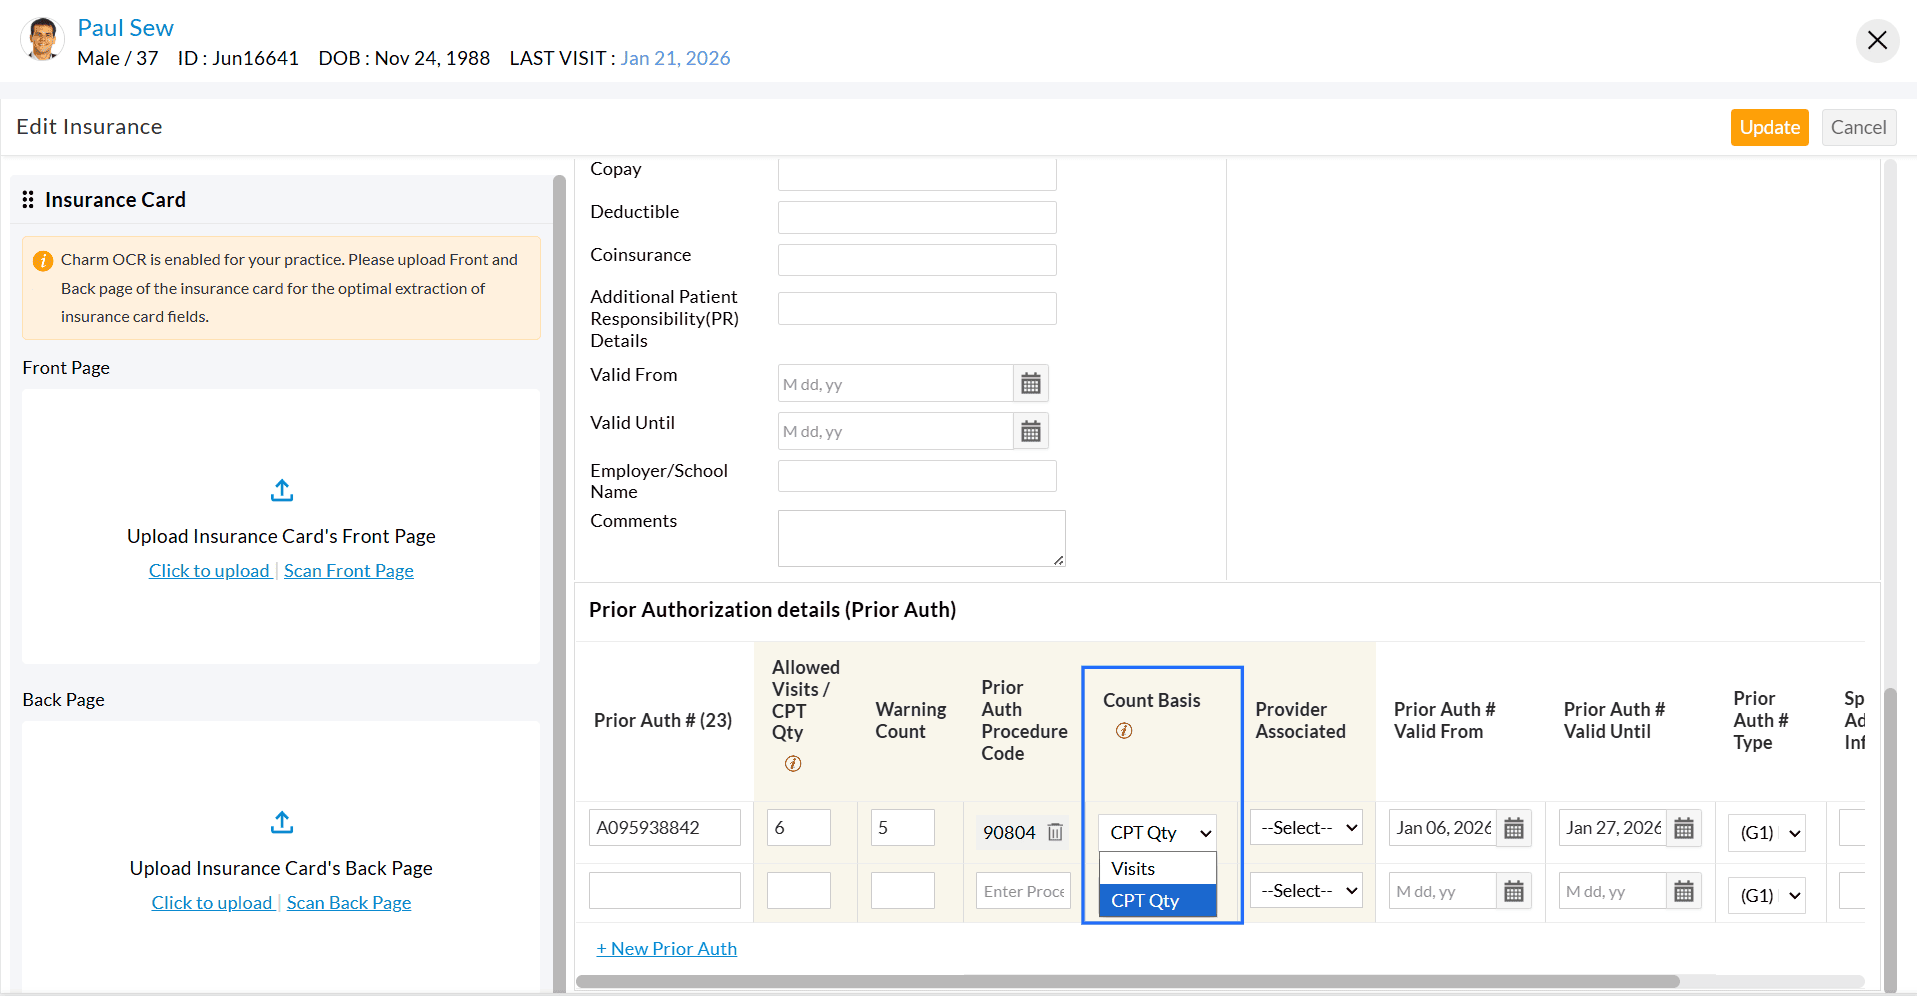
Previously, Practices could track Prior authorization only based on the number of visits for services provided to a Patient. With this enhancement, Prior authorizations can now also be tracked based on the CPT quantity used in the Invoice, enabling more flexible tracking.
This tracking helps Practices:
- Prevent overuse of services beyond payer approval.
- Request additional approvals when needed.
- Reduce Claim denials due to exceeded limits.
When authorized services are provided to a Patient, CharmHealth automatically tracks the Prior authorization usage and updates the remaining approved count.
The Prior authorization tracking follows one of the tracking methods based on how the authorization is configured.
- Visit-Based Tracking: Each Patient Encounter counts as one visit, regardless of the quantity of CPT codes billed during that Encounter.
- Invoice Quantity-Based Tracking: The system tracks the authorization usage based on the total CPT quantities billed in the Invoice.
To configure Prior authorization, follow the steps below.
- Navigate to 'Patient Dashboard > Patient Details > Insurance > + Insurance'
- Enter the Prior authorization number and specify the allowed number of visits or the Invoice CPT quantity.
- When the Prior authorization is allowed by the Payer for a specific Procedure, you can add the 'CPT code' to the authorization record under 'Prior Auth Procedure Code'.
- Under 'Count Basis', select the method for tracking authorization, either by the number of visits or by the Invoice CPT quantity.
Use Case Examples
Visit-Based Tracking
Scenario: A speech therapy clinic receives prior authorization from Cigna for 8 visits.
During one therapy session, the Provider bills a single CPT code (e.g., speech therapy treatment) for 2 units to reflect the extended duration of the session.
Even though the CPT code was billed for 2 units, the system deducts only 1 visit from the authorization.
The remaining count of 7 visits will be left on the authorization.
This method is common in rehabilitation services where the Payers approve the number of visits, and each encounter counts as one, regardless of how many units are billed.
Invoice Quantity-Based Tracking
Scenario: An infusion center receives prior authorization from Aetna for 20 CPT units of chemotherapy infusion.
The Patient undergoes one infusion session, billed under a single CPT code (e.g., chemotherapy administration), but for 4 units to reflect the duration/quantity of the service.
The system deducts 4 units from the authorization, even though only one CPT code was used.
The remaining count of 16 units will be left on the authorization.
This method is common in infusion therapy, radiology, and lab services, where Payers approve a specific number of CPT units rather than visits.
Visit our Resource Center to learn more about Prior Authorization Tracking.
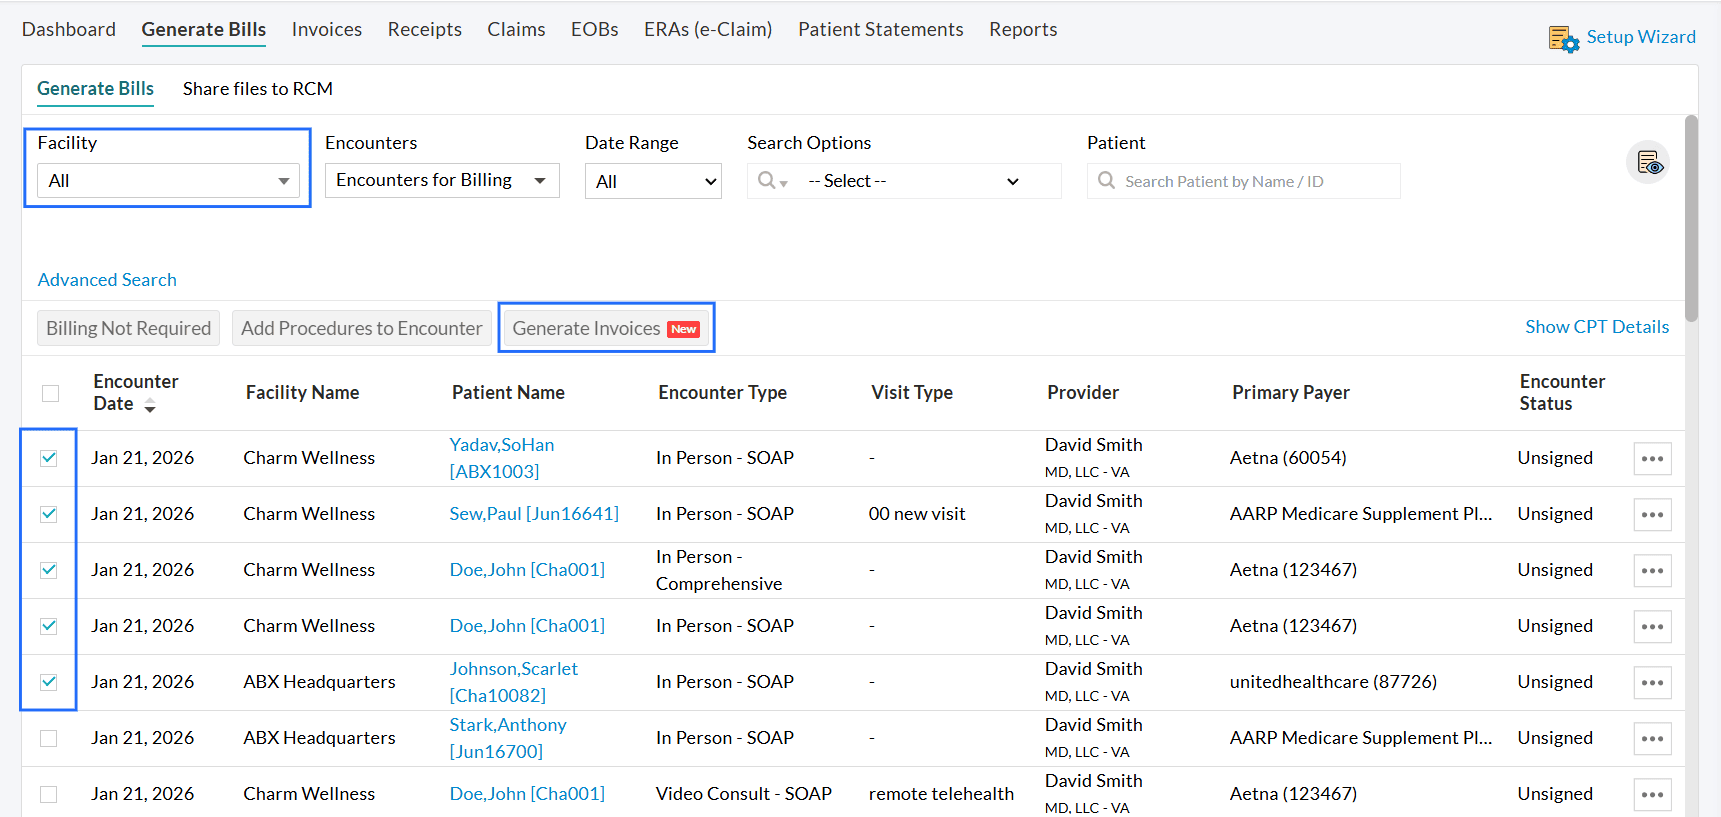
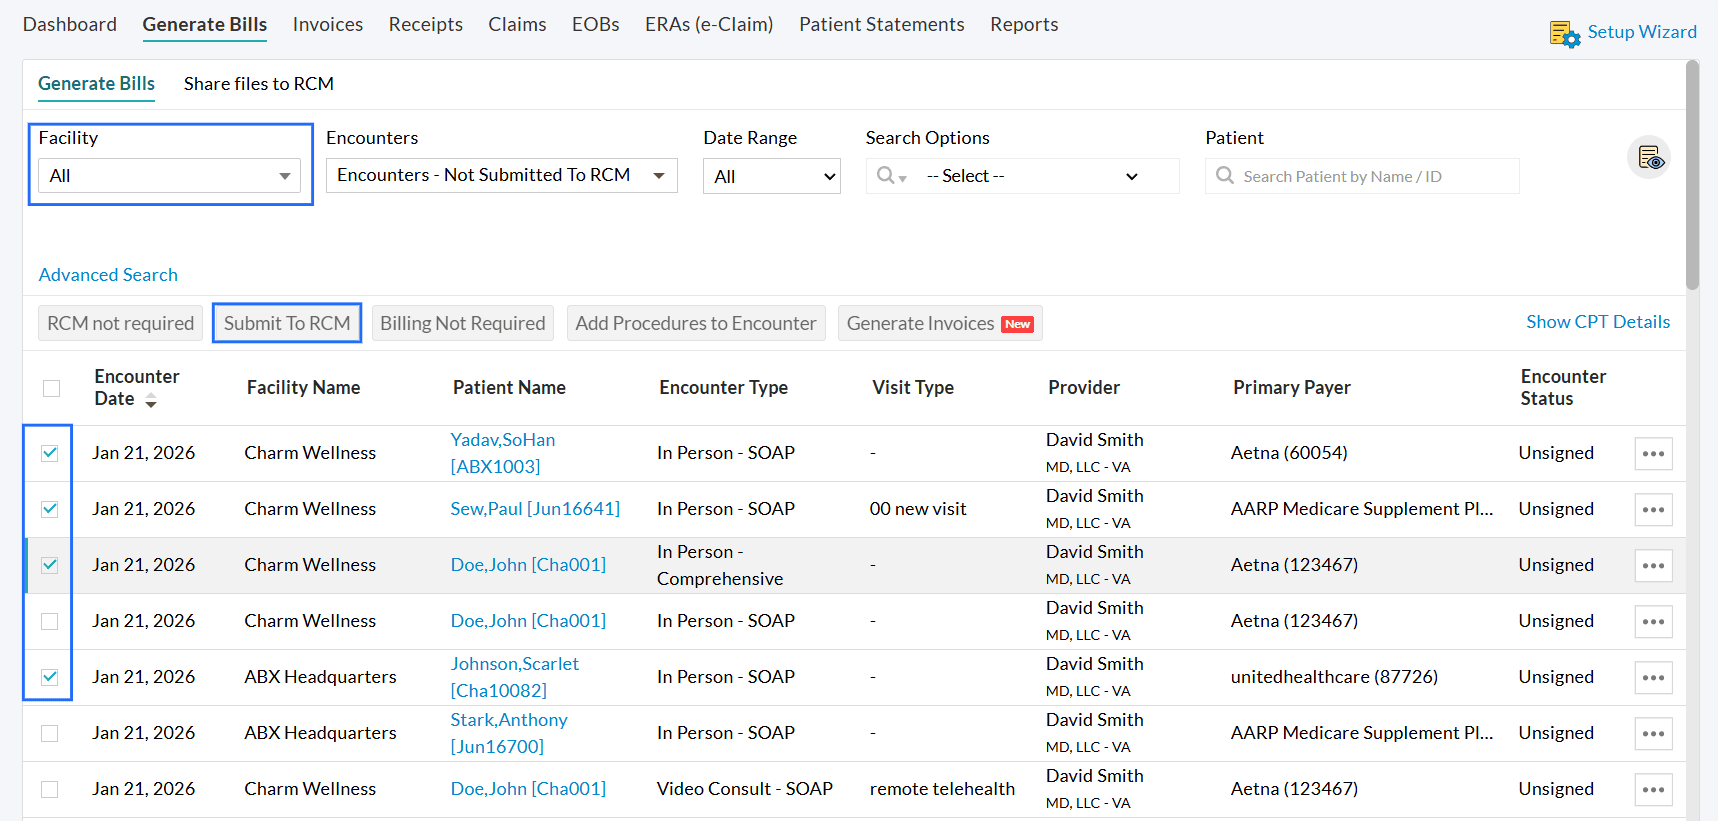
We have introduced a filter option that allows Practices to view Encounter details for all Facilities.
With this filter, Practices can generate Invoices for a single Facility or all Facilities simultaneously and submit Encounters to RCM either for one Facility or across all Facilities from a single location.
- Navigate to 'Billing > Generate Bills'.
- By default, the Encounters of the selected Facility will be listed. You can choose a specific Facility from the 'Facility' dropdown or select 'All'.
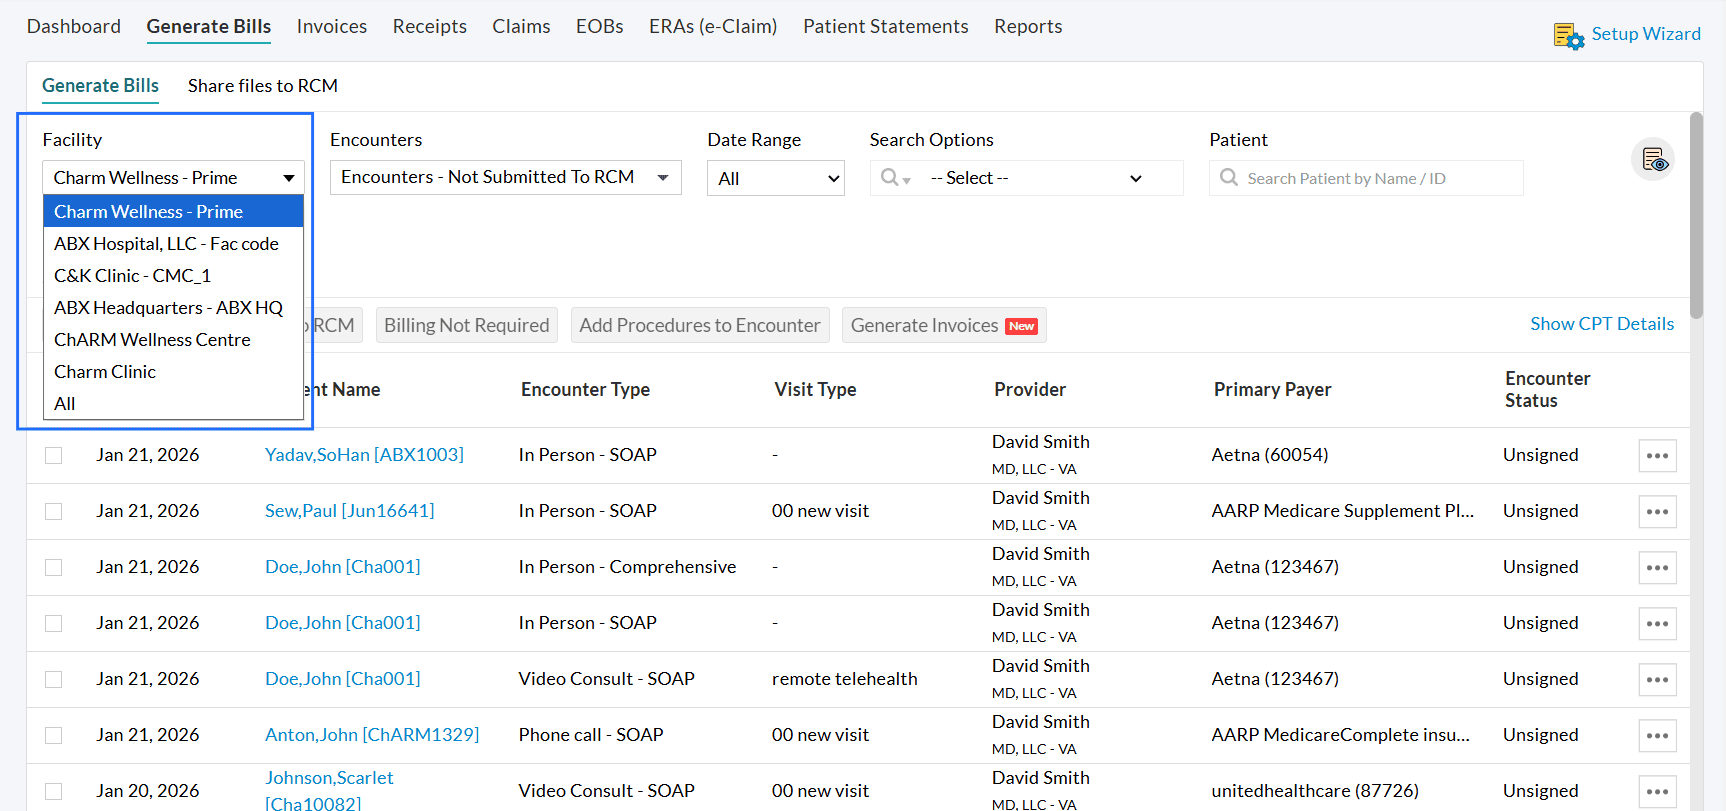
- To generate multiple Invoices across the Facilities,
- Choose the 'Encounter for Billing' filter option.
- Select the Invoices and click on the 'Generate Invoices' button.
- To submit the charts of all Facilities at once,
- Choose the 'Encounters Not Submitted to RCM' filter option.
- Select the Invoices and click on the 'Submit to RCM' button.
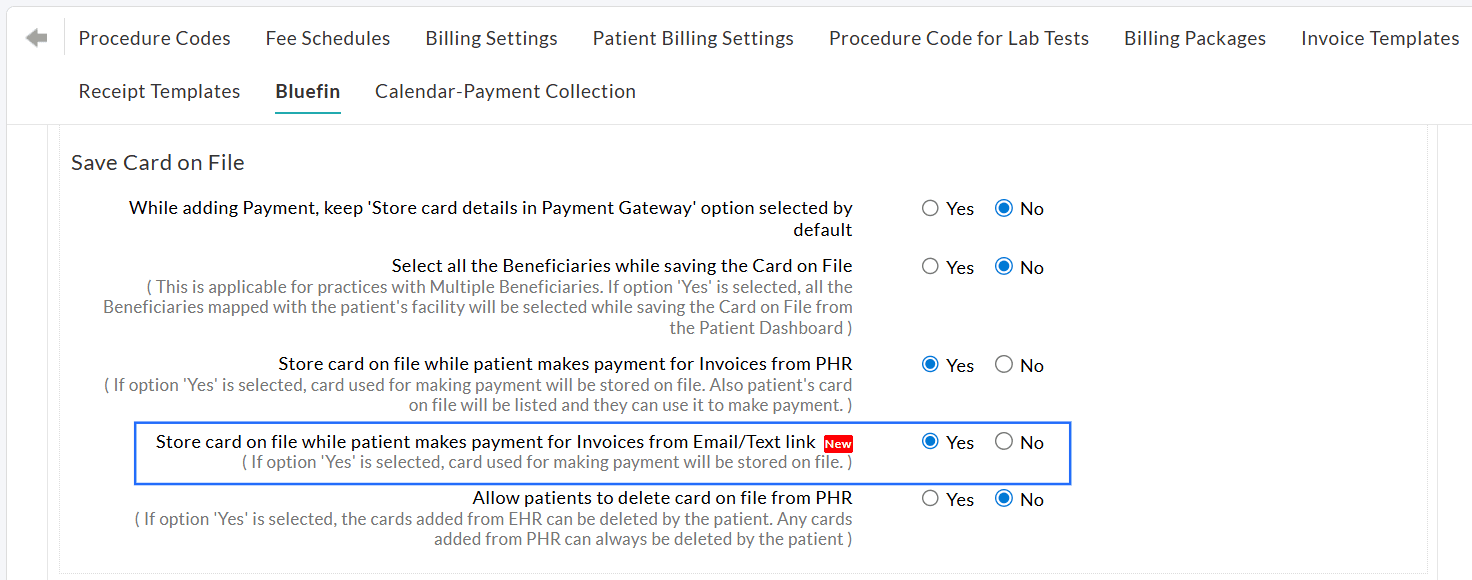
4. Option to Save Card on File when Patients make Payments for Invoices or Statements Sent via Email/Text
We have included a setting that allows Patients to store their card in CharmHealth EHR when making payments for Invoices or Statements through the payment link sent via Email or Text.
This option is also available for Patients when the payment link is shared from the 'Calendar' section. By default, 'Yes' will be selected for this setting.
To enable this setting, navigate to 'Settings > Billing > Bluefin'.
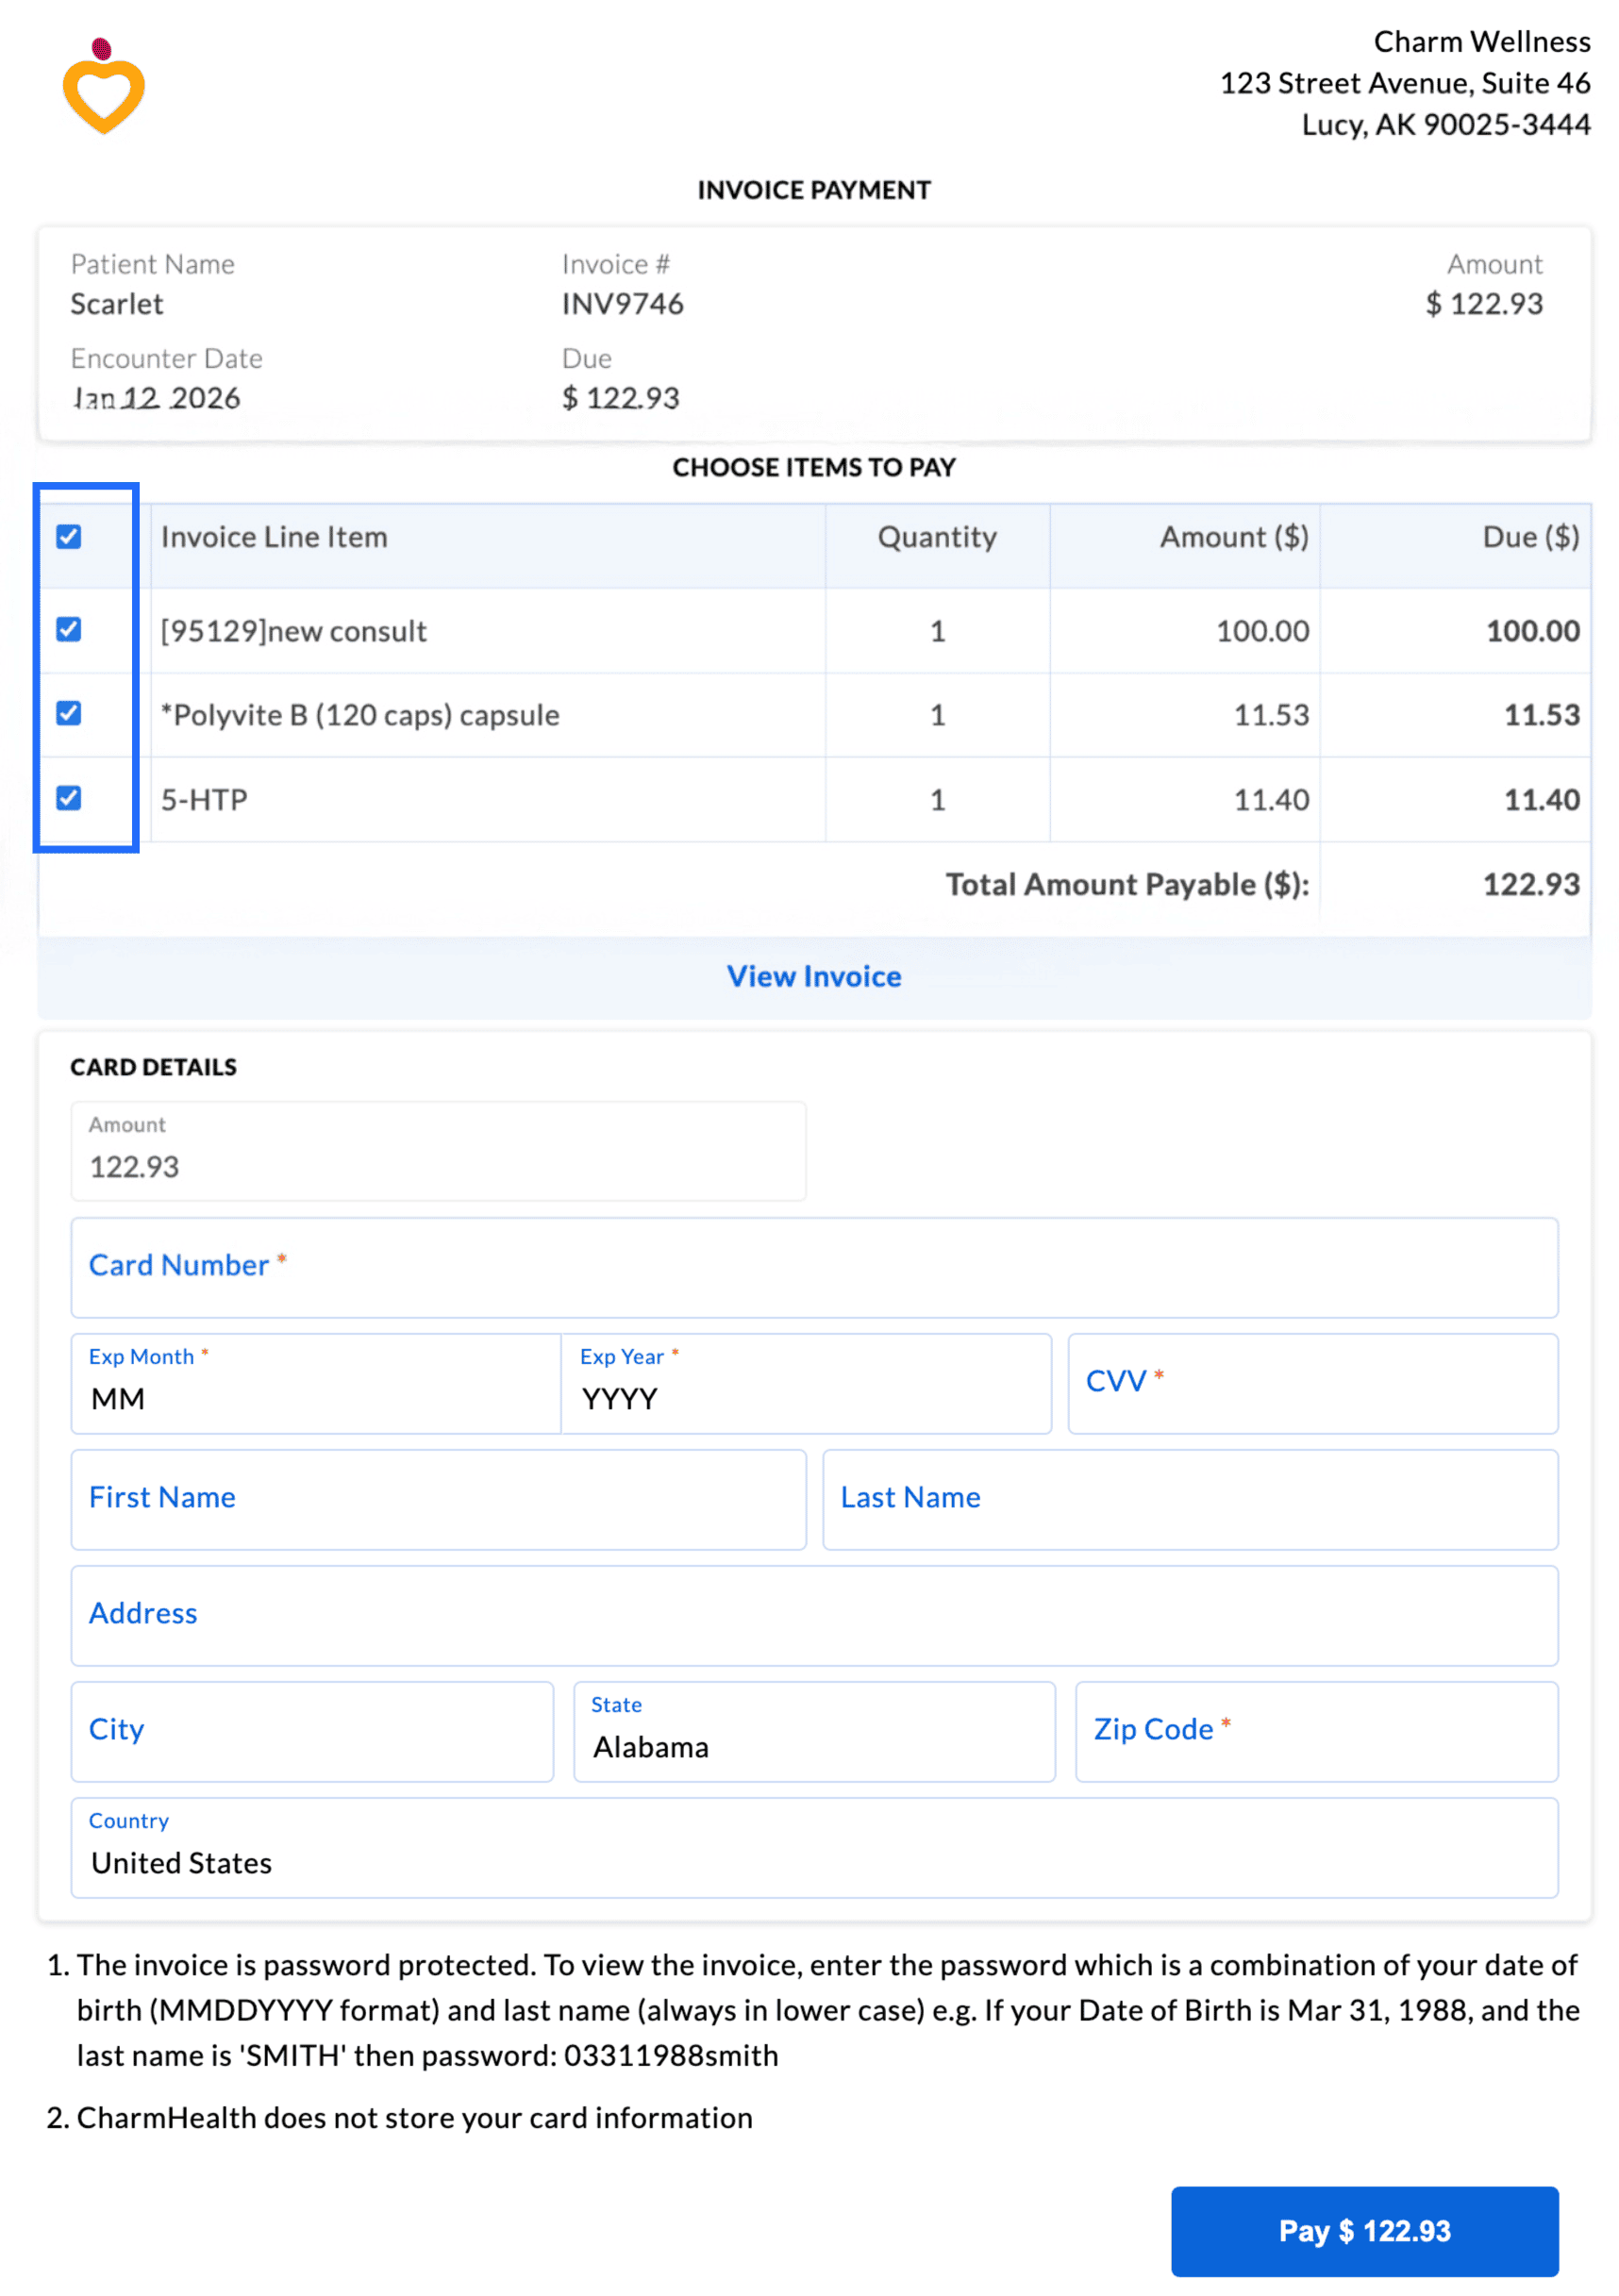
We have provided an option to allow Patients to make payments for specific items of Invoices (Procedures or Products) sent through the payment link via Email/Text.
To enable this setting, navigate to 'Settings > Billing > Bluefin > Default Settings > Patient Online Payment Options > Itemized Payment'.
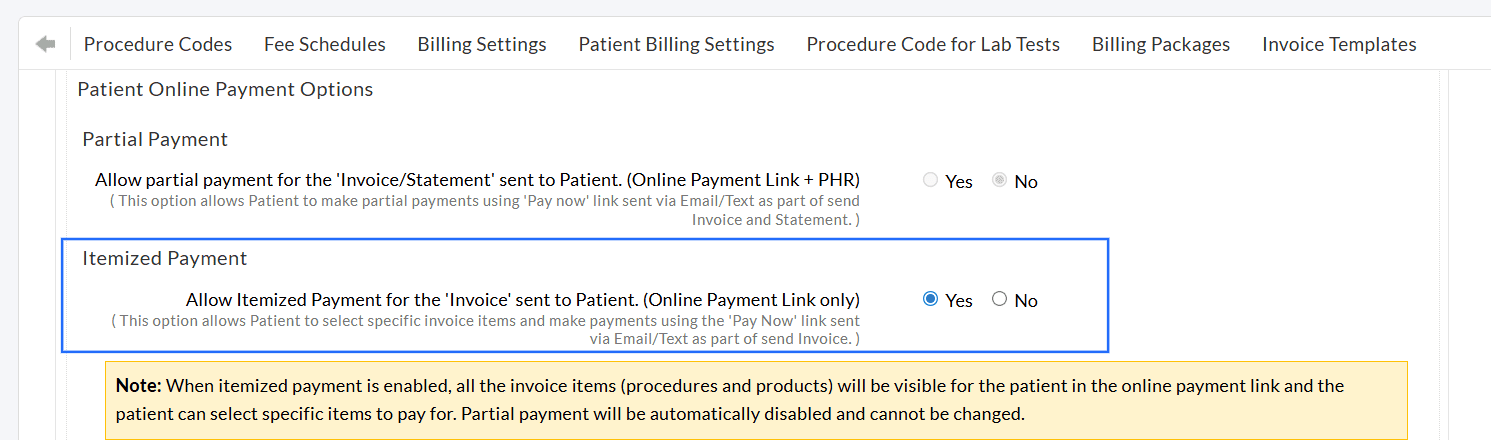
When this option is enabled, all Invoice items will be displayed for the Patient in the online payment link. The Patients can select specific Procedures or Products and make a partial or full payment accordingly.
Note: Enabling the itemized payment option disables the partial payment option for the Patients.
We hope these billing improvements make it easier for Practices to generate multiple Invoices/Claims, clearly track authorizations, and provide Patients with flexible payment options.
Have questions or feedback? Please reach out to our support team at support@charmhealth.com. We will help you sail through!
We are thrilled to announce the release of the Billing Setup Wizard, along with an enhancement to the Patient Billing Automation feature, designed to simplify the billing setup and reduce manual effort for Practices.
The Billing Setup Wizard is a guided setup that helps Practices configure all essential billing settings efficiently in CharmHealth.
The Billing Setup Wizard offers clear visibility into key billing settings and features, enabling Practices to utilize them to their fullest potential.
The key benefits of this feature include:
- Provides a step-by-step flow that brings all essential billing configurations in one place.
- Offers a high-level view of all billing-related settings and features for better control and understanding.
- Streamlines the onboarding for new Practices setting up their billing.
- Helps Practices quickly complete the essential billing setup.
- Displays relevant add-ons and settings based on the selected Practice Type, ensuring an optimized workflow.
How to Access
- Navigate to 'Billing > Generate Bills'.
- Click on the 'Setup Wizard' option in the top-right corner.
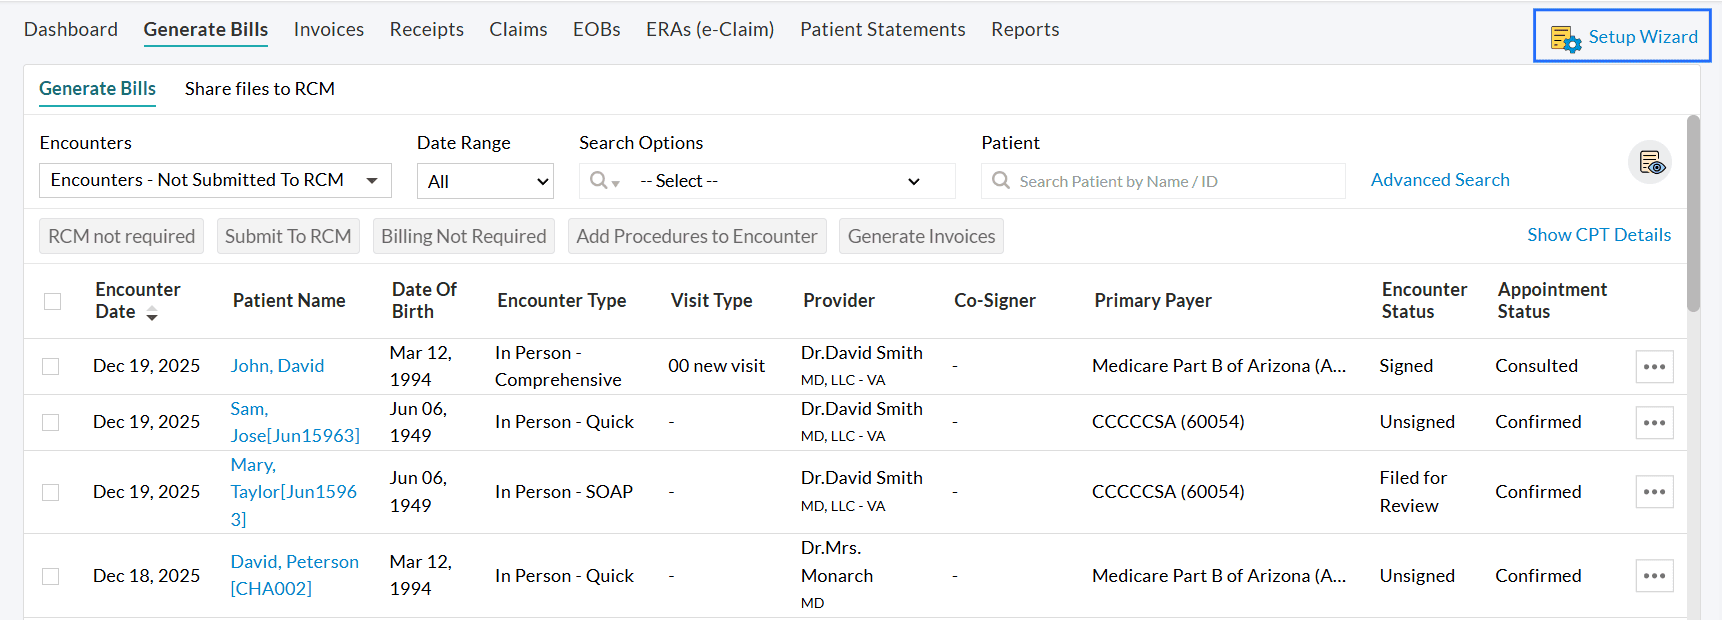
- Select your Practice Type: Insurance Only, Cash Only, or Insurance and Cash-based Practice.
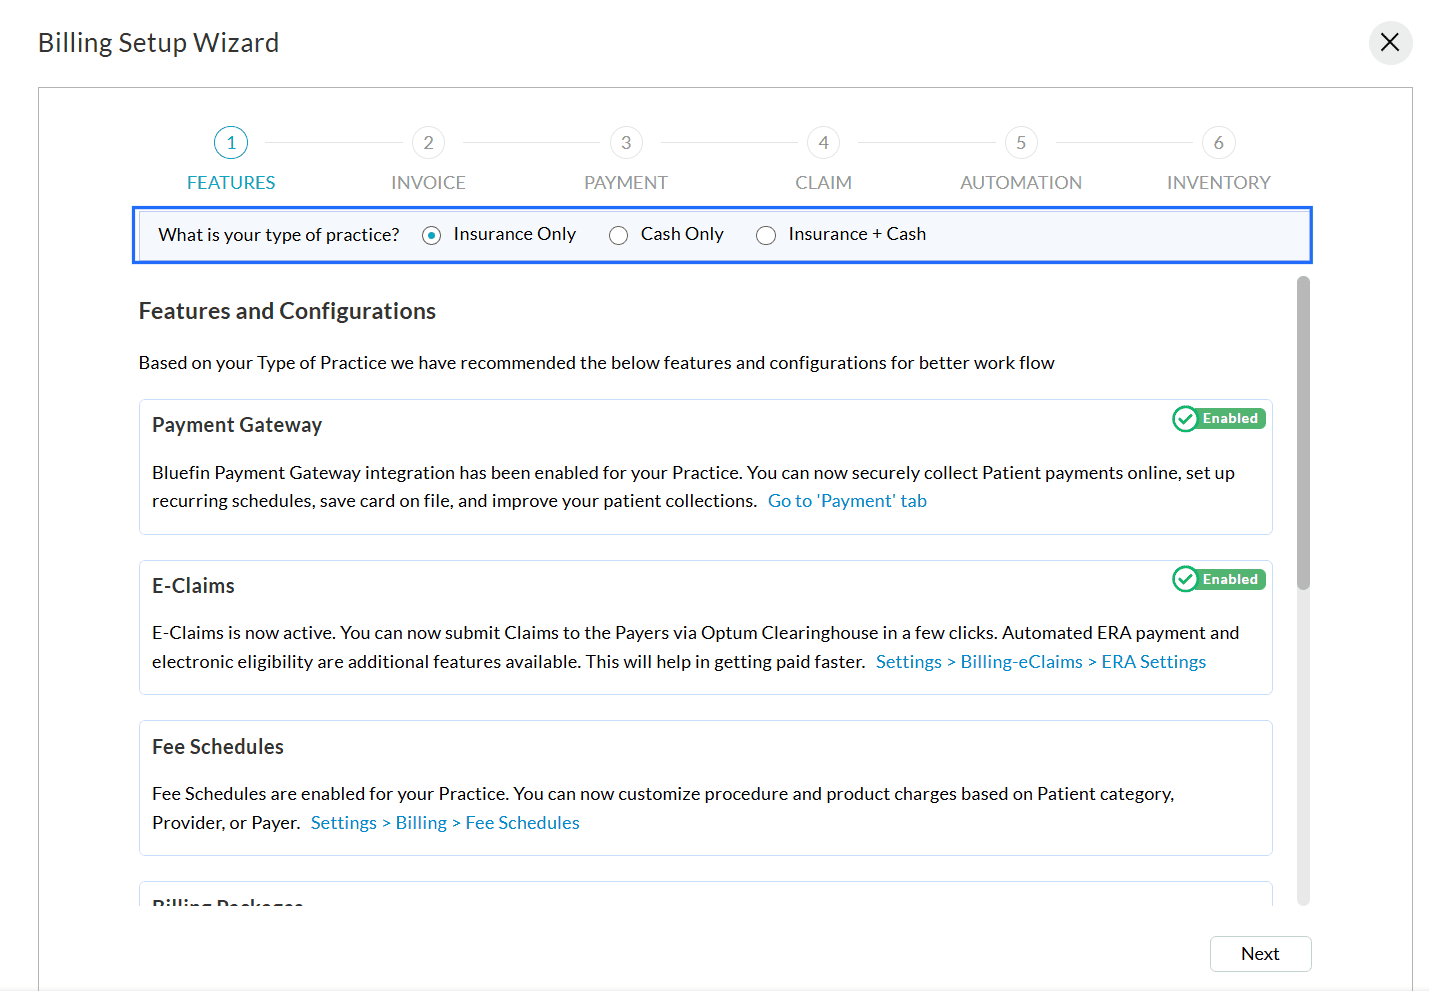
- All applicable configurations and features will be displayed based on the selected Practice type. The features include:
- Click 'Next' to proceed to each section.

You can configure the following settings.
- Invoice Settings
Configure Invoice generation rules, patient credits, auto-payment defaults, and display additional details and category-wise totals. - Payment Settings
Set up item-level payments, unused amount adjustments, payment methods, gateway settings, card-on-file options, partial payments, and saved card management. - Claim Settings
Manage Payer lists, insurance preferences, default Claim values, and decide whether to process the Secondary Claims before billing the Patient. - Automation Settings
Enable and customize automation for Invoices, Receipts, and Claims. - Inventory Settings
Configure Inventory, E-commerce sales, tax handling, advance selling, and billing for drugs using NDC/CPT details.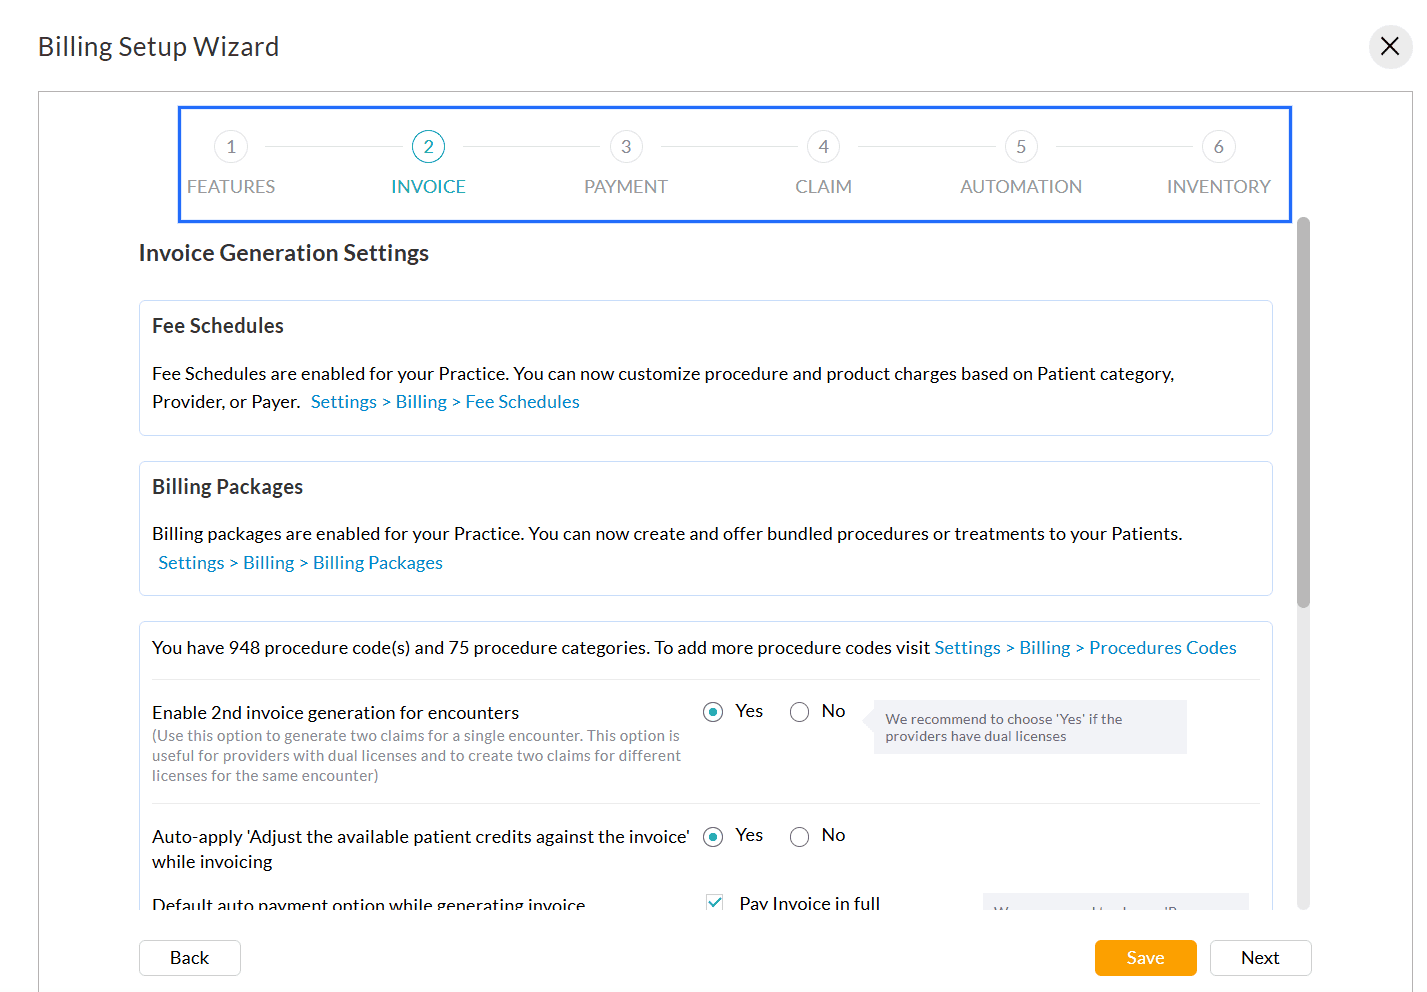
For more detailed configuration, follow the navigation path provided within each section.

To learn more about this feature, visit our Resource Center.
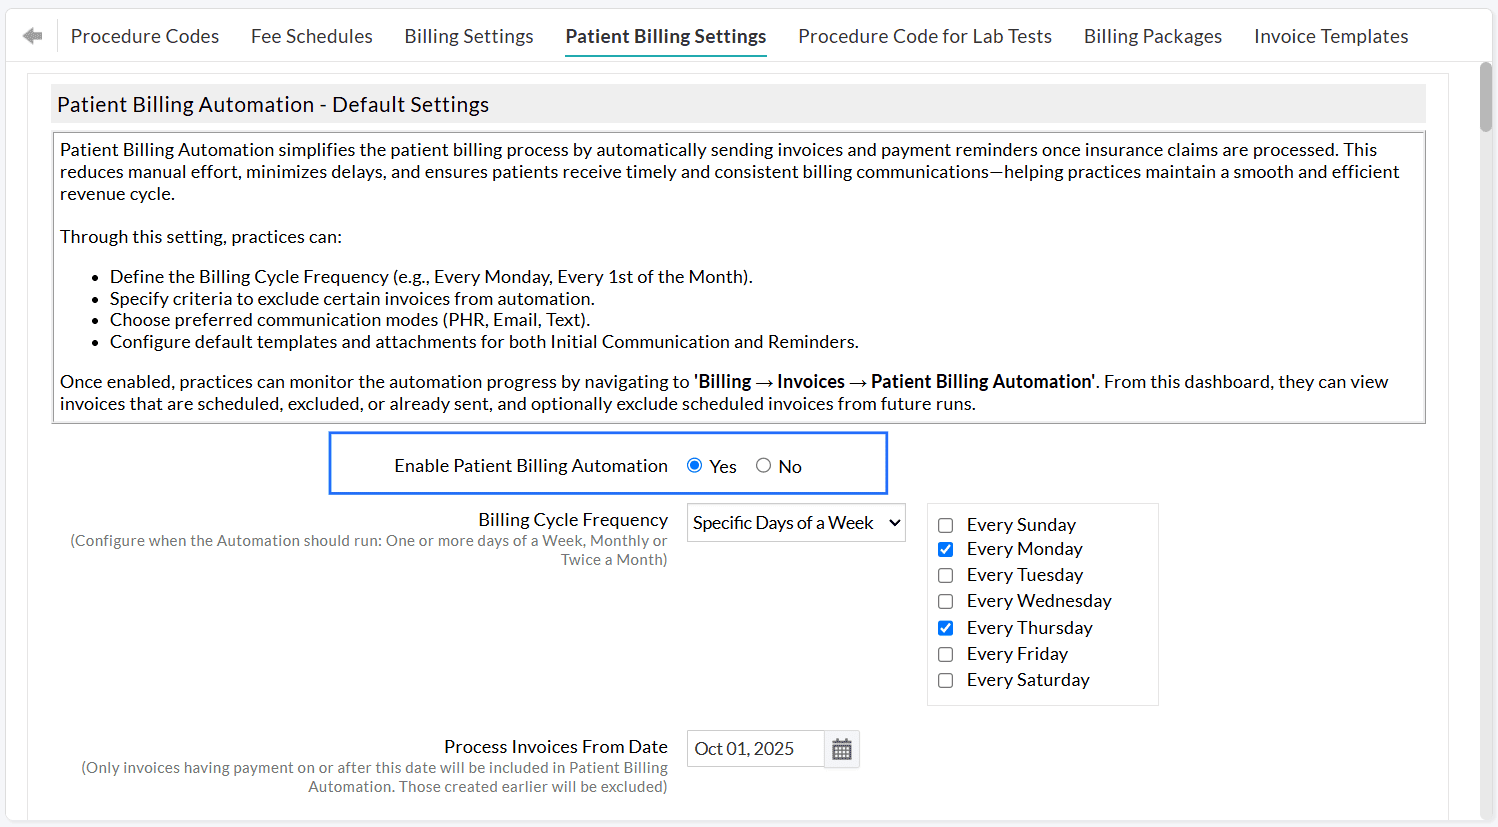
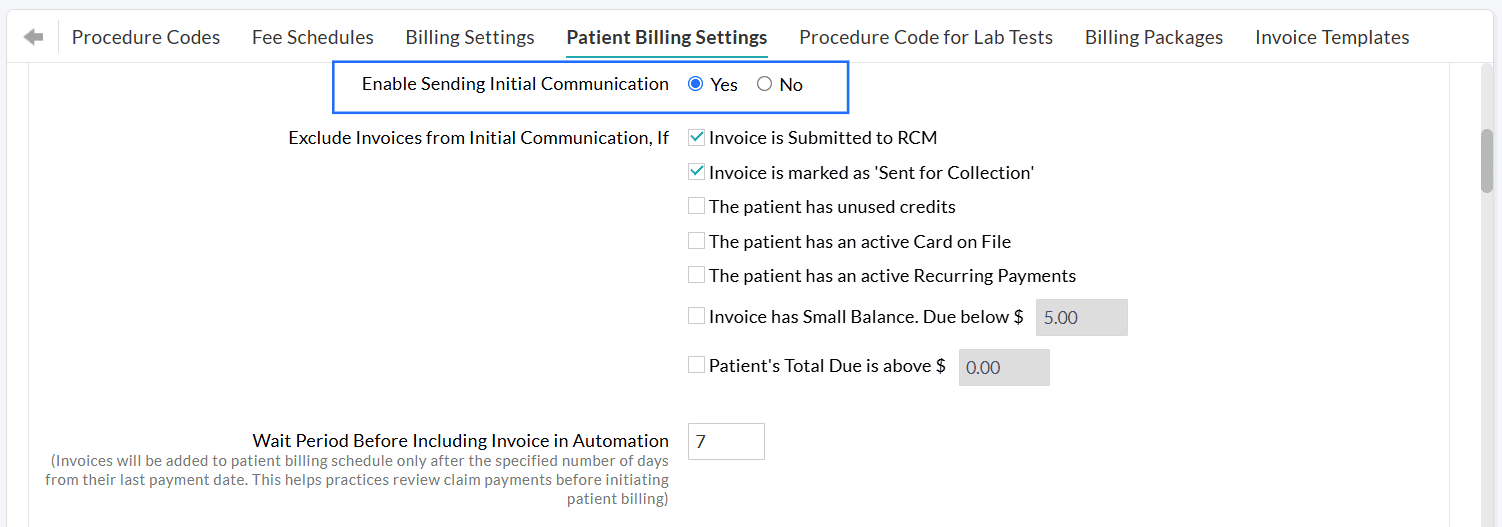
We have enhanced Patient Billing Automation with a new exclusion option that gives Practices greater control over high-value invoices before they are sent to Patients.
Practices can now exclude invoices with higher due amounts from automated communications.
To configure, follow the steps below.
- Navigate to 'Settings > Billing > Patient Billing Settings > Patient Billing Automation'.
- For the 'Exclude Invoices from Initial Communication' setting, enable the 'Invoice due is above' option and enter the amount above which the Invoices need to be excluded from automation.
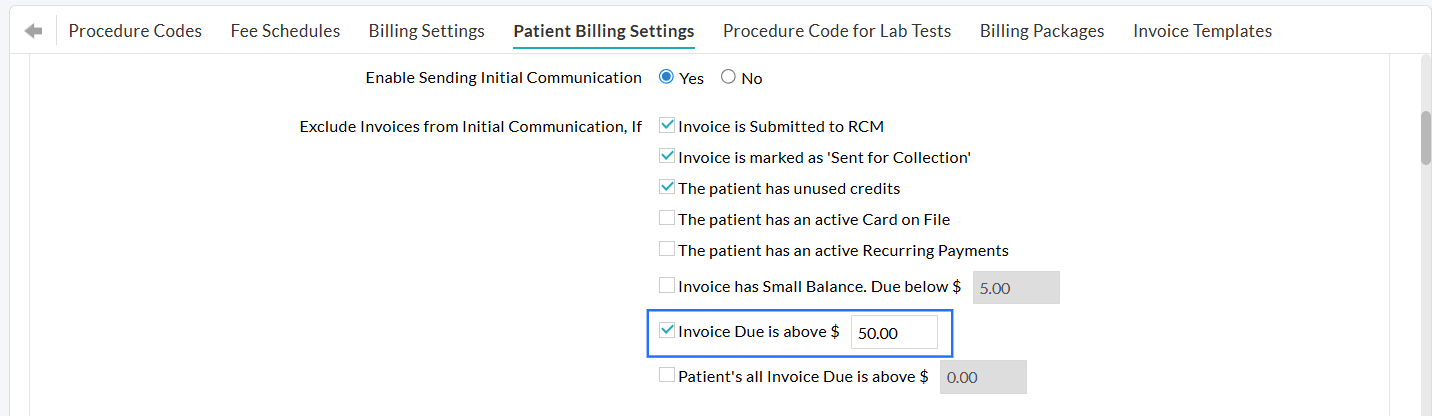
Practices can also exclude sending automatic reminders for invoices that exceed the configured amount.
For more information on the Patient Billing Automation feature and instructions to enable it for your Practice, visit our Resource Center
We hope that the above enhancements will help Practices set up billing effortlessly while maintaining better control over automated Patient Billing.
Have any questions or feedback? Drop us an Email at support@charmhealth.com
We are excited to unveil the integration of CharmHealth EHR with Surescripts' Record Locator and Exchange (RLE), enabling seamless interoperability between the healthcare systems. This enhancement allows Practices to securely exchange and retrieve Patients' medical records from external EHR vendors connected to the RLE network.
With this integration, Providers gain comprehensive visibility into the Patients' medical records, fostering improved care coordination and empowering them to make more informed clinical decisions.
Key Benefits
- Seamless interoperability: Retrieve and view clinical records shared by other Providers across the RLE network.
- Secure Record Sharing: Share signed Visit Summaries of e-RX-enabled Prescribers from CharmHealth with the other EHR vendors in the RLE network.
- Patient Consent Management: Obtain and record Patient consent before sharing or retrieving clinical data.
Prescribers can view the Patients' external documents within their CharmHealth EHR account to support clinical decision-making and improve continuity of care.
We hope that this integration will help Practices achieve enhanced interoperability and streamlined data exchange across care networks.
For detailed setup and workflow guidance, visit our Resource Center.
If you have feedback, questions, or need assistance, please contact our support team at support@charmhealth.com. We will help you sail through.
We are excited to announce an enhancement to the Phone Calls feature in CharmHealth EHR that streamlines inbound call management and enhances Patient communication.
With this update, Practices can now configure call extensions to route the incoming calls directly to the appropriate members or team (e.g., Front Office, Billing), ensuring smoother and more efficient handling of Patient inquiries.
Configuring Inbound Call Extensions
To enable extensions for the inbound calls, follow the steps below.
- Navigate to the 'Settings > Patient > Phone Calls' section.
- Under the 'Incoming Calls' section, choose the 'Receive' option.
- Enable the 'Extensions for Inbound Calls' setting.
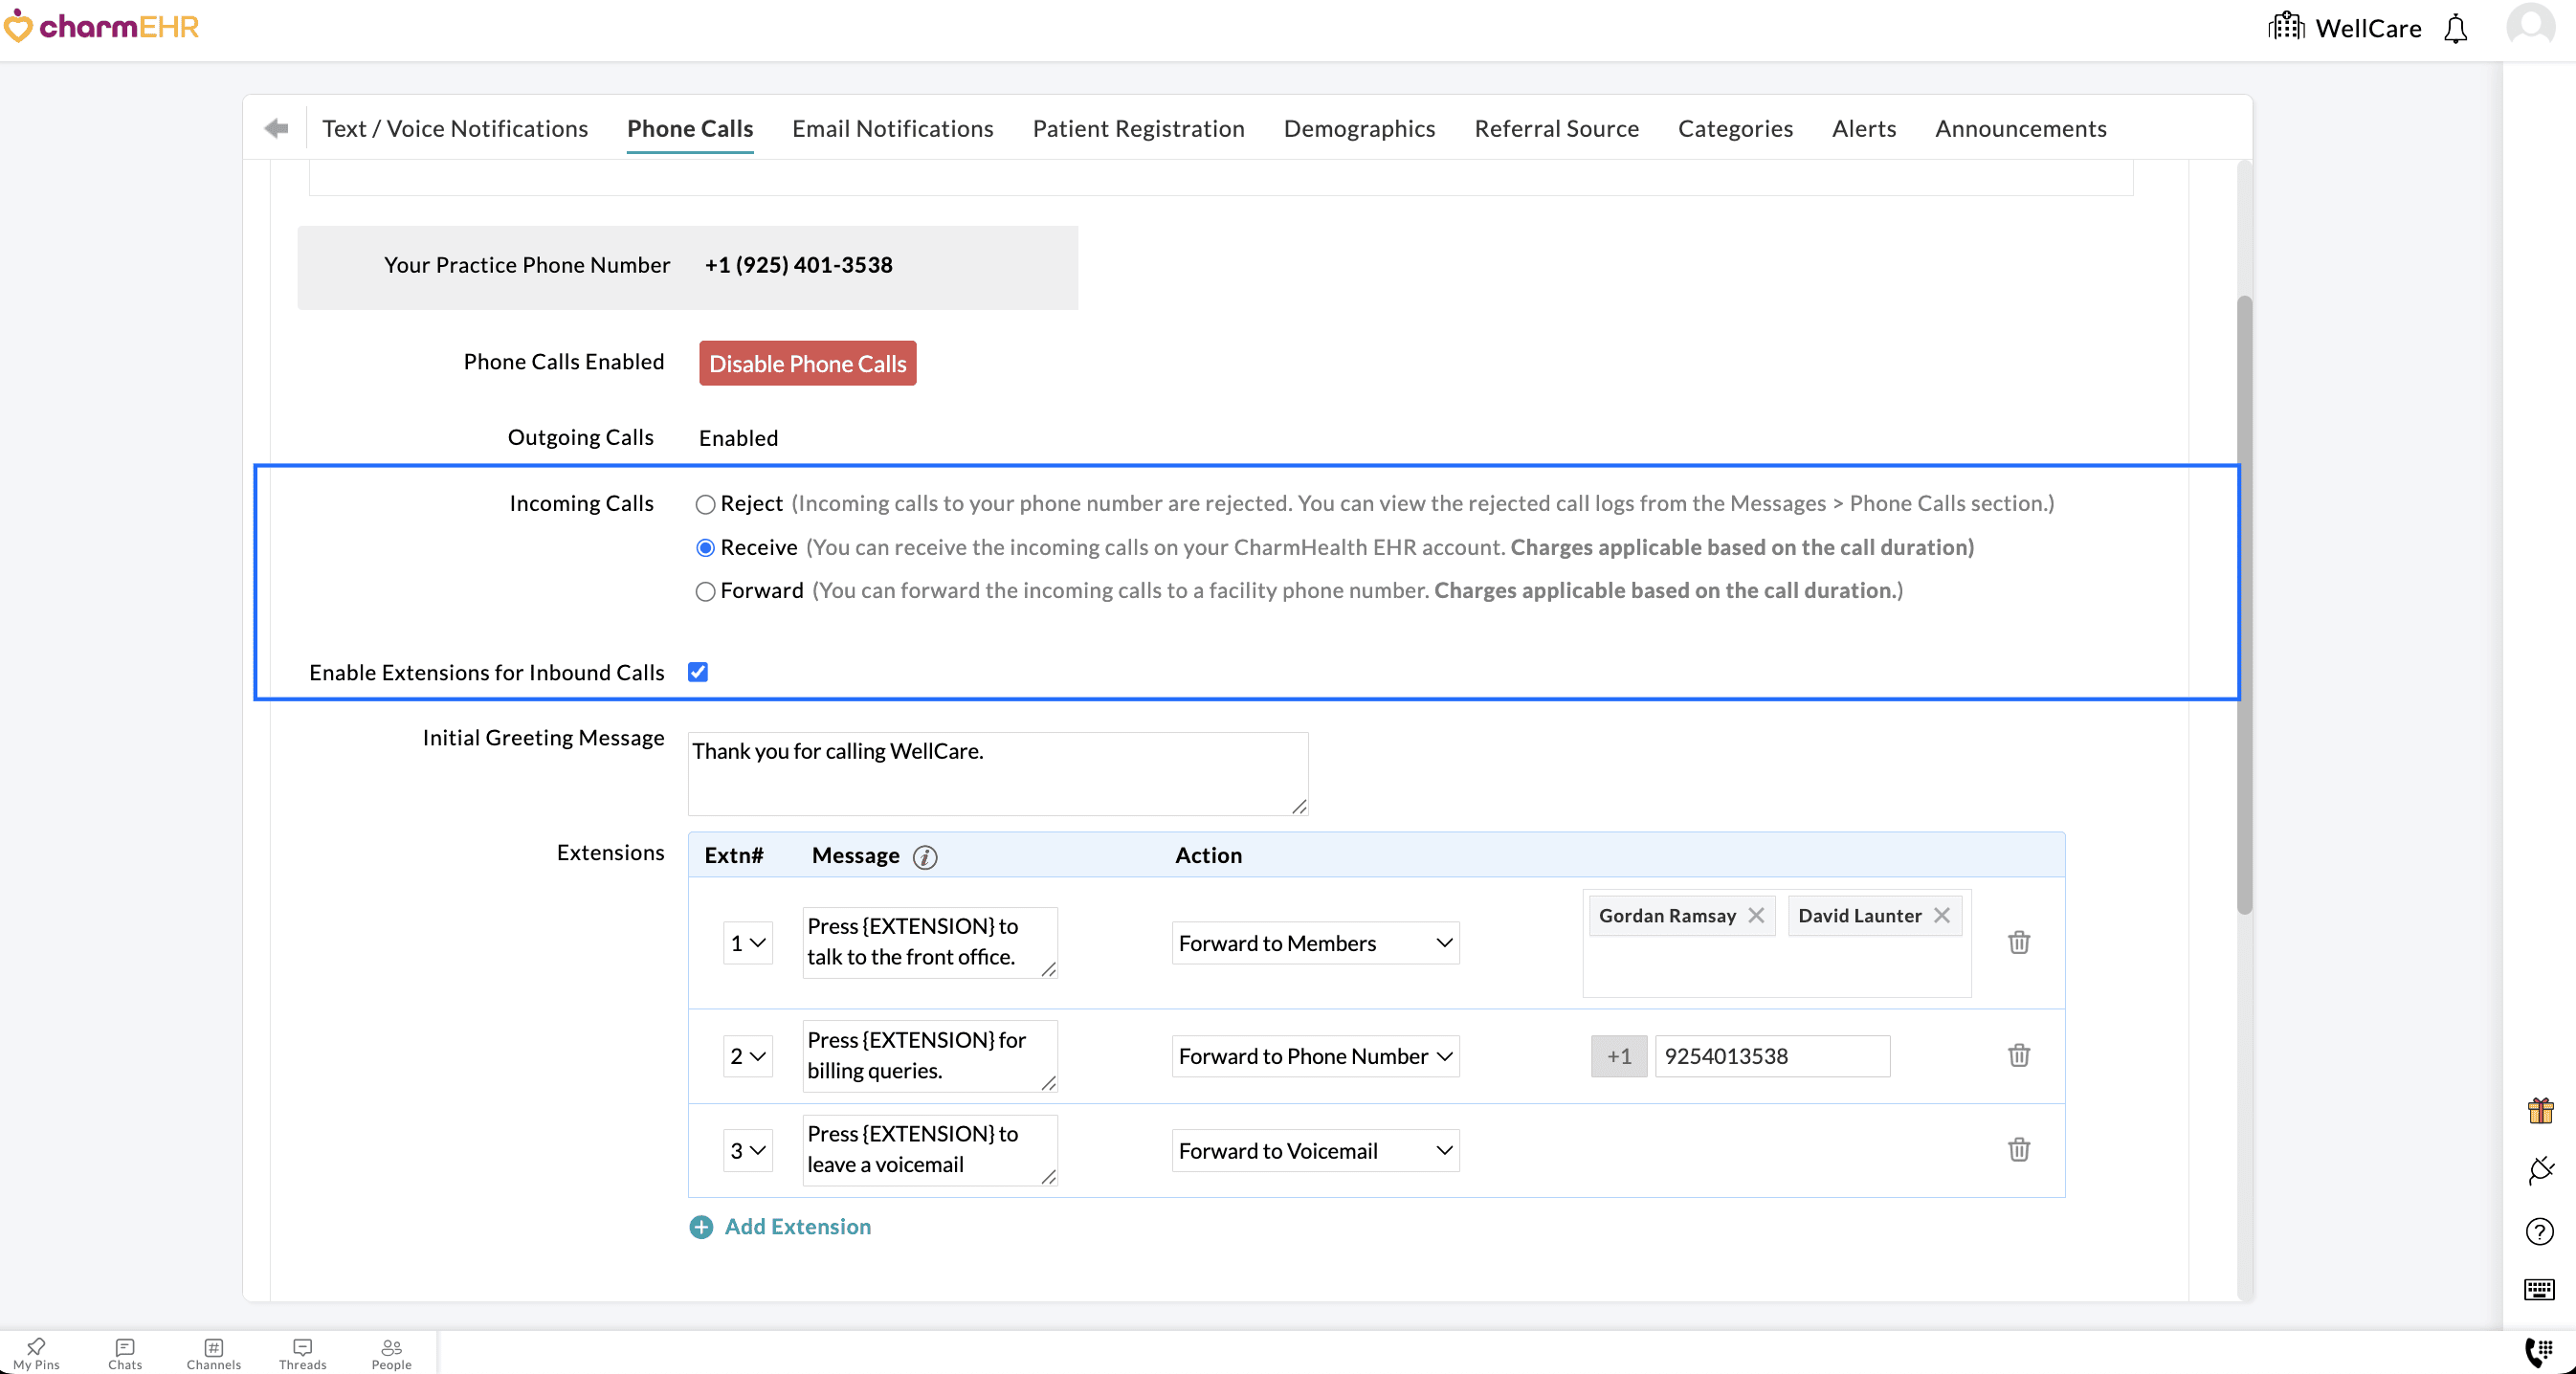
- Enter a custom 'Initial Greeting Message' to play when Patients call your Practice.
- Configure the extensions (0–9) to route the incoming calls based on your Practice needs.
You can assign one of the three actions below to each extension.
- Forward to Practice Members: This action enables you to forward the incoming calls to specific members within your Practice. When Patients choose this extension, members assigned get a notification and can answer the calls directly from their CharmHealth EHR account.
- Forward to Phone Number: You can use this action to route incoming calls to a different phone number, such as your desk phone or mobile device. When Patients select this extension, the call is forwarded to the configured phone number.
- Forward to Voicemail: This action allows Patients to leave a Voicemail. If a Patient leaves a voicemail, it appears under the 'Messages > Phone Calls > Incoming' section, along with the transcription (if enabled), for the members to review and respond promptly.
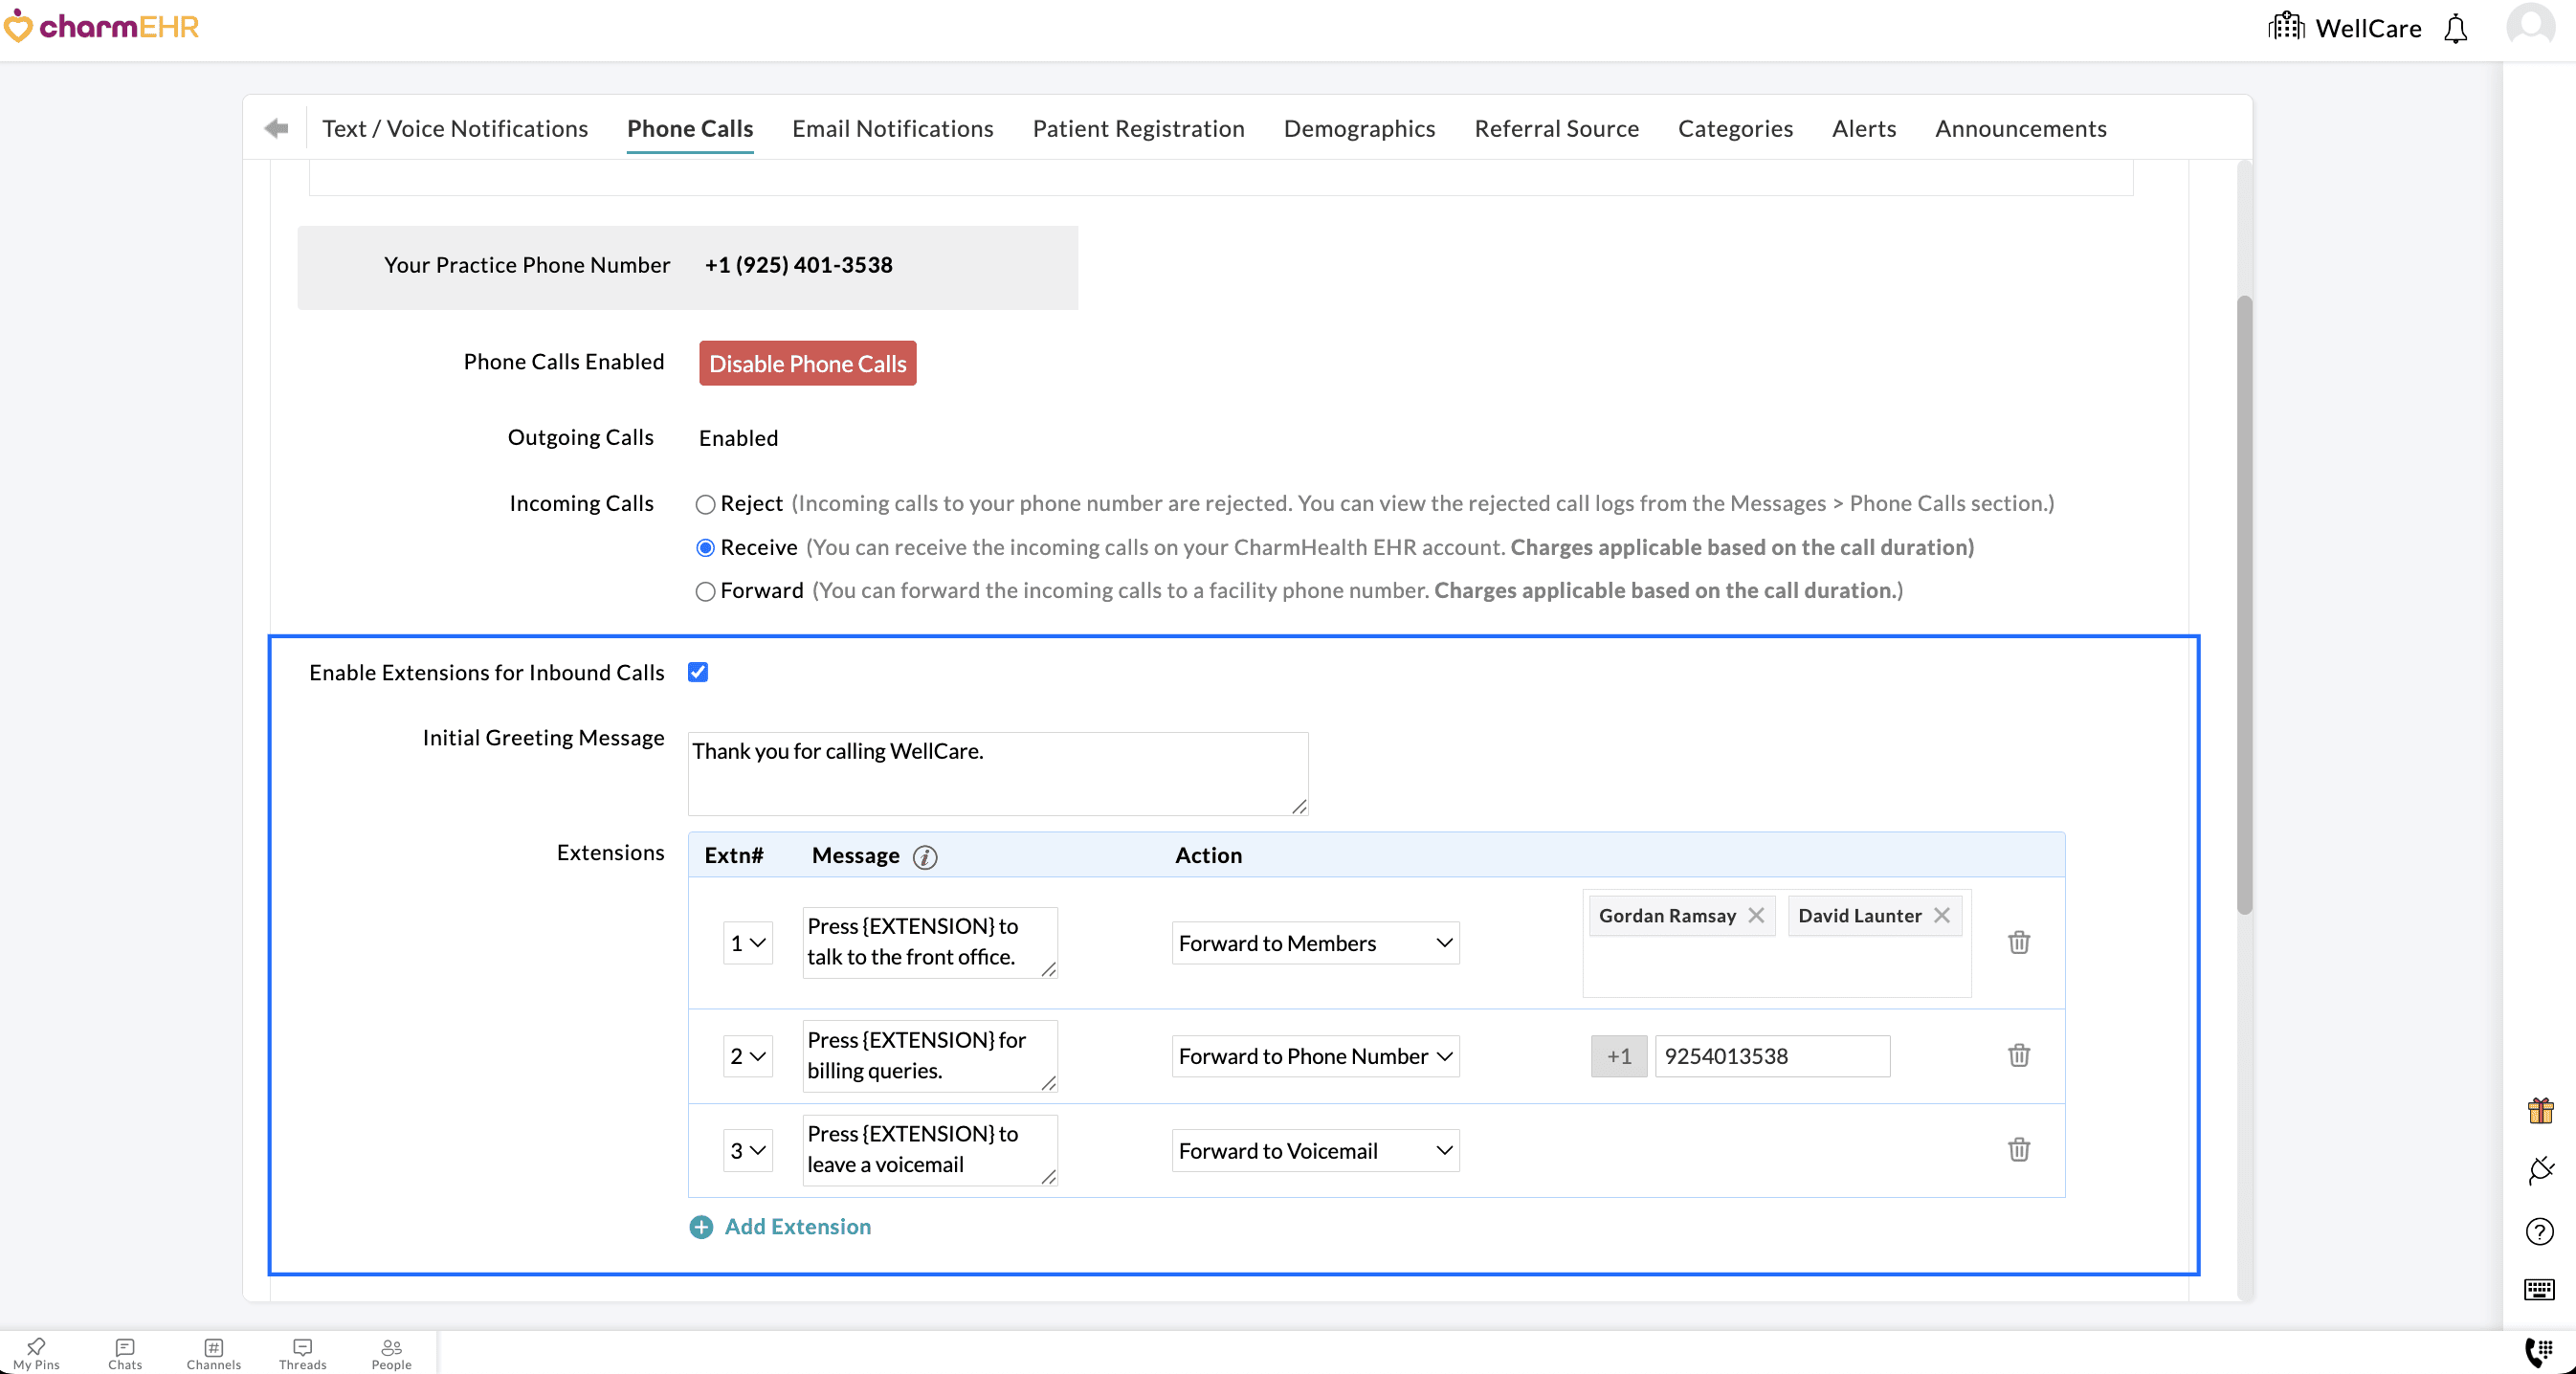
Example: When Patients call the Practice, they will hear the custom greeting message followed by a list of available extensions. For instance, if they have any billing inquiries, they can press extension 2 (as configured above) to reach the billing team.
To learn more about the Phone Call feature in CharmHealth EHR and use it for your Practice, visit our Resource Center.
We hope these enhancements will improve the call-handling experience and streamline communication for your Practice.
For any questions or assistance, please reach out to our support team at support@charmhealth.com
We are excited to unveil the Patient Billing Automation feature, designed to simplify and optimize your Patient Billing workflow by automatically sending Invoices and payment reminders to Patients once their insurance claims are processed.
If your Practice has Secondary Claim Processing enabled, the system will automatically wait until the secondary claims are fully processed before including those Invoices in the automation.
Instead of manually tracking claim completion, preparing statements, and following up for payments, the system intelligently handles these steps for you.
This automation reduces the manual effort required by billers, minimizes delays in sending statements, and ensures timely and consistent communication. It also helps improve Patient collection while reducing the billing workload.
Key Features
- Automatically sends initial Invoice notification to Patients with a secure payment link.
- Sends reminder emails or text messages based on your configured schedule.
- Let you define your billing cycle frequency—on a specific weekday, monthly, or twice a month.
- Allows configuration of reminder frequency.
- Option to continue sending reminders until the Invoice is fully paid.
- Ability to exclude Invoices based on specific criteria such as Patient credits, card on file, recurring profile, small balances, etc.
- Choose preferred communication modes—Email, Text, or PHR.
- Option to send multiple outstanding Invoices of a Patient as a single consolidated statement.
- Provision to track automation progress—including Invoices scheduled, sent, and excluded—from a dedicated dashboard.
- Enabling Patient Billing Automation
- Configuring Billing Cycle Frequency
- Enabling Automation for 'Initial Communication' and 'Reminders'
- Excluding Invoices from Automatic Patient Billing
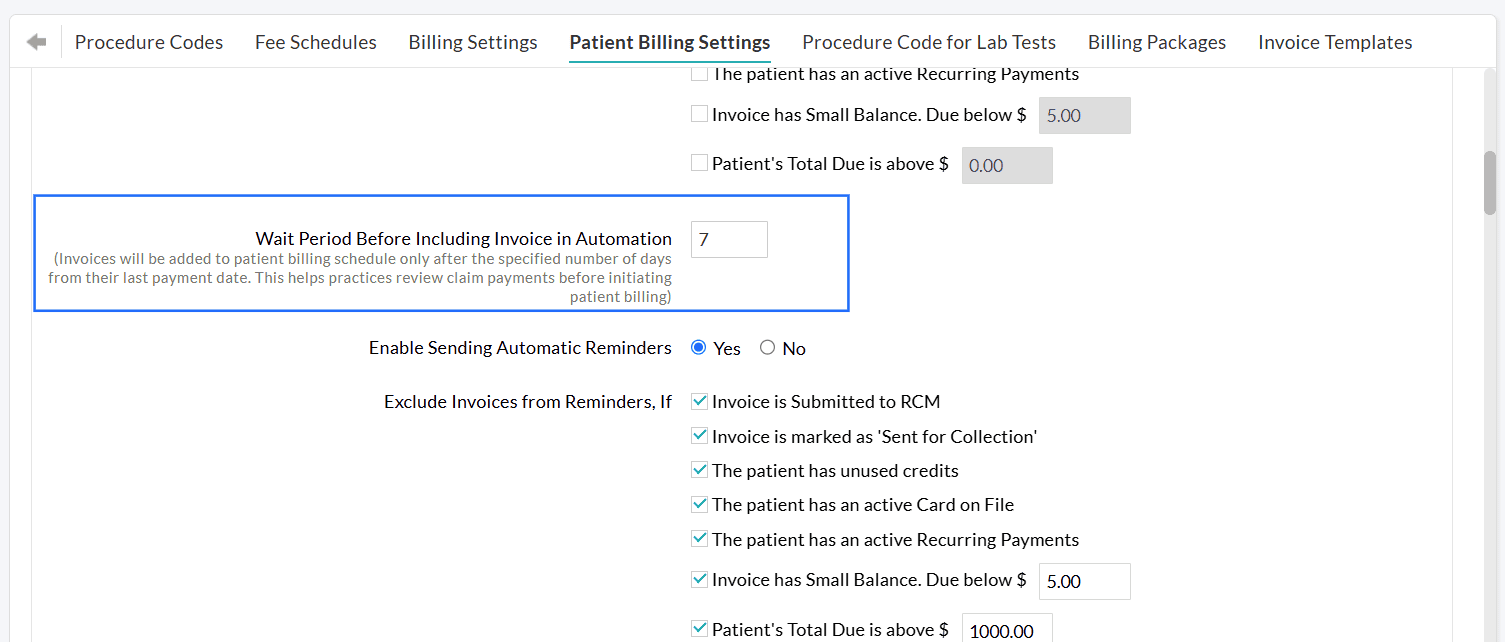
- Wait Period Before Including Invoice in Automation
- Configuring Automation for Reminders
To enable sending Invoices automatically to Patients, navigate to 'Settings > Billing > Patient Billing' and choose 'Yes' for 'Enable Patient Billing Automation'.
Once enabled, Practices can track the automation status from Billing > Invoices > Patient Billing Automation. This dashboard displays Invoices that are scheduled, excluded, or already sent, and allows Practices to manually exclude specific scheduled Invoices from future runs.
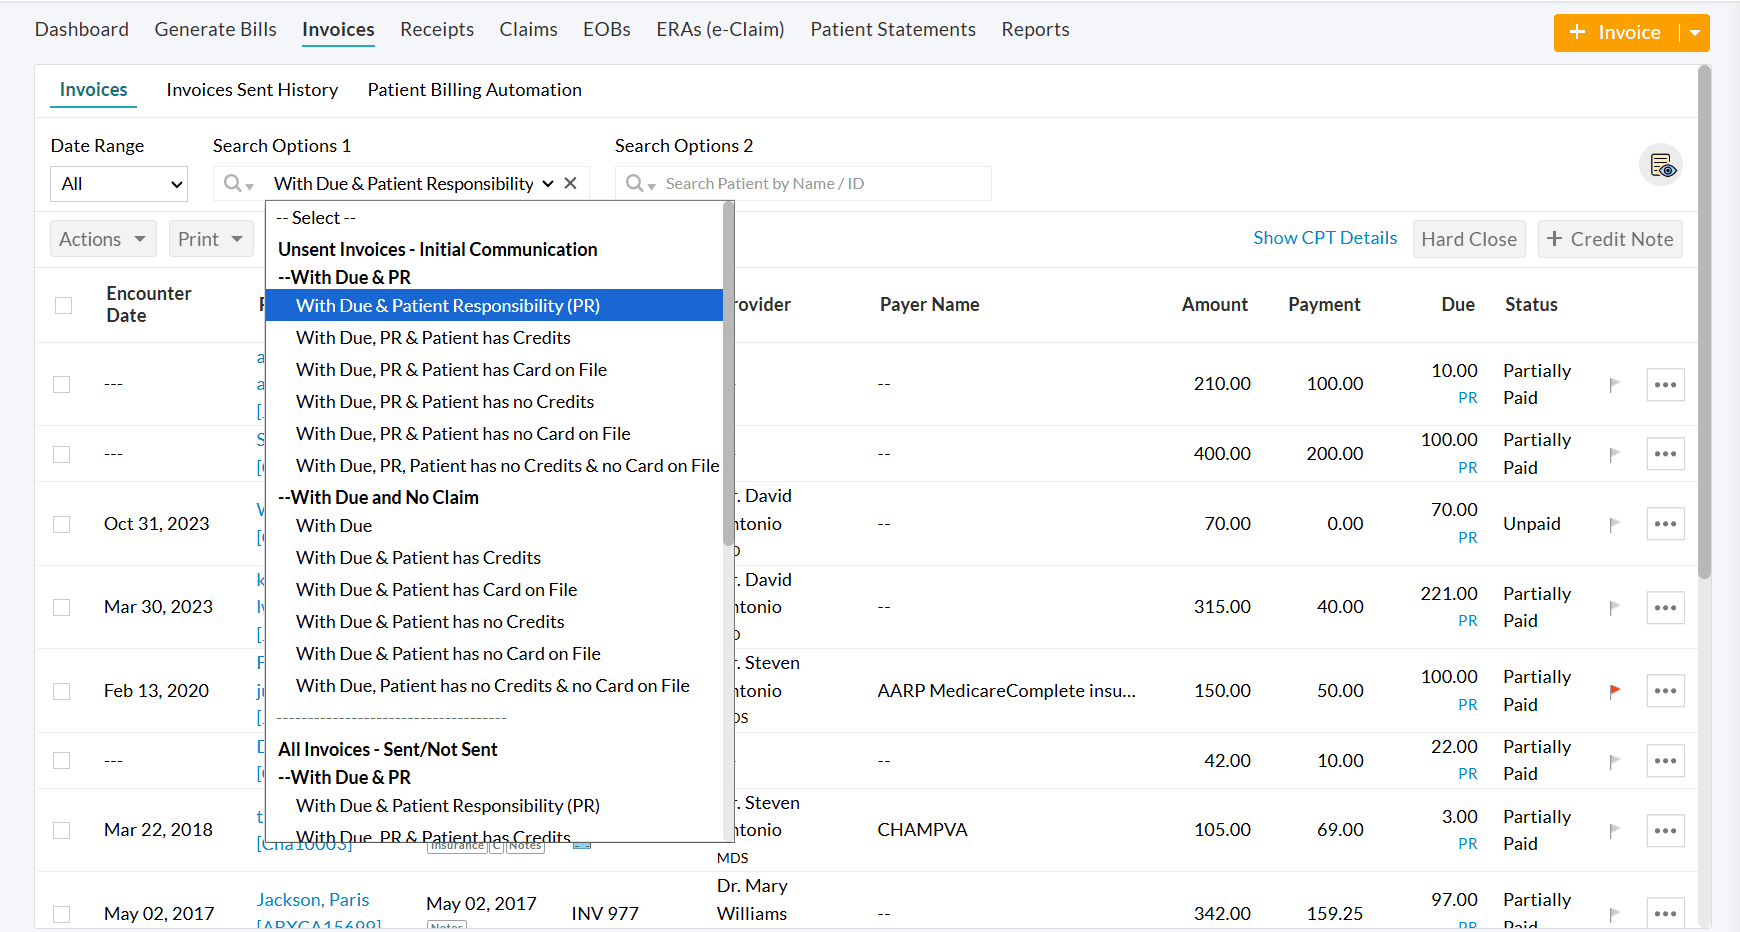
Which Invoices are Included in Patient Billing Automation?
- Invoices for which the Claims are processed and have a PR balance Due are included in the Patient Billing Automation.
- Invoices for which the Secondary Claims are fully processed are included in the automation.
- All Invoices under the filter 'Billing > Invoices > Search Options 1 > Patient Billing - Initial communication > With Due and Patient Responsibility' are automatically considered for initial communication automation.
- All Invoices, except those that fall under any configured exclusion criteria, are processed through automation.
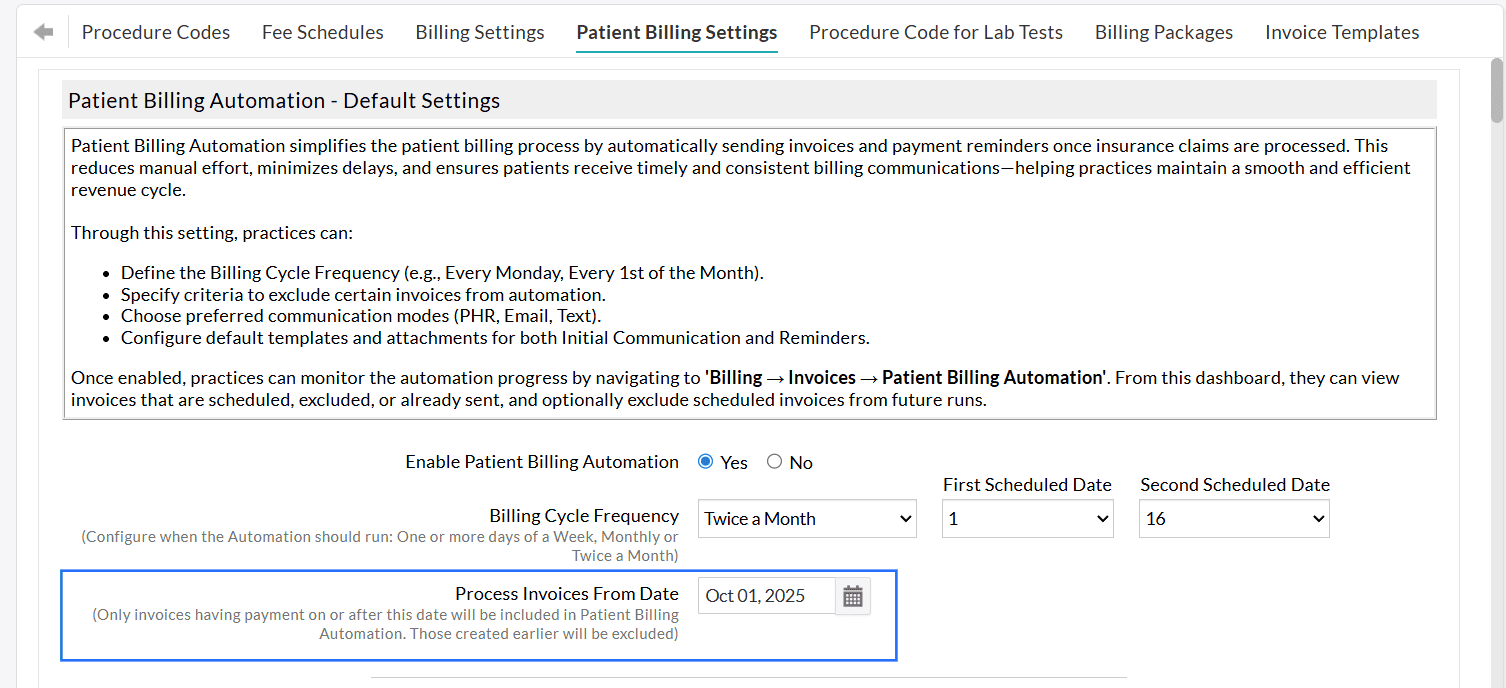
Choose how often Invoices should be sent automatically to the Patients. You can configure the automation to run on a Specific Days of a Week, Monthly, or Twice-a-Month schedule based on your Practice’s billing workflow.
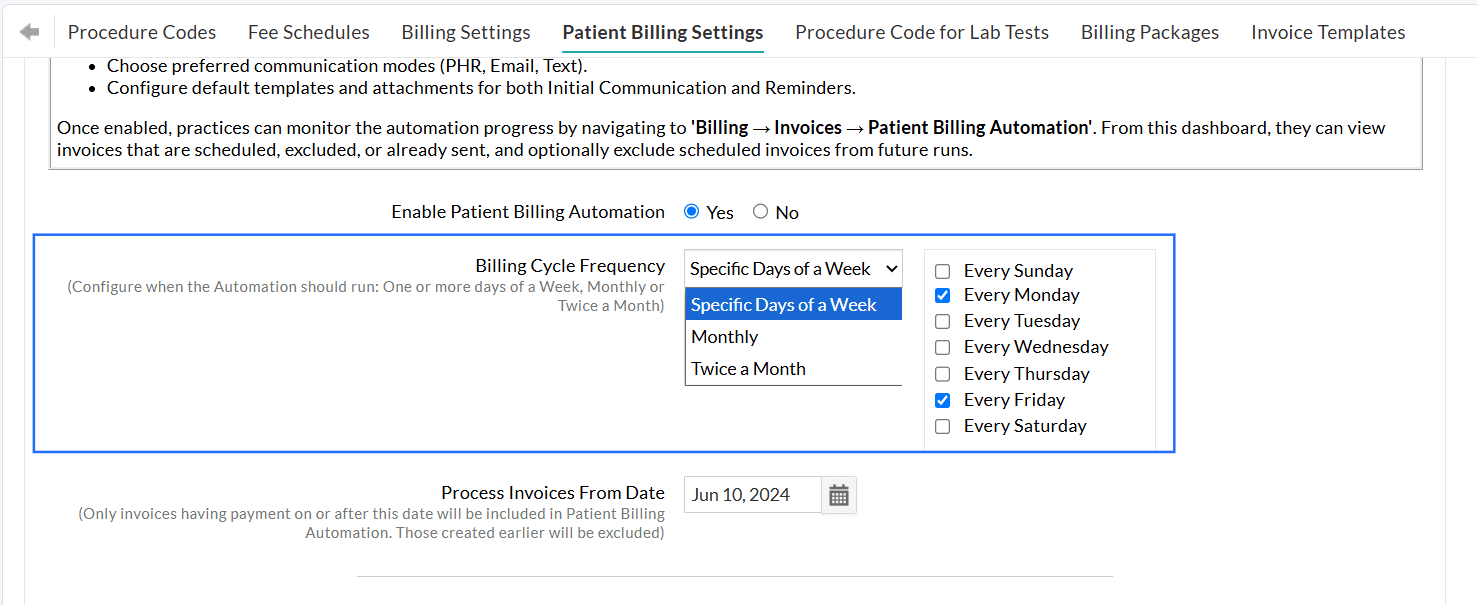
- Specific Days of a Week - Choose the specific days of the week (e.g., Every Monday, Every Tuesday, Every Wednesday, etc.) Example: If you select Specific Days of a Week → Every Monday and Every Friday, the system automatically sends all eligible Invoices to Patients every Monday and Friday.
- Monthly - Select a specific date of the month (e.g., 1st or 15th of every month)
- Twice a Month - Choose two specific dates of every month (e.g., 1st and 16th of every month)
Process Invoice From Date
Set a start date to begin the automation. Only Invoices with payments posted on or after this date will be considered for automation.
Practices can automate sending the first Invoice communication to Patients by navigating to 'Settings > Billing > Patient Billing Settings'.
Choose 'Yes' for 'Enable Sending Invoice Automatically'.
Practices can choose to automate only the initial communication while handling the reminders manually. Alternatively, they can send the initial communication manually and automate the reminders.
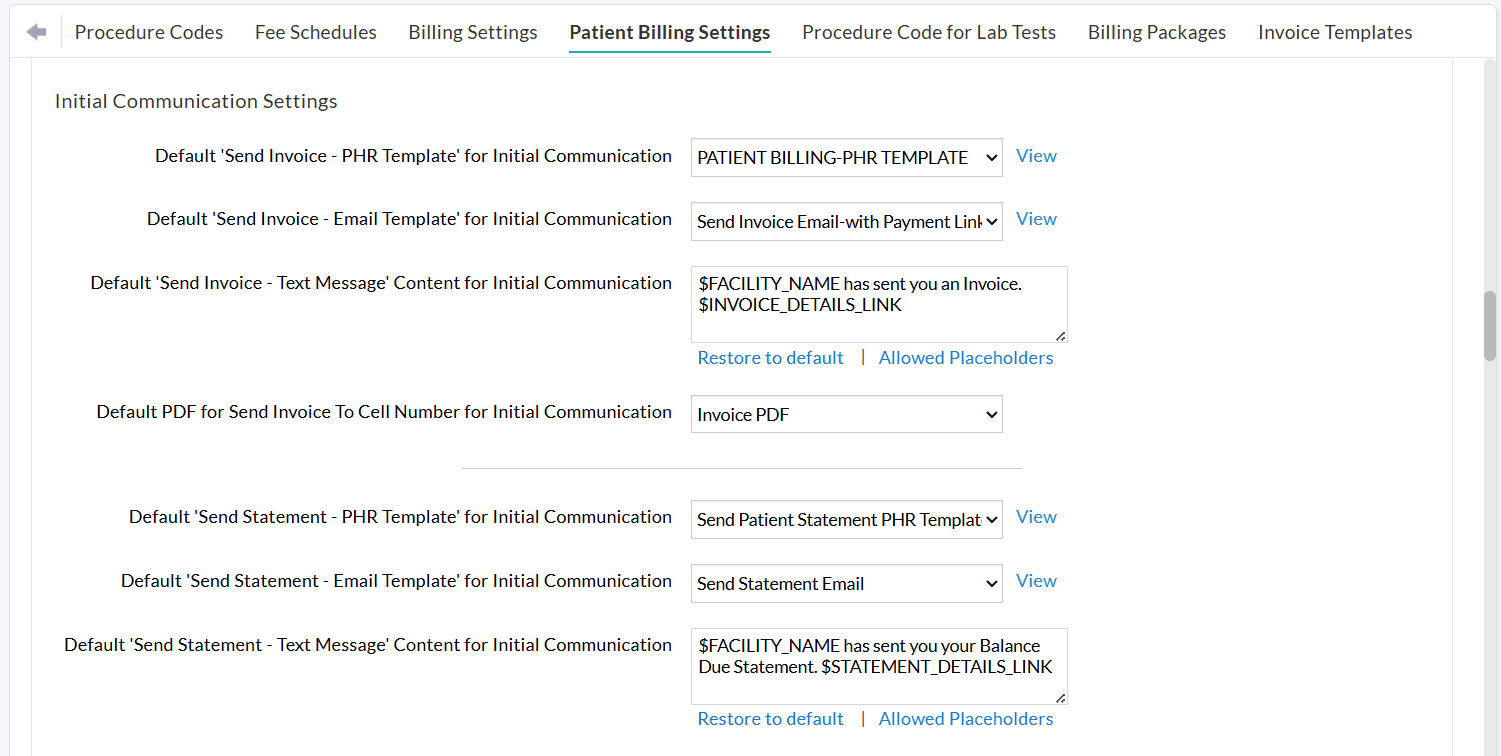
You can configure default preferences for Initial Communication and default templates for sending Invoices/Statements through different communication modes under Patient Billing Automation Settings.
If a Patient has more than one outstanding Invoice, you can enable the ‘Send as Statement’ option to combine and send them as a single statement.
You can exclude Invoices from being sent automatically under the following conditions:
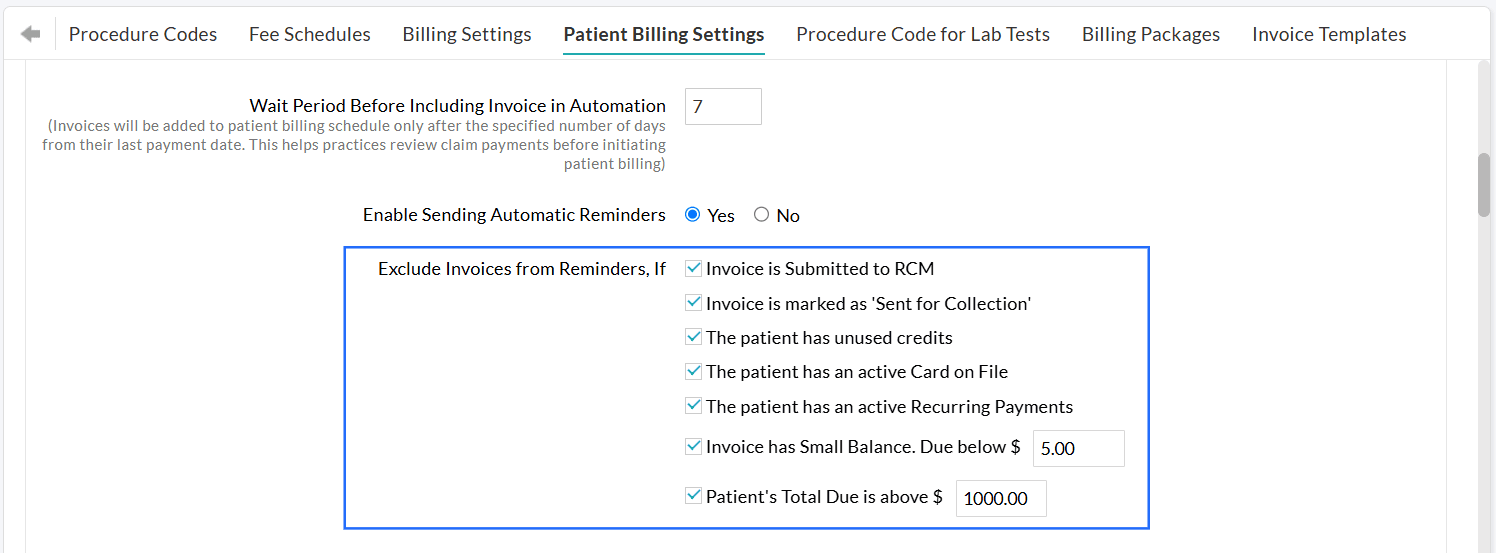
- Invoice is Submitted to RCM: This option is applicable for Practices that use Charm RCM or Charm BillerPro. Invoices submitted to RCM will be excluded from sending to Patients.
- Invoice is marked as 'Sent for Collection': Invoices sent to the collection agency will be excluded from sending to Patients.
- The Patient has unused credits: If the Patient has existing credits in their account, the Practice can apply these credits to clear outstanding Invoices. The Practice can exclude all Invoices of the Patient that have available credits. Once the Practice applies the unused credits to the Invoices, the remaining Invoices will be added to the automation.
- The Patient has an active Card on File: If a Patient has a card on file saved in CharmHealth, and the Practice has obtained consent to charge the Patient’s card, their outstanding dues can be cleared by processing the payment using the saved card. In such cases, Invoices for Patients with an active card on file can be excluded.
- The Patient has an active Recurring Payments: Practices that offer customized payment plans for Patients to settle their outstanding balances in manageable installments can enable this option.
- Invoice has a Small Balance: Invoices with a due below a configured limit (e.g., $5.00) can be excluded.
- Patient's Total Due is above a certain amount: Invoices exceeding a configured amount (e.g., $1,000) can also be excluded. This allows Practices to verify high-value dues before sending them to the Patient.
Note: Practice must review all the excluded Invoices and send them manually if required.
Practices can configure the number of days the system should wait before an Invoice is scheduled for automation.
The Waiting Period will be applicable after the Claim payment is processed for the Invoice.
This helps Practices to:
- Review Claim payments and adjustments (All Invoices scheduled for sending will be listed under the 'Invoices > Patient Billing Automation' section.)
- Handle any special Patient Billing needs of some Patients.
Example:
Configure a Wait Period of 7 days.
- The insurance payment is posted to an Invoice on October 10th.
- The 7-day waiting period begins. The Invoice will not be sent during this time. Practices can review the Invoice payments.
- On October 17th, the waiting period ends. The Invoice will then be sent to the Patient automatically on your next scheduled billing cycle.
Note: If the Claim is resubmitted before the wait period is over, the Invoice will be automatically excluded from the automation.
After the initial Invoice is sent, you can also automate follow-up reminders to Patients who still have outstanding dues.
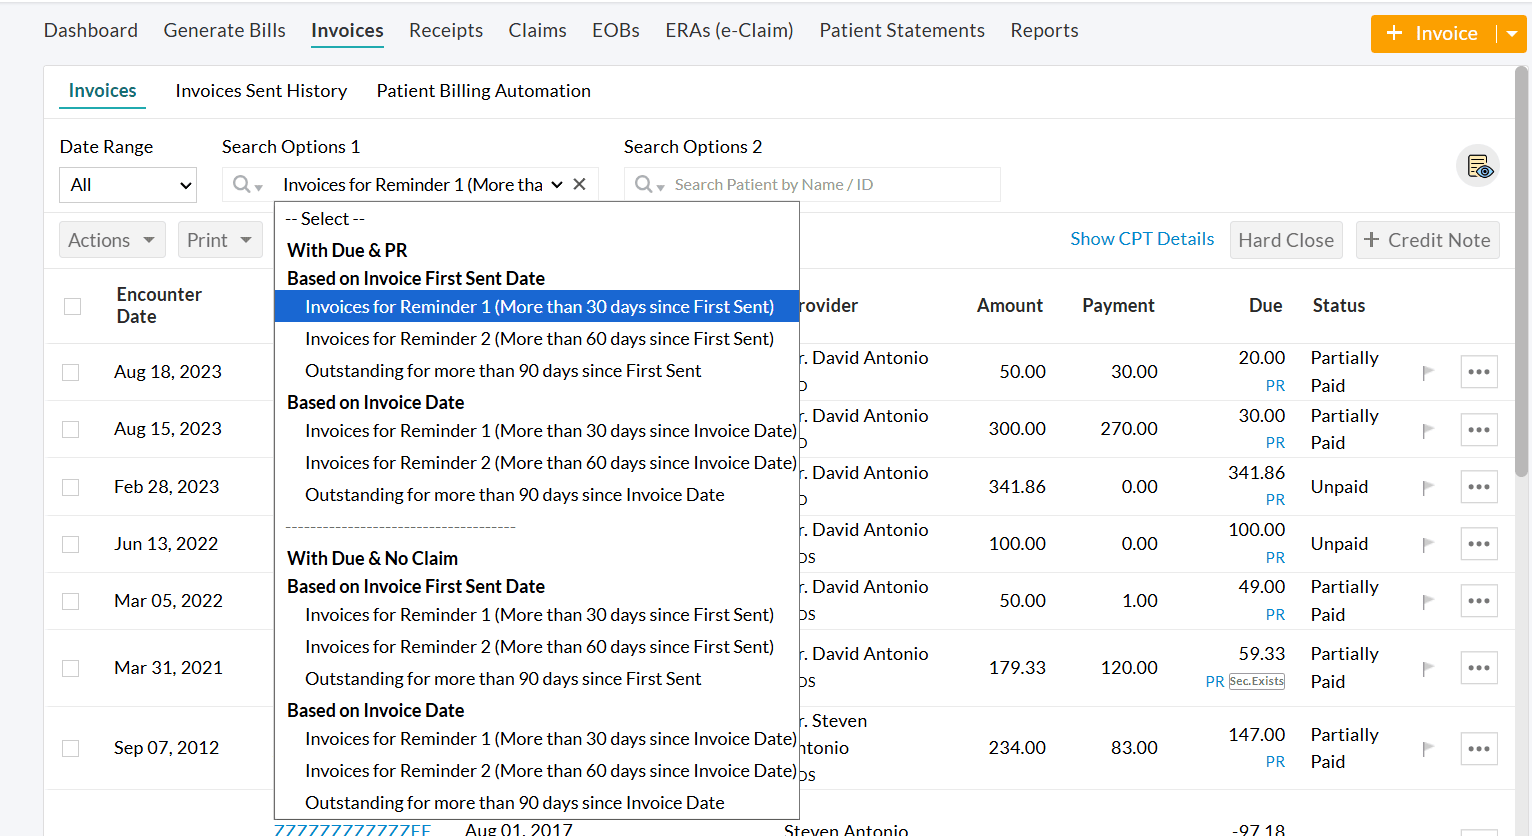
Invoices located within 'Billing > Invoices > Search Options 1 > Patient Billing - Reminders' are processed for automated reminders.

To enable this feature,
- Navigate to 'Settings > Billing > Patient Billing Settings'.
- Choose 'Yes' for 'Enable Sending Automatic reminders to Patients'.
You can configure separate exclusion criteria for reminders, similar to the initial communication.
Practices can customize the Reminder settings, such as:
- How often should reminders should be sent to the Patients
- How many reminders should be sent?
You may send up to three follow-up reminders for each Invoice following the initial communication and opt to keep sending them at the set frequency until the Invoice has no remaining balance.
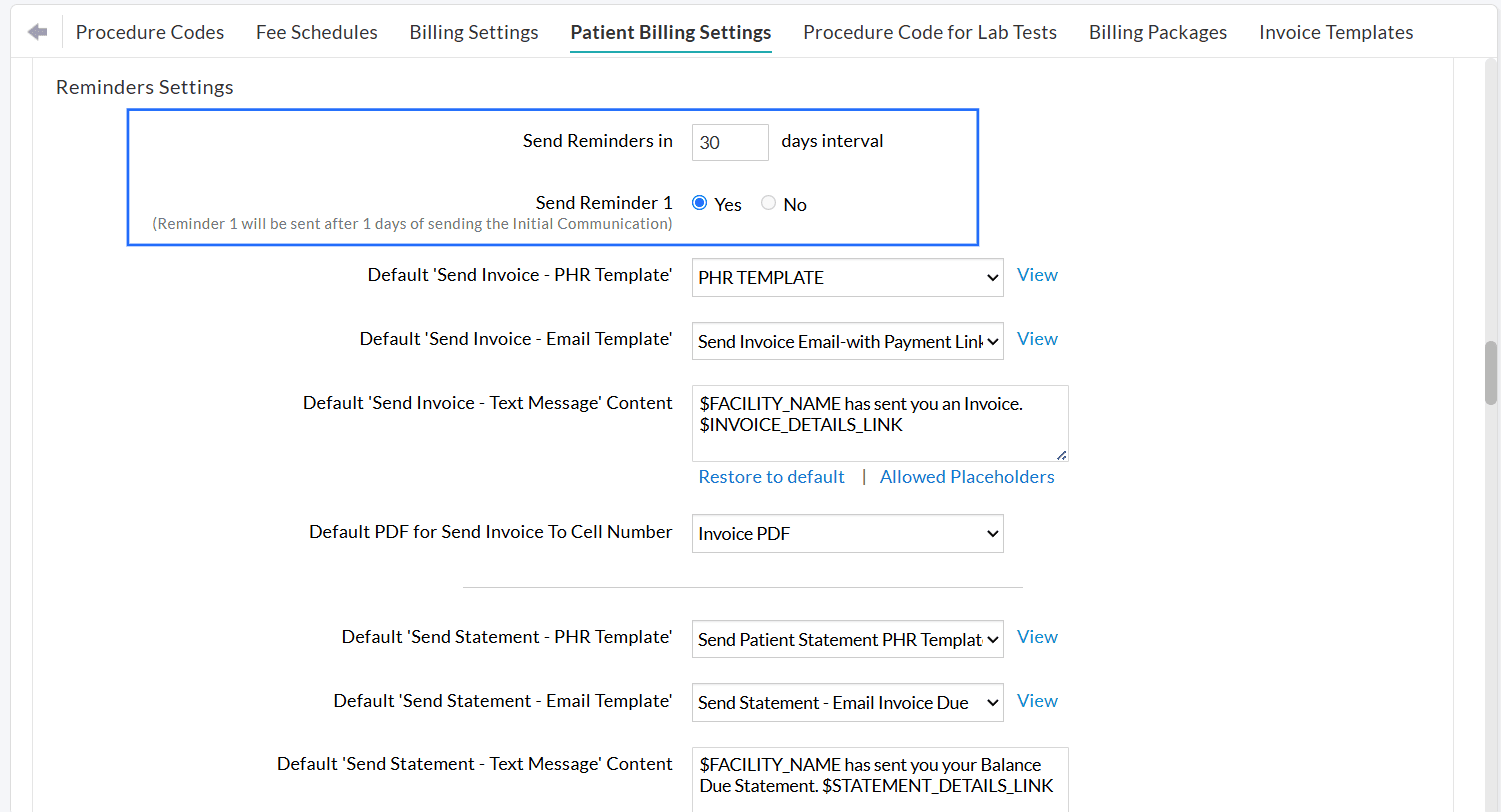
Note: The configured reminder frequency and schedule will be applied while sending Invoices from 'Billing > Invoices > Search Options 1 > Patient Billing - Reminders'.
You can also configure the default templates for each reminder (Reminder 1, Reminder 2, and Reminder 3) based on the chosen communication mode(s).
We believe that Practices can now experience a smoother, faster, and more reliable billing process with Patient Billing Automation.
Visit our Resource Center for more detailed information.
Have any questions or feedback? Drop us an Email at support@charmhealth.com
We are excited to announce a set of enhancements to the Billing module, providing greater clarity in how Patient and Insurance balances are calculated based on your Practice type. These updates also make sending Patient Statements more streamlined and effortless.
The enhancements include:
- Handling Invoice Balances for Cash-Based and Insurance-Based Practices
- Enhancements to Patient Statements
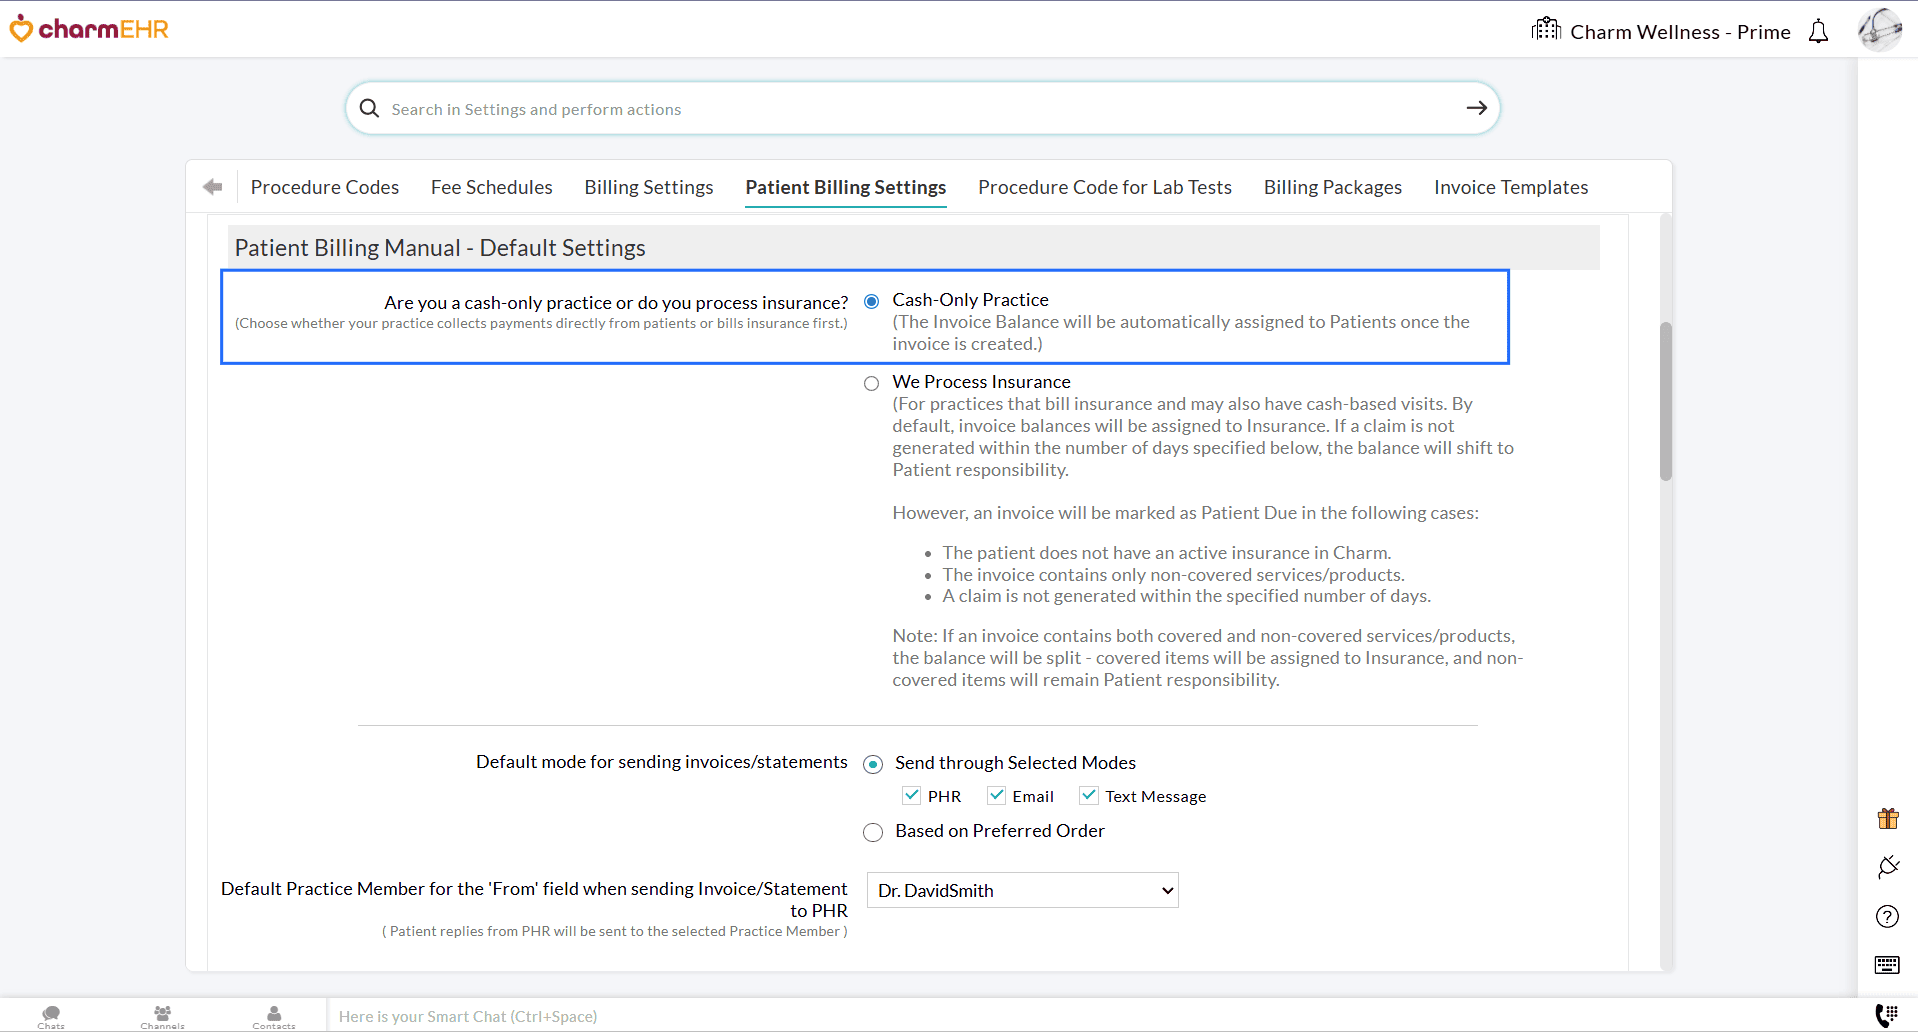
Previously, the Invoice Balance was immediately assigned to Patient Due until a Claim was generated.
With this enhancement, Practices can now choose to keep the Invoice balance under Insurance Due as soon as the Invoice is created. The balance will remain under Insurance Due for a specified number of days, even if a Claim has not been generated.
This update helps Insurance-based Practices avoid billing Patients prematurely before the Claim is generated or processed, ensuring better accuracy in Invoice tracking and reporting.
Navigate to 'Settings > Billing > Patient Billing Settings > Patient Billing Manual-Default Settings' and choose whether you are a Cash-based or Insurance-based Practice.
- For Cash-based Practices, Invoice balances are automatically assigned to the Patient Responsibility unless a Claim is generated.
- For Insurance-based Practices that also handle cash-based visits, the Invoice balances are initially
assigned to the Patient's Insurance by default. If a Claim is not
generated for an Invoice within the specified timeframe, the balance
shifts automatically to Patient Responsibility.
Practices can configure this timeframe to create a Claim, for example, 7
days, during which the Invoice balance remains under Insurance Due
until a Claim is generated.
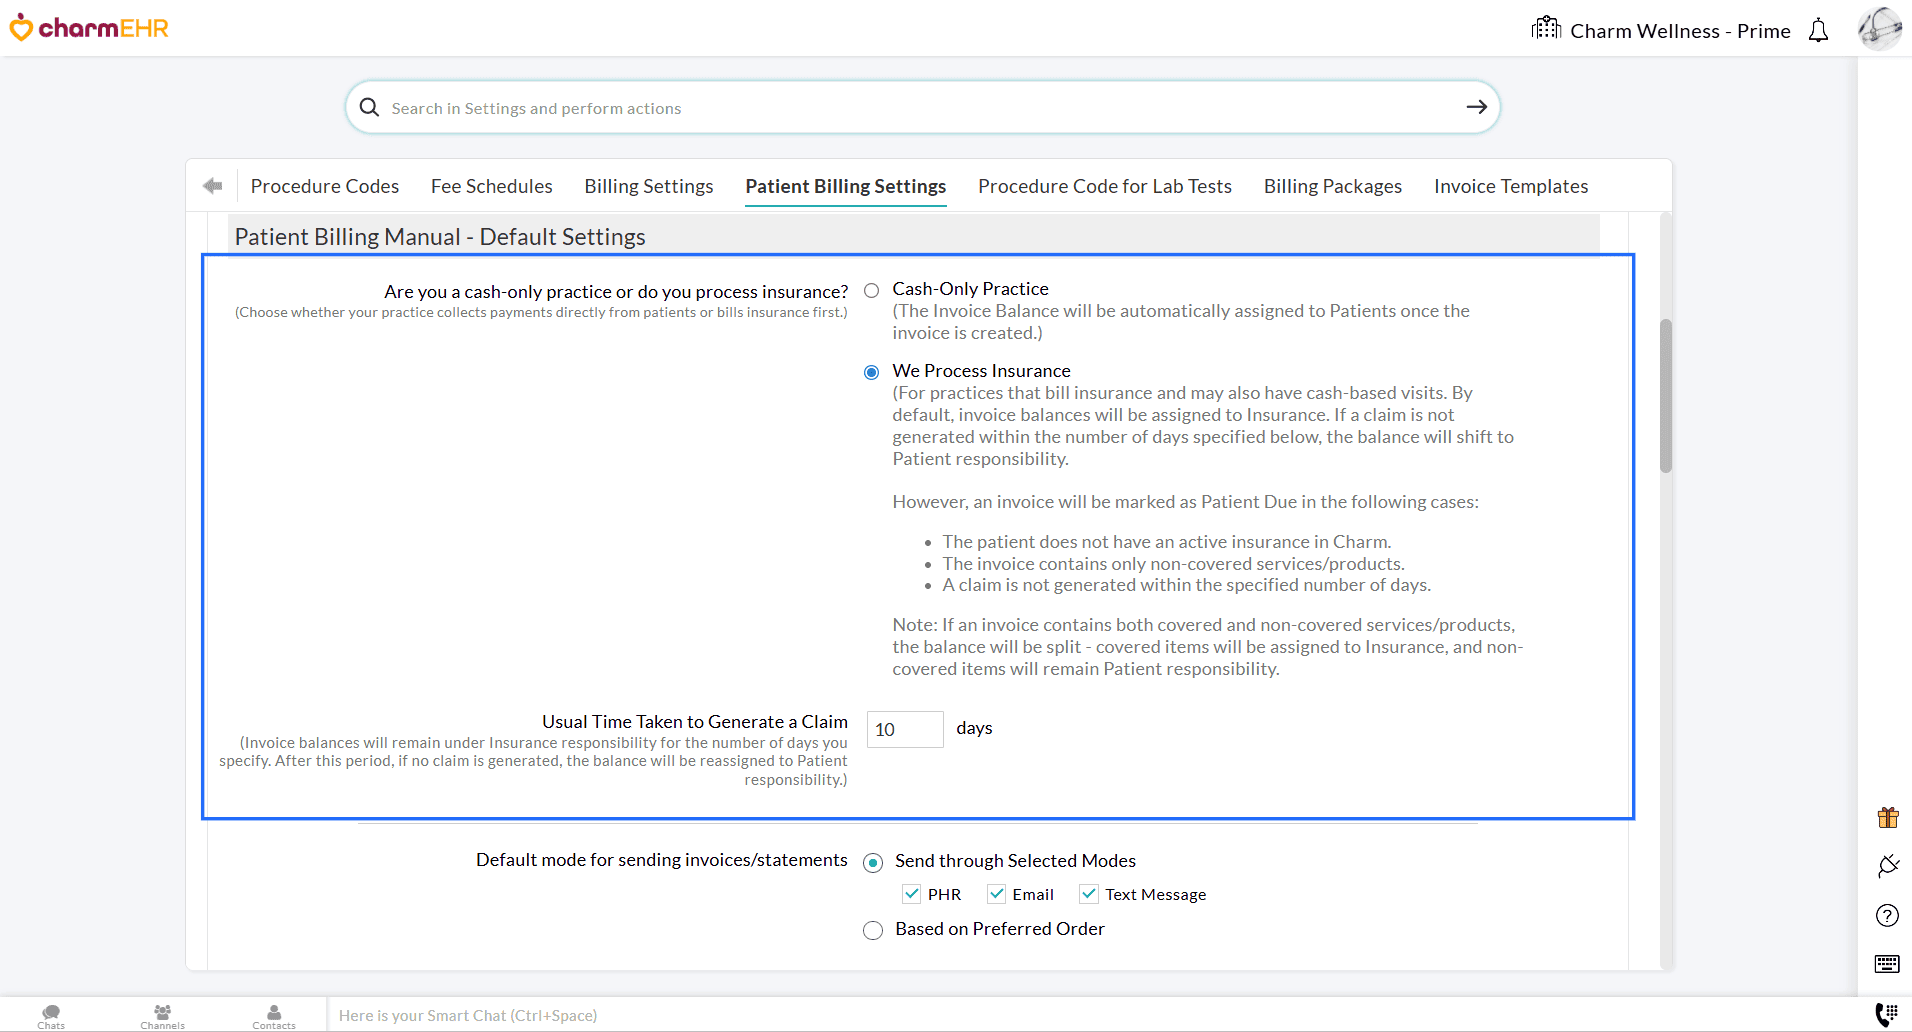
- Even for Insurance-based Practices, there are certain scenarios where
an Invoice balance will be assigned directly to Patient Responsibility.
These include:
- The Patient does not have active insurance.
- The Invoice includes only non-covered services or products.
- A Claim is not generated within the specified timeframe.
Note: If an Invoice has both covered and non-covered services or products, the balance will be split accordingly: covered services are assigned to the Insurance, while non-covered services are assigned to Patient Responsibility.
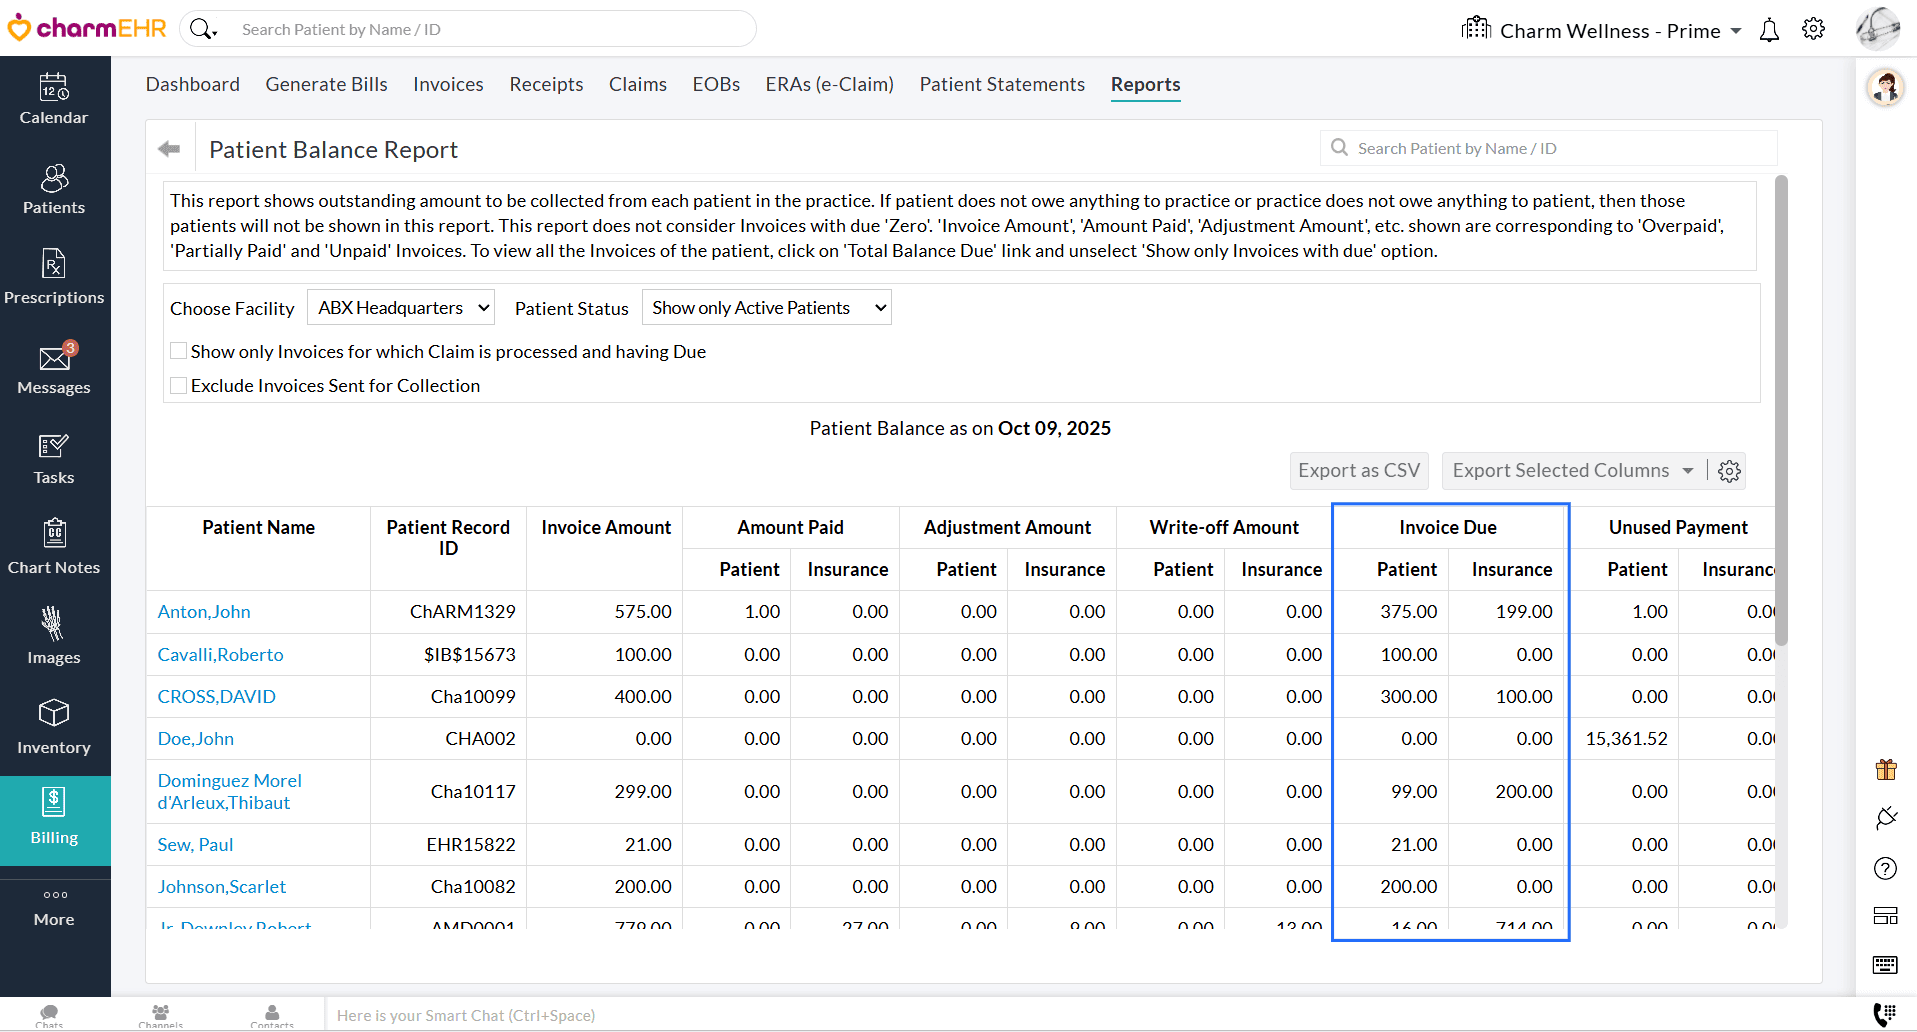
These Invoice balances are reflected in the following sections:
Patient Dashboard > Balance Due
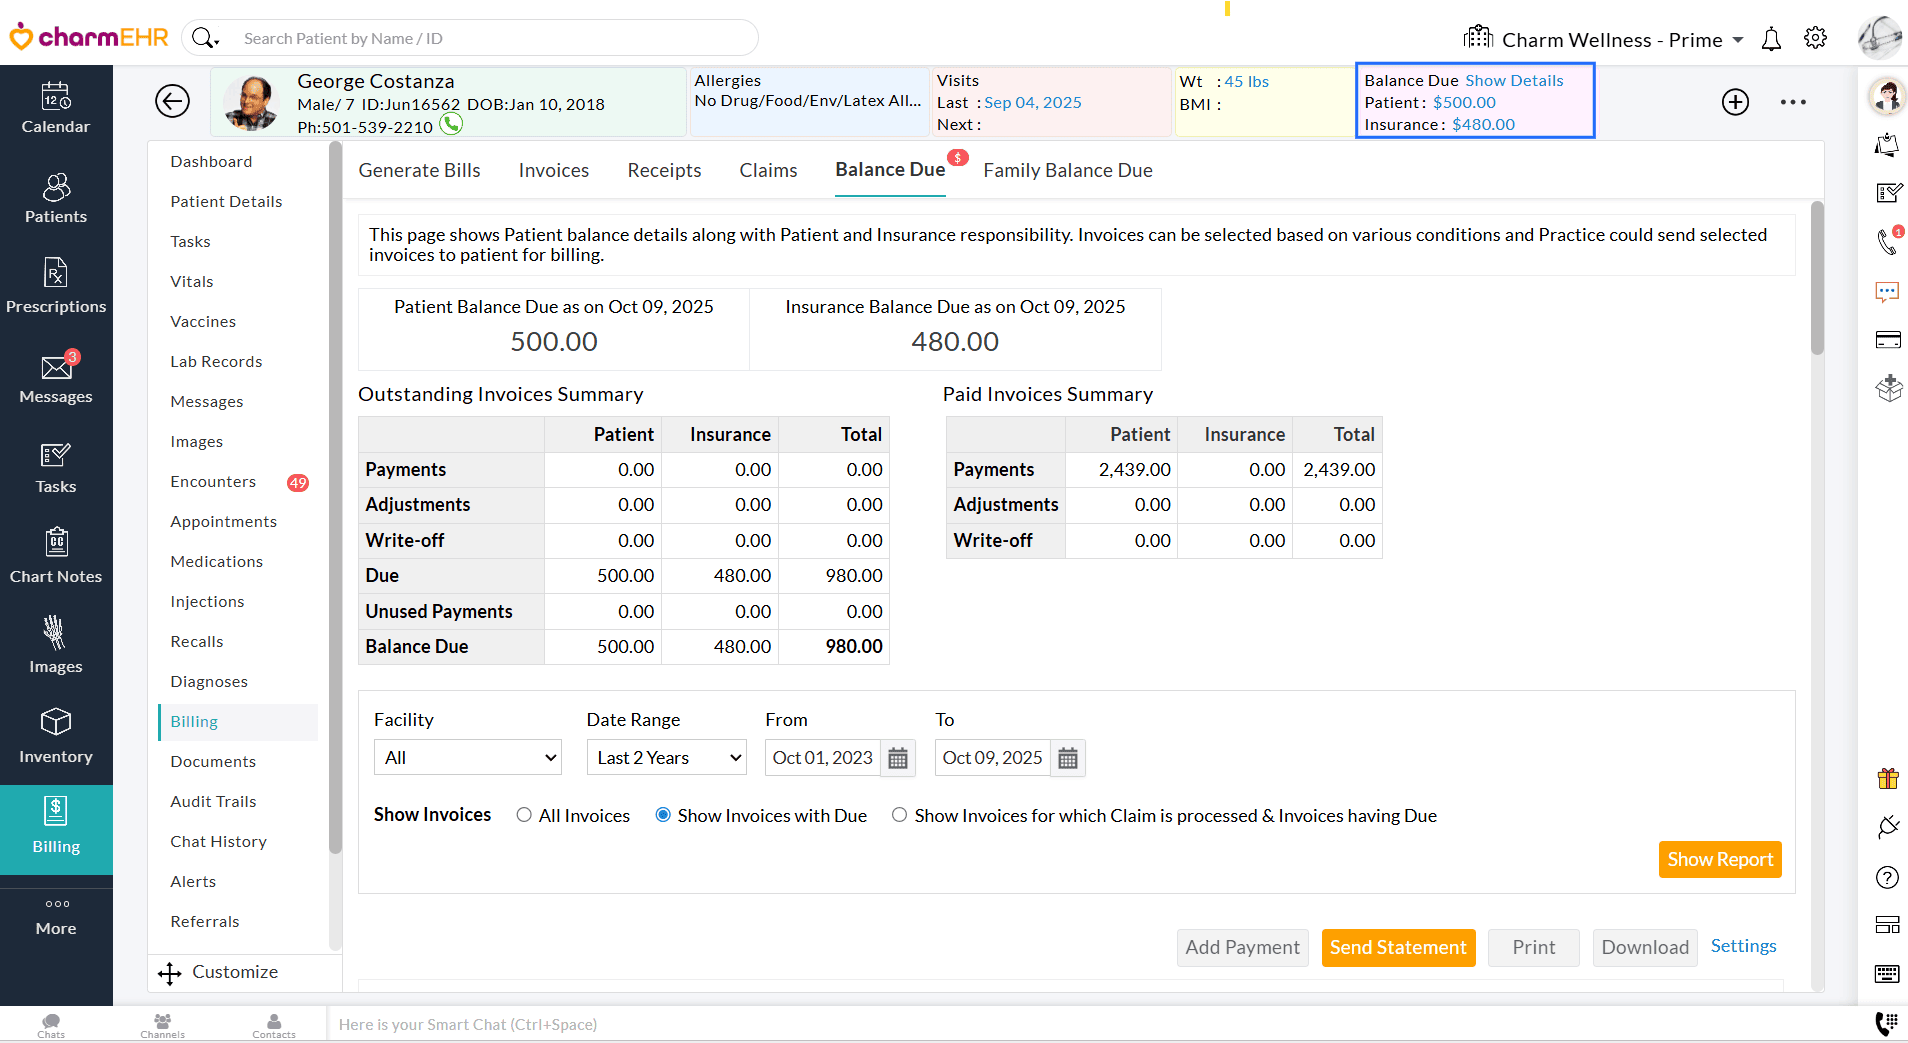
Billing > Patient Statements
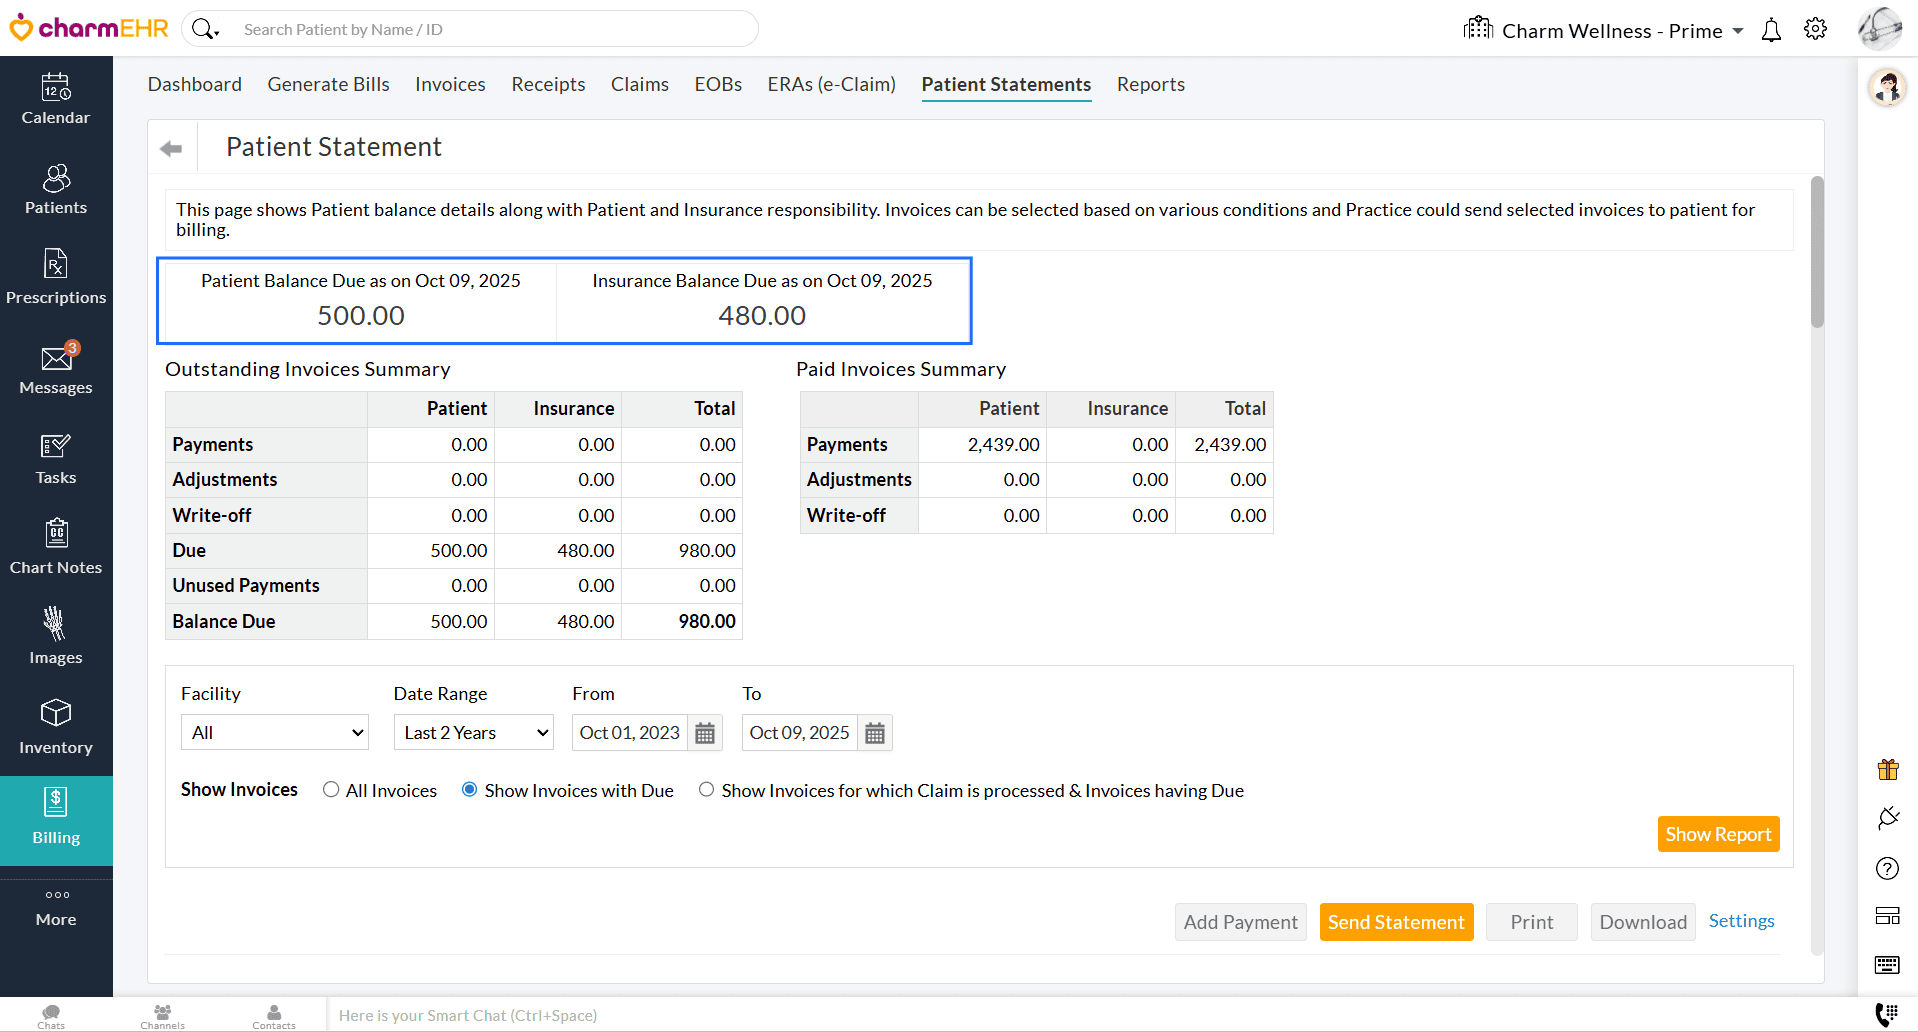
Billing > Reports > Patient Reports > Patient Balance Report
Practices can now send Statements to Patients through multiple communication modes, viz., PHR, Email, and Cell Number (Text Message).
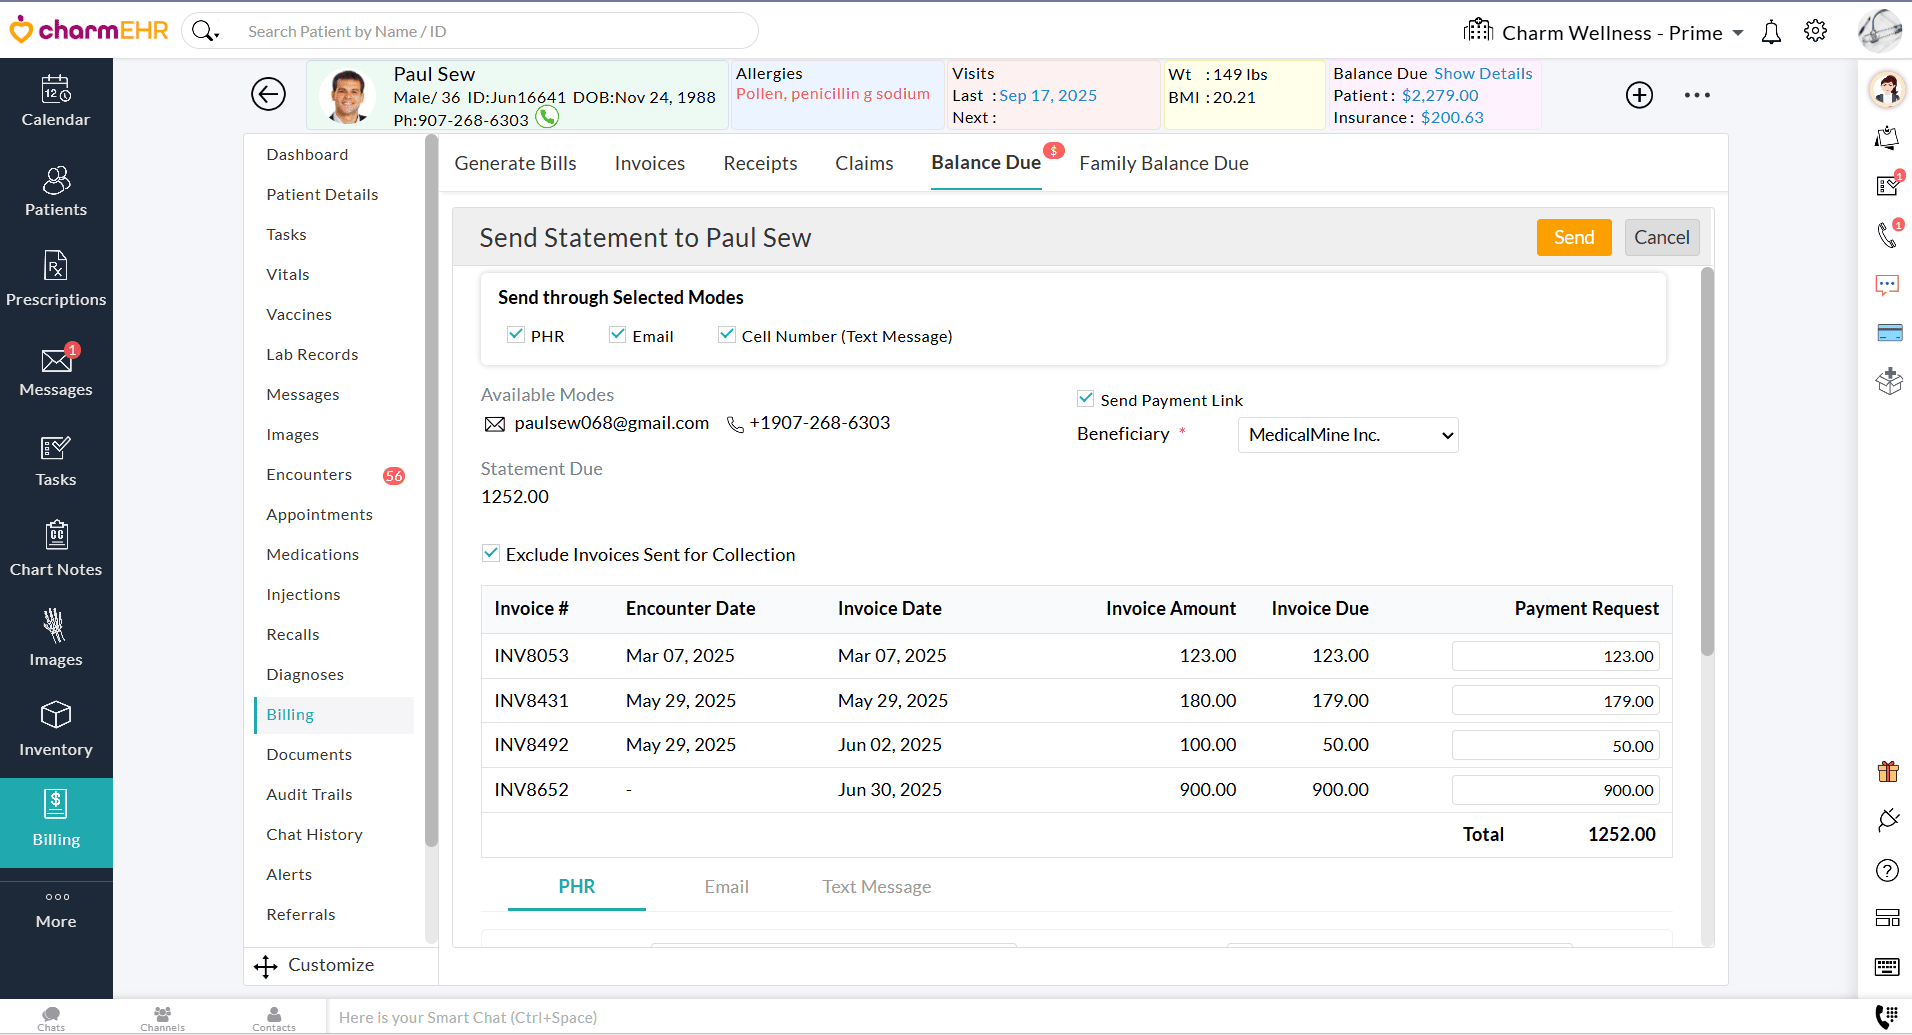
Sending an Individual Statement
- Navigate to 'Billing > Patient Statements'.
- Click the 'More Options' (...) icon against the Patient and select the 'Send Statement' option.
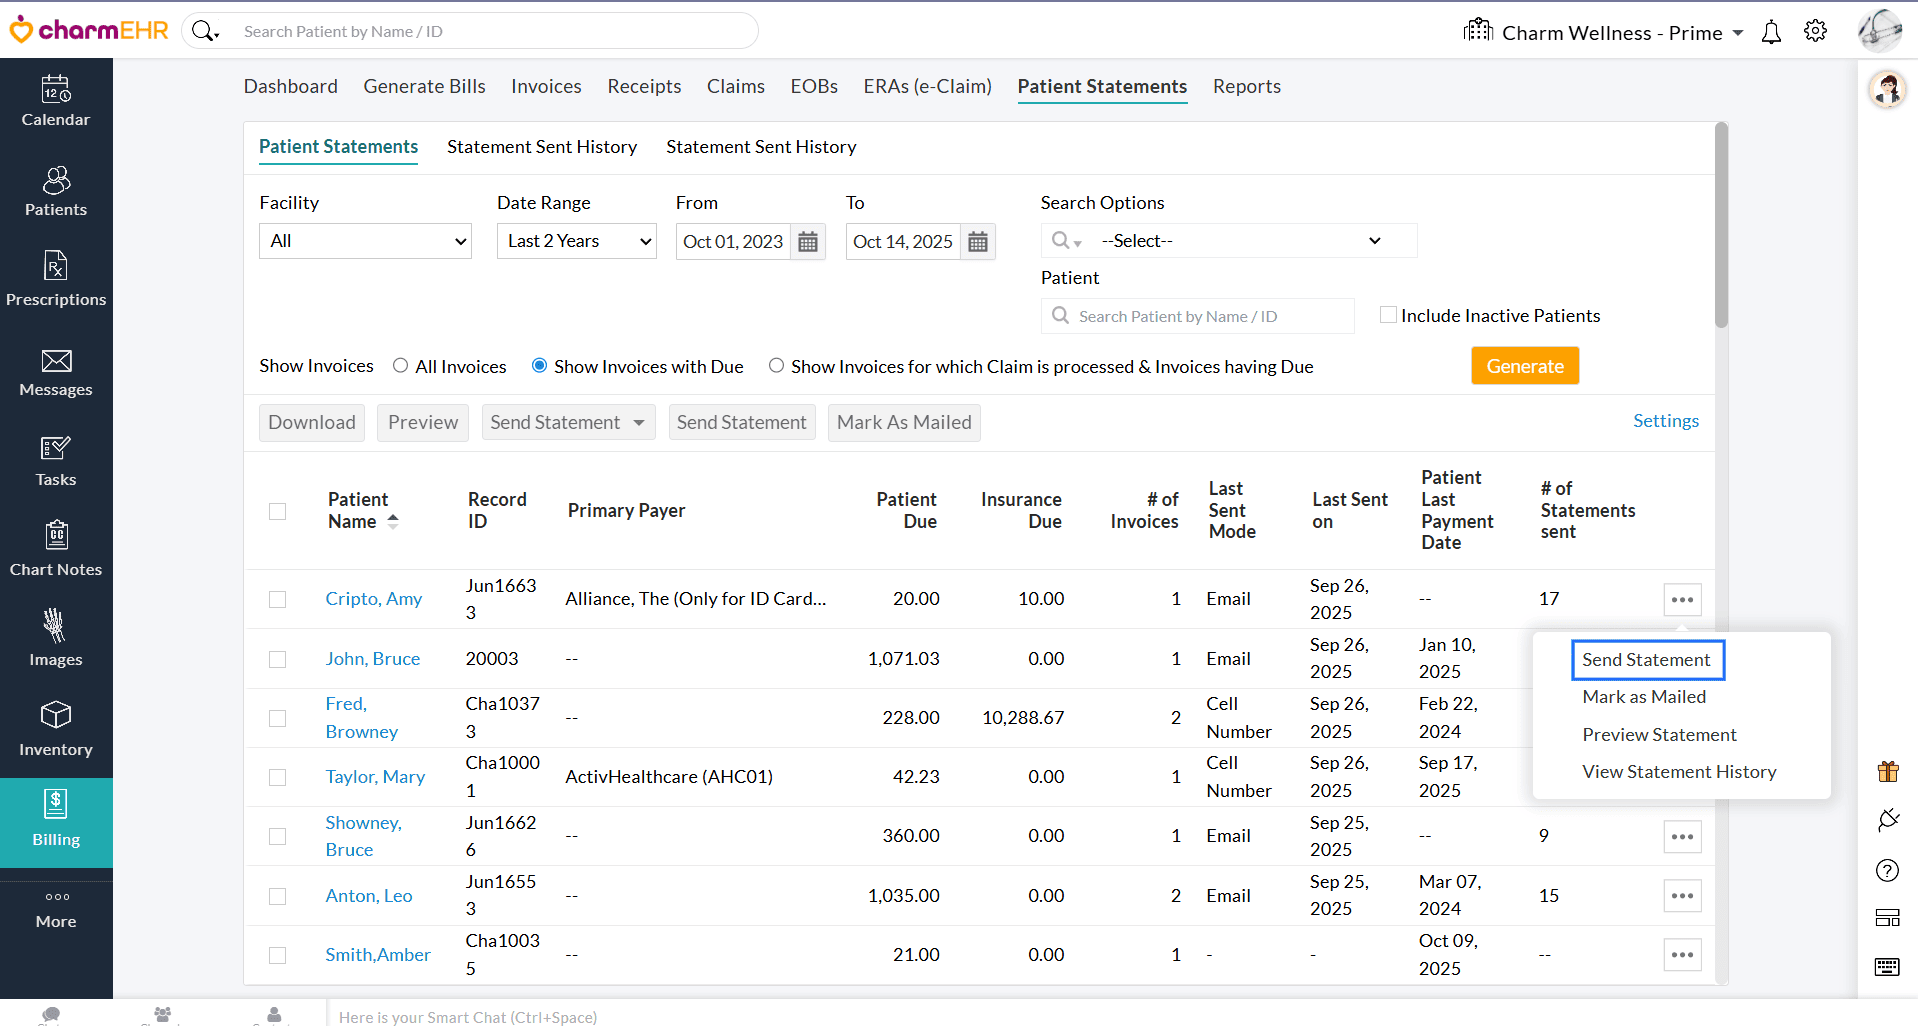
- You can send the Statement through multiple modes to the Patient, viz., PHR, Email, or Cell Number (Text Message). By default, the Patient's available mode(s) will be selected under 'Send through Selected Modes'.
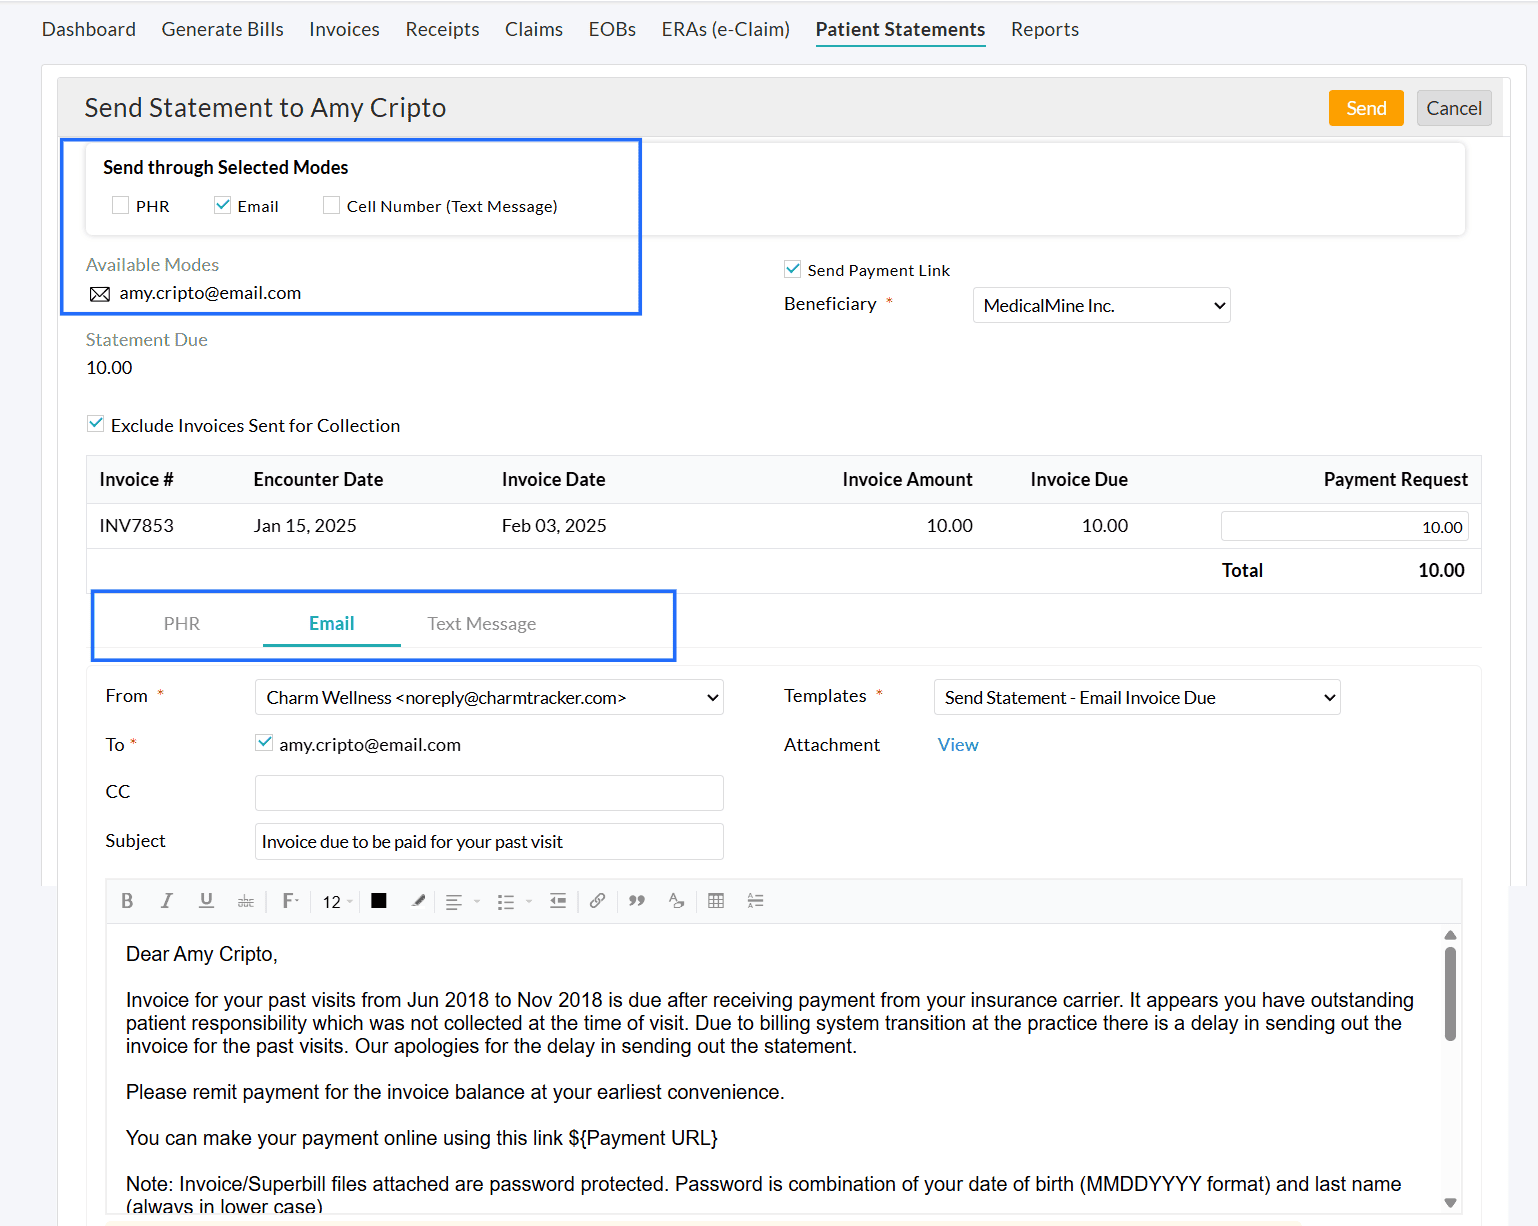
- Configure Templates and attachments under the respective tabs for PHR, Email, and Text Message.
- The default Statement sending preferences can be configured under 'Settings > Billing > Patient Billing Settings > Send Statement-Default Settings'.
Sending Bulk Statements
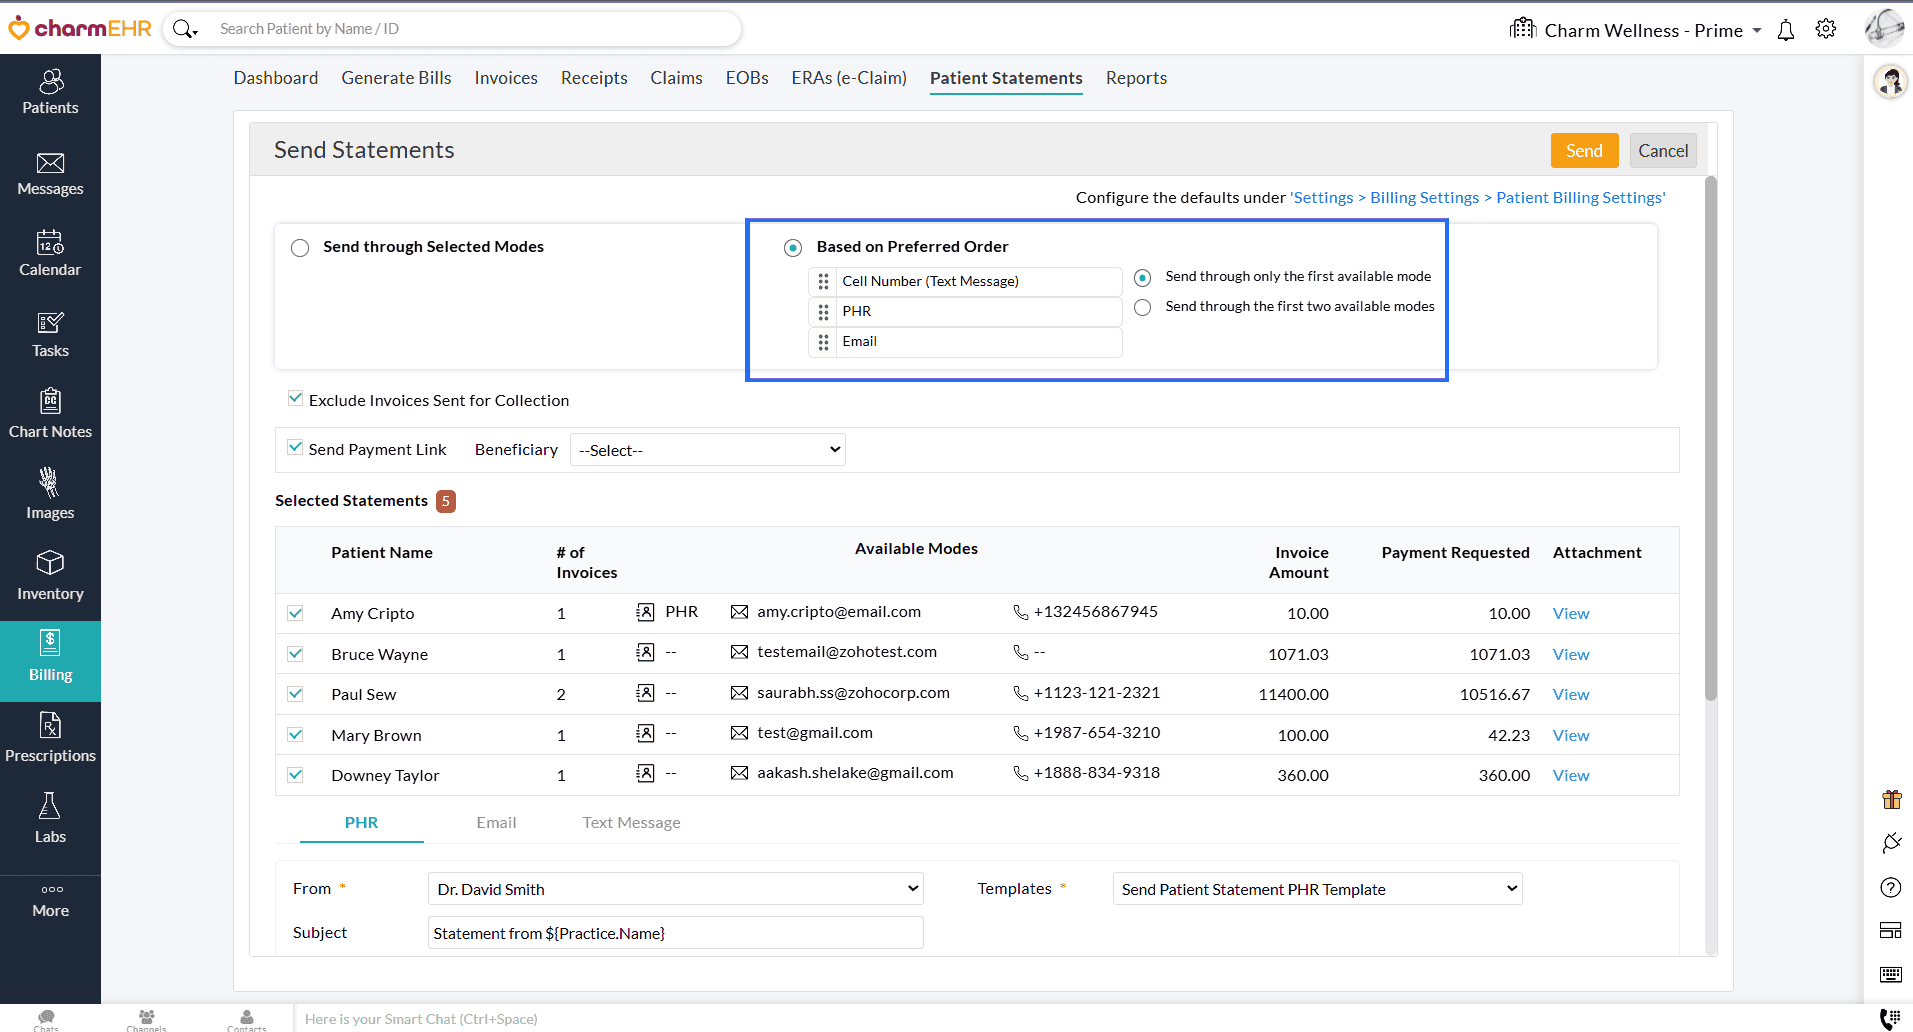
Practices can send multiple statements simultaneously using selected communication modes or a preferred order.
Navigate to 'Billing > Patient Statements'. Choose one or more Statements and click the 'Send Statements' button.
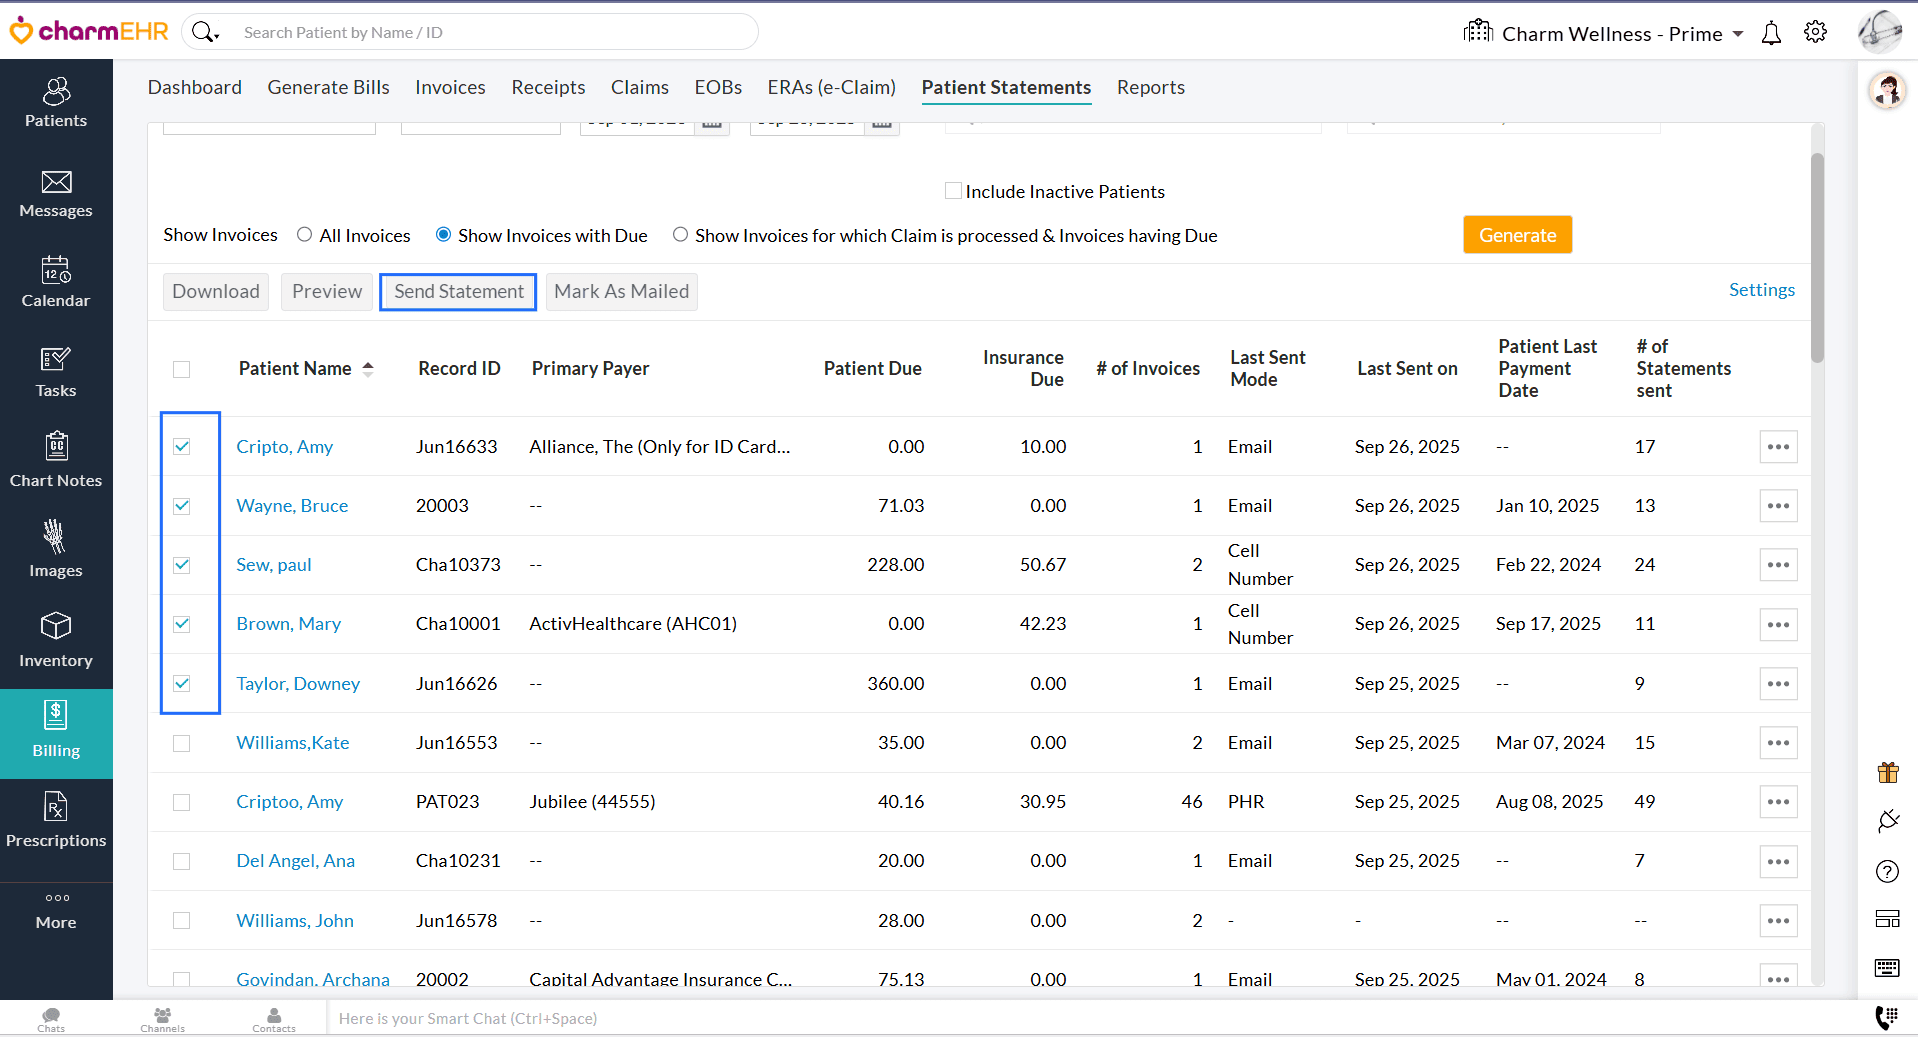
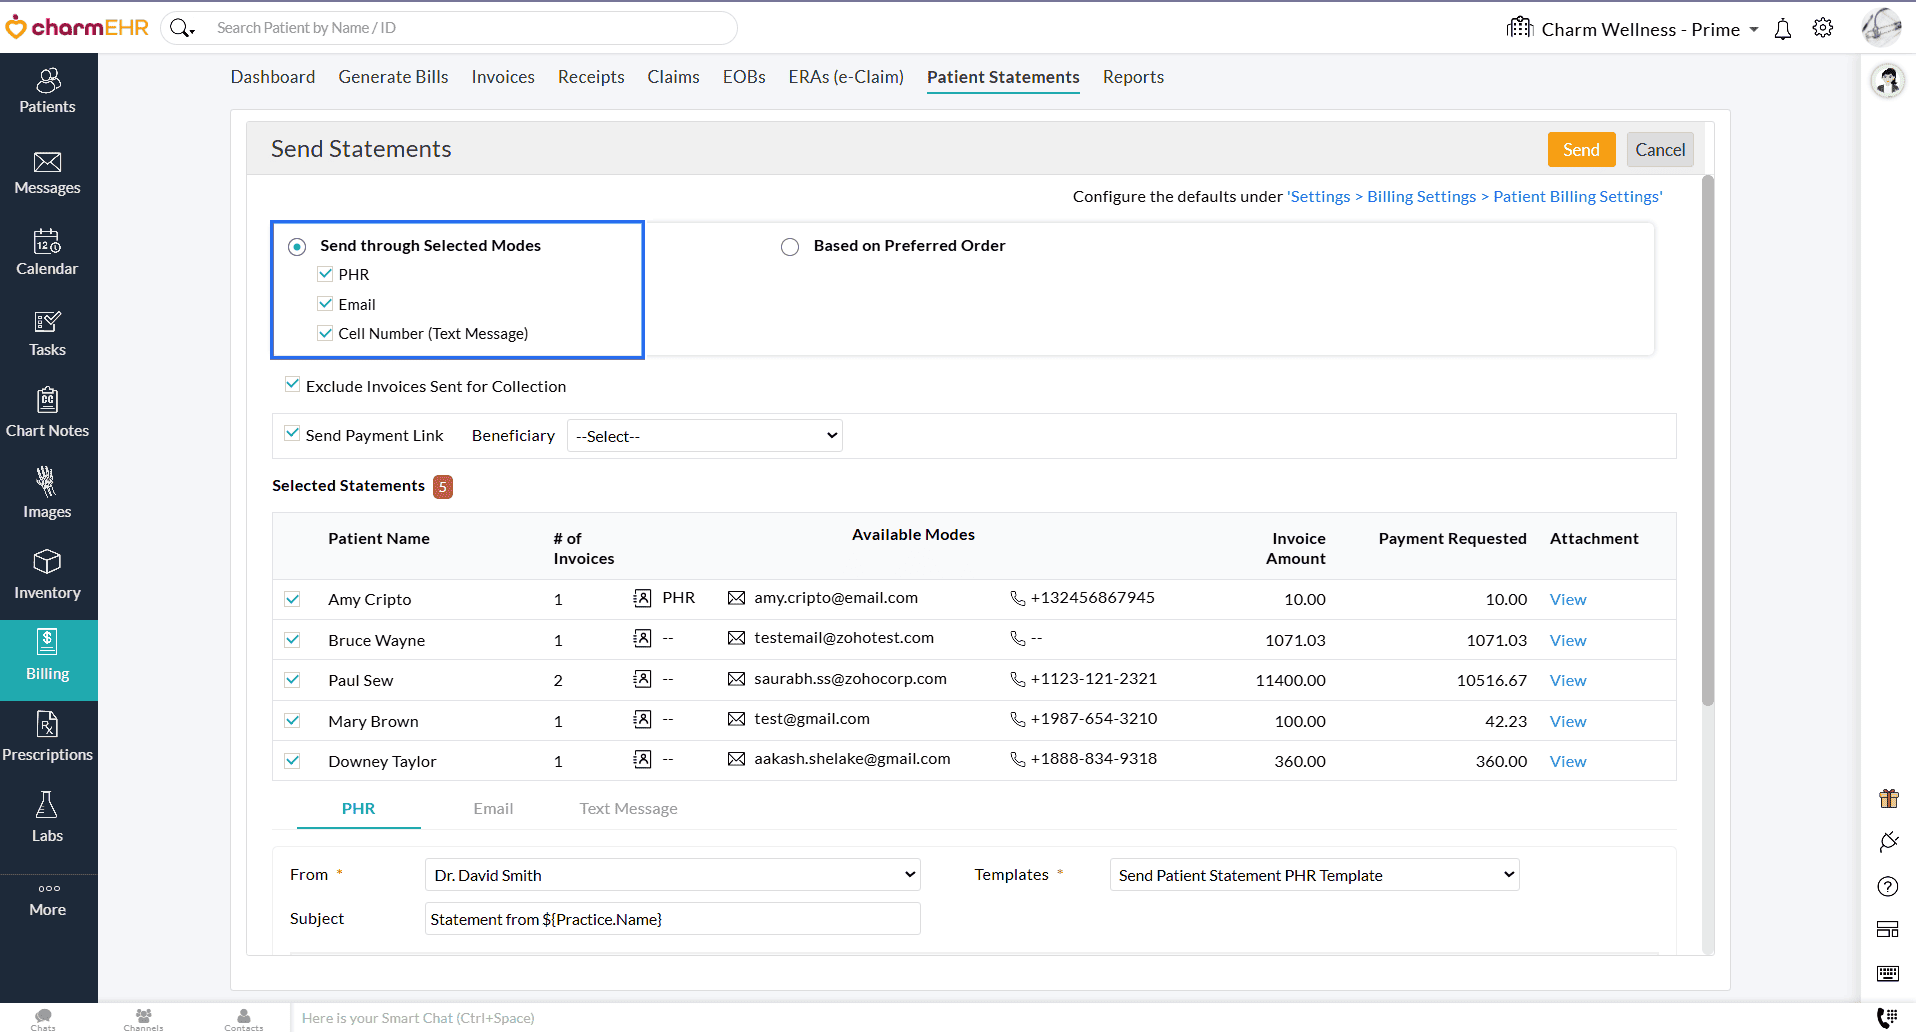
You can either:
- Choose one or more modes to send Statements. The Statement is sent through at least one of the selected modes available for each Patient.
- Set a priority order of delivery modes (PHR > Email > Cell Number (Text Message)). You can choose to send Statements through:
- Only the first available mode (e.g., If a Patient has both PHR and Email, the Statement will only be sent via PHR).
- The first two available modes (e.g., If a Patient has both PHR and Email, the Statement will be sent through both modes)
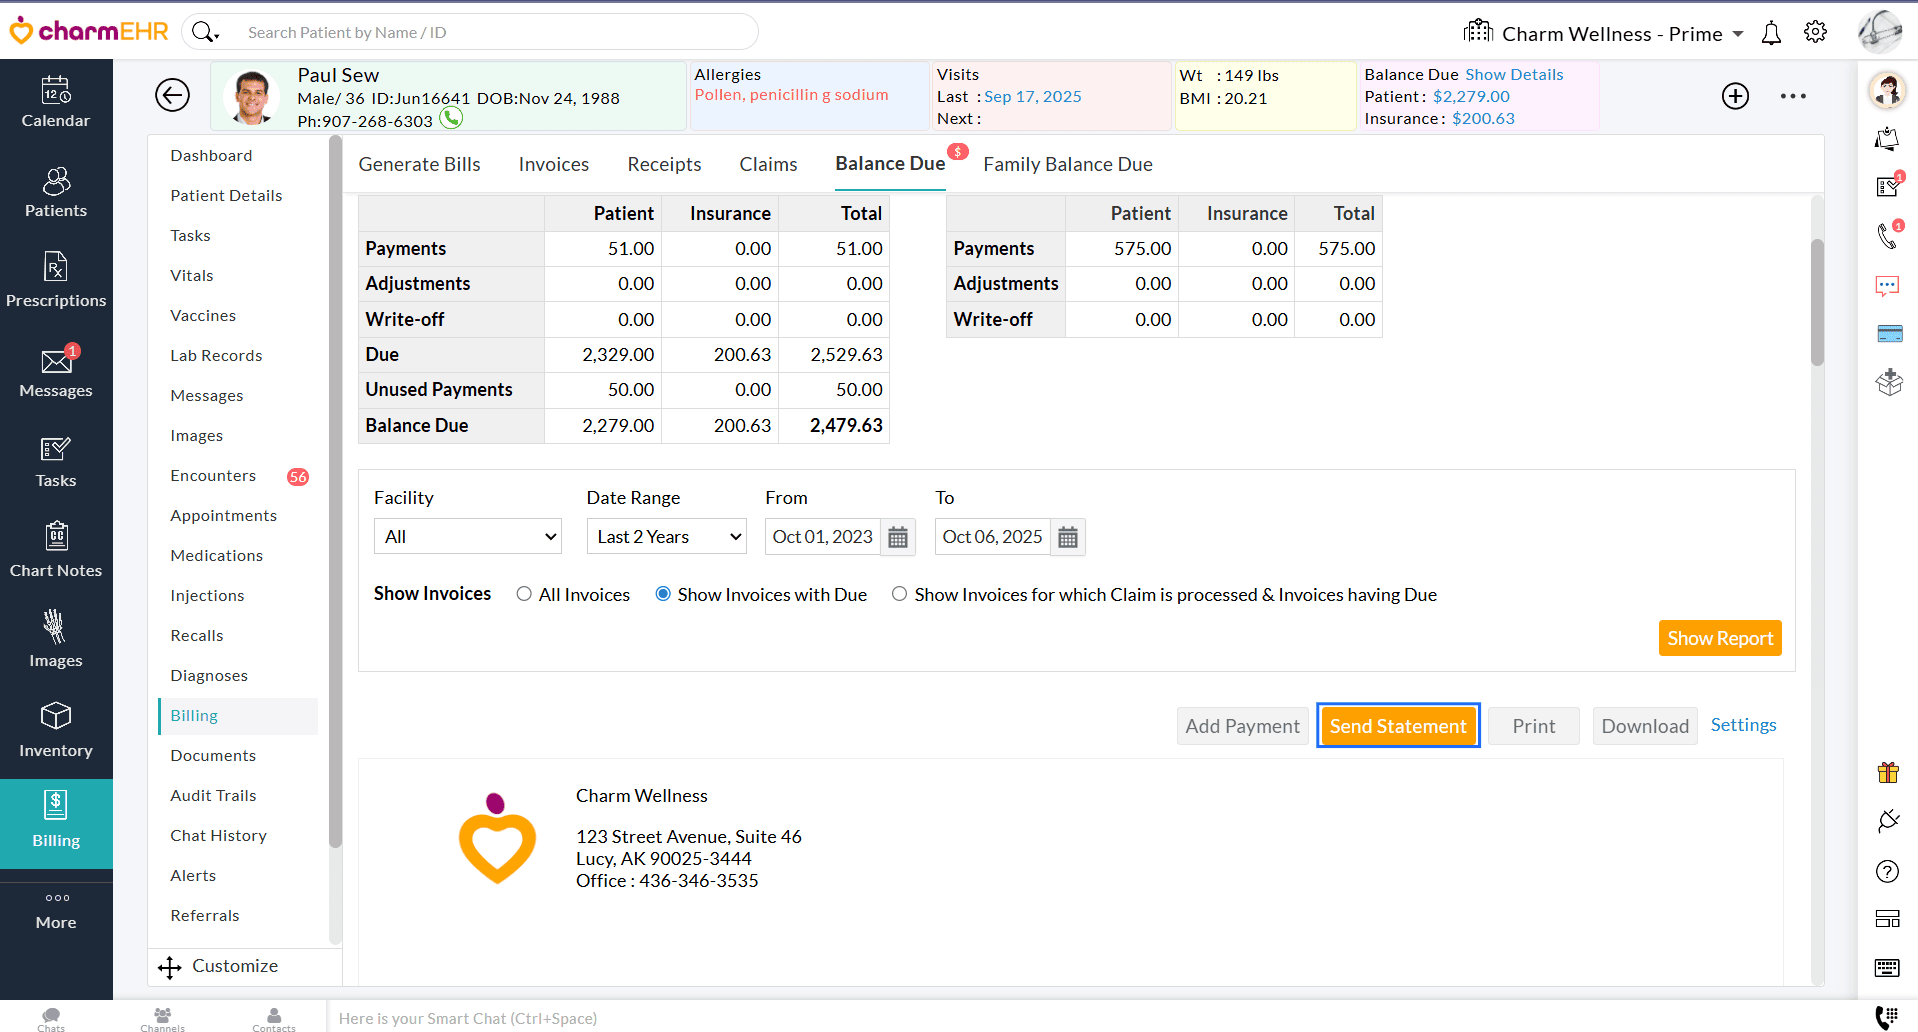
Patient Balance Due
You can also now send a Patient Statement through multiple communication modes from the 'Balance Due' section of the Patient Dashboard.
We hope these enhancements will help Practices manage Invoice balances with ease and improve the statement-sending process.
If you have any queries or feedback, contact us at support@charmhealth.com
We are excited to roll out a series of enhancements designed to simplify your Invoicing process and improve your billing workflow.
- Bulk Invoice Generation for Encounters
- Option to Bulk Edit Invoices
- Improved Add and Edit Invoice Interface
Practices can now generate Invoices for multiple Encounters in one go. This update streamlines batch billing and reduces manual effort, making it ideal for high-volume workflows.
Follow the steps below to generate bulk Invoices for the Encounters.
- Navigate to 'Billing > Generate Bills' and select the 'Encounters for Billing' filter.
- Select the Encounters for which you need to generate Invoices.
- Click the 'Generate Invoices' button.
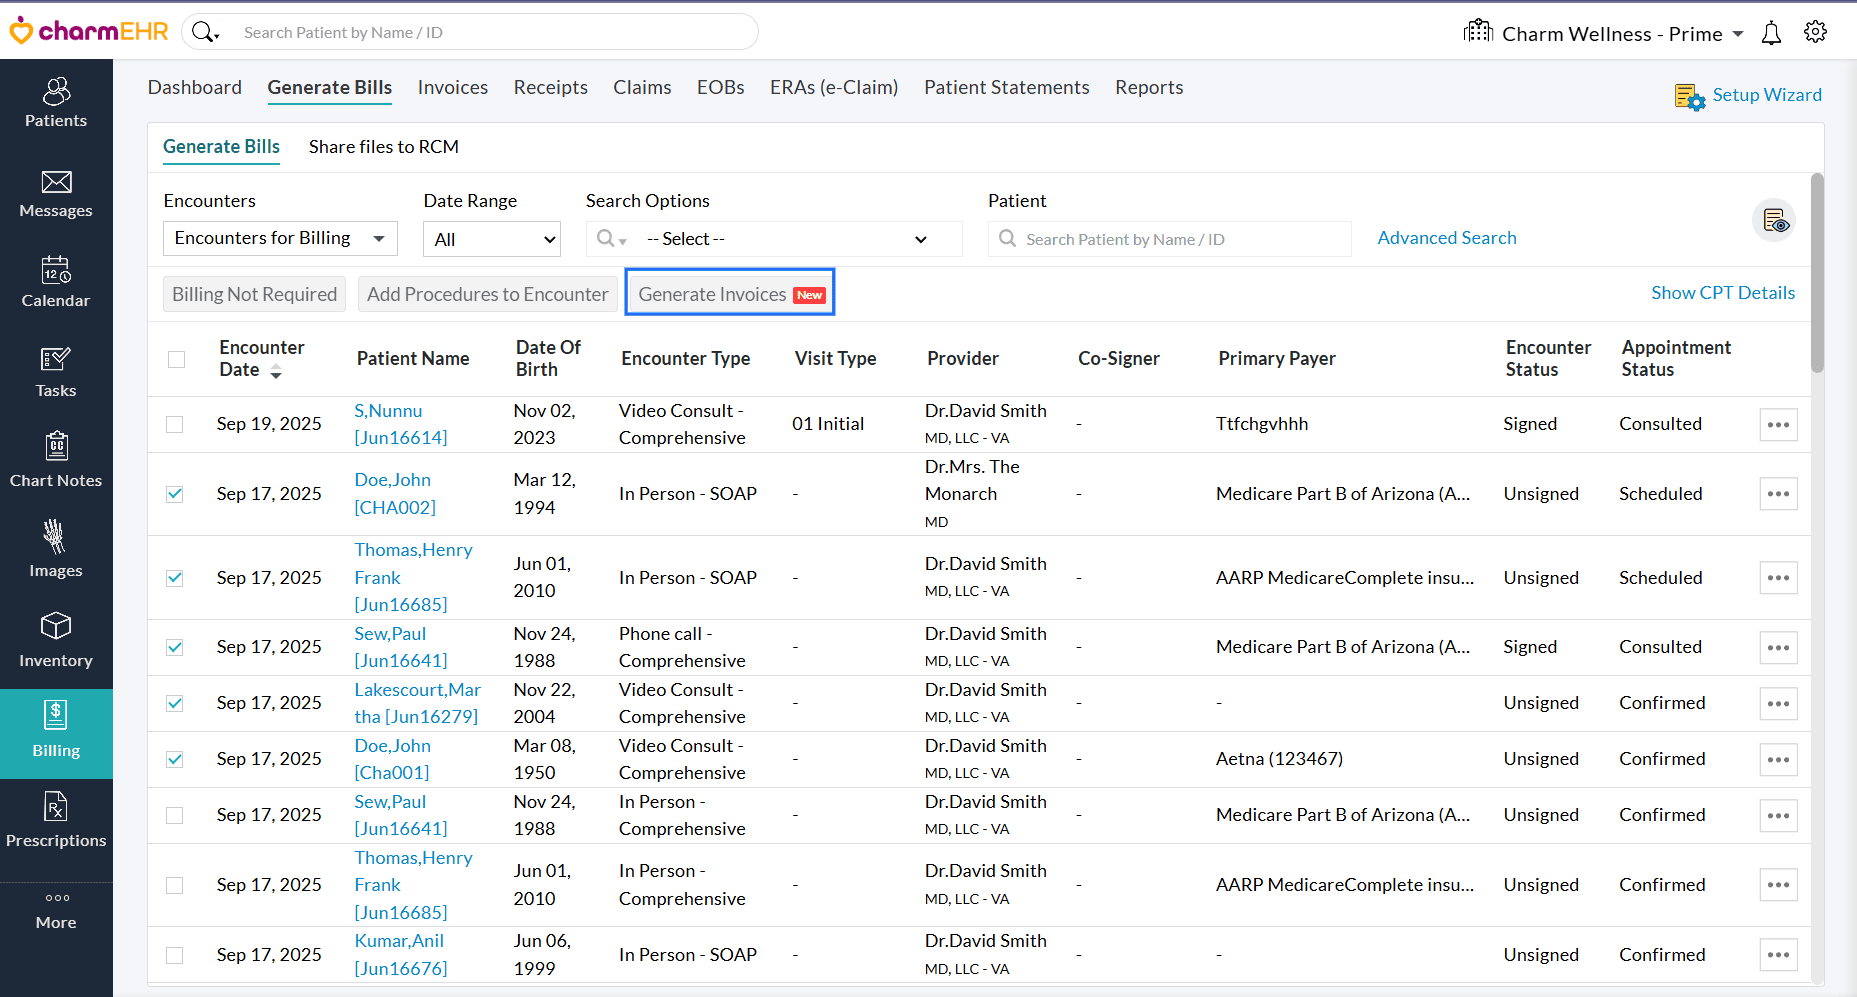
- Invoices will be generated for the selected Encounters and will be in the 'Draft' status.
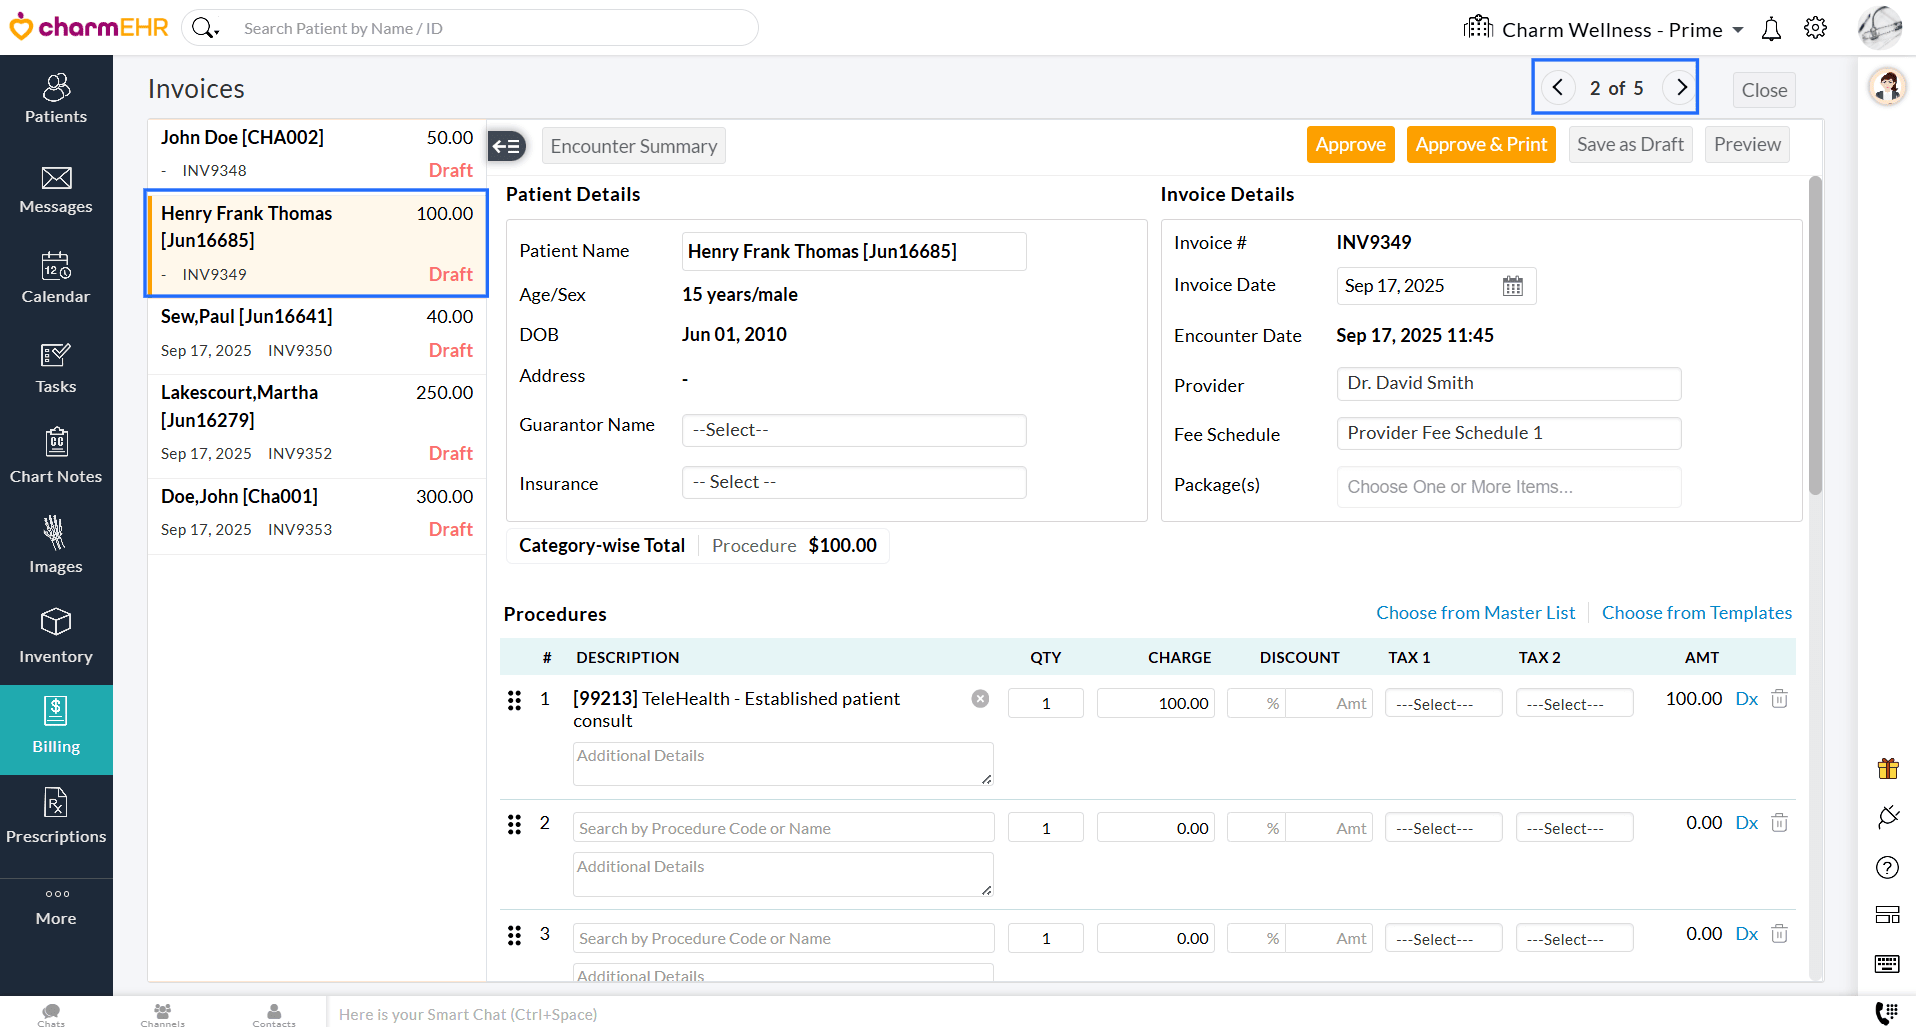
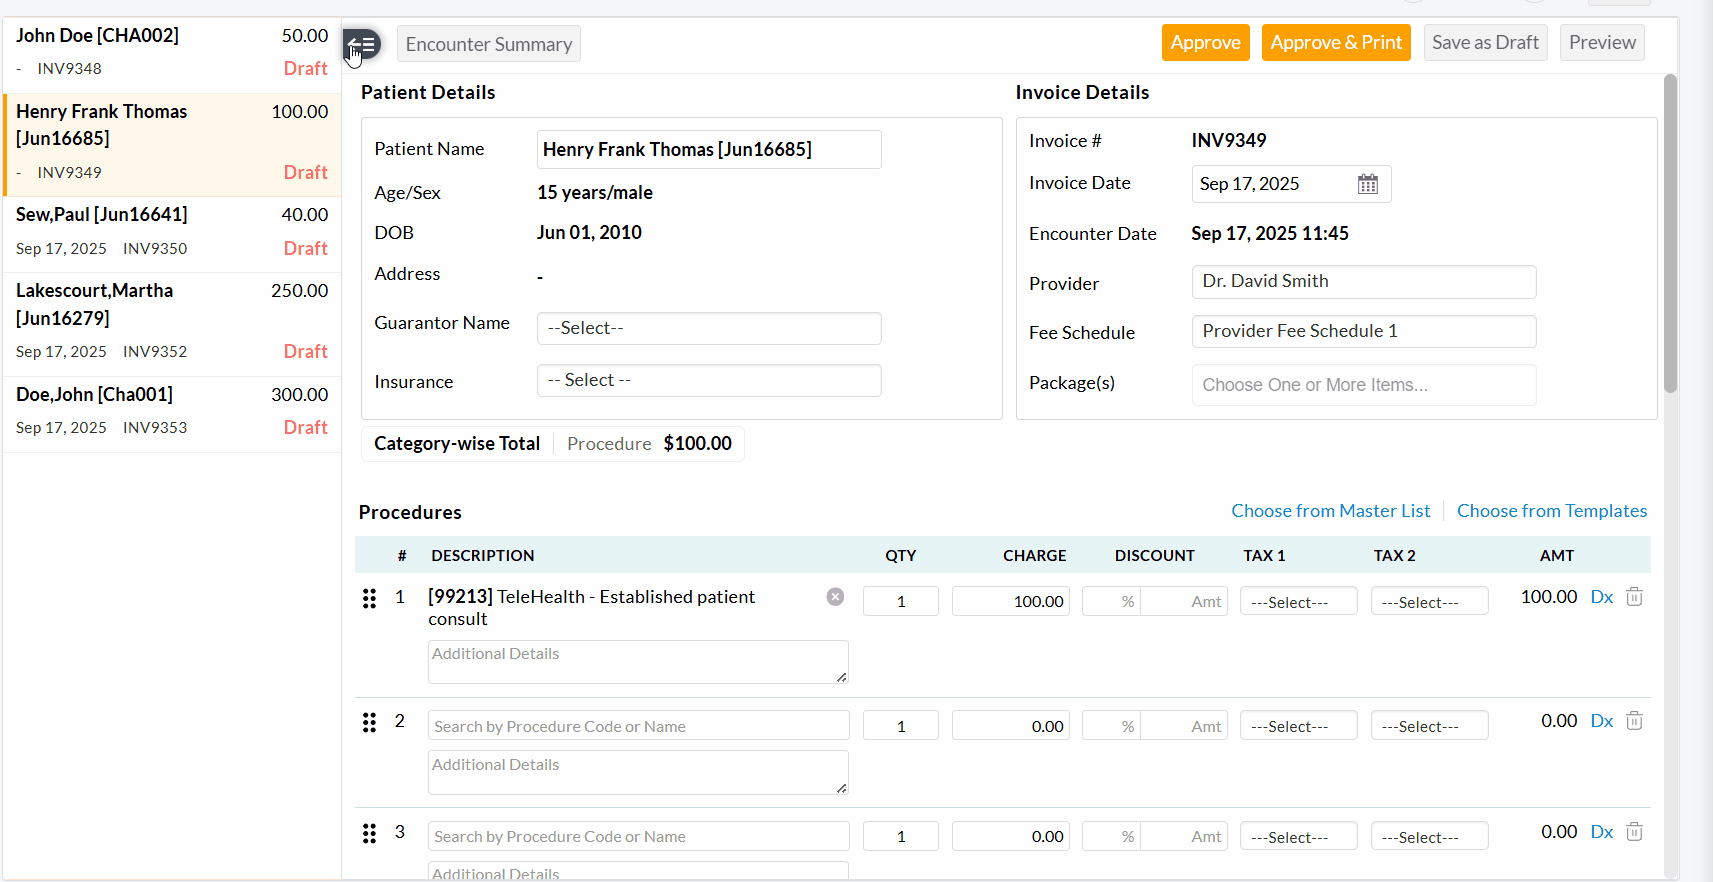
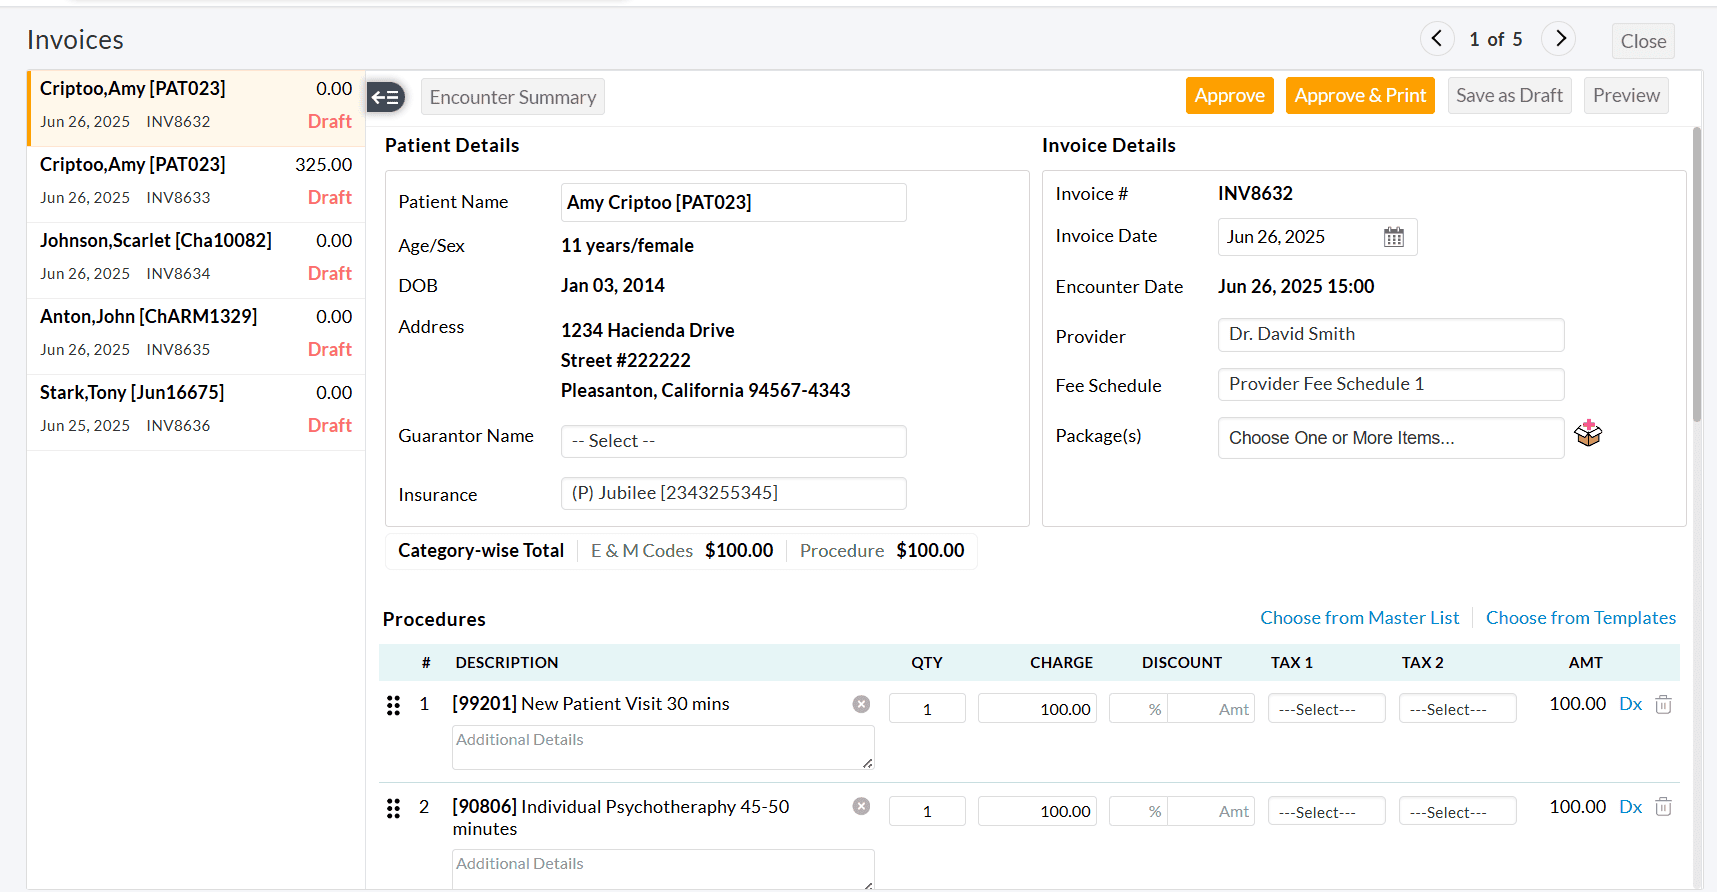
- A
two-pane Invoice Edit View will be shown, allowing Practices to review
the Invoice details of each Encounter and approve them.
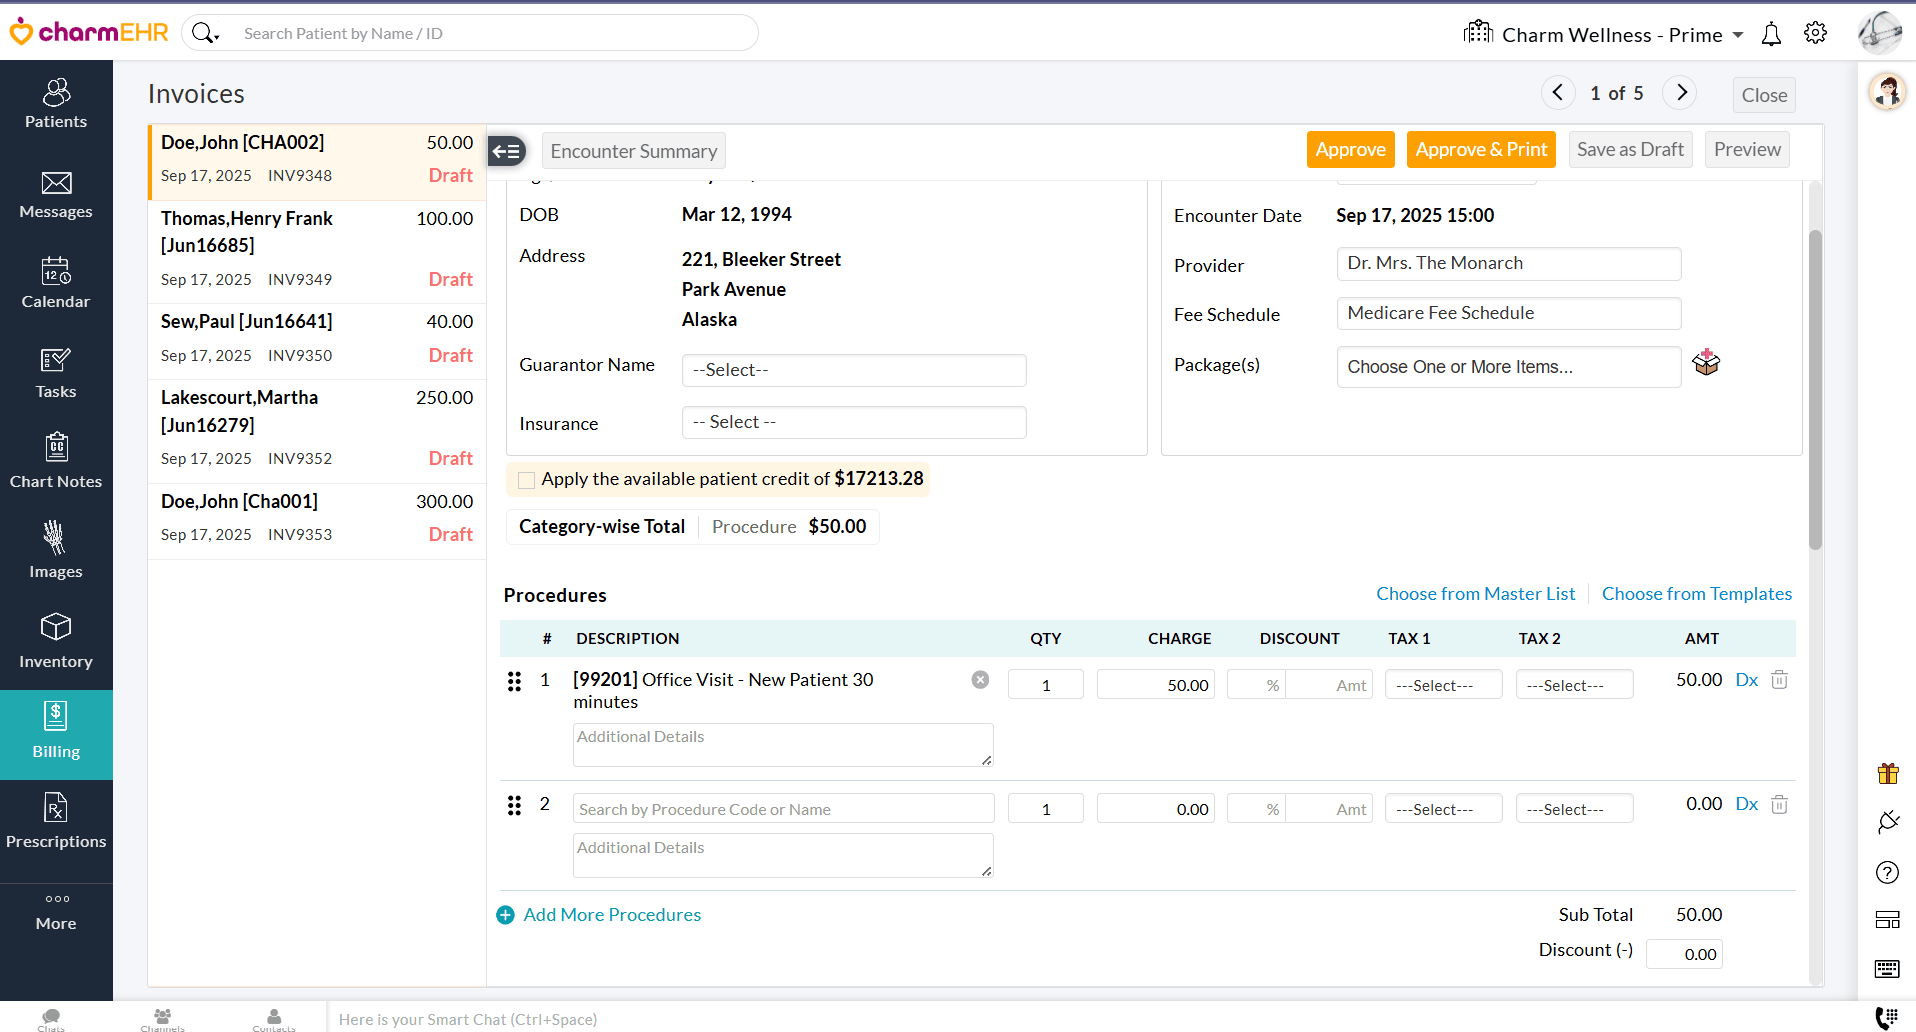
- Once you have reviewed and approved the current Invoice, use the left-pane or top-right arrow to move to the next one.
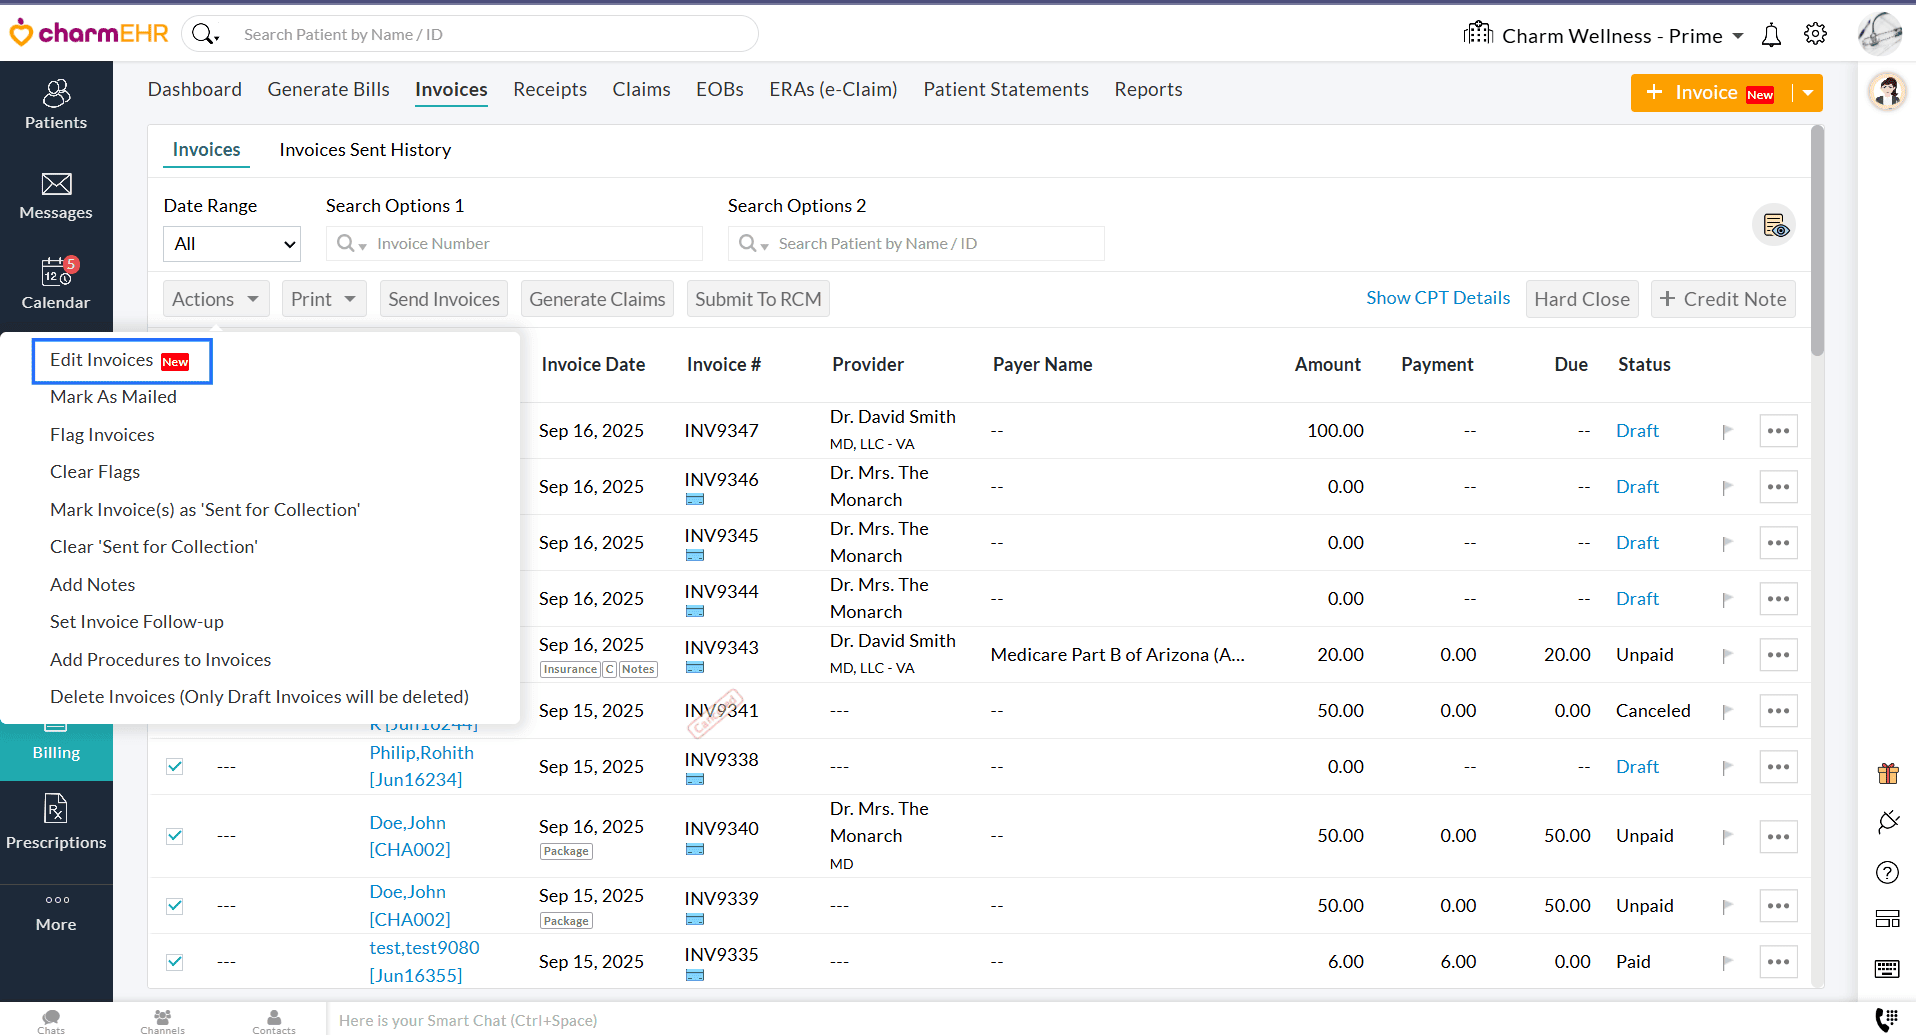
We have added an option to edit multiple Invoices simultaneously from the 'Invoices' section. This enhancement helps you save time and ensures consistent updates across Invoices without the need to open each Invoice individually.
- Navigate to 'Billing > Invoices' and select the Invoices to edit.
- Under the 'Actions' button, select the 'Edit Invoices' option.
- Make the necessary changes to the required Invoices and approve them.
We have redesigned the Add and Edit Invoice interface to provide a clear and intuitive user experience. The updated design simplifies navigation, enhances readability, and makes it easier to review and manage Invoice details efficiently.
We hope these enhancements will make Invoice management faster, more flexible, and easier for your Practice.
Have questions or feedback? Please reach us at support@charmhealth.com
We are excited to announce new enhancements to Charm AI Scribe, our innovative add-on feature that streamlines medical charting by transcribing Patient-Provider conversations in real time. If you are new to Charm AI Scribe, please visit our Resource Center for detailed guidance.
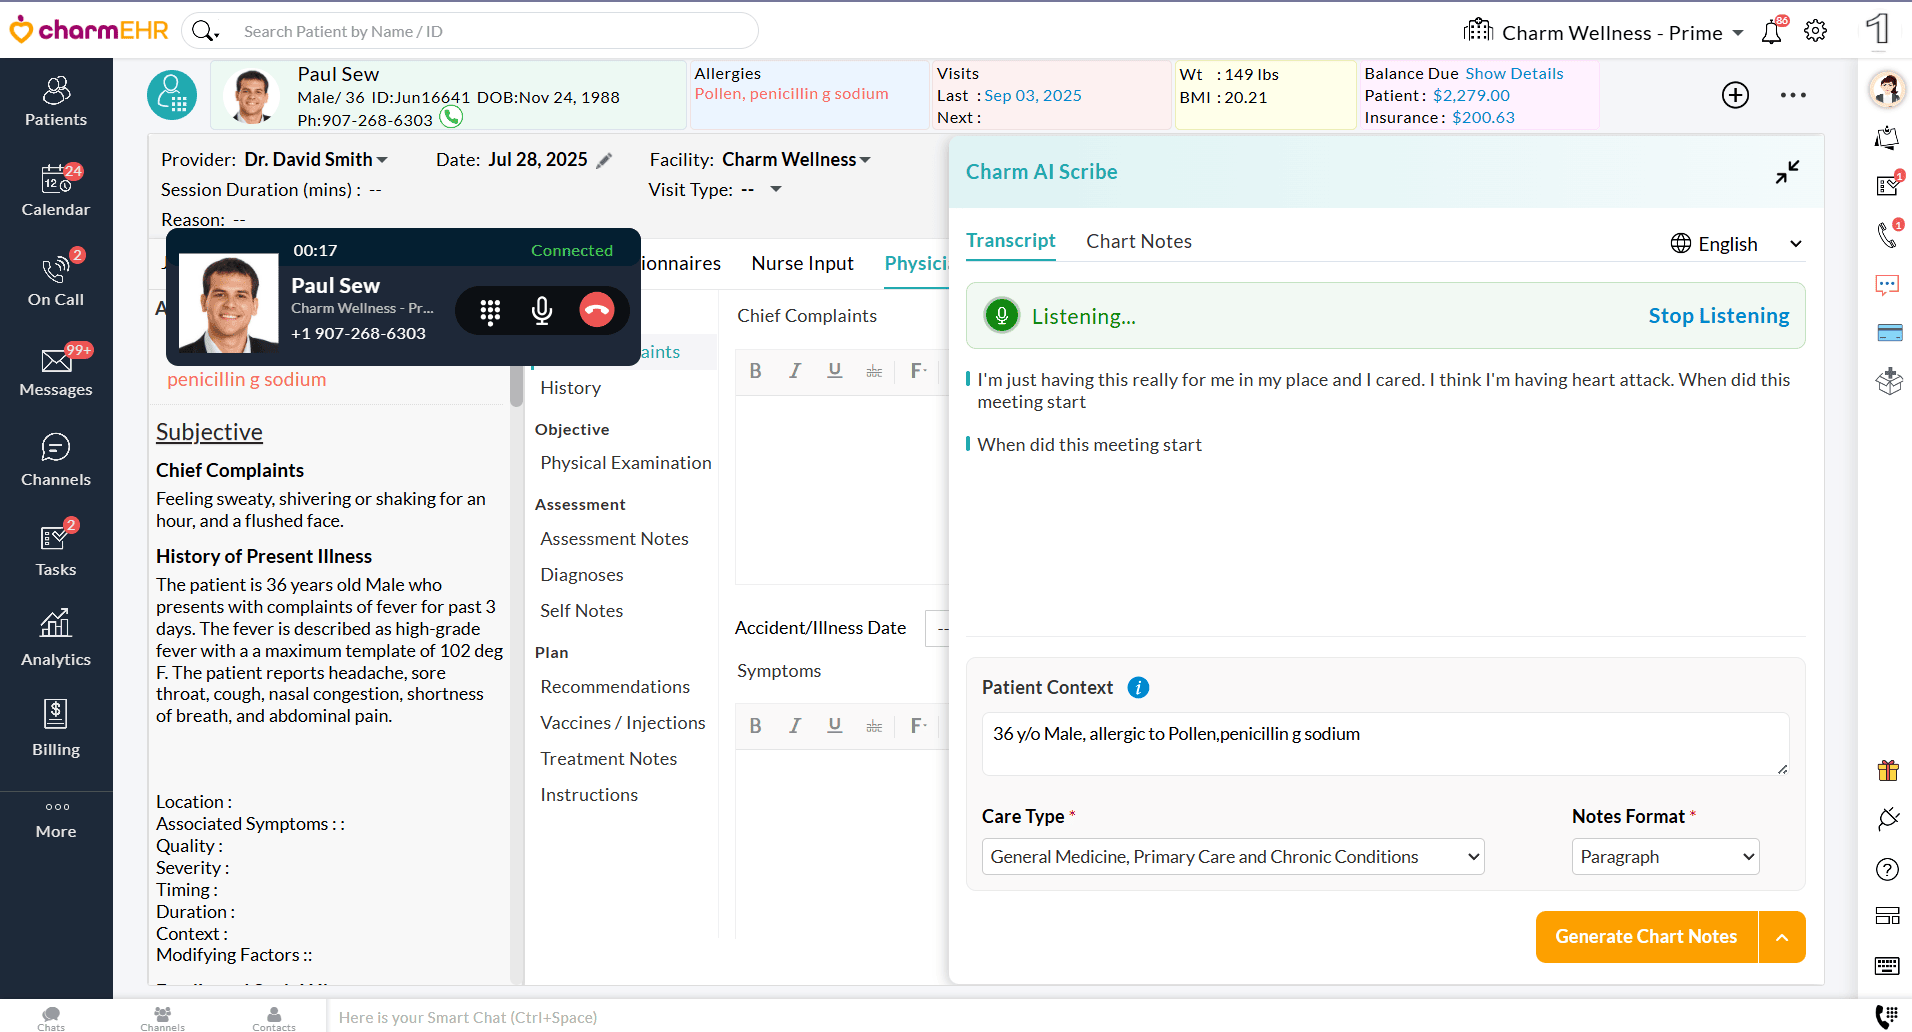
Charm AI Scribe now supports real-time transcriptions for Video and Phone Call consultations when headsets are used during the session.
Note: This functionality is supported only when Video or Phone Call consultations are initiated in the Google Chrome browser.
Charm AI Scribe transcribes the conversations of the Video sessions conducted via either the Charm Integrated Video Platform or Zoom.
To begin, create a Video Consult Encounter for the Patient and connect your headset.
- Start the video consultation by clicking on the 'Camera' icon. The video session opens within the Encounter in CharmHealth EHR.

- Once the Patient joins, click on the Charm AI Scribe icon.
- If you are using a headset, click on the 'Share' option in the Charm AI Scribe window to share the Patient's audio.
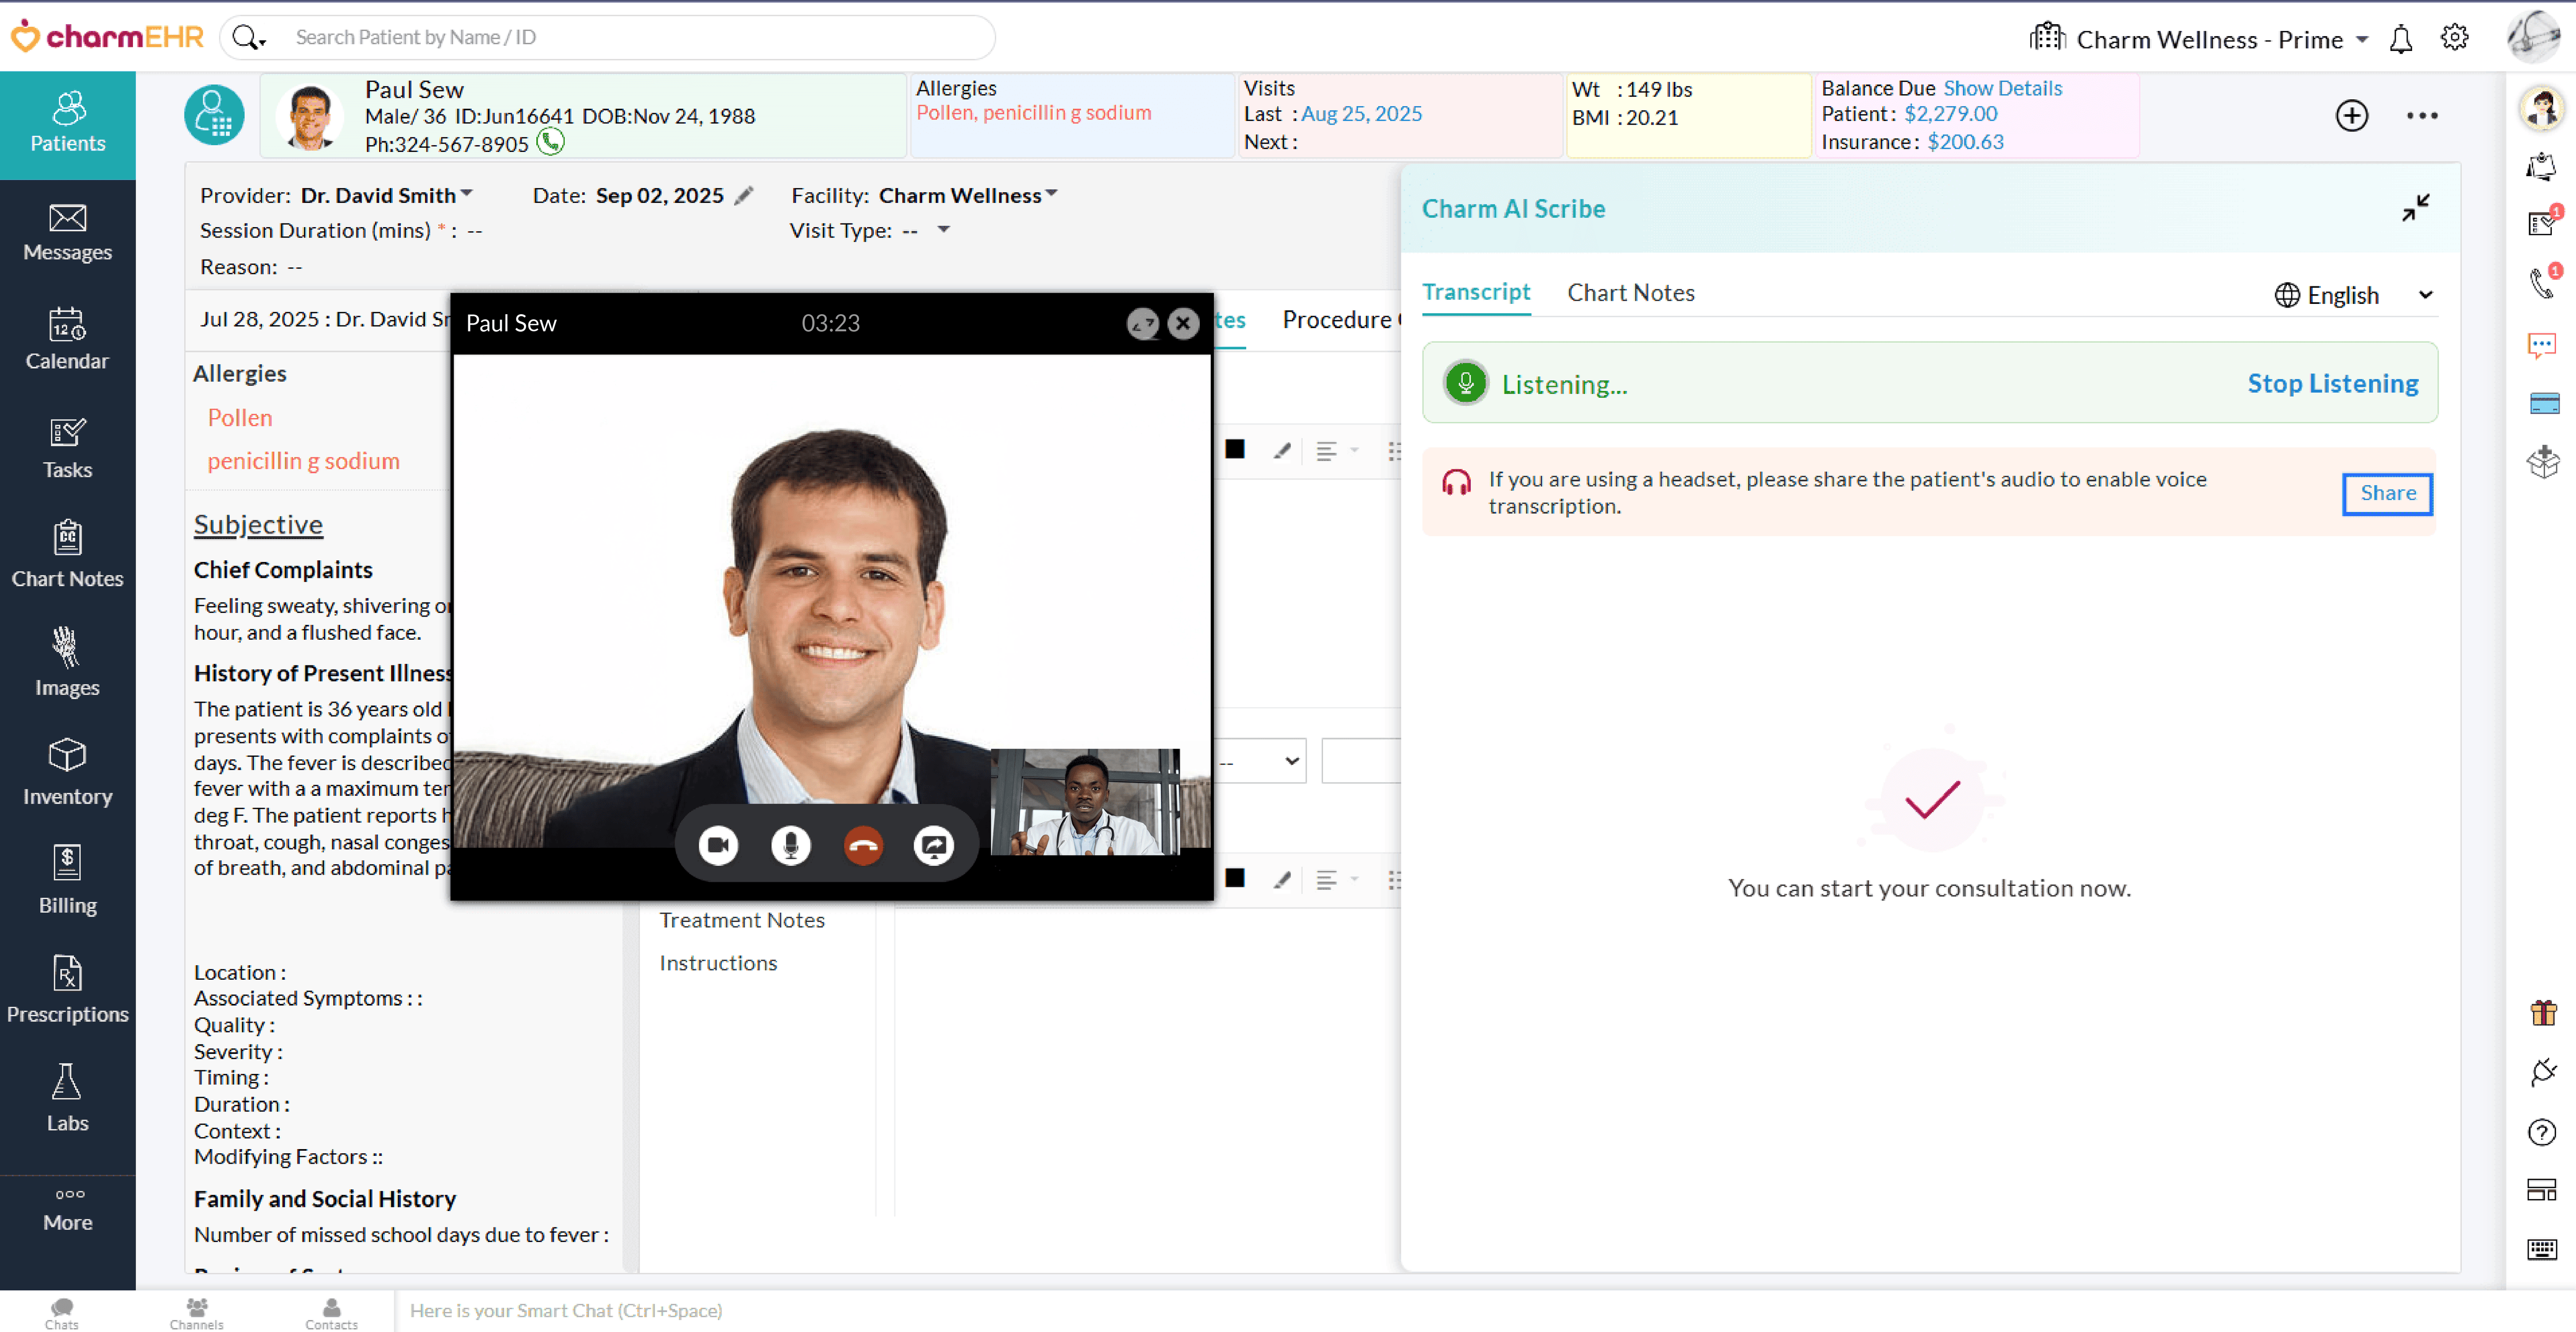
- Once shared, Charm AI Scribe begins the transcription in real time.
- Open the Zoom meeting on a new tab in the same Google Chrome browser as CharmHealth EHR.
- To enable voice transcription while using a headset, click on the 'Share' option in the Charm AI Scribe window to share the patient's audio from the Zoom meeting tab.
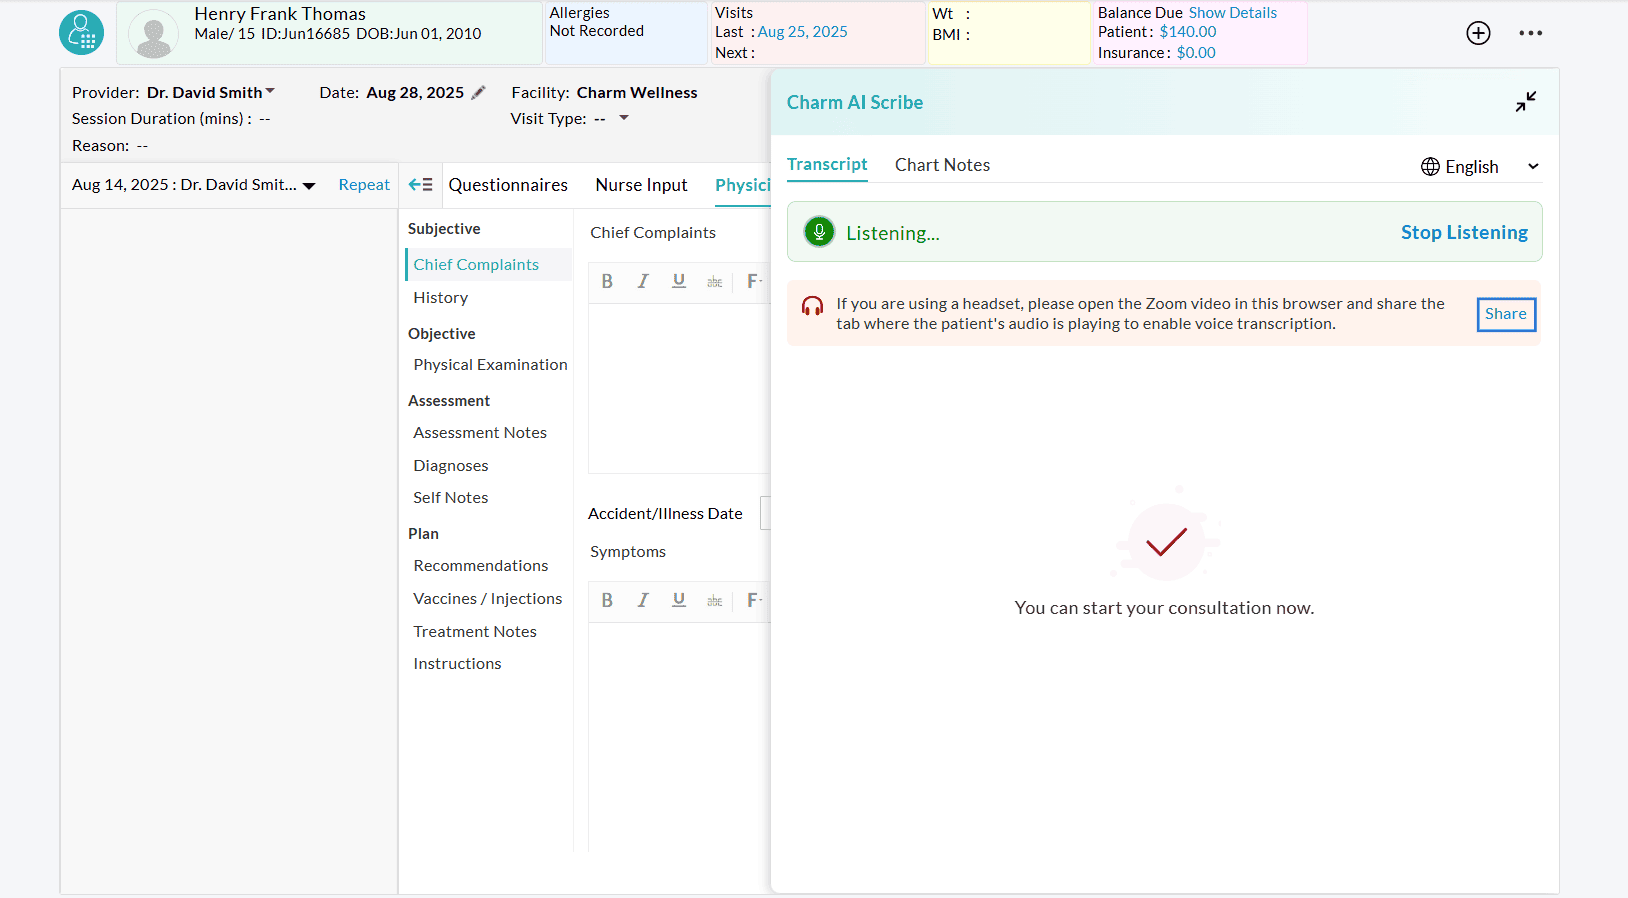
- Choose the Google Chrome tab where the Zoom meeting is initiated and share it with CharmHealth EHR.
- Once shared, Charm AI Scribe automatically captures the conversation from the shared tab and transcribes it.
Note: The Zoom Desktop App does not support transcribing conversations when connected to a headset.
- Start a Phone Call Encounter with the Patient in Google Chrome browser.
- Use the Phone Call feature in CharmHealth to make a call to the Patient.
- If you are using a headset and initiated the Phone call in the same
tab, share the Patient’s audio to enable the transcription.
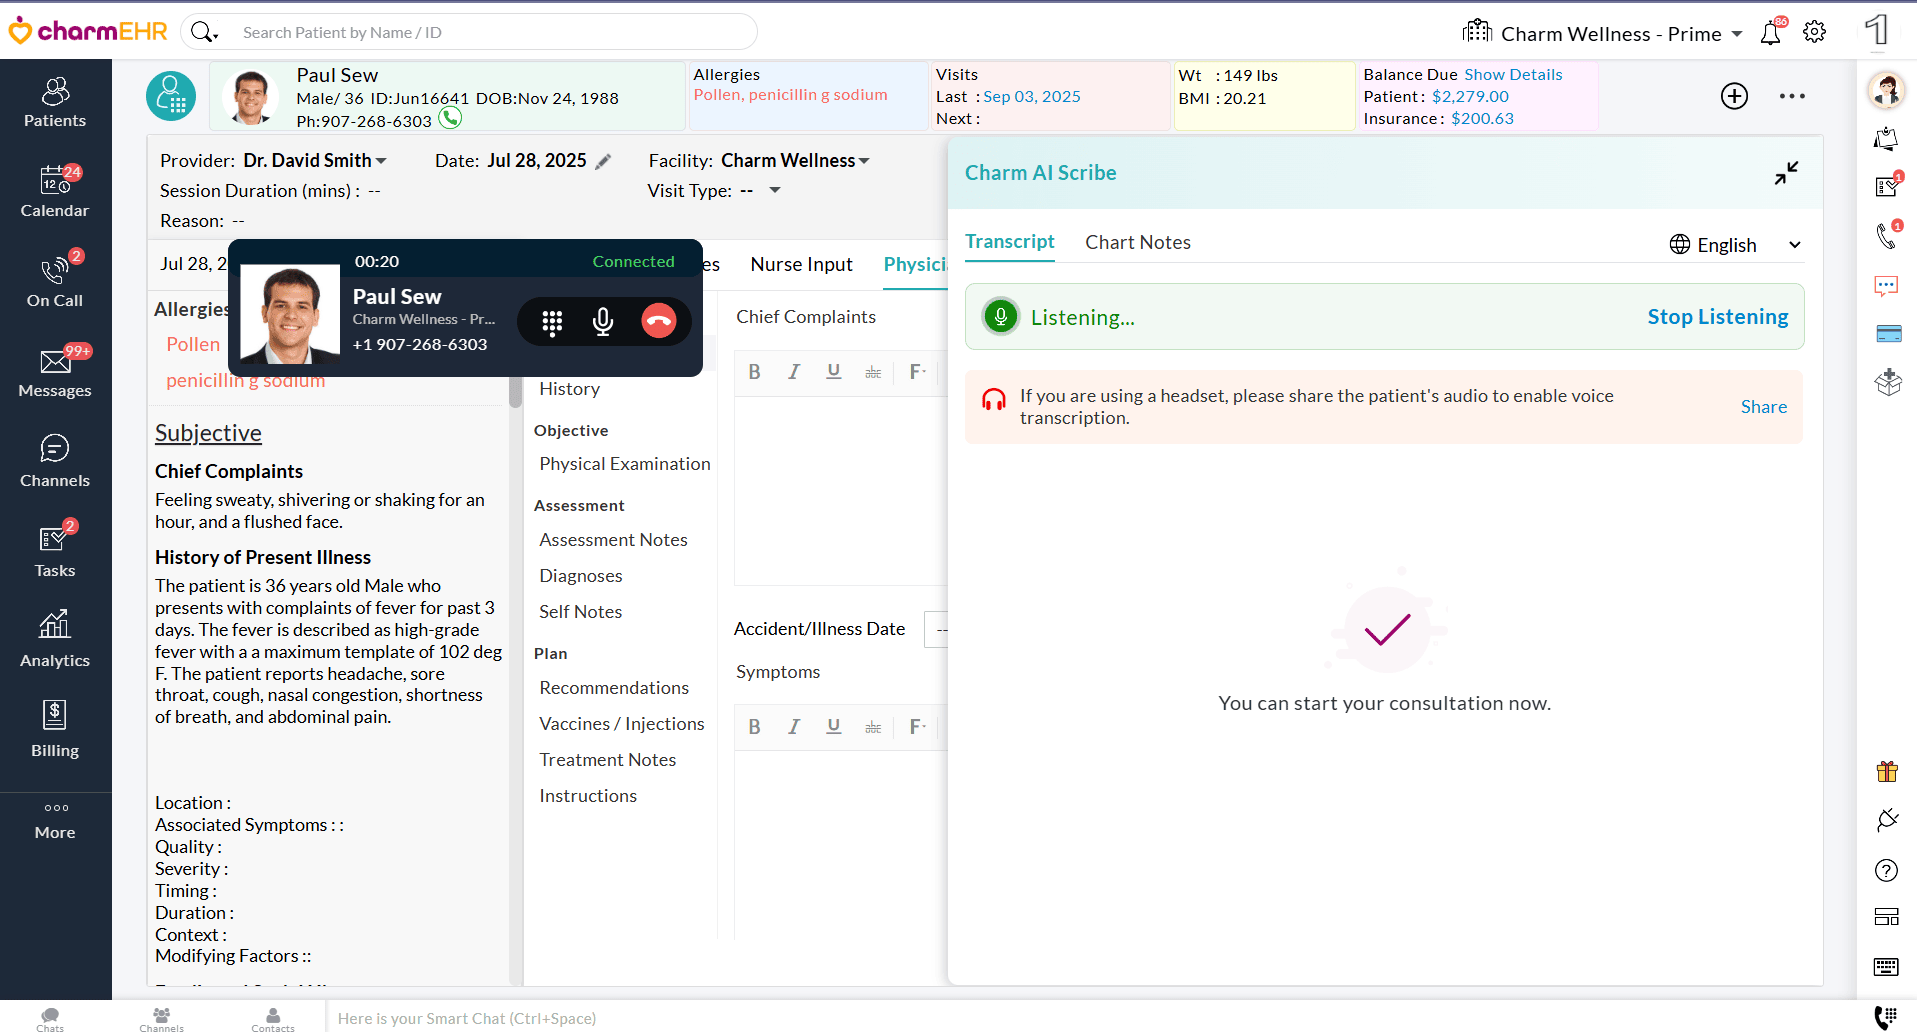
- If the Phone call is initiated in an adjacent tab, share the tab with CharmHealth EHR.
- Once the audio is shared, Charm AI Scribe begins the transcription immediately.
With these enhancements, we hope your charting experience will be more intuitive, reliable, and efficient.
For any queries or suggestions, please contact us at support@charmhealth.com
We are excited to introduce a smart SIG (Instructions for Use) Auto-Suggestion feature that streamlines your medication prescribing workflow.
When prescribing medications, CharmHealth EHR now automatically suggests commonly used SIG instructions tailored to the patient’s age group. This enhancement helps Prescribers quickly select appropriate instructions, reducing the need for manual entry and improving efficiency.
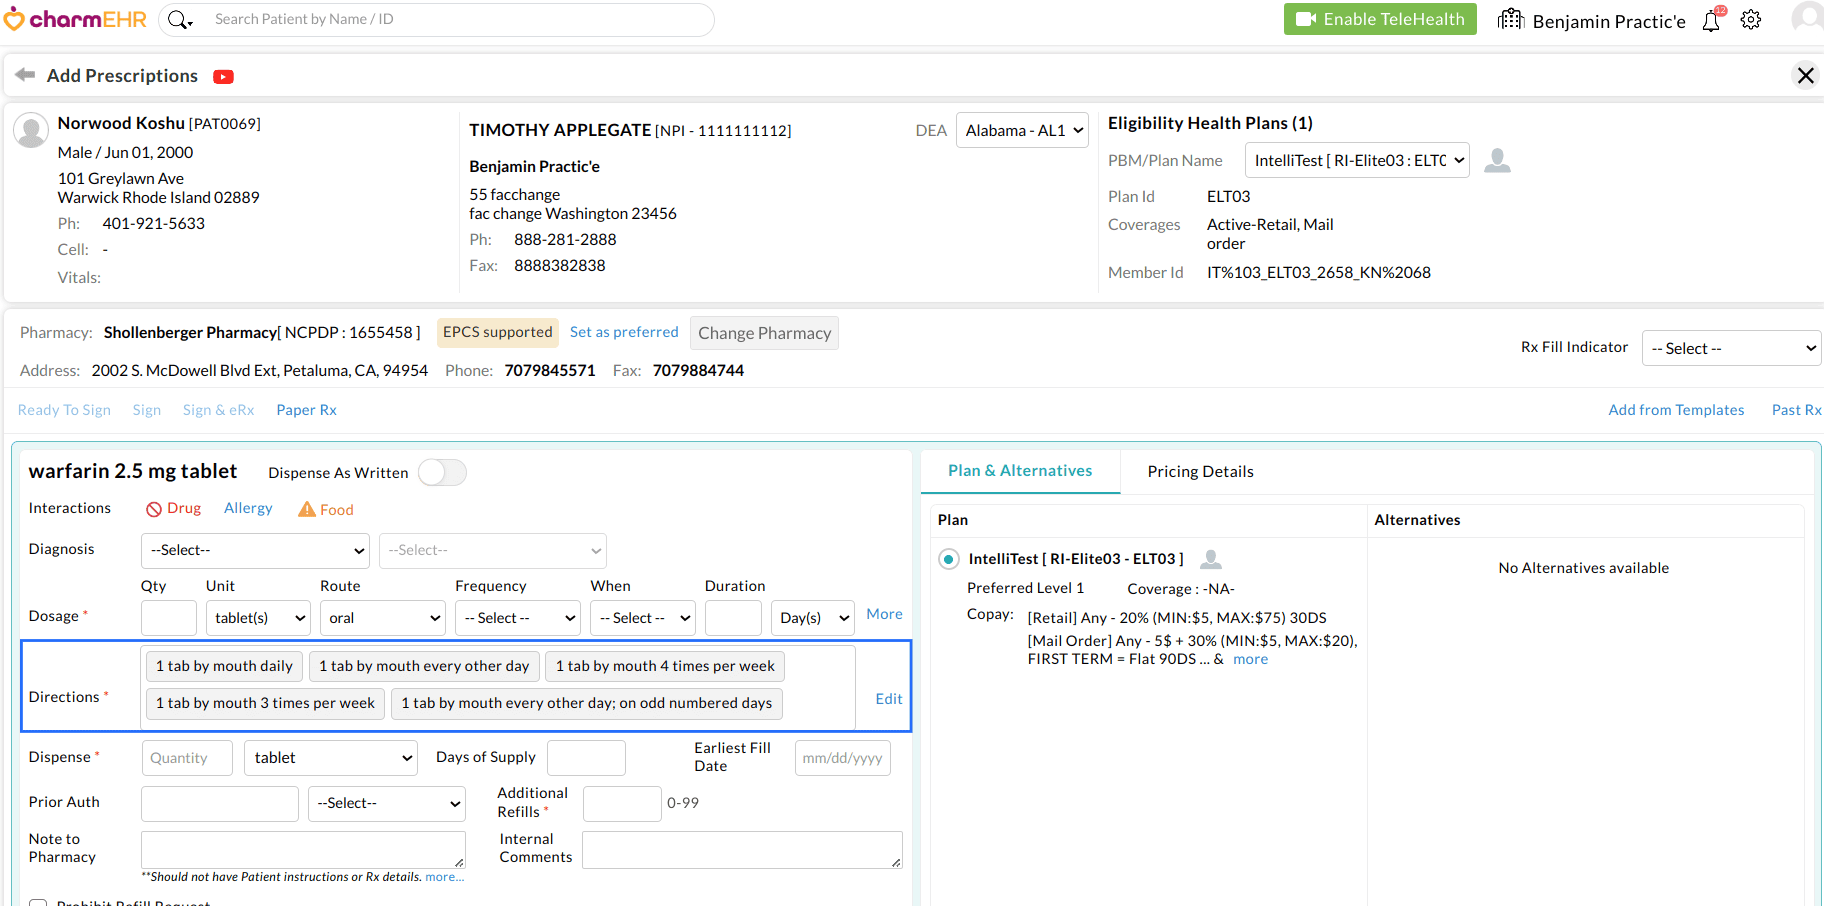
Follow the steps below to start using the Auto-SIG suggestions.
- Start an Encounter with a Patient
- Navigate to the 'Recommendations > Prescriptions' section and click on 'Add Rx'.
- Search and select the medication.
- On selecting the drug, CharmHealth EHR will automatically display the commonly used SIG for the given medication based on the Patient's age.
- If any of the suggested options are suitable, the Prescriber can select one from the list.
Note: You can also manually build one or edit the Directions as needed.
We hope this enhancement will assist Prescribers in writing SIGs more easily and efficiently.
For further queries and feedback, write to us at support@charmhealth.com
We are excited to announce new enhancements to the VitaminLab integration in CharmHealth EHR, empowering Providers to create truly personalized supplement formulations tailored to each Patient's unique health profile, goals, and clinical needs.
With these updates, Providers can now complete the entire Formula creation process directly within CharmHealth EHR eliminating the need to switch to VitaminLab. This includes creating Formulas using custom protocols, predefined VitaminLab protocols, or individual ingredients - all from the Patient's chart.
- Option to Create Customized VitaminLab Protocols
- Option to Create Formula using Standalone Ingredients
Providers can now create their customized VitaminLab Protocols while prescribing Supplements. This offers a more tailored approach to care, based on each Patient's health goals and conditions.
To create your custom VitaminLab Protocols, follow the steps below.
- Create an Encounter for a Patient.
- Navigate to the 'Recommendations > Supplements > Add Suppl > VitaminLab' section.
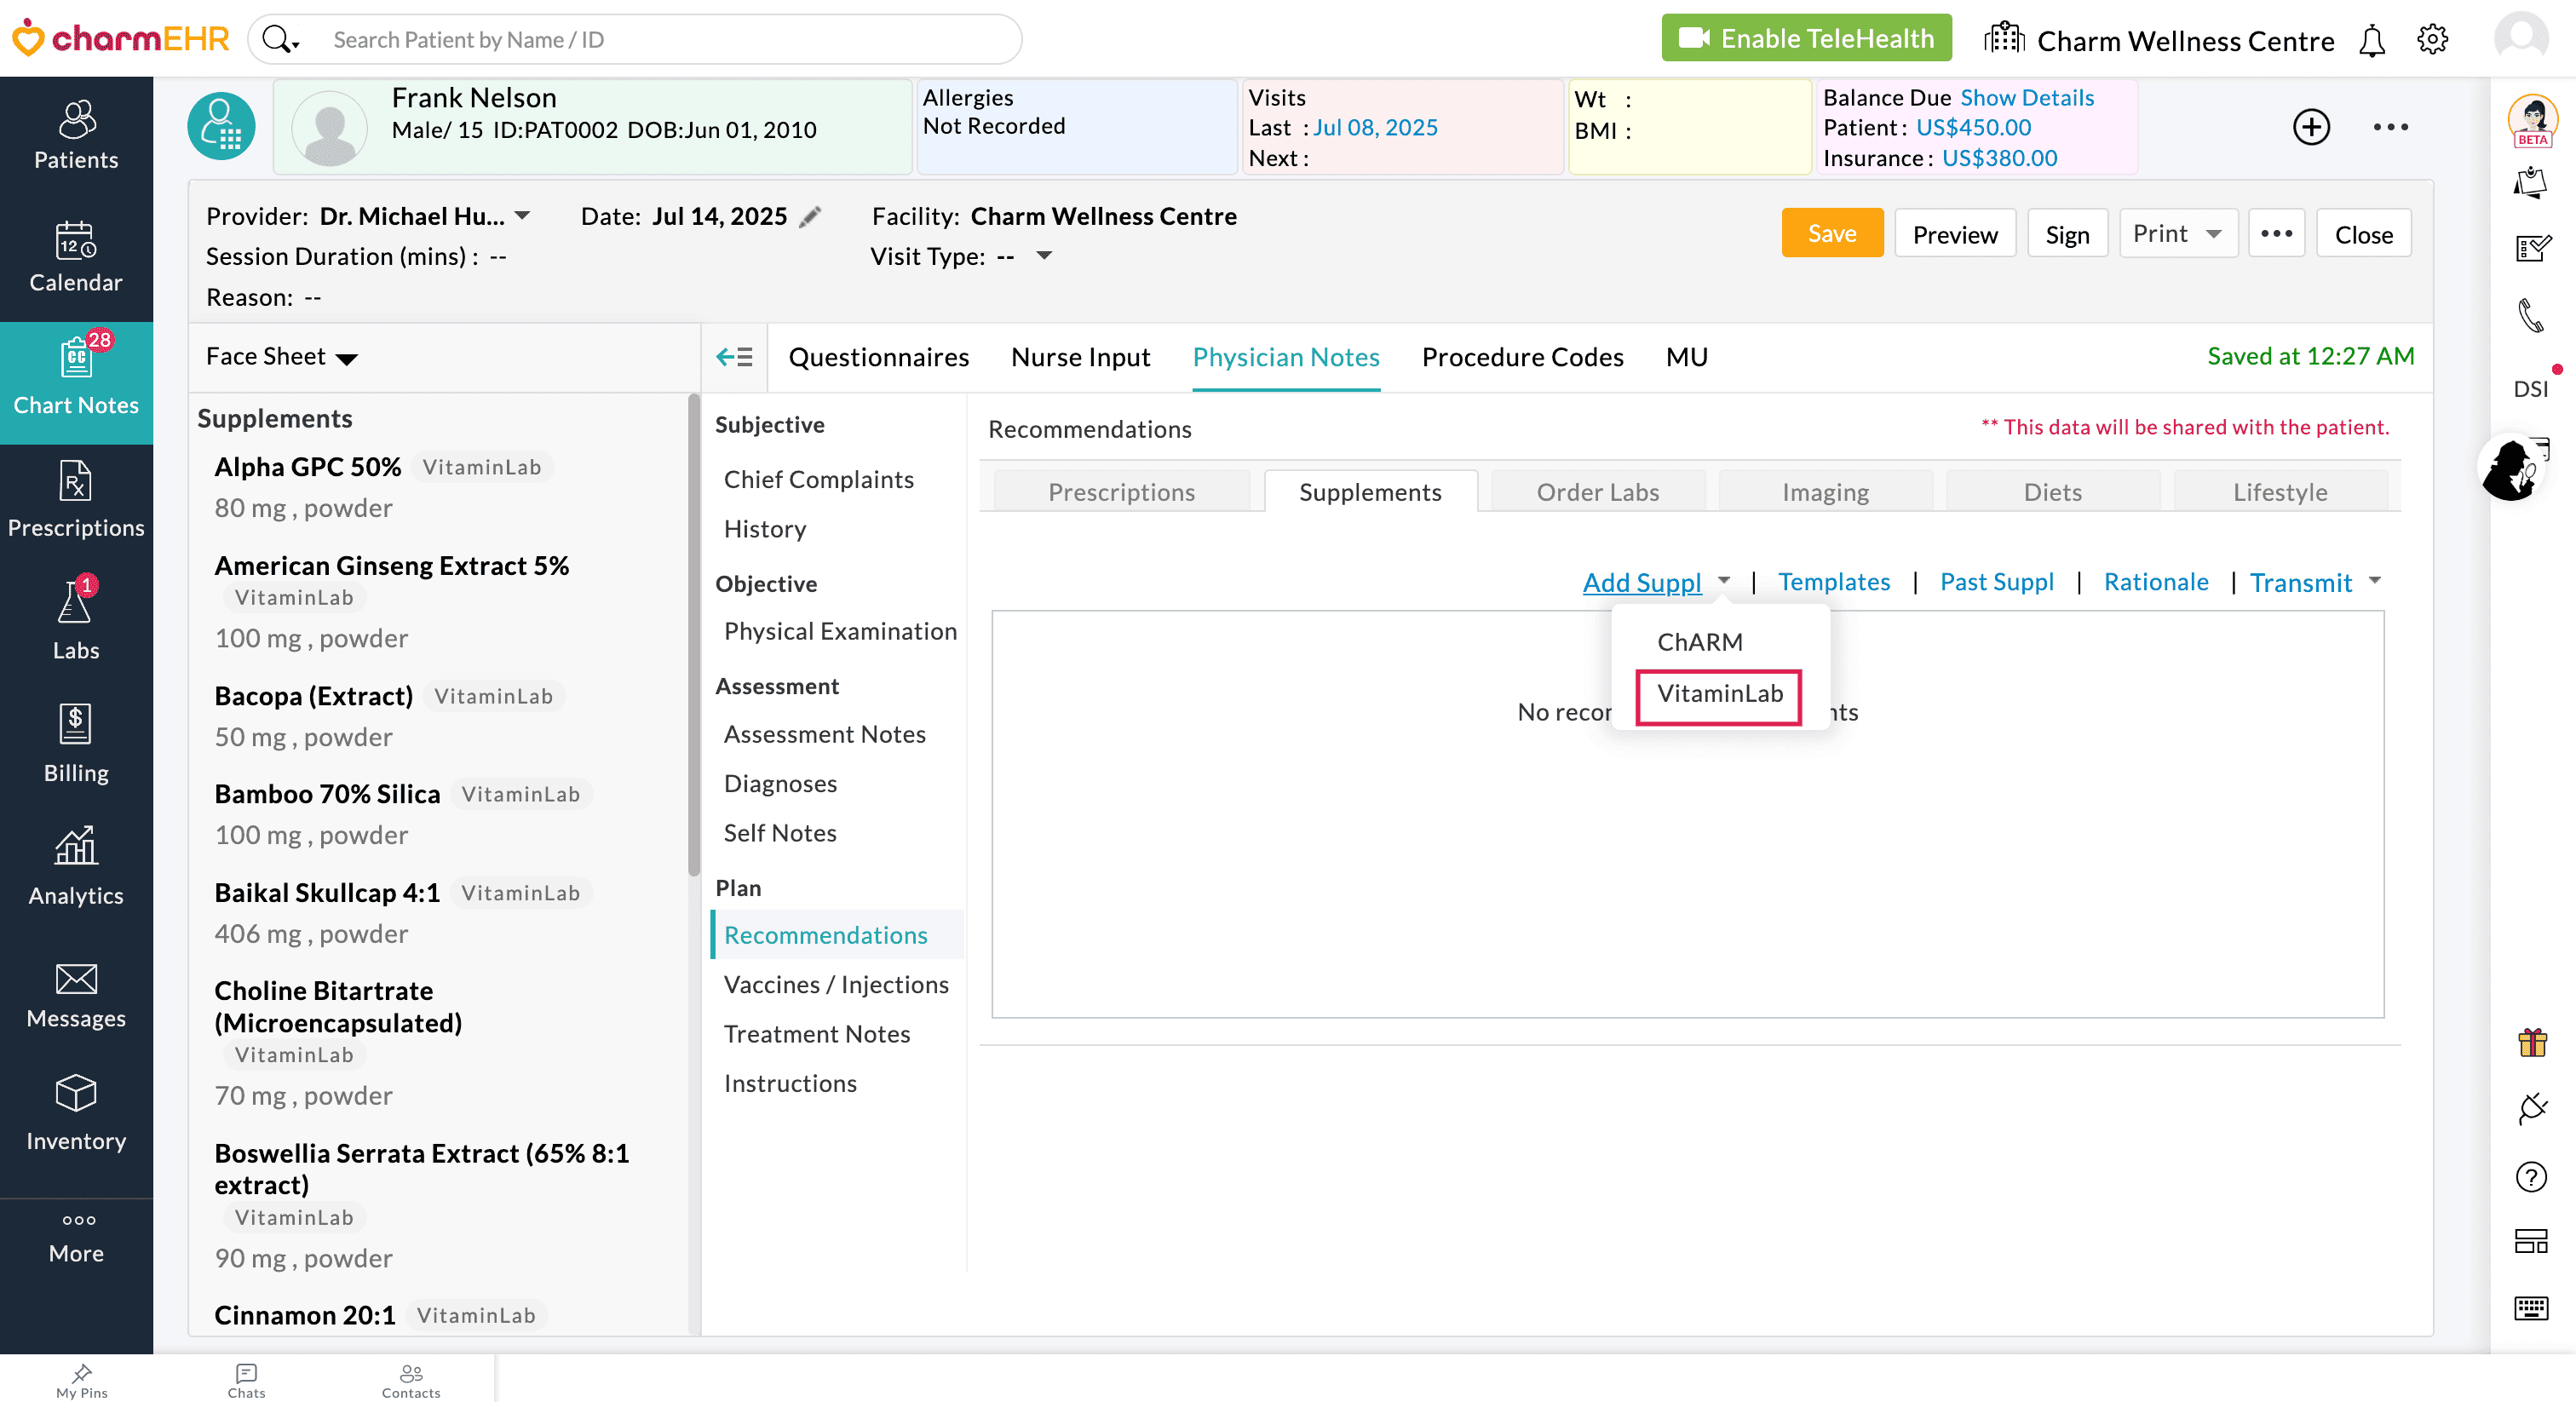
- Go to the 'My Protocols' tab and click the 'Create New Protocol' button.
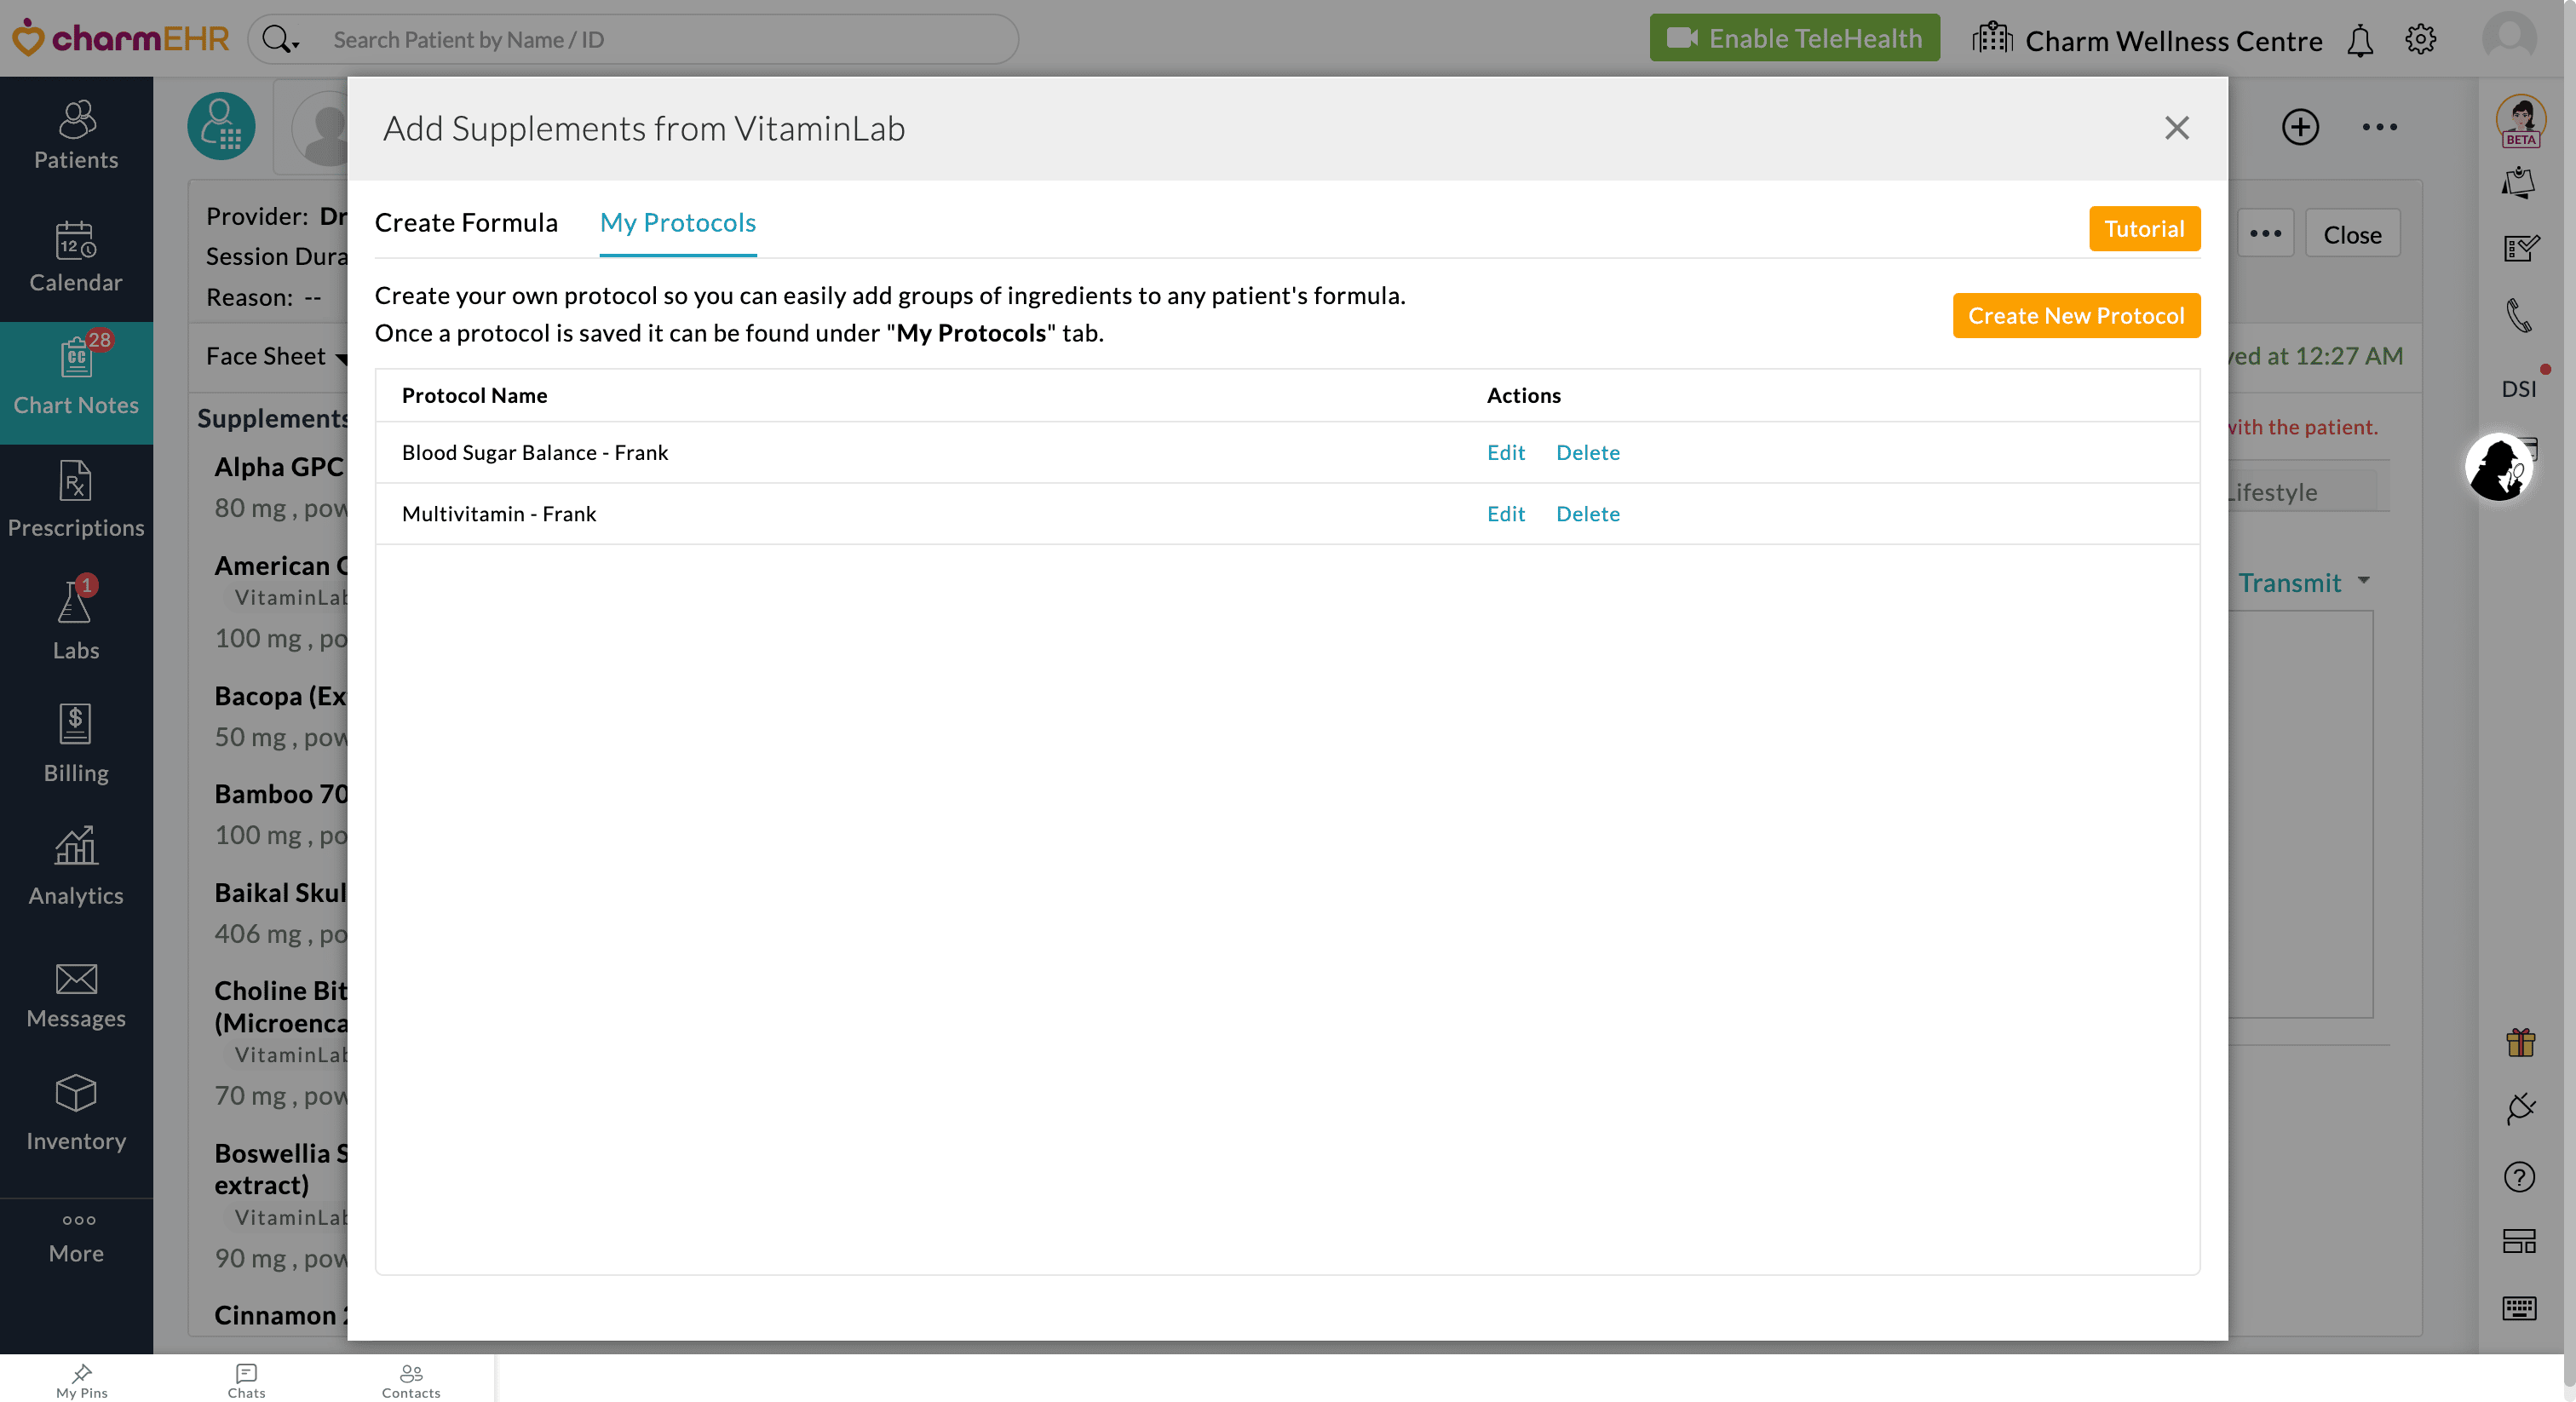
- Enter the Protocol Name, search for the ingredients, and add them to your custom protocol. If needed, click the 'Calculate Price' button to view the pricing.
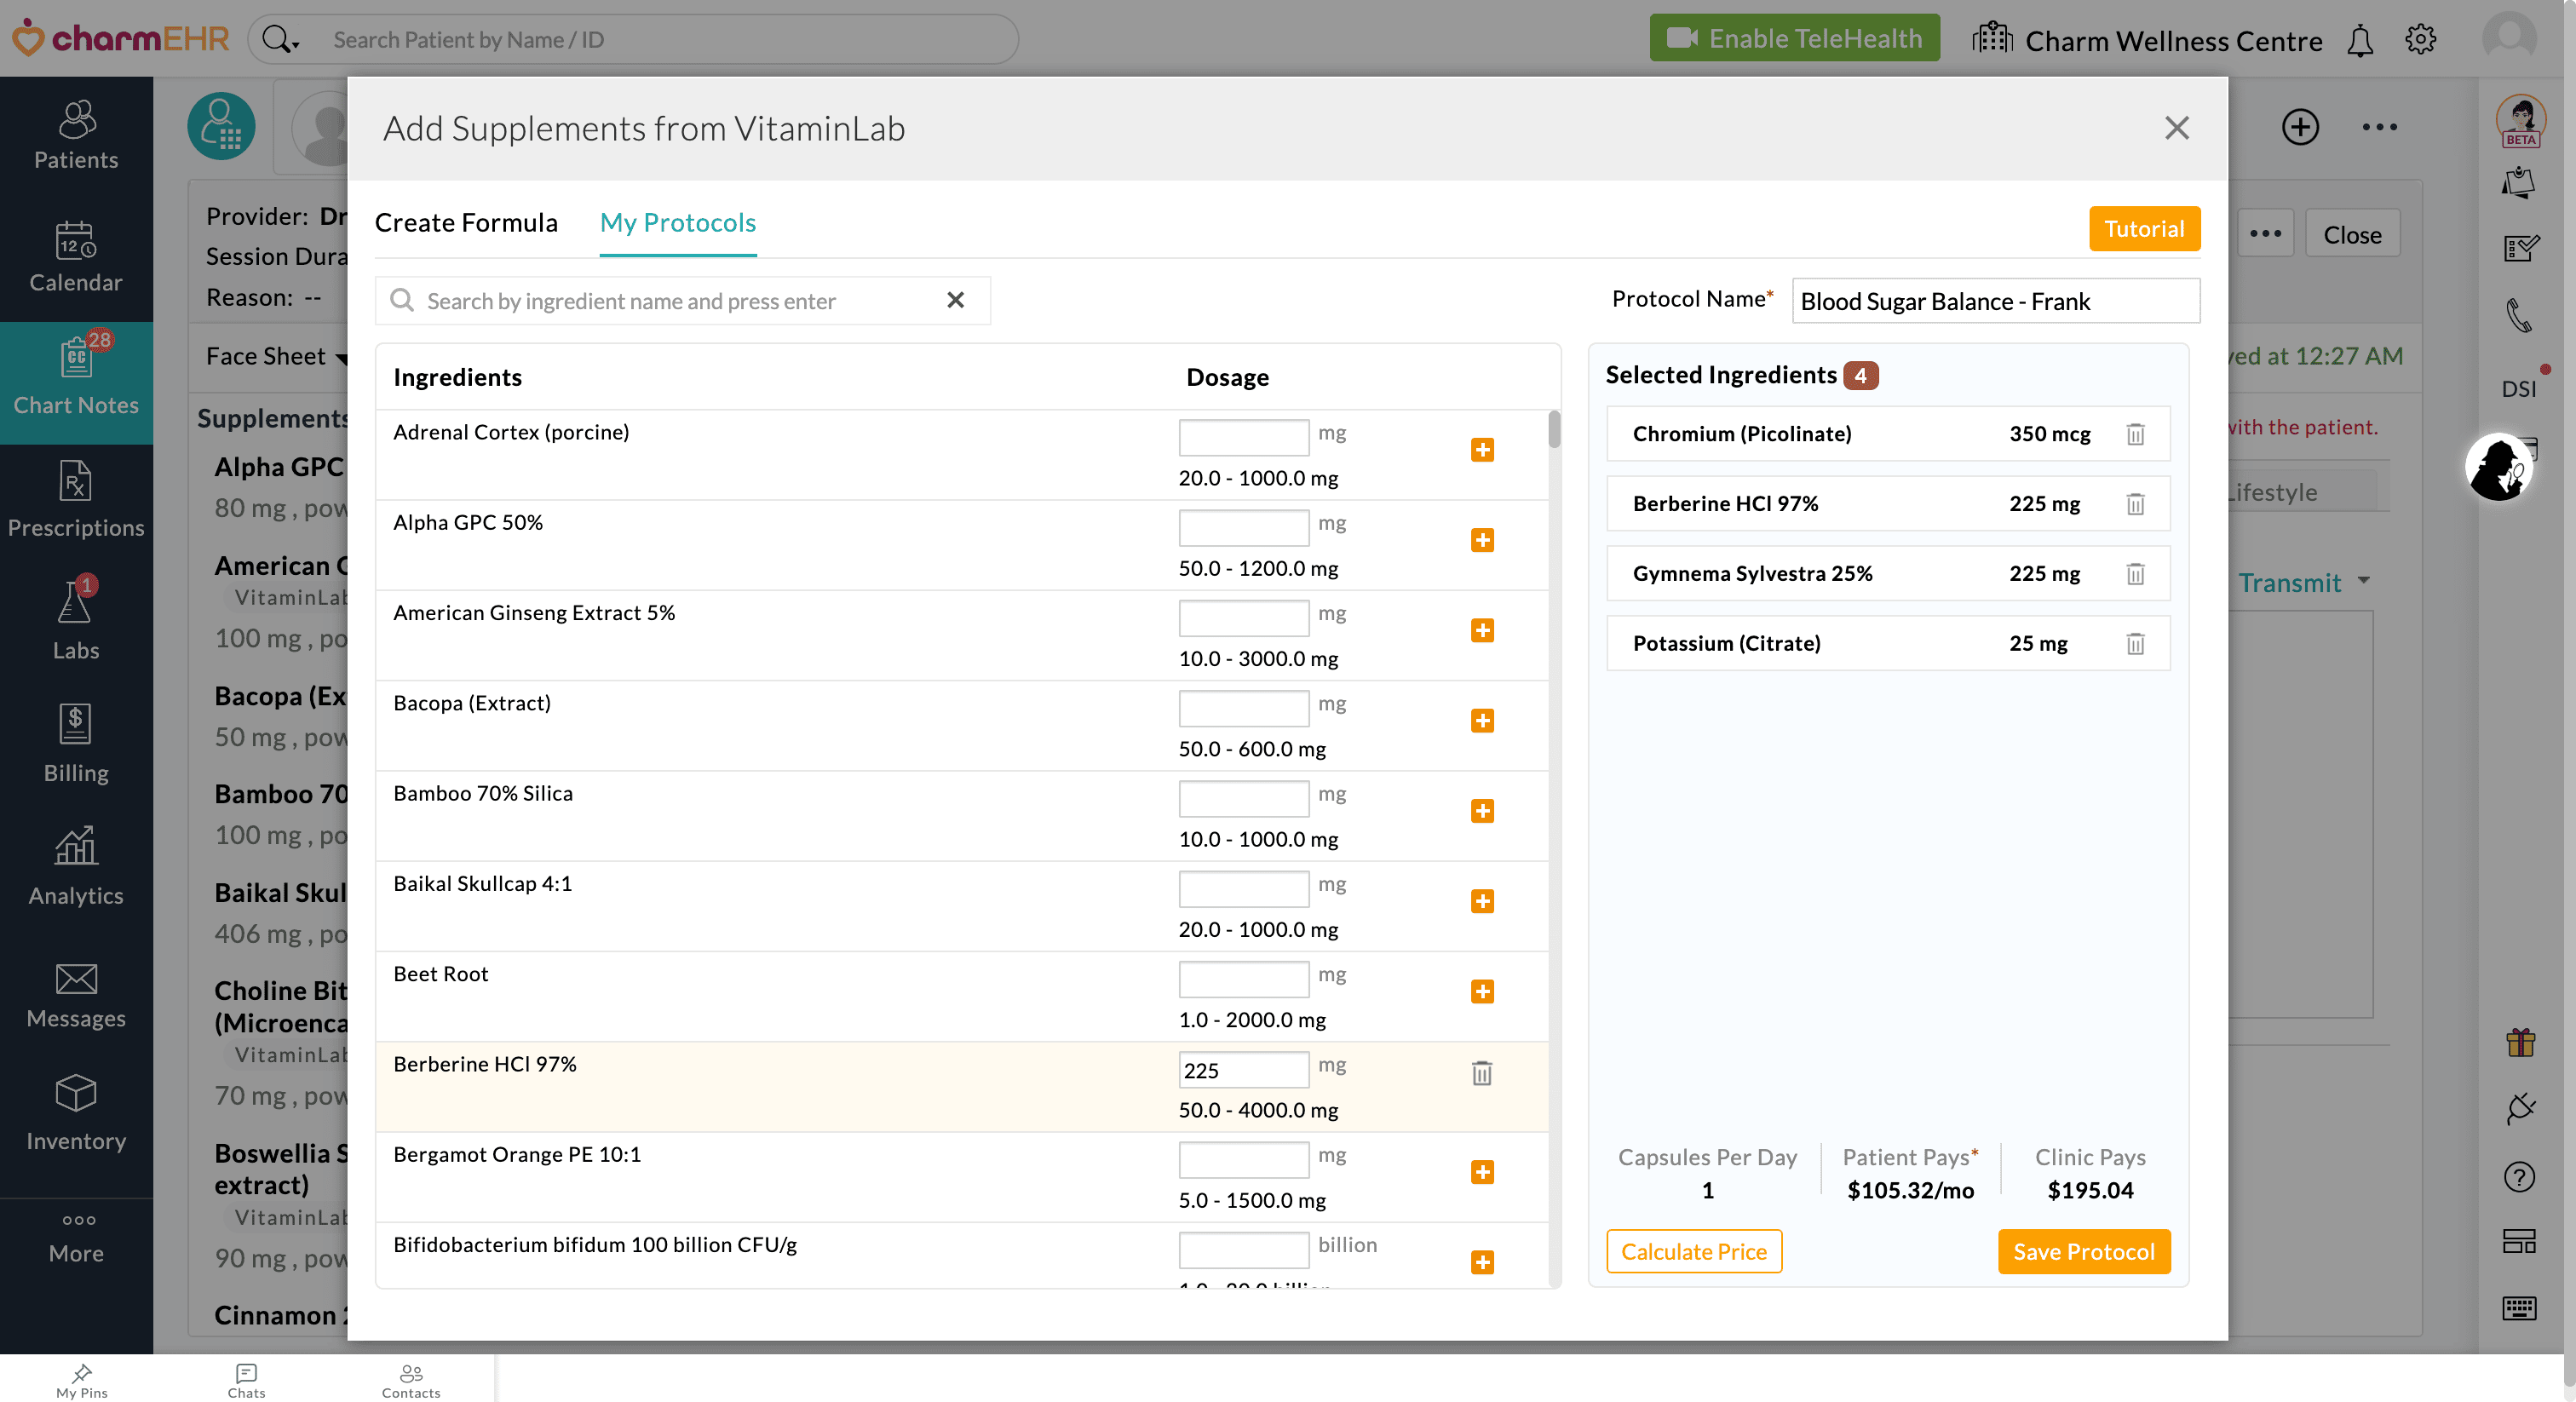
- Click the 'Save Protocol' button.
Once saved, the custom protocol will be available under the 'Create Formula > My Protocols' section, allowing Providers to add it to the Patient's Chart Note.
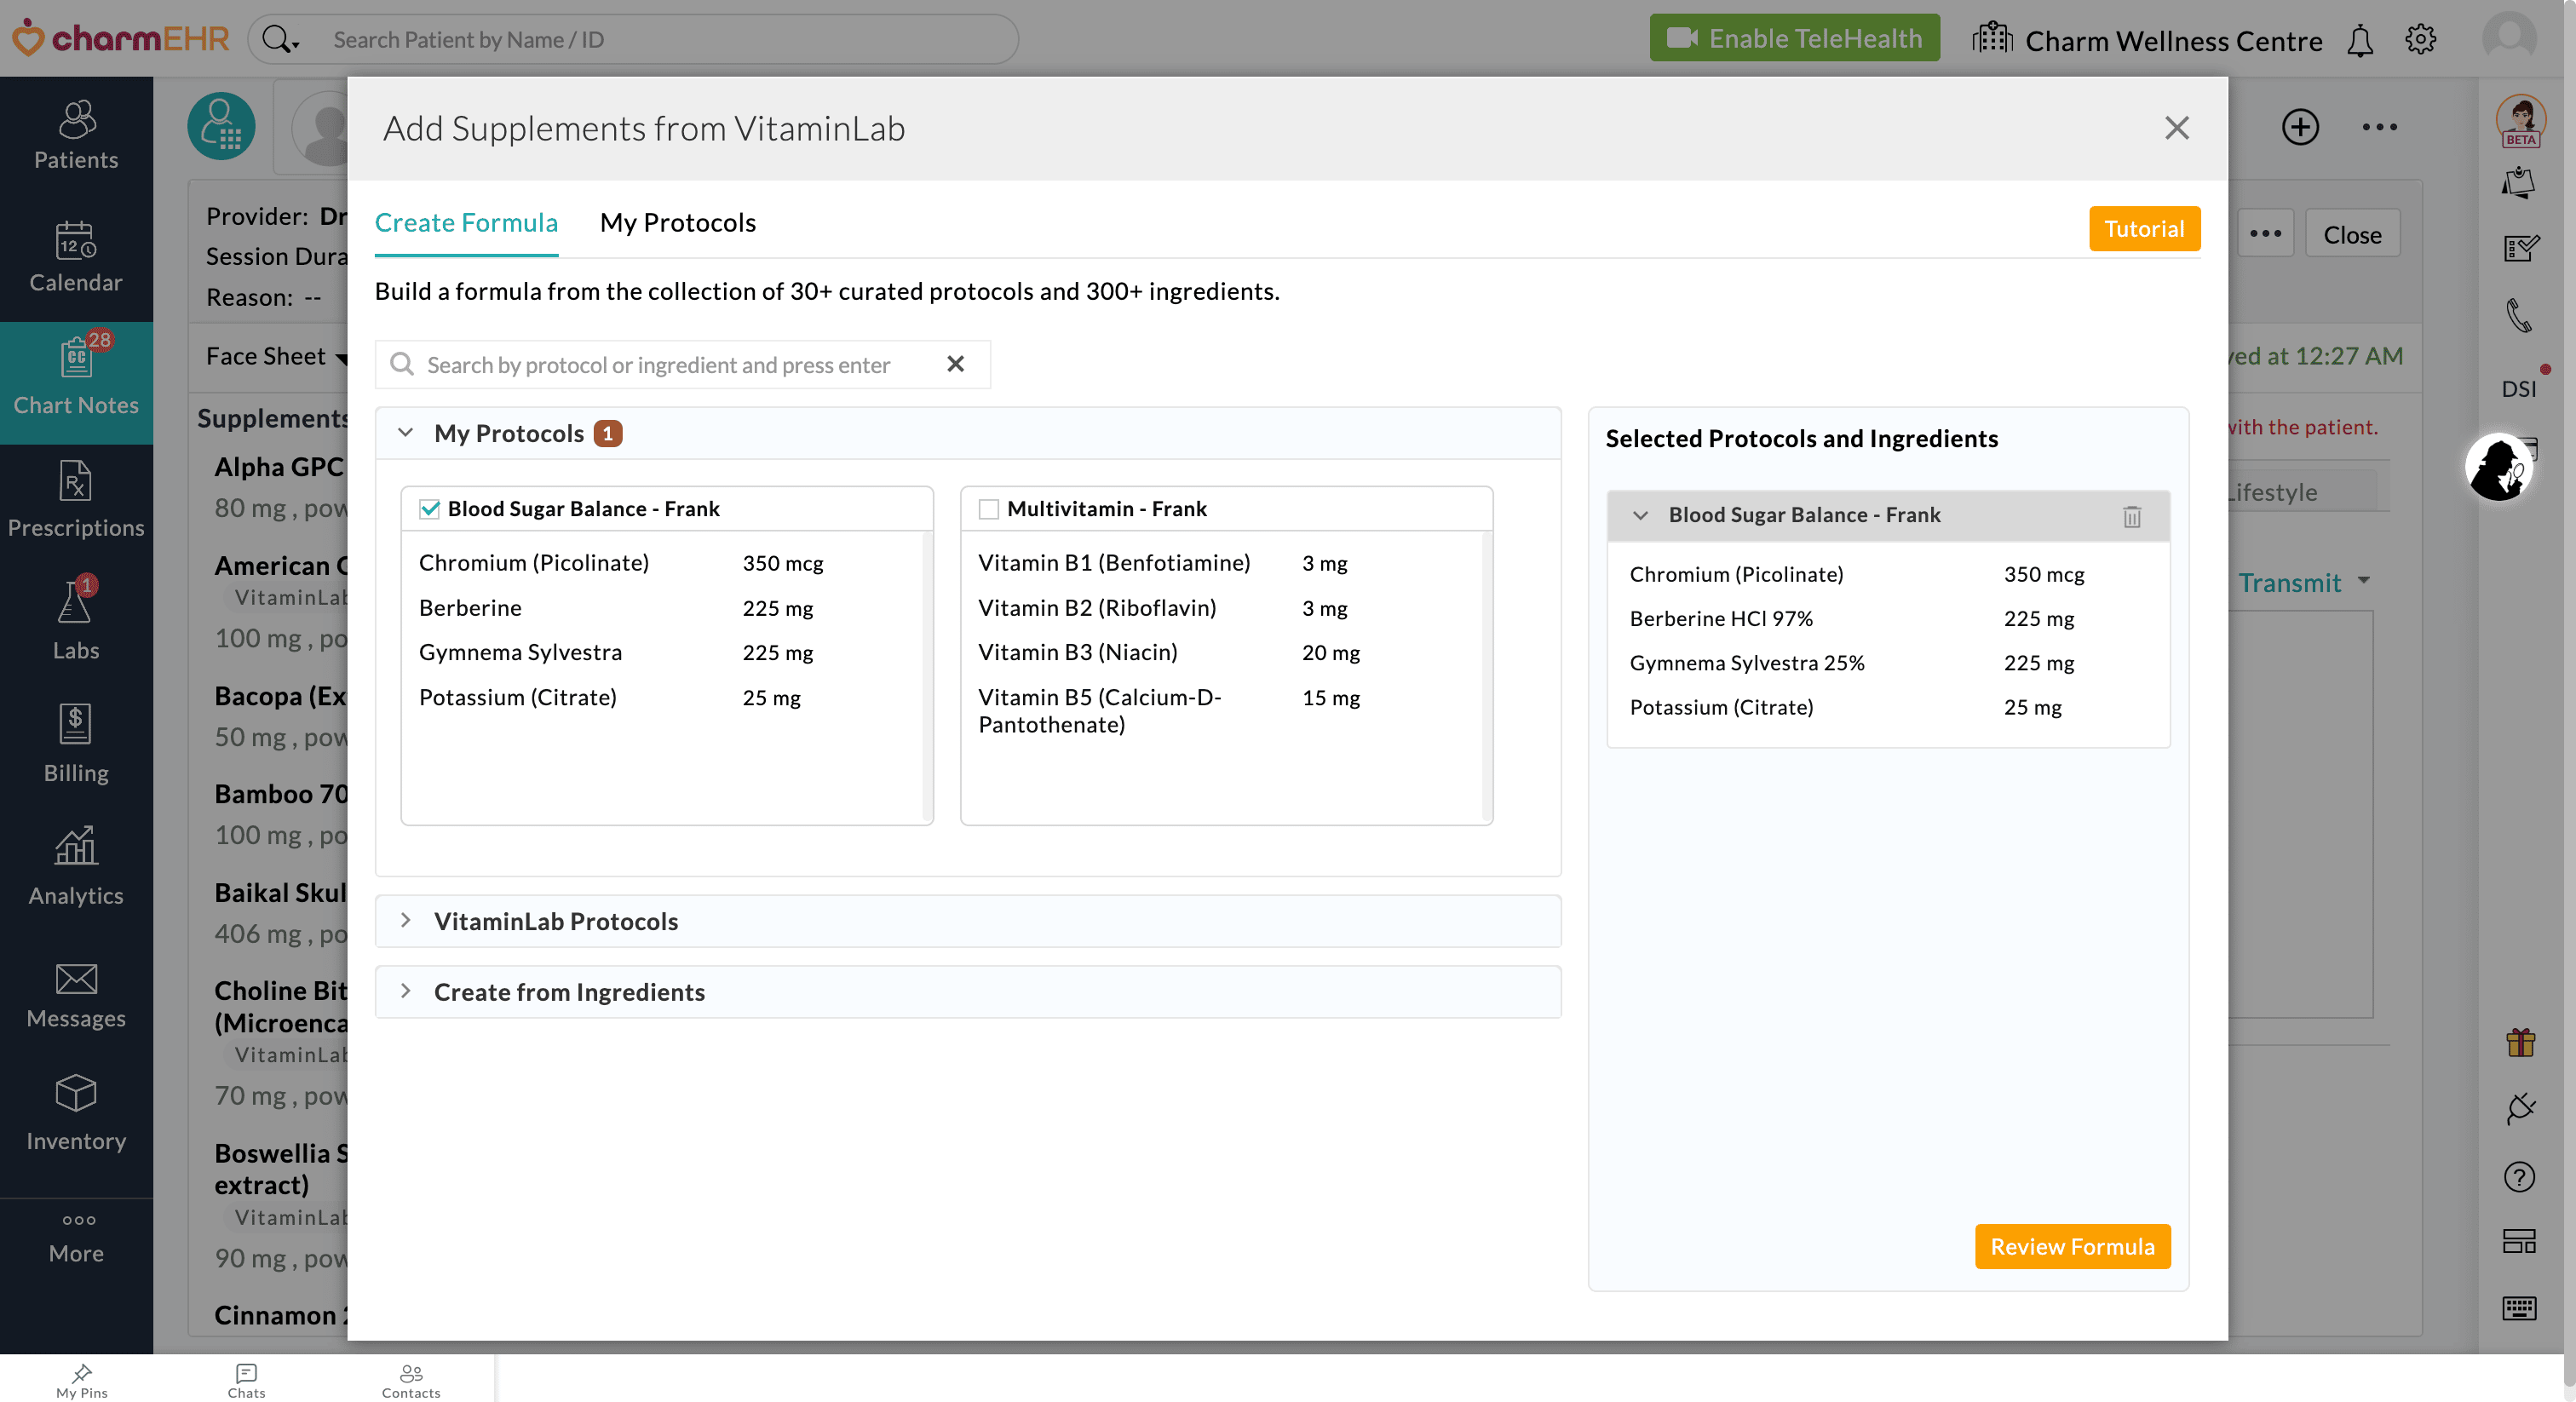
Providers are no longer limited to using predefined or custom Protocols. You can now build completely customized formulas from scratch using individual ingredients.
While prescribing VitaminLab supplements, Providers can:
- Search and select individual ingredients from the ingredient list.
- Customize the dosage for each ingredient.
- Add the selected ingredients to the Patient’s formula.
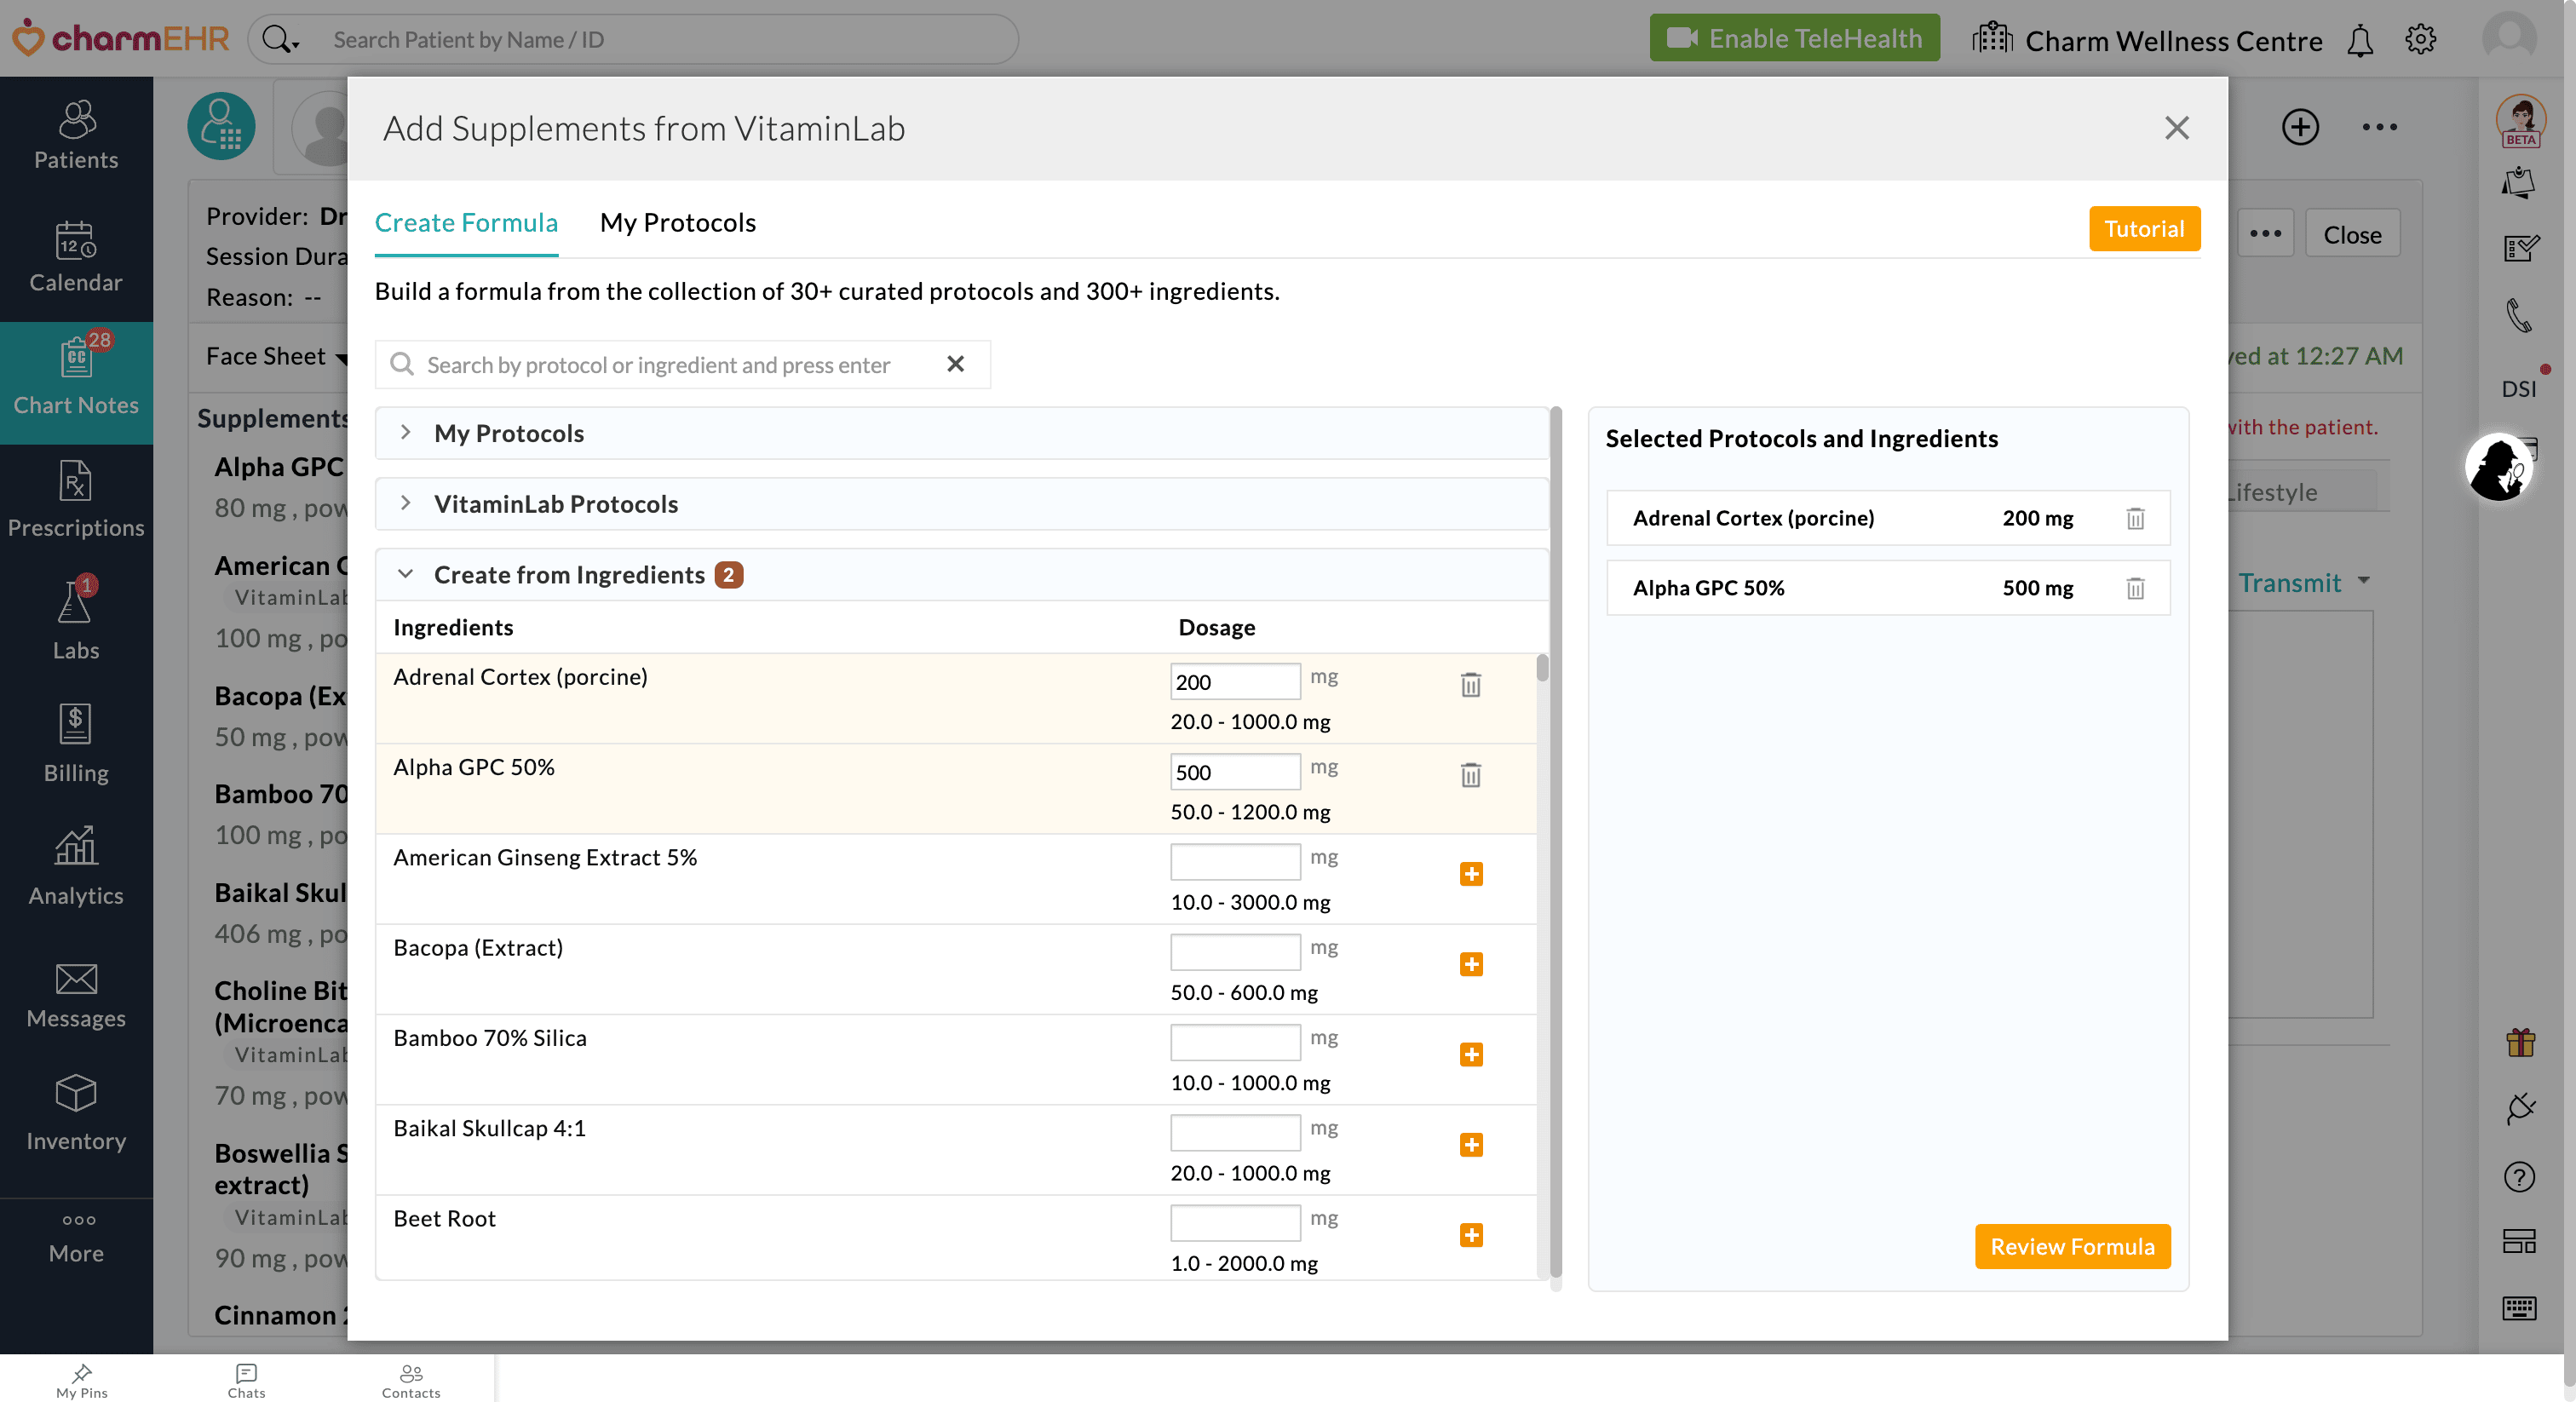
Combine Protocols and Customize Formula: You can also combine custom Protocols, VitaminLab's predefined Protocols, and individual ingredients within a single Formula, allowing complete flexibility for personalized care.
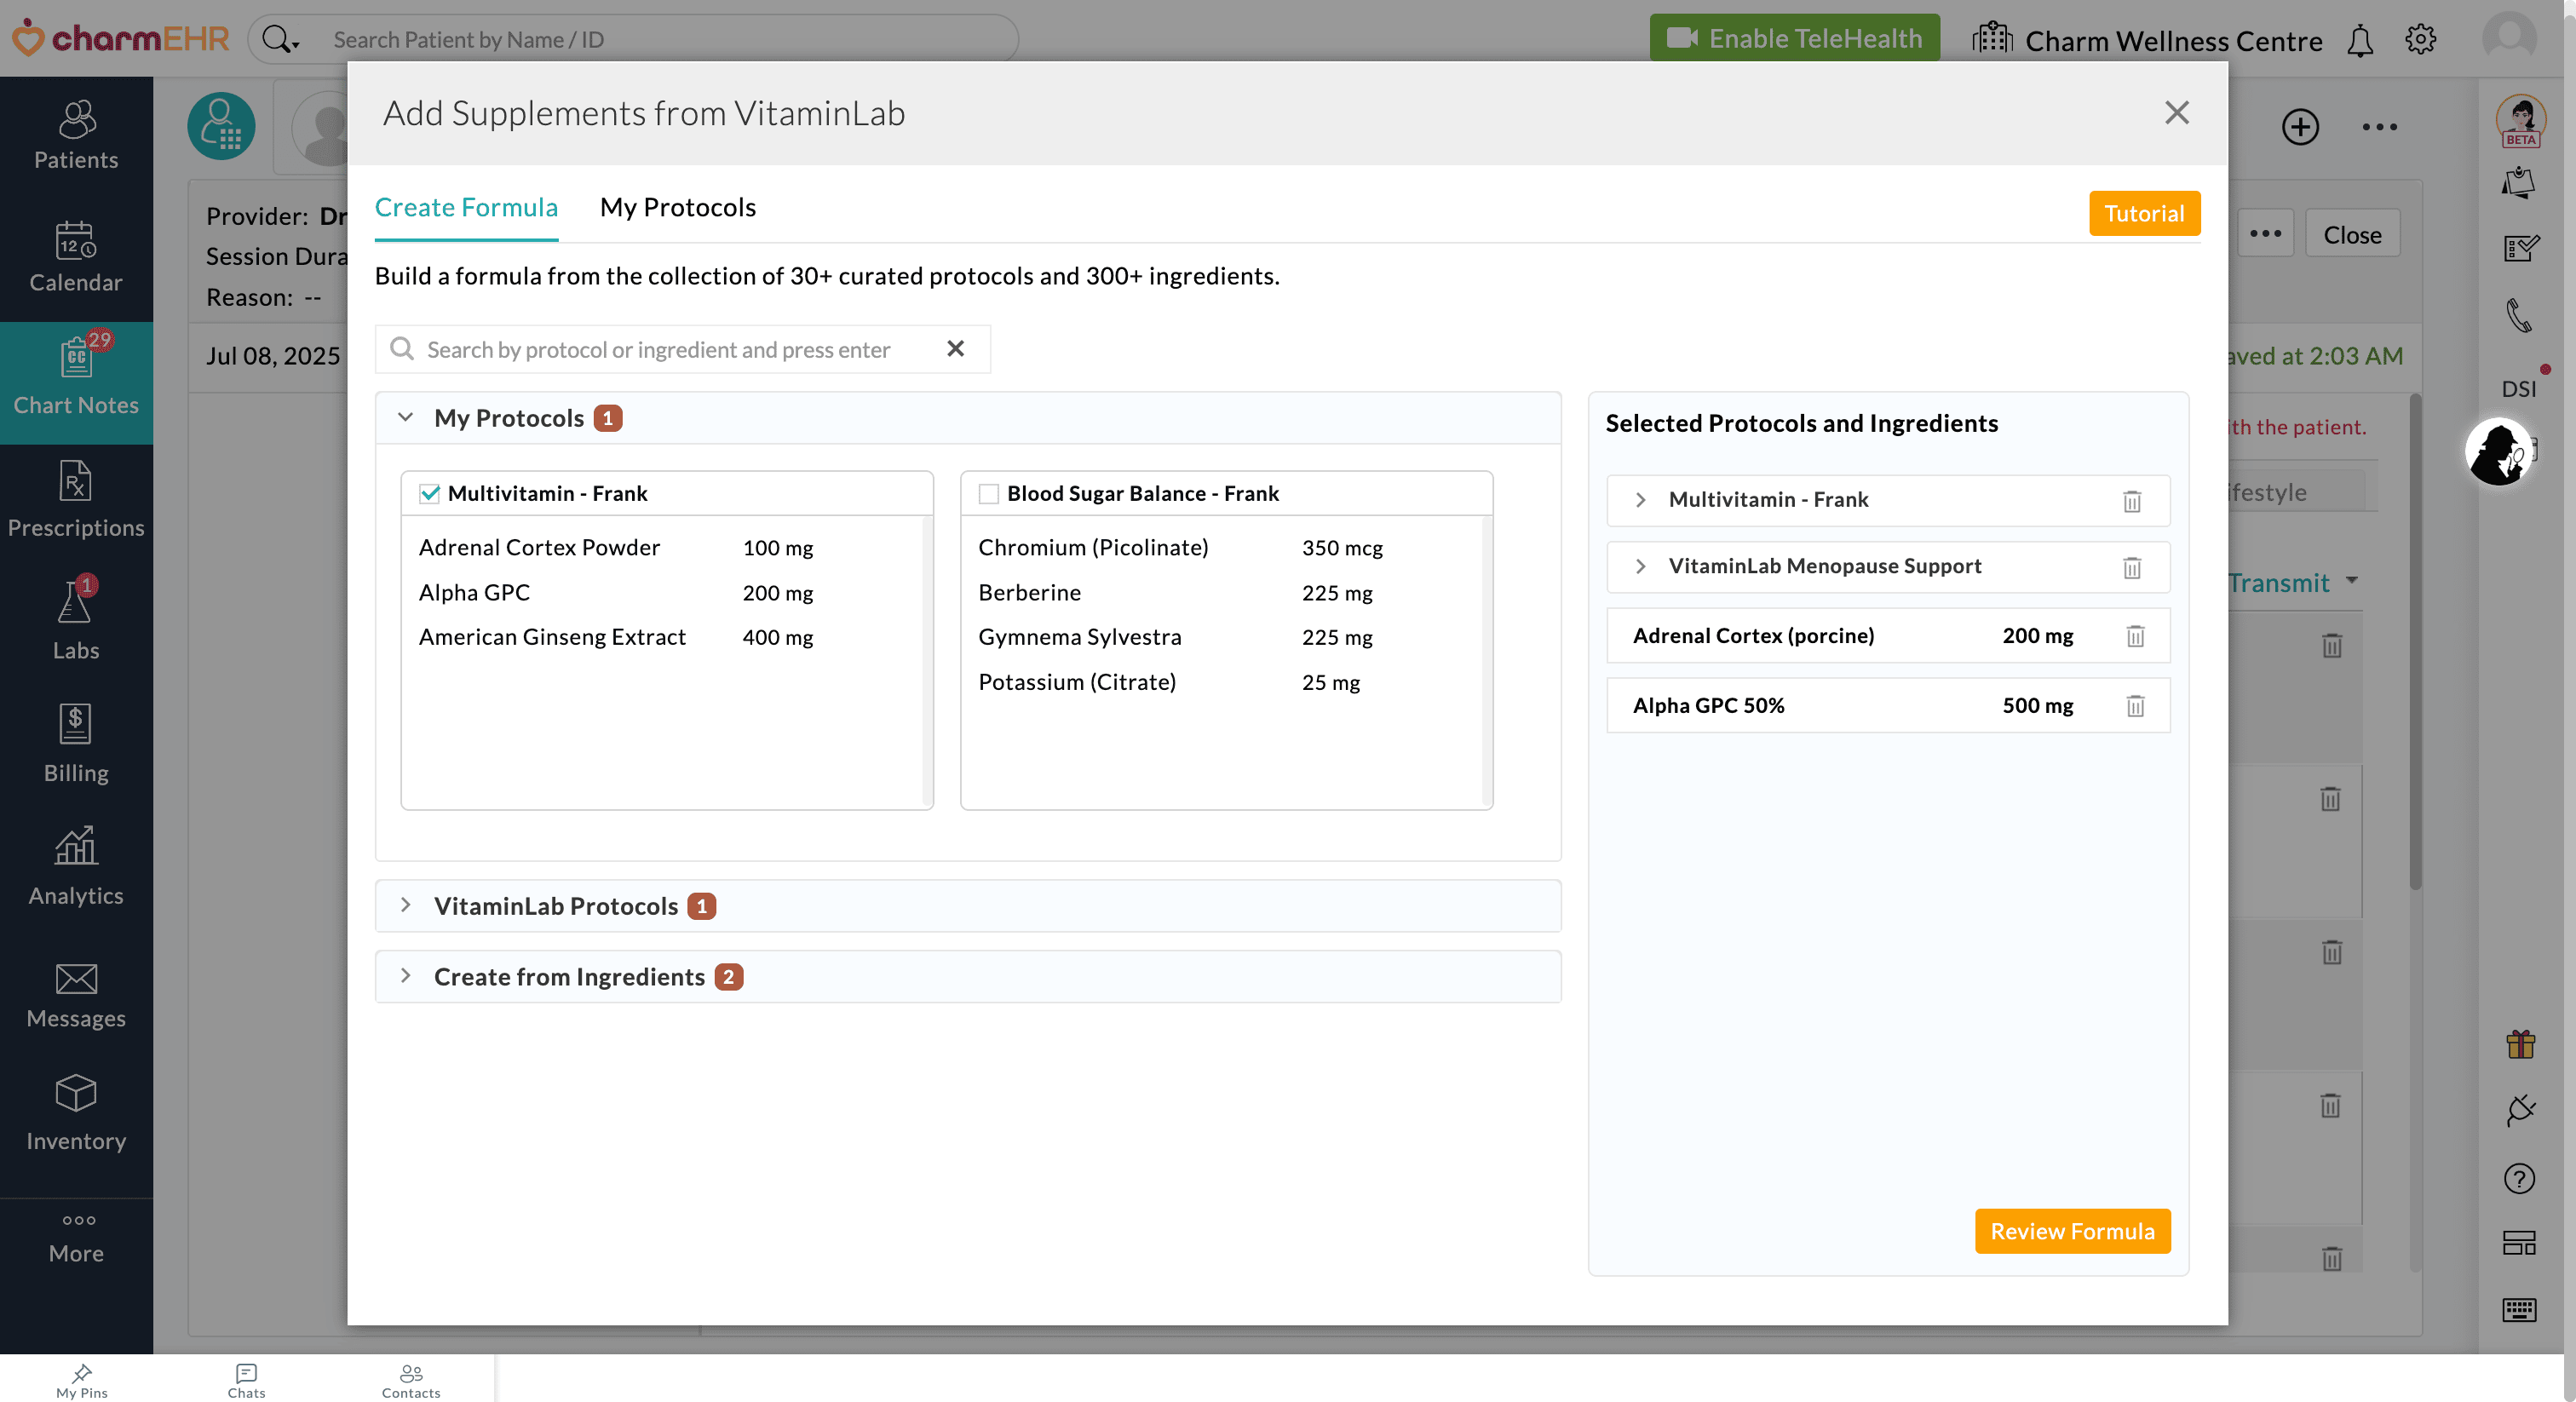
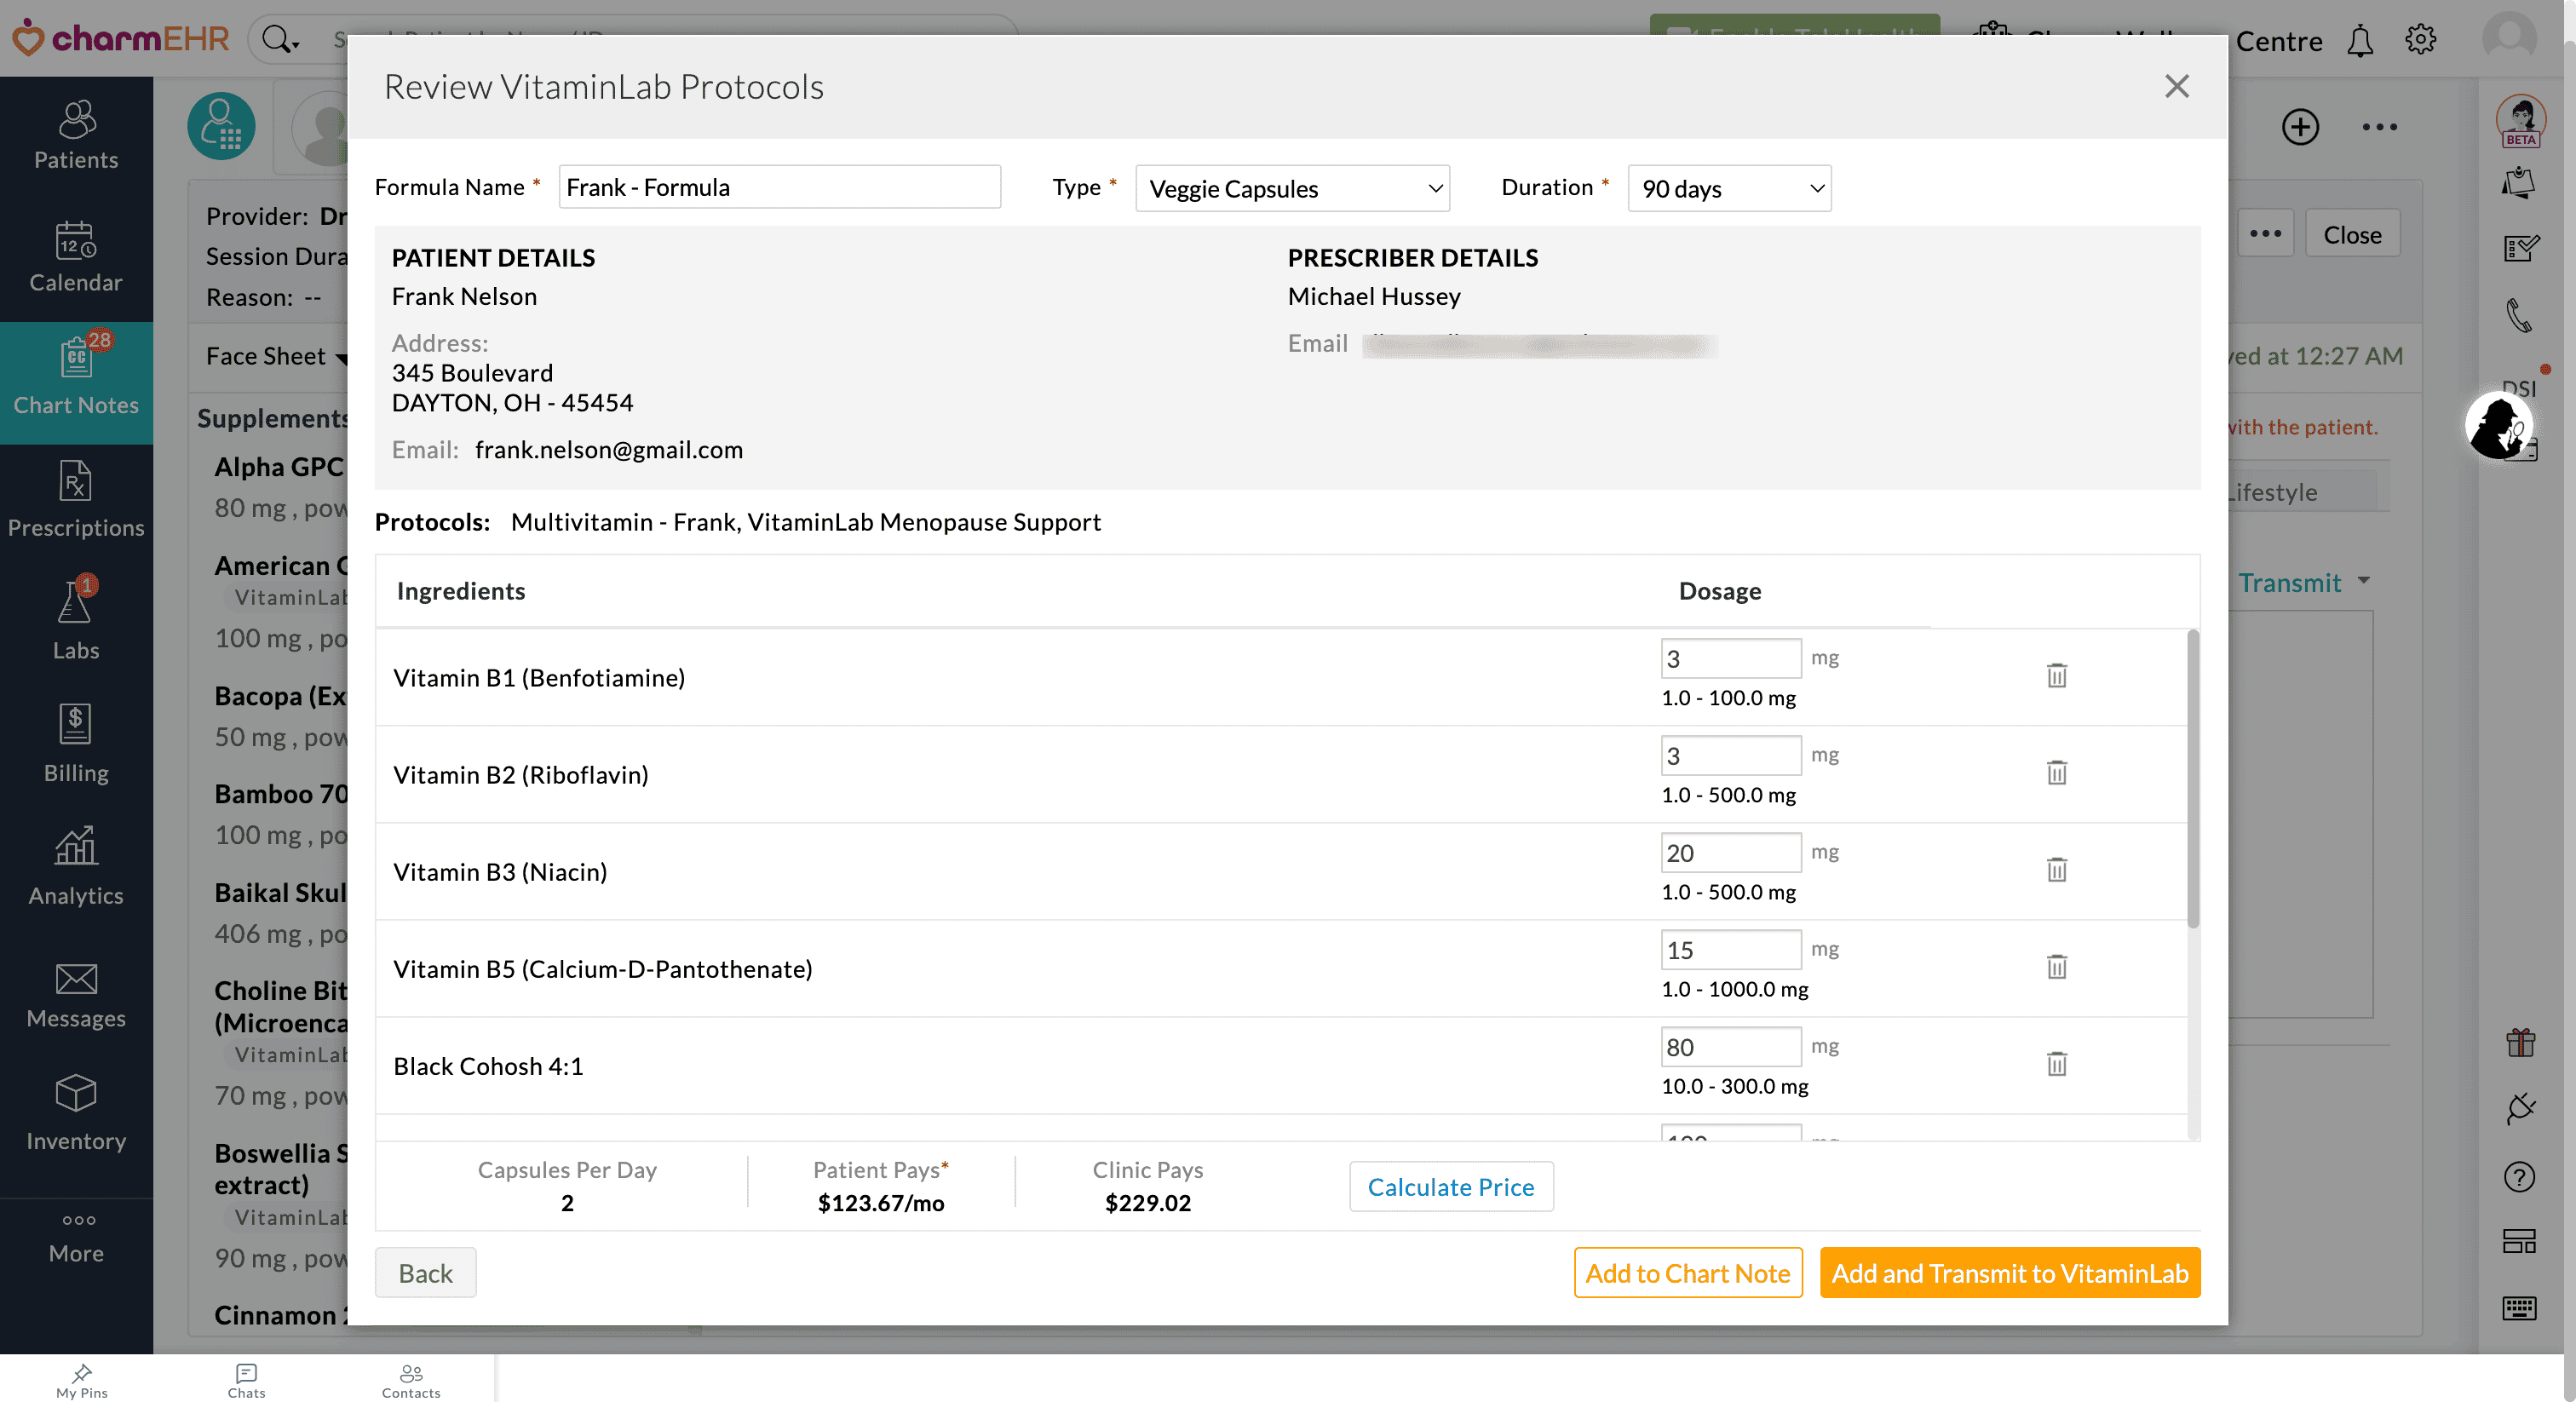
Providers can then review the Formula, calculate the price, and transmit them to VitaminLab.
We believe these enhancements will improve the delivery of care tailored to each patient by offering more customizable supplement plans.
For more information on VitaminLab integration, visit our Resource Center.
Have feedback, questions, or need assistance? Reach out to our support team at support@charmhealth.com, and we will help you sail through.