Generating Bills
Generate Invoice for the Encounter
Once Encounter is started for the Patient, it will get listed under the 'Billing > Generate Bills' section. By default, the 'Encounters for Billing' option will be selected in the 'Encounters' filter option.

New Invoice
- The Practice members can track all the Encounters that are required for Billing by choosing the 'Encounters for Billing' drop-down menu from the 'Encounters' filter option.

- Select the Date Range to view the Encounters. Use the Search Options to filter the Encounters created by a particular Provider and to search for the Encounters of a particular Patient.
- To generate an Invoice for an Encounter, click the 'More Options' (...) against the Encounter and select the 'New Invoice' option.

- Enter the Procedure Codes/Products along with their charges.
- Click the 'Approve' button to approve the Invoice.
Edit Invoice
- While generating an Invoice for an Encounter, the Invoice can be saved as a Draft before approving by clicking the 'Save Draft' button.

- The saved Invoice can be edited later at any time. Click the 'More Options' (...) icon against the Encounter and select the 'Edit Invoice' option.
- Make the required changes to the Invoice and click the 'Approve' button.
Bulk Invoice Generation
Practices can generate Invoices for one or more Encounters across a specific Facility or All Facilities at once from the 'Generate Bills' section.
Follow the steps below to generate bulk Invoices for the Encounters.
- Navigate to 'Billing > Generate Bills' and select the 'Encounters for Billing' filter.
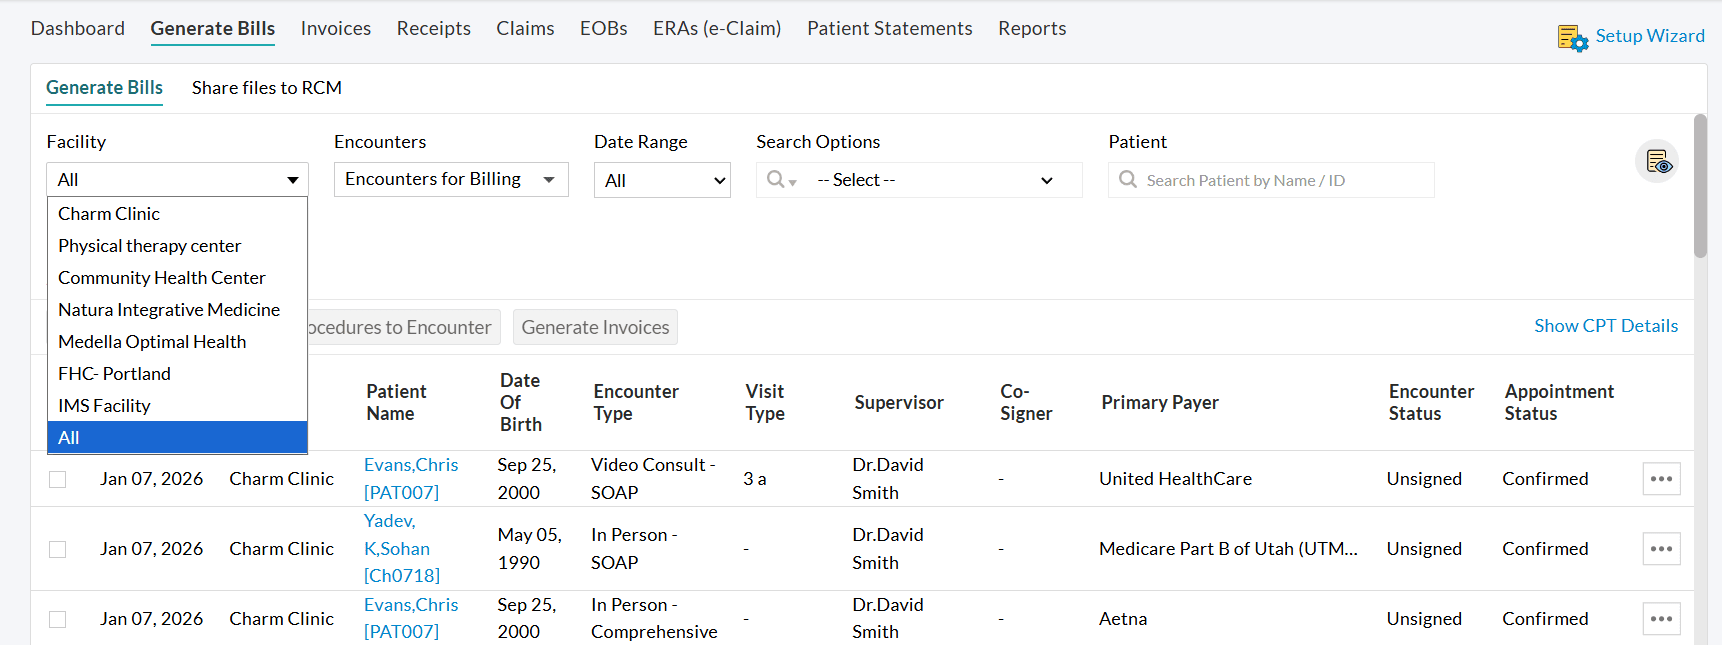
- By default, the Encounters of the selected Facility will be listed. You can choose a specific Facility from the 'Facility' dropdown or select 'All' to generate Invoices for Encounters of all Facilities.
- Select the Encounters for which you need to generate Invoices.
- Click the 'Generate Invoices' button.
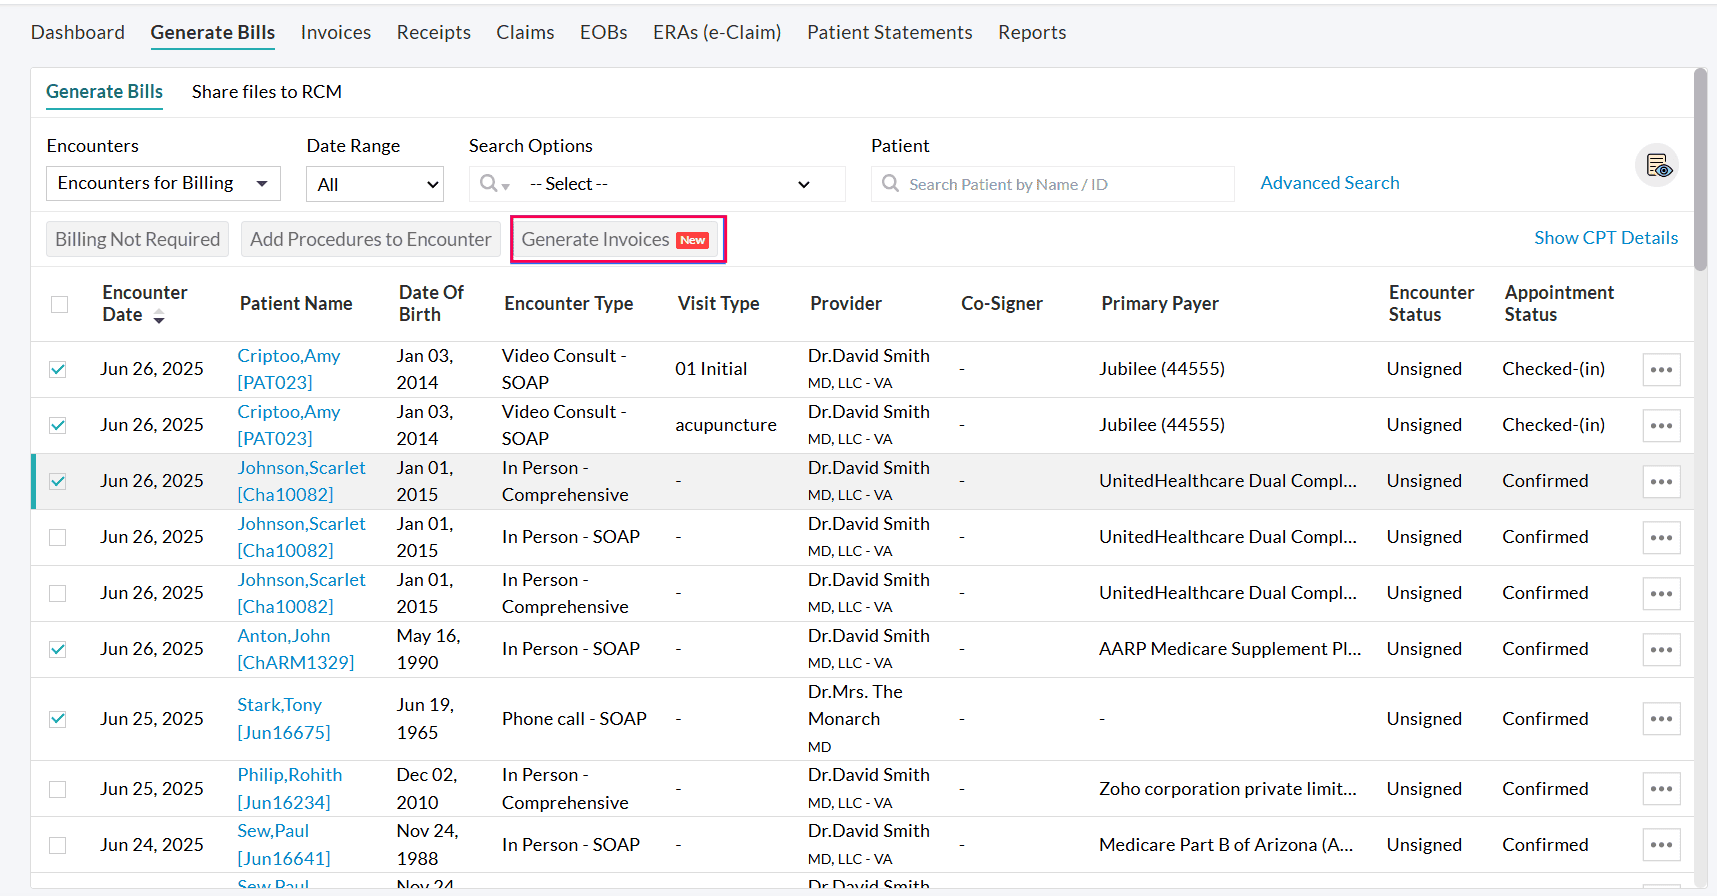
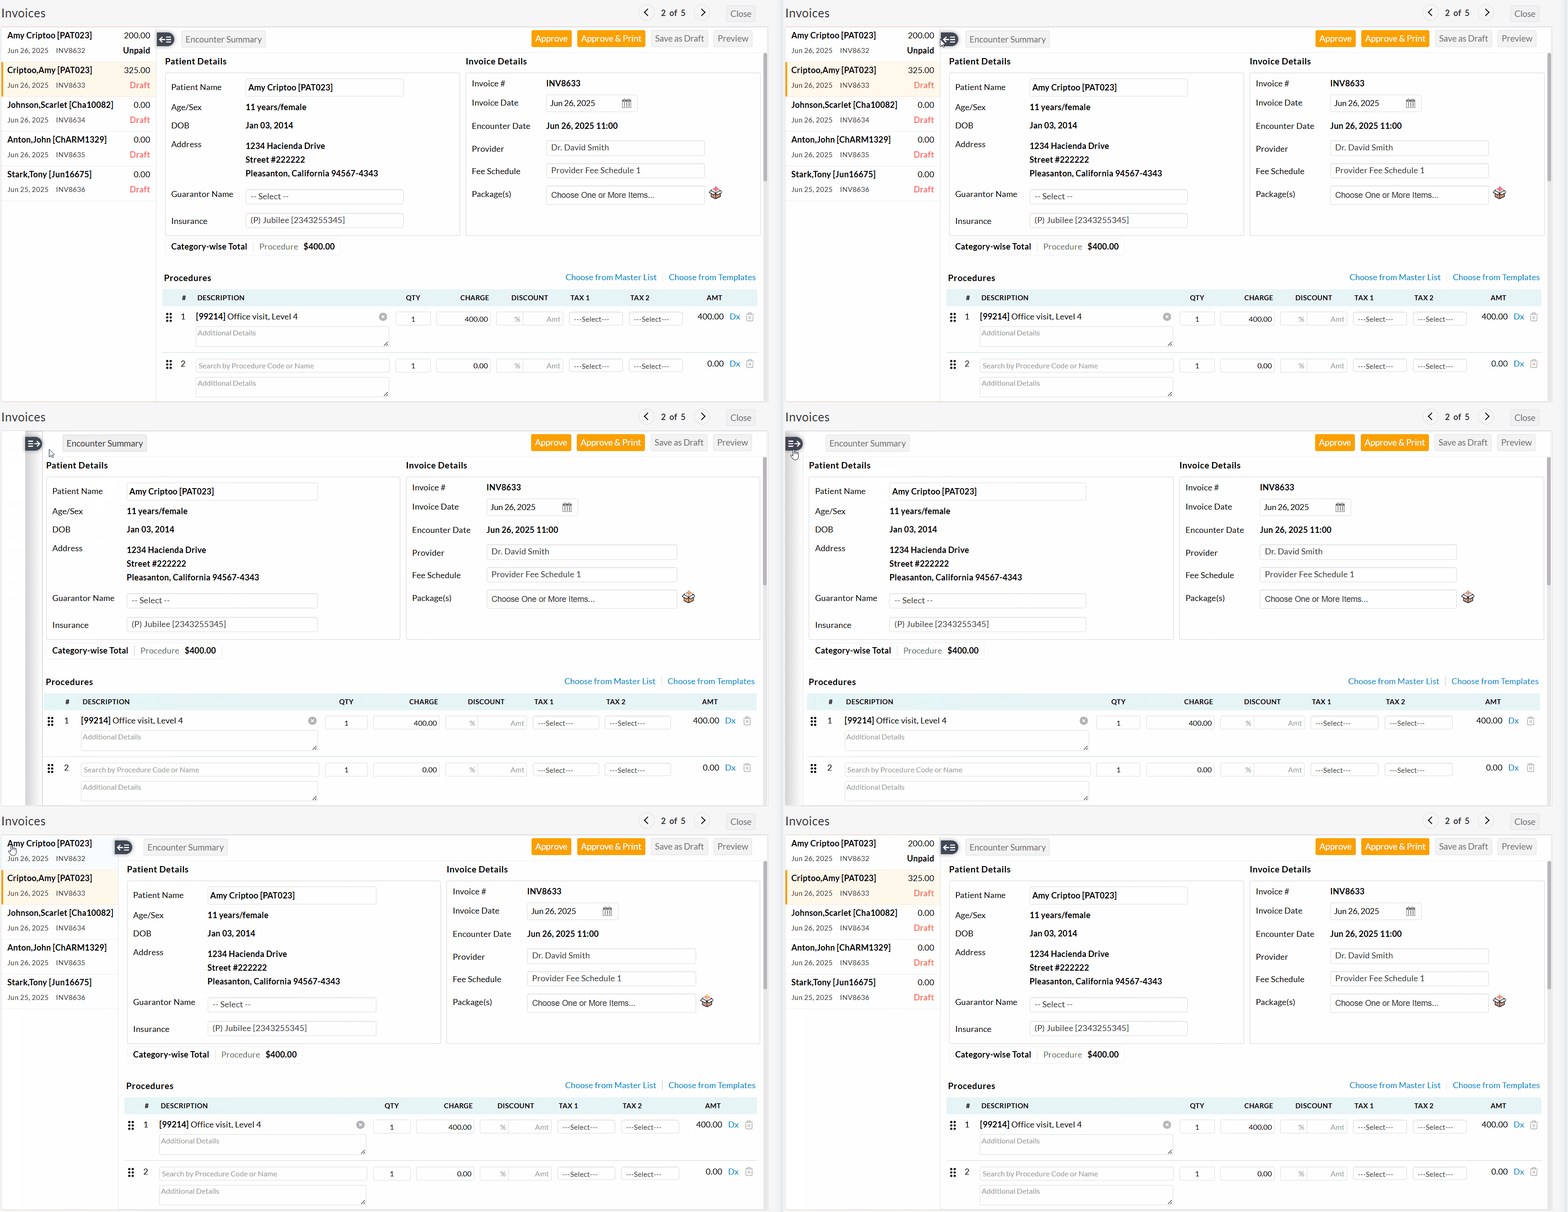
- Once the Invoices are generated, a preview of the generated Invoices will be displayed, and the Invoices will be in the 'Draft' status.
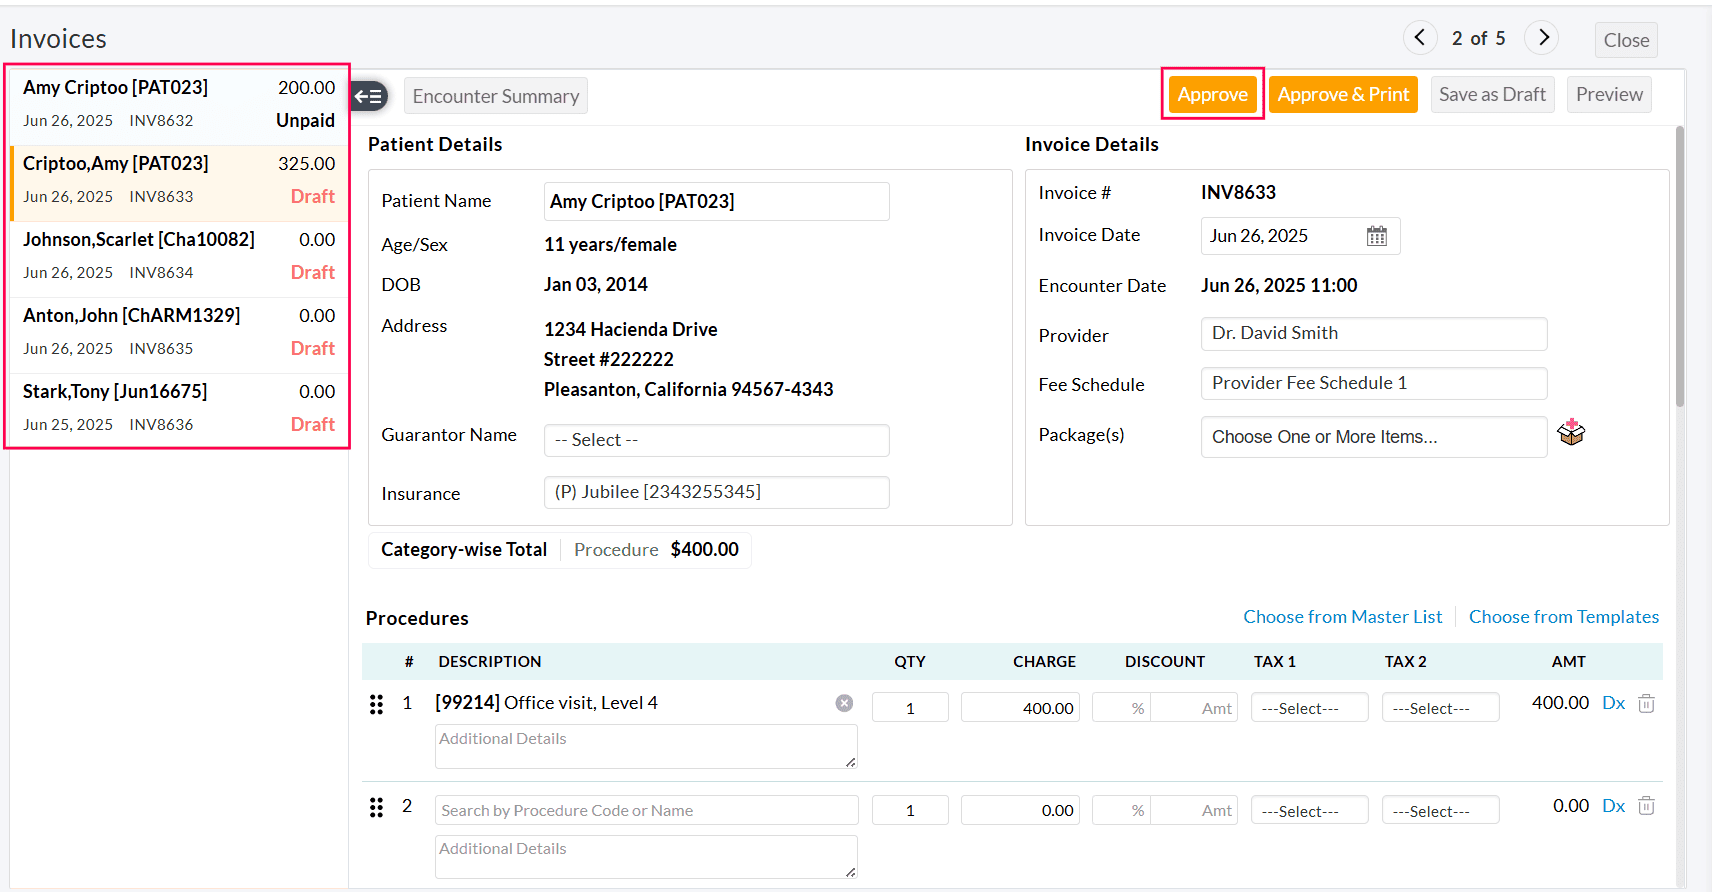
- Practices can then review the Invoice details of each Encounter and approve them.
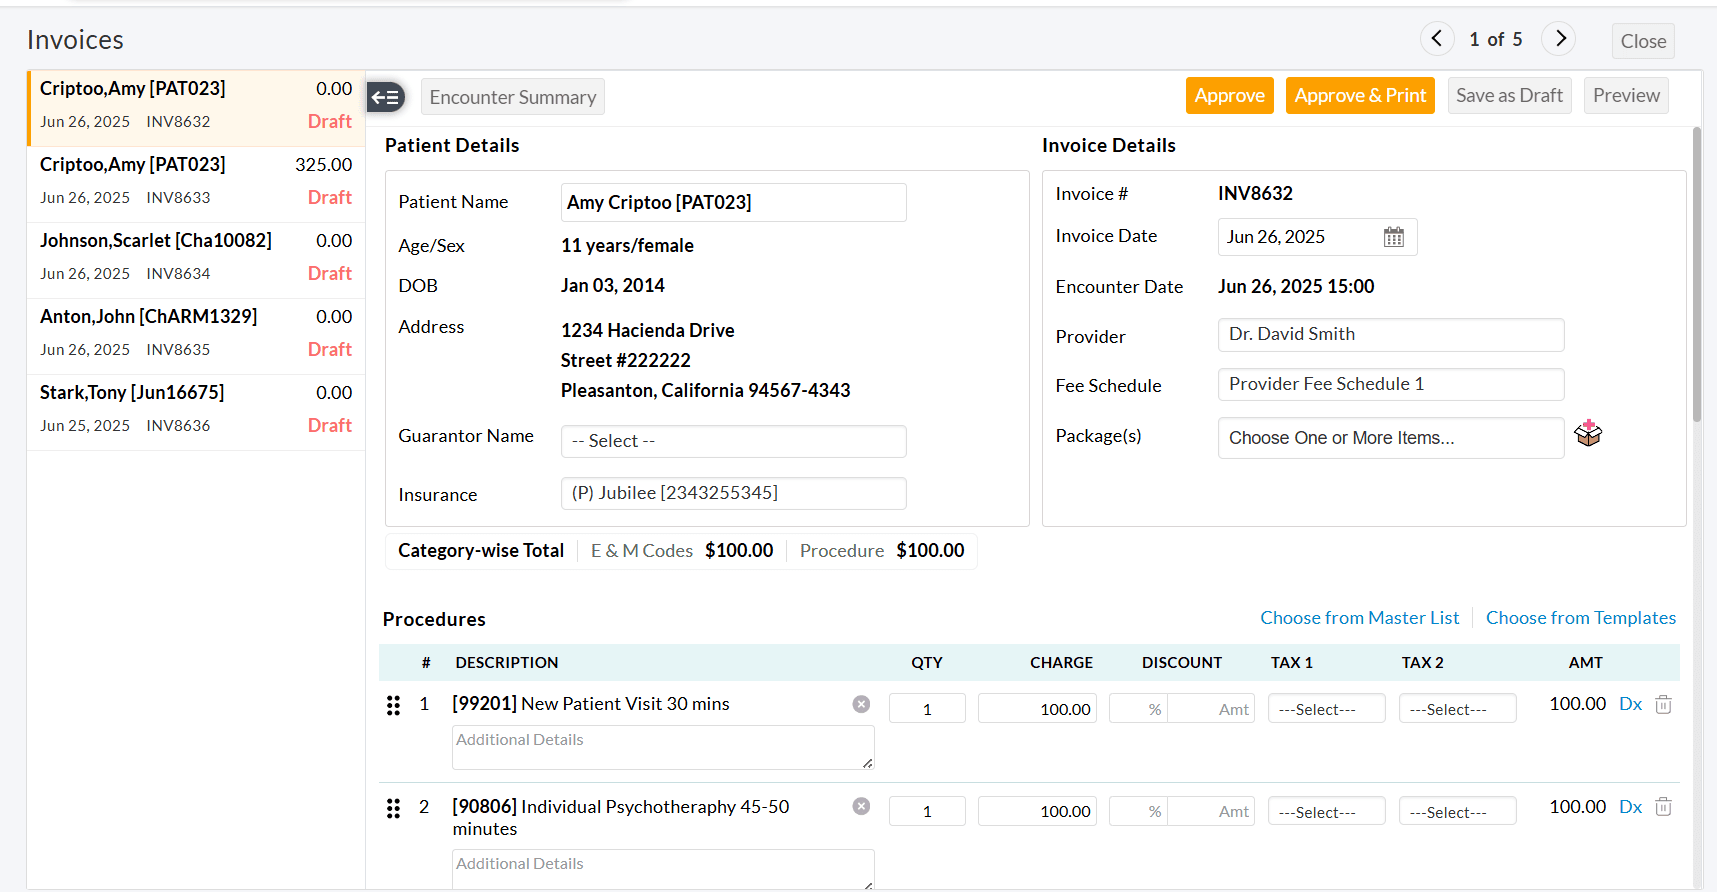
- Once you have reviewed and approved the current Invoice, use the left pane or top-right arrow to move to the next one.
Additional Options for Inventory-enabled Practices
If the Practice has its own Inventory module, the following settings can be configured.

- Choose 'Yes' for the 'We use Inventory module and dispense products' option if you have your Inventory and dispense your Products.
- Whether to auto-populate the Drugs and Supplements details in the Invoice from the Encounter. You can also choose to select either the Drugs or Supplements to auto-populate.
- Whether to auto-populate the Dispense quantity of Drugs & Supplements in Invoice from the Encounter. If the option 'Yes' is selected, the dispense quantity of the Drugs & Supplements from the Encounter gets auto-populated while generating an Invoice.
- Whether to auto-populate the 'Dispense Quantity' in the Invoice only for Drugs/Supplements having 'Dosage Unit' as tablet(s), capsule(s), caplet(s), or pellet(s). If the option 'Yes' is selected, the dispense quantity only for the Drugs & Supplements with the Dosage Unit from the Encounter gets auto-populated while generating an Invoice.
Other Options:
Mark Billing Not Required
If you do not want to generate the Invoice for an Encounter, follow the steps given below.
- Go to the 'Billing > Generate Bills' section.

- Click the 'More Options' (...) against the Encounter for which the Billing is not required.
- Select the 'Billing Not Required' option.
- The Encounter will be moved from the 'Encounter for Billing' section to the 'Encounter- No billing required' section.

- If you need to generate an Invoice for the Encounter that is moved to the 'Encounter- No billing required' section, click the 'More Options' (...) icon against the Encounter and select the 'Billing required' option. The Encounter gets reverted to the 'Encounters for Billing' section.
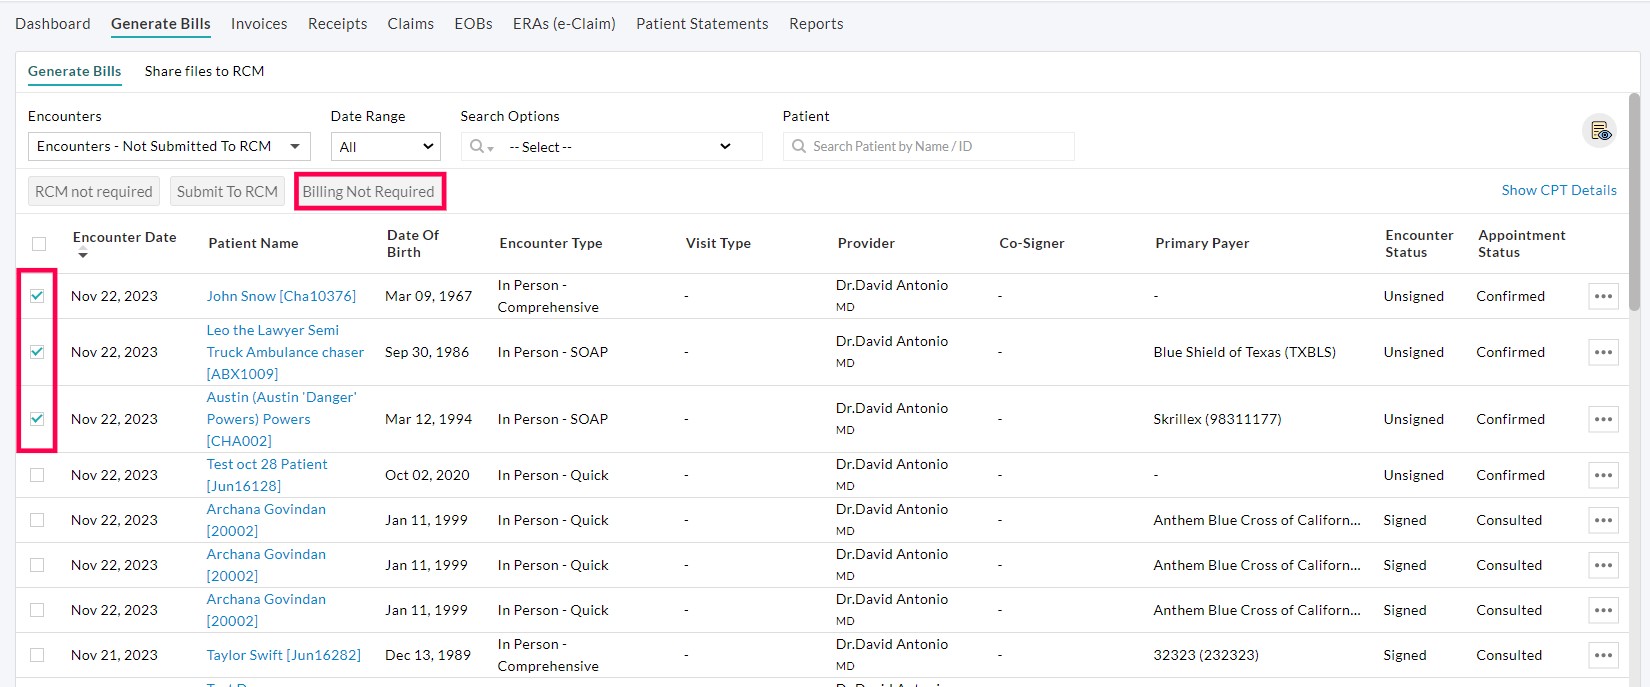
- To mark the Billing as not required for the Encounters in bulk, select the Encounters and click the 'Billing Not Required' button as shown in the screenshot below.

Submit to RCM
The Practice should sign up for the CharmRCM Services to submit the Encounters to RCM.
If not enabled, a pop-up screen appears to sign up for the RCM services as shown in the screenshot below.

Option to 'Update Procedure/Dx details'
This option helps the Practice to update the Procedure code-related Dx, Modifiers, and PoS details from the 'Generate Bills' section. This option helps the Billers to change these details before generating an Invoice or Claim.
- Go to the 'Billing > Generate Bills' section.
- Click the 'More Options' (...) icon against the Encounter.
- Select the 'Update Procedure/Dx Details' option.

- A pop-up appears where you can edit the details like Modifiers, Place of Service, and Dx pointers.

- Drag and drop the Dx codes to re-order based on priority. Choose the Related Diagnoses for the Procedure Codes as required.
Show CPT Details for all Encounters
The Practice can view the CPT details for all the Encounters under the 'Generate Bills' section. This helps in reviewing the CPT details of all Encounters in one go.
- To view the CPT details, go to the 'Billing > Generate Bills' section.
- Click the 'Show CPT Details' link available in the top-right section.


Generate Multiple Invoices or Claims for a Single Encounter
Practices can generate more than one Invoice or Claim for a single Encounter. This allows Practices to create Invoices and Claims based on their specific billing requirements in the following scenarios.
- Providers with multiple licenses need to generate separate Claims with distinct licenses or taxonomy codes for the same Encounter.
- When an Encounter with high value needs to be billed, split charges across multiple Claims to comply with the Payer-defined maximum Claim value limits.
- To bill services related to different patient diagnoses that are documented within a single Encounter
- Send separate Patient Invoices for non-covered products or services, while billing only covered services to the Payers.
When two or more Invoices are generated for an Encounter, the total number of Procedures across all Invoices will match the number of Procedures recorded in that Encounter.
All Invoices or Claims created will take the 'Date of Service' and 'Dx Code(s)' from the Encounter.
Enabling Multiple Invoices Options
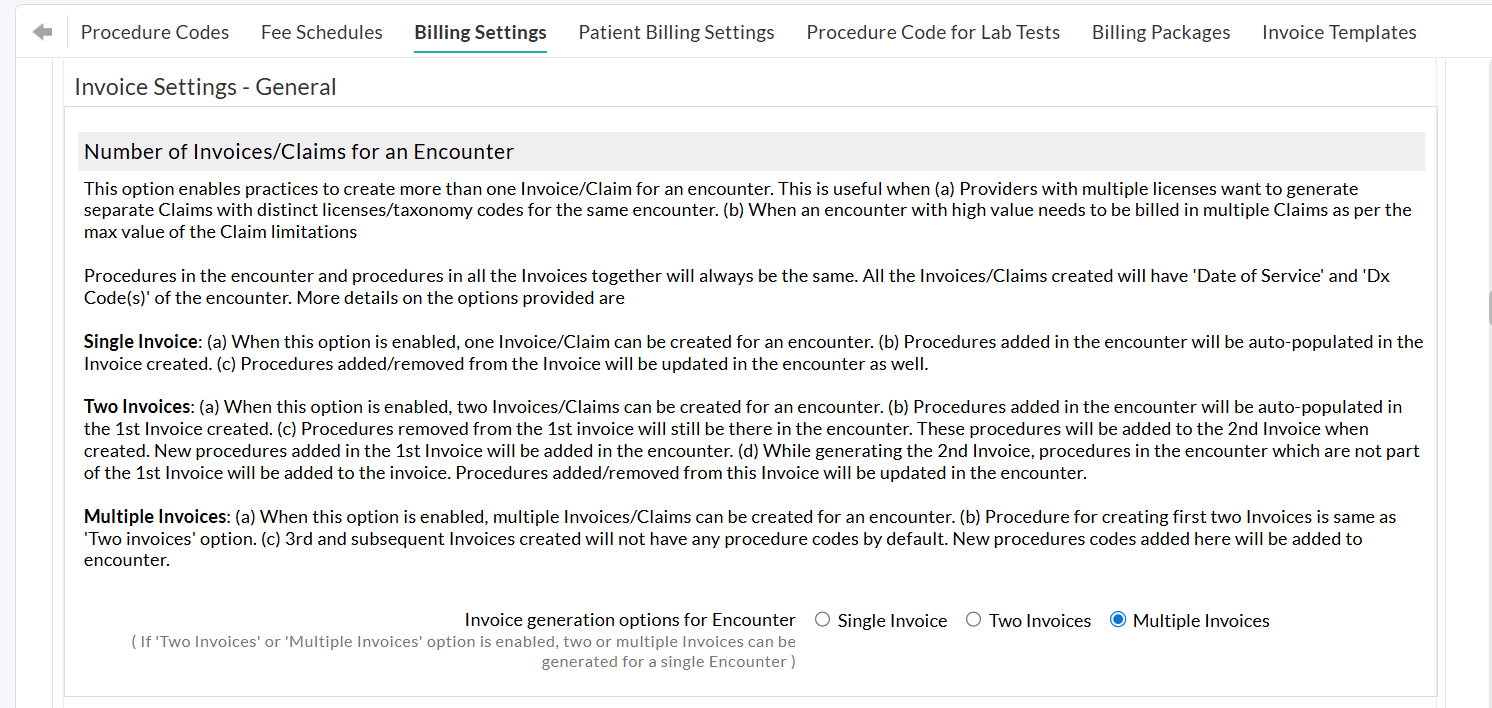
The Practice Admin can enable the option to generate two or multiple Invoices for a single Encounter under the 'Settings > Billing > Billing-Settings > Invoice Settings > Invoice Settings - General' section.
The following options are available.
- Single Invoice - Generate one Invoice per Encounter
- Two Invoices - Split charges into two Invoices
- Multiple Invoices - Create more than two Invoices as required
1. Generating a Single Invoice
When this option is enabled, one Invoice or Claim can be generated for an Encounter.
- Navigate to 'Billing > Generate Bills' and select the Encounter you need to generate the Invoice.
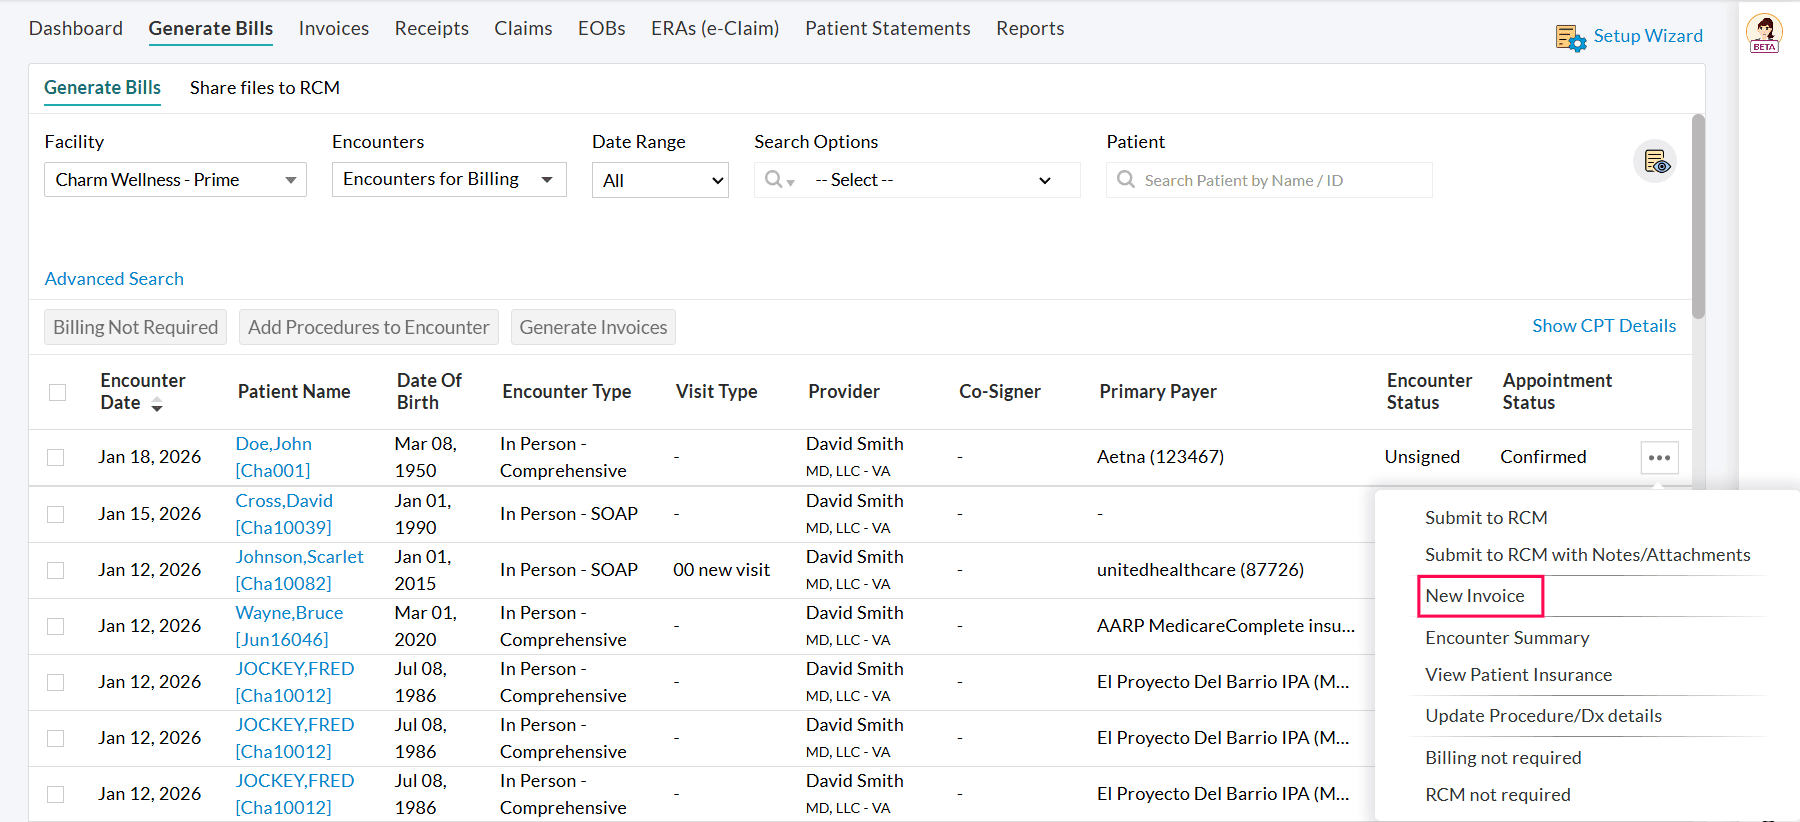
- Click on the 'More Options'(...) icon against the Encounter and select the 'New Invoice' option.
- The Procedures and Products added to the Encounter will get auto-poulated to the Invoice.
- Review the Invoice details and click on the 'Approve' button.
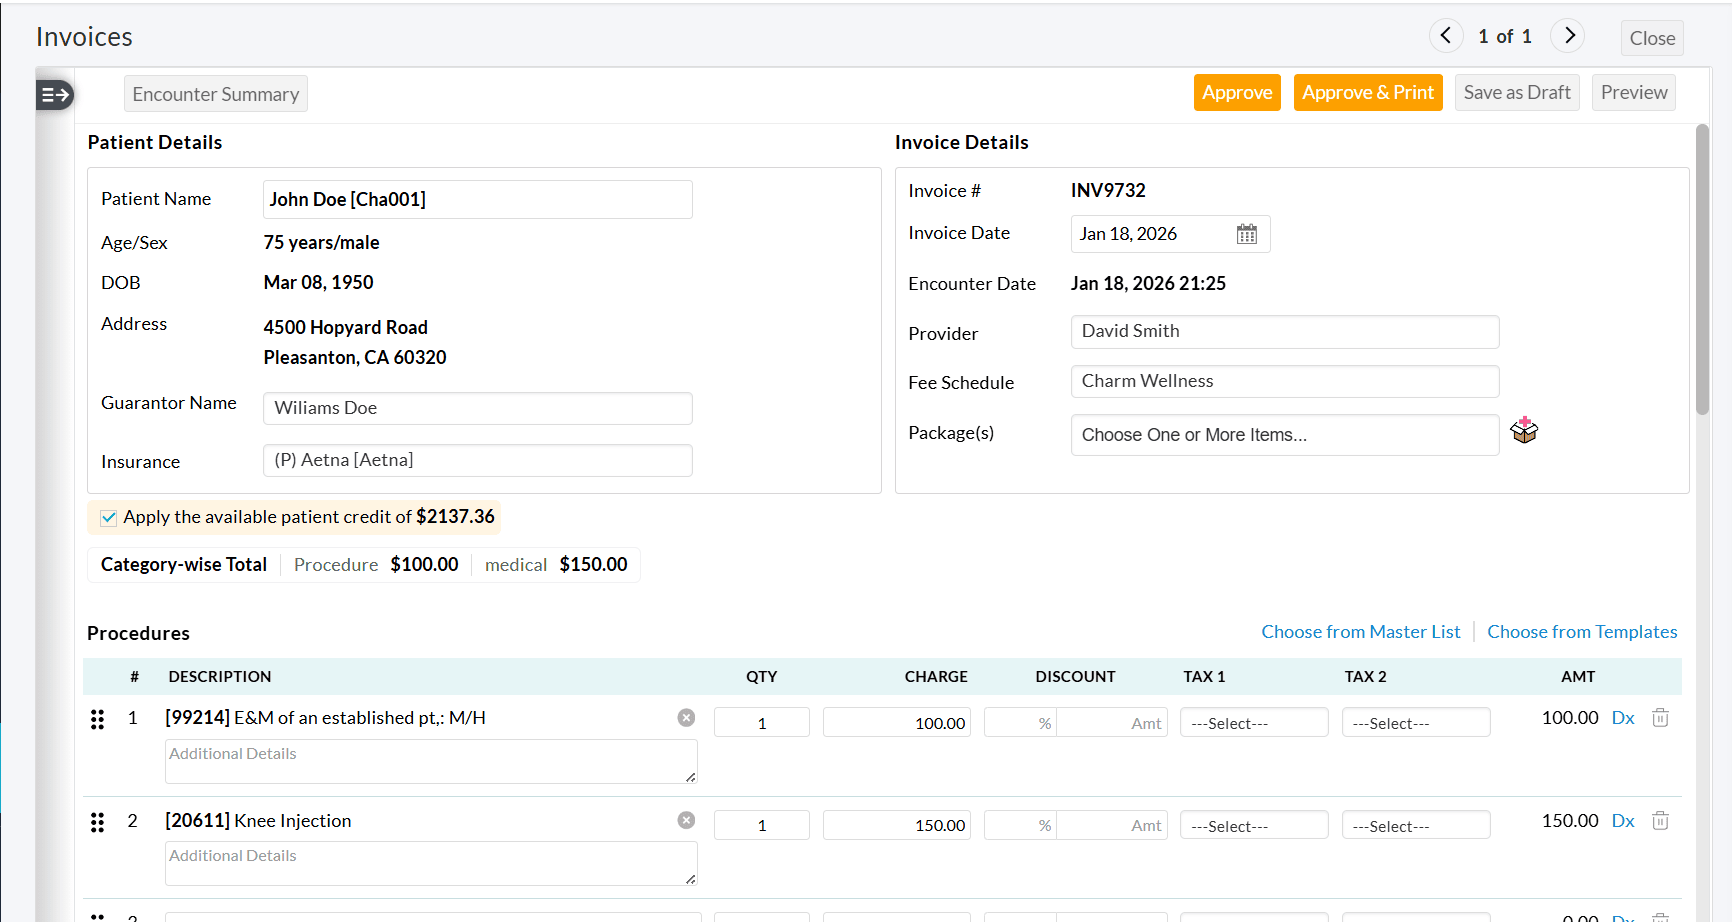
The Procedures or Products added or removed from the Invoice will be updated in the Encounter.
2. Generating Two Invoices
On enabling this option, two Invoices or Claims can be generated for an Encounter. This option is useful for Providers with two taxonomy codes and a need to submit two Claims for a visit with different taxonomy codes to insurance companies.
- Navigate to 'Billing > Generate Bills' and select the Encounter you need to generate the Invoice.
- Click on the 'More Options'(...) icon against the Encounter and select the 'New Invoice' option. The Procedures from the Encounter will be auto-populated to the first Invoice created.
- Delete the procedures from the first Invoice that are required for the second Invoice. These deleted Procedures will still be available in the Encounter.
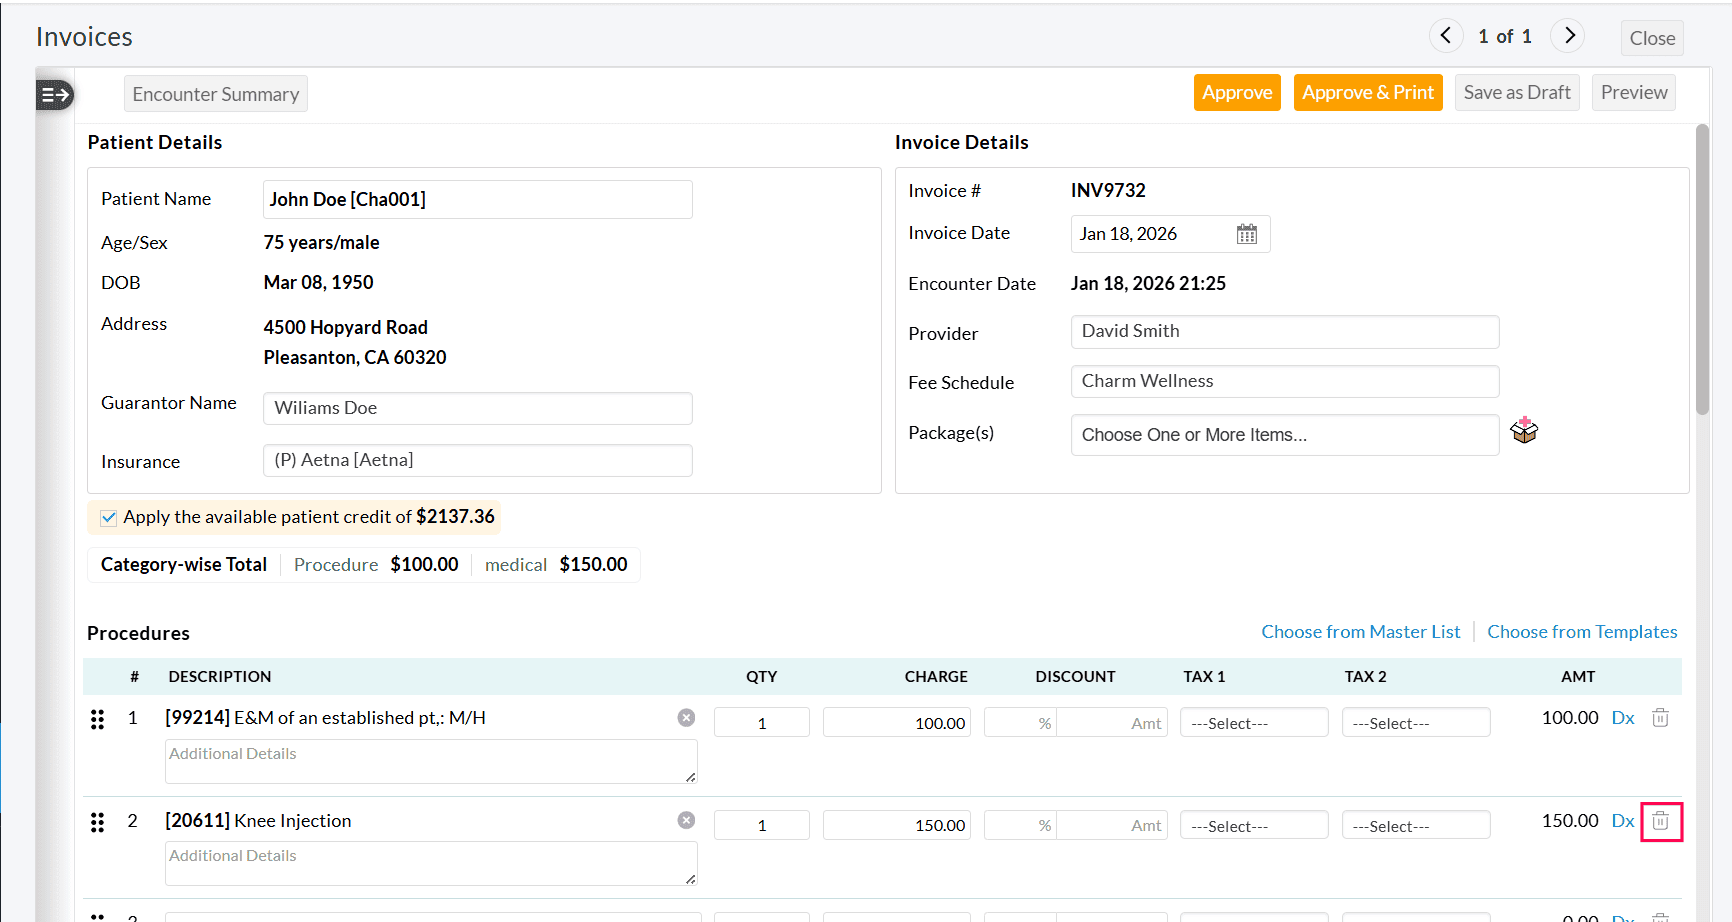
- All Encounters for which the first Invoices have been generated will get listed under the 'Encounters for 2nd Invoice' filter.
- Click on the 'More Options' (...) icon against the Encounter you need to create the second Invoice.
- Select the 'Generate 2nd Invoice' option.

- While generating the 2nd Invoice, the Procedures in the Encounter that are not included in the first Invoice will be added to the second Invoice.
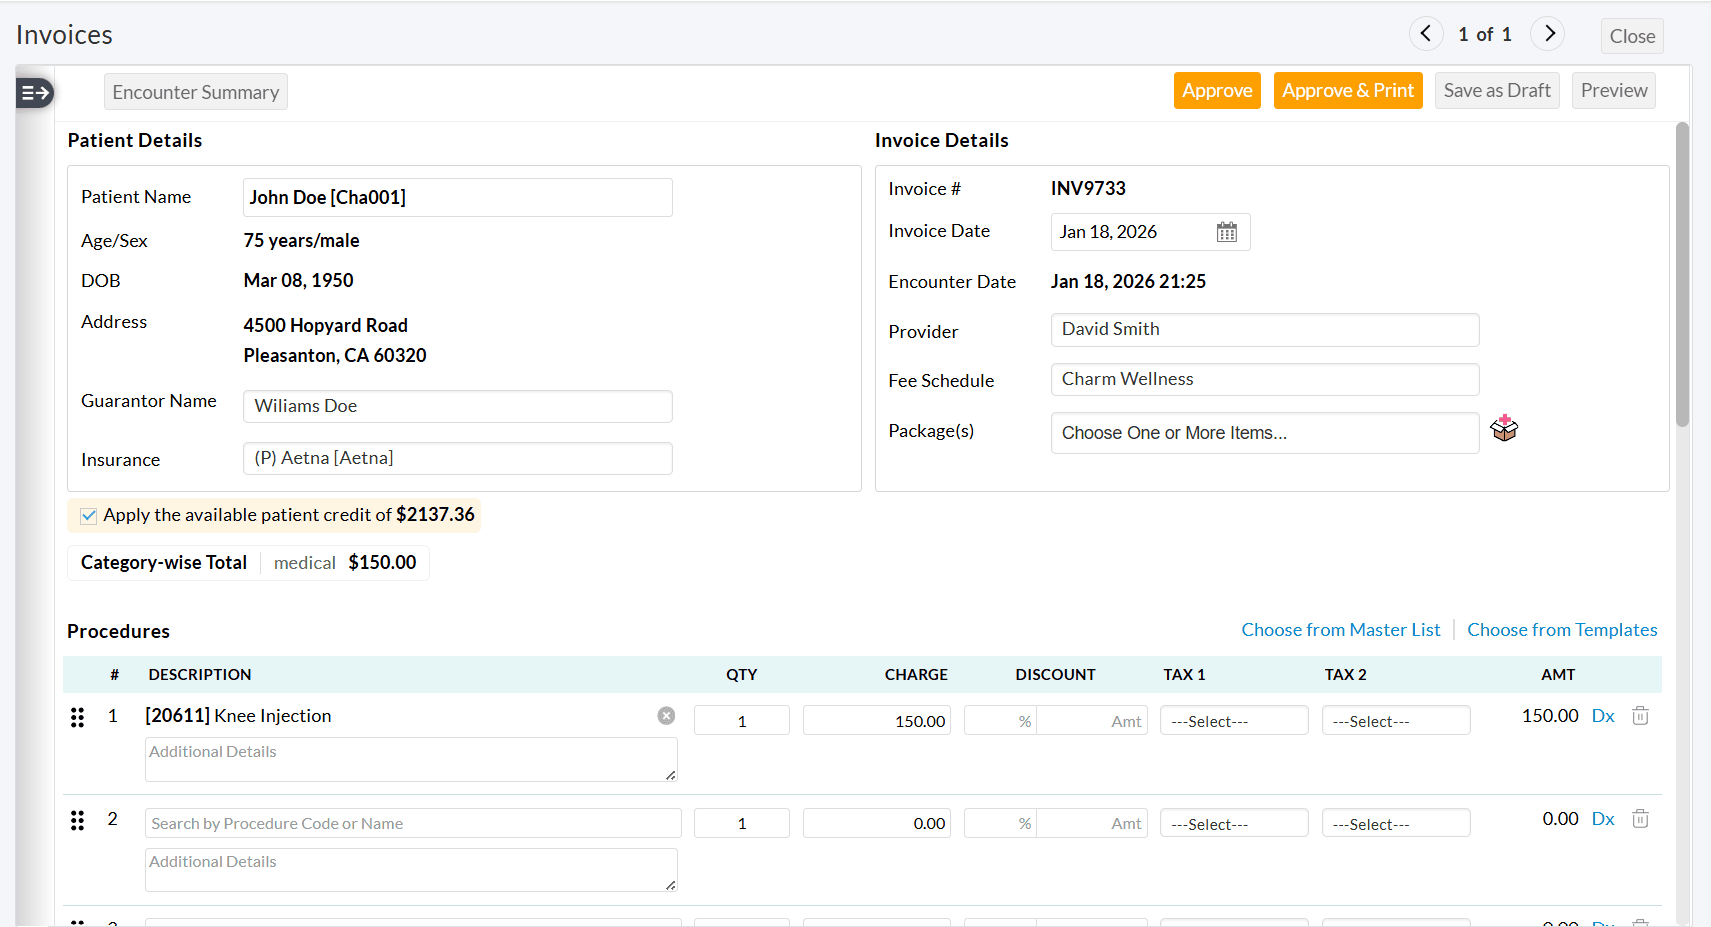
- Review and approve the second Invoice. Any Procedures added or removed from this Invoice will be updated in the Encounter.
3. Generating Multiple Invoices
When this option is enabled, multiple Invoices or Claims can be created for an Encounter. Practices can follow the steps to generate the First Invoice. The second and subsequent Invoices can be generated by following the steps below.
- Under the 'Generate Bills' section, select 'Encounters for Multiple Invoices' for the 'Encounter' filter.
- Click the 'More Options' (...) icon against the Encounter and select the 'Generate Invoice' option.
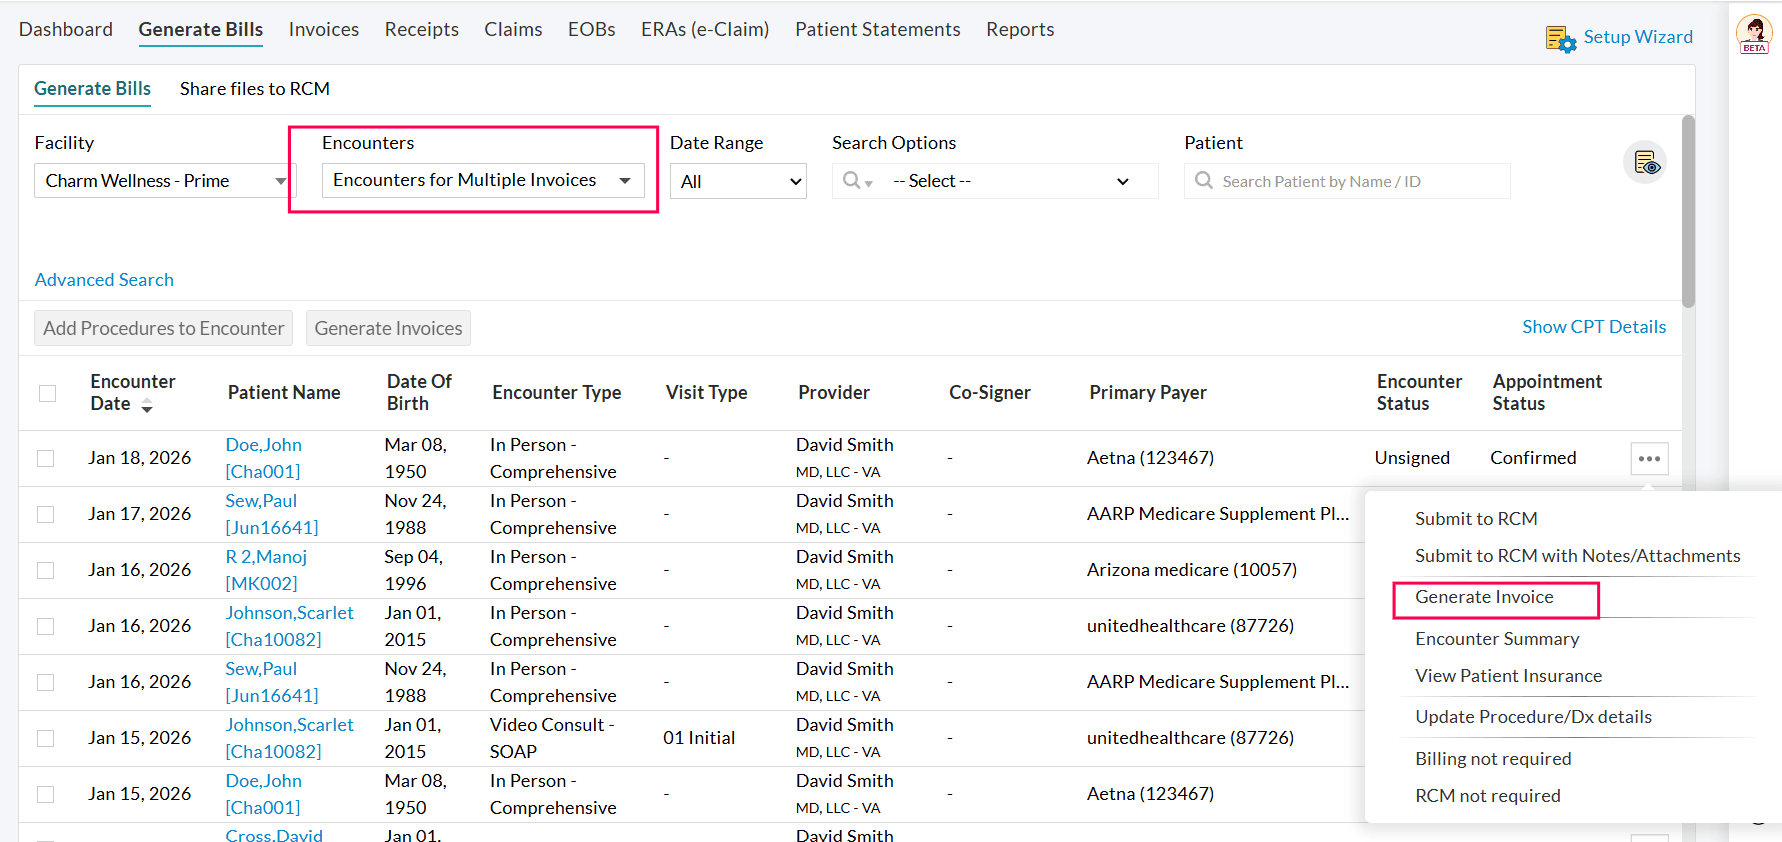
- All Procedures not included in the first Invoice will be added to the second Invoice.
- Review the details and approve the second Invoice.
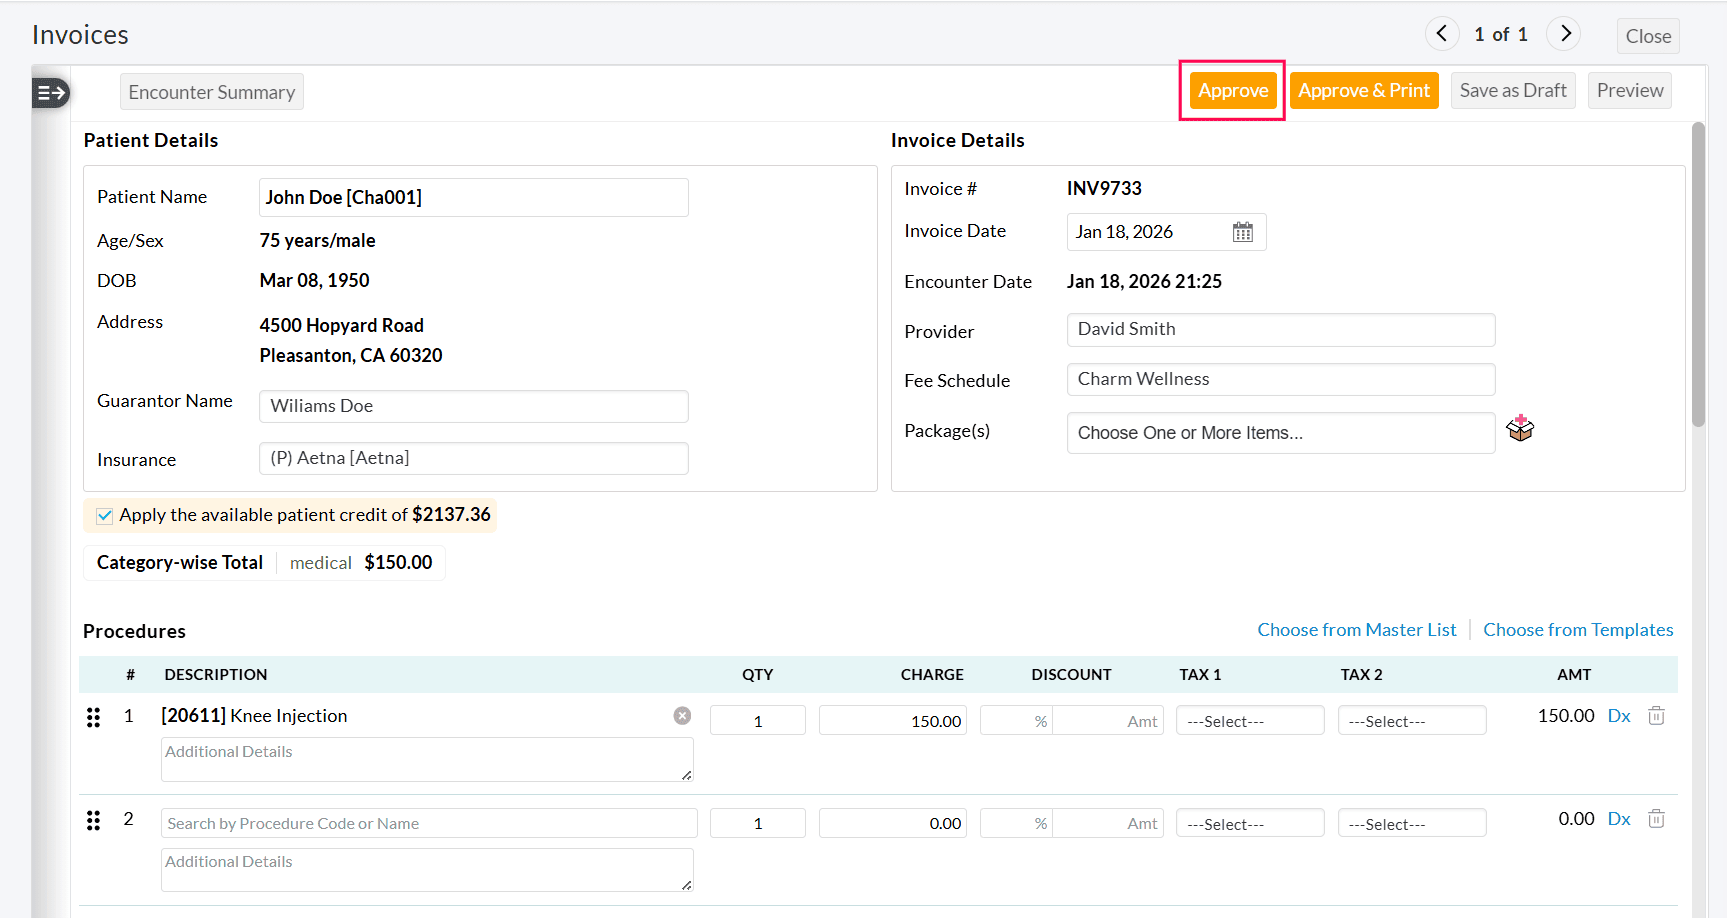
- To generate subsequent Invoices, click the 'More options' (...) against the Encounter for which the first and second Invoices are created and select the 'Generate Invoice' option.
- By default, no Procedure code will be added to the third or subsequent Invoices. Add the Procedure Code(s) to the Invoice and click 'Approve'.
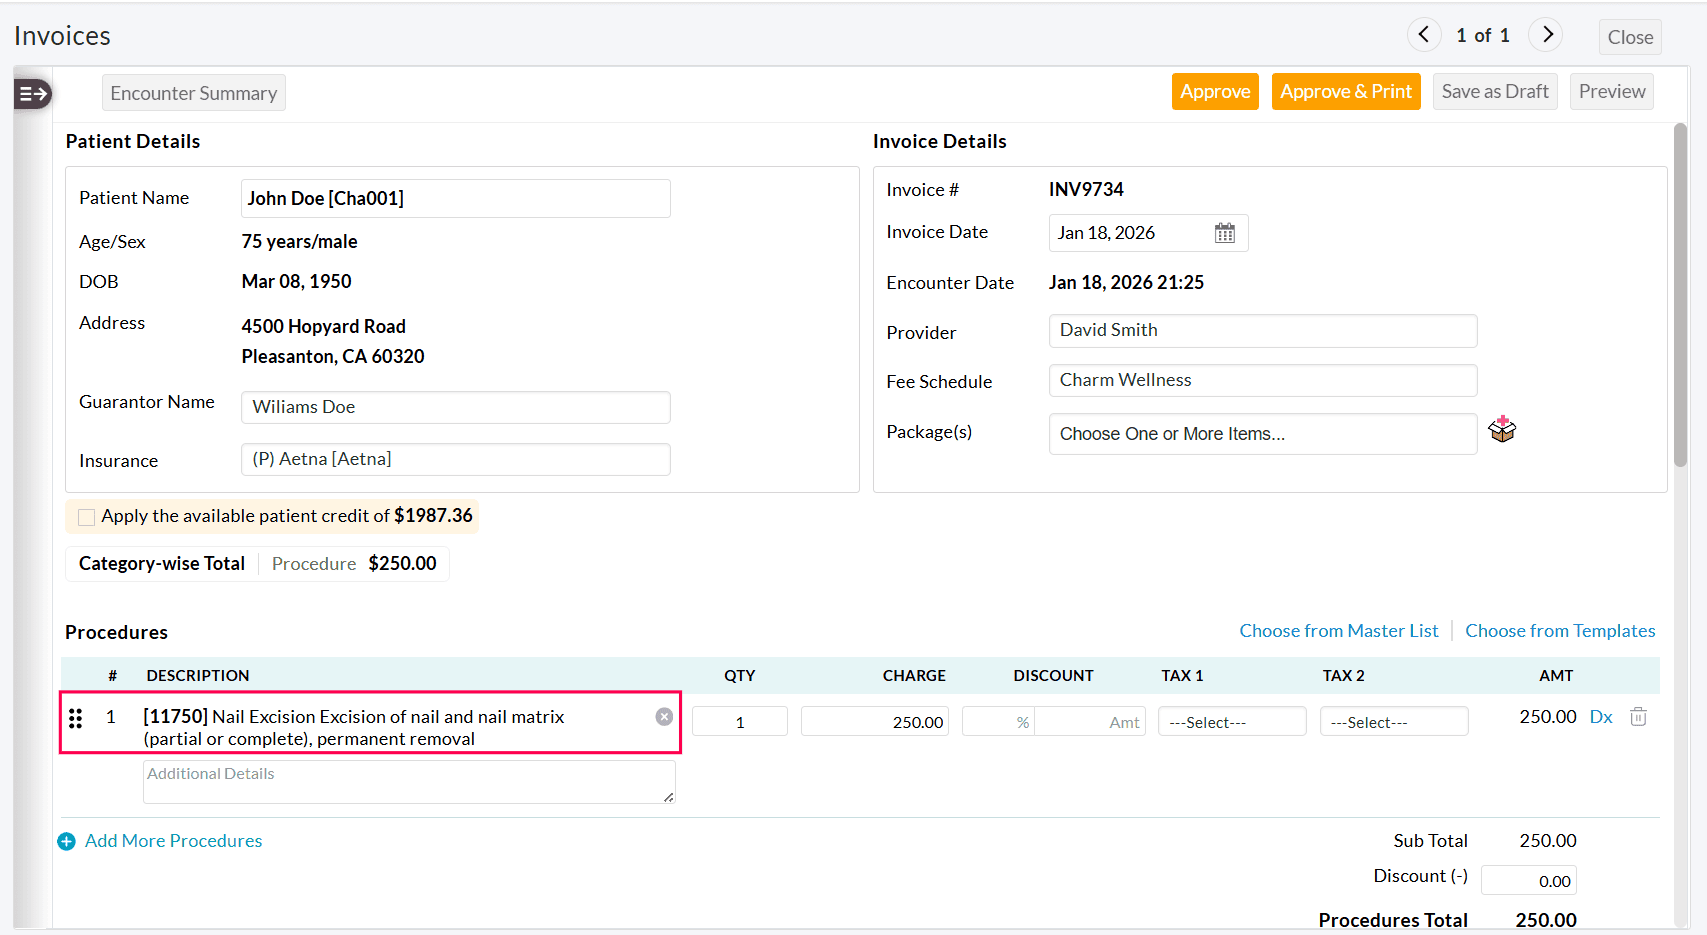
- The newly added Procedure code(s) will be mapped to the Encounter.
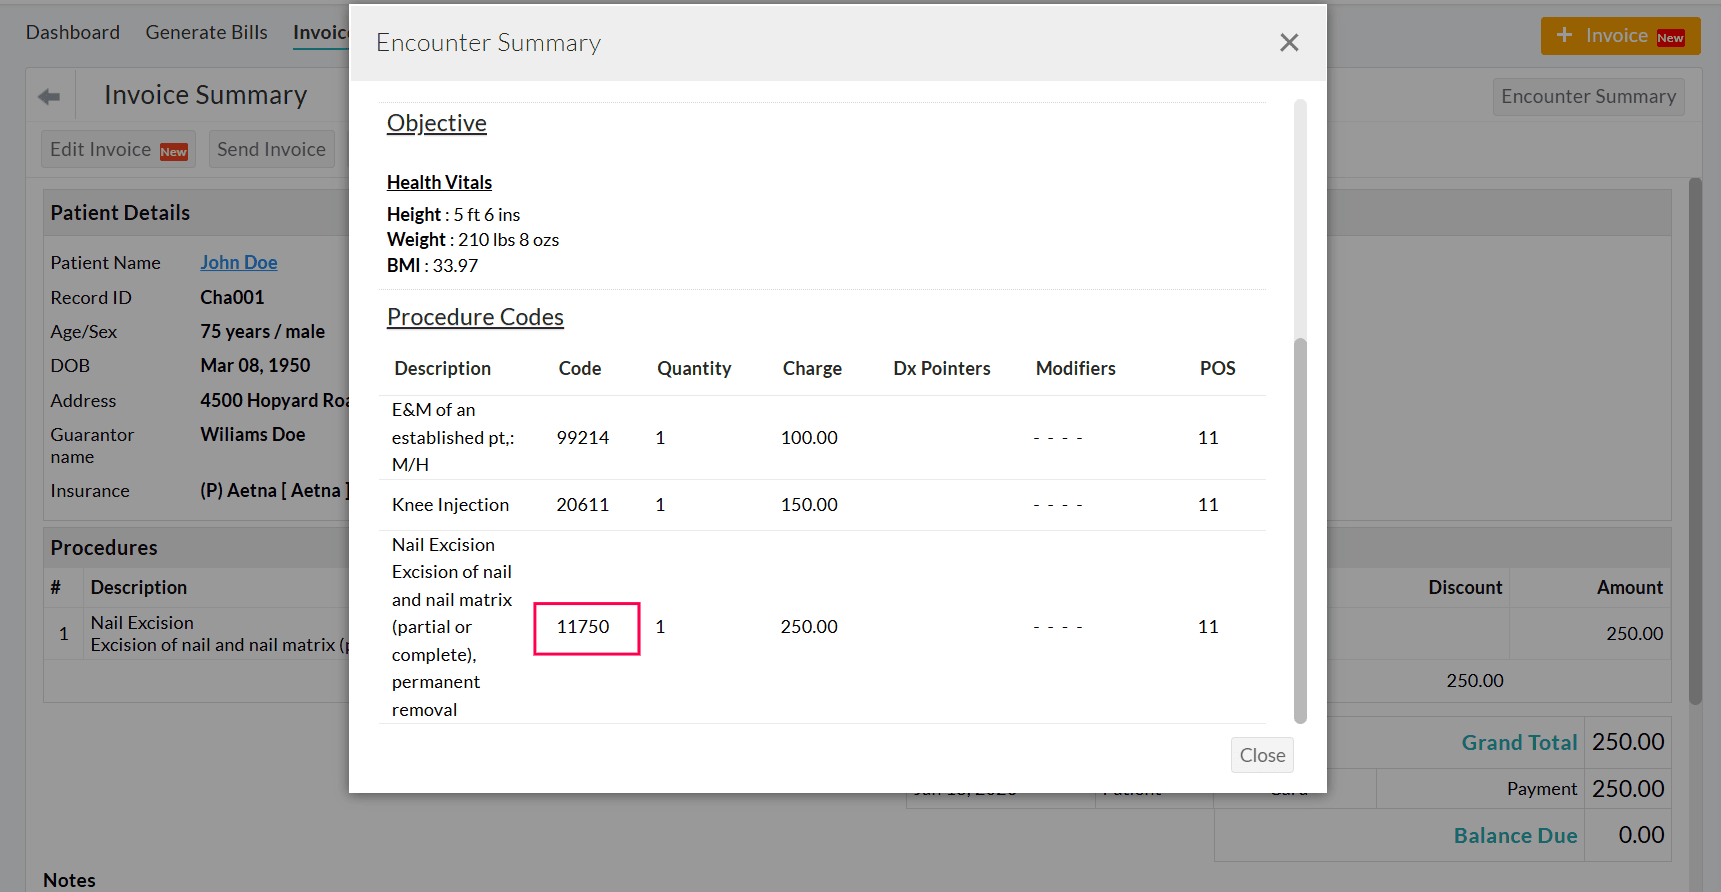
Generate Second or Subsequent Invoices from the 'Invoices' Section
Practices can also generate second or subsequent invoices for the same Patient encounter from the 'Billing > Invoices' section.
Steps to Create Additional Invoices
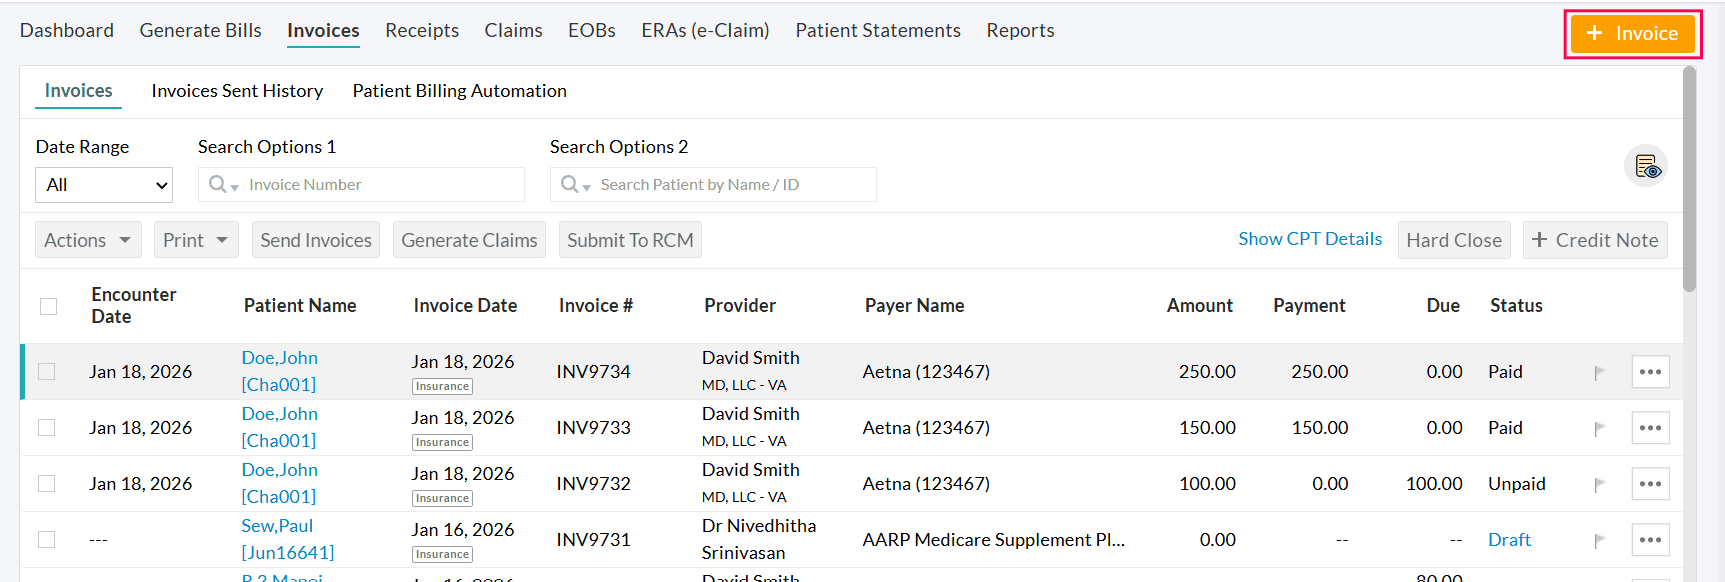
- Navigate to 'Billing > Invoices' and click '+ Invoice'.
- Search for and select the Patient.
- Select the Encounter Date for which you want to create an additional Invoice.
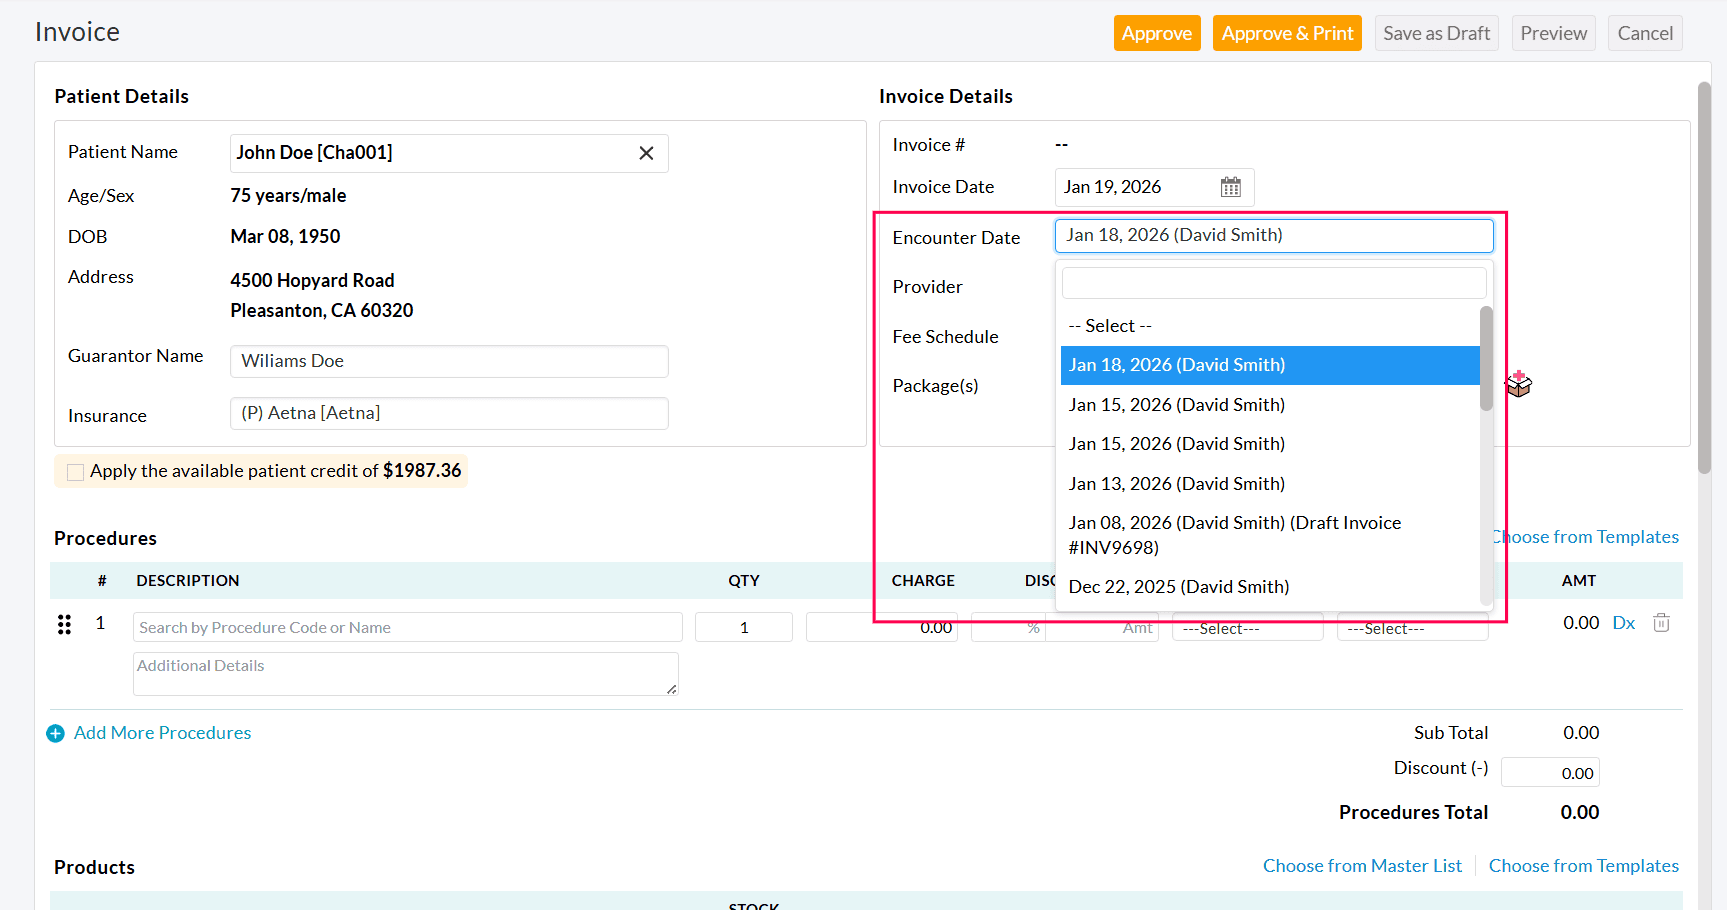
- The system displays Encounter dates based on the number of Invoices already created:
- When the 'Single Invoice' option is enabled, only Unbilled Encounters will be listed for selection. Once the Invoice is generated, that Encounter will not be shown in the list.
- When the 'Two Invoices' option is enabled, all Unbilled Encounters and First-Billed Encounters will be listed for selection. Once the first and second Invoices are generated for a specific Encounter, that Encounter will not be shown in the list.
- When the 'Multiple Invoices' option is selected, all Unbilled and Billed Encounters will be available for the Encounter Date selection.
Note: Only the recent 20 Encounters are displayed for selection.
- Add the required Procedure Code(s) to the Invoice.
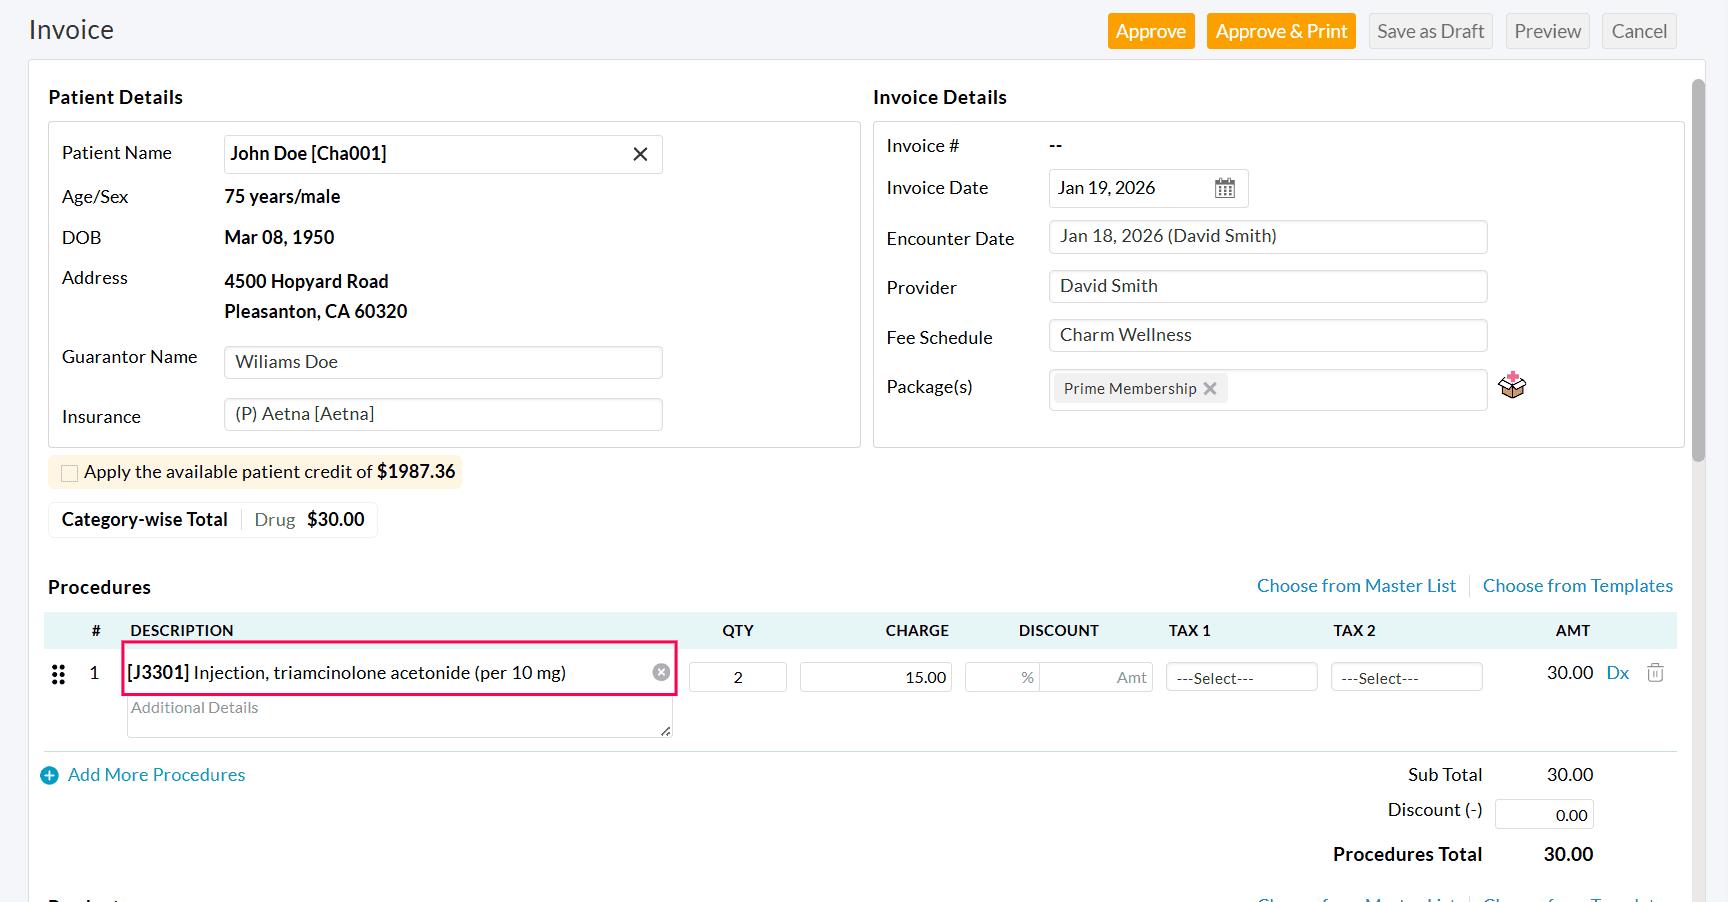
The selected Procedure codes are automatically mapped to the chosen Encounter.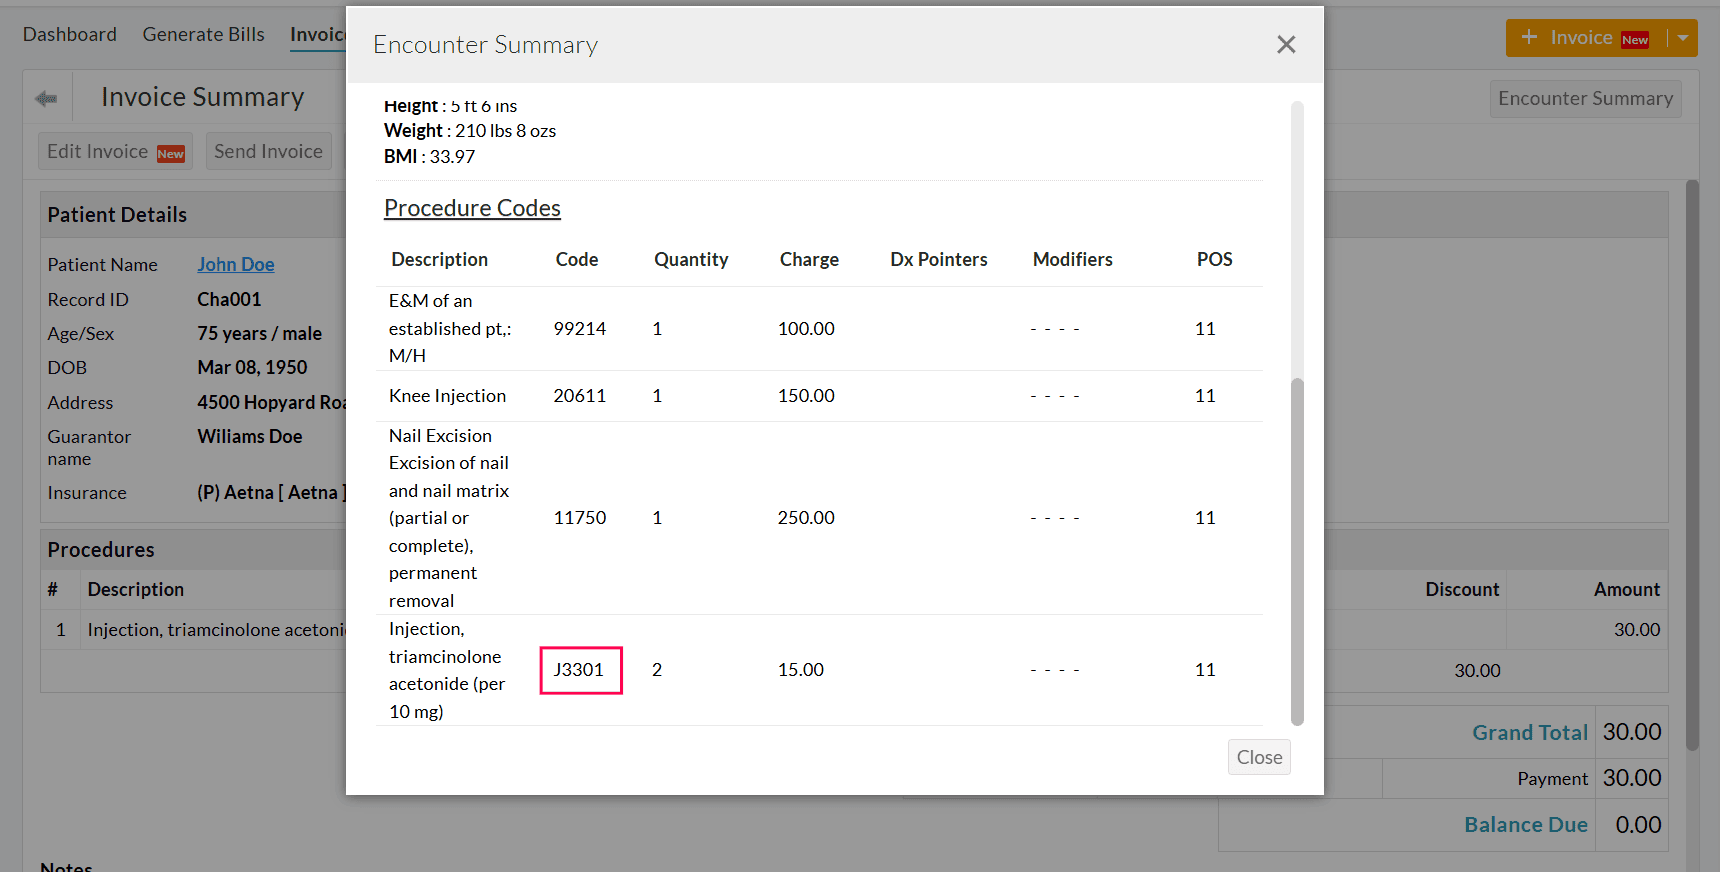
Filters and Bulk Actions:
Encounters for Billing
All the Encounters created get listed under the 'Encounters for Billing' section. Invoices can be generated for the Encounters from this section.

Encounters for 2nd Invoice
- The Encounters for which the second invoice needs to be generated get listed under the 'Encounters for 2nd Invoice' section.

Add Procedure Codes to Multiple Encounters
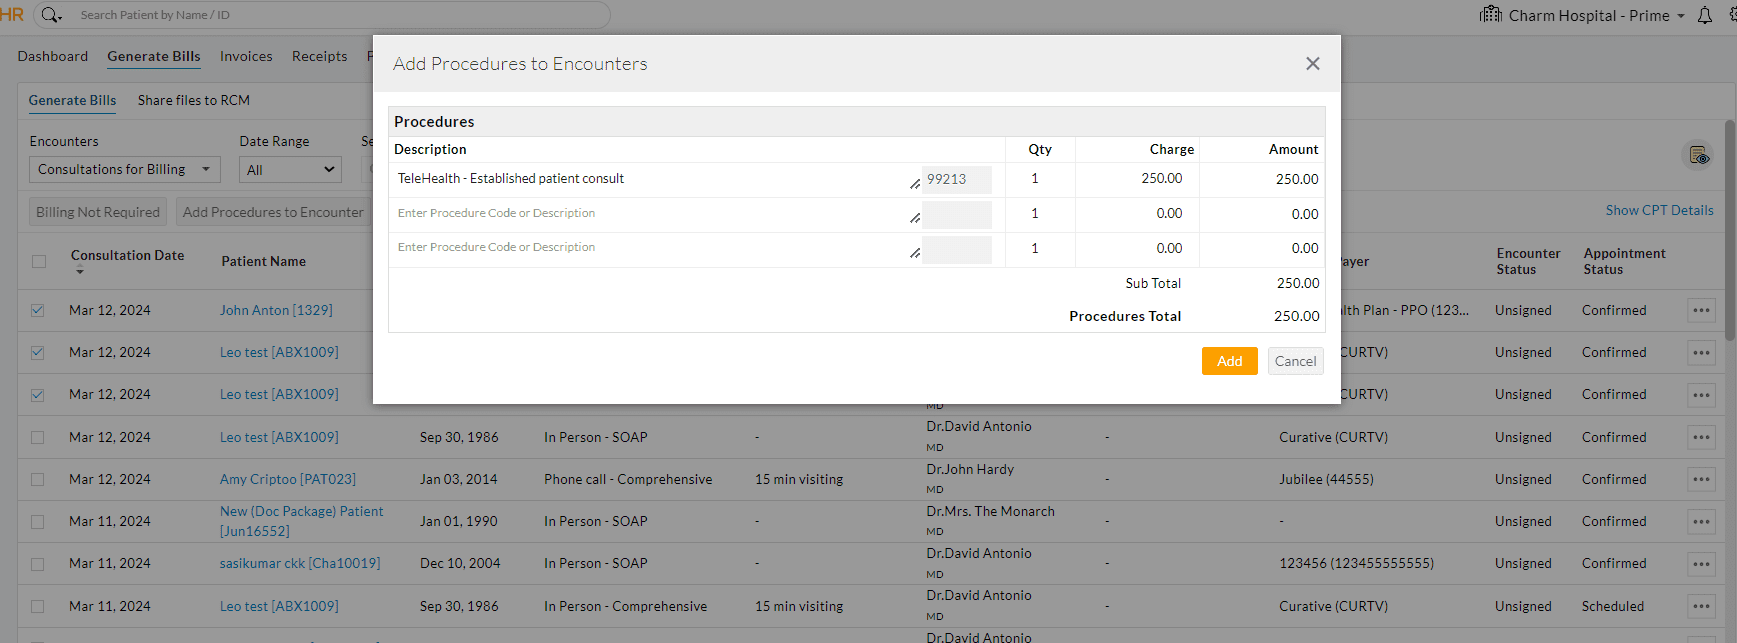
Practices can add Procedure Codes to multiple Encounters at once, reducing manual entry. To add a set of Procedure Codes for specific Encounters, follow the steps given below.
- Go to 'Billing > Generate Bills'
- Select the Encounters for which you need to add the Procedure Codes. A maximum of three Procedure Codes can be added at once for the Encounters selected.

- Click the 'Add Procedures to Encounter' button.
- Enter the Procedure Code or Description.
- Click the 'Add' button to add the Procedures to multiple Encounters.
Encounters - No Billing Required
- If you do not need to generate the Invoice for an Encounter, you can move the Encounter from the 'Encounter for Billing' section to the 'Encounters- No Billing Required' section.
- You can choose the multiple Encounters and click the 'Billing Not Required' option.
- You can revert the Encounter to the 'Encounters for Billing' section by selecting the 'Billing required' option.
Search Options
- The Encounters under the 'Generate Bills' section can be searched with the Patient's Name or ID.

- The other search options are as follows.
- Provider: Select the Provider option and choose a Provider from the list. The Encounters rendered by the selected Provider get listed.
- Co-Signer: The Encounters of the selected Co-signer get listed.
- Encounter Status: Choose the Status of the Encounter viz., Signed, Signed and Filed for Co-sign, Co-Signed, Unsigned, and Filed for Review.

- Encounter Type: Select any one of the four types of Encounters viz., Quick, Brief, Comprehensive, and SOAP.
- Visit Type: Select the Visit Type of the Encounter such as a Follow-up Visit or a New Patient Visit. The Encounters get listed based on the selected Visit Type.
- Procedure Code: Practices can also filter out the Encounters that have a specific CPT by using the 'Procedure Code' filter option. This option shows all the Encounters that contain the CPTs searched.


Watch List in Generate Bills
The 'Watch List' filter in the 'Generate Bills' section helps Practices manage the Encounters that are ready for billing and require follow-up from the Providers for signing or co-signing the Encounter.

Encounters for Billing
Unbilled Encounters - 'Signed, not filed for Co-Sign' and 'Co-signed'
- Practice can use this Watch List option to filter the Encounters ready for billing.
- This filter lists Encounters that are Cosigned and Encounters that are Signed but not assigned for Co-Signing i.e., ready for billing.
Encounters for Follow-up
Practices can use the Watch List options below to view the Encounters that need follow-up from the Encounter Provider, Co-signer, or Reviewer.
- Unbilled Encounters - 'Signed and Filed for Co-signed': This includes the Encounters filed for co-signing but not yet co-signed. Practices need to follow up with the Co-signer to complete the co-signing process.
- Unbilled Encounters - Unsigned: This category includes Encounters that have not been signed. Practices can follow up with the Encounter Providers to sign these Encounters.
- Unbilled Encounters - Filed for Review: This category contains Encounters that have been filed for review and have not been reviewed yet. Practices need to follow up with the reviewer and ensure the Encounters are reviewed.
Total Unbilled Encounters
This category provides an overview of all Encounters that have not been billed and includes the sum of Encounters that fall into the 'Encounters for Billing' and 'Encounters for Follow-up' categories.
Practices Working with CharmRCM or CharmBillerPro
CharmBillerPro streamlines the Claim generation process from an Encounter. It has all the functionality that a Biller needs to process the Claims. To set up and to know more about CharmBillerPro, check the BillerPro User Guide document.
The Practice with the RCM Services enabled can perform the following actions in the 'Generate Bills' section.
Submit to RCM
The Encounters can be submitted to RCM for Claim processing from the 'Generate Bills' section. The Claim contains the following information.
- Patient Demographics (Patient Address and Contact Number)
- Patient's Insurance Information (Payer details, Insurance ID)
- Treatment Information (Procedure and its related Diagnosis codes)
- Invoice Summary
- Encounter Summary
The Practice can submit the Encounters to the RCM, if enabled, by following the steps given below.
- Go to the 'Billing > Generate Bills' section.
- By default, the Encounters of the selected Facility will be listed. To submit the Chart from a different Facility, select a specific Facility or choose 'All' from the 'Facility' dropdown.
- Click the 'More Options' (...) icon against the Encounter you need to submit to RCM.

- Select the 'Submit to RCM' option.
Note: If there is any missing information required for Claim generation, an error appears with the details of missing items as shown in the screenshot below.

Update the Encounter and submit it to RCM. The mandatory information can be configured in your BillerPro account. Go to the 'Admin Settings > Mandatory Chart Details from Practice' section and select the mandatory information required while submitting the Chart to RCM.

- The Encounter will be moved to the 'Encounters- Submitted to RCM' section.
- The submitted Encounters get labeled with the 'RCM' tag.
Submit to RCM with Notes/Attachments
- To submit the Encounter with notes/ attachments, select the 'Submit to RCM with Notes/Attachments' option under the 'More Options' (...) icon against the Encounter.

- Enter the additional information for Claim processing and attach the files related to the Encounter.
- Click the 'Submit to RCM' button.
Multiple Encounters - Submit to RCM
Practices can submit multiple Encounters to RCM across a specific Facility or All Facilities.
To submit the Encounters of a specific Facility, choose a required Facility from the 'Facility' dropdown. To submit the Encounters from all Facilities at once, select 'All'.
Select the Encounters and click the 'Submit to RCM' button. Upon submitting to RCM, an Invoice will be created for an Encounter with the Invoice amount as the procedure total.
RCM Not Required
- When the Claim is not required for an Encounter, it can be marked as 'RCM not required'.

- The Encounter will be moved to the 'Encounters- RCM Not Required' section.
- To revert the Encounter to the 'Encounters- RCM Required' section, select the 'RCM Required' option.

Share Files to RCM
The Practice can share the EOBs or other documents with RCM by following the steps given below.
- Go to the 'Billing > Generate Bills' section.

- Select the 'Share Files to RCM' option in the top-left corner.
- Click the 'Share Files' button.

- Choose the File Type, attach the file(s), and enter the notes to RCM.
- Click the 'Share' button.
Additional Filters
Encounters - Submitted to RCM
The Encounters that are submitted to RCM get listed in this section. On submitting to RCM, an Invoice for an Encounter gets generated.

Encounters - Not Submitted to RCM
The Encounters that are not submitted to RCM get listed in this section. You can submit the Encounters to RCM by clicking the 'Submit to RCM' button.
Encounters - RCM Not Required
This section lists the Encounters that are marked as 'RCM Not Required'. If you need to submit the Encounter to RCM, select the 'RCM required' option under the 'More Options' (...) icon.

Encounters - Billing Not Required
Practices can now mark the Encounters as Billing not required under the 'Billing > Generate Bills' section.
- Go to 'Billing > Generate Bills'
- Choose the 'Encounters - Not Submitted to RCM' filter option. The Encounters that are not submitted to RCM get listed.
- Select the Encounters for which the Billing is not required.
- Click the 'Billing not Required' button.
- The Encounters marked as Billing not required get listed under the 'Encounters - No Billing required' filter option.
