Invoice Templates
This option allows you to use the readily available template designs that can be customized according to your requirement. Go to the 'Settings > Billing > Invoice Templates' section.

Clicking the 'Invoice Templates' link will redirect you to the thumbnail list page where all the available ready-to-use templates are shown. Further actions specific to the template can be done here.
Hover on the template to see the 'Gear/Action' icon. Clicking the 'Gear/Action' icon within a specific template displays the below options:
- Edit
- Set as default for print and download
- Delete
- Duplicate
You can use the 'Edit' option further customization of the template. Use the 'Set as default for print and download' option to set the template as the default print template for the Invoice. If a template is no longer needed, you can remove it using the 'Delete' option.
To create a new template based on the existing template design, you can use the 'Duplicate' option. You can customize it further using the 'Edit' option in the duplicated templates.

Clicking the 'Preview' button displays the template preview.
Creating New Invoice Template
You can create a new Invoice template by following the steps given below.
- Click the '+Invoice Template' button at the top right corner.

- You can choose any templates from the three categories as shown below.
- Single Window Envelope Templates

- Double Window Envelope Templates

- Other Template Designs

- Single Window Envelope Templates
- Hover over the template to see the options.

- Click the 'Preview' button to preview the design of the template.
- Click the 'Use this' button to create a new template based on this design.
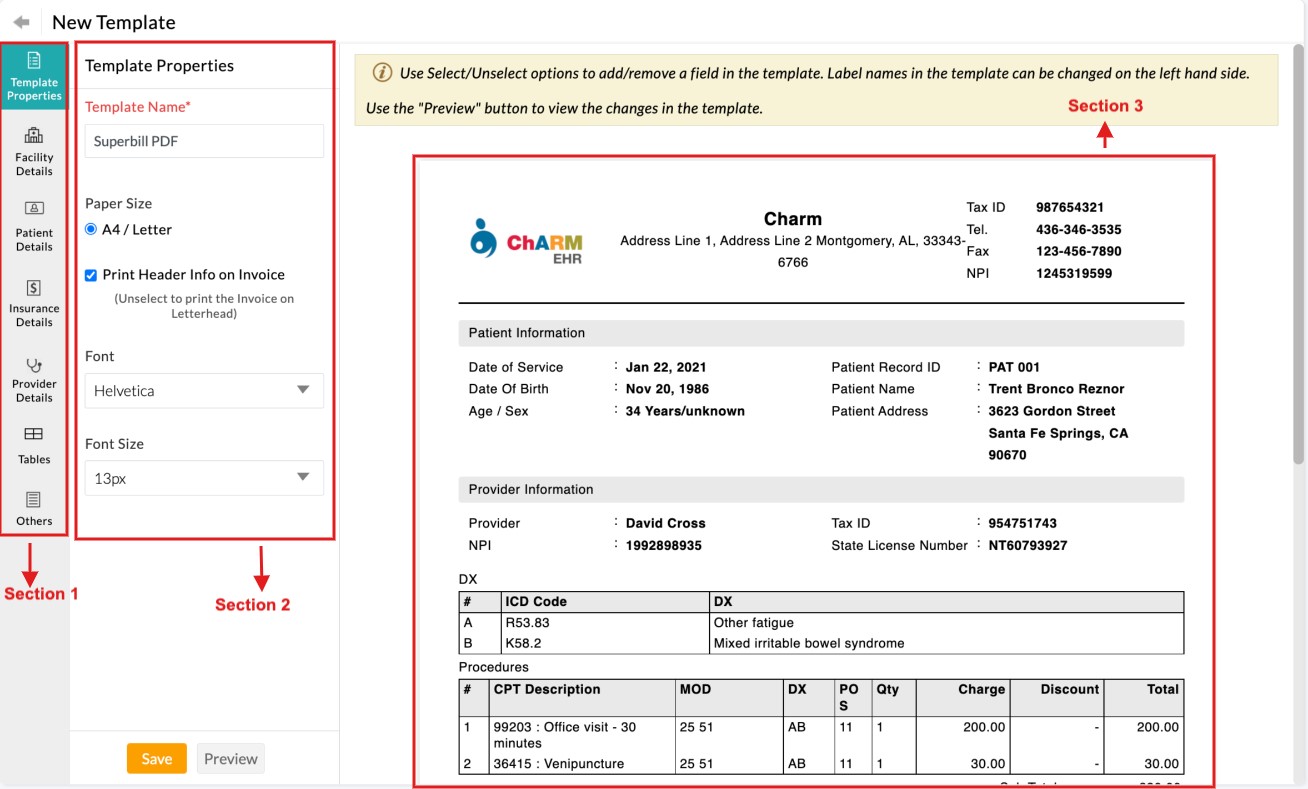
- Clicking the 'Use This' button takes you to the template customization page. This page is divided into three sections as shown below.

- Section 1 contains the different categories of elements in the Invoice.
- Section 2 lists all the elements in the category displayed on the invoice. You can make any customization to the templates here.
- Section 3 gives you a preview of your template after making the changes.
The Practice can switch between different categories of templates by clicking on the respective icons present on the left side of the page.
The main advantage of the feature is to show only the required fields in the invoice. For example, if the Practice does not offer any discounts on their procedures, they can just remove a particular column.
Practice can change the labels of elements shown on the invoice. For example, if a Practice is a wellness center and does not deal with Patients, they can change the label 'Patient' as required.

Modify the template name and other properties. such as paper size, font size, font style, and header under the 'Template Properties' section.

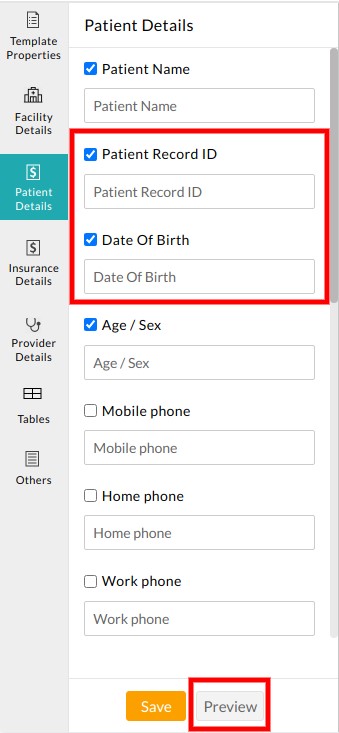
- To have the element in the template, click on the checkbox next to the element name.
- If the element is not needed in the template, click on the checkbox to uncheck.
- Columns on tables are removable. Consider a practice do not want to show tax columns in the Products table, they can simply navigate to 'Tables' in section 1 and find the taxes column under the products table and uncheck it.


- Click on the preview button to view the changes on the right side next to the settings.

- After making the required changes, click the 'Save' button to save the template.
Template Options
Every template is provided with a set of options. Hover on the template and click on the 'Gear' icon to see the options

- The Edit option allows you to edit the saved templates.
- You can set extensively used templates as default templates using the Set as default for print and download option.
- Delete option to delete a template.
- Using Duplicate you can create one more copy of the existing template.
- You can make templates Active or Inactive using the toggle button available on the top right corner of the template thumbnail.
- The print option displays active templates only.
Default templates are differentiated from other templates with an icon on the top left corner as shown in the image below.
