Patient Statements
Using this feature, Practices can prepare the Statement of Invoices and send it to the Patient's PHR account, or Email ID or Cell Number. When the 'Payment Gateway' is enabled, the Practice can also send a 'Payment URL' as a part of the Statement message. Patients can access the 'Payment URL' and make payments for the Statements. This feature will make your 'Patient Billing' process easier.
Filter Options
The Filter options list the specific Invoices based on the billing needs.
- Date Range: Choose the Date Range for the Invoices from the drop-down. You can also select the 'From' and 'To' options to custom the date range. By default, the Invoices of the last two years will be selected. Choose the required 'Date Range' (say Previous Quarter). By default, the 'Last 2 Years' option gets selected. If required, you can select the custom dates using the 'From' and 'To' fields. On clicking the 'Generate' button, only Invoices from the selected 'Date Range' will be considered for the Statement.
- Invoice Filter Options:
- All Invoices: Lists all Invoices based on the selected date range. This option is useful for sending Yearly/Quarterly Statements to Patients.
- Show Invoices with Due: Select this option to list the Invoices with Due. This option is useful for Cash-based Practices as they want to collect the payment for all Invoices with Due.
- Show Invoices for which Claim is Processed: Includes Patients with Invoices for which Claims have been processed, but balances remain. Practices can use this filter to identify Patients ready for billing once Claim processing is complete.
Statement Search Options
- Statement by Sent Date: The list of Patients appears based on the Statement's last sent date.
- Statement by Last Sent Mode: This option lists the Patients for whom the Statement was sent using the last sent mode viz., Email, PHR, Cell Number, and Mail.
- Patient Communication: This option lists the Patients for whom the Statement sent was using a particular sent mode. The Statements can be sent through Email, PHR, Cell Number, Email and No PHR, No Email, Cell Number & No Email, No Cell Number & No Email.
- Show Patients by Name: Select this option to list the Patients in the range of alphabetical order.
- Payer Name or ID: Select this option to search for Patients of a particular Payer.
Sending Patient Statement
The Practice can send a Statement to collect payment from the Patient by following the steps below.
- Navigate to 'Billing > Patient Statements'.
- Click the 'More Options' (...) icon against the Patient and select the 'Send Statement' option.

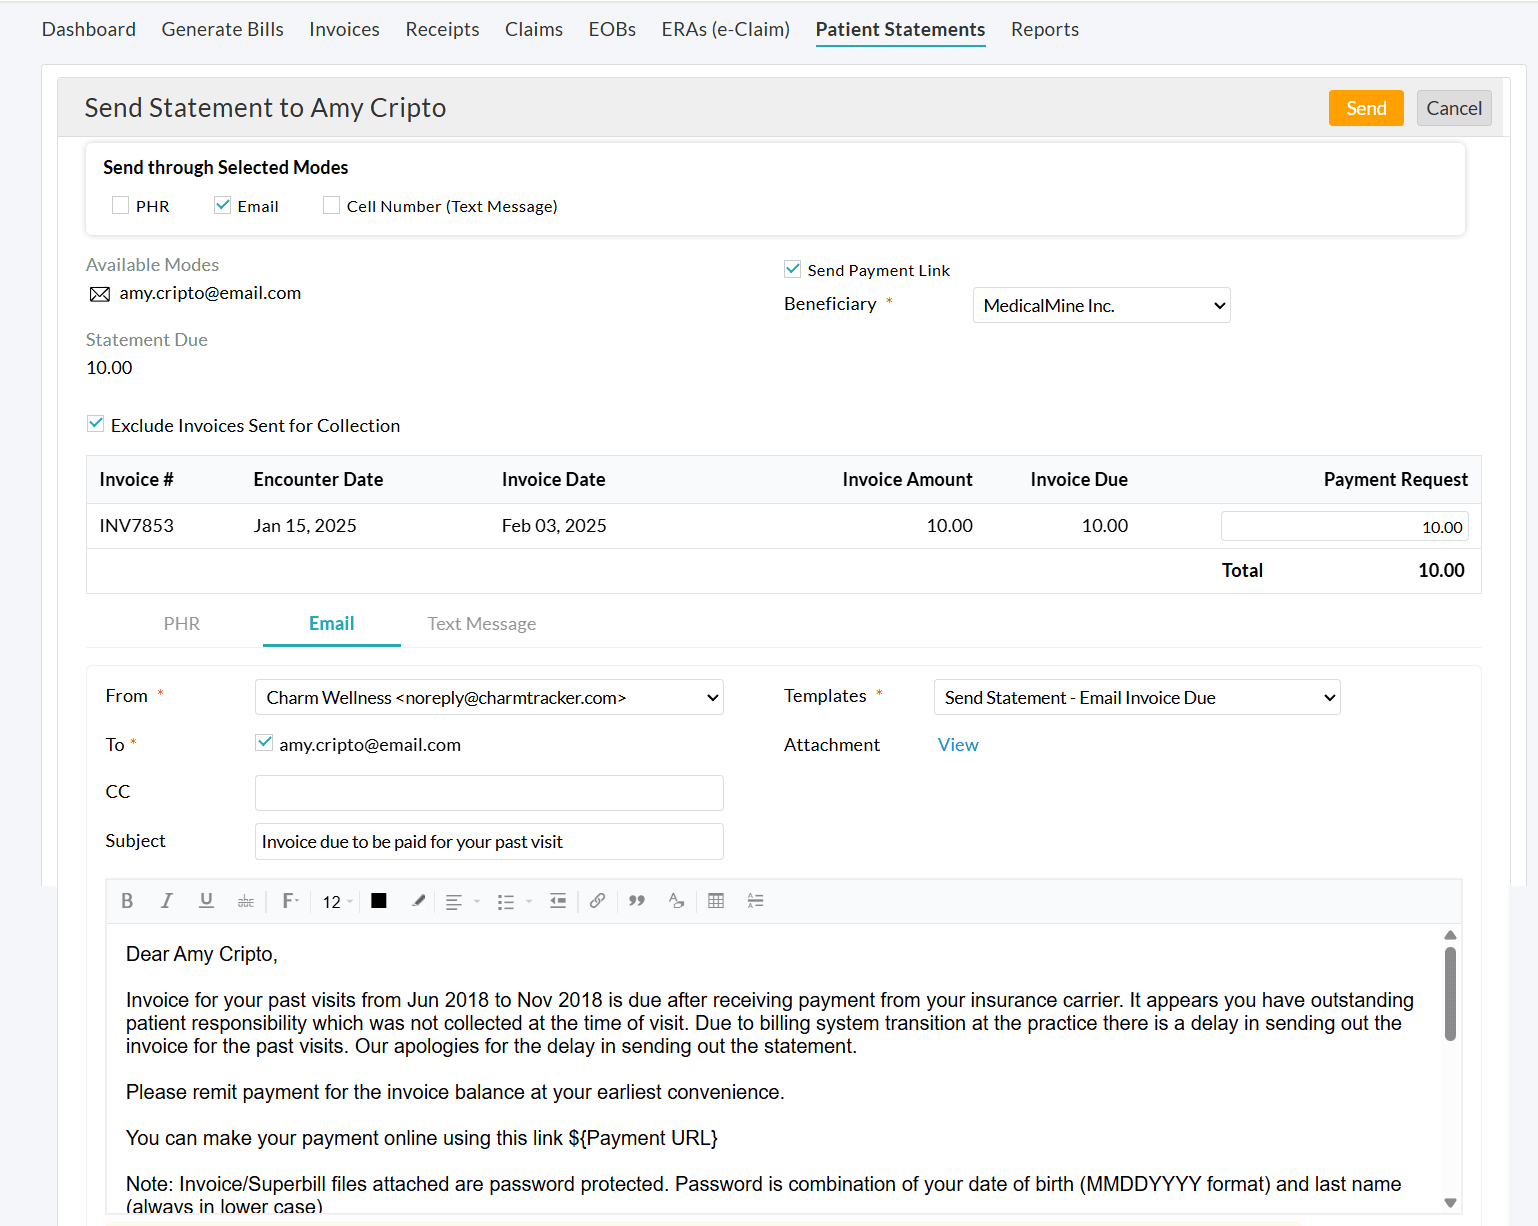
- You can send the Statement through multiple modes to the Patient, viz., PHR, Email, or Cell Number (Text Message). By default, the Patient's available mode(s) will be selected under 'Send through Selected Modes'.

- Select the 'Send Payment Link' option to allow Patients to make payments using the payment link received via Email or SMS. For Patients with PHR, a 'Pay' option will be available in their PHR accounts. If the Bluefin payment gateway is enabled for your Practice, the 'Send Payment Link' option gets selected by default.
- Select the beneficiary to whom the amount has to be credited.
- If you want to exclude invoices sent to the Collection Agency, choose the 'Exclude Invoices Sent for Collection' option.
- Enter the Subject and choose a Template to send the Statement.
- Edit the message content for the required mode(s) if needed.
- Click the 'Send' button to send the Statement to the Patient.
- You can view all sent Statements under the 'Billing > Patient Statements > Statement Sent History' section.

Note: The 'Send to Cell number' option will be enabled only for the Practices subscribed to the 'Text/Voice Notification' add-on.
Bulk Sending of Patient Statements
Practices can send multiple statements simultaneously using selected communication modes or a preferred order.
- Go to 'Billing > Patient Statements'
- Apply the necessary filter and Search Options.
- Choose the Statements and click the 'Send Statement' button.

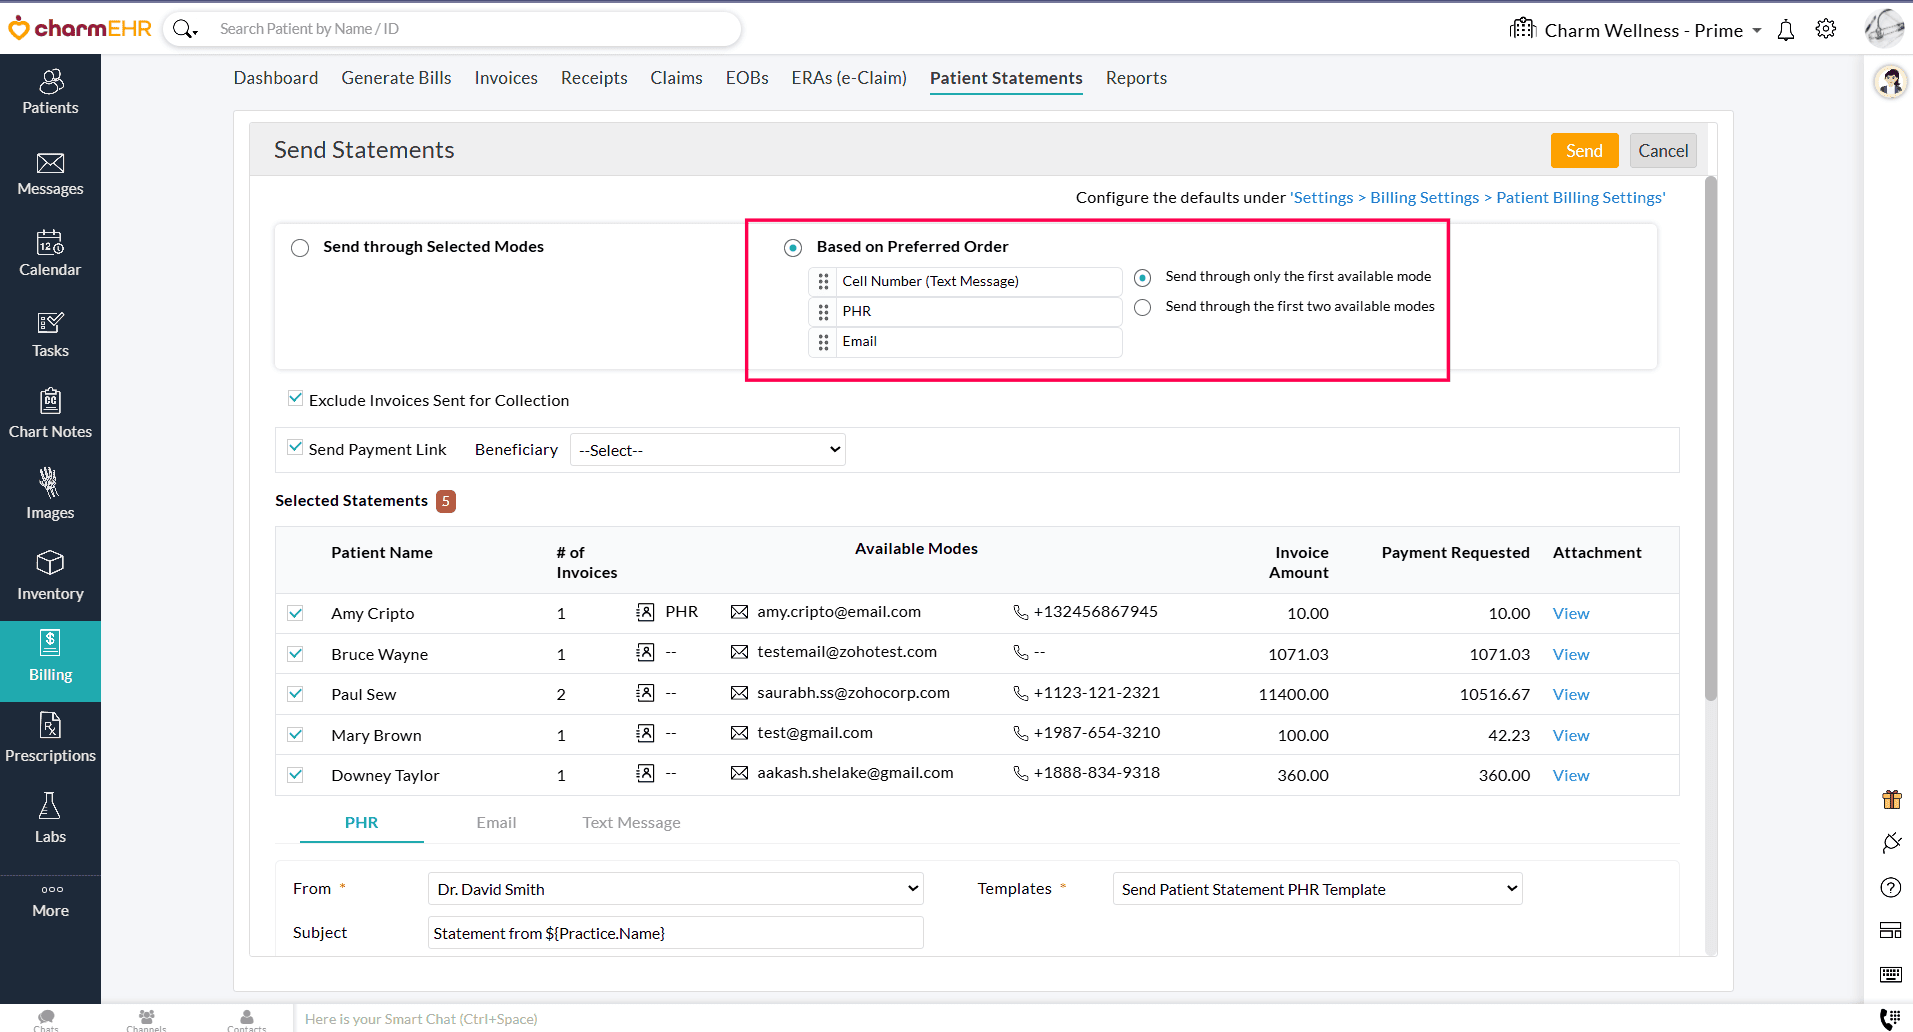
- Choose the delivery mode. You can either:
a. Send through Selected Modes
- Choose one or more modes (PHR, Email, or Cell Number) to send Statements.
- Statement will be sent only through the available communication modes of the Patient.

b. Send based on Preferred Order
- Set a priority order of delivery modes to send Statements (PHR > Email > Text Message (Cell Number)).
- Statements will be sent based on the Patients' available communication modes.
- You can choose to send Statements through:
- Only the first available mode (e.g., If a Patient has both PHR and Email, the Statement will only be sent via PHR).
- The first two available modes (e.g., If a Patient has both PHR and Email, the Statement will be sent through both modes).

Balance Due View
- The detailed view of the Patient balance due can be viewed by clicking the Statement. This can also be viewed under the 'Patient Dashboard > Balance Due' section.

- This page shows the Patient balance details along with the Patient and Insurance responsibilities. The Invoices can be selected based on various conditions and the Practice could send selected Invoices to the Patient for billing.
- The Search Options are provided to search and select the Statements.
- The Statements can be sent to the Patients by clicking the 'Send Statement' button. You can send the Statements to the Patient's PHR account, Email, or Cell Number.

- The Practice can also add the payment by clicking the 'Add Payment' button.

- You can also 'Print' and 'Download' the entries on the page.
- Practices can add Statement Notes in HTML format within the Statements section. It enables rich formatting options, including bold text, hyperlinks, and other HTML elements, improving the clarity and presentation of the notes compared to plain text.
- Under the 'Statement Notes' section, add or update notes in HTML format to enhance the presentation of your Statements.

Family Balance Due
Practices can add payments for the whole family from the 'Family Balance Due' section. The outstanding Invoices of all the linked members of the Family get listed in this section.
- Go to 'Patient Dashboard > Billing > Family Balance Due'.
- Choose the Invoices of the family members you need to make payments.
- Click the 'Add Payment' button and make the payment.
- The Receipts get generated for each member of the family separately.

Other Actions
Preview
To preview the Statement, follow the steps given below.
- Go to 'Billing > Patient Statements'
- In the Invoices listed, select the 'Preview' option against the Patient.

- The preview of the statement with the invoice due amount gets displayed.
- You can also select multiple Statements and click the 'Preview' button.
Download
The Statements can be downloaded by following the steps below.
- Go to 'Billing > Patient Statements'
- Select the Invoice(s) and click the 'Download' button.
- The Statements get downloaded to your system.
Mark as Mailed
The physical copies of the Statements sent to the Patients can be 'Marked as Mailed' by the Practice by following the steps given below.
- Go to the 'Billing > Patient Statements' section.
- Click the 'More Options' (...) icon against the Invoice and select the 'Mark as Mailed' option.

- Choose the Mailed Date and Mailed By options. By default, the address of the Patient gets filled in the 'Mailed To' field. Enter the comments, if any.

- Click the 'Mark As Mailed' button.
- You can select multiple Statements and mark them as mailed by clicking the 'Mark As Mailed' button above. The respective Patient's address will be taken as the mailed address.
Statement Settings

The following Settings can be configured by clicking the 'Settings' option under the 'Billing > Patient Statements' section.

- Default Option for 'Date Range' - Choose the default Date Range of the Invoices to be listed.
- Default Option for 'Show Invoices' - Choose the default option to be selected in the 'Show Invoices' filter option.
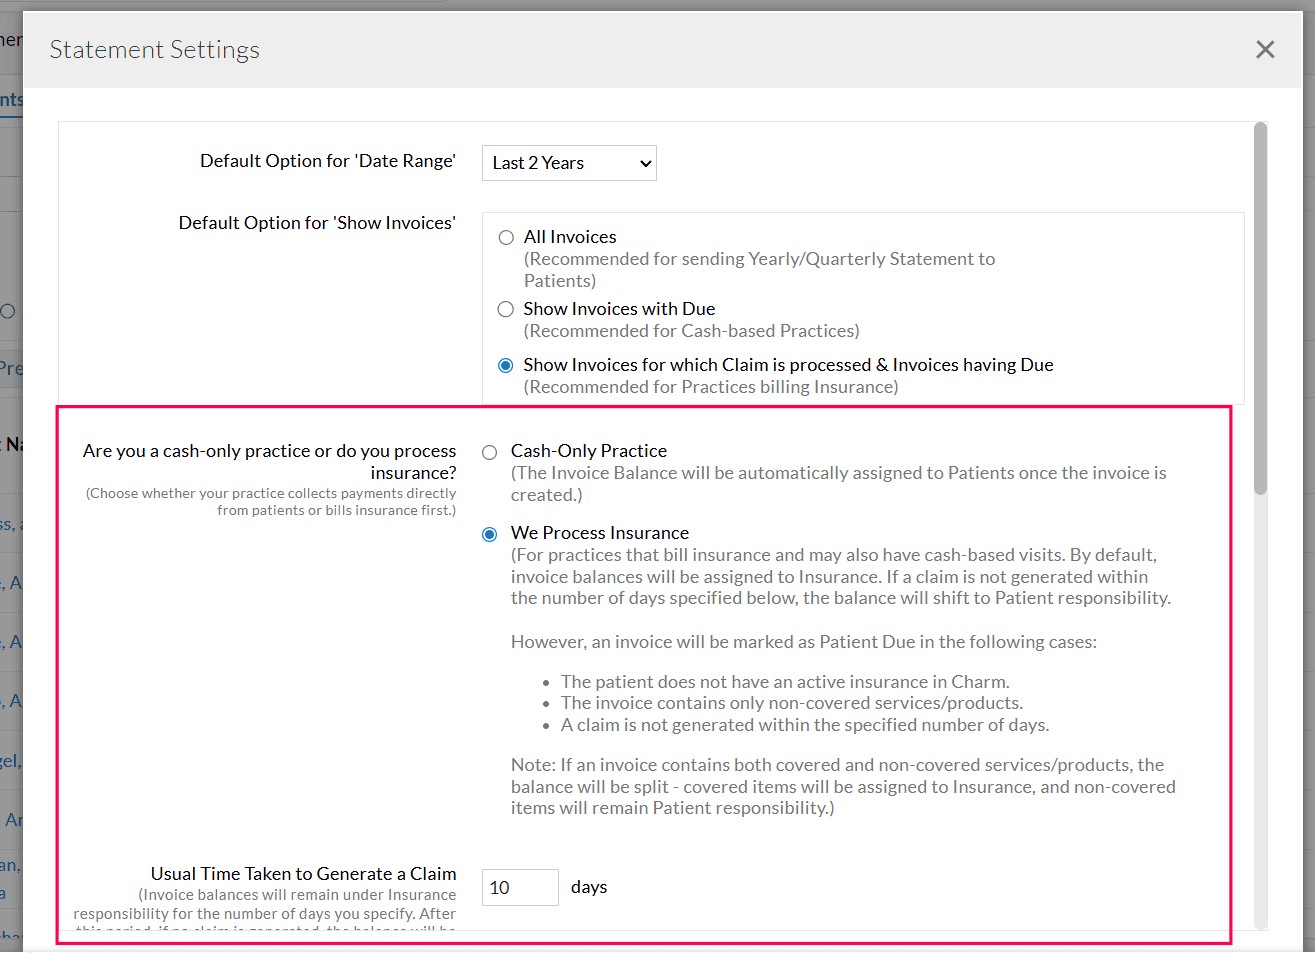
- Choose whether your Practice collects payments directly from the Patients or bills to the insurance. This setting defines how Invoice balances are assigned for Cash-based and Insurance-based Practices.
- For Cash-based Practices, the balance will be assigned automatically to the Patient Responsibility unless a Claim is generated.
- For Insurance-based Practices that also handle cash-based visits,
- The Invoice balances are initially assigned to the Patient's Insurance by default.
- If a Claim is not generated for an Invoice within the specified timeframe, the balance shifts automatically to Patient Responsibility.
- Practices can configure this timeframe to create a Claim, for example, 7 days, during which the Invoice balance remains under Insurance Due until a Claim is generated.
- If the Patient does not have active Insurance or the Invoice includes non-covered services, the balance is directly assigned to Patient Responsibility.
To learn more about this setting, visit Handling Invoice Balances for Cash-based and Insurance-based Practices.

- Choose whether to show 'Diagnosis(Dx)Codes' in the Statement.
- Choose whether to show the 'Patient Responsibility' information for each Invoice in the Statement.
- Select the default Statement Layout. You can choose either the Double Window Envelope in which the Patient address & Facility address will be printed or the Standard layout in which only the Patient address will be printed.
- Choose whether to show both Invoice Summary & Invoice Details in the Statement PDF or only show the Invoice Summary in the Statement PDF.
- Select whether to use the available Facility Address or manually enter the address.
Creating Statement Templates
To send the Statements, you need to include the ${Payment URL} placeholder in all of your 'Send Statement - Email' and 'Send Statement- PHR Messages' templates. Follow the steps given below to create the Statement templates.
Send Statement - PHR Message Template
The 'Send Statement- PHR Message' template can be used while sending the Statement to the Patient's PHR account. Follow the steps below to create the 'Send Statement - PHR Message' template.
- Go to the 'Settings > My Templates' section.
- Click the '+ New Template' button to add the template.
- Select the 'Send Statement- PHR Message' template type to create a PHR template and click the 'Proceed' button.
- Enter the Template Name. Choose the 'Statement' option in the 'Group' drop-down menu.

- Select the required field from the list. To request payment from the Patient and to include the payment link in the message, select the 'Payment Request' option. This automatically populates the Payment Link Place Holder.
- Enter the Subject and the message details.
- Click the 'Save' button to save the template.
Send Statement - Email Template
The 'Send Statement - Email' template can be used while sending the Statement to the Patient's Email address. Follow the steps below to create the 'Send Statement - Email' template.
- Go to the 'Settings > My Templates' section.
- Click the '+ New Template' button to add the template.
- Select the 'Send Statement- Email' template type to create an Email template and click the 'Proceed' button.
- Enter the Template Name. Choose the 'Statement' option in the 'Group' drop-down menu.

- Select the required field from the list. To request payment from the Patient and to include the payment link in the message, select the 'Payment Request' option. This automatically populates the Payment Link Place Holder.
- Enter the Subject and the message details.
- Click the 'Save' button to save the template.
Customizing Statement Text Messages
- You can customize the text message sent to the Patient under 'Settings > Patient > Text / Voice Notifications > Text Notifications'.
- Click the 'Edit Text Content' button.


- Configure the required Text Messages for the 'Send Patient Balance Due Statement Notification' and click the 'Save' button.