Patient Billing
Patient billing involves collecting payments from Patients for their outstanding balances.
This guide provides an overview of managing the Patient Billing process for the Practices handling Insurance-based and Cash-only/Self-pay Invoices.
- Insurance-based Invoices: These are Invoices with outstanding Patient balances that remain after Insurance Claims have been processed.
- Cash-only/Self-pay Invoices: Self-pay Invoices are generated for services where the Patient is directly responsible for payment.
By following the recommended workflows in the guide, Practices can ensure timely payment collection and improve overall billing efficiency.
- Handling Invoice Balances for Cash-Based or Insurance-Based Practices
- Handling Insurance-based Invoices
- Handling Cash-only/Self-pay Invoices
- Sending Patient Reminders for Outstanding Invoices
- Sending Outstanding Invoices to the Collection Agency
- Configuring Patient Billing Settings
- Patient Statements
Handling Invoice Balances for Cash-Based or Insurance-Based Practices
Practices can manage how Invoice balances should be calculated based on your Practice type.
You can choose to keep the Invoice balance under Insurance Due as soon as the Invoice is created. The balance will remain under Insurance Due for a specified number of days, even if a Claim has not been generated.
This helps Insurance-based Practices avoid billing Patients prematurely before the Claim is generated or processed, ensuring better accuracy in Invoice tracking and reporting.
Navigate to 'Settings > Billing > Patient Billing Settings > Patient Billing Manual-Default Settings' and choose whether you are a Cash-based or Insurance-based Practice.
- For Cash-based Practices, Invoice balances are automatically assigned to the Patient Responsibility unless a Claim is generated.
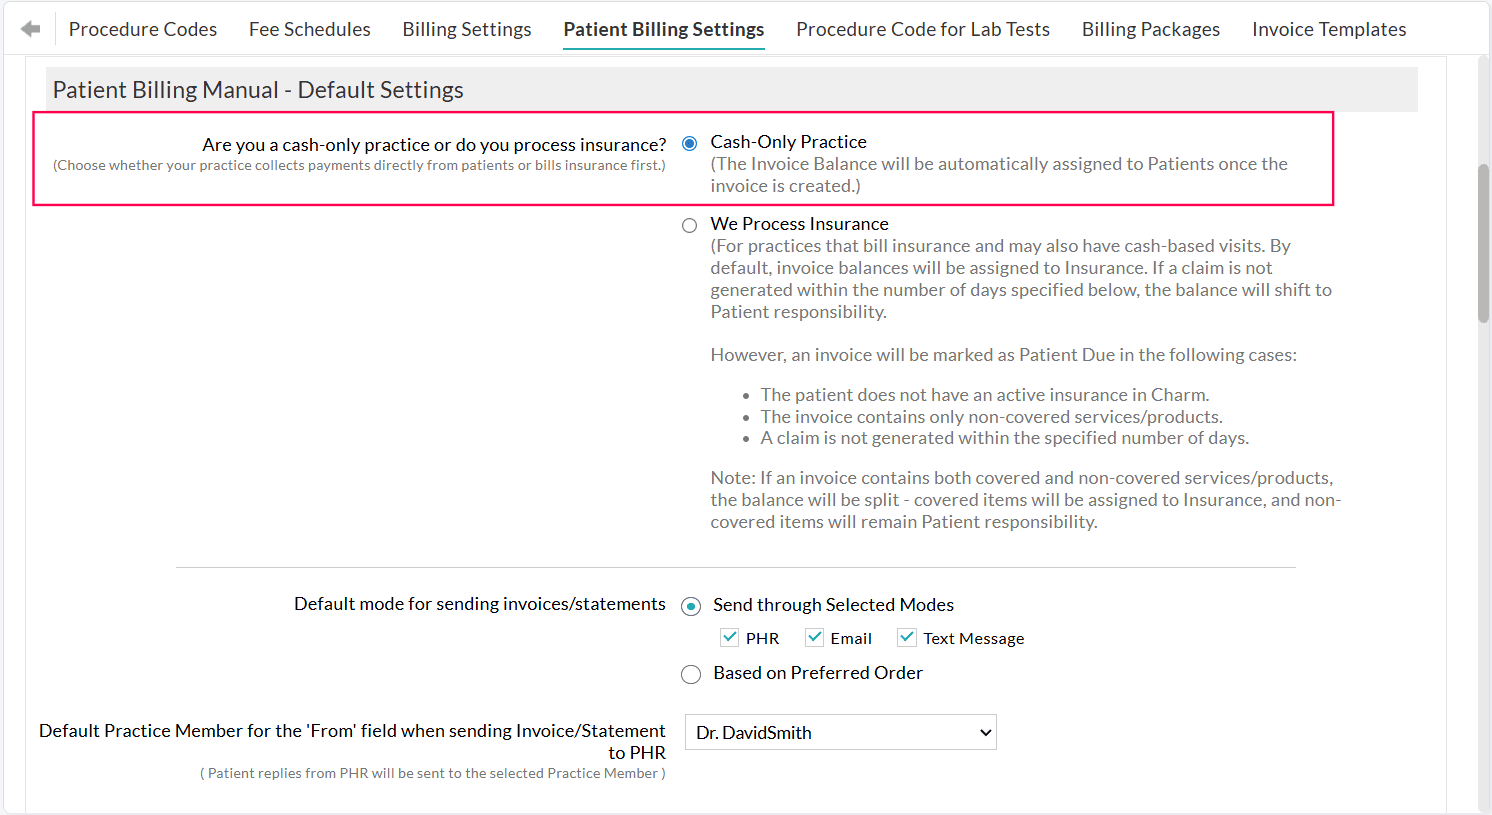
- For Insurance-based Practices that also handle cash-based visits, the Invoice balances are initially assigned to the Patient's Insurance by default. If a Claim is not generated for an Invoice within the specified timeframe, the balance shifts automatically to Patient Responsibility.
Practices can configure this timeframe to create a Claim, for example, 7 days, during which the Invoice balance remains under Insurance Due until a Claim is generated.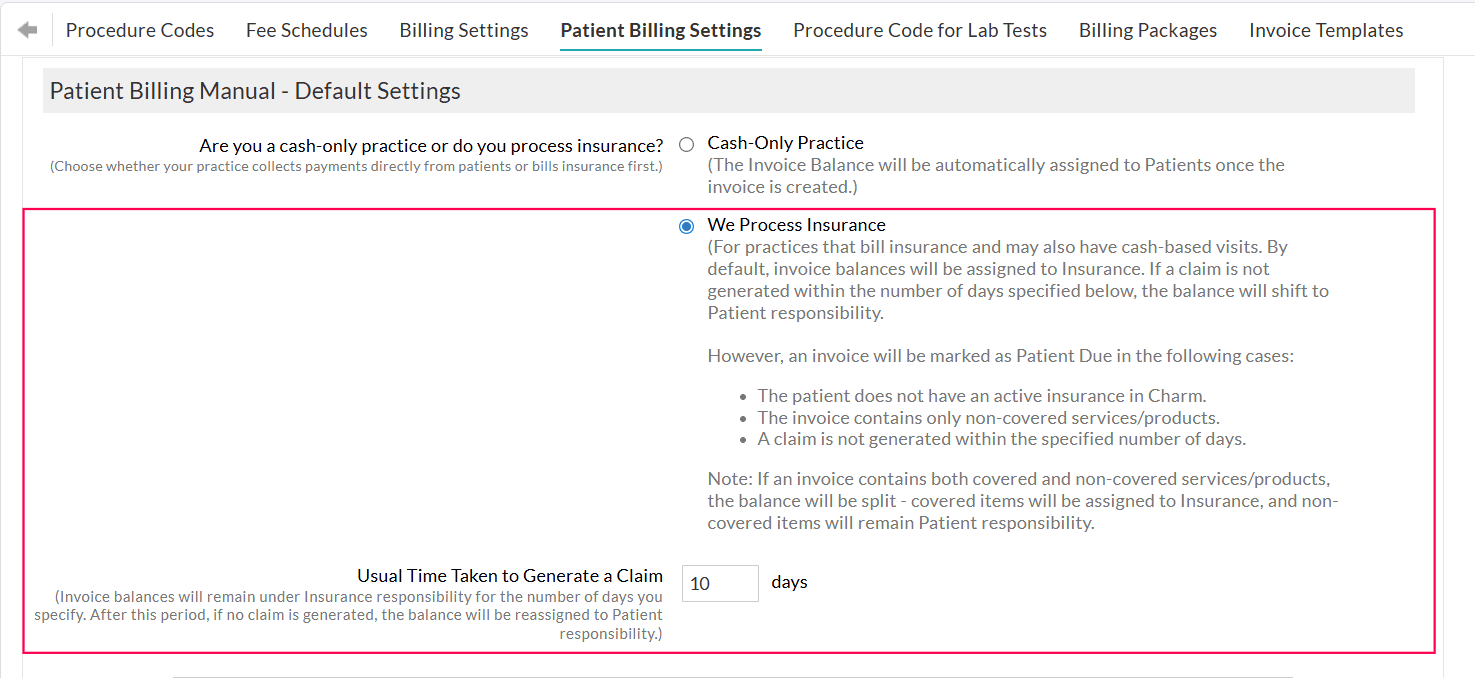
- Even for Insurance-based Practices, there are certain scenarios where an Invoice balance will be assigned directly to Patient Responsibility. These include:
- The Patient does not have active insurance.
- The Invoice includes only non-covered services or products.
- A Claim is not generated within the specified timeframe.
Note: If an Invoice has both covered and non-covered services or products, the balance will be split accordingly: covered services are assigned to the Insurance, while non-covered services are assigned to Patient Responsibility.
These Invoice balances are reflected in the following sections:
Patient Dashboard > Balance Due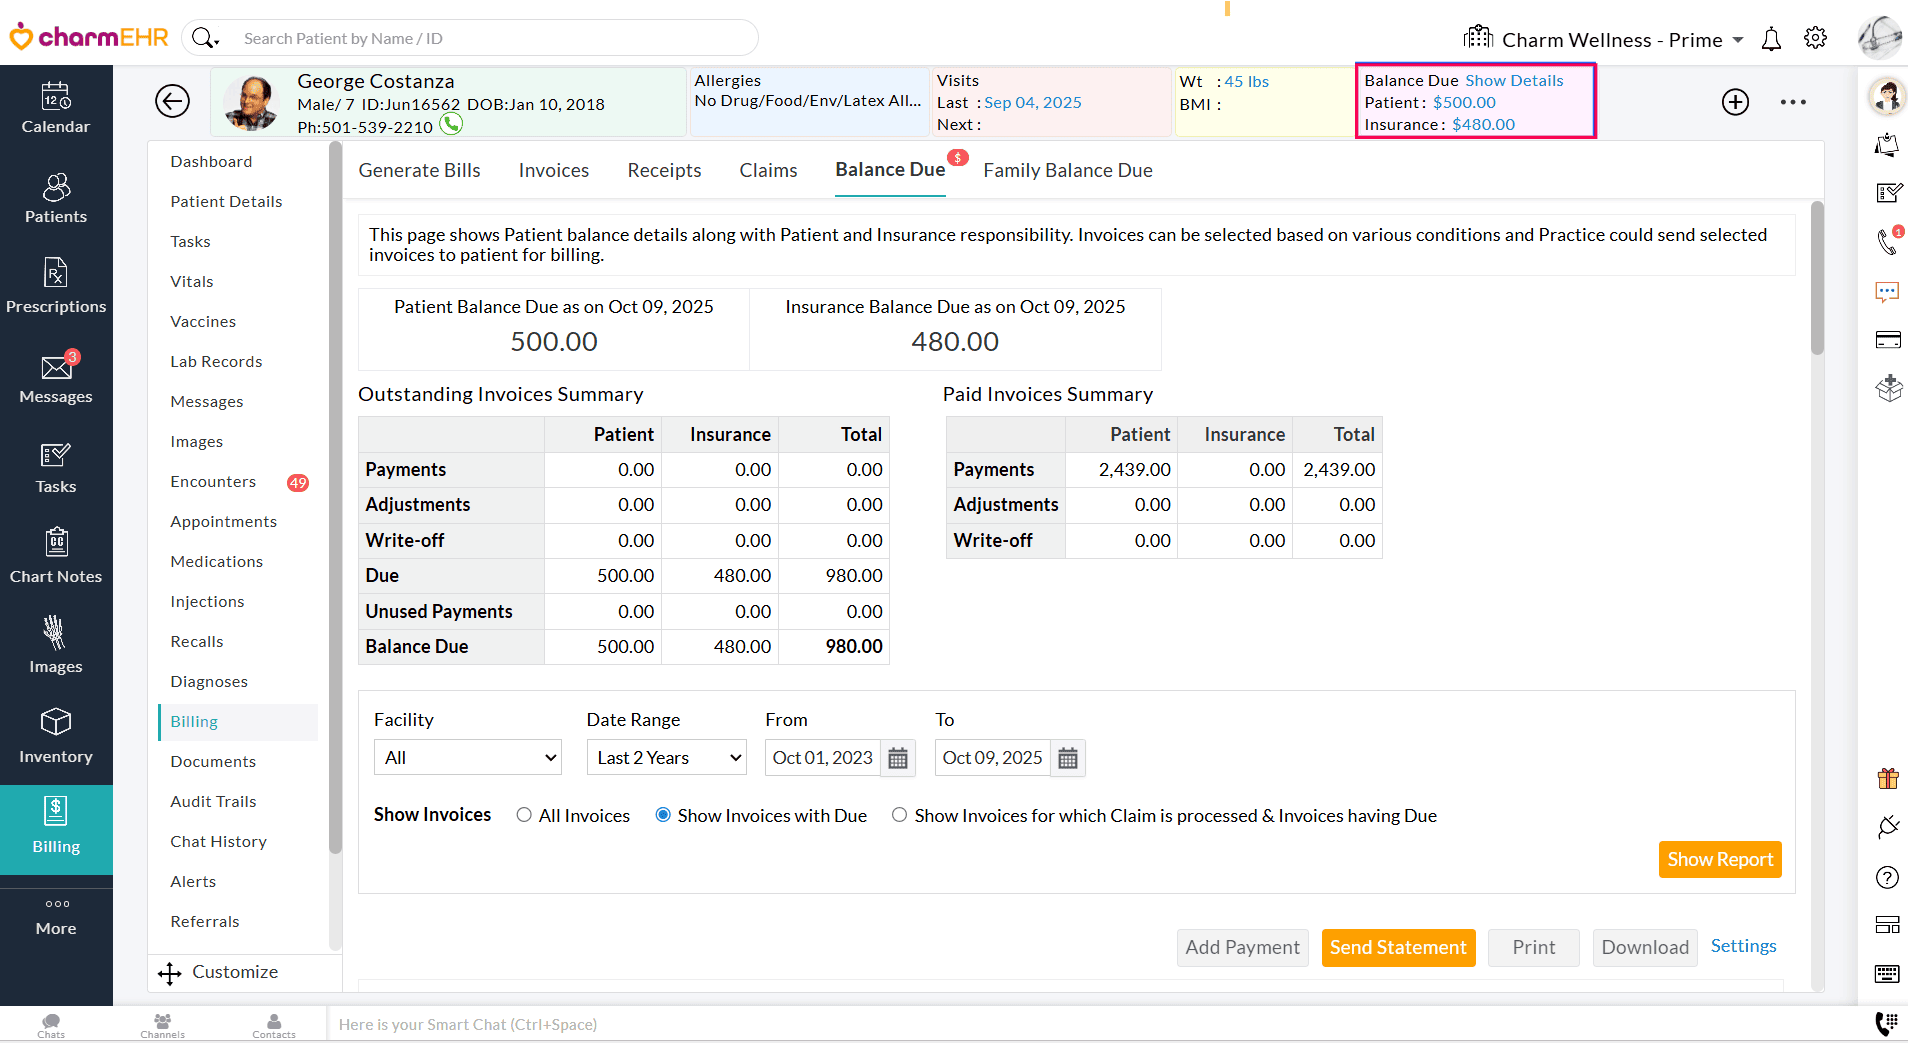
Billing > Patient Statements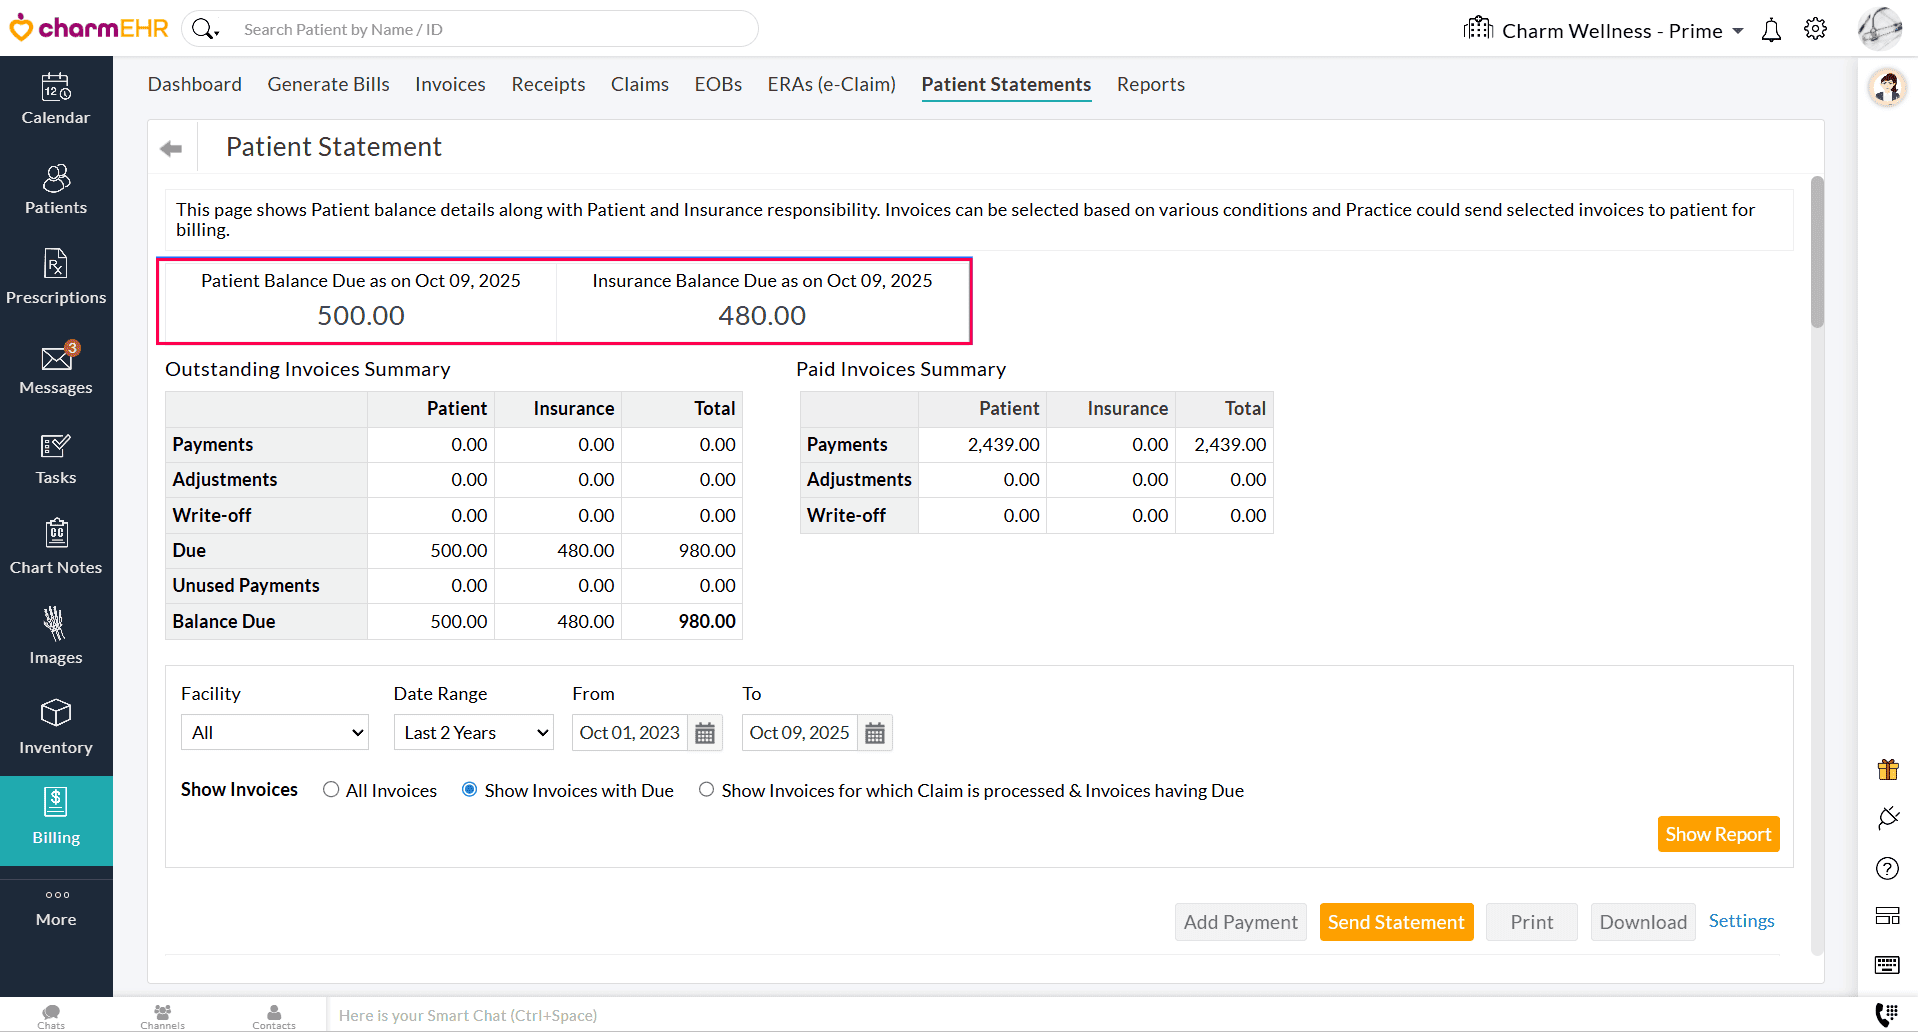
Billing > Reports > Patient Reports > Patient Balance Report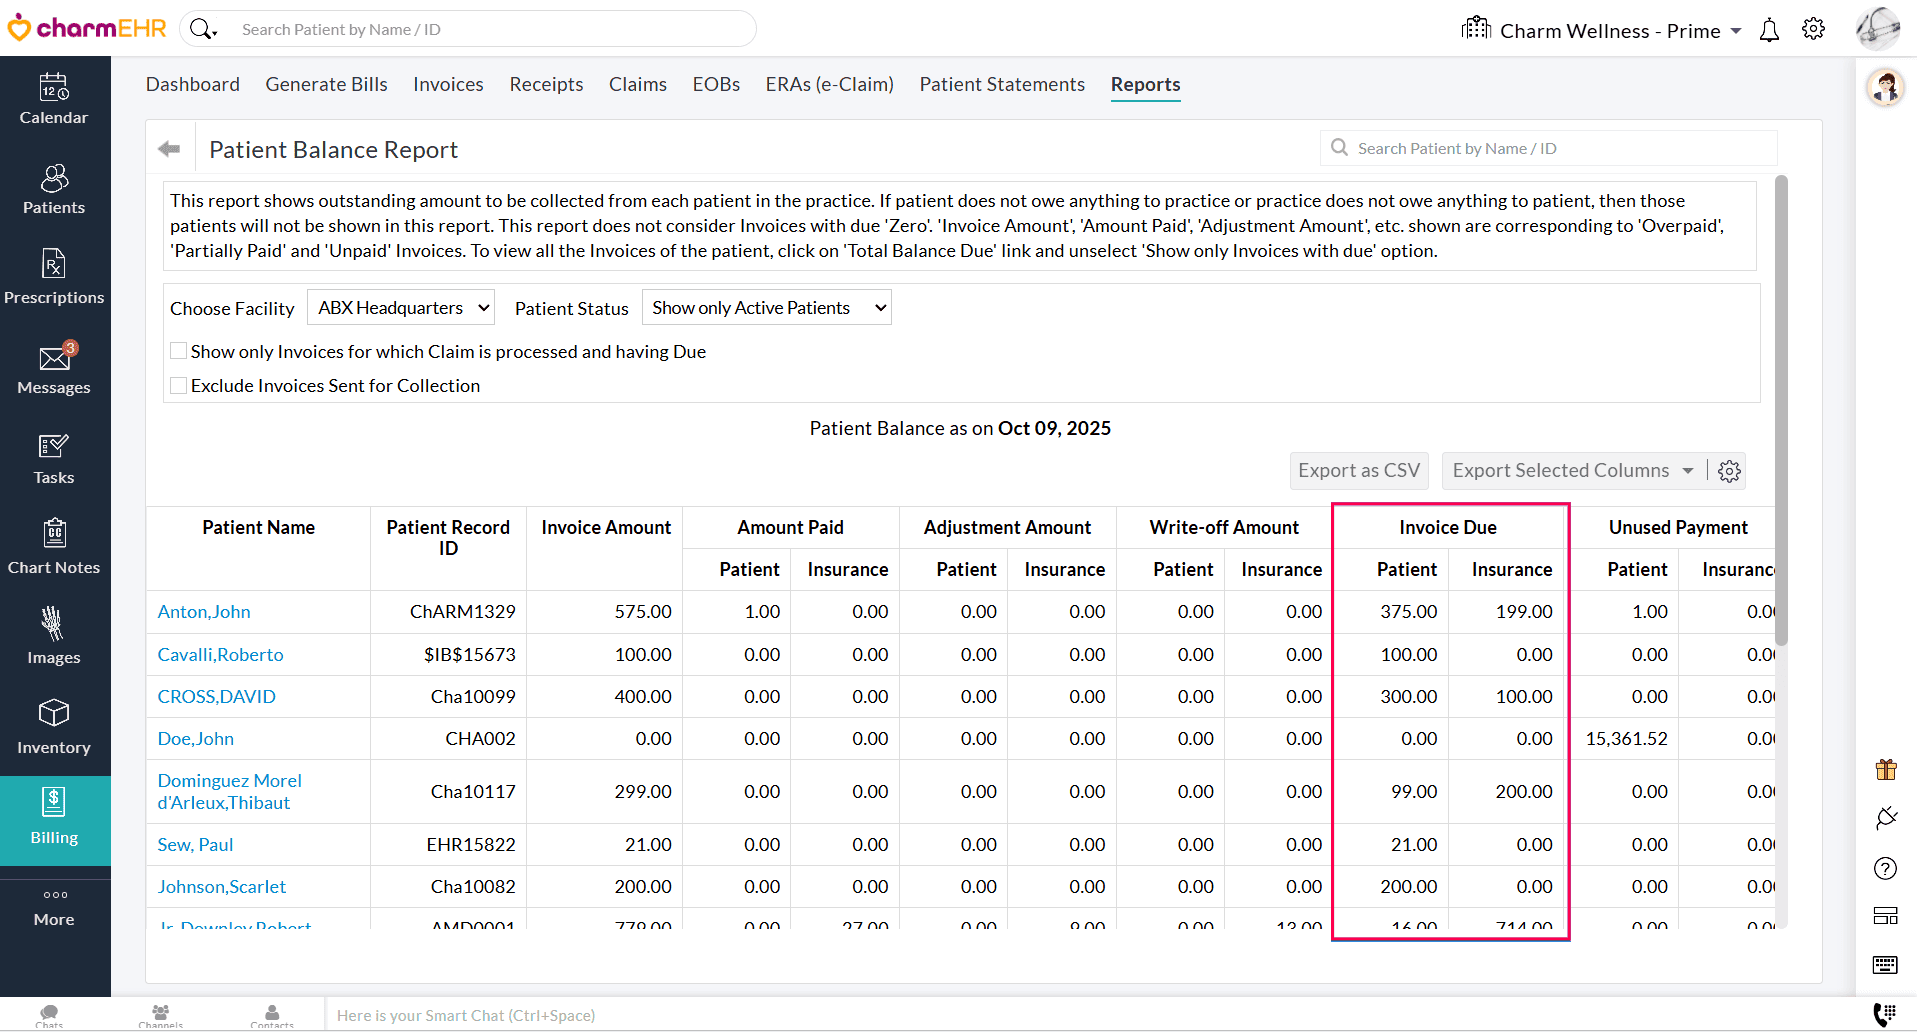
Handling Insurance-based Invoices
Practices can send Invoices to Patients to collect any remaining balances after Claims have been fully processed.
Practices that have enabled secondary claim processing typically wait until the secondary Claims are processed to ensure all insurance responsibilities are accounted for before sending Invoices for payment collection.
To enable secondary claim processing, navigate to 'Settings > Billing-Claims > Claim Settings > Secondary Claim Processing Settings'. To learn more about generating Secondary Claims, Visit Here.

While the following steps are not mandatory, Charm recommends following this workflow before sending an invoice to a patient for payment collection to ensure efficient management of outstanding invoices.
Practices can identify insurance-based Invoices by using the ‘With Due & PR’ filter under the ‘Billing > Invoices > Search Options 1 > Outstanding Invoices (Initial Communication)’ section.
1. Managing Overpaid Invoices
Before billing a Patient for outstanding Invoices, it is important to review any overpaid Invoices. Applying overpaid amounts towards outstanding balances helps to reduce Patient dues and ensures accurate billing.
To manage the Invoices with overpayments, follow the steps below.
- Navigate to 'Billing > Invoices > Search Options 1'
- Select the 'Outstanding Invoices (Initial Communication) > Invoices with Excess Payments' filter option.

- This lists all Invoices with a negative due balance, indicating an excess payment or adjustment.
- Transfer the overpayment amount to the Patient’s account as a credit by editing the Invoice and adjusting the Invoice Amount.
- Once moved to Patient Credits, it can be used for the Outstanding Invoices as discussed in the next section.
2. Apply Patient Credits to Outstanding Invoices
Before sending Invoices to Patients, verify whether there are existing credits in their accounts. Apply these credits to reduce or clear outstanding balances.
To identify such Invoices, follow the steps below.
- Navigate to 'Outstanding Invoices (Initial Communication) > With Due & PR > With Due, PR & Patient has Credits'.

- This lists Invoices with Due, PR, and Patient has Credits.
To apply the available Patient Credits to the outstanding Invoices, follow the steps below.
- Click the Patient Name link to navigate to the Patient Dashboard.
- In the Receipts tab, sort by the 'Unused Payments' column to identify Receipts with unused payments. Alternatively, select 'Receipts with Unused Payments' from the 'Watch List'.

- Edit the Receipt and apply the unused payments to the corresponding Invoices.
If there are still outstanding Invoices with Patient Responsibility after applying the Patient Credits, those Invoices can then be billed to the Patient. This ensures efficient utilization of Patient credits, reducing their dues before initiating billing.
3. Charge Patient's Card on File
If a Patient has a card on file saved in Charm, and the Practice has obtained consent to charge the Patient’s card, their outstanding dues can be cleared by processing the payment using the saved card.
Follow the steps below to process payments using the Patient’s card on file.
- Navigate to 'Outstanding Invoices (Initial Communication) > With Due & PR > With Due, PR & Patient has Card on File'.

- This lists all Invoices with Due, PR, and the Patient has Cards on File.
Note: This functionality is available only for Practices using the Bluefin Payment Gateway.
- Select the Invoices and click the 'Charge Card on File' button to process payments for all selected Invoices.


4. Send Invoices to Patients for Payment Collection
After following the steps to apply for Patient credits and charge the card on file, any remaining outstanding Invoices can be sent to the Patient for payment collection.
- Navigate to 'Outstanding Invoices (Initial Communication) > With Due & PR > With Due and Patient Responsibility'.

- Select the Invoices and click 'Send Invoices'.

- Send Invoices with the Payment link through the Patient's available communication modes, such as Email, PHR, or Cell Number. To learn more about sending Invoices through different communication modes, Click Here.
- Patients can then pay their balances using the payment links.
5. Set Up Patient Payment Plans
Practices can offer customized payment plans for Patients, allowing them to settle their outstanding balances in manageable installments.
Navigate to 'Receipt > Recurring Payments > + Recurring Payments' and set up Recurring payments tailored to specific Invoices or outstanding balances.

For more information on Recurring Payments, Click Here.
Handling Cash-only/Self-pay Invoices
Patient billing for cash-only/self-pay Invoices follows the same process as billing for insurance-based Invoices, with one key distinction: the ‘With Due & No Claim’ filter is used under ‘Outstanding Invoices (Initial Communication)’ to identify cash-only/self-pay Invoices.
Follow the steps below to handle Patient billing for cash-only/self-pay Invoices.
1. Managing Overpaid Invoices
To manage the Invoices with overpayments, follow the steps below.
- Navigate to 'Billing > Invoices > Search Options 1'
- Select the 'Outstanding Invoices (Initial Communication) > Invoices with Excess Payments' filter option.

- This lists all Invoices with a negative due balance, indicating an excess payment or adjustment.
- Transfer the overpayment amount to the Patient’s account as a credit by editing the Invoice and adjusting the Invoice Amount.
- Once moved to Patient Credits, it can be used for the outstanding Invoices, as further discussed in the next section.
2. Apply Patient Credits to Outstanding Invoices
Follow the steps below to filter the Invoices with Patient credits and apply them to the outstanding Invoices.
- Navigate to 'Billing > Invoices'
- Filter the Invoices with due and Patient has credits using the 'Outstanding Invoices (Initial Communication) > With Due & No Claim > With Due & Patient has Credits' filter option.

- Click on the Patient Name Link to navigate to the Patient Dashboard.
- Edit the Receipt containing Patient credits and apply them to the Invoice.
If there are still outstanding Invoices with Patient Responsibility after applying the Patient Credits, those Invoices can then be billed to the Patient.
3. Charge Patient's Card on File
Follow the steps below to process payments using the Patient’s card on file.
- Navigate to 'Outstanding Invoices (Initial Communication) > With Due & No Claim > With Due & Patient has Card on File'.

- This lists all Invoices with Due, PR, and the Patient has Cards on File.
Note: This functionality is available only for the Practices using the Bluefin Payment Gateway.
- Select the Invoices and click the 'Charge Card on File' button to process payments for all selected Invoices.
4. Send Invoices to Patients for Payment Collection
The outstanding Invoices can be sent to the Patients for payment collection by following the steps below.
- Navigate to 'Billing > Invoices > Outstanding Invoices (Initial Communication) > With Due & No Claim > With Due'

- Select the Invoices and click 'Send Invoice' to send Invoices with a payment link to the Patients.
- Patients can pay their balances using the payment links.
5. Set Up Patient Payment Plans
Practices can offer customized payment plans for Patients, allowing them to pay their outstanding balances in manageable installments.
Navigate to 'Receipt > Recurring Payments > + Recurring Payments' and set up Recurring payments tailored to specific Invoices or outstanding balances.
Sending Patient Reminders for Outstanding Invoices
Practices can effectively follow up with Patients by sending reminders for outstanding Invoices.
Follow the steps below to send reminders for the outstanding Invoices.
- Navigate to 'Billing > Invoices > Search Options 1'
- Select the 'Patient Billing - Reminders' option.

- Practices can filter the Invoices based on the first invoice sent date for sending Reminders.

- Filter For Insurance-based Invoices: Invoices with Due and PR
Reminder Levels:- Reminder 1: Outstanding for over 30 days from the First Invoice Sent Date.
- Reminder 2: Outstanding for over 60 days from the First Invoice Sent Date.
- Reminder 3: Outstanding for over 90 days from the First Invoice Sent Date.
- Filter For Self-pay Invoices: Invoices with Due and No Claim Reminder Levels:
- Reminder 1: Outstanding for over 30 days from the First Invoice Sent Date.
- Reminder 2: Outstanding for over 60 days from the First Invoice Sent Date.
- Reminder 3: Outstanding for over 90 days from the First Invoice Sent Date.
- Filter For Insurance-based Invoices: Invoices with Due and PR
Late Payment Fee
If a payment is overdue, Practices can send reminders along with the Late Payment Fee if required by the Practice.
For example, Practices can apply a late payment fee to Invoices that have been outstanding for over 30 days. Follow the steps below to send Invoices with a late payment fee.
- Navigate to 'Billing > Invoices > Search Options 1 > Patient Billing'
- Filter Invoices that have been outstanding for more than 30 days.
- Select the Invoices from the list.

- Click the 'Actions' button and select the 'Add Procedures to Invoices' option.
- Select the appropriate Late Payment Fee Procedure Code to apply the fee to all selected invoices.

This ensures overdue payments are managed efficiently and aligns with the Practice’s policy.
Visit Here to learn more about adding Procedure Codes to multiple Invoices.
Patient Billing Settings
The Patient Billing settings allow Practices to customize the billing parameters for an efficient workflow.
Navigate to the 'Settings > Billing > Patient Billing Settings' section.
- Patient Billing Manual - Default Settings
- Default Options for Sending Invoices/Statements
- Default Options to Re-send Invoices
- Default Options when Bluefin is Enabled
- Card on File Settings

Patient Billing Manual - Default Settings
- Manage Invoice balances for Cash-based and Insurance-based Practices:
This setting determines how Invoice balances are calculated based on the Practice type. Choose whether you are a Cash-based or Insurance-based Practice.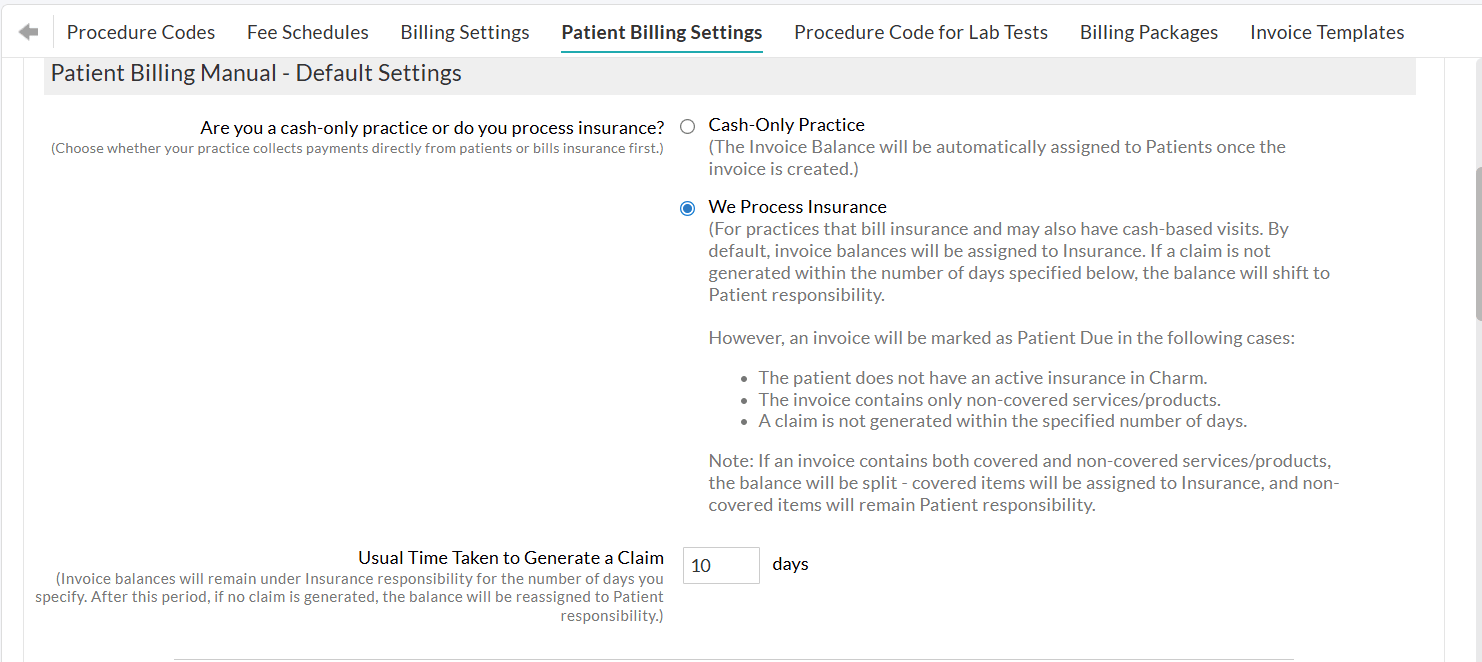
- For Cash-based Practices, Invoice balances are automatically assigned to the Patient Responsibility unless a Claim is generated.
- For Insurance-based Practices that also handle cash-based visits, the Invoice balances are initially assigned to the Patient's Insurance by default. If a Claim is not generated for an Invoice within the specified timeframe, the balance shifts automatically to Patient Responsibility.
- Practices can configure this timeframe to generate the Claims, during which the Invoice balance remains under Insurance Due until a Claim is generated.
To learn more about this setting, visit Handling Invoice Balances for Cash-based and Insurance-based Practices.
- Choose the delivery modes or set a preferred order for sending Invoices:
- Send Through Selected Modes: Choose one or more default modes (PHR, Email, or Cell Number) to send Invoices. The selected modes will be chosen automatically while sending Invoices.
- Send Based on Preferred Order:
- Arrange the preferred modes in priority order (e.g., PHR > Email > Text Message (Cell Number)).
- The selected order will be chosen automatically while sending Invoices.
- You can choose to send Invoices through:
- Only the first available mode will be used (e.g., If a Patient has both PHR and Email, the Invoice will only be sent via PHR).
- The first two available modes will be used (e.g., If a Patient has both PHR and Email, the Invoice will be sent through both).

- Choose the default Practice Member for the 'From' field, when sending an Invoice or Statement to PHR:
The responses from the Patient's PHR will be directed to the selected Practice Member. - Choose the 'Guarantor Email ID' and 'Guarantor Cell Number' options by default while sending Invoice/Statement:
Enabling this setting to send Invoices and Statements to the Guarantor's Email ID and Cell Number.
Default Options for Sending Invoices/Statements
Practices can choose preferred settings for sending Invoices and Statements.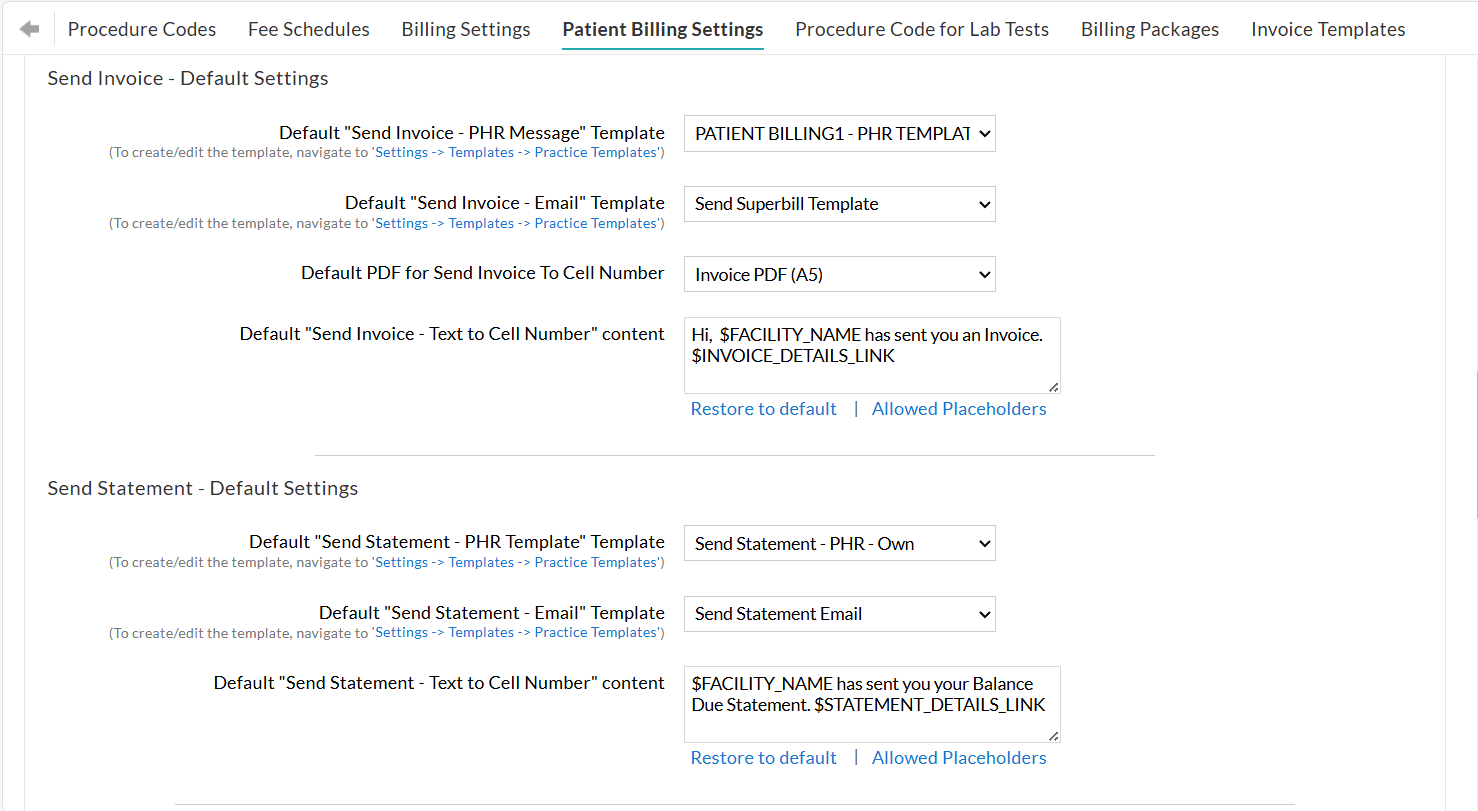
- Choose the default 'Send-Invoice - PHR Message' template and 'Send-Statement - PHR Message' template:
To create or edit the template, navigate to 'Settings > Templates > Practice Templates' - Choose the default 'Email Template' for sending Invoice and Statement via Email:
This template will be selected automatically when 'Email' is chosen as the preferred communication mode under the 'Send Invoice' and 'Send Statement' sections. - Choose the 'Default PDF for Send Invoice To Cell Number':
The selected Invoice PDF will be shared when sending Invoices to the Patient's Cell Number. - Enter the Default 'Send Invoice - Text to Cell Number' and Default 'Send Statement - Text to Cell Number' content.
Default Options to Re-send Invoices
Practices can automatically resend Invoices to Patients whenever there is a change to the Invoice Due. This functionality applies only if the Invoice has already been sent initially.
- Re-send the Invoice to PHR account:
Enable this option to resend the Invoice to the PHR account when the Patient pays or when the Invoice Due changes. - Choose the default template for re-sending the Invoice to PHR Account:
The Invoice will be sent to the PHR account using either the last used or preferred template based on the selection. - Re-send the Invoice to Email ID:
When enabled, Invoices will automatically be resent to the Patient's Email ID upon payment or 'Invoice Due' changes. This applies only if the Invoice has been previously sent by the Practice. - Choose the default template for re-sending the Invoice to Email ID:
The Invoice will be sent to the Patient's Email ID using the last used or preferred template based on the selection. - Re-send the Invoice to Cell Number :
When enabled, Invoices will automatically be resent to the Patient's Cell Number upon payment or 'Invoice Due' changes. This applies only if the Invoice has been previously sent by the Practice. - Choose the default template for re-sending the Invoice to Cell Number:
The Invoice will be sent to the Patient's Cell Number using the last used or preferred Invoice PDF type based on the selection. - Send Invoice to Patients with only the Patient Portion of Invoice Due:
This setting enables Practices to enter an amount submitted on a Claim so it can be excluded from the Patient's Invoice, ensuring that only the remaining balance specific to the Patient is shown. - Invoice Label Selection:
Choose the label to be displayed on the Invoice.
Default Options when Bluefin is Enabled

- Select the 'Send Payment Link' option while sending Invoice/Statement by default.
- Allow Patients to make Partial Payments for Invoices and Statements: If 'Yes' is selected, Patients can make multiple partial payments for Invoices and Statements to the requested amount.
When 'No' is selected, Patients will be required to pay the total amount due, as the payment amount field will be locked and cannot be edited.
Card on File Setting
Practices can configure the default options when the Patient's Card on File is used.
- Keep the 'Use Payment Gateway' option selected by default:
Select 'Yes' to automatically enable the 'Use Payment Gateway' option when adding a payment. - Select all beneficiaries while saving the Card on File:
This option allows you to associate the saved card with multiple beneficiaries under the same account. This applies to Practices with Multiple Beneficiaries.
If 'Yes' is selected, all Beneficiaries mapped with the Patient's facility will be selected while saving the Card on File from the Patient Dashboard. - Store the card on file while the Patient pays for Invoices from PHR:
When this option is enabled, the Patient's card information will be saved automatically whenever they make a card payment from their PHR account. - Allow Patients to delete the card on file from their PHR account:
Once enabled, Patients can remove their saved cards directly from their PHR account.