Charm AI Scribe [WATCH VIDEO ]
Charm's Ambient AI Scribe is an innovative add-on feature designed to streamline medical charting by transcribing Patient-Provider conversations in real-time.
This feature makes documentation easier by leveraging AI technology, helping Providers focus more on Patient care.
Enabling Charm AI Scribe
The Practice Admin or Office Manager can enable the Charm AI Scribe by following the steps below.
- Go to the 'Add-ons' page by clicking on the 'Plug' icon.

- Click on the 'Enable Now' button under the 'Charm AI Scribe' add-on.

- If there is no Credit Card on file in your CharmHealth account, click on the 'Add a Payment Method' button to enter your card details before enabling the add-on.

- Select the member roles (e.g., Physician, Therapist) that need access to this add-on.
- Choose a Pricing Plan between the two options.
- Plan 1: $125 per Provider/month (unlimited Encounters)
This plan is ideal for Practices with a high volume of Encounters. It allows for unlimited Encounters at a fixed monthly rate per Provider. - Plan 2: $2 per Encounter, with a monthly minimum of $20
This plan is suitable for Practices with a lower volume of Encounters. Practices are charged $2 per Encounter with a monthly minimum charge of $20.
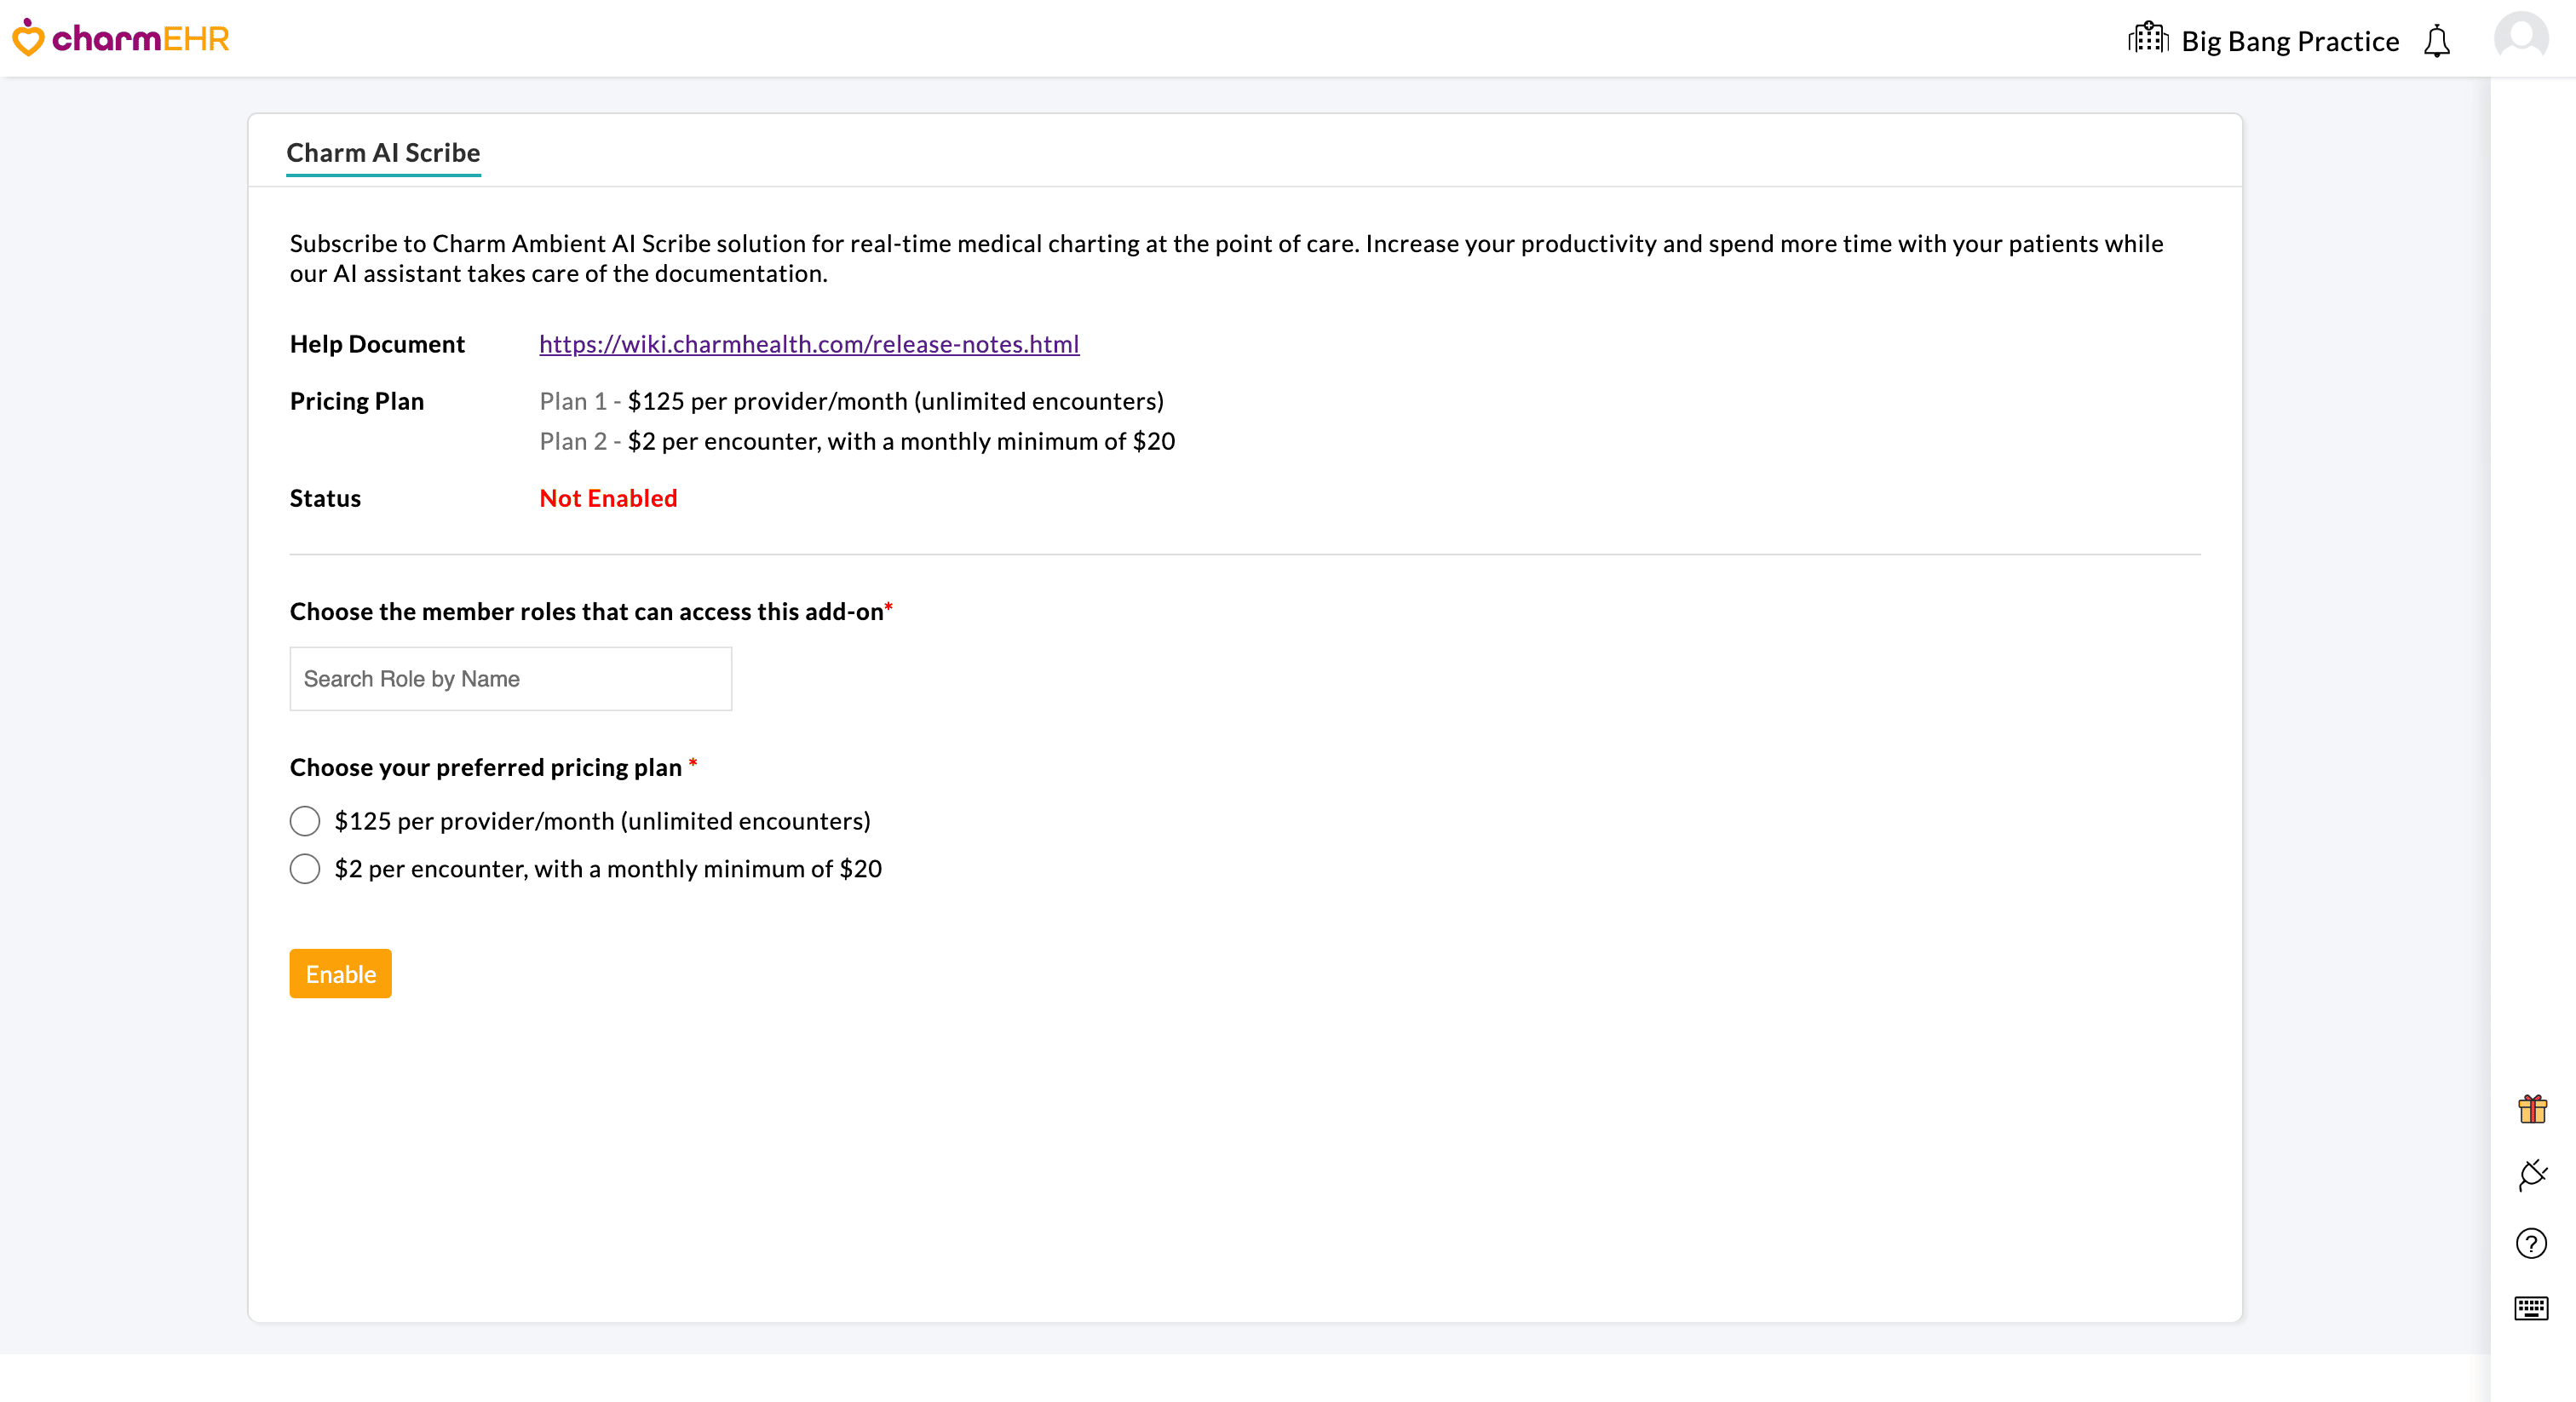
- Plan 1: $125 per Provider/month (unlimited Encounters)
- Click on the 'Enable' button to enable the Charm AI Scribe add-on.
- Once enabled, the status of the add-on will be changed to 'Enabled'.

Note: After enabling, you can Edit the member roles in this section.
Using Charm AI Scribe within Encounter
Once the Charm AI Scribe add-on is enabled, you can start using it during Patient Encounters for real-time charting.
Charm AI Scribe is supported in SOAP, Comprehensive, and Brief Encounters.
i. Starting a New Encounter
To start an Encounter, follow the steps below.
- Navigate to the 'Chart Note > + Encounter' section.
- Choose the Patient to create an Encounter.
- Alternatively, you can also create an Encounter from the Calendar or Patient Dashboard.

ii. Transcribing Conversations
To start using Charm AI Scribe during a Patient Encounter, follow the steps below.
- Click on the 'Charm AI Scribe (Mic)' icon to transcribe the conversation with the Patient.

- Once the Charm AI Scribe is ready, start your conversation with the Patient.

- Choose your preferred language to communicate with the Patient. Charm AI Scribe supports multiple languages during transcription, including English, Spanish (Mexico), Spanish (Spain), French, German, and more.

- Your conversation gets recorded and displayed in real-time.

- If needed, minimize the Charm AI Scribe to access and work on the Chart Note.

- Charm AI Scribe listens to your conversation even after you minimize it. Click on the 'Mic' icon to open the Charm AI Scribe window again.

- You can also stop the transcription at anytime by using the 'Stop Listening' option.

Stopped/Paused Transcription

- Charm AI Scribe continues listening to your conversation with the Patient, even when you navigate away from the Encounter section to the Patient Dashboard to review the Patient's Medical Records.

- Charm AI Scribe supports seamless and reliable transcription even when your network connection is unstable. This ensures that transcription proceeds smoothly, preventing data loss during patient-provider conversations.
When a network disruption happens:
- Charm AI Scribe continues to listen to the Patient-Provider conversation and stores the conversation locally.
- An alert message appears, notifying the members about the network instability.

- The Orange Mic icon indicates that the network is unstable, but Charm AI Scribe continues to capture the conversation.

- Charm AI Scribe listens to your conversation even if you navigate away from the Encounter section to the Patient Dashboard to review medical records during a session with weak connectivity.

iii. Section-Wise Customization for the Generated Chart Note
Providers can now tailor every section of the Chart Note generated by Charm AI Scribe to match the unique documentation style across different care types. This is a member-specific configuration and allows each Provider to have their own preferences. Follow the steps below to customize the generated Chart Note.
- Navigate to the 'Patient Encounter > Charm AI Scribe > Settings' section.
- Select the Care Type you need to customize.
- You can customize each section of the Chart Note, such as the Chief Complaint, History of Present Illness, Past Medical History, Family History, and Physical Exam, for the selected Care Type.
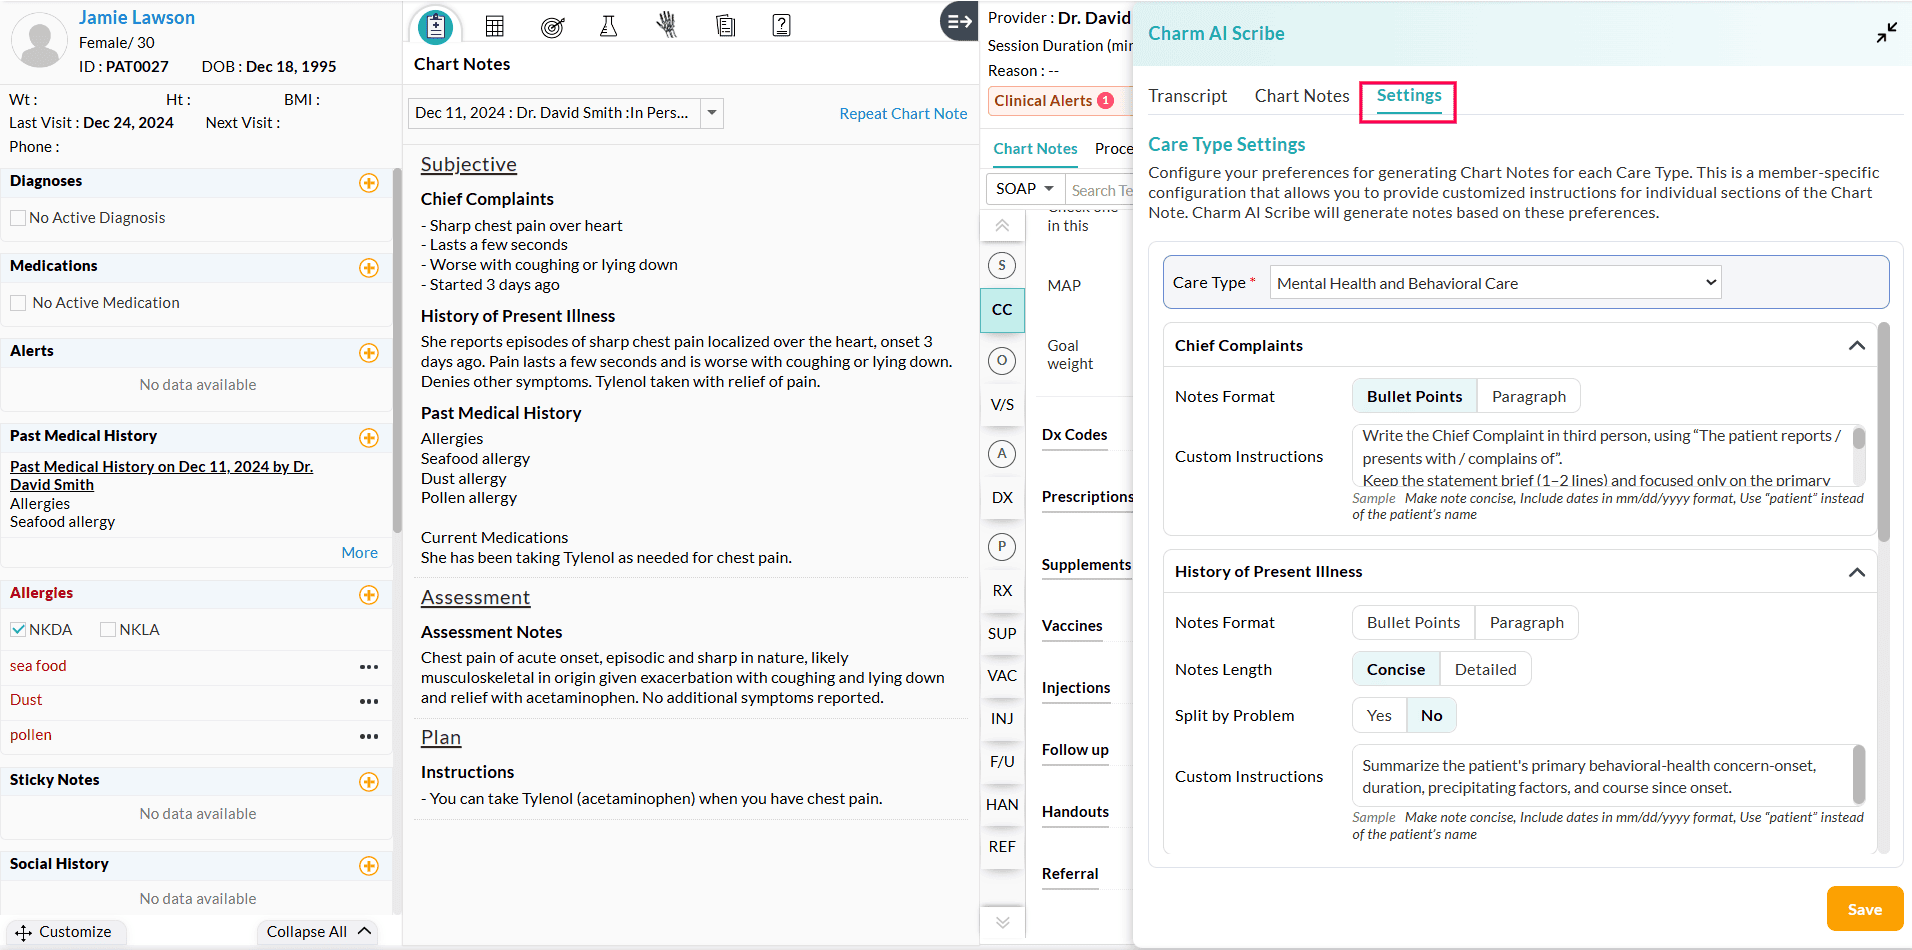
The customization options include:
a. Notes Format
Select the note format for each section that aligns with your documentation needs.
You can select between Paragraph format for detailed, narrative-style notes and Bullet points for a structured, concise summary.
The selected Notes Format will get saved as the default for the upcoming Encounters.
b. Custom Instructions
Providers can now define custom instructions for the required sections of the Chart Note.
While generating the Chart Note, Charm AI Scribe follows these instructions by extracting relevant details from the transcript, if available.
Note:Use clear and concise instructions for better results.
Example: Include information regarding therapy in the HPI section. Exclude the Physical Examination information in HPI.
c. History of Present Illness-Specific Customization
Notes Length
Providers can generate History of Present Illness notes either in a concise or detailed format, based on their documentation needs.
Split by Problem
You can enable this option to group History of Present Illness notes by specific symptoms or diagnosis, creating a clear and organized structure for complex Encounters. Each problem appears as a separate subsection, enhancing clarity and readability.
This helps the Providers read and understand the different issues discussed during the Encounter.
iv. Generating Chart Note
Follow the steps below to customize and generate the Chart Note.
- Choose the relevant Care Type:
Providers can customize the Chart Notes based on the specific medical specialty relevant to the Patient's condition. This ensures that the generated Chart Note is more relevant and structured according to the Provider’s area of care.
- While generating the Chart Note, select a Care Type that aligns with the Patient’s medical condition.
- Once a Care Type is selected, Charm AI Scribe tailors the generated Chart Note to align with the chosen specialty, resulting in a more precise and contextually relevant Chart Note.
- For example, by selecting the Care Type as 'Mental Health and Behavioral Care', Providers can generate notes that align with the needs of mental health professionals, making charting more relevant and efficient.

Note: The selected Care Type is saved as the default for future Encounters.
- Enter the Patient Context to include in the Chart Note:
You can include key patient details such as Age, Gender, Pronouns, Allergies, and Visit-specific information in the Chart Note that are not explicitly mentioned during the conversation.
The Patient Context field will be pre-filled with available Patient data from the CharmHealth EHR, allowing Providers to review, edit, or add additional details before generating the Chart Notes.

- Once the Patient conversation is completed, click the 'Generate Chart Notes' button to generate a concise summary of the Encounter.


- There may be a temporary delay in generating transcribed notes due to network instability while generating the Chart Note. You can either wait for the full transcription to complete, or generate Encounter Notes based on the partial transcription available. Once the network is restored, Charm AI Scribe automatically syncs the stored data and completes the transcription process.

- Charm AI Scribe categorizes the transcription into multiple sections of the Chart Note, such as the Chief Complaint, History of Present Illness, Past Medical History, Family History, Physical Exam, etc.
Also, the Charm AI Scribe suggests the related Dx Codes based on your conversation with the Patient.

For non-English speaking Patients, the Instructions to Patients in the generated Chart Note will be displayed in the selected language while transcribing. The rest of the sections in the Chart Note will continue to be in English for consistency in medical documentation.

v. Reviewing and Editing Chart Note
Review the generated Chart Note for accuracy and edit the content if needed.
All the sections of the generated Chart Note are selected by default. If required, Providers can uncheck the sections that are not required to be included in the Chart Note.
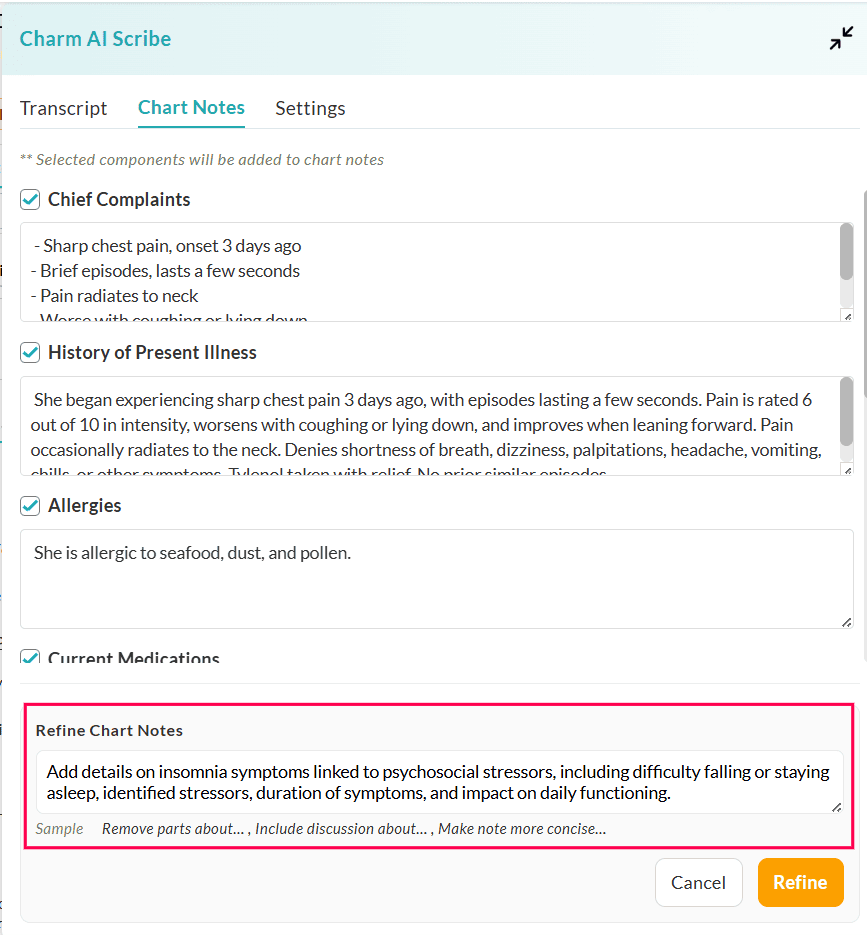
The Section-wise customization options mentioned above allow you to generate the Chart Note based on your preferences. If you need to make any further changes to the generated notes on specific Encounters, you can use the 'Refine Chart Notes' option.
Upon generating the Chart Notes, click on the 'Refine Chart Notes' button. Enter the instructions to modify the generated Chart Notes.
For Example, 'Rephrase the assessment to be more clinical' or 'Add that the patient declined a follow-up'.


Adding Charm AI Scribe Notes to your SOAP Template
Charm AI Scribe allows Providers to add the generated notes directly to required sections of your SOAP templates.
To include the Charm AI Scribe notes in SOAP templates, follow the steps below.
- Go to the 'Settings > Templates' section.
- Edit the required template and navigate to the required SOAP sections (History of Present Illness, etc.).
- Select the 'Notes' component where you want to include the AI Scribe Notes, then enable the 'Add Charm AI Scribe Notes' option.
- Repeat this process for all the SOAP sections in your template and turn on the 'Add Charm AI Scribe Notes' option for the required Notes component.
- Click on the 'Save' button to apply the changes.

Note: If a SOAP section (HPI, ROS, etc.,) contains multiple Notes components, you can add the Charm AI Scribe notes to only one.
Once you have updated your templates, follow the steps below to populate the Charm AI Scribe notes into your SOAP templates.
- Start a SOAP Encounter.
- Load the required templates with Charm AI Notes enabled.
- Use the Charm AI Scribe by clicking on the 'Mic' icon.
- Once the transcription is completed, generate the notes and add them to the encounter.
- This action auto-populates the chosen notes field within the loaded template.
- If multiple templates are loaded for the encounter, then the Charm AI Scribe Notes get added to the notes field in the first template.

Using Headsets for Video and Phone Consultations
Charm AI Scribe supports real-time transcriptions for Video and Phone Call consultations when headsets are used during the session.
Note: This functionality is supported only when Video or Phone consultations are initiated in the Google Chrome browser.
Transcribing Video Consultations
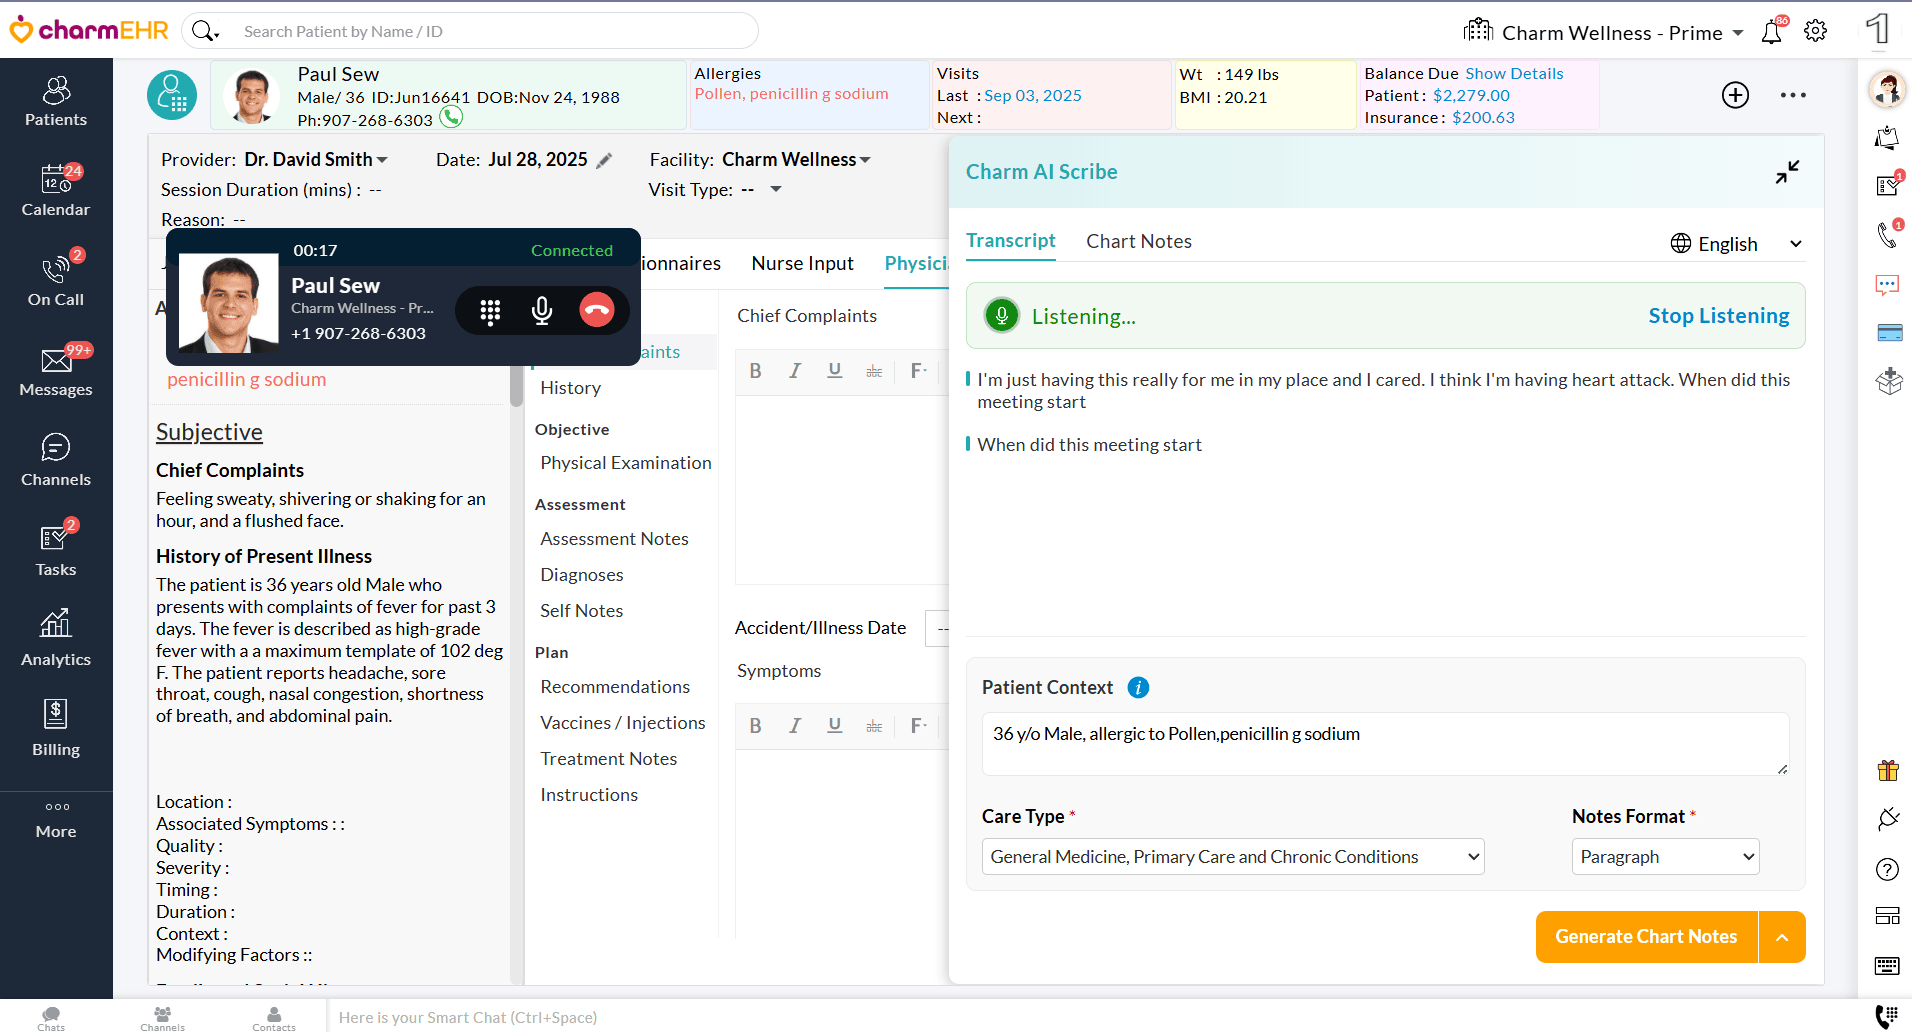
Charm AI Scribe transcribes the conversation of video sessions initiated via Charm Integrated Video Platform or Zoom.
1. Video Consult via Charm Integrated Video Platform
- Start the Video Consultation by clicking the 'Camera' icon. The video session opens within the Encounter in CharmHealth EHR.
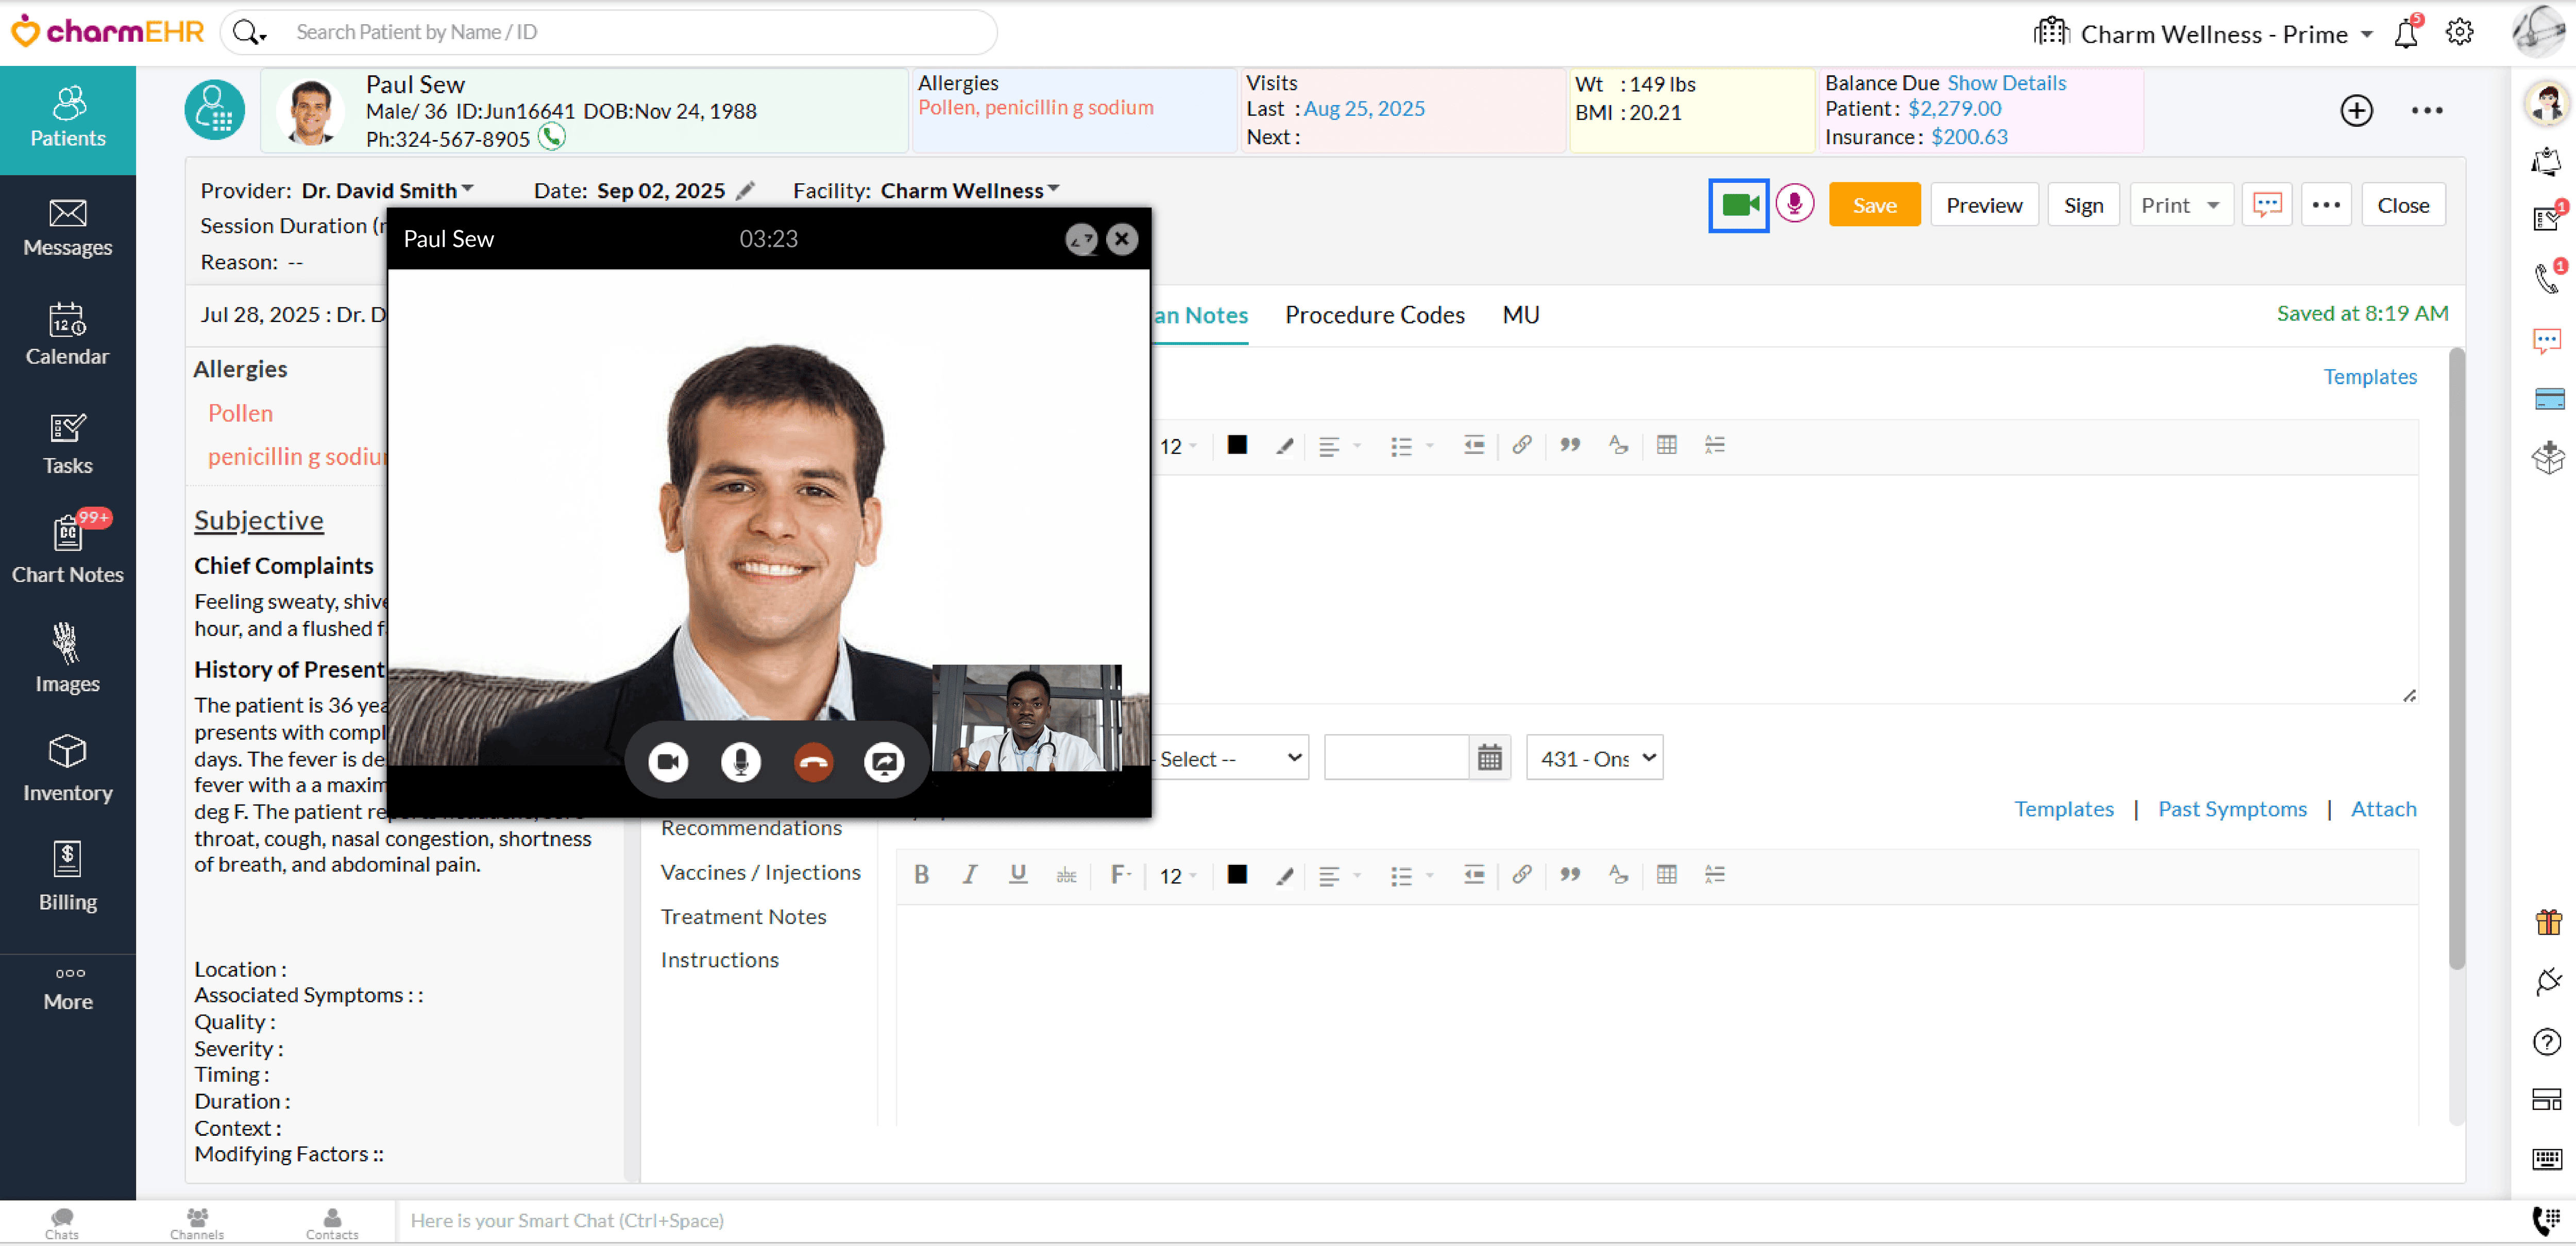
- Once the Patient joins, click on the 'Charm AI Scribe' icon.
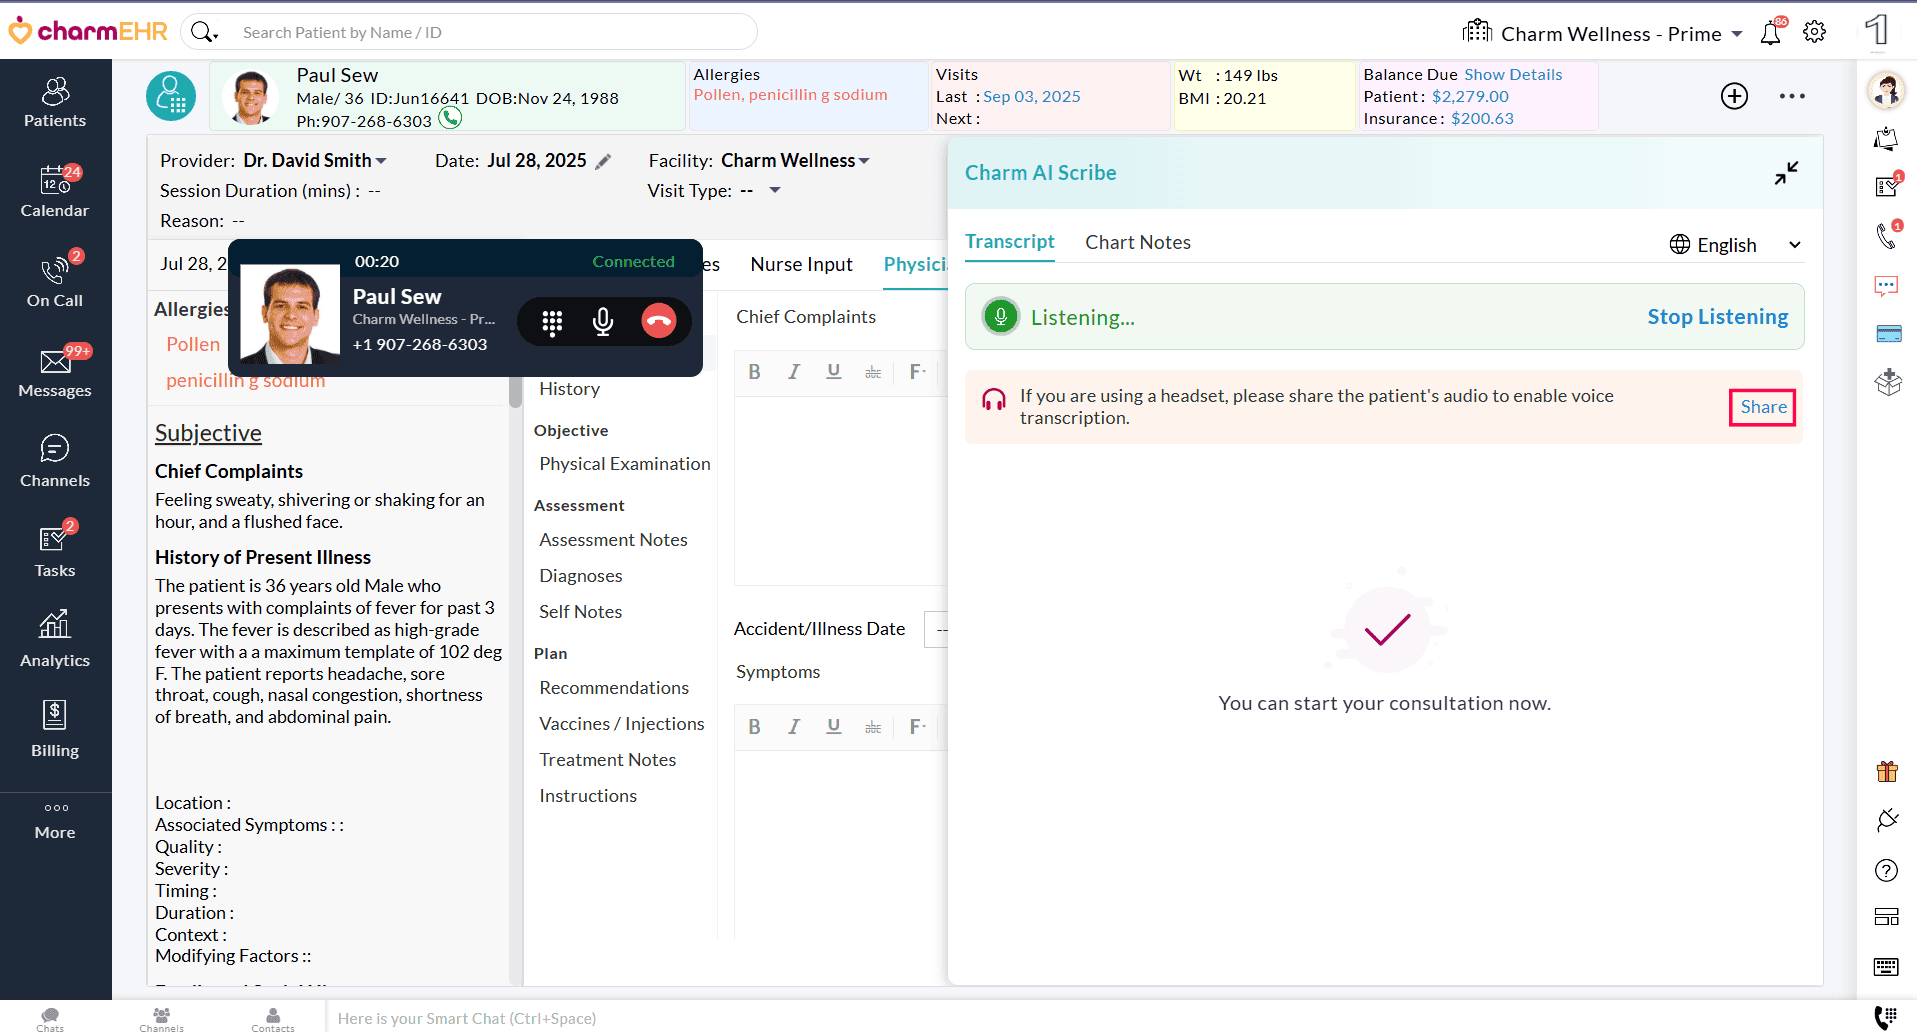
- If you are using a headset, click on the 'Share' option in the Charm AI Scribe window to share the Patient's audio.
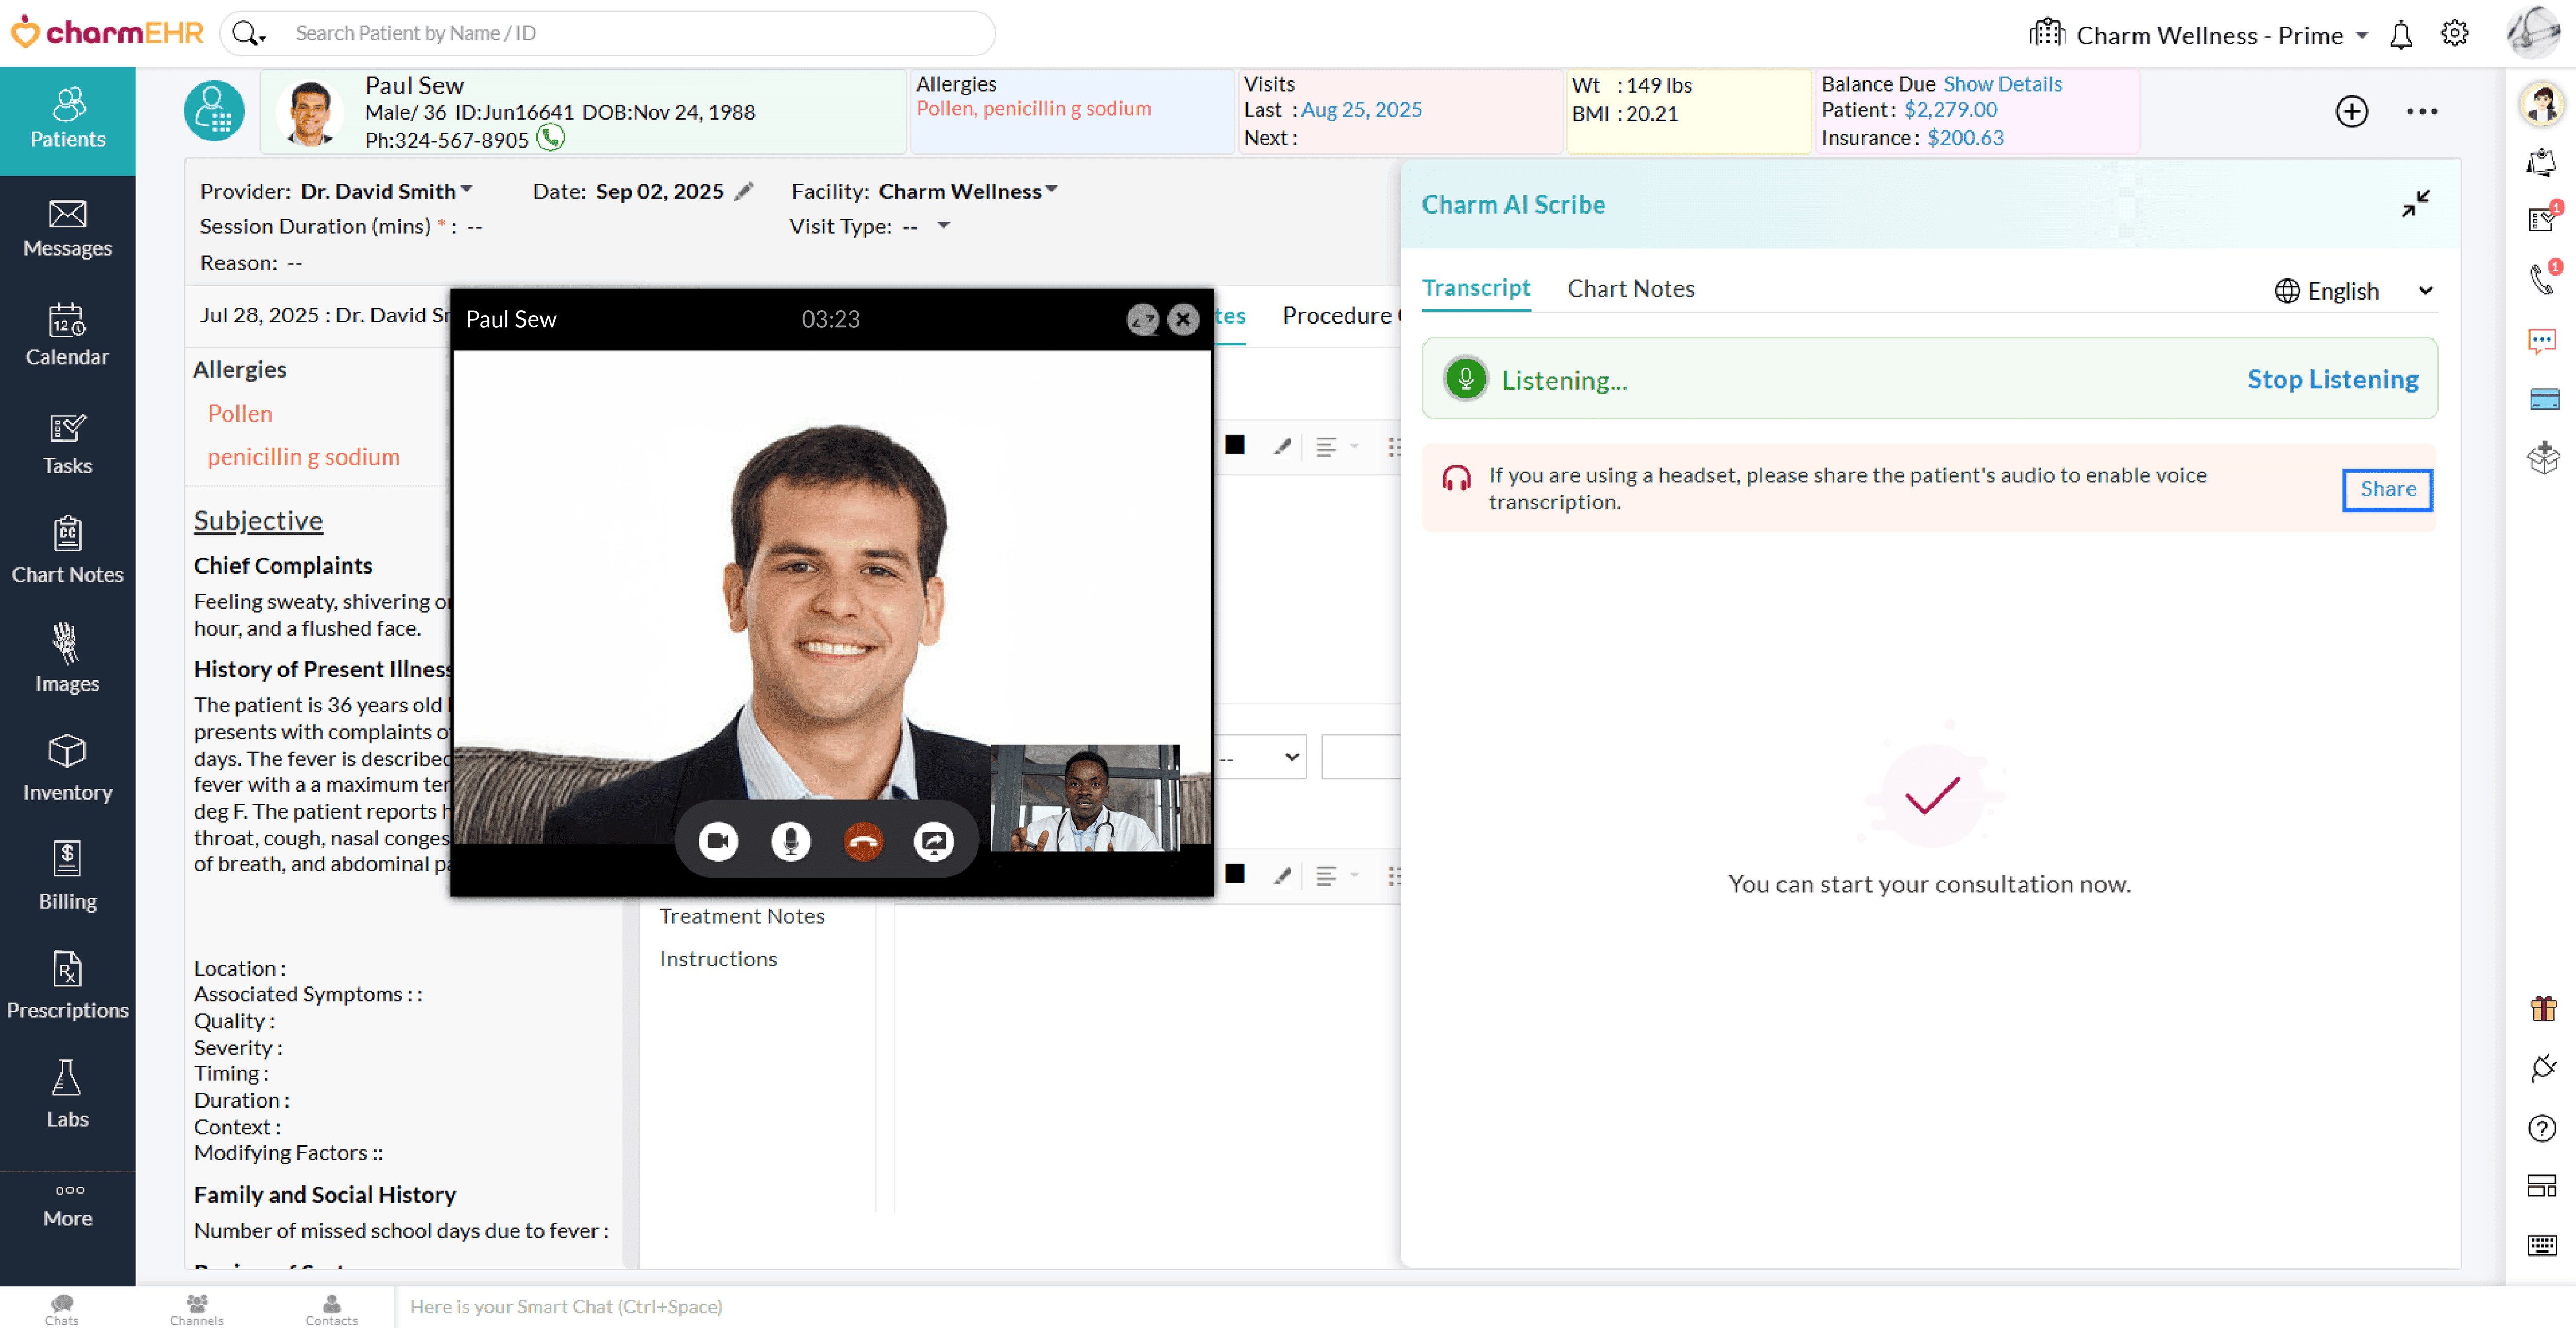
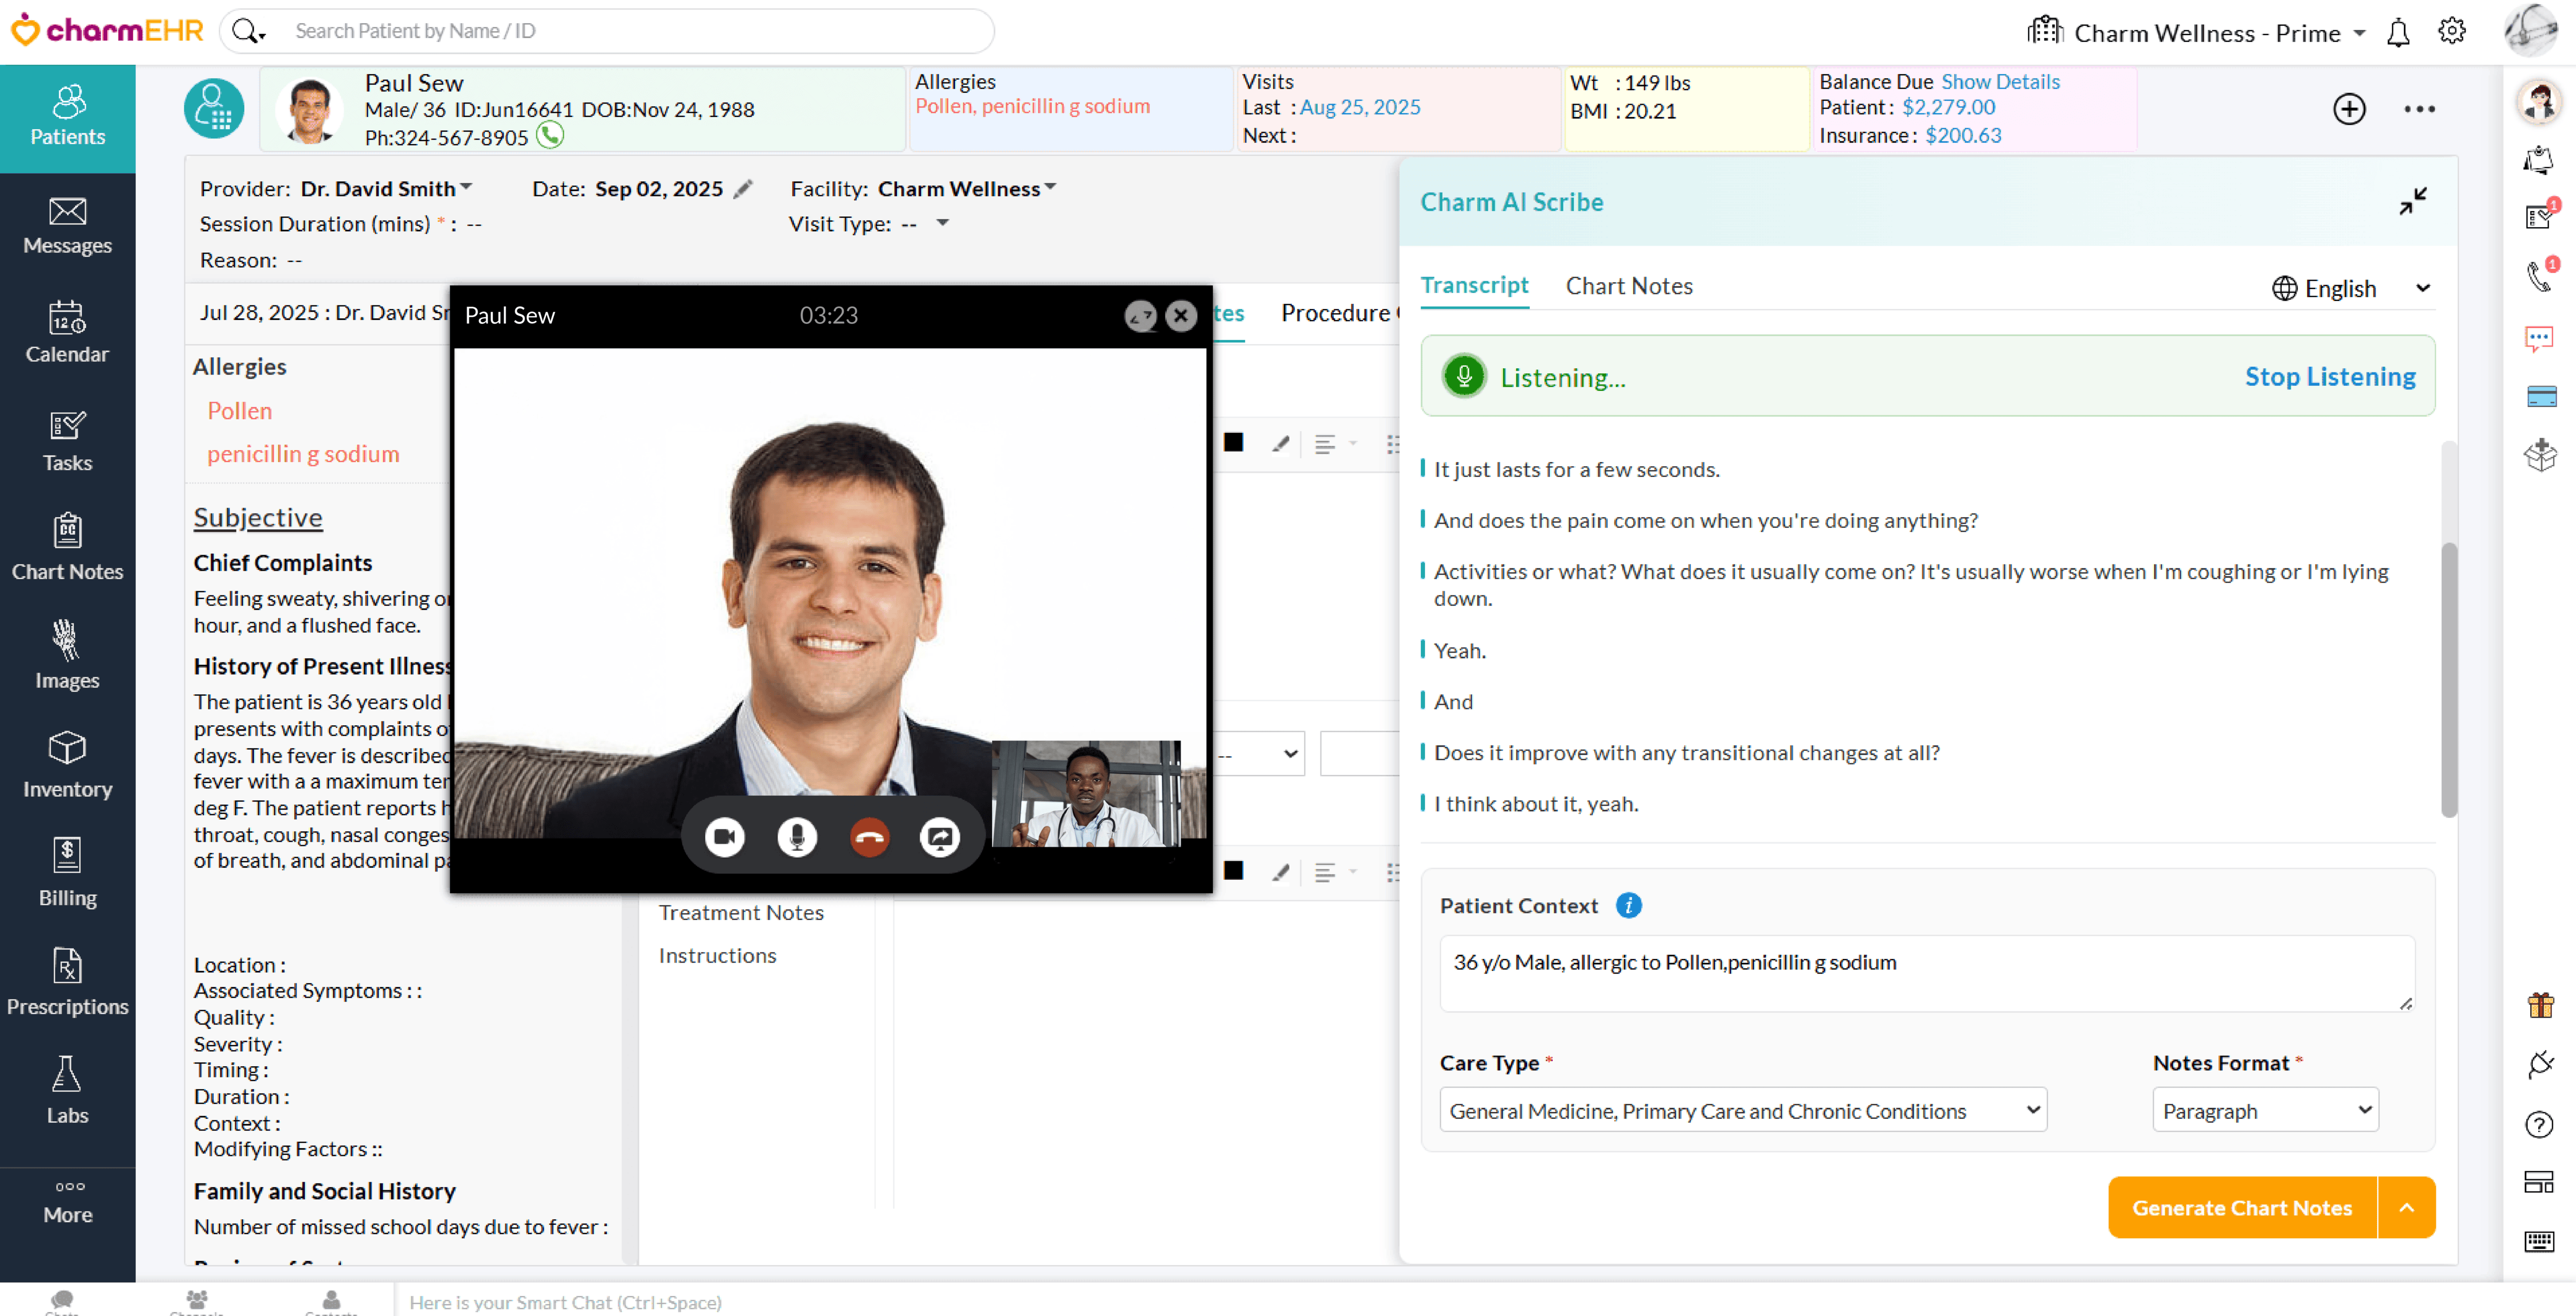
- Once shared, Charm AI Scribe begins the transcription in real time.
2. Video Consult via Zoom
- Open the Zoom meeting on a new tab in the same Chrome browser as CharmHealth EHR.
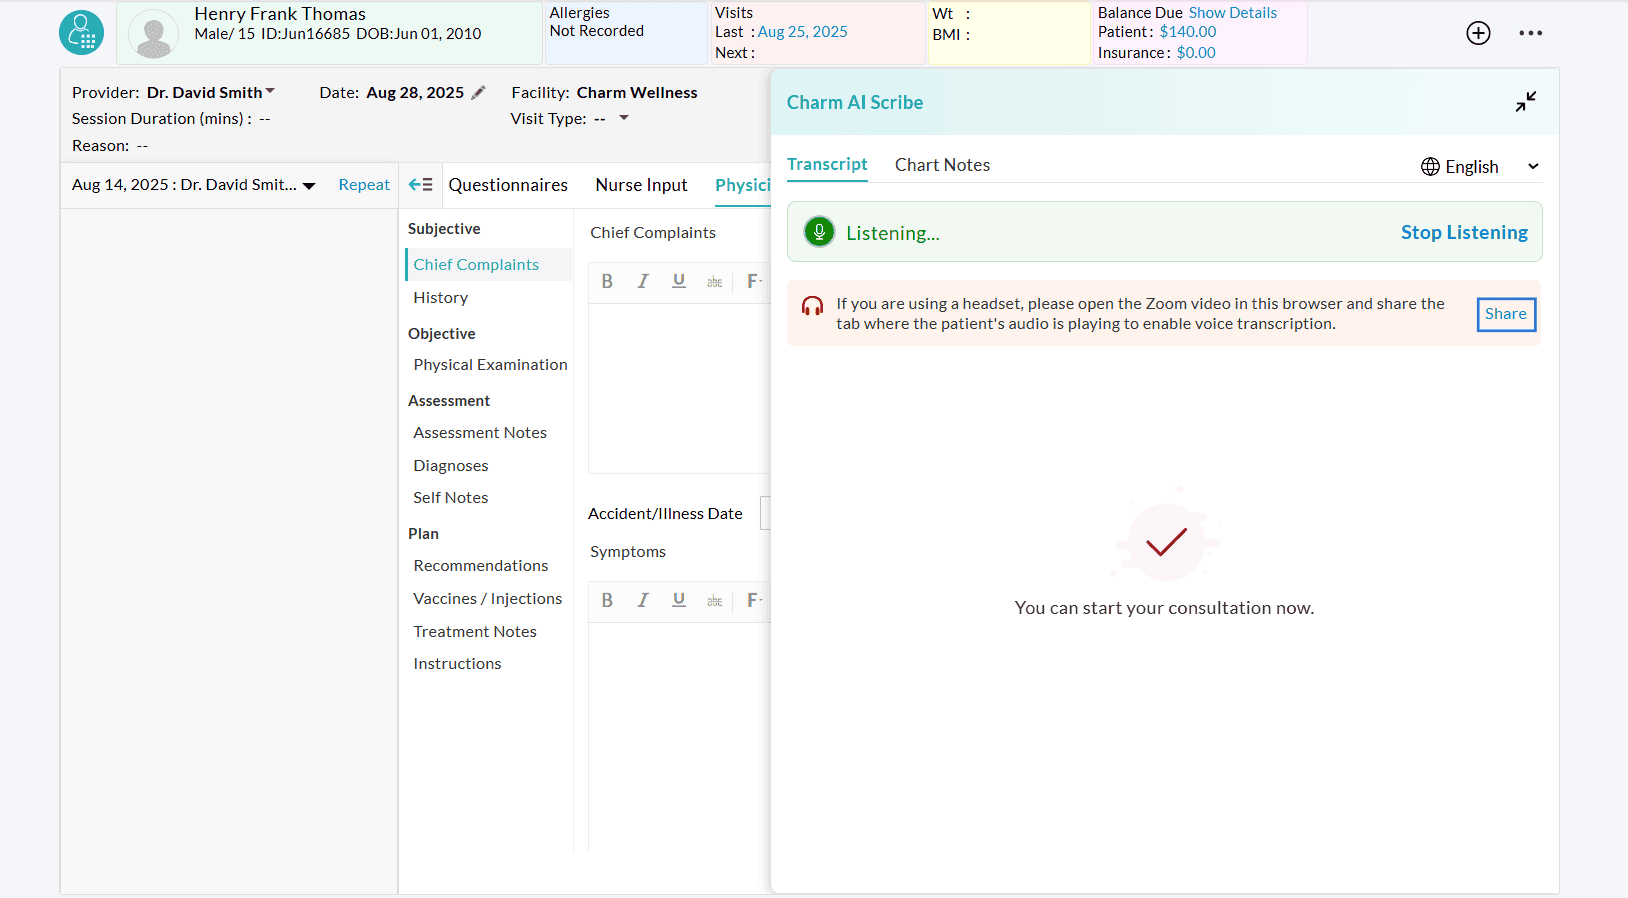
- While using a headset, click on the 'Share' option in the Charm AI Scribe window and share the Zoom tab with CharmHealth EHR.
- Choose the Google Chrome tab where the Zoom meeting gets initiated and share it with CharmHealth EHR.
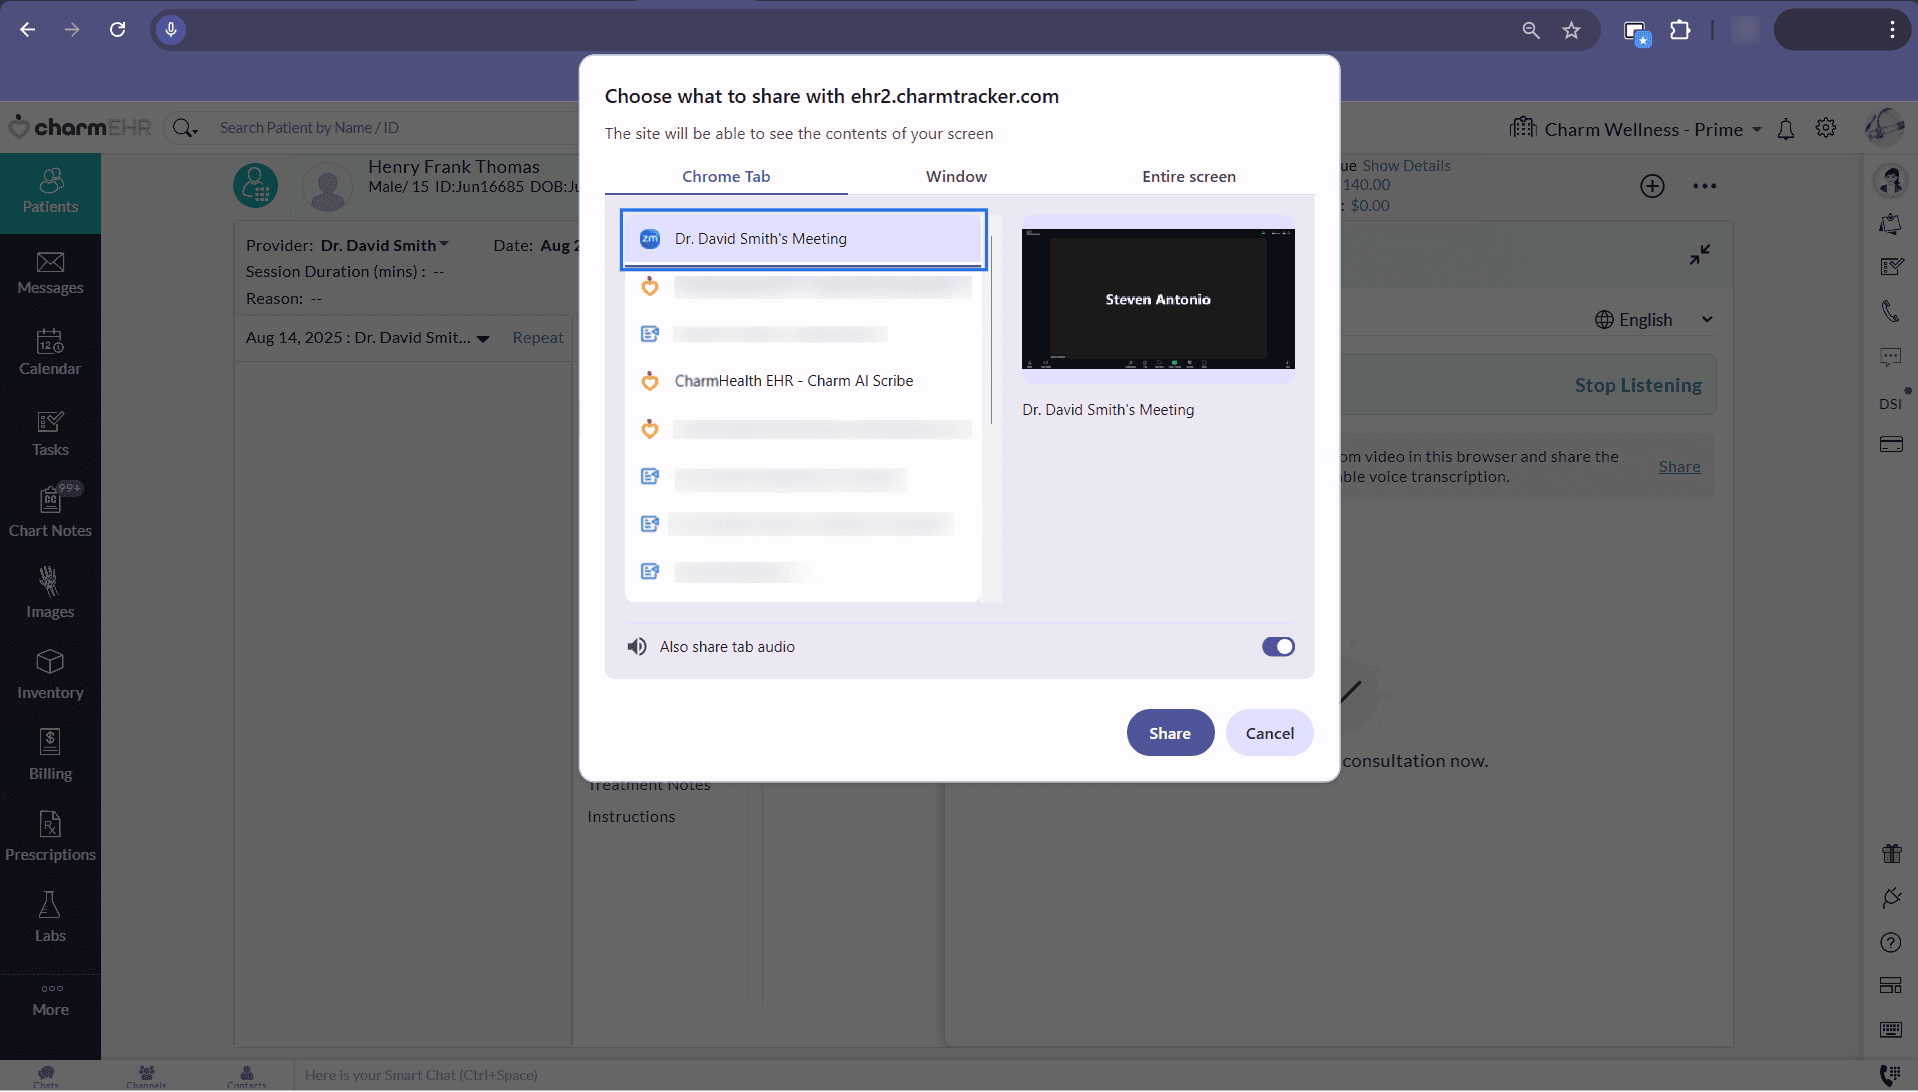
- Once shared, Charm AI Scribe automatically captures the conversation from the shared tab and transcribes it.
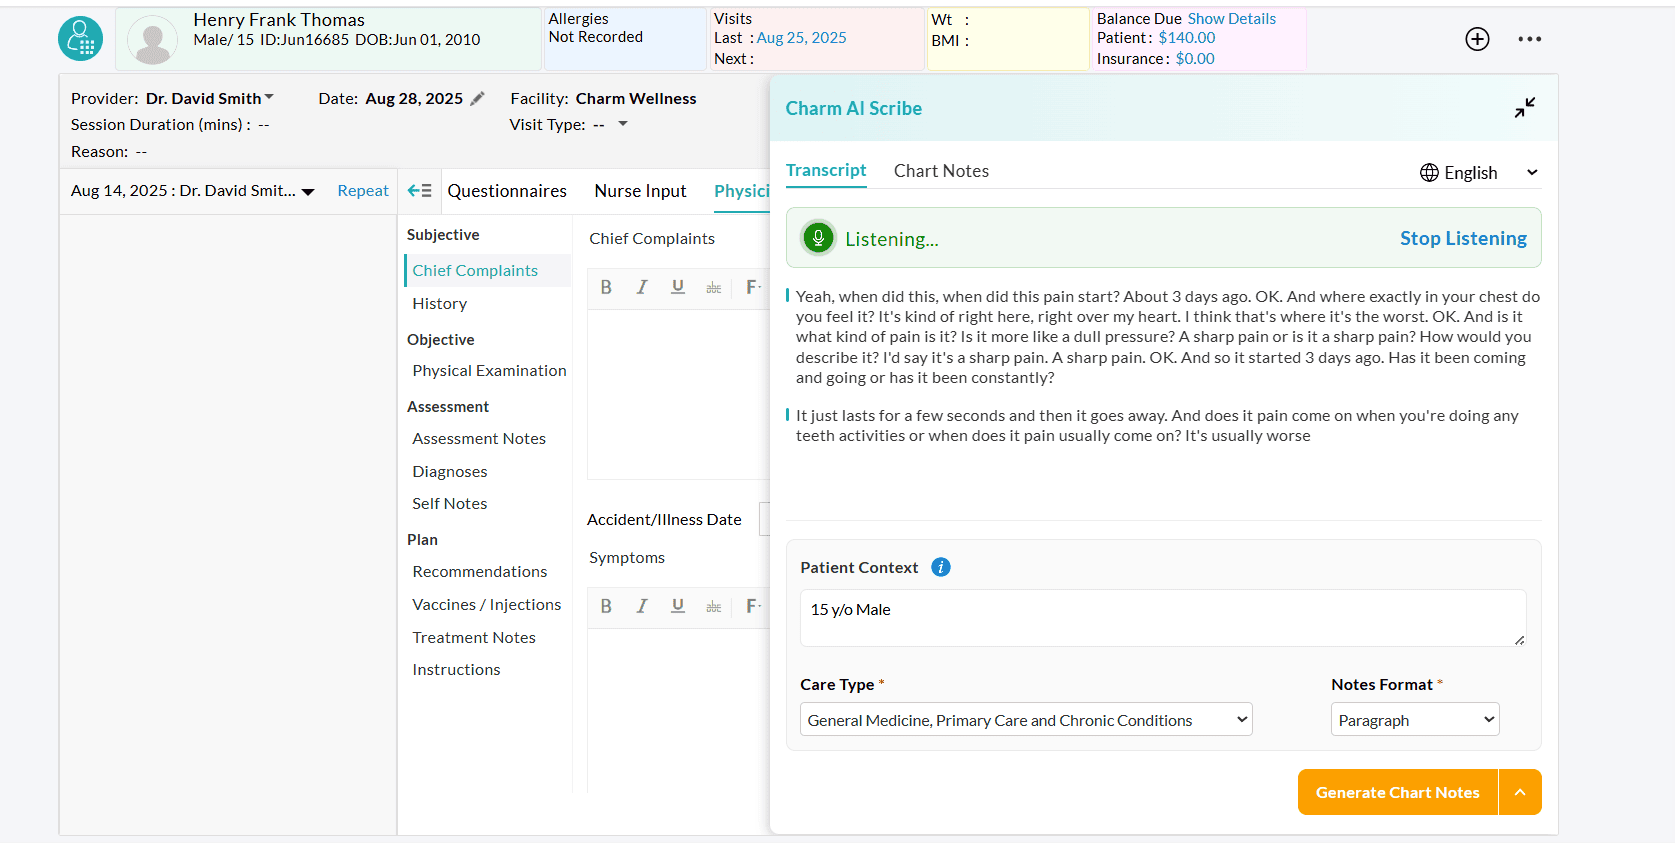
Note: The Zoom Desktop App does not support transcribing conversations when connected to a headset.
Transcribing Phone Consultations
- Start a Phone Call Encounter with the Patient in Google Chrome browser.
- Use the Phone Call feature in CharmHealth to make a call to the Patient.
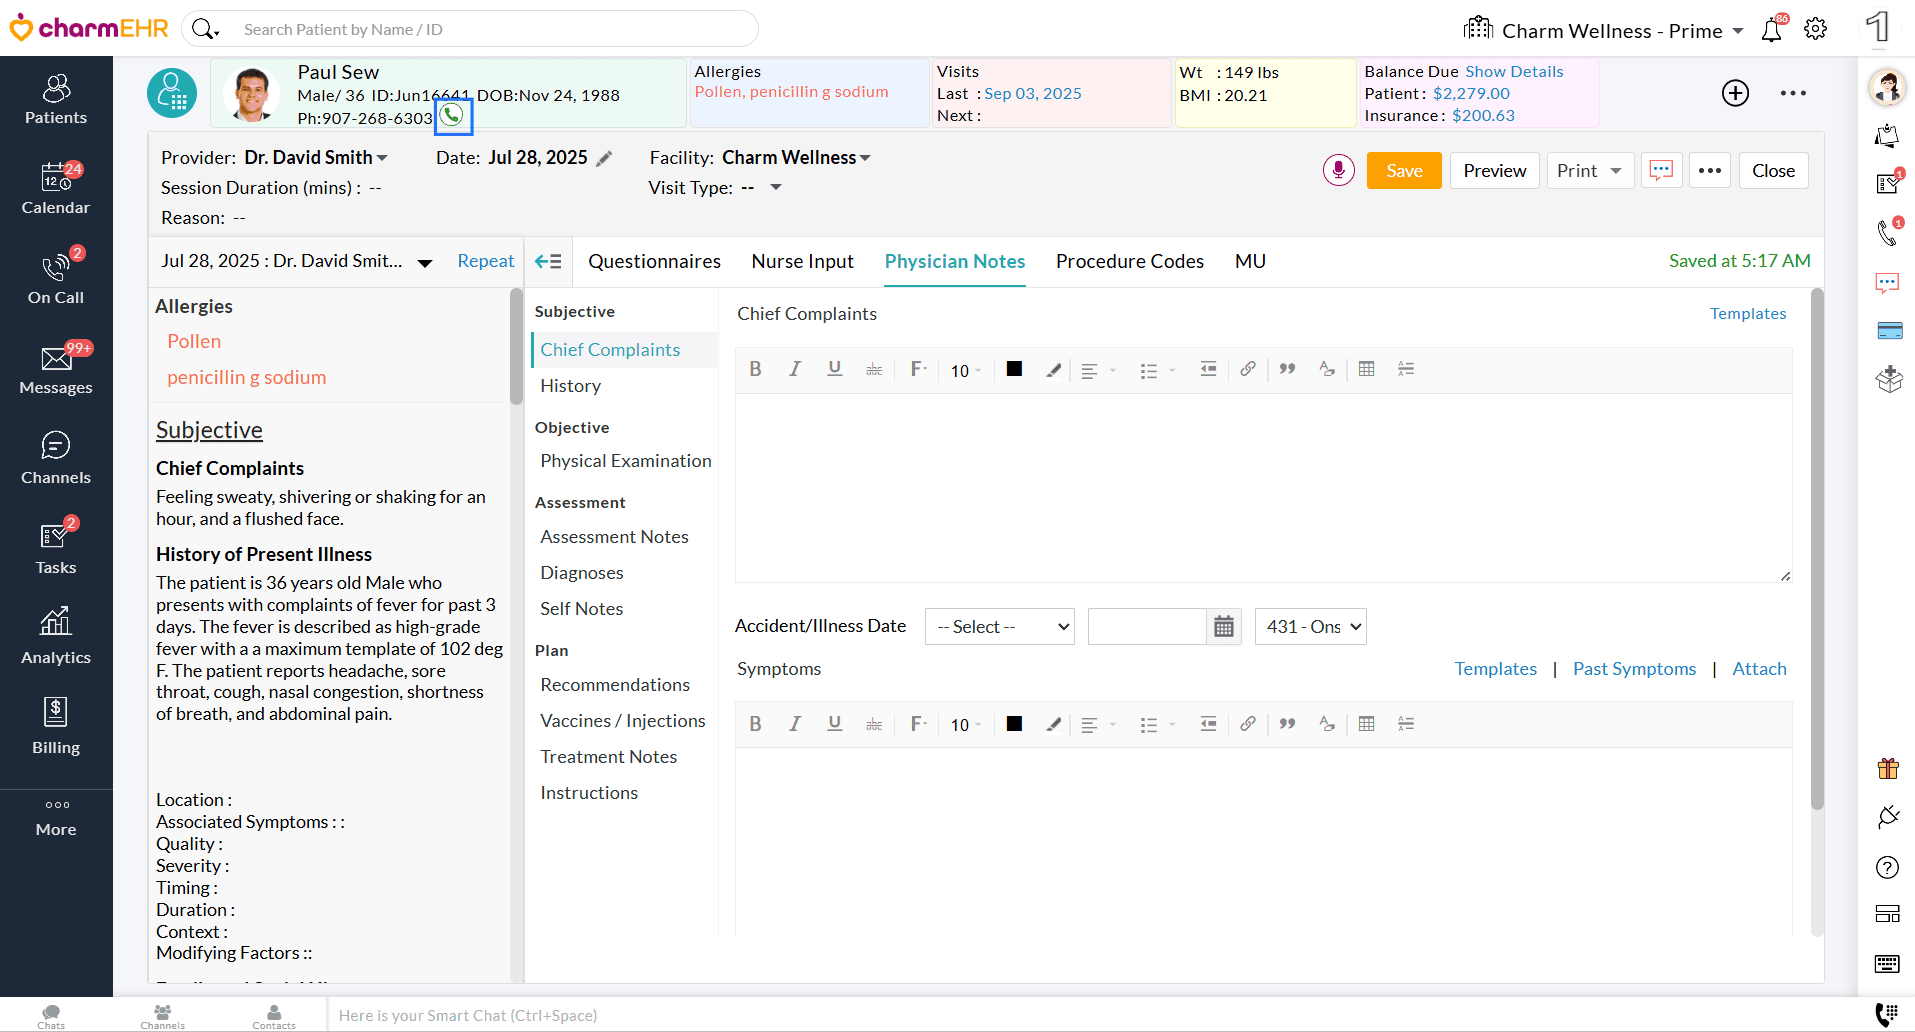
- If you are using a headset and initiated the Phone call in the same tab, share the Patient’s audio to enable the transcription.
- If the Phone call gets initiated in an adjacent tab, share the tab with CharmHealth EHR.
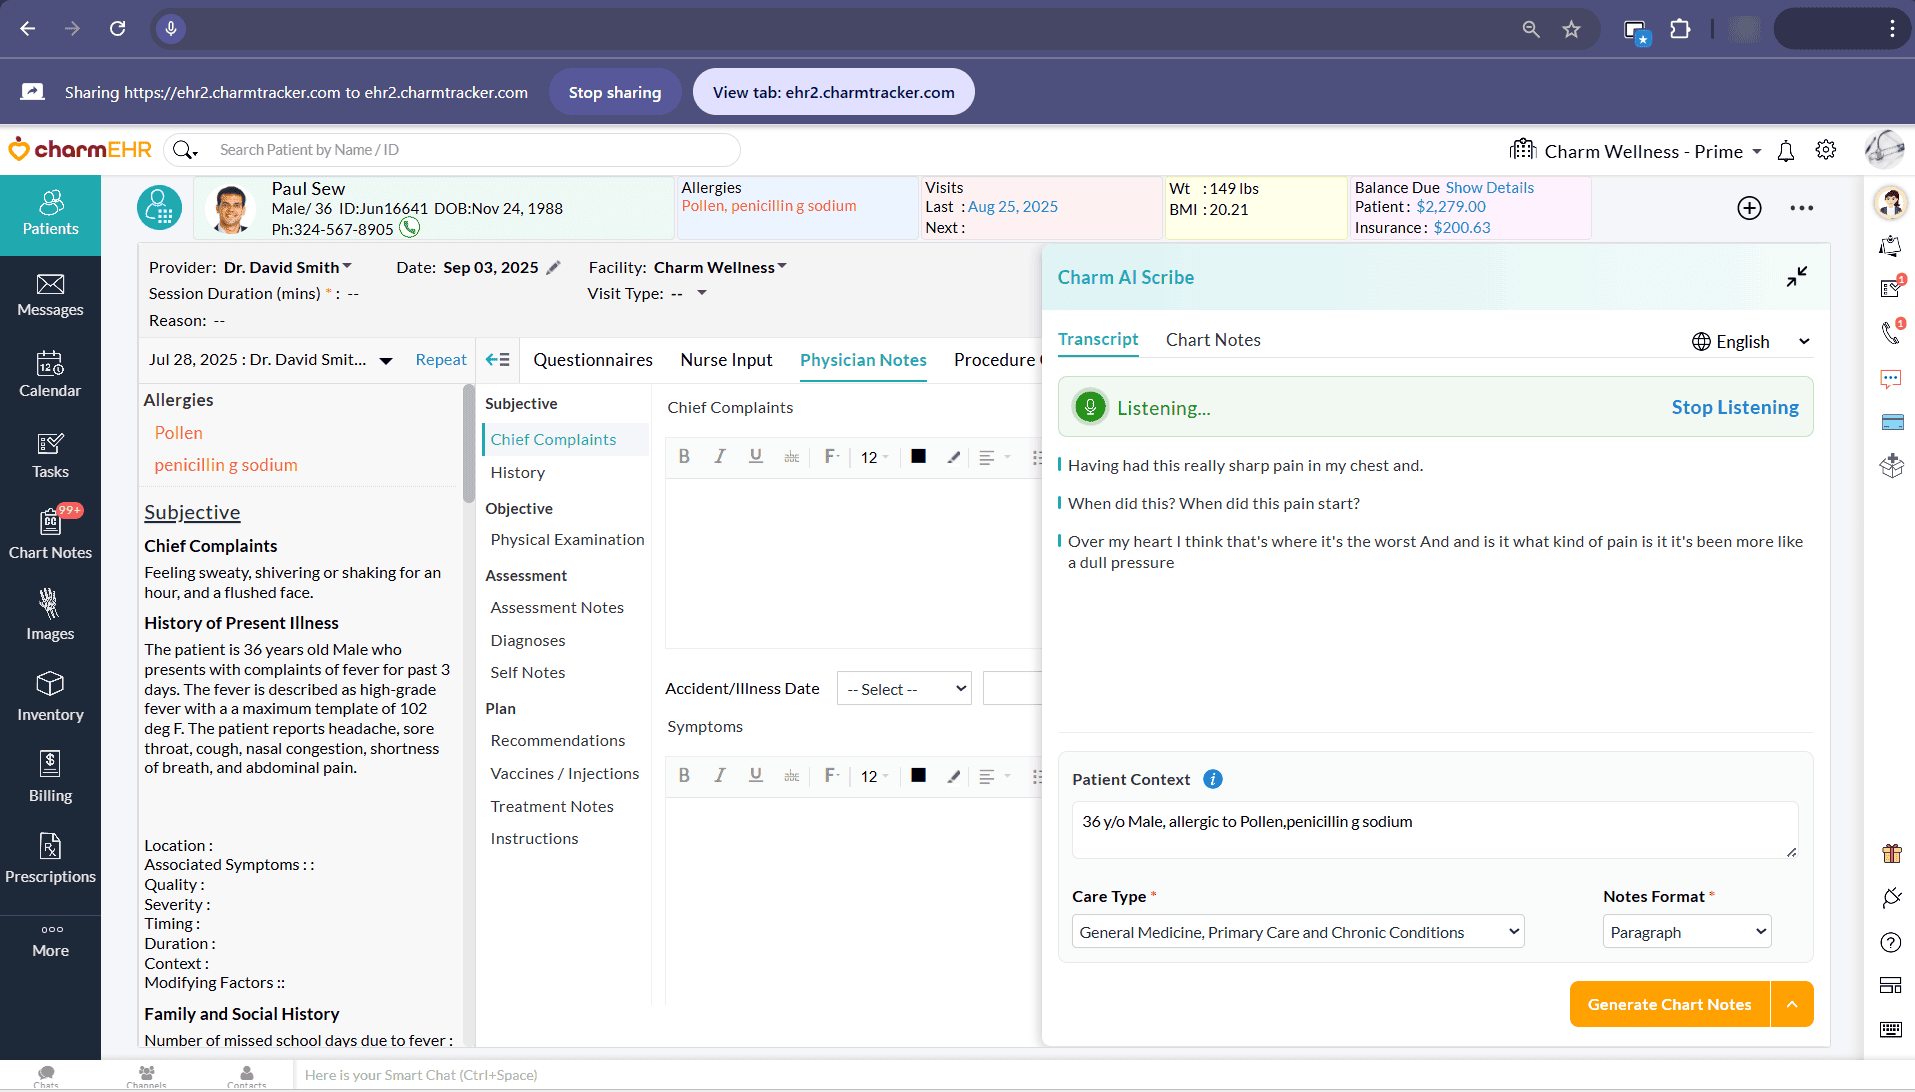
- Charm AI Scribe begins the transcription immediately once the audio is shared.
Viewing and Deleting Transcripts of Past Encounters
Practice members can view the Charm AI Scribe transcripts of the past signed Encounters based on the role privileges assigned to them.
To view the transcripts of past encounters, follow the steps below.
- Navigate to the 'Chart Notes' section and select the desired signed Encounter. Alternatively, go to the 'Patient Dashboard > Encounters' section.
- Click on the 'Charm AI Scribe' (Mic) icon and view the transcript.

Additionally, members with the required role privileges can delete the transcript by clicking the 'Delete Transcript' button.

If you do not want to store the transcripts for all the Patients in your Practice, you can use the setting below, accessible to the Practice Admin and Office Managers.
- Navigate to the 'Settings > Charm AI Scribe > Preferences' section.

- Under the Preferences, choose 'Yes' for the 'Delete Transcripts once the Chart Note is signed' option to enable the automatic deletion of transcripts once an encounter is signed.

Note: The role privileges for the Practice members to view and delete the transcripts can be configured by the Practice Admin or Office Manager from the 'Settings > Facility > Roles' section. Edit the role settings to enable or disable the necessary privileges.

By following the above steps, the Practices can efficiently configure and use Charm AI Scribe, allowing for more accurate documentation and enabling Providers to focus more on Patient care.