Prescriptions
Introduction
CharmHealth EHR's dynamic Rx workflow is certified by both Drummond Group and SureScripts for excellence. The intuitive single-view Rx window streamlines your prescribing process with,
- Up-to-date Drug Information - A comprehensive database by First Databank ensures you have access to the latest drug details when prescribing.
- Reliable Dispensing - Our trusted partner, SureScripts engages with PBMs to provide secure and detailed patient eligibility data for transmitting prescriptions, ensuring a smooth dispensing process.
- Secured e-Prescription - CharmHealth has partnered with Experian and Exostar to facilitate a secure Prescriber identity-proofing process to enable e-prescription services.
Note - The eRx and EPCS workflow is available only to the US region. Non-US Practices can utilize the rest of the workflow.
Prerequisites
Prescribers can fulfill the required prerequisites based on their prescription method:
- EPCS (Electronic Prescription of Controlled Substances) - This solution helps to e-prescribe Controlled substance drugs, as well as non-controlled drugs. Please visit our EPCS link to know more details. Providers with both NPI and DEA numbers can subscribe to this add-on.
- eRx - This solution is used to e-Prescribe only Non-Controlled Substance drugs. Our video tutorial explains the steps in enabling the eRx solution for prescribers. You can either opt for EPCS or eRX prescriptions. Practice Admin can enable eRx for the Prescribers from the 'Settings > Rx > eRx' section. NPI number is mandatory to enable eRx for the Prescribers.
- e-Fax Rx - The respective state authorities regulate the prescription and transmission of drugs through e-Fax.
Role Privileges
The Practice Admin or Office Manager should enable the following role privileges for Prescribers:
- Go to the 'Settings > Facility > Roles' section.

- Create a role or edit an existing role.
- Enable the 'Enter SOAP notes, Prescribe Medications, and Order Labs/Images' checkbox under 'Encounter' and the 'Add, Edit, and Delete' checkbox under 'Medications'.
- Click on the 'Save' or 'Update' button, respectively.
Add Prescriptions
Watch our video tutorial on how to e-prescribe controlled substances.
Watch our video tutorial on how to e-prescribe non-controlled substances.
Prescribers can follow the steps below to add prescriptions:
- Start an Encounter
- Navigate to the 'Recommendations' section, and click on the 'Add Rx' link.

Note: With the PDMP add-on enabled, Prescribers can access important information on the patient's controlled substance prescription history and NARX scores before prescribing medication. It helps in identifying high-risk patients who would benefit from early intervention.
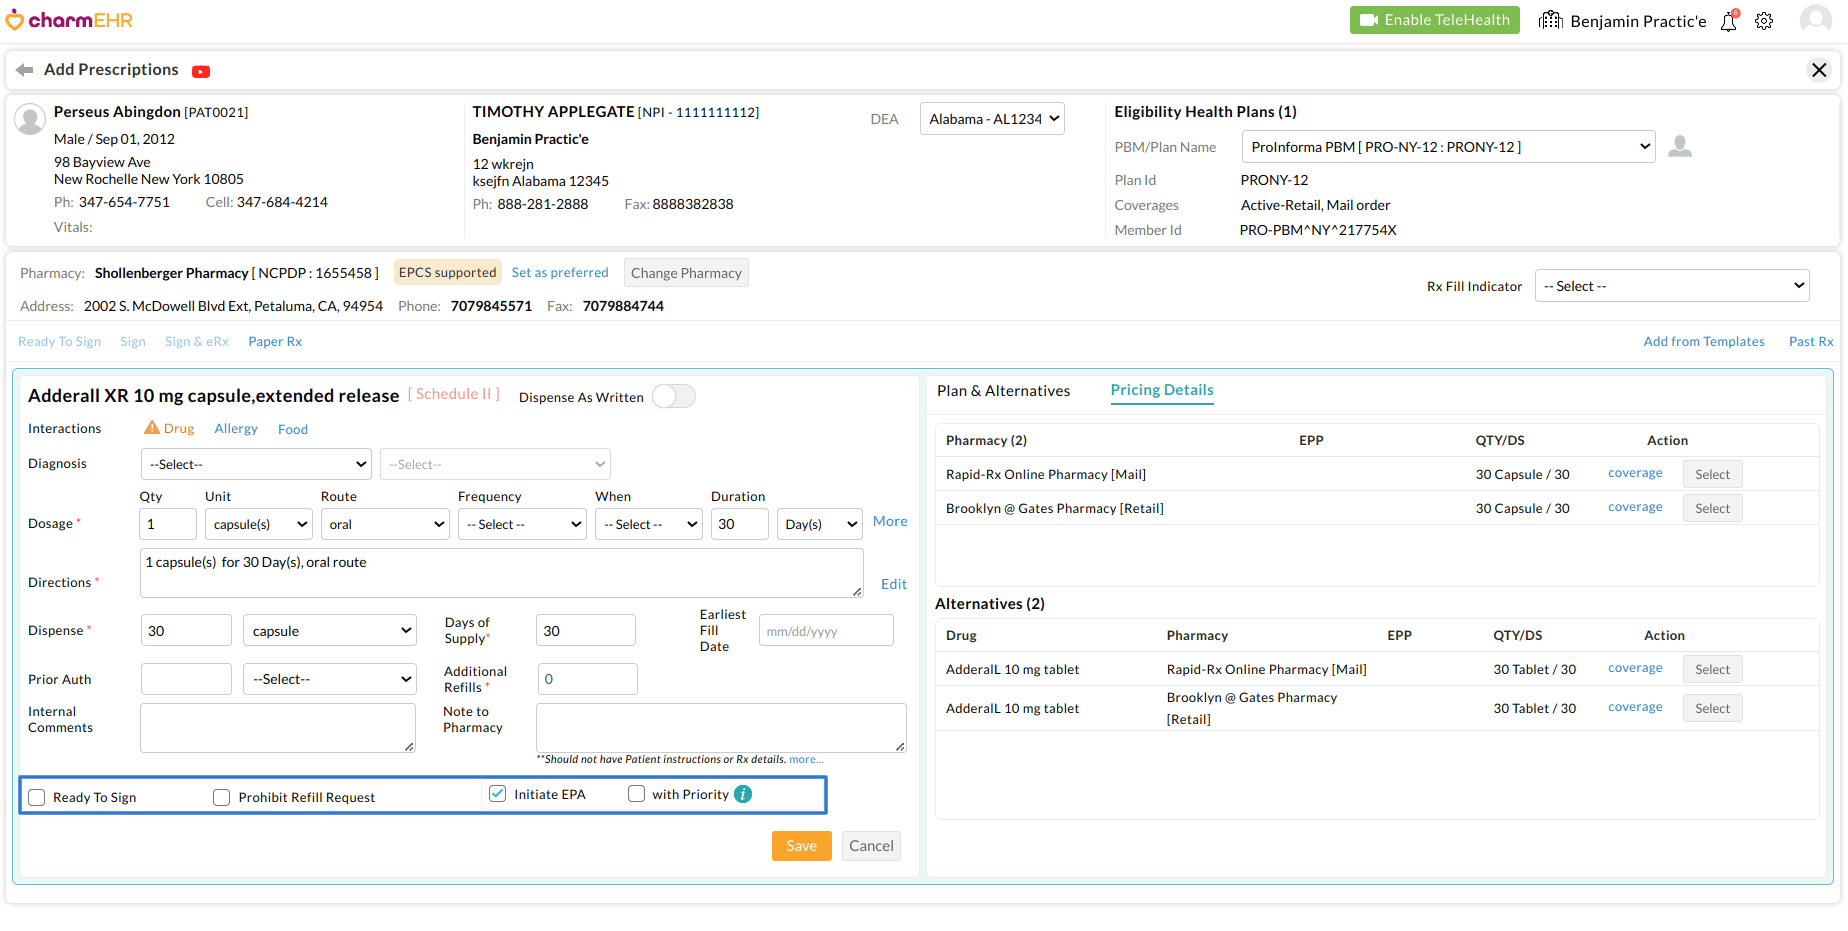
- The Add Prescriptions window displays information about the Patient, Prescriber, and Real-Time Eligibility, along with the options for Select Pharmacy and Search & Add Rx.

If the Prescriber has more than one DEA number, choose one accordingly. Then, select an eligibility plan if there are multiple plans available.
Note - If there is a discrepancy between the patient demographics in CharmHealth EHR and the Health Eligibility Plan, the plan name will display a red 'Man' icon. Clicking on the icon displays the Patient Benefit Plan details.
- Next, click on the 'Select Pharmacy' button.

If you will be prescribing controlled substances, choose 'Yes' for the 'Are you e-Prescribing Controlled Substances?' option.
Fill in the necessary filters like Name, City, Zip Code, Fax/Phone No, Address, and State to narrow down the search.
Click the 'Search' button to view the list of available pharmacies. In the dynamic view window, click on the desired pharmacy to select it.
Once selected, you can verify whether the pharmacy Supports EPCS, Set as Preferred, or Change Pharmacy.
Note - You can easily select a Preferred Pharmacy with just a click for any upcoming prescriptions once you have added it.
- If you want to receive a prescription-filled notification from the pharmacy, select 'Rx Fill Indicator' from the drop-down to receive a status update on the prescription.

- Now, enter at least four characters of the drug and click 'Enter' in the 'Search & Add Rx' field.

The system will fetch and display the drugs matching your search from the standard drug database, including information like route, brand or generic name, and strength. Refine your search using the Route, Dose Form, and Strength filters.
Note: If the required drug name is not available in the database, you can create custom drugs.
- Select the appropriate drug from the auto-suggested list.
- On adding the Legend drug, the right-hand side of the Add Prescriptions page displays the Real Time Eligibility Information, Plan & Alternatives, including Formulary, Copay, Coverage, and Pricing Details sections based on the Patient Plan Eligibility for the chosen drug.


The 'Alternatives' tab displays Therapeutic and Payer alternatives with higher preference levels for the added drug.
The suggested drugs can either be Therapeutic or Payer alternatives with higher preference levels.
Compare the Plan & Alternatives and choose the most appropriate drug for your Patient, if needed.
- The 'Interaction' field provides information on adverse effects that may occur when combining the prescription drug with the patient's active medications, allergies, and food.
- On selecting the drug, CharmHealth EHR will automatically display commonly used SIG for the given medication based on the Patient's age.
The Prescriber can choose a suggested SIG or manually build a SIG using the available fields (Dosage, Frequency, Route, etc.), or edit the Directions to enter customized instructions.
In the Intake form view, enable 'Dispense as Written' and fill in the necessary fields, including, Dispense, Days of Supply, Internal Comments, and Notes to Pharmacy, among others, as needed.


- If you have subscribed to the Real Time Prescription Benefit (RTPB) add-on, the Pricing Details tab displays the up-to-date pharmacy or plan benefit details, price information, and affordable alternatives based on the Pharmacy, dosage, and days of supply details.

- Then, proceed to enable the checkboxes:
- Ready to Sign - If you are prescribing CS drugs or would like to complete the prescription later, enable this checkbox.
- Prohibit Refill Request - Enable this option if you prefer that the Pharmacy not send refill requests after dispensing.
- Initiate EPA - If the Prior Auth Required flag is set on the real-time eligibility response, the EPA checkbox gets enabled by default. Adding the drug to the system initiates an EPA request to the PBM.
Note - Electronic Prior Authorization helps you streamline your workflow by making the most efficient medication-related prior authorization process by default. Click on this link to learn more about the EPA add-on
- With Priority - Enable this option if you want to initiate the PA process immediately.

- Click the 'Save' button to add the drug to the chart note. Proceed to search and add other drugs or sign and transmit the prescription.

Alternatively, you can add drugs from the Templates or Past Rx sections.
Sign and Transmit Prescriptions
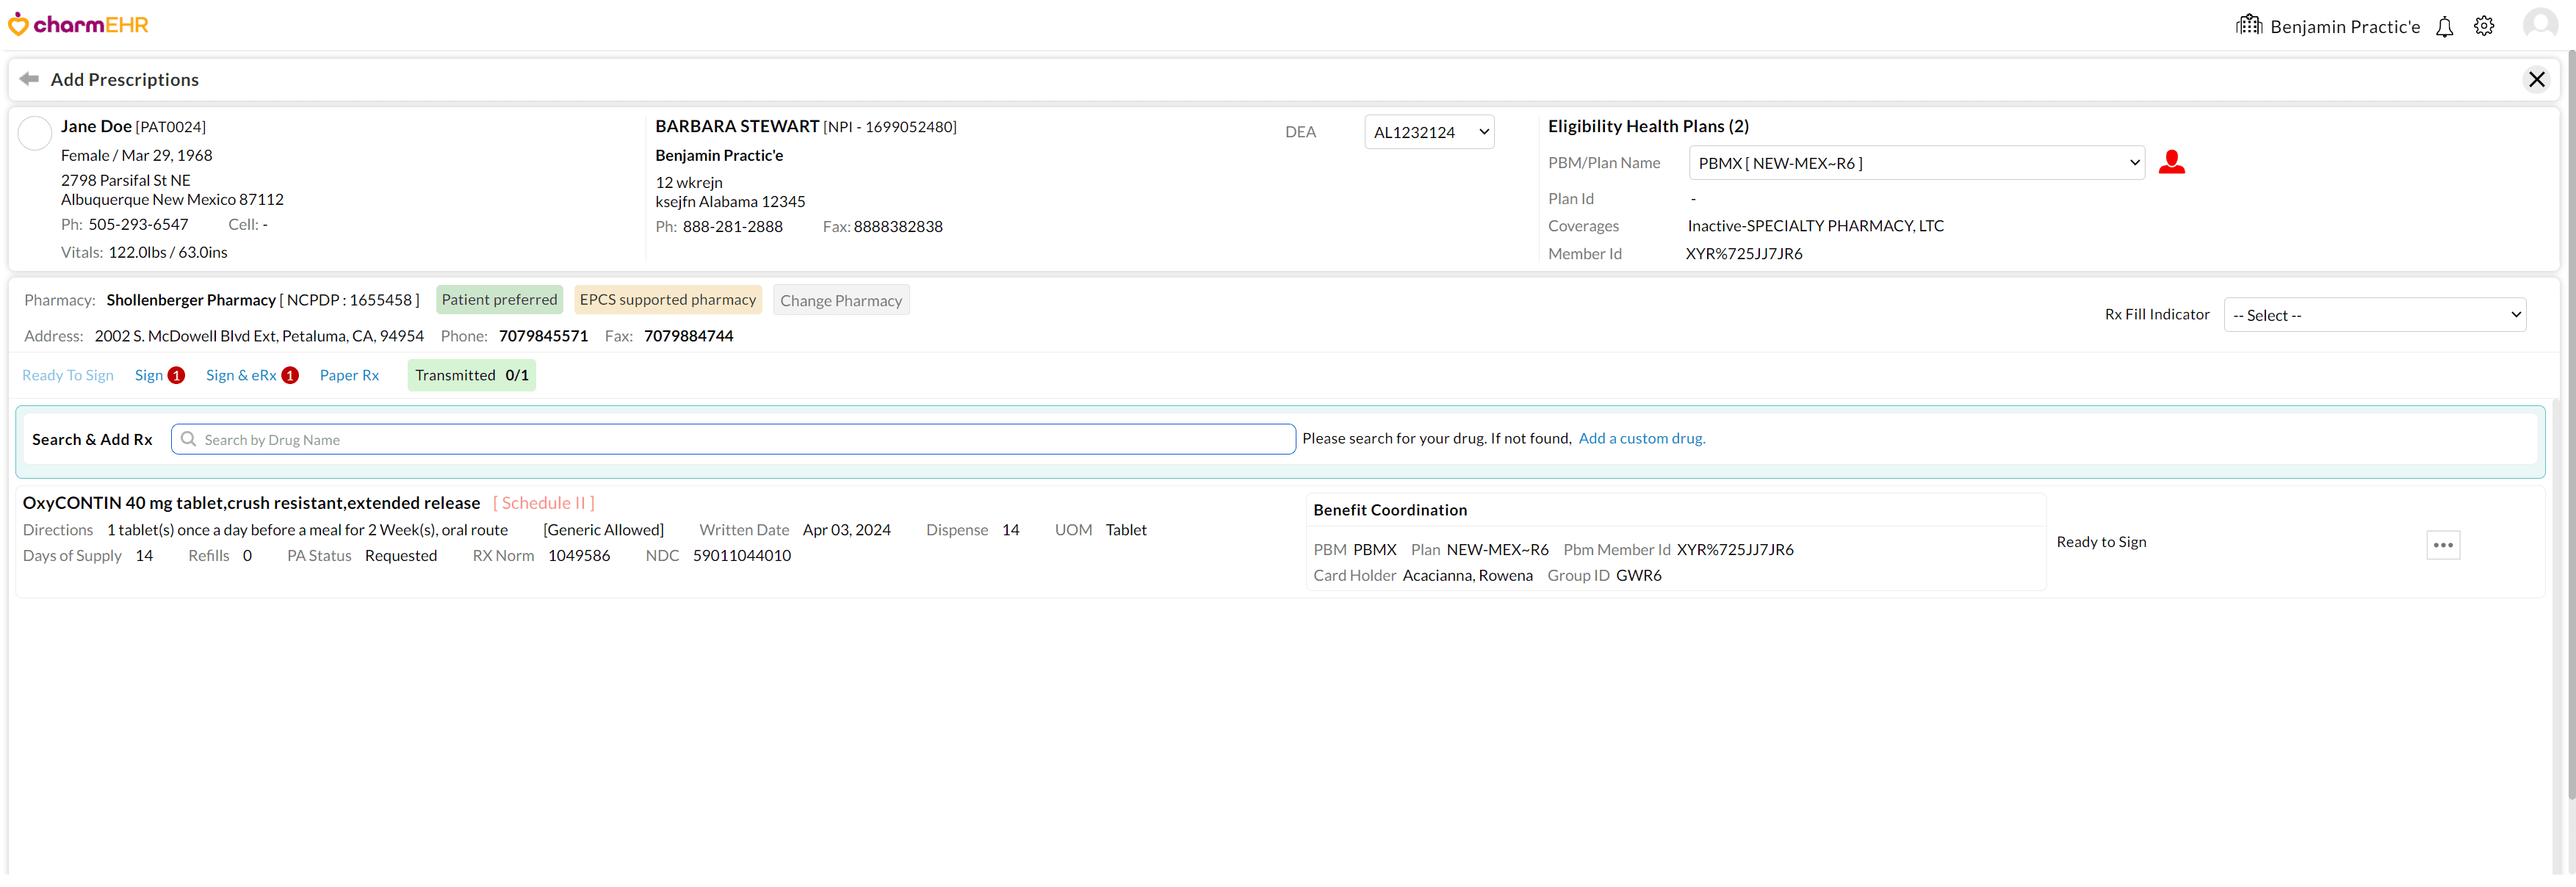
Prescribers with the required role privileges can Sign, Sign & eRx, or issue Paper Rx for the prescribed drugs.
Before signing and transmitting, mark drugs as Ready to Sign if you are e-prescribing controlled substances.
The Red Indicator icon against each of these actions displays the pending action count.
The "Transmitted" tag displays the number of prescribed drugs transmitted versus the amount transmitted.

Sign
The Prescribers can sign the prescription and allow their agents to transmit them on their behalf later using the following steps:
- Click on the 'Sign' link.
- Choose the drugs you want to Sign.

- Click on the 'Sign' button.
Sign & eRx
- Clicking on the 'Sign & eRx' link allows you to sign and electronically transmit the chosen drugs to the Pharmacy.
Note - You should have e-Rx enabled for transmitting non-controlled substances or EPCS enabled for transmitting controlled and non-controlled substances.
- Choose the drugs you want to sign and transmit.
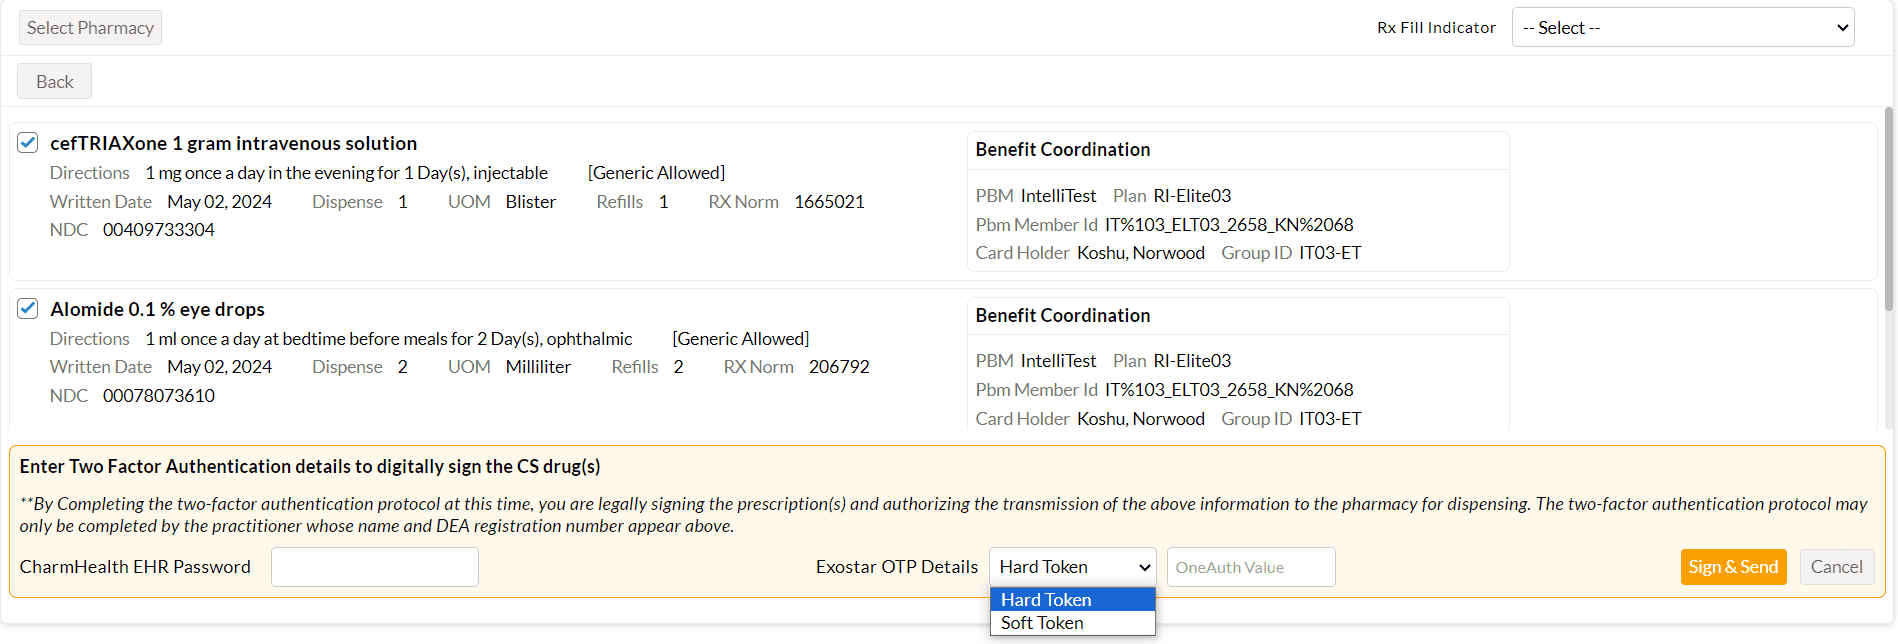
- Click the 'Sign & Send' button to directly transmit non-controlled substances. For transmitting controlled substances, complete the two-factor authentication steps below:
- Enter your CharmHealth EHR login password.
- Choose either the Exostar Hard Token or Soft Token (One Auth) from the drop-down list and enter the corresponding OTP.
- Then, click on the 'Sign & Send' button.

Once you have signed and transmitted a Prescription, the status will change to eRx sent. Revisiting the page will show the Prescription transmitted view.

Note - Once you transmit electronically, the prescriptions cannot be transmitted by any other mode.
Paper Rx
Click on the 'Paper Rx' link to view and print a Paper Rx. In the US, you can print Paper Rx in the format recommended by your state.


Note - Once you transmit through Paper Rx, the prescriptions cannot be transmitted by any other mode.
Fax Rx
You can fax the prescriptions from the 'Encounter > Rx > Fax Rx' section.

Select the prescription and preferred Pharmacy. Click on the 'Send' button to fax the Prescription.

Note - Once you transmit through Fax Rx, the prescriptions cannot be transmitted by any other mode. Visit our resource center to learn more about our Fax add-on.
Add Custom Compounded Drugs
Watch our video tutorial on how to add custom drugs.
For writing a custom compounded drug, follow the steps below:
- Click on the 'Add a Custom Drug' to create a custom drug.
- Choose the 'Drug Type' as 'Compounded'.

Note - You can also add supplies and drugs you are unable to find in our standard drug DB search list.- Supplies - NDC value and DEA schedule are not required to e-prescribe.
- Drugs - Add free-text drugs only if you are not able to locate the ingredient in our standard Drug DB search.
- Typing the first five letters of the ingredient suggests the matching ingredients from our standard drug database. Selecting an ingredient from the list will fetch NDC and DEA scheduled levels from the Standard drug DB.
- Fill in the values for strengths, dose form, and quantity. Add the ingredients as needed.
Note - The most restrained drug's NDC and DEA value applies to the entire prescription.
- In the Intake view on the left side, enter dispense details, days-of-supply, refills, note-to-pharmacy, and other fields as needed.
- Click on the 'Save' button.
- Once done, you can sign and transmit based on the schedule level.
Previously added custom drugs will be available as a part of the drug search. You can filter Custom Drugs by checking the 'Is Custom' checkbox in the Search and Add Rx view.

Add Prescriptions from Templates
Watch our video tutorial on how to add Rx Templates.
To add drugs using Prescription Templates, follow these steps:
- Start an Encounter and navigate to the 'Recommendations' section.
- Click on the 'Templates' link.

- Click on the Practice or My Templates drop-down to view the list of templates.

- Choosing a Template lists all the drugs that are a part of it.
- Click on the '+' icon to add a drug.

- You can view real-time Formulary, Copay, Coverage details, and alternatives for each drug. It helps Prescribers choose the most relevant drug quickly for enhanced patient care.
- Review and modify the intake details if needed.
- Proceed to Add more drugs or Save.
Add Prescriptions from Past Rx
Watch our video tutorial on how to add Past Rx.
Follow the steps below for repeating prescriptions from previous encounters with the Patient:
- Start an Encounter and navigate to the 'Recommendations' section.
- Click on the 'Past Rx' link.

- Choose 'From Patient Dashboard' or 'Encounter' from the drop-down to view the list of associated active drugs.

- Click on the '+' icon.
- Choose the 'Repeat' option to repeat the previous Rx as it is.
- Choose the 'Modify' option to modify the strength of the drug.

- You can view the real-time Formulary, Copay, Coverage details, and alternatives. It helps Prescribers choose the most relevant drug for enhanced patient care.

- Review and modify the intake details if needed.
- Proceed to Add more drugs or Save.
Cancel Rx
You can initiate a Cancel Rx for transmitted prescriptions from the following sections:
- Encounter - Go to the 'Encounter > Recommendations > Prescriptions' section and click the 'Cancel Rx' button.

- Erx - Go to the 'Prescriptions > e-Rx Sent' section. Click on the 'More Options' icon (3 dots) available against each drug and choose the 'Cancel Rx' option.

- Patient Dashboard - Go to the 'Patient Dashboard > Medications' section. Click on the 'More Options' icon (3 dots) against each drug name. Choose the 'Cancel Rx' option.

Then, a pop-up box with the Rx details will appear; review and click the 'Cancel Rx' button.

Once canceled, the prescription status will change to eRx - Cancelled.

Clicking on each canceled Rx displays a pop-up box containing the cancel confirmation message from Surescripts.

Modify Rx Strength
To modify the prescribed drug strength, navigate to the 'Patient Dashboard', click the 'More Options' icon (three dots) next to the drug, and select 'Modify'.

Now, pick the necessary drug strength from the Modify Prescriptions window and click the 'Save' button.

Once done, the previous drug will go inactive once modified.
Delete Rx
Prescribers can delete unsigned Rx from the 'Patient Dashboard'. Click on the 'Trash Bin' icon to delete the Rx.

Signed prescriptions cannot be deleted. Alternatively, you can choose the 'Void' option to prevent it from being transmitted.
Prescriptions Tab
The 'Prescriptions' tab facilitates the Agent workflow. It displays all prescriptions added to each patient throughout the Practice alongside the Provider, Date, and Status details. The 'Date', 'Rx Status', 'Provider', 'Patient', and 'Facility List' drop-down filters allow narrowing your search further.

Once the Agent has added the prescription, the Prescriber can click the 'More Options' icon (3 dots) against each Patient to review and Sign the prescriptions.

Similarly, the Agent can Transmit non-controlled prescriptions signed by the Prescriber from here.
Pharmacy Requests
Prescribers can review and process Pharmacy Refill or RxChange requests from the Prescriptions > Pharmacy Request section.

Refill Requests
Prescribers can click the 'Process' button against each request and choose to Approve, Deny, or Replace the Rx in the 'Action' field.
To approve the Pharmacy request, follow the steps below:
Modify the number of refills if needed, and proceed to sign and transmit the refill request.

Note - Processing CS refill requests requires two-factor authentication.
Replace Refill Request
This option allows you to replace the drug during the refill process. Clicking 'Replace' directs you to the Replace Prescriptions window.

Rx Change Requests
The Pharmacy can raise Rx Change requests to dispense Generic Substitutes, Therapeutic Alternatives, or for Prior Auth. Prescribers can click the 'Process' button to approve or deny the request.

Note - Processing CS refill requests requires two-factor authentication.
Rx-Fill Notification
Rx-Fill status update received from the Pharmacy will be displayed in the Prescriptions > Rx-Fill Notification section. You can click on each Rx to view the Prescription Fill Info.


eRx Sent
The Prescriptions > eRx Sent tab displays the entire list of prescriptions transmitted electronically from the Practice. You can filter the list using the Type, Date, Provider, Patient, and Facility List drop-down menus.

Quick Rx
Quick prescriptions can be written for a patient without an encounter by following the below steps:
- Go to the Patient dashboard > Medications section.
- Click on the '+Prescriptions' button.

- Clicking on the Add Rx, Templates, or Past Rx links redirects you to the Add Prescription view. The Patient Allergies and recent prescription sections are available here for your reference.


You can continue to add, sign, and transmit the prescription as usual.